
Course
Intermediate Python
4 hr
1.3M
Now that you know what .exe files are and why you may wish to convert a Python file to a .exe file, let’s look at how to do it in Python. In this section, we will cover three frameworks: pyinstaller, nuitka and auto-py-to-exe.
One thing to keep in mind is that auto-py-to-exe has known compatibility issues with Python 3.11 and later, and is generally only reliable up to Python 3.10 unless you use specific newer versions and carefully matched dependencies.
That being said, let's get started.
This demonstration will use the New York City Airbnb open data dataset.
Before data scientists can analyze a dataset, the data must be formatted to be compatible with the tools they are using. Thus, creating a validation schema effectively defines all the validations that apply to each field declaratively. This process can be quite repetitive. To prevent our data scientists from engaging in repetitive tasks, we’ve created an automated validation script to run periodically.
Note: Be extremely careful when using relative paths if your script must read data. You are better off using absolute paths to ensure your executable works as expected.
import pandas as pd
from pandas.api.types import CategoricalDtype

def perform_validation(filename:str):
    """
    A function to validate inputs for NYC Airbnb Open data.
    """
    path_to_data = "../.."
    data = pd.read_csv(f"{path_to_data}{filename}")


    # Convert neighbourhood_group to type category
    neighbourhood_group_to_cat = CategoricalDtype(
        categories=["Manhattan", "Brooklyn", "Queens", "Bronx", "Staten Island"],
        ordered=False
        )

    data["neighbourhood_group"] = data["neighbourhood_group"].astype(neighbourhood_group_to_cat)

    # Convert room_type to type category
    room_type_to_cat = CategoricalDtype(
        categories=["Entire home/apt", "Private room", "Shared room"],
        ordered=False
    )

    data["room_type"] = data["room_type"].astype(room_type_to_cat)

    # Convert last_review to datetime
    data["last_review"] = pd.to_datetime(data["last_review"])

    # Minimum nights a person can stay is one night
    assert data["minimum_nights"].min() >= 1

    # Minimum number of reviews is 0
    assert data["number_of_reviews"].min() >= 0

    # Minimum number of reviews per month
    assert data["reviews_per_month"].min() >= 0.00

    # Minimum amount of listings per host
    assert data["calculated_host_listings_count"].min() >= 1

    # Number of days when listing is available for books
    # Could be 0 if tennant has long term booking
    assert data["availability_365"].min() >= 0

    # Save validated data
    data.to_csv("validated_ab_nyc_2019.csv", index=False)

if __name__ == "__main__":
    # User inputs filename
    filename = input("Enter filename: ")

    # Ensure it's a string
    if not filename.isalpha():
        filename = str(filename)

    # Automated validation
    perform_validation(filename)
Note: we have copied and pasted this script into the pyinstaller, nuitka and auto-py-to-exe directories.
# Directory structure
|   AB_NYC_2019.csv
|
+---auto_py_to_exe
|   |   requirements.txt
|   |   validation.py
+---pyinstaller
    |   requirements.txt
    |   validation.py
Each directory has there own virtual environment in which we’ve installed the requirements: see pyinstaller requirements or auto-py-to-exe requirements. If you’re following along with the code, be sure to create a virtual environment in the pyinstaller directory and auto-py-to-exe directory.
At a high level, the script above contains a function – learn more about writing functions in Python – that reads in a dataset and then defines the expected format of specific fields in the data. The next step is to convert this Python script into an executable file that could be run periodically to generate a formatted dataset.
Pyinstaller allows you to quickly convert a Python file to an executable file from your terminal. Once you’ve created your virtual environment and installed the requirements for your script (including pyinstaller), simply open the terminal and navigate to the directory where the Python file you wish to convert is located.
The next step is to run the following command:
pyinstaller --onefile validation.pyInitially, you will see several logs of which the final one will say something along the lines of “completed successfully” – given the executable file is created successfully.
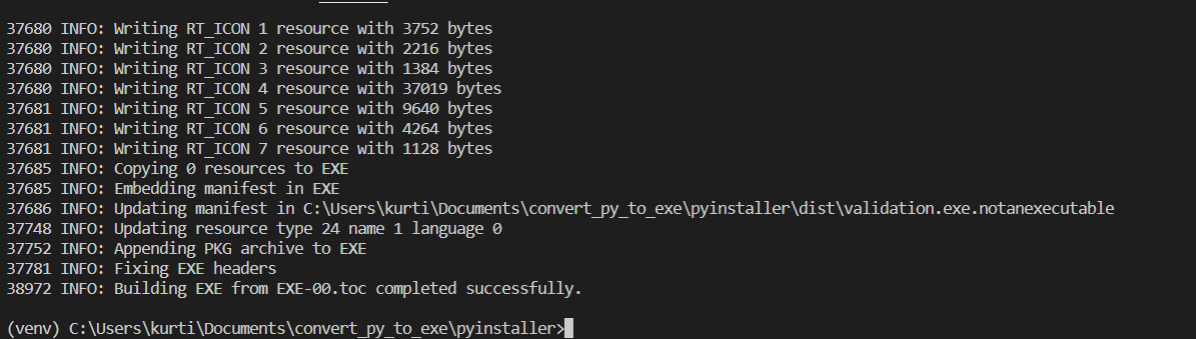
Figure 1: Logs showing the executable file being created and that it is completed successfully.
The completion of this run will create two new directories, build and dist, in the same directory as where the Python file is located. In the dist directory, you will find the validation.exe script.
Figure 2: A GIF demonstrating the execution of validation.exe on a dataset.
To run the script, simply click on it. This will bring up a console that asks you to insert the filename of the data on which you wish to run the validation. Once you enter the file's name, the console will close, and the validated data will be created in the same directory as the validation.exe file – see Figure 2.
Nuitka is another approach worth considering. Unlike PyInstaller, which bundles your Python script with the Python interpreter, Nuitka actually compiles your Python code to C code. This results in better source code protection, potentially faster execution, and often smaller file sizes. The trade-off is a longer compilation time and more setup complexity.
After you have created a virtual environment and installed Nuitka using pip install nuitka, you need to ensure a C compiler is available on your system. What compiler you need depends on your operating system:
Windows: Download and install Microsoft Visual C++ Build Tools (free) from the Visual Studio website, or use MinGW
macOS: Install Xcode Command Line Tools with xcode-select --install
Linux: GCC is usually pre-installed; if not, install it via your package manager
Once installed, Nuitka will automatically detect your compiler. If you encounter issues, ensure the compiler is in your system PATH.
Let's convert the same NYC Airbnb validation script using Nuitka, just as we did with PyInstaller and auto-py-to-exe. To compile our script into an executable, run:
python -m nuitka --onefile --follow-imports --include-package=pandas validation.pyLet's break down each flag:
--onefile: Creates a single executable file (instead of a directory with multiple files and dependencies)
--follow-imports: Automatically includes all modules that your script imports
--include-package=pandas: Explicitly includes the pandas package (some packages aren't automatically detected, so this ensures it's bundled)
Unlike PyInstaller, which completes in about 30 seconds, Nuitka will take significantly longer—typically 5–15 minutes depending on your code complexity and system speed. You'll see compilation output in the terminal showing progress through the C compilation stage.
Once complete, you'll see a success message indicating the executable has been created. The compiled executable is created in the same directory as the validation.py file.
Double-click validation.exe or run it from the command line. A console window will open asking you to enter a filename, just like with PyInstaller. After typing AB_NYC_2019.csvand hitting enter, the validation runs, the console closes, and a new file validated_ab_nyc_2019.csv is created in the same directory, exactly like the PyInstaller version.
The first step to creating an executable file using auto-py-to-exe is to run it using the following command:
auto-py-to-exe This should return a graphical user interface (GUI) that will assist us in converting our Python file to an executable file.
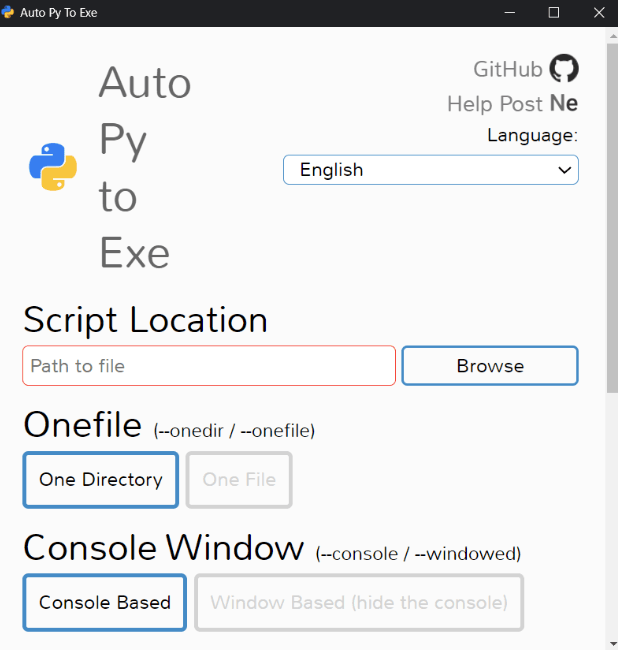
Figure 3: The graphical user interface returned after running the auto-py-to-exe command.
Note: if it’s not working, ensure you’ve created a virtual environment in the auto-py-to-exe directory and installed the requirements.txt in your virtual environment using the following command: pip install -r requirements.txt.
The GUI has several fields we must fill in. Let’s take a look at each one and break do:
We are also provided with other options to configure the creation of our executable file (i.e. add icons, additional files, and more). In this section, we can also modify the path for where we want to export the files generated by our executable file: to do this, select the “Settings” toggle option and browse to the output directory of your choosing. The last step is to select “Convert .py to .exe” to convert our Python file.
See the GIF in Figure 4 to see how we configured our executable file.
Figure 4: A GIF demonstrating the configuration for auto-py-to-exe
When we navigate back to the auto-py-to-exe directory, there will be a directory called output: this is where our validation.exe file lives. Select the file to run it, which will bring up a console that asks you to enter a filename:
Figure 5: Console returned from running the executable validation file.
Simply enter the file's name – in this example, AB_NYC_2019.csv – and press enter. This will close the console and create a new file in the output directory (where the executable file lives) called validated_ab_nyc_2019.csv.
Here's how Nuitka and PyInstaller compare on the same validation script, along with auto-py-to-exe as a GUI alternative:
|
Metric |
PyInstaller |
auto-py-to-exe |
Nuitka |
|
Executable size |
average |
average |
20-30% smaller |
|
Build time |
average |
average |
16x longer |
|
Startup time |
~2 seconds |
~2 seconds |
~1 second |
|
Runtime (validation task) |
~3 seconds |
~3 seconds |
~2.5 seconds |
|
Source code protection |
Moderate |
Moderate |
Excellent |
|
Python 3.8–3.10 |
✅ Excellent |
✅ Excellent |
✅ Excellent |
|
Python 3.11+ |
✅ Excellent |
⚠️ Known issues |
✅ Excellent |
PyInstaller and Nuitka both offer reliable support across all modern Python versions, while auto-py-to-exe has known compatibility issues with Python 3.11 and later. Nuitka produces smaller, faster executables with superior IP protection—but the build process is roughly 16 times slower than PyInstaller.
In this article, you have learned:
Learn more about how you could leverage Python to do data science in DataCamps Associate Data Scientist with Python career track.
Courses for Python
Course
Course
Course
Tutorial
Aditya Sharma
Tutorial
Matthew Przybyla
Tutorial
Joleen Bothma
Tutorial
J. Andrés Pizarro
Tutorial
Aditya Sharma
Tutorial
Natassha Selvaraj