Course
Image Processing in Python
4 hr
41.5K
Extracting text from images and documents manually can be very tedious and time-consuming. Fortunately, OCR (Optical Character Recognition) can automate this process, allowing you to convert those images into editable and searchable text files.
The techniques you are about to learn can be applied in many applications:
The tutorial will focus on the Tesseract OCR engine and its Python API - PyTesseract. Before we start writing code, let’s briefly review some of the popular libraries dedicated to OCR.
Since OCR is a popular ongoing problem, many open-source libraries try to solve it. In this section, we will cover the ones that gained the most popularity due to their high performance and accuracy.
Tesseract OCR is an open-source optical character recognition engine that is the most popular among developers. Like other tools in this list, Tesseract can take images of text and convert them into editable text.
EasyOCR is a Python library designed for effortless Optical Character Recognition (OCR). It lives up to its name by offering a user-friendly approach to text extraction from images.
Keras-OCR is a Python library built on top of Keras, a popular deep learning framework. It provides out-of-the-box OCR models and an end-to-end training pipeline to build new OCR models.
Here is a table summarizing their differences, advantages, and disadvantages:
|
Package Name |
Advantage |
Disadvantages |
|
Tesseract (pytesseract) |
Mature, widely used, extensive support |
Slower, lower accuracy on complex layouts |
|
EasyOCR |
Simple to use, multiple models |
Lower accuracy, limited customization |
|
Keras-OCR |
Higher accuracy, customizable |
Requires GPU, steeper learning curve |
In this tutorial, we will focus on PyTesseract, which is Tesseract’s Python API. We will learn how to extract text from simple images, how to draw bounding boxes around text, and perform a case study with a scanned document.
PyTesseract works on top of the official Tesseract engine, which is a separate CLI software. Before installing pytesseract, you must have the engine installed. Below are installation instructions for different platforms.
For Ubuntu or WSL2 (my choice):
$ sudo apt update && sudo apt upgrade
$ sudo apt install tesseract-ocr
$ sudo apt install libtesseract-dev
For Mac using Homebrew:
$ brew install tesseract
For Windows, follow the instructions from this GitHub page.
Next, create a new virtual environment. I will be using Conda:
$ conda create -n ocr python==3.9 -y
$ conda activate ocr
Then, you must install pytesseract for doing OCR and opencv for image manipulation:
$ pip install pytesseract
$ pip install opencv-python
If you are following this tutorial in Jupyter, run these commands in the same terminal session so that your new virtual environment is added as a kernel:
$ pip install ipykernel
$ ipython kernel install --user --name=ocr
Now, we can start writing code.
We start by importing the necessary libraries:
import cv2
import pytesseract
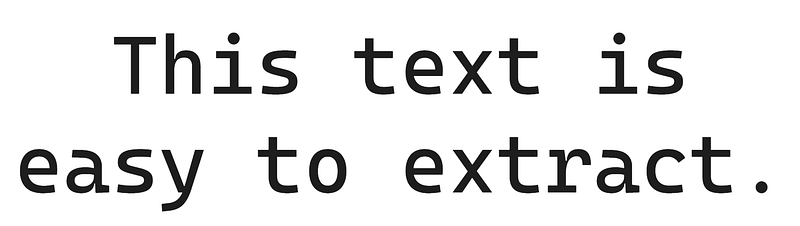
Our task is to read the text from the following image:
First, we define the image path and feed it to the cv2.imread function:
# Read image
easy_text_path = "images/easy_text.png"
easy_img = cv2.imread(easy_text_path)
Then, we pass the loaded image to the image_to_string function of pytesseract to extract the text:
# Convert to text
text = pytesseract.image_to_string(easy_img)
print(text)
This text is
easy to extract.
It is as easy as that! Let’s convert what we just did into a function:
def image_to_text(input_path):
   """
   A function to read text from images.
   """
   img = cv2.imread(input_path)
   text = pytesseract.image_to_string(img)

   return text.strip()
Let’s use the function on a more difficult image:

The image offers more of a challenge as there are more punctuation symbols and text in different fonts.
# Define image path
medium_text_path = "images/medium_text.png"

# Extract text
extracted_text = image_to_text(medium_text_path)
print(extracted_text)
Home > Tutorials » Data Engineering

Snowflake Tutorial For Beginners:
From Architecture to Running
Databases

Learn the fundamentals of cloud data warehouse management using
Snowflake. Snowflake is a cloud-based platform that offers significant
benefits for companies wanting to extract as much insight from their data as
quickly and efficiently as possible.

Jan 2024 - 12 min read
Our function worked nearly perfectly. It confused one of the dots and “>” signs, but the result is acceptable otherwise.
A common operation in OCR is drawing bounding boxes around text. This operation is supported in PyTesseract.
First, we pass a loaded image to the image_to_data function:
from pytesseract import Output

# Extract recognized data from easy text
data = pytesseract.image_to_data(easy_img, output_type=Output.DICT)
The Output.DICT part ensures that the image details are returned as a dictionary. Let's take a look inside:
data{'level': [1, 2, 3, 4, 5, 5, 5, 4, 5, 5, 5],
'page_num': [1, 1, 1, 1, 1, 1, 1, 1, 1, 1, 1],
'block_num': [0, 1, 1, 1, 1, 1, 1, 1, 1, 1, 1],
'par_num': [0, 0, 1, 1, 1, 1, 1, 1, 1, 1, 1],
'line_num': [0, 0, 0, 1, 1, 1, 1, 2, 2, 2, 2],
'word_num': [0, 0, 0, 0, 1, 2, 3, 0, 1, 2, 3],
'left': [0, 41, 41, 236, 236, 734, 1242, 41, 41, 534, 841],
'top': [0, 68, 68, 68, 68, 80, 68, 284, 309, 284, 284],
'width': [1658, 1550, 1550, 1179, 380, 383, 173, 1550, 381, 184, 750],
'height': [469, 371, 371, 128, 128, 116, 128, 155, 130, 117, 117],
'conf': [-1, -1, -1, -1, 96, 95, 95, -1, 96, 96, 96],
'text': ['', '', '', '', 'This', 'text', 'is', '', 'easy', 'to', 'extract.']}
The dictionary contains a lot of information about the image. First, notice the conf and text keys. They both have a length of 11:
len(data["text"])11This means that pytesseract drew 11 boxes. The conf stands for confidence. If it is equal to -1, then the corresponding box is drawn around blocks of text rather than individual words.
For example, if you look at the first four width and height values, they are large compared to the rest because those boxes are drawn around the entire text in the middle, then for each line of text and the overall image itself.
Also:
left is the distance from the upper-left corner of the bounding box, to the left border of the image.top is the distance from the upper-left corner of the bounding box to the top border of the image.width and height are the width and height of the bounding box.Using these pieces of information, let’s draw the boxes on top of the image in OpenCV.
First, we extract the data again and its length:
from pytesseract import Output

# Extract recognized data
data = pytesseract.image_to_data(easy_img, output_type=Output.DICT)
n_boxes = len(data["text"])
Then, we create a loop for the number of found boxes:
for i in range(n_boxes):
   if data["conf"][i] == -1:
       continue
Inside the loop, we create a condition that skips the current loop iteration if conf equals -1. Skipping larger bounding boxes will keep our image clean.
Then, we define the coordinates of the current box, specifically the locations of the upper left and bottom right corners:
for i in range(n_boxes):
   if data["conf"][i] == -1:
       continue
   # Coordinates
   x, y = data["left"][i], data["top"][i]
   w, h = data["width"][i], data["height"][i]

   # Corners
   top_left = (x, y)
   bottom_right = (x + w, y + h)
After defining some box parameters, such as box color and thickness in pixels, we pass all the information to the cv2.rectangle function:
for i in range(n_boxes):
   if data["conf"][i] == -1:
       continue
   # Coordinates
   x, y = data["left"][i], data["top"][i]
   w, h = data["width"][i], data["height"][i]

   # Corners
   top_left = (x, y)
   bottom_right = (x + w, y + h)

   # Box params
   green = (0, 255, 0)
   thickness = 3  # pixels

   cv2.rectangle(
       img=easy_img, pt1=top_left, pt2=bottom_right, color=green, thickness=thickness
   )
The function will draw the boxes on top of the original images. Let’s save the image and take a look:
# Save the image
output_image_path = "images/text_with_boxes.jpg"
cv2.imwrite(output_image_path, easy_img)
True
The result is just what we wanted!
Now, let’s put everything we did into a function again:
def draw_bounding_boxes(input_img_path, output_path):
   img = cv2.imread(input_img_path)

   # Extract data
   data = pytesseract.image_to_data(img, output_type=Output.DICT)
   n_boxes = len(data["text"])

   for i in range(n_boxes):
       if data["conf"][i] == -1:
           continue
       # Coordinates
       x, y = data["left"][i], data["top"][i]
       w, h = data["width"][i], data["height"][i]

       # Corners
       top_left = (x, y)
       bottom_right = (x + w, y + h)

       # Box params
       green = (0, 255, 0)
       thickness = 1  # The function-version uses thinner lines

       cv2.rectangle(img, top_left, bottom_right, green, thickness)

   # Save the image with boxes
   cv2.imwrite(output_path, img)
And use the function on the medium-hard text:
output_path = "images/medium_text_with_boxes.png"

draw_bounding_boxes(medium_text_path, output_path)

Even for the harder image, the result is perfect!
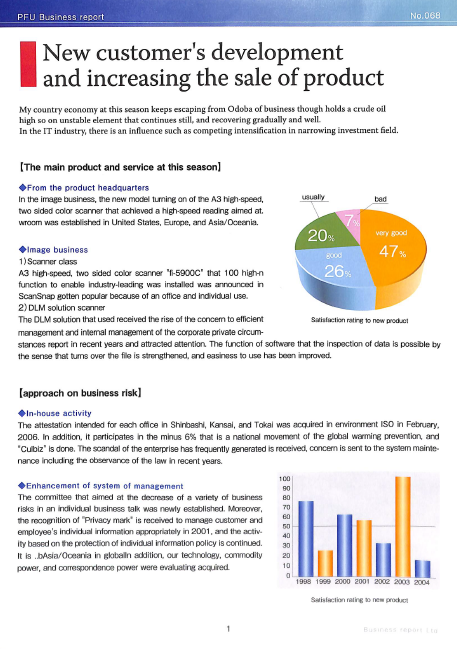
Let’s do a case study on a sample scanned PDF file. In practice, it is highly likely that you will be working with scanned PDFs instead of images, like this one:
You can download the PDF from this page of my GitHub.
The next step is installing the pdf2image library, which requires PDF processing software called Poppler. Here are platform-specific instructions:
For Mac:
$ brew install poppler
$ pip install pdf2image
For Linux and WSL2:
$ sudo apt-get install -y poppler-utils
$ pip install pdf2image
For Windows, you can follow the the instructions from the PDF2Image docs.
After installation, we import the relevant modules:
import pathlib
from pathlib import Path

from pdf2image import convert_from_path
The convert_from_path function converts a given PDF to a series of images. Here is a function that saves each page of a PDF file as an image to a given directory:
def pdf_to_image(pdf_path, output_folder: str = "."):
   """
   A function to convert PDF files to images
   """
   # Create the output folder if it doesn't exist
   if not Path(output_folder).exists():
       Path(output_folder).mkdir()

   pages = convert_from_path(pdf_path, output_folder=output_folder, fmt="png")

   return pages
Let’s run it on our document:
pdf_path = "scanned_document.pdf"

pdf_to_image(pdf_path, output_folder="documents")
[<PIL.PngImagePlugin.PngImageFile image mode=RGB size=1662x2341>]
The output is a list containing a single image PngImageFile object. Let's take a look at the documents directory:
$ ls documents
2d8f6922-99c4-4ef4-a475-ef81effe65a3-1.png
The image is there, so let’s feed it to our image_to_text function we created in the beginning and print the first few hundred characters of the extracted text:
scanned_img_path = "documents/2d8f6922-99c4-4ef4-a475-ef81effe65a3-1.png"

print(image_to_text(scanned_img_path)[:377])
PEU Business report

New customer's development
and increasing the sale of product

My country economy at this season keeps escaping from Odoba of business though holds a crude oil
high so on unstable element that continues still, and recovering gradually and well.
In the IT industry, there is an influence such as competing intensification in narrowing investment field.
If we compare the text to the file, everything is working well — the formatting and spacing is preserved, and the text is accurate. So, how do we share the extracted text?
Well, the best format to share extracted PDF text is another PDF file! PyTesseract has an image_to_pdf_or_hocr function that takes any image with text and converts it to a raw, text-searchable PDF file. Let's use it on our scanned image:
raw_pdf = pytesseract.image_to_pdf_or_hocr(scanned_img_path)

with open("searchable_pdf.pdf", "w+b") as f:
   f.write(bytearray(raw_pdf))
And here is what the searchable_pdf looks like:

As you can see, I can highlight and copy text from the file. Besides, all elements of the original PDF are preserved.
There is no one-size-fits-all approach for OCR. The techniques we’ve covered today may not work with other types of images. I recommend that you experiment with different image preprocessing techniques and Tesseract configurations to find the optimal settings for specific images.
The most important factor in OCR is image quality. Properly scanned, fully vertical, and high-contrast (black and white) images tend to work best with any OCR software. Remember, just because you can read the text doesn’t mean your computer can.
If your images don’t satisfy the high quality standards of Tesseract and the output is gibberish, then there are some preprocessing steps you can perform.
First, start with converting colored images to grayscale. This can improve accuracy by removing color variations that might confuse the recognition process. In OpenCV, this will look like this:
def grayscale(image):
   """Converts an image to grayscale.

   Args:
       image: The input image in BGR format.

   Returns:
       The grayscale image.
   """
   return cv2.cvtColor(image, cv2.COLOR_BGR2GRAY)
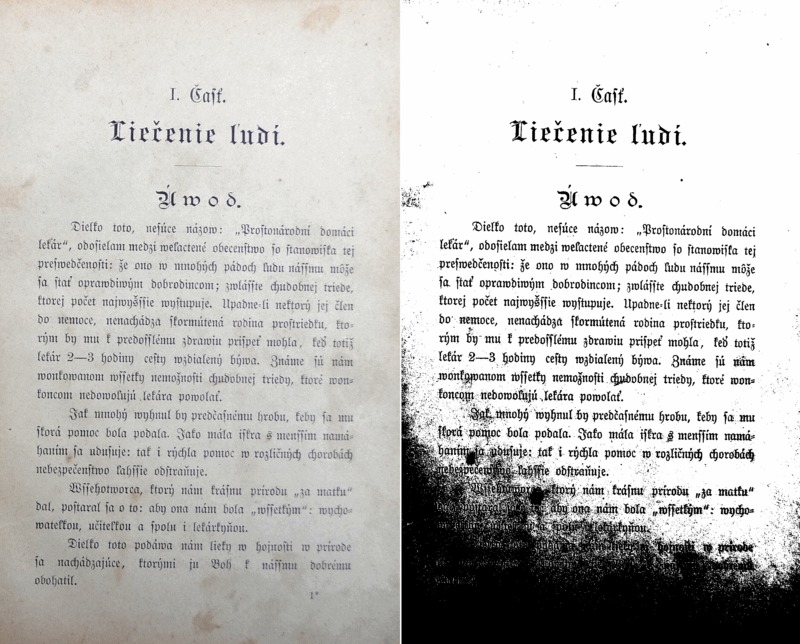
Not all images, especially scanned documents, come with pristine, uniform backgrounds. Also, some images might be from old documents where the pages deteriorated due to age. Here is an example:
Apply techniques like denoising filters (e.g., median blur) to reduce noise artifacts in the image that can lead to misinterpretations during OCR. In OpenCV, you can use the medianBlur function:
def denoise(image):
   """Reduces noise in the image using a median blur filter.

   Args:
       image: The input grayscale image.

   Returns:
       The denoised image.
   """
   return cv2.medianBlur(image, 5)  # Adjust kernel size as needed
In some cases, sharpening the image can enhance edges and improve character recognition, especially for blurry or low-resolution images. Sharpening can be performed by applying a Laplacian filter in OpenCV:
def sharpen(image):
   """Sharpens the image using a Laplacian filter.

   Args:
       image: The input grayscale image.

   Returns:
       The sharpened image (be cautious with sharpening).
   """
   kernel = np.array([[0, -1, 0], [-1, 5, -1], [0, -1, 0]])
   return cv2.filter2D(image, -1, kernel)
For certain images, binarization (converting the image to black and white) might be beneficial. Experiment with different thresholding techniques to find the optimal separation between foreground (text) and background.
However, binarization can be sensitive to variations in lighting and might not always be necessary. Here is an example of what a binarized image looks like:
To perform binarization in OpenCV, you can use the adaptiveThreshold function:
def binarize(image):
   """Binarizes the image using adaptive thresholding.

   Args:
       image: The input grayscale image.

   Returns:
       The binary image.
   """
   thresh = cv2.adaptiveThreshold(
       image, 255, cv2.ADAPTIVE_THRESH_MEAN_C, cv2.THRESH_BINARY, 11, 2
   )

   return thresh
There are many other preprocessing techniques, such as:
You can learn more about image quality improvements from this page of Tesseract documentation.
In this article, you’ve taken the first steps to learn about the dynamic problem that is OCR. We first covered how to extract text from simple images, then moved on to more difficult images with complex formatting.
We’ve also learned an end-to-end workflow to extract text from scanned PDFs and how to save extracted text as a PDF again so that it becomes searchable. We’ve capped off the article with some tips to improve image quality with OpenCV before feeding it to Tesseract.
If you want to learn more about solving image-related problems, here are some computer vision resources for you to check out:
Contnue Your Python Learning Journey!
Course
Track
Track
tutorial
Amberle McKee
tutorial
Adel Nehme
tutorial
Bex Tuychiev
tutorial
Adel Nehme
tutorial
Gary Alway
8 min
tutorial
Bex Tuychiev
11 min