Course
Large Language Models (LLMs) Concepts
2 hr
17.3K
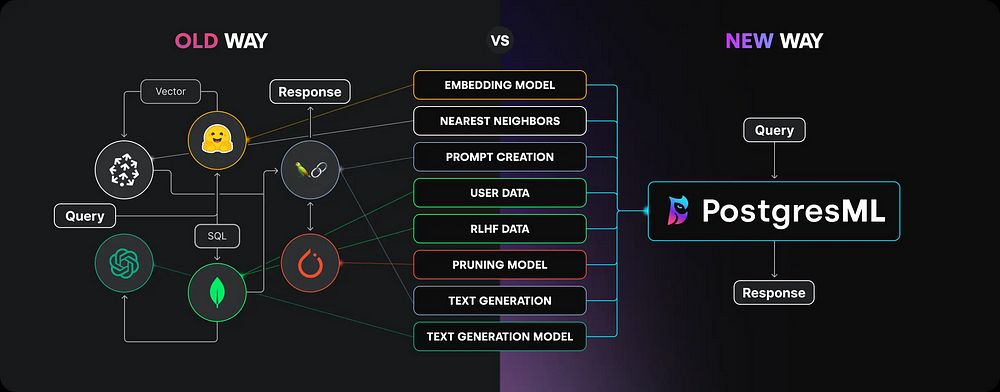
The overarching trend in machine learning is that data is moved to the model’s environment for training. But what if we do that in reverse? Since today’s databases are orders of magnitude larger than machine learning models, wouldn’t it be much easier if we brought the models to the datasets?
That’s the core idea behind PostgresML — data stays put, you bring your code to the database. This type of reversed-logic machine learning brings a host of real-world benefits that will make you reconsider the concept of a “database.”
PostgresML is a comprehensive machine learning platform built on top of the popular PostgreSQL database. It introduces a new paradigm called “in-database” machine learning, allowing you to perform many ML tasks in SQL without needing separate tools at each step.
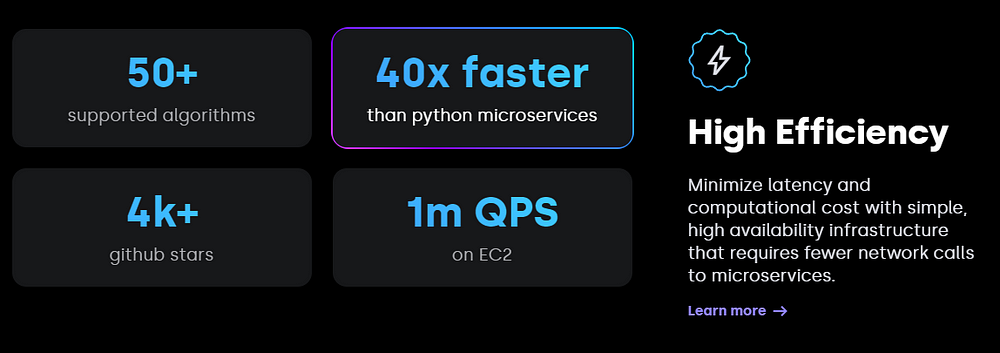
Despite being relatively new, PostgresML promises these guaranteed benefits:
We will test-drive all these features in this tutorial by following a typical machine-learning workflow:
…all inside a Postgres database. Let’s get started!
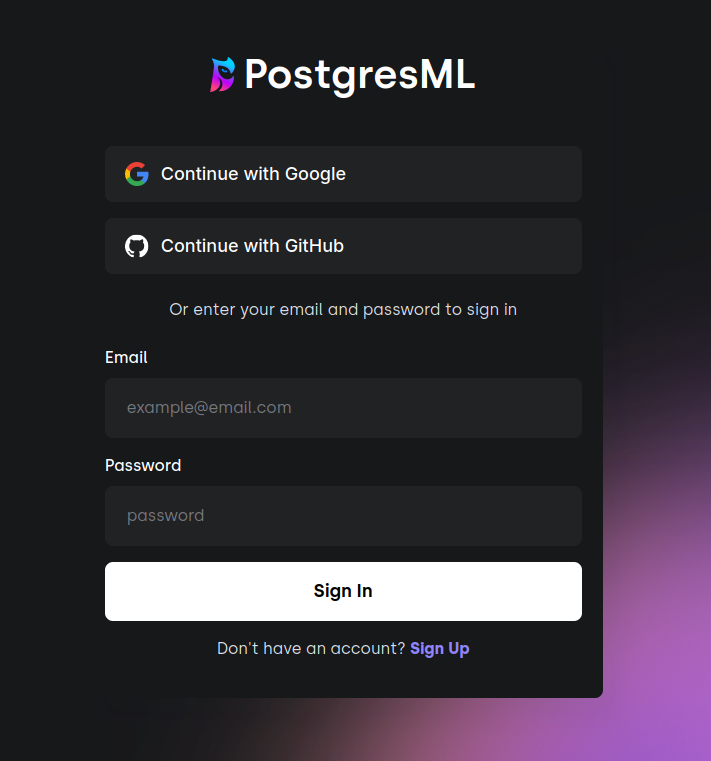
First, we will start by creating a free account at https://postgresml.org/signup:
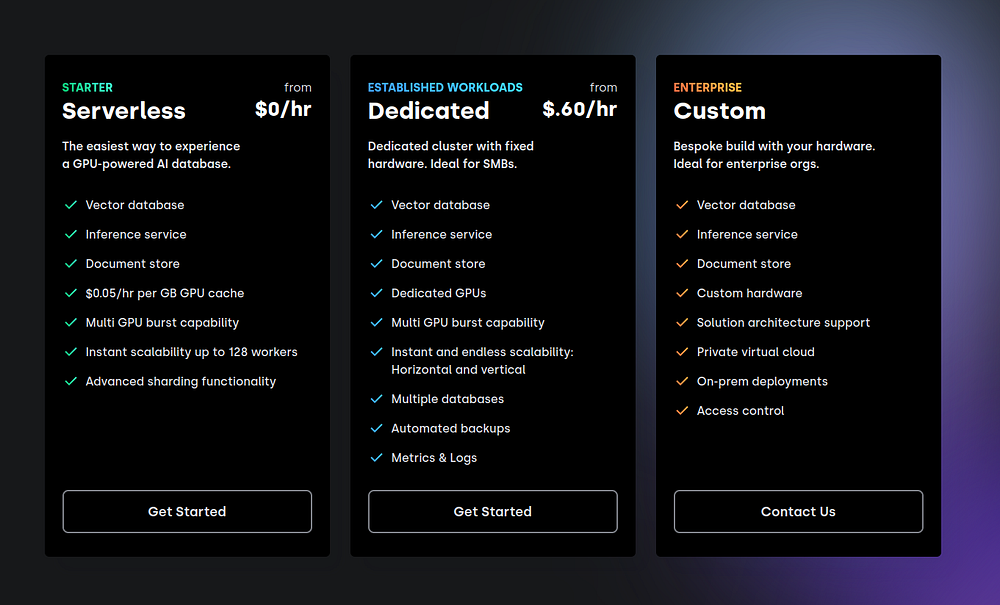
Then, choose the free tier, which gives some generous resources:
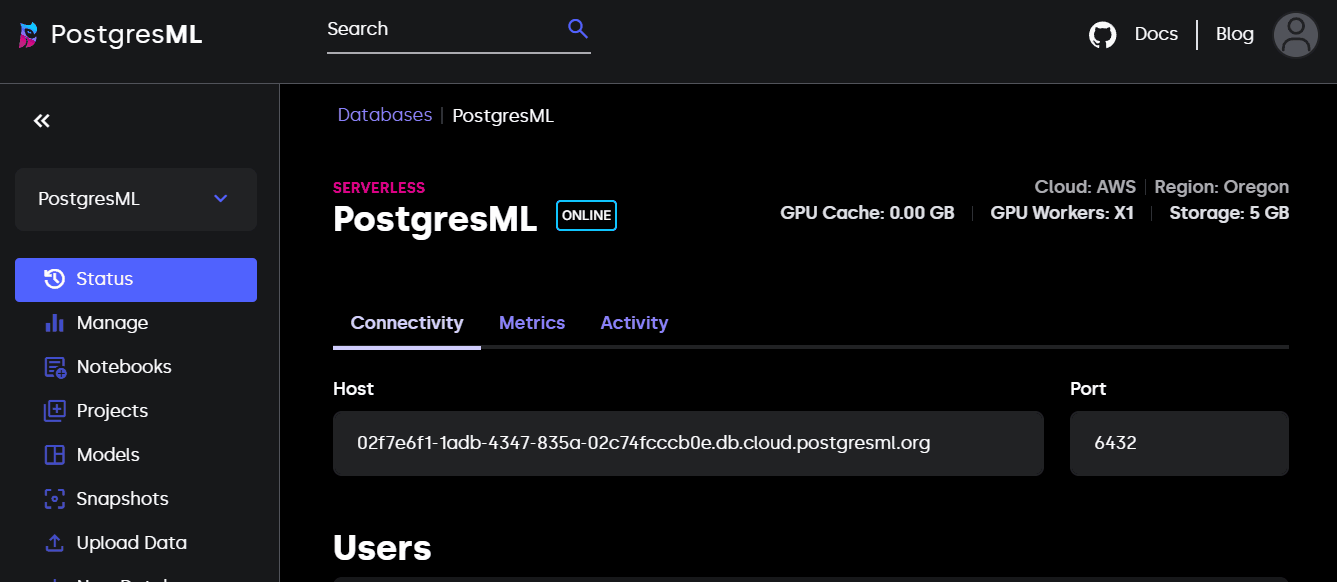
After sign-up, you will land at your PostgresML console. This is where you manage different “In-database ML” projects and their related resources.

If you go to the “Manage” section, you will be able to scale your environment based on your compute requirements:
As the name suggests, we need PostgreSQL installed on our system to use PostgresML. If you don’t know what Postgres is, it is the world’s most advanced open-source database (that’s what they say on their website).
Here are links to platform-specific guides on PostgreSQL installation:
I am on WSL2, so I can just do:
$ sudo apt update
$ sudo apt install postgresql postgresql-contrib
$ sudo passwd postgres  # Set a new Postgres password
# Close and reopen your terminal and done!
Afterward, verify the installation with:
$ psql --version
psql (PostgreSQL) 12.18 (Ubuntu 12.18-0ubuntu0.20.04.1)
psql is the official Postgres client to connect and manage databases in the terminal.
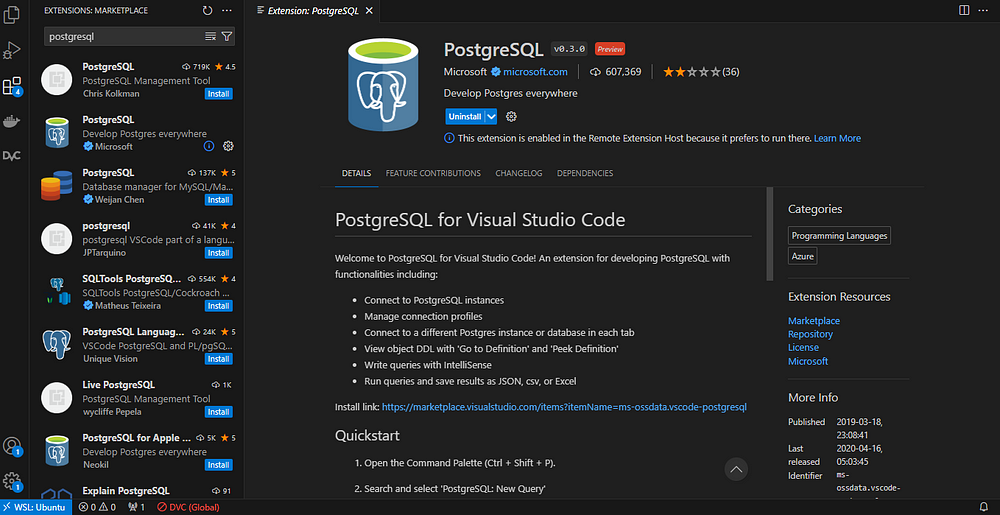
I understand that for most people, it is not ideal to run SQL in ugly terminals, so you can also install the following VSCode extension after installing Postgres:
Remember the landing page of your PostgresML console? Keep it open in a separate tab:
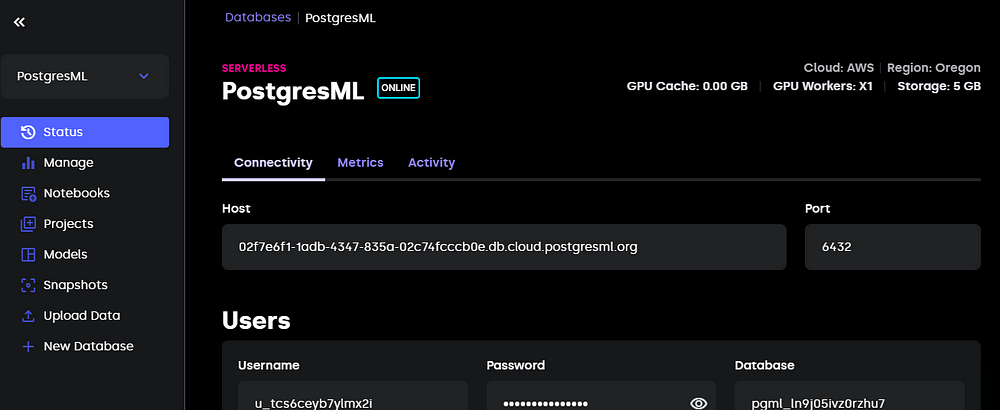
Now, using psql, you can type the following command with your own credentials to establish a connection with PostgresML server:
$ psql -h "host" \
      -U "username" \
      -p 6432 \
      -d "database_name"
If you are using the VSCode extension, follow these steps (taken from the extension’s installation page) to do the same:
And you will be connected to your PostgresML database.
The next step is creating the pgml extension that will allow us to run PostgresML functions:
CREATE EXTENSION IF NOT EXISTS pgml;

NOTICE:  extension "pgml" already exists, skipping
CREATE EXTENSION
-- Your output may be different.
Check if everything is successful by printing the pgml version:
SELECT pgml.version();

2.8.2 (98f114891db58acd472e068c44272b198274b11d)
Now, let’s load some data into our database. To keep things simple, we will only create a single table using the Diamonds dataset from Kaggle. You can download it as a CSV file from the website or using the Python snippet below:
import seaborn as sns

diamonds = sns.load_dataset("diamonds")
diamonds.to_csv("diamonds.csv", index=False)
Then, run the following CREATE command with the correct schema:
CREATE TABLE IF NOT EXISTS diamonds (
   index SERIAL PRIMARY KEY,
   carat FLOAT,
   cut VARCHAR(255),
   color VARCHAR(255),
   clarity VARCHAR(255),
   depth FLOAT,
   table_ FLOAT,
   price INT,
   x FLOAT,
   y FLOAT,
   z FLOAT
)
The command will create a table named diamonds which we can populate with the rows in the CSV file:
INSERT INTO diamonds
   (carat, cut, color, clarity, depth, table_, price, x, y, z)
   FROM '~/full/path/to/diamonds.csv'
   DELIMITER ','
   CSV HEADER;
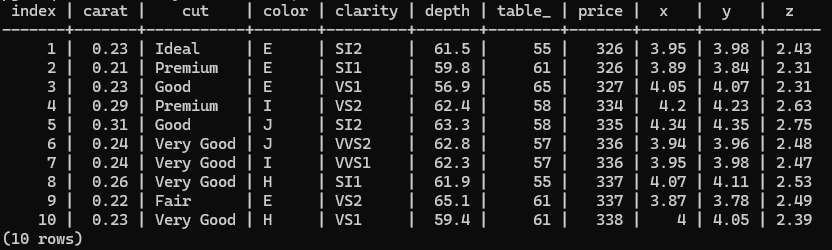
Finally, we print the top of the table as a confirmation that the last command executed successfully:
SELECT * FROM diamonds
LIMIT 10;
Now, we are ready to train a model!
Training a machine learning model for supervised learning is done using the pgml.train function. Here is its basic structure:
SELECT pgml.train(
 project_name => 'Diamond prices prediction',
 task => 'regression',
 relation_name => 'diamonds',
 y_column_name => 'price',
 algorithm => 'xgboost'
);
The above SQL statement fits an XGBoost regressor to the diamonds table to predict diamond prices. One thing you will notice from running the command is how fast it is (almost instantaneous) even though we have over 50k rows.
You can easily switch tasks as well. Here is how to fit a multi-class classifier (don’t forget to change project name):
SELECT pgml.train(
 project_name => 'Diamond cut quality prediction',
 task => 'classification',
 relation_name => 'diamonds',
 y_column_name => 'cut',
 algorithm => 'xgboost',
 test_size => 0.1
);
Notice how we are specifying the test_size argument this time - custom splitting is supported as well!
We’ve also changed the default algorithm linear to xgboost but it could have been any other model from Scikit-learn or another supported framework.
Let’s try to fit a random forest model this time:
…
But wait! The diamonds dataset has text features that need to be encoded. Since XGBoost natively encodes categoricals, we didn’t receive any errors from previous queries. That may not be the case with random forests. So, let’s add some preprocessing steps to our query:
SELECT pgml.train(
   project_name => 'Diamond prices prediction',
   task => 'regression',
   relation_name => 'diamonds',
   y_column_name => 'price',
   algorithm => 'random_forest',
   preprocess => '{
       "carat": {"scale": "standard"},
       "depth": {"scale": "standard"},
       "table_": {"scale": "standard"},
       "cut": {"encode": "target", "scale": "standard"},
       "color": {"encode": "target", "scale": "standard"},
       "clarity": {"encode": "target", "scale": "standard"}
   }'::JSONB
);
The preprocessing logic is defined inside a JSONB object that maps columns to transformation steps. For numeric features, we are using standardization (even though standardization isn’t necessary for RF). As for the categorical columns, we are using target encoding and then standardization.
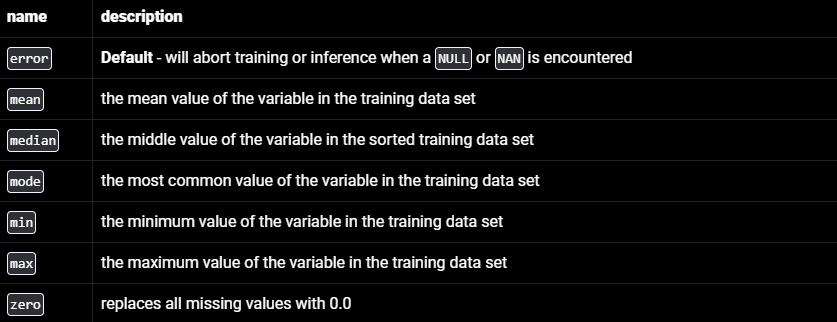
PostgresML offers other alternative preprocessing functions as well. Here is a full list of encoding options available:

pgml supports standard imputing techniques, too:
And here is a list of scalers:
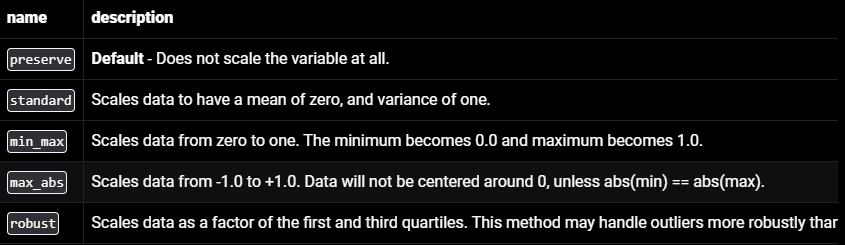
While you don’t have a vast suite of preprocessors like in Scikit-learn, these will be enough for most supervised learning tasks.
Until now, we have been using the default parameters of algorithms. However, the defaults are almost always not the ideal choice for real-world problems. To specify custom values, we can use the hyperparams argument of pgml.train:
SELECT pgml.train(
   project_name => 'Diamond prices prediction',
   task => 'regression',
   relation_name => 'diamonds',
   y_column_name => 'price',
   algorithm => 'xgboost',
   hyperparams => '{
       "n_estimators": 1000, "max_depth": 5, "eta": 0.01, "subsample": 0.7
   }'::JSONB
);
This time, we are fitting an XGBoost regressor with 1000 trees, a max depth of 5, and a learning rate of 0.01. Right now, we are simply shooting in the dark, so these hyperparameters may not produce accurate results.
To max out model the results, we always need hyperparameter tuning in supervised-learning tasks. This process is also supported in pgml inside the train function. Here is how to perform a grid search over a small selection of hyperparameter combinations:
SELECT pgml.train(
   'Diamond prices prediction',
   algorithm => 'xgboost',
   search => 'grid',
   search_params => '{
       "max_depth": [5, 7],
       "n_estimators": [1000, 1500],
       "eta": [0.1, 0.01, 0.001]
   }'::JSONB
);
At this point, I just want you to appreciate what we are doing here. We are tuning the hyperparameters of an XGBoost regressor using SQL! That’s a sentence I never thought I would write.
As of writing this tutorial, PostgresML doesn’t have mature enough evaluation tools at its disposal. We only have the predict function available to us. Here is how to use it to predict on a new, single sample:
SELECT pgml.predict(
   project_name => 'Diamond prices prediction',
   features => ARRAY[0.7, "Ideal", "A", "IF", 67.9, 56.9, 7024, 5.85, 5.87, 3.71]
);
predict automatically uses the best-performing model from your experiments. For regression, it will be the model with the highest R-squared whereas classification uses the model with the highest F1-score.
To use a specific model for prediction, you can specify its ID:
SELECT pgml.predict(
  2' -- Use model with ID of 2,
   features => ARRAY[0.7, "Ideal", "A", "IF", 67.9, 56.9, 7024, 5.85, 5.87, 3.71]
)
But how do you find model IDs, you ask? Here is a snippet that prints out a nice table with exactly that information:
SELECT models.id, models.algorithm, models.metrics
FROM pgml.models
JOIN pgml.projects
 ON projects.id = models.project_id
WHERE projects.name = 'Diamond prices prediction';
From this statement, you can discover many variables and metrics about pgml like models.id, pgml.models, pgml.projects and so on. Try `SELECT` statements on them to get a feel for what they do.
Unlike traditional MLOps, this step is the easiest in PostgresML. The pgml extension automatically exposes the best-performing model from your experiments as the default one. So, any SELECT pgml.predict statements users send to the server will use that model for inference.
If you want finer control over which model goes into production, you can control it with pgml.deploy function. Here is its structure:
SELECT * FROM pgml.deploy(
   project_name TEXT,
   strategy TEXT DEFAULT 'best_score',
   algorithm TEXT DEFAULT NULL
)
Apart from best_score, there are also most_recent and rollback deployment strategies as well:

By combining strategy and algorithm parameters, you can narrow down deployment even further. For example, the below statement deploys the best scoring XGBoost model, not the best-performing model of the entire project.
SELECT * FROM pgml.deploy(
   project_name => 'Diamond prices prediction',
   strategy => 'best_score',
   algorithm => 'xgboost'
)
Supervised learning is only a small part of PostgresML. In fact, the entire value proposition of PostgresML is “Building AI apps in Postgres.” To showcase this, they even put up a small SQL editor on the homepage:
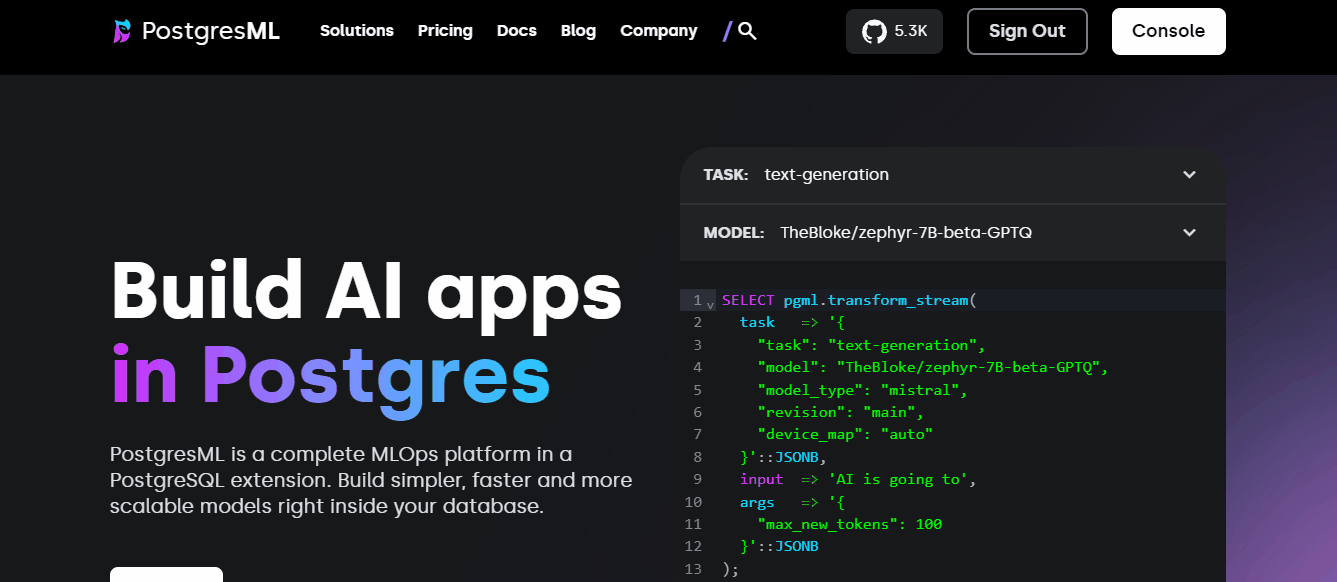
You can run those examples straight in the environment you’ve been using in this tutorial as well!
So, if you wanted to build a consumer-facing machine learning service with PostgresML, how would you do it? Here are some possible steps (after you have the model ready):
psycopg2 (Python) or pg-promise (JavaScript) to connect to your PostgresML database.pgml.predict is called.This is a rough outline that can change significantly based on use cases.
PostgresML introduces a completely new paradigm in machine learning, so it takes a bit more than a single tutorial to master it. To solidify your understanding and explore other ways PostgresML can be used, read the use-cases section of the PostgresML docs.
If your SQL skills are a bit rusty, you can take DataCamp’s short course on creating PostgreSQL databases or even the entire Data Analyst in SQL career track.
Since PostgresML heavily focuses on AI, you can also learn some AI fundamentals:
Continue Your AI Journey Today!
Course
Track
Track
Austin Chia
7 min
Adel Nehme
44 min
Laiba Siddiqui
8 min
Abid Ali Awan
7 min
Andrea Valenzuela
15 min
Josep Ferrer
12 min