Track
Data Engineer
57hrs hr
Welcome to the world of ETL pipelines using Apache Airflow. In this tutorial, we will focus on pulling stock market data using the Polygon API, transforming this data, and then loading it into a SQLite database for easy access and manipulation. Let's get started!
Apache Airflow is considered an industry standard for data orchestration and pipeline management. It has become popular among data scientists, machine learning engineers, and AI practitioners for its ability to orchestrate complex workflows, manage dependencies between tasks, retry failed tasks, and provide extensive logging.
Airflow ETL refers to the use of Apache Airflow to manage ETL processes. To review, ETL is a type of data integration that involves extracting data from various sources, transforming it into a format suitable for analysis, and loading it into a final destination such as a data warehouse.
We must first configure our development environment before we can start building an ETL pipeline with Airflow. For detailed information about how to configure our development environment, check out our Getting Started with Apache Airflow tutorial.
We will also have to install the Astro CLI. Please check out Astronomer, who maintains the Astro CLI and provides detailed documentation, for instructions.
After configuring our environment and installing the Astro CLI, we create an Airflow project. We do this by opening a terminal shell and creating a new directory with the chosen path.
~/Documents/data-engineering/ETL-pipeline/ From the root of this directory, we run the following command in order to create the required resources:
astro dev initThe contents of the directory will look something like below. The exact output might vary.
├── dags/
├── include/
├── plugins/
├── tests/
├── airflow_settings.yaml
├── Dockerfile
├── packages.txt
└── requirements.txt
To get your project up and running, execute the following command:
astro dev startYour Airflow environment will take about a minute to spin up. Once it does, navigate to localhost: 8080 in your web browser, and you’ll be greeted by the Airflow UI.
You’re now ready to start developing your own ETL pipeline with Airflow!
It’s important to take time and plan each component of your pipeline before you write even a single line of code. In particular, it’s a good habit to first identify your data source and the destination to which your data will be loaded. By taking some time to identify the data sources and destination, we also learn about how the data will be transformed along the way.
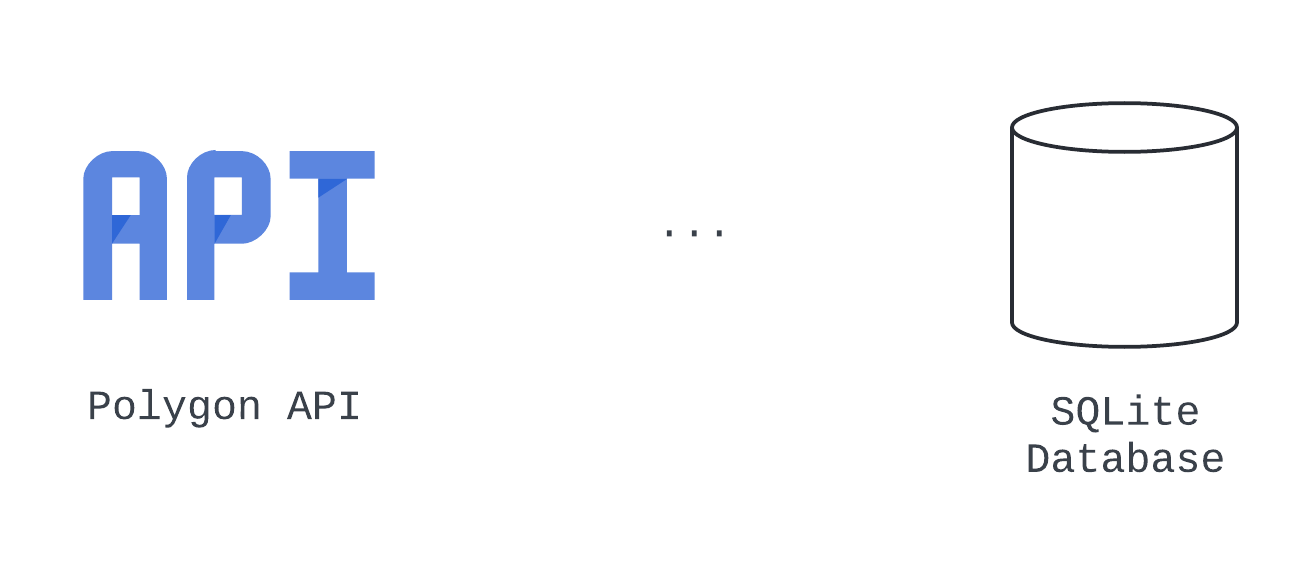
For our example, we will design a data pipeline to pull stock market data from the Polygon API, before transforming and loading this data into a SQLite database. In this case, the source system is the Polygon API, and the destination is a SQLite database. Let’s illustrate this with an image:
 Source and destination diagram
We know from our experience as data engineers that to prepare data to be loaded into a SQLite database, it needs to be transformed from JSON to a tabular format. We create a plan to transform our data after it has been pulled from the Polygon API, using native Python and the pandas library. Let’s update our visual to show this change:
 Architecture diagram
By adding this additional info, we have created an architecture diagram, which is a broad visual representation of our system. We see the three logical steps in this pipeline, which correspond to the E, T, and L of our process.
We can also translate each of these tasks into a directed acyclic graph, of DAG, which is a specific configuration that defines the entire set of tasks to be executed by Airflow, their sequence, and their dependencies on each other. Learn more about directed acyclic graphs by taking our Introduction to Data Engineering Course which reviews Airflow DAGs in detail.
In an enterprise data setting, many teams use other kinds of documents called technical specifications, or tech specs, to agree upon and document design choices. For our case, it's sufficient to create a table to document the design choices for our data pipeline.
|
Operator Type |
Task ID |
Notes |
|---|---|---|
|
Extract |
hit_polygon_api |
Use the TaskFlow API and build a Python function to authenticate and hit the Polygon API, before returning the response |
|
Transform |
flatten_market_data |
Flatten the data returned from the hit_polygon_api task, prepare it to be loaded to SQLite |
|
Load |
load_market_data |
Load the flattened data to SQLite |
Data pipeline choices
Keep in mind our DAG focuses on task-level specifics and may not encompass every bit of information. We can use a second table to document additional details we need to iron out. Our questions include:
|
Parameter |
Value |
|---|---|
|
DAG ID |
market_etl |
|
Start Date |
January 1, 2024 (9:00 AM UTC) |
|
Interval |
Daily |
|
Catchup? |
True (load all data since January 1, 2024) |
|
Concurrency |
1 DAG running at a time |
|
Task Retries, Retry Delay |
3 retries, 5 minute delay each retry |
|
Multiple Stock Tickers? |
Dynamically-spawning DAGs |
Questions to iron out
Let's take stock of all that we have accomplished: We have created an architecture diagram, documented how the pipeline can be broken down into Airflow tasks, and identified high-level information needed to configure the DAG.
If you want to learn more about designing, developing, and testing data pipelines, check out DataCamp’s Introduction to Data Pipelines. Here, you’ll master the basics of building ETL pipelines with Python, as well as best practices for ensuring your solution is robust, resilient, and reusable.
We will organize how we build out ETL pipeline by moving through the steps in order. Taking a structured approach ensures each phase is executed with precision.
Before pulling data from the Polygon API, we’ll need to create an API token by visiting Polygon and selecting the Create API Key button. Please note that for this tutorial, there is no need to sign up for a paid subscription - the free tier will generate an API key and provide all the functionality we need. Just remember to copy and save your API key.
After we have created an API key, we are now ready to start extracting data from the Polygon API with Airflow. We use the tech specs table we created, which includes the details for our DAG configuration, to help us code.
from airflow import DAG
from datetime import datetime, timedelta

with DAG(
    dag_id="market_etl",
    start_date=datetime(2024, 1, 1, 9),
    schedule="@daily",
    catchup=True,
    max_active_runs=1,
    default_args={
        "retries": 3,
        "retry_delay": timedelta(minutes=5)
    }
) as dag:
Let’s add our first task. We’ll use the TaskFlow API and the requests module to pull stock open-close data from the Polygon API.
import requests
...
@task()

def hit_polygon_api(**context):
    # Instantiate a list of tickers that will be pulled and looped over
    stock_ticker = "AMZN"
    # Set variables
    polygon_api_key= "<your-api-key>"
  ds = context.get("ds")

  # Create the URL
    url= f"<https://api.polygon.io/v1/open-close/{stock_ticker}/{ds}?adjusted=true&apiKey={polygon_api_key}>"
    response = requests.get(url)
    # Return the raw data
    return response.json()
There are a few things that you’ll notice about this code.
hit_polygon_api function is decorated with @task. This decorator converts the function to an Airflow task that can be executed as part of a DAG.context parameter is defined in the hit_polygon_api signature. It is later used to extract the value stored at the ds key.context is a dictionary that contains metadata about the task and DAG.ds from the context dictionary, we get the date of the data_interaval_end in the format YYYY-mm-dd. hit_polygon_api.Putting this all together, the code to create the first part of our ETL pipeline looks like this.
from airflow import DAG
from airflow.decorators import task
from datetime import datetime, timedelta import requests

with DAG(
    dag_id="market_etl",
    start_date=datetime(2024, 1, 1, 9),
    schedule="@daily",
    catchup=False,
    max_active_runs=1,
    default_args={
        "retries": 3,
        "retry_delay": timedelta(minutes=5)
    }
) as dag:
    # Create a task using the TaskFlow API
    @task()
    def hit_polygon_api(**context):
        # Instantiate a list of tickers that will be pulled and looped over
        stock_ticker = "AMZN"
        # Set variables
        polygon_api_key = "<your-api-key>"
        ds = context.get("ds")
        # Create the URL
        url = f"<https://api.polygon.io/v1/open-close/{stock_ticker}/{ds}?adjusted=true&apiKey={polygon_api_key}>"
        response = requests.get(url)
        # Return the raw data
        return response.json()
    hit_polygon_api()
You’ll notice that the response will contain an error when this is run for January 1, 2024. Since the market is closed on this day, Polygon returns a response noting the exception. We’ll take care of this in the next step.
After data’s been extracted from the Polygon API, we’re ready to transform it.
To do this, we’ll create another task using the TaskFlow API. This task will be named flatten_market_data and has parameters polygon_response, which is the raw data returned by the hit_polygon_api function, and **context. We’ll take a closer look at polygon_response momentarily.
The actual transformation that we’ll do is quite straightforward. We’re going to flatten the JSON returned by the Polygon API into a list. The catch is that we’ll provide unique default values for each key if it does not exist in the response.
For example, if the from key does not exist in the response, we’ll provide a default value using Airflow’s context. This takes care of the issue we saw earlier, where a response contained a limited set of keys (due to the market being closed). Next, we’ll convert the list to a pandas DataFrame, and return it. The resulting task looks like this:
@task
def flatten_market_data(polygon_response, **context):
    # Create a list of headers and a list to store the normalized data in
    columns = {
        "status": "closed",
        "from": context.get("ds"),
        "symbol": "AMZN",
        "open": None,
        "high": None,
        "low": None,
        "close": None,
        "volume": None
    }
    # Create a list to append the data to
    flattened_record = []
    for header_name, default_value in columns.items():
        # Append the data
        flattened_record.append(polygon_response.get(header_name, default_value))
    # Convert to a pandas DataFrame
    flattened_dataframe = pd.DataFrame([flattened_record], columns=columns.keys())
    return flattened_dataframe
We’ll have to add a dependency between the hit_polygon_api and flatten_market_data tasks. To do this, we’ll update the code in our DAG to match what is below:
import pandas as pd
with DAG(
    dag_id="market_etl",
    start_date=datetime(2024, 1, 1, 9),
    schedule="@daily",
    catchup=True,
    max_active_runs=1,
    default_args={
        "retries": 3,
        "retry_delay": timedelta(minutes=5)
    }
) as dag:
    @task()
    def hit_polygon_api(**context):
        ...
    @task
    def flatten_market_data(polygon_response, **context):
        # Create a list of headers and a list to store the normalized data in
        columns = {
            "status": None,
            "from": context.get("ds"),
            "symbol": "AMZN",
            "open": None,
            "high": None,
            "low": None,
            "close": None,
            "volume": None
        }
        # Create a list to append the data to
        flattened_record = []
        for header_name, default_value in columns.items():
            # Append the data
            flattened_record.append(polygon_response.get(header_name, default_value))
        # Convert to a pandas DataFrame
        flattened_dataframe = pd.DataFrame([flattened_record], columns=columns.keys())
        return flattened_dataframe
# Set dependencies
    raw_market_data = hit_polygon_api()
    flatten_market_data(raw_market_data)
Here, the return value of the hit_polygon_api task is stored in the raw_market_data. Then, raw_market_data is passed as an argument to the flatten_market_data task via the polygon_response parameter. Not only does this code set a dependency between the hit_polygon_api and flatten_market_data tasks, but it also allows data to be shared between these two tasks.
Although the transformation we performed was relatively simple, Airflow offers the capability to execute a wide range of more complicated data manipulations. In addition to using native tasks, it’s easy to leverage Airflow’s extensive collection of provider-built hooks and operators to orchestrate transformation using tools such as AWS Lambda and DBT.
We’ve made it to the last step of our ETL pipeline. We have planned to do this using a SQLite database and one final task defined with the TaskFlow API.
Like before, we’ll define a single parameter when we create our task. We’ll name this one flattened_dataframe. This allows for the data returned by the flatten_market_data task to be passed to our new task.
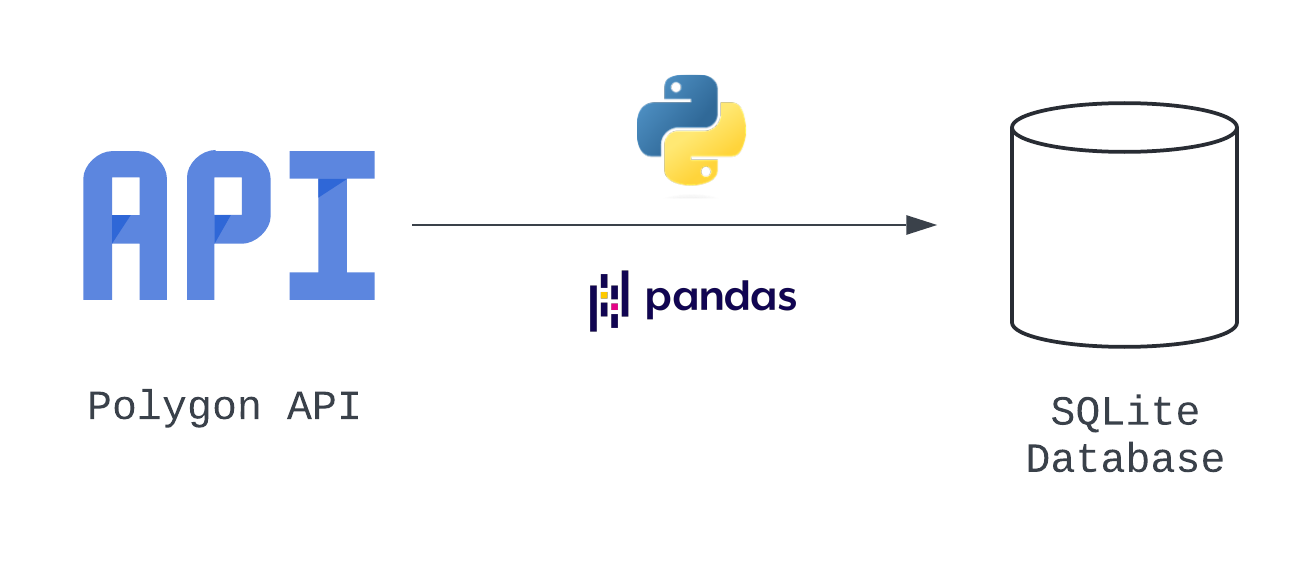
Before we write the code to load our data to a SQLite database, we’ll first need to create a connection in the Airflow UI. To open the connections page, follow these steps:
You’ll be directed to a screen that looks like this:
 Airflow connections page
To fill out the connections page, follow these steps:
The configuration for this connection should look like the image below. Once it does, click Save.
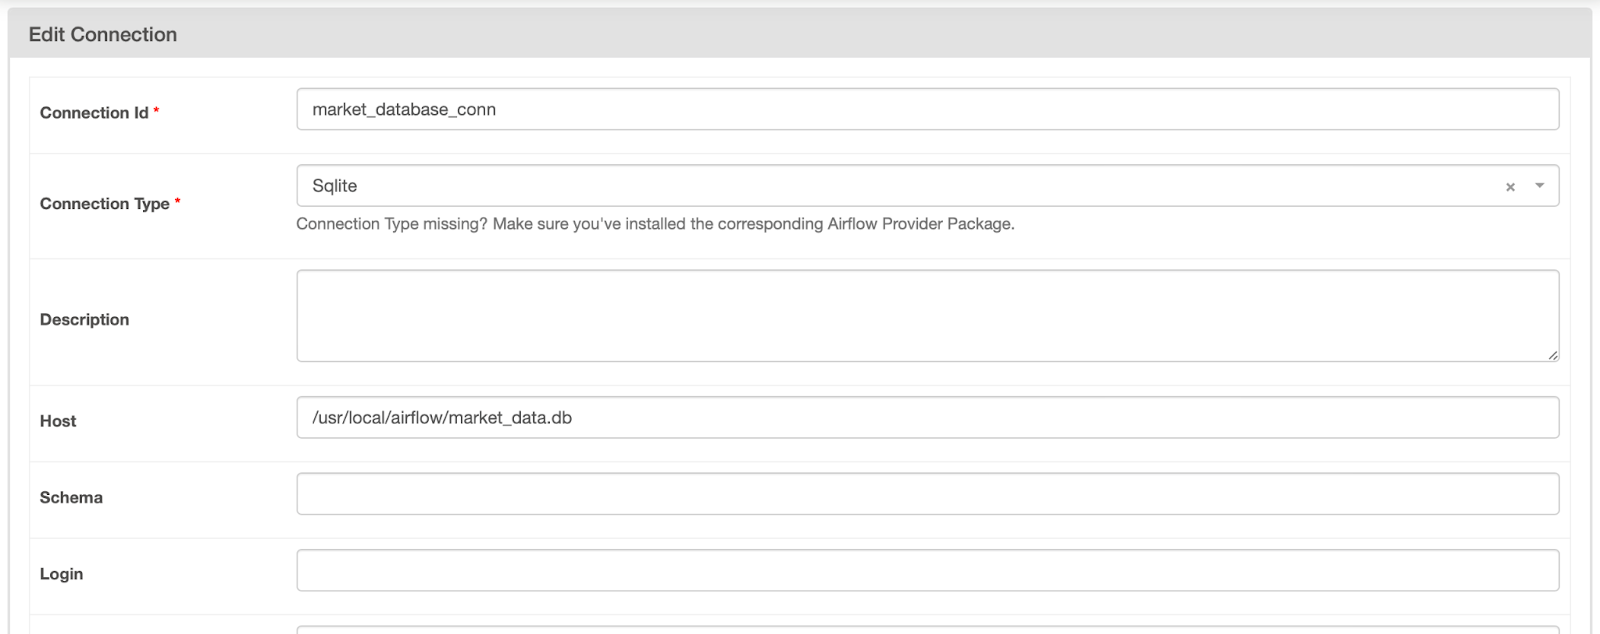 Unsaved Airflow connection to SQLite database
Now that we’ve created a connection, we can retrieve this information in our task using the SqliteHook. Take a look at the code below.
from airflow.providers.sqlite.hooks.sqlite import SqliteHook@task
def load_market_data(flattened_dataframe):
# Pull the connection
market_database_hook = SqliteHook("market_database_conn")
market_database_conn = market_database_hook.get_sqlalchemy_engine()
# Load the table to Postgres, replace if it exists
flattened_dataframe.to_sql(
name="market_data",
con=market_database_conn,
if_exists="append",
index=False
)
# print(market_database_hook.get_records("SELECT * FROM market_data;"))With this code, we’re creating a connection to the SQLite database we specified in the last step. Then, the connection engine is retrieved from the hook using the .get_sqlalchemy_engine() method. This is then passed as an argument to the con parameter when the .to_sql() method is called upon the flattened_dataframe.
Note that the table name this data is being written to is market_data, and if the table exists, it is appended to. When testing, I like to check that data is being written by retrieving and printing these records. You can do this by uncommenting the last line of this task.
Putting this all together, our code should look a little something like this:
from airflow import DAG
from airflow.decorators import task
from airflow.providers.sqlite.hooks.sqlite import SqliteHook
from datetime import datetime, timedelta
import requests
import pandas as pd

with DAG(
    dag_id="market_etl",
    start_date=datetime(2024, 1, 1, 9),
    schedule="@daily",
    catchup=True,
    max_active_runs=1,
    default_args={
        "retries": 3,
        "retry_delay": timedelta(minutes=5)
    }
) as dag:
    # Create a task using the TaskFlow API
    @task()
    def hit_polygon_api(**context):
        # Instantiate a list of tickers that will be pulled and looped over
        stock_ticker = "AMZN"
        # Set variables
        polygon_api_key = "<your-api-key>"
        ds = context.get("ds")
        # Create the URL
        url = f"<https://api.polygon.io/v1/open-close/{stock_ticker}/{ds}?adjusted=true&apiKey={polygon_api_key}>"
        response = requests.get(url)
        # Return the raw data
        return response.json()
    @task
    def flatten_market_data(polygon_response, **context):
        # Create a list of headers and a list to store the normalized data in
        columns = {
            "status": None,
            "from": context.get("ds"),
            "symbol": "AMZN",
            "open": None,
            "high": None,
            "low": None,
            "close": None,
            "volume": None
        }
        # Create a list to append the data to
        flattened_record = []
        for header_name, default_value in columns.items():
            # Append the data
            flattened_record.append(polygon_response.get(header_name, default_value))
        # Convert to a pandas DataFrame
        flattened_dataframe = pd.DataFrame([flattened_record], columns=columns.keys())
        return flattened_dataframe
    @task
    def load_market_data(flattened_dataframe):
        # Pull the connection
        market_database_hook = SqliteHook("market_database_conn")
        market_database_conn = market_database_hook.get_sqlalchemy_engine()
        # Load the table to SQLite, append if it exists
        flattened_dataframe.to_sql(
            name="market_data",
            con=market_database_conn,
            if_exists="append",
            index=False
        )
    # Set dependencies between tasks
    raw_market_data = hit_polygon_api()
    transformed_market_data = flatten_market_data(raw_market_data)
    load_market_data(transformed_market_data)
Again, we updated our dependencies to allow data returned from the flatten_market_data task to be passed to the load_market_data task. The resulting graph view for our DAG looks something like this:
 Graph view for ETL pipeline
Now that you’ve built your first Airflow DAG, it’s time to ensure it works. There are a few ways to do this, but one of the most common is by running the DAG end-to-end.
To do this in the Airflow UI, you’ll navigate to your DAG and toggle the switch from blue to active. Since catchup was set to True, a DAG run should be queued and begin to run. If a task executes successfully, the box associated with it in the UI will turn green. If all tasks in the DAG are successful, the DAG will be marked as success, and the next DAG run will be triggered.
If a task fails, the state will be up for retry and marked in yellow. When this happens, it’s best to take a look at the logs for that task. This can be done by clicking on the yellow box in grid view and selecting Logs. Here, you’ll find the exception message and you can begin to triage. If a task fails more than the number of retries that are specified, the state of that task and the DAG will be set to failed.
In addition to testing a DAG end-to-end, Airflow makes it easy to write unit tests. When you initially create your environment using astro dev start, a tests/ directory is created for you. Here, you can add unit tests for both your DAG, as well as the components of your DAG.
Below is a unit test for our DAG’s configuration. This test validates a number of the parameters set when define, such as start_date, schedule, and catchup. Once you’ve written your test, navigate to the root of your project, and run:
from airflow.models.dagbag import DagBag
from datetime import datetime
import pytz

def test_market_etl_config():
    # Pull the DAG
    market_etl_dag = DagBag().get_dag("market_etl")
    # Assert start date, schedule, and catchup
    assert market_etl_dag.start_date == datetime(2024, 3, 25, 9, tzinfo=pytz.UTC)
    assert market_etl_dag.schedule_interval == "@daily"
    assert market_etl_dag.catchup
astro dev pytestThis command will execute all unit tests in your tests/ directory. If you’d like only to execute a single test, you can provide the path to the file as an argument to the command above. In addition to using the Astro CLI to execute tests, any Python test runner can be used to write and execute unit tests.
For personal projects, writing unit tests will help to ensure your code performs as you might expect. In an enterprise setting, unit tests are almost always required. Most data teams will leverage some sort of CI/CD tool to deploy their Airflow project. This process typically involves running unit tests and validating their output to ensure the DAG you’ve written is production-ready. For more information about unit tests, check out our How to Use Pytest for Unit Testing tutorial, as well as the Introduction to Testing in Python.
We’ve built a simple data pipeline that works, and we even used transformation and persistence techniques. In other cases, Airflow is equipped to orchestrate complex workflows using provider-built and custom operators, processing terabytes of data.
Some examples of these are the S3ToSnowflakeOperator, and the DatabricksRunNowOperator, which both easily allow for integration with a larger data stack. Working with these sorts of operators is tricky in a hobby-like setting. For example, to use the S3ToSnowflakeOperator, you’d need to have both AWS and Snowflake accounts and configuration for the resource you’d be transferring data between.
In addition to ETL workflows, Airflow supports ELT workflows, which are widely becoming the industry standard for teams leveraging cloud data warehouses. Make sure to keep this in mind when designing data pipelines.
In the load component of our pipeline, we created a connection to a SQLite database, which was later retrieved and used to persist data. Connections, sometimes called Secrets, are a feature in Airflow designed to simplify interactions with source and destination systems. By using these connections to store sensitive information, such as your Polygon API key, you enhance the security of your code. This approach also allows you to manage credentials separately from your codebase. Whenever feasible, it's advisable to utilize Connections extensively to keep your workflow both secure and organized.
You may have noticed that the “AMZN” stock ticker was hard-coded into our hit_polygon_api and flatten_market_data tasks. This allowed for us to extract, transform, and load data for this single stock ticker. But what if you wanted to use this same code for multiple stock tickers? Luckily it’s easy to generate DAGs dynamically. With minimal refactoring in our code, we could loop over a list of stock tickers and parameterize the stock ticker values. This helps to make your DAGs more modular and portable. For information about dynamically generating DAGs, check out the Dynamically Generate DAGs in Airflow documentation from Astronomer.
Congratulations! You’ve built an Airflow DAG to extract, transform, and load stock market data from the Polygon API using Python, pandas, and SQLite. Along the way, you honed your skills in building architecture diagrams and tech specs, creating Airflow connections, and testing your DAGs. As you continue your Airflow journey, experiment with more advanced techniques to help make your pipelines robust, resilient, and reusable.
Best of luck, and happy coding!
Learn Data Engineering with Datacamp
Track
Course
Course
blog
Srujana Maddula
9 min
blog
Jake Roach
13 min
podcast
Richie Cotton
39 min
tutorial
Zoumana Keita
tutorial
Tim Lu
8 min
tutorial
Bex Tuychiev
19 min