Course
Introduction to Python
4 hr
6.9M
Testing is a massive topic in software development. Before a software product gets into the hands of an end-user, it’s likely it would have gone through several tests such as integration tests, systems tests, and acceptance tests. The idea behind such vigorous testing is to ensure the behavior of the application is working as expected from the end-users standpoint. This approach to testing is known as behavior-driven development (BDD).
More recently, an interest in test-driven development (TDD) has grown significantly among developers. Diving into the depths of it may be a complex task for this article, but the general idea is that the traditional process of development and testing is reversed - you write your unit tests first, and then implement code changes until the tests pass.
In this article, we will focus on unit tests and, specifically, how to do them using a popular Python testing framework called Pytest.
Unit tests are a form of automated tests - this simply means that the test plan is executed by a script rather than manually by a human. They serve as the first level of software testing and are typically written in the form of functions that validate the behavior of various functionalities within a software program.
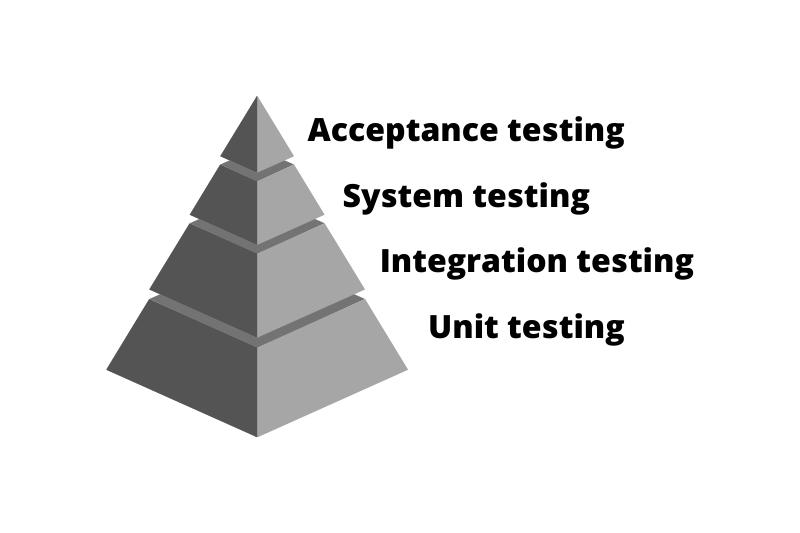
The levels of software testing
The idea behind these tests is to permit developers to isolate the smallest unit of code that makes logical sense and test that it behaves as expected. In other words, unit tests validate that a software program's single component works as the developers intended.
Ideally, these tests should be pretty small - the smaller they are, the better. One reason for building smaller tests is that the test will be more efficient since testing smaller units will enable the testing code to execute much faster. Another reason for testing smaller components is that it gives you greater insight into how the granular code behaves when merged.
The global justification for why it’s essential to conduct unit tests is that developers must ensure the code they write meets the quality standards before permitting it to enter a production environment. However, several other factors contribute to the necessity of unit tests. Let’s dig deeper into some of those reasons.
Carrying out unit tests help developers catch code bugs during the software construction stage, preventing them from transitioning deeper into the development lifecycle. This preserves resources since developers wouldn’t have to pay the cost of fixing bugs later in development - it also means end-users are less likely to have to deal with buggy code.
Another great justification for conducting unit tests is that they serve as an extra layer of living documentation for your software product. Developers can simply refer to the unit tests for a holistic understanding of the overall system since they detail how the more minor components should behave.
It’s extremely simple to make subtle mistakes in your code while writing up some functionality. However, most developers would agree it’s much better to identify the breaking points within a codebase before it’s put in a production environment: unit tests provide developers with this opportunity.
It’s fair to say that “code covered with unit tests can be considered more reliable than code that is not.” Future breaks in the code may be discovered much faster than code with no test coverage, saving time and money. Developers also benefit from extra documentation so they can understand the codebase quicker, and there is the added confidence of knowing that if they make a mistake in their code, it will be caught by the unit tests rather than by an end-user.
Python has grown tremendously in popularity over the years. As part of Python’s growth, the number of testing frameworks has also increased, resulting in a wealth of tools available to help you test your Python code. Getting into the nitty-gritty of each tool is beyond the scope of this article, but we will touch on some of the most common Python testing frameworks available.
Unittest is a built-in Python framework for unit testing. It was inspired by a unit testing framework called JUnit from the Java programming language. Since it comes out of the box with the Python language, there are no extra modules to install, and most developers use it to begin learning about testing.
Pytest is possibly the most widely used Python testing framework around - this means it has a large community to support you whenever you get stuck. It’s an open-source framework that enables developers to write simple, compact test suites while supporting unit testing, functional testing, and API testing.
The doctest framework merges two core components of software engineering: documentation and testing. This functionality ensures that all software programs are thoroughly documented and tested to ensure they run as they should. doctest comes with Python’s standard library and is pretty straightforward to learn.
Nose2, the successor to the nose regiment, is essentially unittest with plugins. People often refer to nose2 as “extended unit tests” or “unit tests with a plugin” due to its close ties to the Python built-in unit testing framework. Since it’s practically an extension of the unittest framework, nose2 is incredibly easy to adopt for those familiar with unittest.
Testify, a Python framework for unit, integration, and system testing, is popularly known as the framework that was designed to replace unittest and nose. The framework is packed with extensive plugins and has quite a smooth learning curve if you’re already familiar with unittest.
Hypothesis enables developers to create unit tests that are simpler to write and are powerful when run. Since the framework is built to support data science projects, it helps to find edge cases that aren’t so apparent while you’re creating your tests by generating examples of inputs that align with specific properties you define.
For our tutorial, we will be using pytest. Check out the next section to see why you may wish to opt for Pytest over the others we’ve listed.
Beyond its vast supportive community, pytest has several factors that make it one of the greatest tools to conduct your automated test suite in Python. Pytest’s philosophy and features are set up to make software testing a much better developer experience. One way the creators of Pytest achieved this goal is by significantly reducing the amount of code required to perform common tasks and making it possible to perform advanced tasks with extensive commands and plug-ins.
Some other reasons to use Pytest include the following:
Pytest is extremely easy to learn: if you understand how Python’s assert keyword works, then you’re already well on your way to mastering the framework. Tests using pytest are Python functions with “test_” prepended or “_test” appended to the function's name - although you can use a class to group multiple tests. Overall, the learning curve for pytest is much shallower than the likes of unittest since you’re not required to learn any new constructs.
You may not want to run all of your tests with each execution - this may be the case as your test suite grows. Sometimes, you may wish to isolate a few tests on a new feature to get rapid feedback while you’re developing, then run the full suite once you’re confident everything is functioning as planned. Pytest has three ways you could isolate tests: 1) name-based filtering, which tells pytest only to run the tests whose names match the pattern provided 2) directory scoping, which is a default setting that tells pytest to only run tests that are in or under the current directory and 3) test categorization which allows you to define categories for tests that pytest should include or exclude.
Pytest has a built-in decorator called parametrize that enables the parametrization of arguments for a test function. Thus, if the functions you’re testing process data or performs a generic transformation, you are not required to write several similar tests. We will cover more on parametrization later in the article.
We will stop here, but the list of why pytest is a great tooling option for your automated test suite goes on.
Despite all of the reasons we’ve covered above, one may still dispute the idea of using pytest for the simple fact that it’s a third-party framework - “what’s the point of installing a framework if there’s already one built-in?” It’s a good argument, but to cover our back in that dispute, we’ll provide you with some things to consider.
Note: If you’re already sold on pytest, skip to the next section where we get to grips with how to use the framework.
Unittest requires developers to create classes derived from the TestCase module and then define the test cases as methods in the class.
"""
An example test case with unittest.
See: https://docs.python.org/3/library/unittest.html
"""
import unittest

class TestStringMethods(unittest.TestCase):

    def test_upper(self):
        self.assertEqual('foo'.upper(), 'FOO')

    def test_isupper(self):
        self.assertTrue('FOO'.isupper())
        self.assertFalse('Foo'.isupper())

    def test_split(self):
        s = 'hello world'
        self.assertEqual(s.split(), ['hello', 'world'])
        # check that s.split fails when the separator is not a string
        with self.assertRaises(TypeError):
            s.split(2)
Pytest, on the other hand, only requires you to define a function with “test_” prepended and use the assert conditions inside them.
"""
An example test case with pytest.
See: https://docs.pytest.org/en/6.2.x/index.html
"""
# content of test_sample.py
def inc(x):
    return x + 1


def test_answer():
    assert inc(3) == 5
Notice the difference in the amount of code required; unittest has a significant amount of boilerplate code required, which serves as a minimum requirement for any test you’d like to perform. This means it’s highly likely you’ll end up writing the same code several times over. Pytest, on the other hand, has rich inbuilt features that simplify this workflow by reducing the amount of code required to write test cases.
The outputs provided by each framework is extremely different. Here’s an example pytest execution:
"""
See: https://docs.pytest.org/en/6.2.x/index.html
"""
$ pytest
=========================== test session starts ============================
platform linux -- Python 3.x.y, pytest-6.x.y, py-1.x.y, pluggy-1.x.y
cachedir: $PYTHON_PREFIX/.pytest_cache
rootdir: $REGENDOC_TMPDIR
collected 1 item

test_sample.py F                                                     [100%]

================================= FAILURES =================================
_______________________________ test_answer ________________________________

    def test_answer():
>       assert inc(3) == 5
E       assert 4 == 5
E        +  where 4 = inc(3)

test_sample.py:6: AssertionError
========================= short test summary info ==========================
FAILED test_sample.py::test_answer - assert 4 == 5
============================ 1 failed in 0.12s =============================
The test case above failed, but notice how detailed the breakdown of the failure is. This makes it easier for developers to identify where the bugs in their code exist, which is super helpful when debugging. As an added bonus, there’s also an overall status report for the test suite, which tells us the number of tests that failed and how long it took.
Let’s take a look at a failed test case example with unittest.
import unittest

def square(n):
    return n*n

def cube(n):
    return n*n*n

class TestCase(unittest.TestCase):
    def test_square(self):
        self.asserEquals(square(4), 16)

    def test_cube(self):
        self.assertEquals(cube(4), 16)
When we run the script, we get the following output:
---------------------------------------------------------------
Ran 2 tests in 0.001s

FAILED (errors=1)
The output above tells us that two tests were run in 0.001s and one failed, but not much else. Ultimately, pytest provides much more informative feedback, which comes in handy when it’s time to debug.
All in all, both pytest and unittest are great tools to use for automated testing in Python. Several Python developers may lean more towards pytest over its counterparts due to its compactness and efficiency. It’s also extremely easy to adopt and there are several features you could use to build an effective test suite.
Now for the main part of this article. We’ve discussed what unit testing is and why pytest is a great tool for automated testing in Python. Now let’s have a look at how to use the tool.
Let’s see how this Python testing framework we’ve been going on about works.
The first step is installing the package, which can be done with a simple pip command.
Note: The creators of pytest recommend you use venv for development and pip for installing your application, dependencies, and pytest itself.
pip install -U pytestNext, check to see the framework has been installed using the following command:
>>>> pytest --version

pytest 7.1.2
Everything is installed. You’re now ready to start running some tests.
Creating a test is simple with Pytest. To demonstrate this functionality, we’ve created a script called calcualte_age.py. This script has only one function, get_age, which is responsible for calculating a user's age, given their date of birth.
import datetime

def get_age(yyyy:int, mm:int, dd:int) -> int:
    dob = datetime.date(yyyy, mm, dd)
    today = datetime.date.today()
    age = round((today - dob).days / 365.25)
    return age
Pytest will execute all the python files that have the name test_ prepended or _test appended to the name of the script. To be more specific, pytest follows the following conventions for test discovery [source: documentation]:
We have not specified any arguments, but we have created another script in the same directory called test_calculate_age.py: thus, when the directories are recursed the test will be discovered. In this script, we have a single test, test_get_age, to validate our function is working accordingly.
Note: You may decide to put your tests into an extra directory outside of your application which is a good idea if you have several functional tests or you want to keep testing code and application code separate for some other reason.
from calculate_age import get_age

def test_get_age():
    # Given.
    yyyy, mm, dd = map(int, "1996/07/11".split(""))
    # When.
    age = get_age(yyyy, mm, dd)
    # Then.
    assert age == 26
To execute the test, run the following command from the command prompt:
py -m pytest 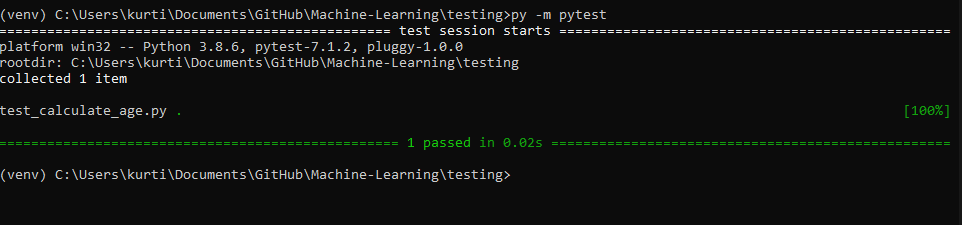
The output of a successful pytest run.
And that’s all.
But what if we need to provide some data for our tests to pass? Say hello to pytest fixtures.
Pytest’s invaluable fixtures feature permits developers to feed data into the tests. They are essentially functions that run before each test function to manage the state of our tests. For example, say we have several tests that all make use of the same data then we can use a fixture to pull the repeated data using a single function.
import pytest
from sklearn.model_selection import train_test_split
from fraud_detection_model.config.core import config
from fraud_detection_model.processing.data_manager import (

load_datasets,

load_interim_data

)


@pytest.fixture(scope="session")
def pipeline_inputs():
    # import the training dataset
    dataset = load_datasets(transaction=config.app_config.train_transaction, identity=config.app_config.train_identity, )
    # divide train and test
    X_train, X_test, y_train, y_test = train_test_split(

dataset[config.model_config.all_features], dataset[config.model_config.target],
test_size=config.model_config.test_size,
stratify=dataset[config.model_config.target],
random_state=config.model_config.random_state)
    return X_train, X_test, y_train, y_test
In the code above, we have created a fixture using the pytest.fixture decorator. Notice the scope is set to "session" to inform pytest that we want the fixture to be destroyed at the end of the test session.
Note: our fixtures are stored in conftest.py.
The code uses a function we’ve imported from another module to load two csv files into memory and merge together into a single dataset. After that, the dataset is then split into training and testing sets and returned from the function.
To use this fixture in our tests, we must pass it as a parameter to our test function. In this example, use our fixture in our test_pipeline.py test script as follows:
import pandas as pd
from pandas.api.types import is_categorical_dtype, is_object_dtype
from fraud_detection_model import pipeline
from fraud_detection_model.config.core import configfrom fraud_detection_model.processing.validation import validate_inputs


def test_pipeline_most_frequent_imputer(pipeline_inputs):
    # Given
    X_train, _, _, _ = pipeline_inputs assert all( x in X_train.loc[:, X_train.isnull().any()].columns for x in config.model_config.impute_most_freq_cols )
    # When
    X_transformed = pipeline.fraud_detection_pipe[:1].fit_transform(X_train[:50])
    # Then
    assert all( x not in X_transformed.loc[:, X_transformed.isnull().any()].columns for x in config.model_config.impute_most_freq_cols )
def test_pipeline_aggregate_categorical(pipeline_inputs):
    # Given
    X_train, _, _, _ = pipeline_inputs

    assert X_train["R_emaildomain"].nunique() == 60
    # When
    X_transformed = pipeline.fraud_detection_pipe[:2].fit_transform(X_train[:50])
    # Then
    assert X_transformed["R_emaildomain"].nunique() == 2
Don’t worry too much about what the code is doing. The most important thing we want to highlight is how we’ve significantly reduced the need to write redundant code because we’ve created a fixture that we pass as a parameter to pull data into our tests.
However, there are situations in which fixtures may be overkill. For example, if the data being pulled into your tests must be processed again in each test case - this is practically the equivalent of littering your code with several plain objects. With all of that being said, fixtures will likely play a pivotal role within your test suite, but discerning when to use or avoid them will take practice and lots of thought.
Fixtures are great when you have several tests with the same inputs. What if you want to test a single function with slight variations to the inputs? One solution is to write several different tests with various cases.
def test_eval_addition():
    assert eval("2 + 2") == 4

def test_eval_subtraction():
    assert eval("2 - 2") == 0

def test_eval_multiplication():
    assert eval("2 * 2") == 4

def test_eval_division():
    assert eval("2 / 2") == 1.0
While this solution certainly works, it’s not the most efficient: for starters, there’s lots of boilerplate code. A better solution is to use the pytest.mark.parametrize() decorator to enable the parametrization of arguments for a test function. This will allow us to define a single test definition, and then pytest will test the various parameters we specify for us.
Here’s how we would rewrite the code above if we used parametrization:
import pytest

@pytest.mark.parametrize("test_input, expected_output", [("2+2", 4), ("2-2", 0), ("2*2", 4), ("2/2", 1.0)])
def test_eval(test_input, expected_output):
    assert eval(test_input) == expected_output
The @parametrize decorator defines four different test inputs and expected values for the test_eval function to execute - this means the function will run four times using each one in turn.

The output from pytest for parametrize test
In this article, we covered the following topics:
You now know enough to begin writing your own test using the pytest framework. We highly encourage you to do so, so that everything you’ve learned in this article sticks. You should also check out our course on unit testing for data science in python for a more detailed explanation with examples.
Courses for Python
Course
Course
Course
blog
DataCamp Team
8 min
Tutorial
Abid Ali Awan
Tutorial
Matthew Przybyla
Tutorial
Aditya Sharma
Tutorial
Abid Ali Awan
Tutorial
Natassha Selvaraj