Course
Understanding Machine Learning
2 hr
274.2K
Continuous Integration (CI) and Continuous Deployment (CD) are practices commonly used in software development to automate the process of integrating code changes, testing them, and deploying the updated application quickly. Initially, these practices were developed for traditional software applications, but they are now becoming increasingly relevant in machine learning (ML) projects as well.
In this comprehensive guide, we will take a look at CI/CD for ML and learn how to build our own machine learning pipeline that will automate the process of training, evaluating, and deploying the model.
This guide presents a simple project that uses only GitHub actions to automate the entire process. Most of the things we will discuss are well-known to machine learning engineers and data scientists. The only thing they will be learning here is how to use GitHub Actions, Makefile, CML, and Hugging Face CLI.
Enroll in the MLOps Concepts course to learn how to take machine learning models from local notebooks to production models that generate business value.
CI/CD is a game-changer when it comes to operationalizing your model and using it to develop a product. Streamlining the automation process provides a bug-free, fast, and scalable solution for your ML project, allowing you to focus on improving the model rather than managing and deploying the solution.
In particular, CI/CD for machine learning helps with the following:
With CI/CD, you can automatically retrain your models on new data on a regular schedule, saving time compared to manually triggering retraining.
CI tools run tests and checks for each code commit, which helps to catch bugs, integration issues, and decreases in model performance.
CI/CD helps ensure models can be rebuilt and retrained exactly the same way, enabling reproducibility of results. Environments, model and data versioning, and configurations are codified.
CI/CD allows for automated testing of new models before deployment to check for issues. It also enables better monitoring of models post-deployment through integration with monitoring tools.
New model versions or experiments can be quickly trained, tested, and deployed in an automated fashion with CI/CD. It accelerates the development and improvement of ML systems.
As the ML project grows in size and complexity, managing the entire lifecycle manually becomes impractical. CI/CD pipelines provide a scalable solution that can handle large volumes of data, numerous models, and diverse dependencies while maintaining efficiency and reliability.
In this guide, we will walk you through the process of setting up accounts and environments, creating a CI/CD pipeline, and optimizing the entire process.
We will be using scikit-learn pipelines to train our random forest algorithm and build a drug classifier. After training, we will automate the evaluation process using CML. Finally, we will build and deploy the web application to Hugging Face Hub.
From training to evaluation, the entire process will be automated using GitHub actions. All you have to do is push the code to your GitHub repository, and within two minutes, the model will be updated on Hugging Face with the updated app, model, and results.

If you want to learn more using interactive exercises, try taking DataCamp’s CI/CD for Machine Learning course to elevate your machine learning development with GitHub Actions and Data Version Control.
In this section, we will create a GitHub repository, necessary files and folders, and a Space in Hugging Face.
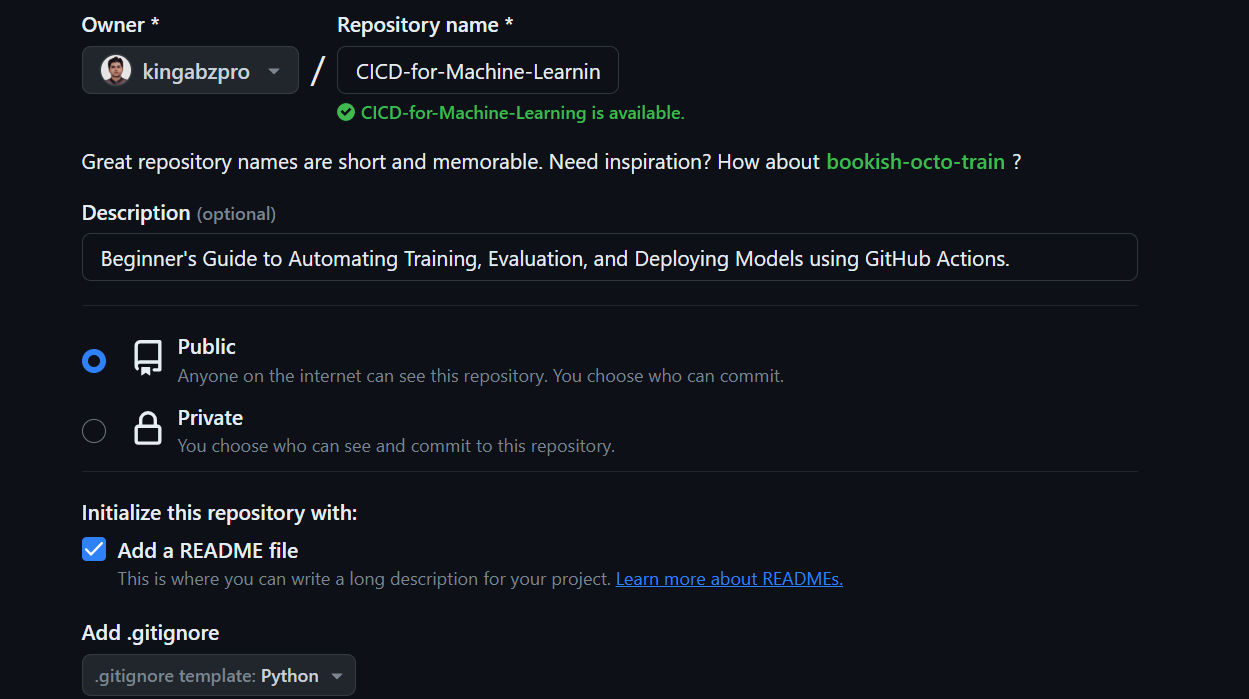
Click the “+” button on the top right of GitHub main page and select “New repository”.
Add the repository name and description, check the README file, and set .gitignore as Python.
After creating the repository, we need to copy its URL. Then, open the terminal or bash and navigate to the directory where we want to store the project folder.
Finally, clone the repository by running the following command:
git clone https://github.com/kingabzpro/CICD-for-Machine-Learning.gitTo get started, use your preferred IDE to open the local repository. We recommend using VSCode for this project. Once you launch your IDE, you will see a VSCode workspace containing files such as README and LICENSE.
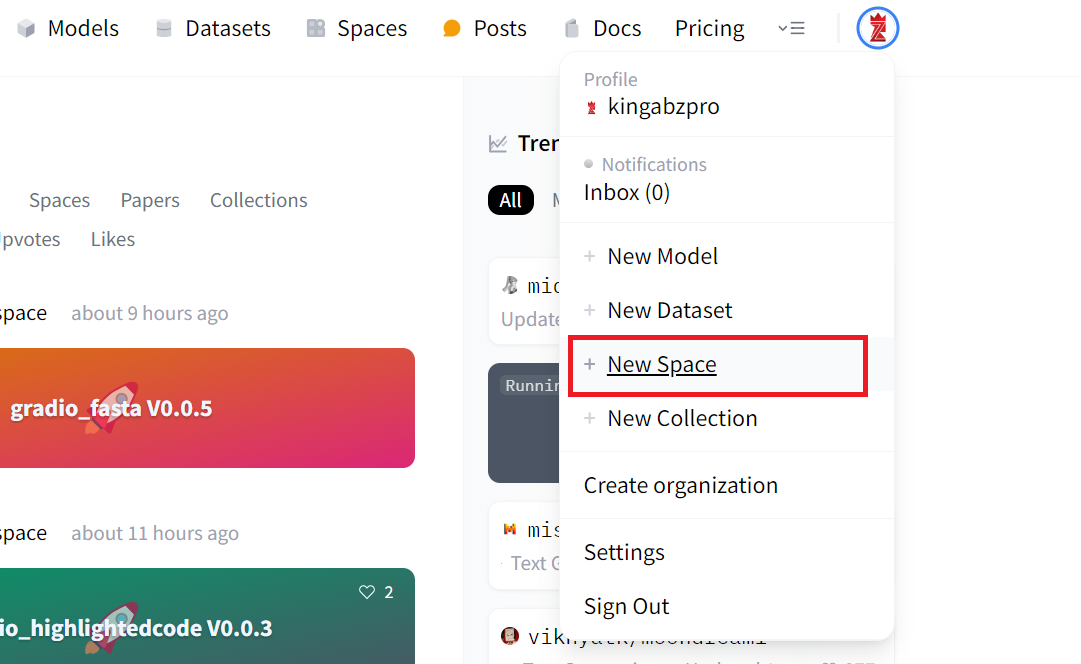
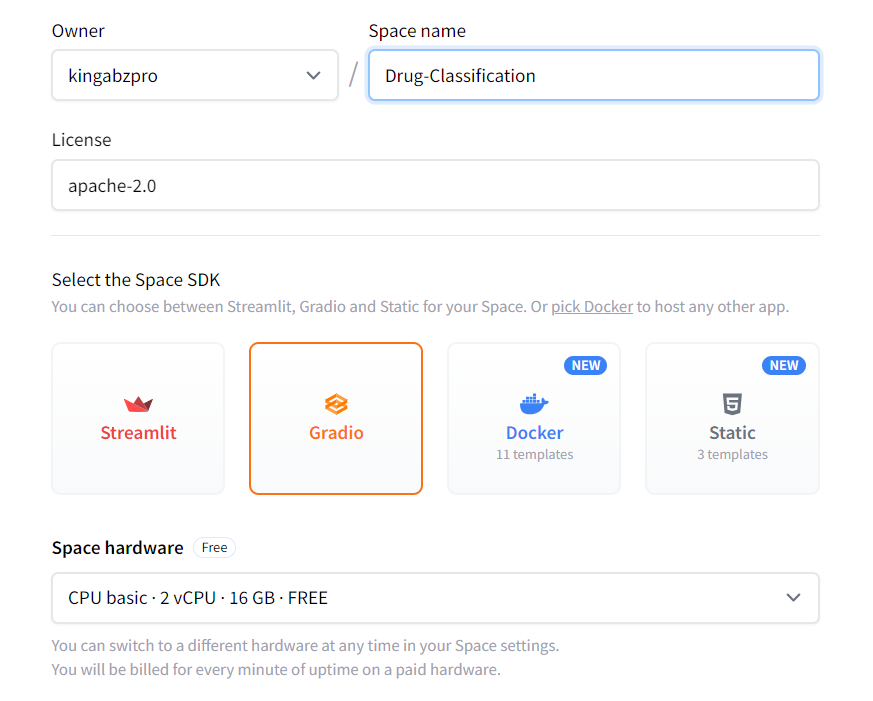
Let's create a Hugging Face Space that we will use to deploy our application with the model file.
1. Click on your display picture and select "New Space".
2. Add the Spaces name, License, SDK type, and Create Space.
3. To edit the README.md file, click the three dots on the top left, select Files, and make the necessary changes.
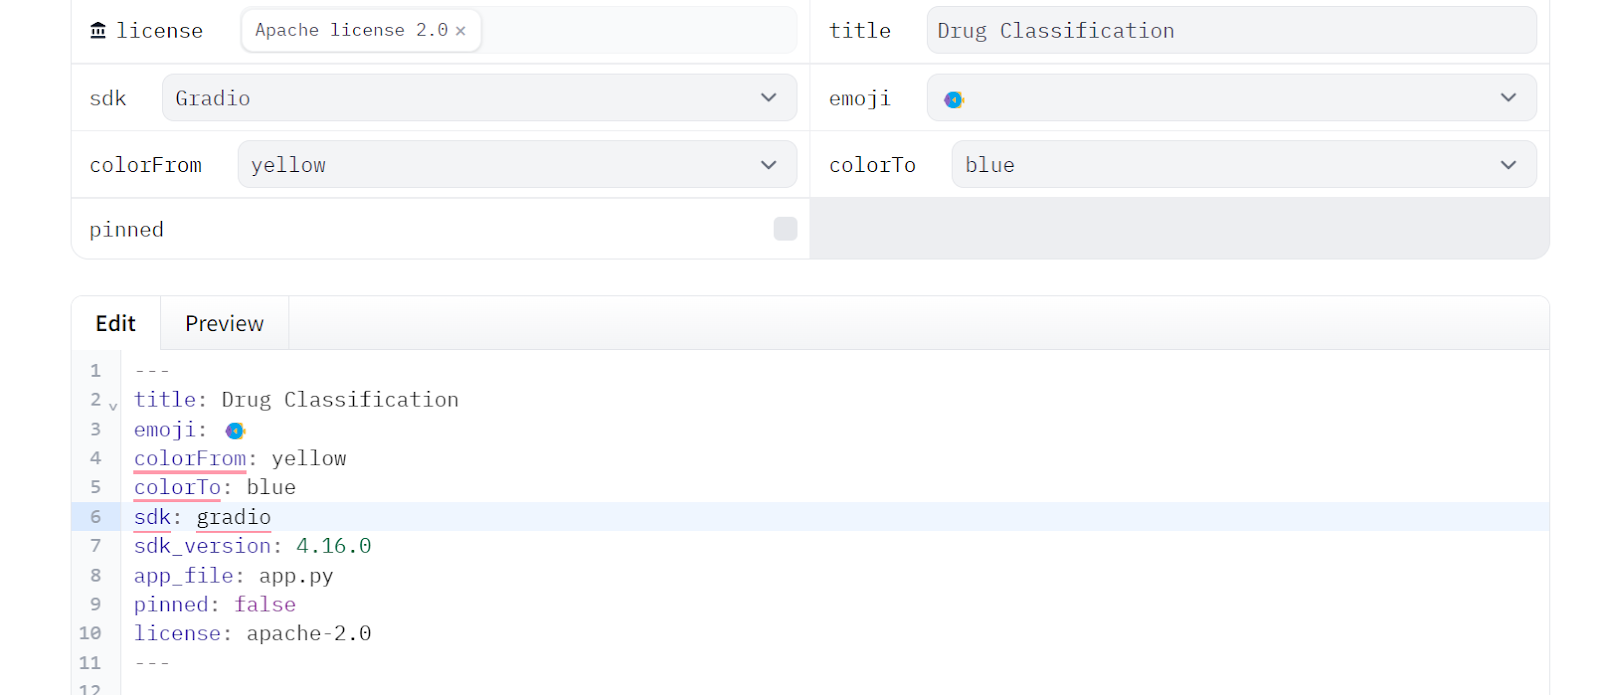
4. We will copy the metadata from the README file of the Space and paste it into our local README file that will stay in the App folder.
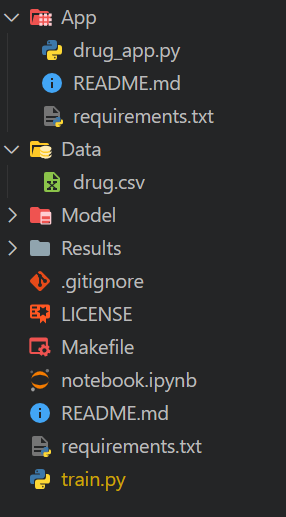
We need to create the necessary folder and file before we start experimenting and building pipelines. This will help us in the long run to keep the workspace clean.
Create a Python file named drug_app.py, along with a README.md file and a requirements.txt file, and move all of these files to the App folder. This will help us better organize all the necessary files needed to run the app.
Next, please edit the README.md file in the App folder and ensure that all metadata versioning has been modified accordingly. This will allow you to easily point to the location of the app files, change colors, set the SDK version, and add licensing information.
---
title: Drug Classification
emoji: 💊
colorFrom: yellow
colorTo: red
sdk: gradio
sdk_version: 4.16.0
app_file: drug_app.py
pinned: false
license: apache-2.0
---
Edit the requirement.txt file in the App folder by providing the missing Python packages:
scikit-learn
skops
Note: the requirement and README files will differ for the GitHub repository and Hugging Face Space.
Download the Drug Classification dataset from Kaggle, extract the CSV file, and move it to the Data folder.
Both the Model and Results folders will remain empty as they will be populated by the Python script we run.
Makefile to simplify running the script on GitHub Action workflow.notebook.ipynb. In this notebook, we will experiment with our algorithms and processing pipelines.requirements.txt. It will be used to set up the environment while running the CI workflow jobs.train.py. It will contain Python code for loading and processing data, as well as training, evaluating, and saving the model and performance metrics.This is how our directory should look like:
In this part, we will experiment with creating Python code that processes data and trains a model using a scikit-learn pipeline. We will then evaluate it and save the results and model.
We will use pandas to load our CSV file, shuffle it using the sample function, and display the top three rows.
import pandas as pd

drug_df = pd.read_csv("Data/drug.csv")
drug_df = drug_df.sample(frac=1)
drug_df.head(3)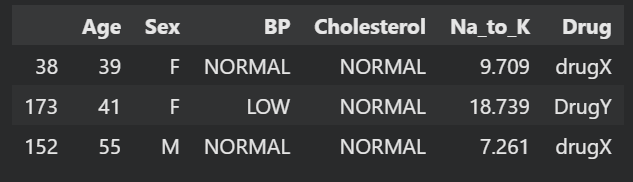
Create a dependent variable and an independent variable. Then split them into training and testing sets. This will help you to evaluate the performance of your model.
from sklearn.model_selection import train_test_split

X = drug_df.drop("Drug", axis=1).values
y = drug_df.Drug.values

X_train, X_test, y_train, y_test = train_test_split(
    X, y, test_size=0.3, random_state=125
)We will build a processing pipeline using ColumnTransformer, which will convert categorical values into numbers, fill in missing values, and scale the numerical columns.
After that, we'll create a training pipeline that will take the transformed data and train a random forest classifier.
Finally, we'll train the model.
By using pipelines, we can ensure reproducibility, modularity, and clarity in our code.
from sklearn.compose import ColumnTransformer
from sklearn.ensemble import RandomForestClassifier
from sklearn.impute import SimpleImputer
from sklearn.pipeline import Pipeline
from sklearn.preprocessing import OrdinalEncoder, StandardScaler

cat_col = [1,2,3]
num_col = [0,4]

transform = ColumnTransformer(
    [
        ("encoder", OrdinalEncoder(), cat_col),
        ("num_imputer", SimpleImputer(strategy="median"), num_col),
        ("num_scaler", StandardScaler(), num_col),
    ]
)
pipe = Pipeline(
    steps=[
        ("preprocessing", transform),
        ("model", RandomForestClassifier(n_estimators=100, random_state=125)),
    ]
)
pipe.fit(X_train, y_train)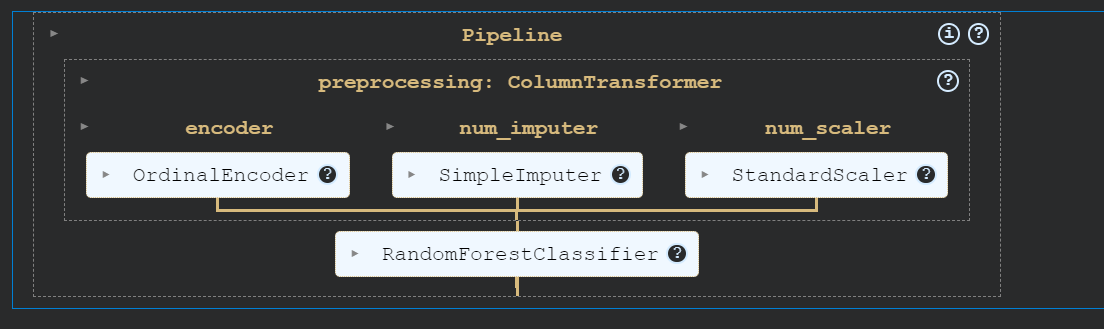
Evaluate the performance of the model by calculating both the accuracy and F1 score.
from sklearn.metrics import accuracy_score, f1_score

predictions = pipe.predict(X_test)
accuracy = accuracy_score(y_test, predictions)
f1 = f1_score(y_test, predictions, average="macro")

print("Accuracy:", str(round(accuracy, 2) * 100) + "%", "F1:", round(f1, 2))
Our model has performed exceptionally well.
Accuracy: 95.0% F1: 0.91Create the metrics file and save it in the Results folder.
with open("Results/metrics.txt", "w") as outfile:
    outfile.write(f"\nAccuracy = {accuracy.round(2)}, F1 Score = {f1.round(2)}.")
We will then create the confusion matrix and save the image file into the Results folder.
import matplotlib.pyplot as plt
from sklearn.metrics import ConfusionMatrixDisplay, confusion_matrix

cm = confusion_matrix(y_test, predictions, labels=pipe.classes_)
disp = ConfusionMatrixDisplay(confusion_matrix=cm, display_labels=pipe.classes_)
disp.plot()
plt.savefig("Results/model_results.png", dpi=120)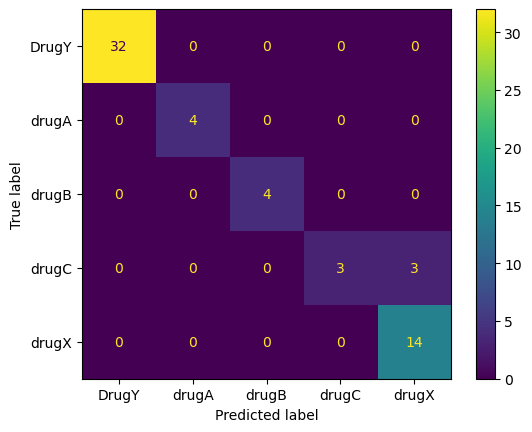
We will now save our model using the skops Python package. This will help us save both the scikit-learn pipeline and model.
import skops.io as sio

sio.dump(pipe, "Model/drug_pipeline.skops")
You can just load the entire pipeline, and it will work out of the box without processing your data or making edits to the code.
sio.load("Model/drug_pipeline.skops", trusted=True)
Copy and paste the entire code into the 'train.py' file. This will be the standardized training script that will run in CI workflow whenever there is a change in the data or code.
Before starting your MLOps engineering career, read the MLOps Roadmap: A Complete Career Guide.
In this section, we will cover CML, Makefile, and setting up GitHub Action workflows to automate the training, evaluation, and versioning of our project.
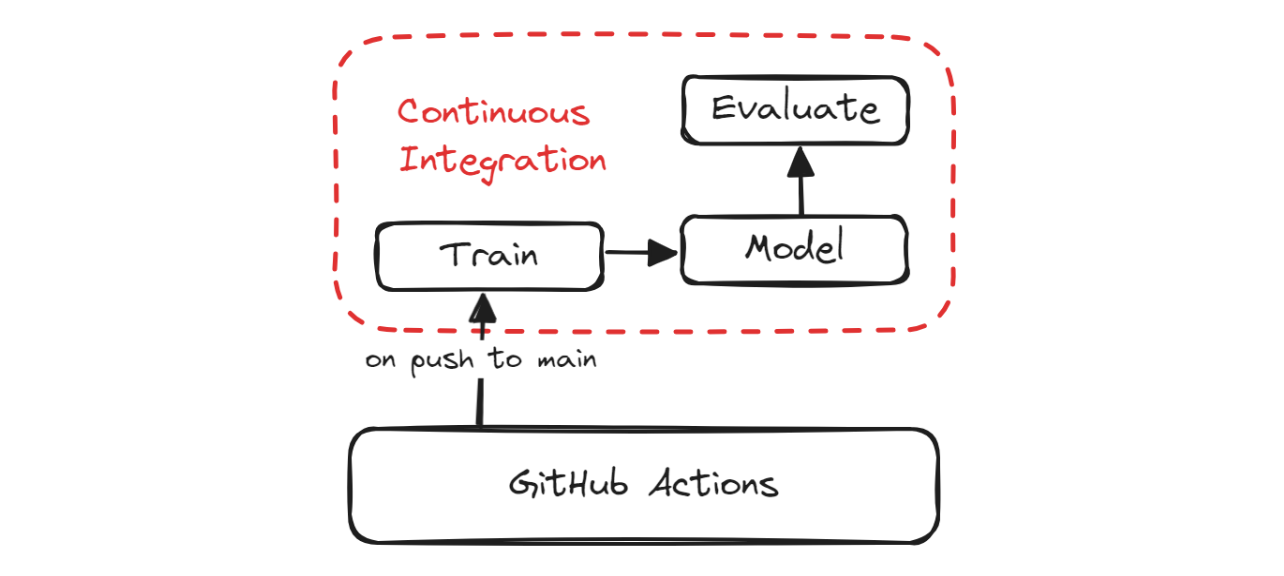
CI Pipeline
Continuous Machine Learning (CML) is an open-source library that allows you to implement continuous integration within your machine learning projects. We will be using the "iterative/setup-cml" GitHub Action that uses CML functions in the workflow to automate the generation of the model evaluation report.
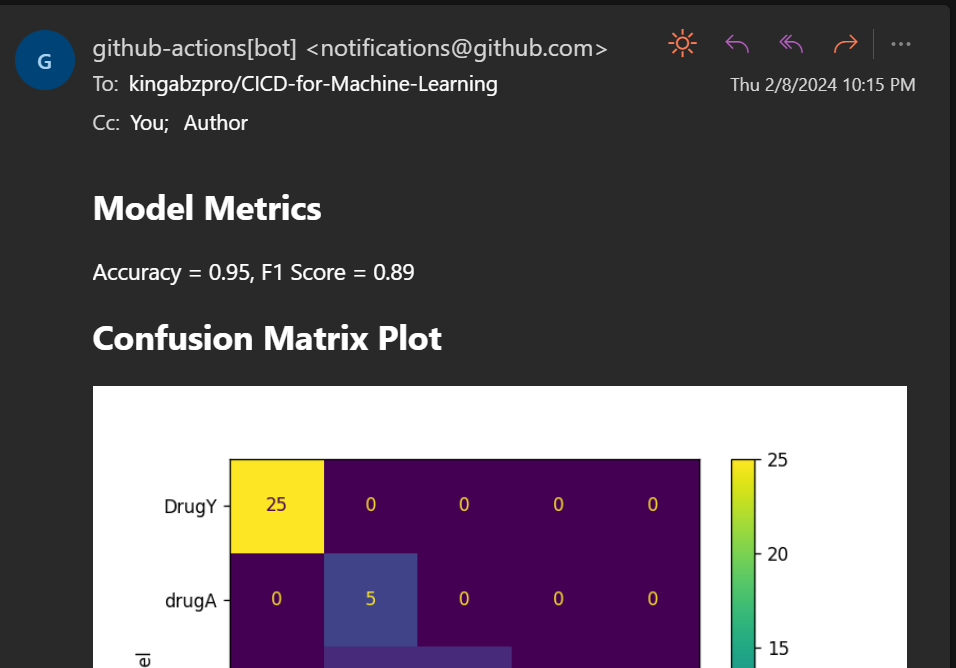
What does this mean? Whenever you push changes to GitHub, it will generate a report under the commit and send you an email with performance metrics and a confusion matrix.
A Makefile is a file that consists of a set of instructions used by make command to automate various tasks, such as compiling code, running tests, setting up environments, preprocessing data, training and evaluating models, and deploying models.
We can use make commands to run multiple scripts to make the CI workflow file clean and simple. The Makefile contains the name of the set of commands and the script for running those commands.
Here is our Makefile:
install:
pip install --upgrade pip &&\
pip install -r requirements.txt
format:
black *.py
train:
python train.py
eval:
echo "## Model Metrics" > report.md
cat ./Results/metrics.txt >> report.md
echo '\n## Confusion Matrix Plot' >> report.md
echo '' >> report.md
cml comment create report.mdWe have commands to install Python packages (install), format code (format), train scripts (train), and generate CML reports (eval).
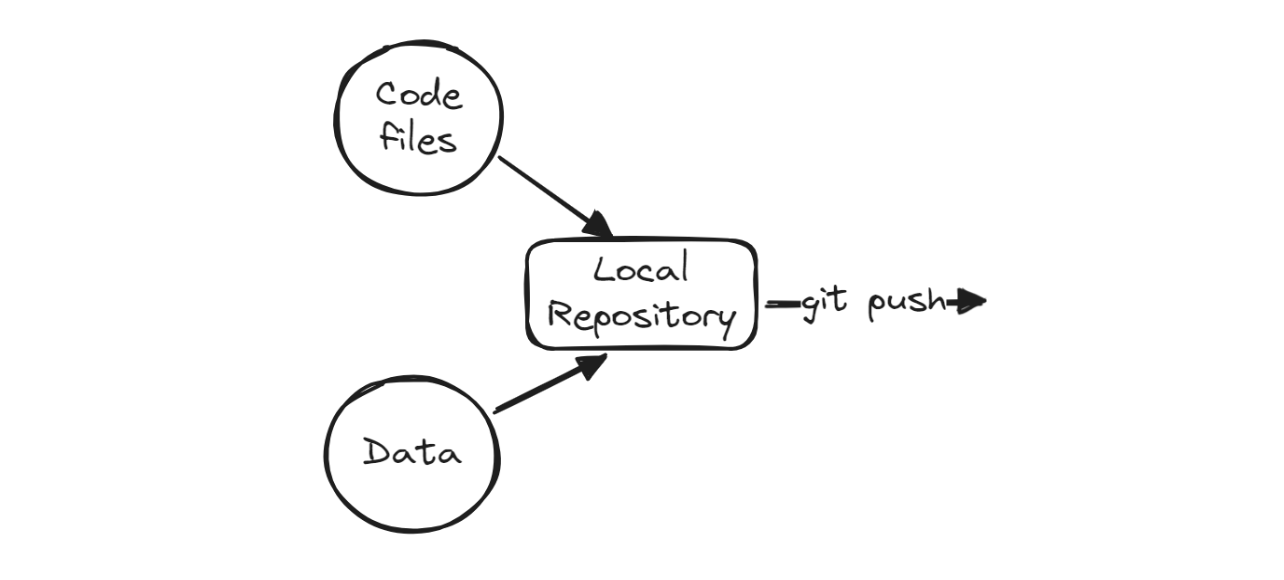
After that, we will add the changes, create a commit, and push the changes to the GitHub remote server.
git commit -am "new changes"
git push origin mainTo automate training and evaluation, we need to create a GitHub action workflow. To do this, navigate to the “Actions” tab on our repository kingabzpro/CICD-for-Machine-Learning and click on the blue text “set up a workflow yourself.”
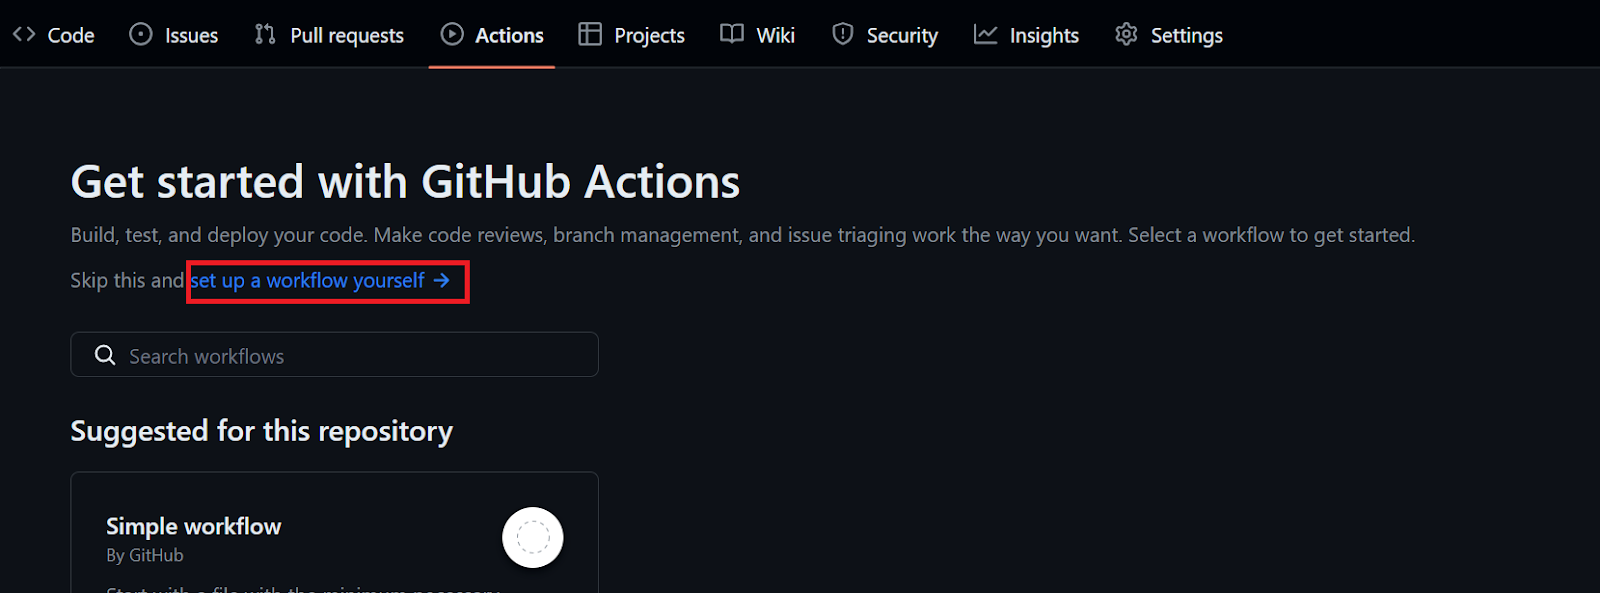
Rename the .yml file with “ci” and start adding the GitHub action command.
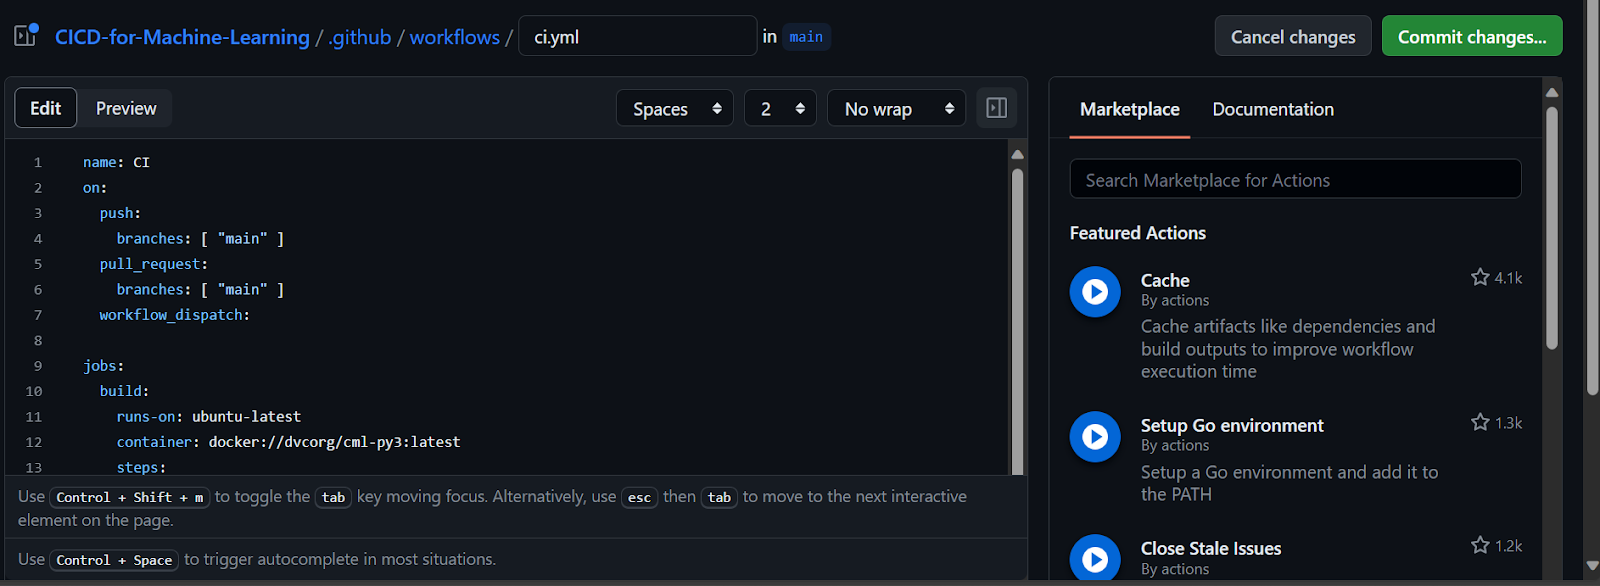
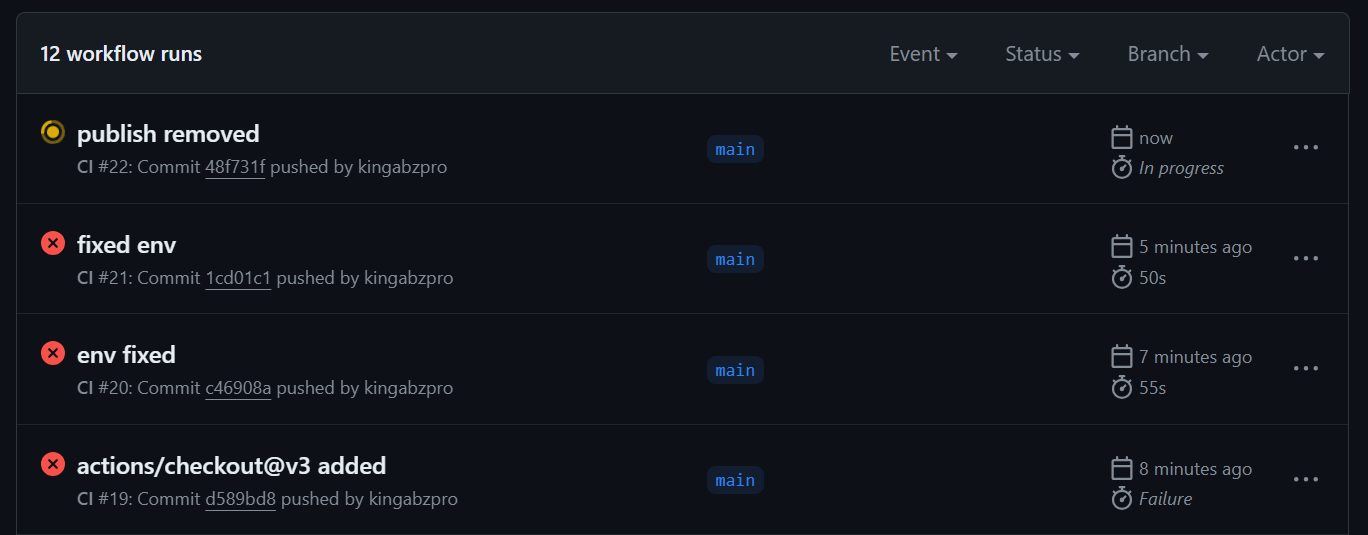
You will encounter failures while figuring out errors and syntax, which is why it's important to read the Workflow syntax for GitHub Actions before jumping into GitHub action.
We have successfully fixed all the errors and issues with the workflow, and we now have the final version of the `ci.yml` file that runs smoothly.
As you can see, the workflow will first set up the environment and load the necessary actions. Then, we run each step one by one using the make command, which invokes various Python and Bash scripts in the backend.
However, there are two important things to keep in mind when working with CML actions. Firstly, we need to set the write permission at the start. Secondly, provide a GitHub token to a CML job, which we can access using the secrets.
name: Continuous Integration
on:
  push:
    branches: [ "main" ]
  pull_request:
    branches: [ "main" ]
  workflow_dispatch:

permissions: write-all
jobs:
  build:
    runs-on: ubuntu-latest
    steps:
      - uses: actions/checkout@v3
      - uses: iterative/setup-cml@v2
      - name: Install Packages
        run: make install
      - name: Format
        run: make format
      - name: Train
        run: make train
      - name: Evaluation
        env:
          REPO_TOKEN: ${{ secrets.GITHUB_TOKEN }}
        run: make eval
The metrics and results show under the commit message.
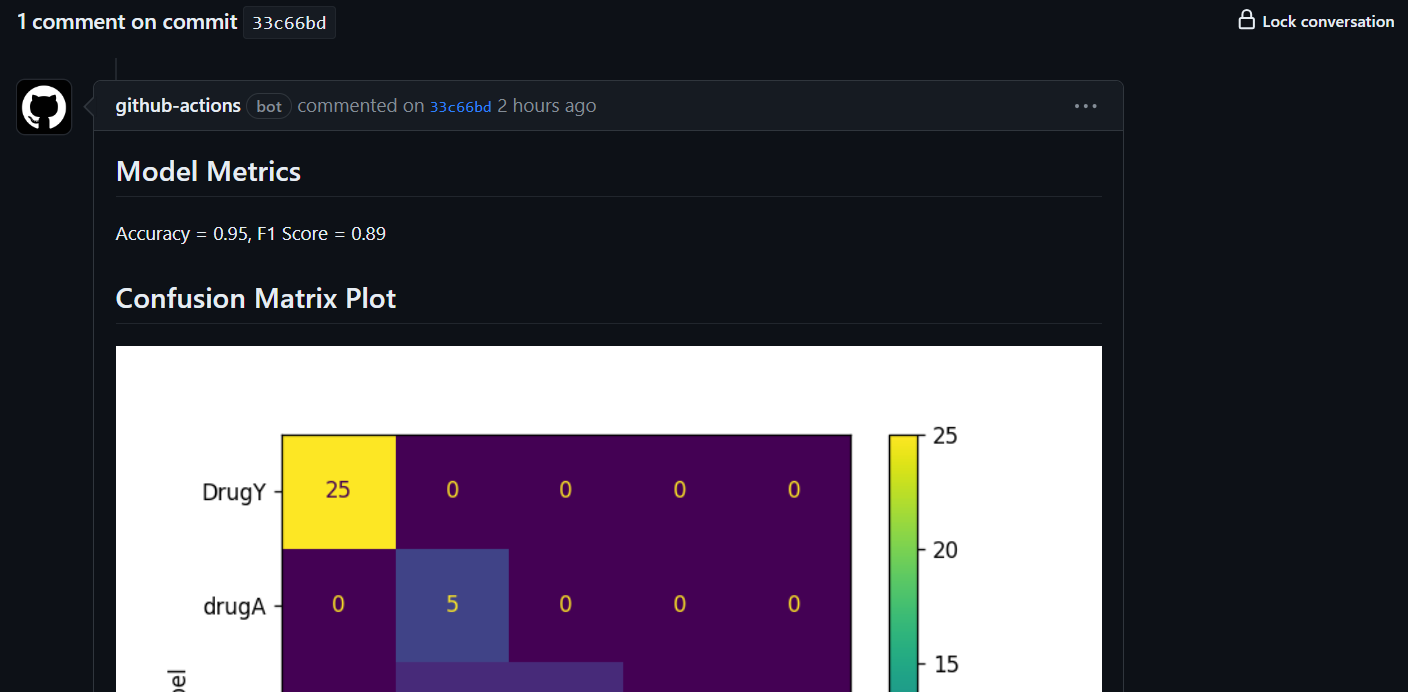
It will also send you the email with the results.
We are generating the evaluation report, but we are not versioning the model and results. To save the changes, we'll create a new branch named "update" and push the updated model and results to it.
Create the "update" branch by clicking the main branch button, typing in "update" for the branch name, and then selecting "create branch update from main".

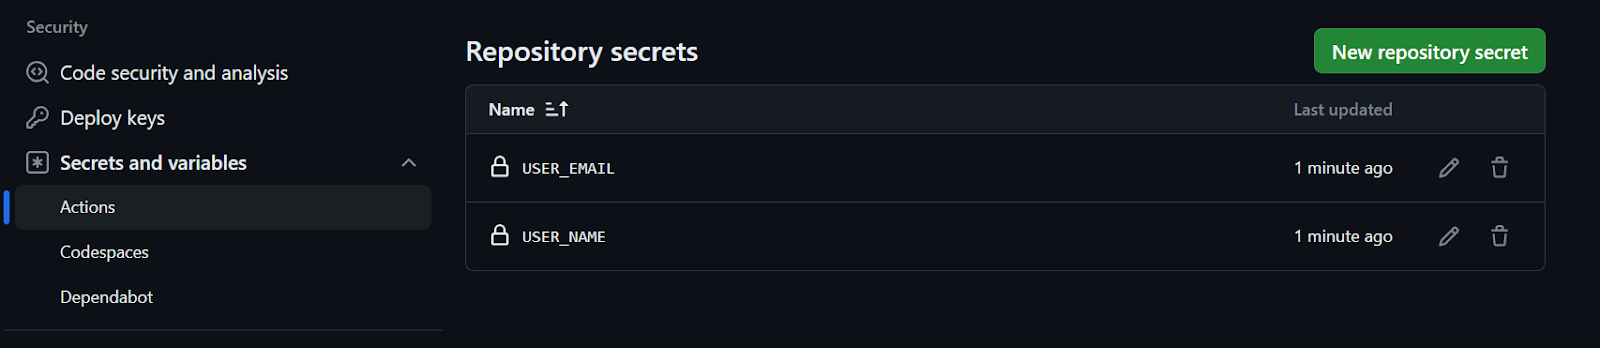
To commit and push changes using the Git command, we need to provide a username and email. You can add them directly, but using GitHub secrets is a better option. Follow these steps:
That's it!
To automate saving the changes to the new branch, we have to update the Makefile and ci.yml.
Makefile:
We are configuring the username and email, committing the changes, and saving them to the update branch.
update-branch:
	git config --global user.name $(USER_NAME)
	git config --global user.email $(USER_EMAIL)
	git commit -am "Update with new results"
	git push --force origin HEAD:update
ci.yml:
Makefile is using an environment variable to run the script. For that, we have to first extract the environment variable value from the secrets, then set the environment variable at the end of the make command.
    - name: Update Branch
        env:
          NAME: ${{ secrets.USER_NAME }}
          EMAIL: ${{ secrets.USER_EMAIL }}
        run: make update-branch USER_NAME=$NAME USER_EMAIL=$EMAIL
Once you have updated files and pushed the changes to the main branch, you will then be able to see the magic happening in real-time. An analytical report will be generated, along with an updated model that can be deployed to Hugging Face in the continuous deployment part.
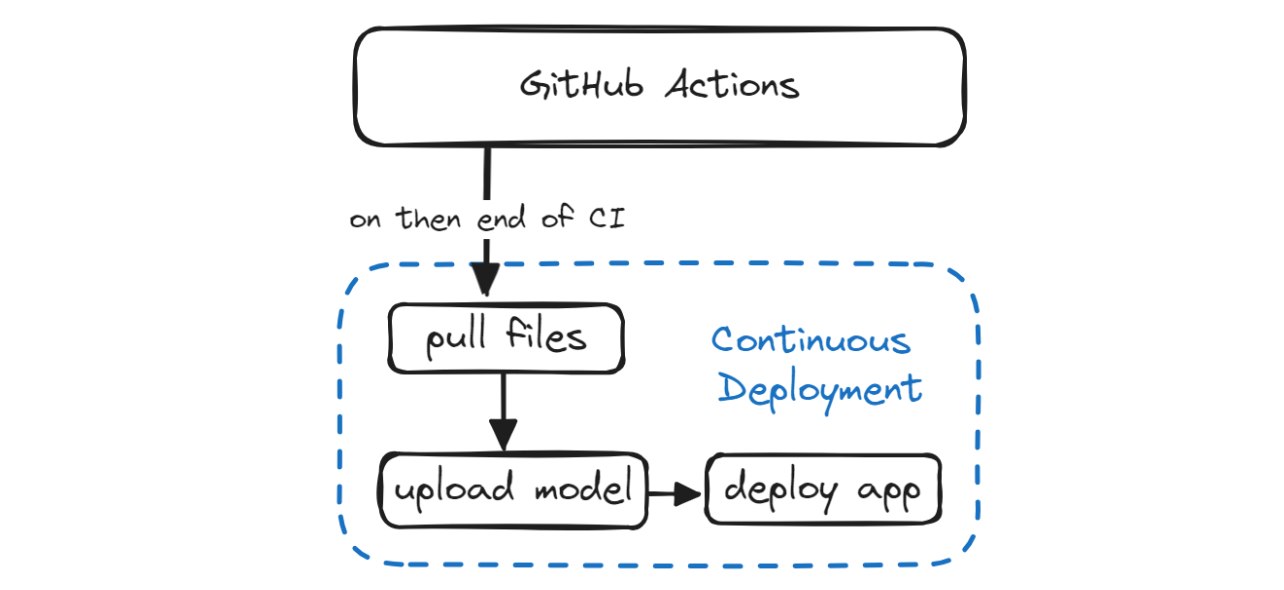
In the Continuous Deployment section, we will discover how to automate the process of deploying both the model and the application. This involves pulling the updated model and application file from the `update` branch, logging in to Hugging Face CLI using a token, pushing the model and application files, and finally deploying the application.
In order to deploy our model and access it, we need to create a Gradio app. This app will include:
Interface function and launch it.import gradio as gr
import skops.io as sio
pipe = sio.load("./Model/drug_pipeline.skops", trusted=True)
def predict_drug(age, sex, blood_pressure, cholesterol, na_to_k_ratio):
""Predict drugs based on patient features.
Args:
age (int): Age of patient
sex (str): Sex of patient
blood_pressure (str): Blood pressure level
cholesterol (str): Cholesterol level
na_to_k_ratio (float): Ratio of sodium to potassium in blood
Returns:
str: Predicted drug label
"""
features = [age, sex, blood_pressure, cholesterol, na_to_k_ratio]
predicted_drug = pipe.predict([features])[0]
label = f"Predicted Drug: {predicted_drug}"
return label
inputs = [
gr.Slider(15, 74, step=1, label="Age"),
gr.Radio(["M", "F"], label="Sex"),
gr.Radio(["HIGH", "LOW", "NORMAL"], label="Blood Pressure"),
gr.Radio(["HIGH", "NORMAL"], label="Cholesterol"),
gr.Slider(6.2, 38.2, step=0.1, label="Na_to_K"),
]
outputs = [gr.Label(num_top_classes=5)]
examples = [
[30, "M", "HIGH", "NORMAL", 15.4],
[35, "F", "LOW", "NORMAL", 8],
[50, "M", "HIGH", "HIGH", 34],
]
title = "Drug Classification"
description = "Enter the details to correctly identify Drug type?"
article = "This app is a part of the Beginner's Guide to CI/CD for Machine Learning. It teaches how to automate training, evaluation, and deployment of models to Hugging Face using GitHub Actions."
gr.Interface(
fn=predict_drug,
inputs=inputs,
outputs=outputs,
examples=examples,
title=title,
description=description,
article=article,
theme=gr.themes.Soft(),
).launch()
Open the terminal and run the app locally to fix issues before pushing changes to the remote repository.
python ./App/drug_app.py Running on local URL: http://127.0.0.1:7860
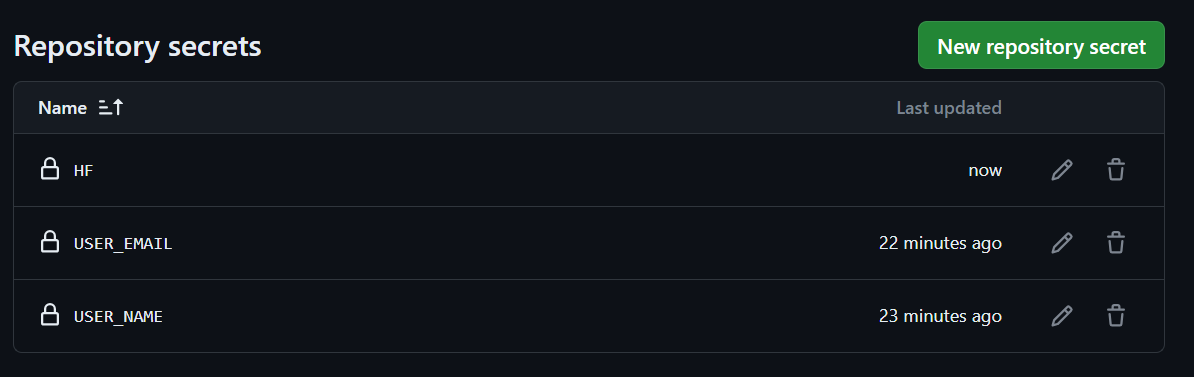
To create a public link, set `share=True` in `launch()`.We will now generate the Hugging Face token and provide it to our Makefile script. However, we must ensure that the token is kept confidential and not leaked to anyone. To achieve this, we will use the GitHub secrets.
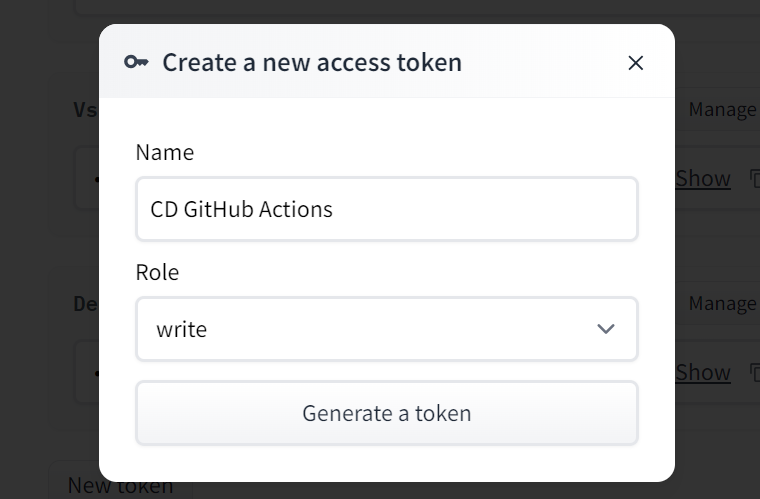
Firstly, click on your Hugging Face profile picture and select the settings option. Next, choose the "Access Tokens" option and click the "New Token" button to generate the token. While generating the token, ensure that it has write permission.
Copy the token and create a Repository secret, just like we did with user names and email.
In this section, we will add three new commands to create files and create another GitHub workflow called "Continuous Deployment". This workflow will help automate the process of pulling and deploying files.
update branch and switch to update branch.deploy command will run the hf-login first and then push-hub next.hf-login:
git pull origin update
git switch update
pip install -U "huggingface_hub[cli]"
huggingface-cli login --token $(HF) --add-to-git-credential
push-hub:
huggingface-cli upload kingabzpro/Drug-Classification ./App --repo-type=space --commit-message="Sync App files"
huggingface-cli upload kingabzpro/Drug-Classification ./Model /Model --repo-type=space --commit-message="Sync Model"
huggingface-cli upload kingabzpro/Drug-Classification ./Results /Metrics --repo-type=space --commit-message="Sync Model"
deploy: hf-login push-hubOur application will have access to an updated model, application file, and results, allowing us to track changes in the Hugging Face space.
To make our workflow truly CI/CD, we need to create another file named cd.yml similar to our ci.yml file. Once the CI pipeline is complete, it will initiate the cd.yml workflow using the on argument with the workflow_run parameter.
This workflow will build the environment and execute the make deploy command using the Hugging Face token to deploy the latest changes to the Hugging Face Hub.
name: Continuous Deployment
on:
  workflow_run:
    workflows: ["Continuous Integration"]
    types:
      - completed

  workflow_dispatch:

jobs:
  build:
    runs-on: ubuntu-latest
    steps:
      - uses: actions/checkout@v3

      - name: Deployment To Hugging Face
        env:
          HF: ${{ secrets.HF }}
        run: make deploy HF=$HF
When we push the changes to the main branch, it will start with the CI workflow.
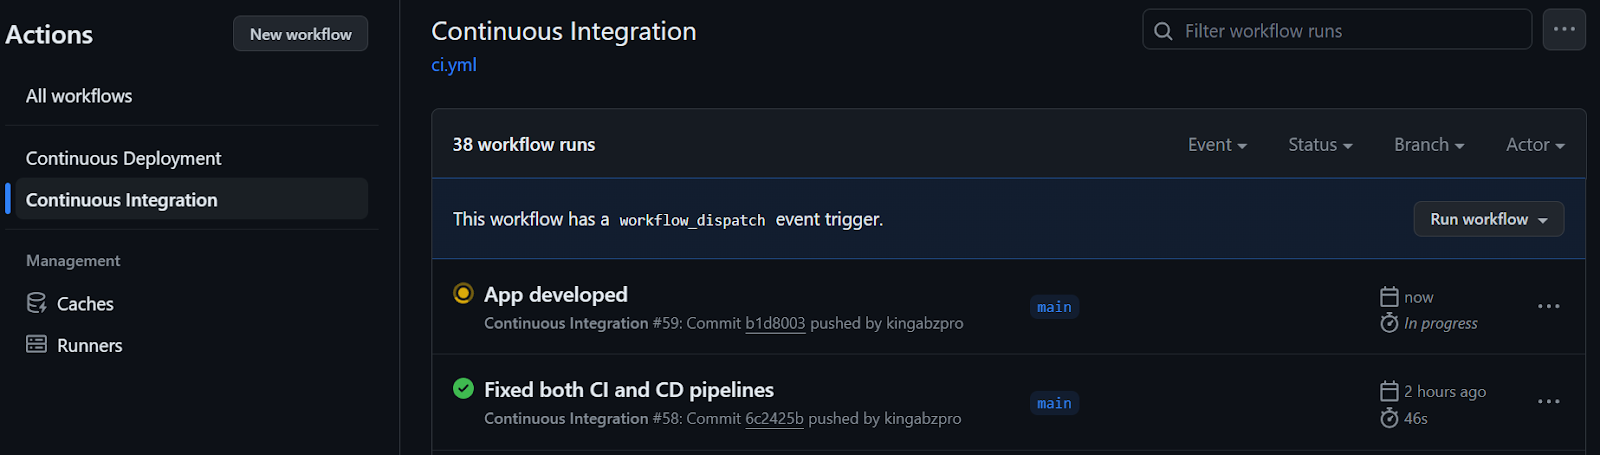
After the CI workflow is completed, the CD workflow will begin, as shown below.
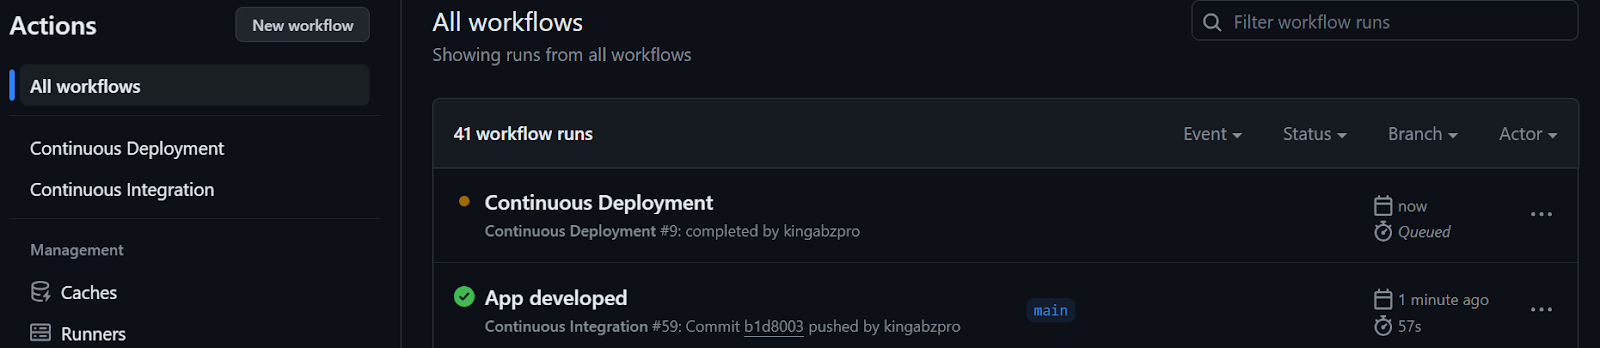
We can observe the live logs of each function by selecting the run option in the workflow build. Our files have been successfully uploaded to the Hugging Face server.
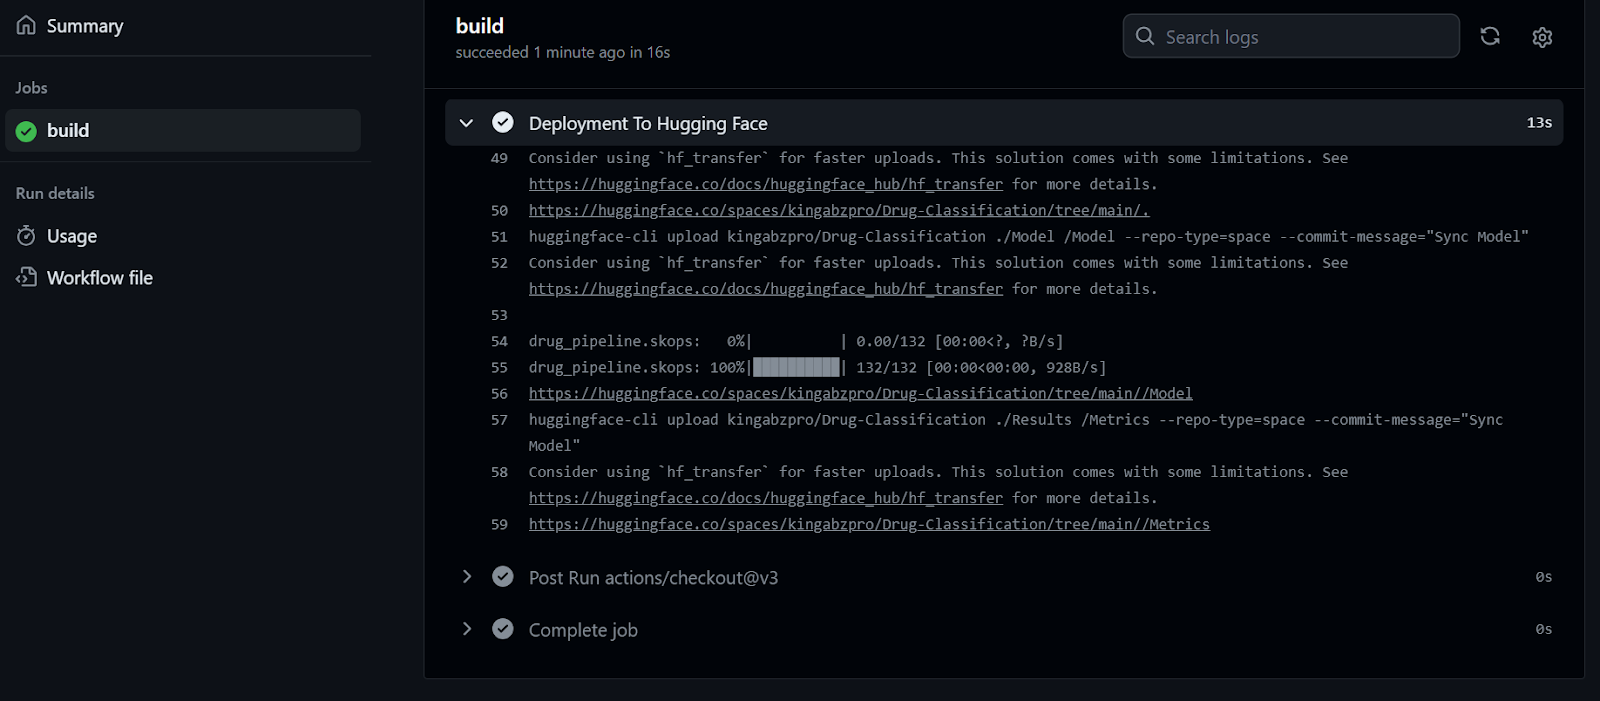
After receiving the updated file, the Hugging Face Space will begin building the environment, and the app will start running within a few seconds.
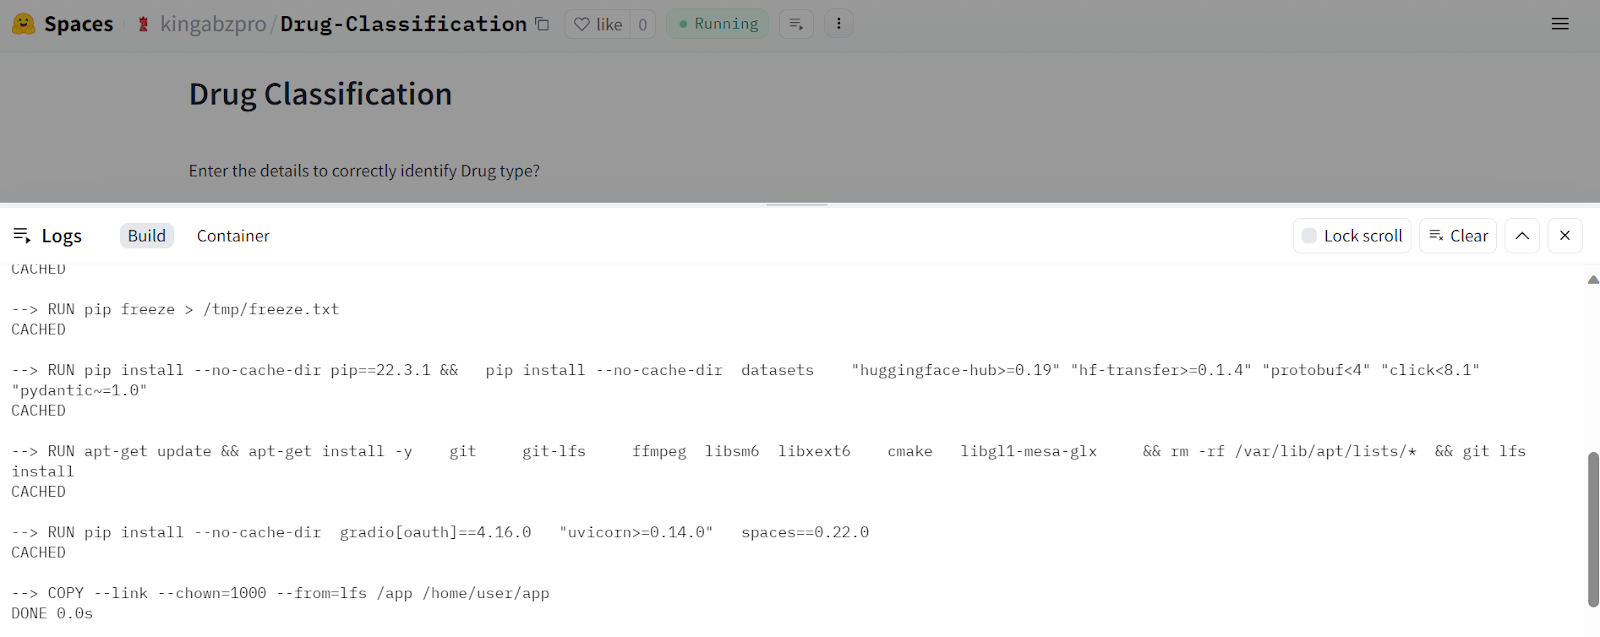
Our Drug Classification application works seamlessly and has a beautiful interface.
Try inputting different data to experience the model's performance.
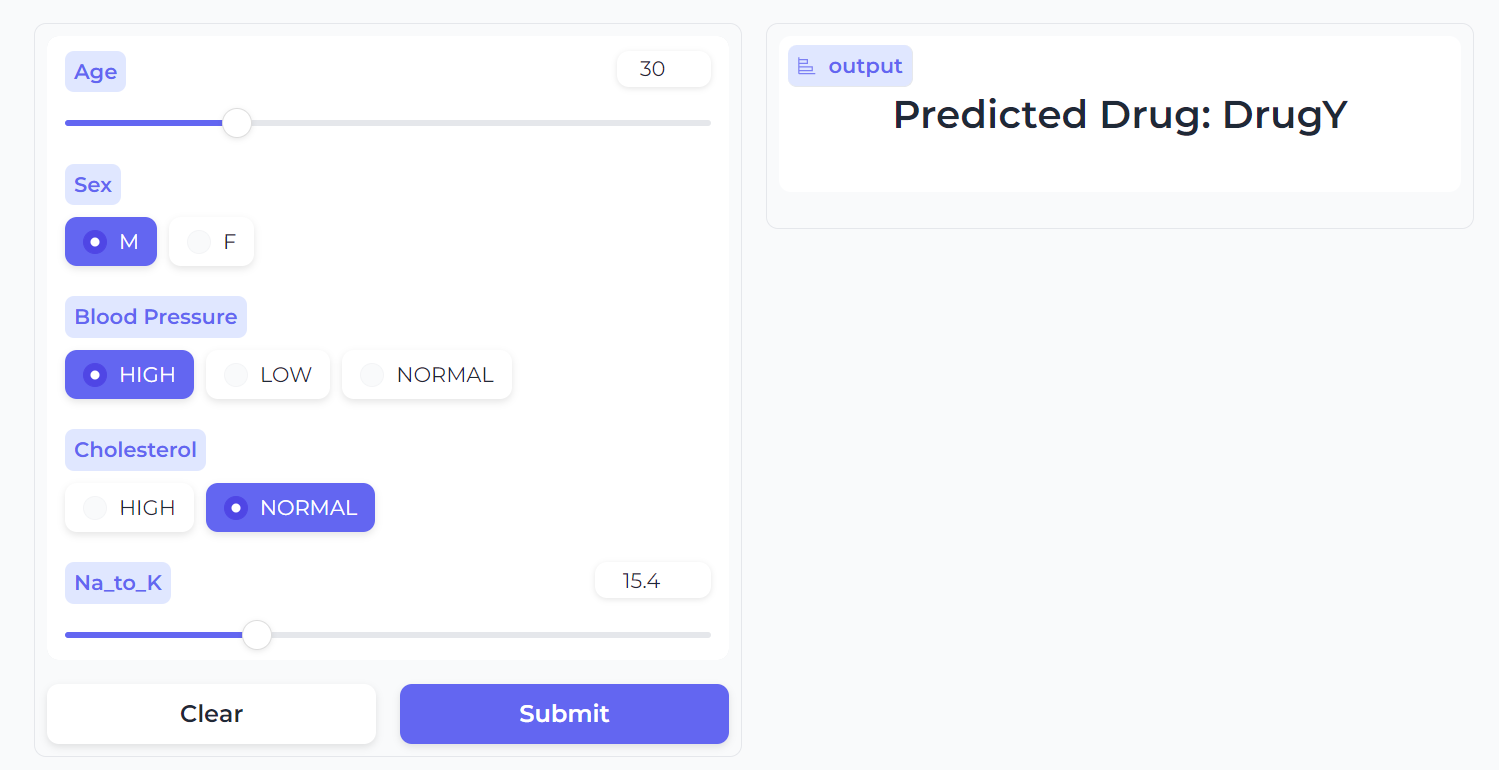
Image Source
This guide outlines how we have automated the training, evaluation, versioning, and deployment processes, ensuring that any changes in data or algorithms will automatically trigger this process without any errors. This approach helps us build fast, scalable, and production-ready applications.
Please note that we use multiple MLOps tools in real-world projects to orchestrate, version, deploy, and monitor machine learning applications. To learn more about these tools, check out the Top MLOps Tools You Need to Know, which outlines popular technologies used by big tech companies to streamline their machine learning applications.
To optimize your CI/CD pipeline, it is crucial to learn tools like Docker, Kubernetes, Azure Cloud, and other MLOps technologies. Follow a Machine Learning, Pipelines, Deployment, and MLOps tutorial to gain familiarity with industry-standard practices and work on advanced projects.
Start Your Machine Learning Journey Today!
Course
Course
Course
Tutorial
Moez Ali
Tutorial
Moez Ali
Tutorial
Abid Ali Awan
Tutorial
Moez Ali
Tutorial
Abid Ali Awan
code-along
Weston Bassler