courses
OpenAI API 활용하기
3
141.6K
Jupyter Notebook을 실행하고 새 셀을 만든 뒤 필요한 임포트와 프로젝트 구성을 추가하세요.
import json
import os

import requests
from agents import Agent, AsyncOpenAI, ModelSettings, OpenAIChatCompletionsModel, RunConfig, Runner, function_tool, set_tracing_disabled
from IPython.display import Markdown, display
from pypdf import PdfReader
이제 모델 이름, API 엔드포인트, 에이전트 최대 턴 수, 이력서 경로, 선호 직무를 정의합니다.
KIMI_MODEL = "kimi-k2.6"
KIMI_BASE_URL = "https://api.moonshot.ai/v1"
OLOSTEP_SEARCH_URL = "https://api.olostep.com/v1/searches"
OLOSTEP_SCRAPE_URL = "https://api.olostep.com/v1/scrapes"
MAX_AGENT_TURNS = 25


cv_path = "abid-resume.pdf"
preferences = """
Remote data science, AI writer, or technical writer roles in AI, machine learning, data science, or cloud.
Prefer technical content, tutorials, developer education, research writing, and AI product storytelling.
""".strip()


set_tracing_disabled(True)KIMI_MODEL과 KIMI_BASE_URL 값은 Moonshot AI의 OpenAI 호환 API 엔드포인트를 통해 Kimi K2.6를 사용하도록 앱에 지시합니다. Olostep URL은 실시간 채용 검색과 페이지 스크레이핑에 사용됩니다.
cv_path 변수는 지원자의 이력서 PDF를 가리킵니다. PDF가 같은 프로젝트 폴더에 저장되어 있는지 확인하거나, 다른 위치라면 경로를 업데이트하세요.
preferences 변수는 에이전트에게 어떤 유형의 채용 공고를 검색할지 알려줍니다. 대상 직무, 산업, 지역, 경력 수준, 선호 근무 형태에 따라 업데이트할 수 있습니다.
또한 set_tracing_disabled(True)로 트레이싱을 비활성화합니다. 트레이싱은 기본적으로 활성화된 OpenAI Agents SDK 기능인데, 이 프로젝트는 OpenAI 호환 엔드포인트를 통해 Kimi를 사용하므로 트레이싱을 끄면 로컬 설정이 단순해지고 타사 모델 제공업체 사용 시 발생할 수 있는 트레이싱 관련 문제를 피할 수 있습니다.
이제 이전에 환경 변수로 저장한 API 키를 사용해 Kimi 클라이언트를 설정합니다.
kimi_client = AsyncOpenAI(
   api_key=os.environ["MOONSHOT_API_KEY"],
   base_url=KIMI_BASE_URL,
)
이 코드는 Kimi용 API 클라이언트를 생성합니다. api_key는 MOONSHOT_API_KEY에서 불러오고, base_url은 Moonshot AI의 OpenAI 호환 엔드포인트를 가리킵니다.
다음으로 OpenAI Agents SDK 내부에서 사용될 수 있도록 Kimi 모델을 래핑합니다.
kimi_model = OpenAIChatCompletionsModel(
   model=KIMI_MODEL,
   openai_client=kimi_client,
)
이제 모델 설정을 정의합니다.
model_settings = ModelSettings(
   tool_choice="auto",
   parallel_tool_calls=True,
   extra_body={"thinking": {"type": "disabled"}},
)tool_choice="auto"는 도구 호출 시점을 에이전트가 스스로 결정하도록 합니다. parallel_tool_calls=True는 필요할 때 여러 도구 호출을 동시에 수행하도록 허용합니다.
또한 extra_body={"thinking": {"type": "disabled"}}로 Kimi의 사고 모드를 비활성화합니다. 이렇게 하면 출력이 더 깔끔해지고 구조화된 적합도 보고서에 더 적합해집니다.
마지막으로 실행 구성을 생성합니다.
run_config = RunConfig(
   workflow_name="JobFit AI Kimi Search",
   tracing_disabled=True,
)workflow_name은 이 실행에 명확한 레이블을 부여합니다. 또한 이 프로젝트는 OpenAI의 트레이싱 백엔드가 아니라 OpenAI 호환 엔드포인트를 통해 Kimi를 사용하므로 여기서도 트레이싱을 비활성화합니다.
이제 PdfReader를 사용해 이력서를 불러오고 각 페이지에서 텍스트를 추출합니다.
reader = PdfReader(cv_path)
cv_text = "\n".join(page.extract_text() or "" for page in reader.pages)[:12000]
print(f"Loaded {len(cv_text):,} characters from {cv_path}")
이 코드는 cv_path에 지정된 PDF 파일을 읽고, 모든 페이지에서 텍스트를 추출한 뒤 하나의 문자열로 합칩니다.
[:12000] 제한은 에이전트 프롬프트에 무리 없이 들어가도록 이력서 텍스트를 적절히 줄이면서도, 지원자의 경력, 기술, 선호에 대한 충분한 컨텍스트를 제공합니다.
출력은 이력서의 이름과 길이에 따라 다음과 비슷하게 표시됩니다.
Loaded 2,946 characters from abid-resume.pdf이는 이력서가 성공적으로 로드되었고 PDF에서 추출된 문자 수를 보여줍니다.
다음으로 에이전트가 어떻게 검색하고, 도구를 사용하며, 최종 보고서를 포맷해야 하는지 제어하는 지시문을 정의합니다.
AGENT_INSTRUCTIONS = """
You are JobFit AI, a focused job-search agent.

Tool plan:
- Call search_jobs exactly once with limit 8.
- Read at most 3 direct job pages with read_job_page.
- After reading up to 3 pages, stop using tools and write the report.
- Search again only if the first search returns zero usable jobs.
- Avoid broad search pages, expired jobs, and LinkedIn unless no better source exists.

Report rules:
- Keep the report simple, clear, and practical.
- Use short bullets.
- Do not use em dashes.
- Do not use contractions.
- Do not add text before or after the report.
- End after the final Job Notes entry.
- Include at least 5 ranked jobs if the search results contain at least 5 usable jobs.
- If only 3 pages were scraped, use backup jobs from search results when they look usable.
- Every job must include a clickable Markdown link.
- Every job must have one apply decision: Apply, Maybe, or Do not apply.

Use exactly this Markdown structure:

# JobFit AI Report

## Best Match

- **Role:** <job title>
- **Company:** <company>
- **Apply decision:** Apply / Maybe / Do not apply
- **Fit score:** <score>/100
- **Link:** [Apply here](<job url>)

**Why this is the best match:**

- <specific reason>
- <specific reason>
- <specific reason>

## Ranked Jobs

| Rank | Role | Company | Apply? | Fit | Link |
| --- | --- | --- | --- | --- | --- |
| 1 | <role> | <company> | Apply / Maybe / Do not apply | <score>/100 | [Apply here](<url>) |

## Job Notes

### 1. <Role> at <Company>

- **Apply decision:** Apply / Maybe / Do not apply
- **Fit score:** <score>/100
- **Link:** [Apply here](<job url>)

**Why it fits:**

- <bullet>
- <bullet>

**Concerns:**

- <bullet>
- <bullet>

**Application angle:**

- <how the person should position their CV/application>
""".strip()
이 지시문은 에이전트가 한 번의 채용 검색, 최대 세 개의 공고 페이지 읽기, 고정된 Markdown 보고서 구조에 집중하도록 만듭니다.
또한 보고서 규칙을 통해 짧은 불릿, 클릭 가능한 링크, 적합도 점수, 각 역할에 대한 명확한 지원 결정이 요구되어 출력물을 더 쉽게 훑어볼 수 있습니다.
에이전트 지시문을 정의한 후, 각 실행 시 에이전트에 전달할 프롬프트 템플릿을 만듭니다.
RUN_PROMPT_TEMPLATE = """
Find current job postings for this candidate and rank them by fit.

Keep the run simple:
- one search
- up to three page reads
- final report

The final report must follow AGENT_INSTRUCTIONS exactly.
Use simple wording. Do not use em dashes. Do not use contractions.

Candidate CV:
{cv_text}

Preferences:
{preferences}
""".strip()
이 프롬프트는 실행 시 지원자의 이력서 텍스트와 선호 직무를 결합합니다.
cv_text 자리표시는 추출된 이력서 내용으로 채워지고, preferences 자리표시는 앞서 정의한 목표 역할 선호도로 채워집니다. 두 요소가 결합되어 에이전트가 관련 공고를 검색하고 적합도에 따라 순위를 매길 충분한 컨텍스트를 제공합니다.
에이전트 지시문과 런타임 프롬프트가 준비되었으니, Olostep을 사용해 에이전트가 웹을 검색하고 공고 페이지를 읽을 수 있게 하는 두 가지 도구를 추가합니다.
첫 번째 도구는 채용 공고를 웹에서 검색해 간결한 결과 목록을 반환합니다.
@function_tool
def search_jobs(query: str, limit: int = 8) -> str:
    """Search the web for job listings and return compact JSON results."""
    response = requests.post(
        OLOSTEP_SEARCH_URL,
        headers={"Authorization": f"Bearer {os.environ['OLOSTEP_API_KEY']}", "Content-Type": "application/json"},
        json={"query": query},
        timeout=60,
    )
    response.raise_for_status()
    links = response.json().get("result", {}).get("links", [])[:limit]
    results = [
        {"title": item.get("title", "Untitled"), "url": item.get("url"), "description": item.get("description", "")}
        for item in links
        if isinstance(item, dict) and item.get("url")
    ]
    return json.dumps(results, ensure_ascii=False)
@function_tool 데코레이터는 이 파이썬 함수를 에이전트가 호출 가능한 도구로 제공합니다.
에이전트가 채용 공고가 필요할 때 search_jobs를 검색 쿼리와 함께 호출합니다. 함수는 Olostep 검색 엔드포인트로 쿼리를 전송하고 상위 결과를 수집해 JSON으로 반환합니다.
각 결과에는 다음이 포함됩니다.
두 번째 도구는 특정 공고 페이지를 열어 읽을 수 있게 해줍니다.
@function_tool
def read_job_page(url: str) -> str:
    """Scrape one job listing URL and return markdown text."""
    response = requests.post(
        OLOSTEP_SCRAPE_URL,
        headers={"Authorization": f"Bearer {os.environ['OLOSTEP_API_KEY']}", "Content-Type": "application/json"},
        json={"url_to_scrape": url, "formats": ["markdown"]},
        timeout=120,
    )
    response.raise_for_status()
    markdown = response.json().get("result", {}).get("markdown_content") or ""
    return markdown[:8000]
이 함수는 공고 URL을 Olostep 스크레이프 엔드포인트로 전송하고 페이지 내용을 Markdown 형식으로 반환합니다.
[:8000] 제한은 에이전트가 처리하기 적합한 길이로 유지하면서도 직무 내용, 요구 사항, 회사 정보 등 유용한 세부사항을 충분히 담습니다.
이제 앞서 정의한 Kimi 모델, 모델 설정, Olostep 도구, 에이전트 지시문을 연결해 에이전트를 생성합니다.
agent = Agent(
   name="JobFit AI",
   model=kimi_model,
   model_settings=model_settings,
   tools=[search_jobs, read_job_page],
   instructions=AGENT_INSTRUCTIONS,
)
Agent 객체는 이 워크플로우의 주요 컨트롤러입니다.
에이전트는 다음을 사용합니다.
kimi_model — 추론 모델model_settings — 도구 사용과 출력 동작 제어search_jobs — 실시간 채용 공고 검색read_job_page — 선택된 공고 페이지 스크레이핑AGENT_INSTRUCTIONS — 정확한 검색 및 보고 규칙 준수이제 에이전트는 채용 공고를 검색하고 지원자의 이력서와 비교해 구조화된 JobFit AI 보고서를 생성할 준비가 되었습니다.
추출한 이력서 텍스트와 앞서 정의한 선호 직무를 사용해 JobFit AI 에이전트를 실행합니다.
먼저 런타임 프롬프트를 포맷합니다.
prompt = RUN_PROMPT_TEMPLATE.format(cv_text=cv_text, preferences=preferences)이 코드는 프롬프트 템플릿을 지원자의 이력서와 목표 직무 선호도로 채웁니다.
다음으로 스트리밍 실행을 시작합니다.
print("Starting agent run")


result = Runner.run_streamed(
   agent,
   prompt,
   max_turns=MAX_AGENT_TURNS,
   run_config=run_config,
)
Runner.run_streamed() 메서드는 에이전트 워크플로우를 시작하고 이벤트를 실시간으로 스트리밍합니다. 이를 통해 에이전트가 도구를 호출하고, 도구 출력을 수신하고, 최종 메시지를 생성하는 시점을 쉽게 파악할 수 있습니다.
이제 스트리밍 루프를 추가합니다.
async for event in result.stream_events():
   if event.type == "agent_updated_stream_event":
       print(f"Agent: {event.new_agent.name}")
   elif event.type == "run_item_stream_event":
       item = event.item
       if event.name == "tool_called":
           raw = item.raw_item
           tool_name = raw.get("name") if isinstance(raw, dict) else getattr(raw, "name", "tool")
           arguments = raw.get("arguments") if isinstance(raw, dict) else getattr(raw, "arguments", "")
           arguments = str(arguments).replace(chr(10), " ")[:500]
           print(f"Tool call: {tool_name}")
           if arguments:
               print(f"Parameters: {arguments}")
       elif event.name == "tool_output":
           print(f"Tool output: {len(str(item.output)):,} chars")
       elif event.name == "message_output_created":
           print("Final message ready")
이 루프는 에이전트 실행 중 유용한 진행 상황을 출력합니다. 예를 들어 에이전트가 채용을 검색하거나 공고 페이지를 읽거나 보고서 생성을 마치는 시점을 보여줍니다.
마지막으로 최종 출력을 report 변수에 저장합니다.
report = result.final_output
globals()["report"] = report


print("Run complete")
print(f"Model responses: {len(result.raw_responses)}")
print(f"Run items: {len(result.new_items)}")
print(f"Final output: {len(str(report)):,} chars")
report 변수에는 최종 JobFit AI 보고서가 저장되며, 이를 표시하거나 저장하거나 Gradio 앱 내에서 사용할 수 있습니다.
출력은 대략 다음과 같습니다.
Starting agent run
Agent: JobFit AI
Tool call: search_jobs
Parameters: {"query":"remote data science writer technical writer AI machine learning content editor","limit":8}
Tool output: 2,445 chars
Tool call: read_job_page
Parameters: {"url":"https://www.indeed.com/q-data-science-writer-jobs.html"}
Tool output: 8,000 chars
Tool call: read_job_page
Parameters: {"url":"https://www.builtinnyc.com/jobs/remote/data-analytics/data-science"}
Tool output: 8,000 chars
Tool call: read_job_page
Parameters: {"url":"https://www.virtualvocations.com/jobs/q-data+scientist+remote+jobs/c-writing/d-336"}
Tool output: 5,075 chars
Final message ready
Run complete
Model responses: 5
Run items: 13
Final output: 5,931 chars
이 출력은 에이전트가 채용을 검색하고 선택된 페이지를 읽은 뒤 최종 보고서를 성공적으로 생성했음을 확인해 줍니다.
에이전트 실행이 끝나면 최종 보고서를 Markdown 형식으로 표시합니다.
display(Markdown(report))이렇게 하면 생성된 JobFit AI 보고서가 노트북에서 직접 렌더링되어 일반 텍스트보다 읽기 쉬워집니다.
보고서에는 최적 일치 직무, 순위표, 적합도 점수, 지원 결정, 우려 사항, 지원 전략이 포함됩니다.
노트북에서 워크플로우를 테스트한 후, 이를 간단한 Gradio 웹 앱으로 만들 수 있습니다. app.py 파일을 만든 다음 GitHub 프로젝트의 JobFit-AI/app.py 파일 코드를 로컬 파일에 복사해 붙여넣습니다.
앱을 실행합니다.
python app.py
그런 다음 표시된 로컬 URL(이 경우 http://127.0.0.1:7860/)을 브라우저에서 열어 로컬 앱에 접속합니다.
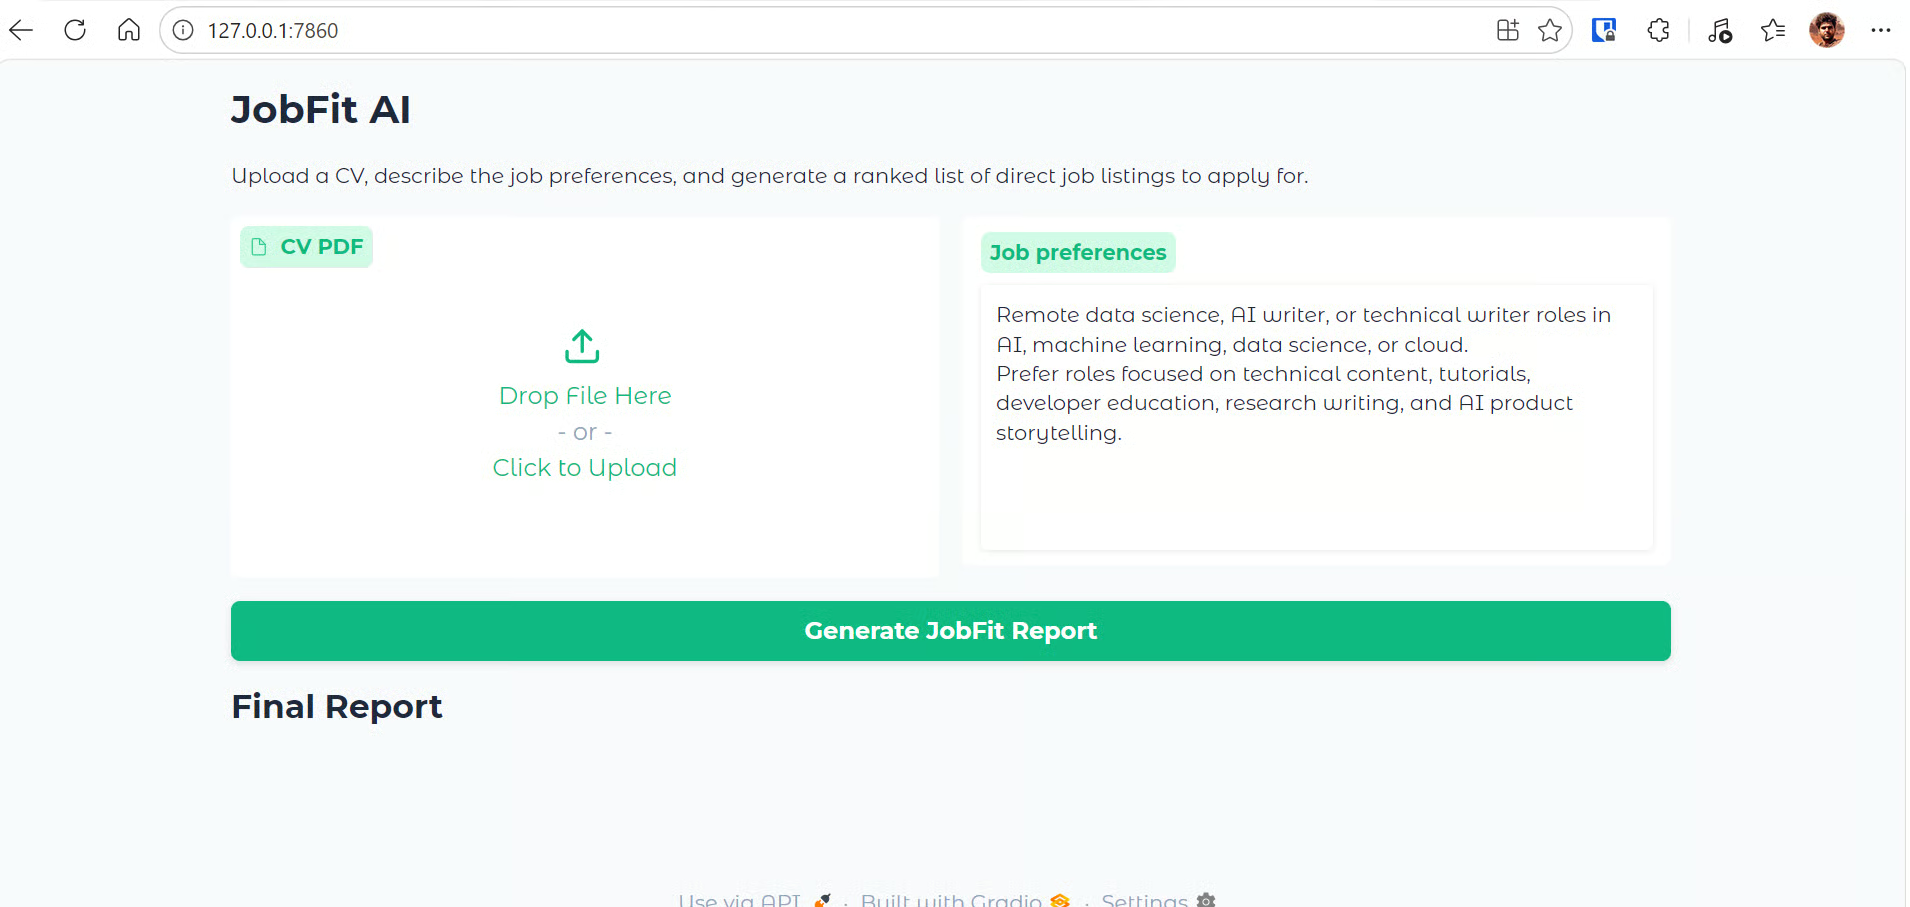
Gradio 앱은 채용 적합도 보고서를 생성하는 간단한 인터페이스를 제공합니다. 포함된 요소는 다음과 같습니다.
백그라운드에서는 앱이 업로드된 이력서를 읽고 텍스트를 추출한 다음, 이력서와 선호도를 JobFit AI 에이전트에 전달하여 Olostep으로 실시간 채용 공고를 검색합니다. 최대 세 개의 공고 페이지를 읽고, 순위가 매겨진 역할, 적합도 점수, 지원 결정, 우려 사항, 지원 전략을 담은 구조화된 Markdown 보고서를 반환합니다.
이제 CV 또는 이력서 PDF를 업로드하고 Generate JobFit Report를 클릭해 웹 앱을 테스트하세요.
이 예시에서는 약 3년의 경력을 담은 이력서를 업로드해, 앱이 지원자 프로필과 선호도를 바탕으로 관련 직무를 찾을 수 있는지 확인했습니다. 보고서는 1분 이내에 생성되었습니다.
앱이 실행되는 동안 진행 로그에는 다음과 같은 워크플로우 단계가 표시됩니다.
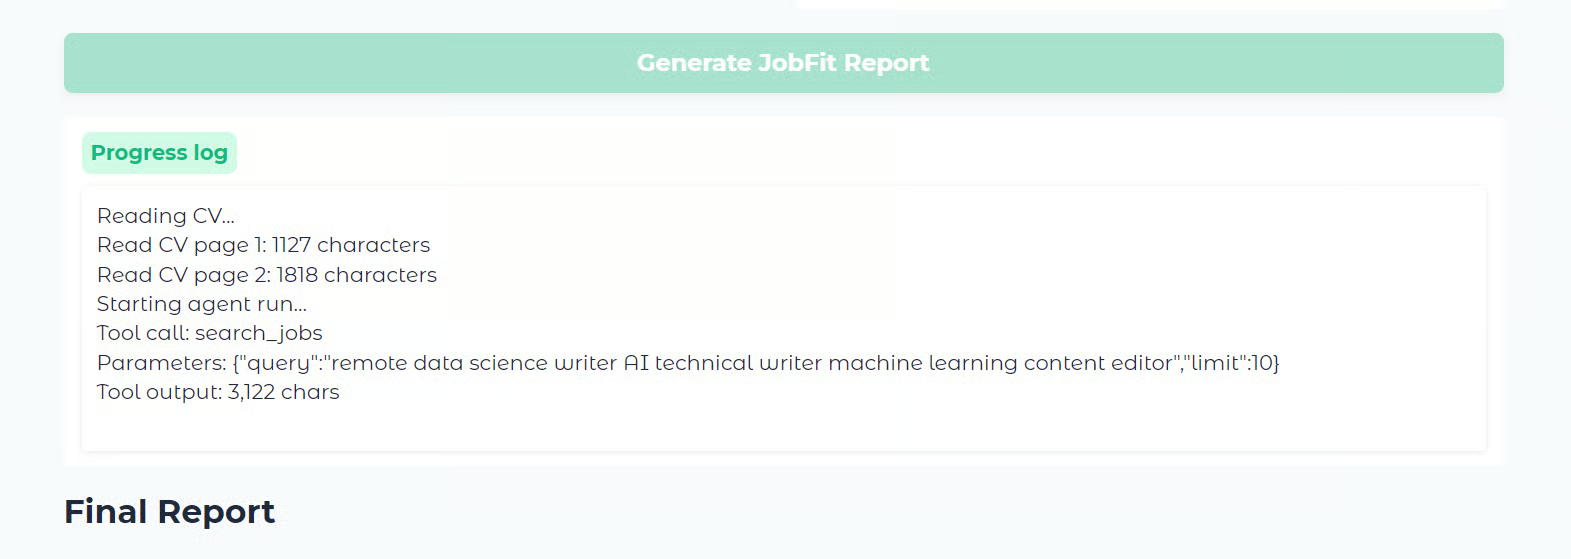
실행이 완료되면 앱은 최종 보고서를 Markdown 형식으로 표시합니다.
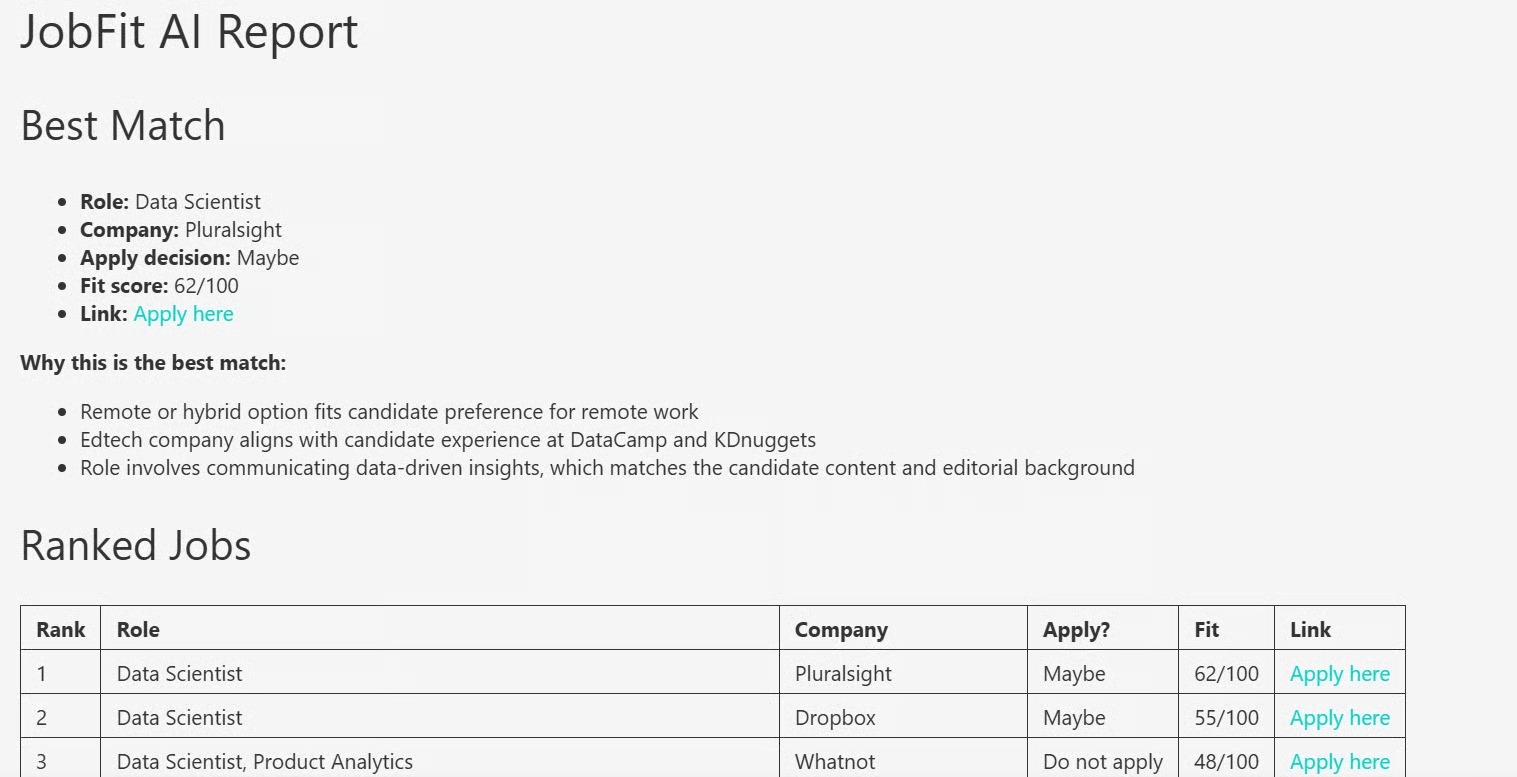
보고서는 최적 일치 직무로 시작하고, 이어서 순위표가 제공됩니다. 그런 다음 각 역할에 대한 상세 노트를 제공하며, 적합도 점수, 지원 결정, 적합한 이유, 잠재적 우려 사항, 지원 전략을 포함합니다.
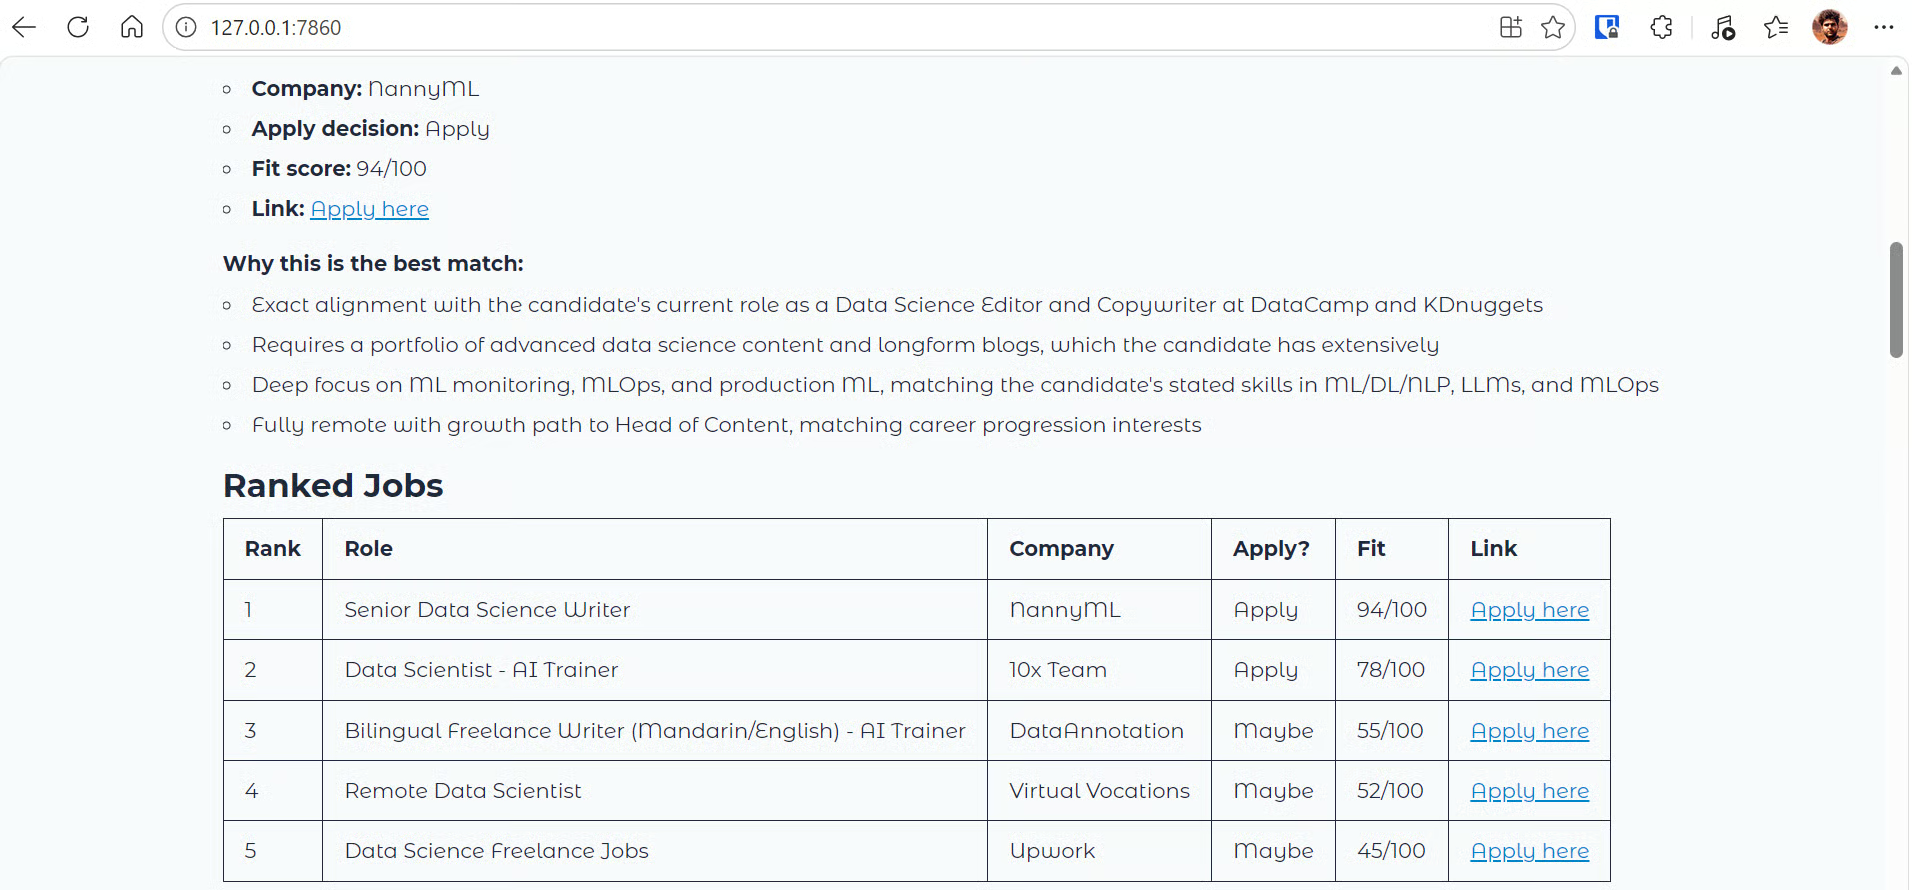
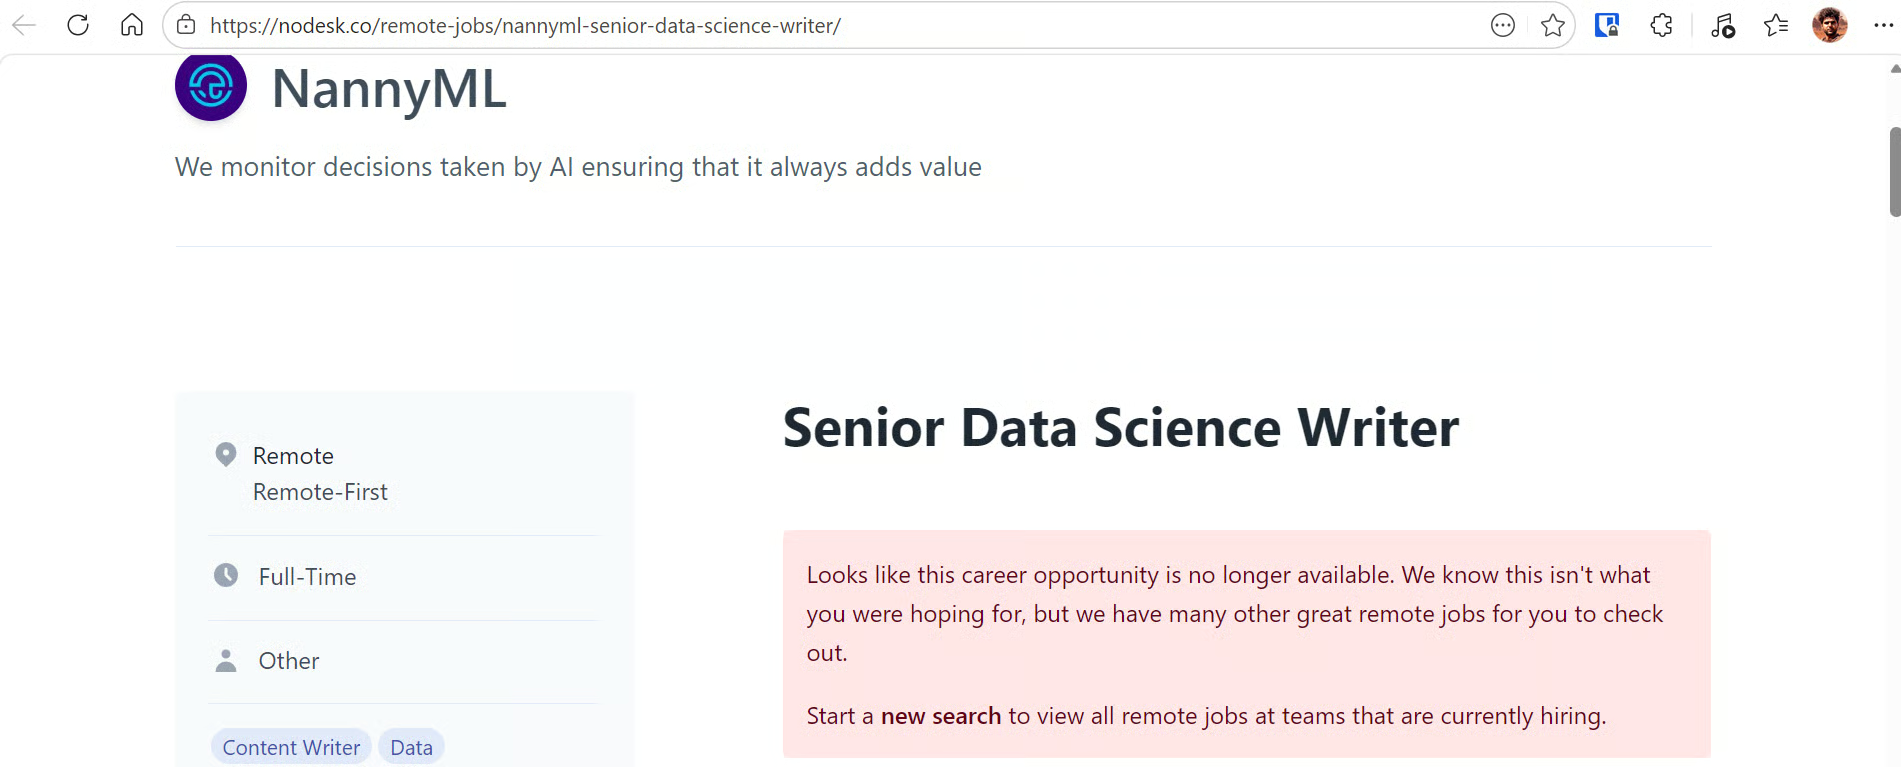
이 예시에서 최상위 결과는 NannyML의 Senior Data Science Writer 역할이었습니다. 해당 역할은 데이터 사이언스, 기술 글쓰기, AI 콘텐츠 배경과 잘 맞아 높은 적합도를 보였습니다.
보고서의 Apply here 링크를 클릭해 공고 페이지를 열고, 지원 여부를 결정하기 전에 전체 공고를 검토할 수 있습니다.
참고: 로컬에서 프로젝트를 실행하는 데 문제가 있다면 GitHub 저장소 kingabzpro/JobFit-AI를 확인하세요. 노트북, app.py 파일, 종속성 설치 및 로컬 실행을 위한 설정 안내가 포함되어 있습니다.
JobFit AI는 Kimi K2.6, Olostep, OpenAI Agent SDK를 사용해 이직자나 적극적으로 구직 중인 사람들에게 흔한 두 가지 문제를 해결합니다.
첫 번째 문제는 어디에 지원할지입니다. 채용 게시판, 플랫폼, 기업 채용 페이지가 많지만, 어떤 역할이 시간을 들일 가치가 있는지는 항상 명확하지 않습니다. 이 앱은 지원자의 이력서와 선호도를 활용해 그들의 경험과 더 관련성 높은 채용 공고를 찾아 대상을 좁혀줍니다.
두 번째 문제는 너무 많은 공고를 필터링해야 한다는 점입니다. 모든 게시판을 일일이 확인하는 대신, 에이전트가 실시간 공고를 검색하고 선택된 공고 페이지를 읽은 뒤, 최적 일치 직무, 순위표, 적합도 점수, 우려 사항, 지원 전략이 담긴 구조화된 보고서를 만듭니다. 덕분에 실제로 지원할 가치가 있는 역할에 집중하기 쉬워집니다.
Kimi K2.6 API는 이 에이전트 기반 워크플로우에서도 좋은 성능을 보였습니다. 빠르고 신뢰할 수 있으며 구조화된 지시를 잘 따랐습니다. 테스트 중 에이전트에 최대 25턴을 허용했을 때는 더 많은 페이지를 깊이 있게 검색하고 스크레이핑했지만, 실행에 약 5분이 걸렸습니다. 품질과 속도의 균형을 위해 워크플로우를 한 번의 검색과 최대 세 페이지 읽기로 제한해, 1분 이내에 보고서를 생성하도록 했습니다.
허용 단계 수, 검색 결과 수, 읽기 페이지 수를 늘리면 채용 보고서의 품질을 높일 수 있습니다. 예를 들어 에이전트 한도를 30턴으로 늘리고 더 많은 공고 페이지를 읽도록 하면, 더 많은 역할과 강력한 추천이 포함된 심층 보고서를 만들 수 있습니다. 다만 실행 시간과 API 사용량도 증가합니다.
비슷한 에이전트형 도구를 만들고 싶다면 다음 API 튜토리얼도 살펴보세요.
DataCamp과 함께 Agentic AI를 배우세요!
courses
courses
courses