
Track
Developing AI Applications
21 hr
The Model Context Protocol (MCP) is an open standard that enables large language models to interact dynamically with external tools, databases, and APIs through a standardized interface.
In this blog, I’ll guide you through building an MCP-powered PR review server that integrates with Claude Desktop. This server will:
We will use the Model Context Protocol (MCP) to standardize communication between the server and Claude Desktop, making it modular and scalable.
We keep our readers updated on the latest in AI by sending out The Median, our free Friday newsletter that breaks down the week’s key stories. Subscribe and stay sharp in just a few minutes a week:
The Model Context Protocol (MCP) is an open standard developed by Anthropic to enable easy and standardized integration between AI models and external tools. It acts as a universal connector, allowing large language models (LLMs) to interact dynamically with APIs, databases, and business applications.
Originally built to improve Claude’s ability to interact with external systems, Anthropic decided to open-source MCP in early 2024 to encourage industry-wide adoption. By making MCP publicly available, they aimed to create a standardized framework for AI-to-tool communication, reducing reliance on proprietary integrations and enabling greater modularity and interoperability across AI applications.
MCP follows a client-server architecture where:
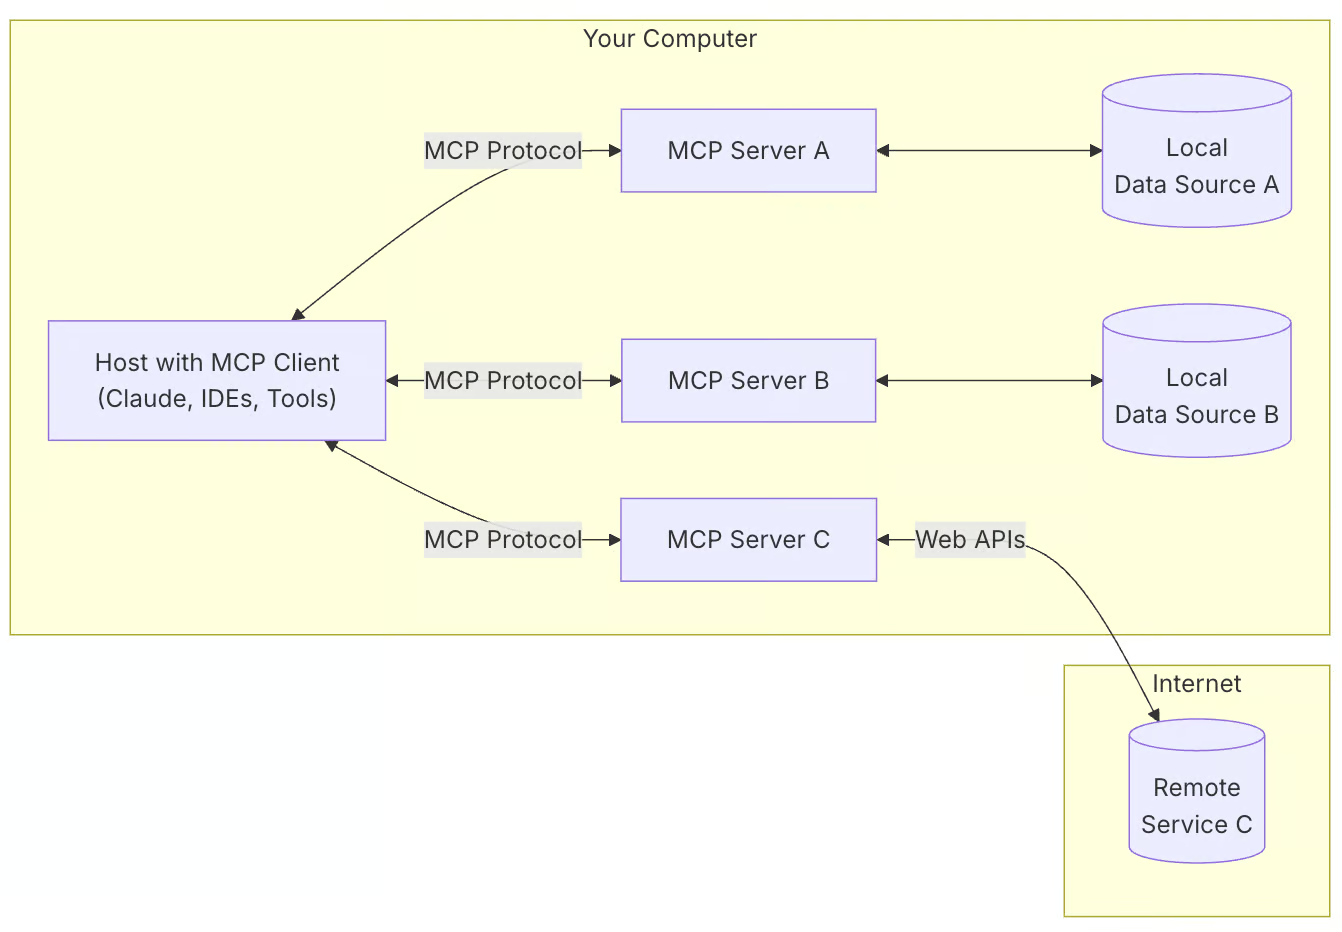
Source: Model Context Protocol
Here’s why you’d want to use MCP for your projects:
The PR review system automates code analysis and documentation using Claude Desktop and Notion.
Here’s a concise breakdown of the pipeline:
Before we begin, ensure you have Python 3.10+ installed. Then, we set up our environment and start with installing the uv package manager. For Mac or Linux:
curl -LsSf https://astral.sh/uv/install.sh | sh # Mac/LinuxFor Windows (PowerShell):
powershell -ExecutionPolicy ByPass -c "irm https://astral.sh/uv/install.ps1 | iex"Then, we create a new project directory and initialize it with uv:
uv init pr_reviewer
cd pr_reviewer
We can now create and activate a virtual environment. For Mac or Linux:
uv venv
source .venv/bin/activate
For Windows:
.venv\Scripts\activateNow we install the required dependencies:
uv add "mcp[cli]" requests python-dotenv notion-clientWe will use uv over conda for this project because it's faster, lighter, and more focused on Python package management. Let’s recap what we just did:
pr_reviewer and navigated to it.Once our environment is set up, we set up our dependencies with the API keys and other requirements. Create a requirements.txt file and add the following Python packages to it:
# Core dependencies for PR Analyzer
requests>=2.31.0          # For GitHub API calls
python-dotenv>=1.0.0      # For environment variables
mcp[cli]>=1.4.0          # For MCP server functionality
notion-client>=2.3.0      # For Notion integration

# Optional: Pin versions for stability
# requests==2.31.0
# python-dotenv==1.0.0
# mcp[cli]==1.4.0
# notion-client==2.3.0
The requirements.txt file contains all the core dependencies required for the project. To set up the dependencies, run either of the following commands (use uv if you’ve installed it earlier).
uv pip install -r requirements.txt
pip install -r requirements.txt
Now, your environment has all the required dependencies installed.
Next, we create a .env file that contains all the keys and tokens required for this project.
To generate GitHub tokens:
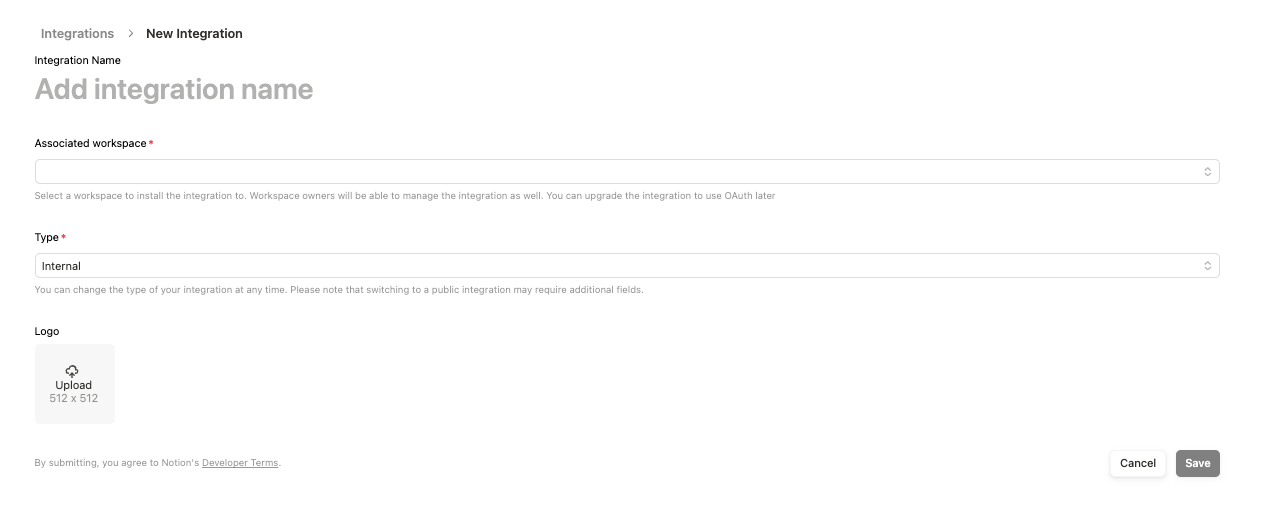
https://www.notion.so/profile/integrations/internal/UUID.env fileNow, create a .env file and add the following text along with the API keys and token we generated above.
GITHUB_TOKEN=your_github_token
NOTION_API_KEY=your_notion_api_key
NOTION_PAGE_ID=your_notion_page_idLet’s configure our GitHub integration module to manage and retrieve PR changes from a GitHub repository.
Create a github_integration.py file and write the following code (we’ll explain it in a bit).
import os
import requests
import traceback
from dotenv import load_dotenv

# Load environment variables
load_dotenv()
GITHUB_TOKEN = os.getenv('GITHUB_TOKEN')

def fetch_pr_changes(repo_owner: str, repo_name: str, pr_number: int) -> list:
    """Fetch changes from a GitHub pull request.

    Args:
        repo_owner: The owner of the GitHub repository
        repo_name: The name of the GitHub repository
        pr_number: The number of the pull request to analyze

    Returns:
        A list of file changes with detailed information about each change
    """
    print(f" Fetching PR changes for {repo_owner}/{repo_name}#{pr_number}")

    # Fetch PR details
    pr_url = f"https://api.github.com/repos/{repo_owner}/{repo_name}/pulls/{pr_number}"
    files_url = f"{pr_url}/files"
    headers = {'Authorization': f'token {GITHUB_TOKEN}'}

    try:
        # Get PR metadata
        pr_response = requests.get(pr_url, headers=headers)
        pr_response.raise_for_status()
        pr_data = pr_response.json()

        # Get file changes
        files_response = requests.get(files_url, headers=headers)
        files_response.raise_for_status()
        files_data = files_response.json()

        # Combine PR metadata with file changes
        changes = []
        for file in files_data:
            change = {
                'filename': file['filename'],
                'status': file['status'],  # added, modified, removed
                'additions': file['additions'],
                'deletions': file['deletions'],
                'changes': file['changes'],
                'patch': file.get('patch', ''),  # The actual diff
                'raw_url': file.get('raw_url', ''),
                'contents_url': file.get('contents_url', '')
            }
            changes.append(change)

        # Add PR metadata
        pr_info = {
            'title': pr_data['title'],
            'description': pr_data['body'],
            'author': pr_data['user']['login'],
            'created_at': pr_data['created_at'],
            'updated_at': pr_data['updated_at'],
            'state': pr_data['state'],
            'total_changes': len(changes),
            'changes': changes
        }

        print(f"Successfully fetched {len(changes)} changes")
        return pr_info

    except Exception as e:
        print(f"Error fetching PR changes: {str(e)}")
        traceback.print_exc()
        return None

# Example usage for debugging
# pr_data = fetch_pr_changes('owner', 'repo', 1)
# print(pr_data)
The fetch_pr_changes() function retrieves and returns changes from a given GitHub pull request. It takes three parameters, namely repo_owner, repo_name, and pr_number, and it returns a structured list of file changes along with PR metadata.
The code uses the requests library to send authenticated HTTP GET requests, fetching both general PR metadata and detailed file-level changes:
Once the data is retrieved, the function structures and combines the PR metadata with file changes into a dictionary. The file changes are stored in a list, with each entry containing detailed information about a file. The final data structure includes the PR title, description, author, timestamps, state, total count of files changed, and a detailed breakdown of file modifications.
Now that we have all the dependencies and extra functions in place, we set up our MCP server. We create a pr_analyzer.py file, which will:
Let’s first add the code and explain it after
import sys
import os
import traceback
from typing import Any, List, Dict
from mcp.server.fastmcp import FastMCP
from github_integration import fetch_pr_changes
from notion_client import Client
from dotenv import load_dotenv

class PRAnalyzer:
    def __init__(self):
        # Load environment variables
        load_dotenv()

        # Initialize MCP Server
        self.mcp = FastMCP("github_pr_analysis")
        print("MCP Server initialized", file=sys.stderr)

        # Initialize Notion client
        self._init_notion()

        # Register MCP tools
        self._register_tools()

    def _init_notion(self):
        """Initialize the Notion client with API key and page ID."""
        try:
            self.notion_api_key = os.getenv("NOTION_API_KEY")
            self.notion_page_id = os.getenv("NOTION_PAGE_ID")

            if not self.notion_api_key or not self.notion_page_id:
                raise ValueError("Missing Notion API key or page ID in environment variables")

            self.notion = Client(auth=self.notion_api_key)
            print(f"Notion client initialized successfully", file=sys.stderr)
            print(f"Using Notion page ID: {self.notion_page_id}", file=sys.stderr)
        except Exception as e:
            print(f"Error initializing Notion client: {str(e)}", file=sys.stderr)
            traceback.print_exc(file=sys.stderr)
            sys.exit(1)

    def _register_tools(self):
        """Register MCP tools for PR analysis."""
        @self.mcp.tool()
        async def fetch_pr(repo_owner: str, repo_name: str, pr_number: int) -> Dict[str, Any]:
            """Fetch changes from a GitHub pull request."""
            print(f"Fetching PR #{pr_number} from {repo_owner}/{repo_name}", file=sys.stderr)
            try:
                pr_info = fetch_pr_changes(repo_owner, repo_name, pr_number)
                if pr_info is None:
                    print("No changes returned from fetch_pr_changes", file=sys.stderr)
                    return {}
                print(f"Successfully fetched PR information", file=sys.stderr)
                return pr_info
            except Exception as e:
                print(f"Error fetching PR: {str(e)}", file=sys.stderr)
                traceback.print_exc(file=sys.stderr)
                return {}

        @self.mcp.tool()
        async def create_notion_page(title: str, content: str) -> str:
            """Create a Notion page with PR analysis."""
            print(f"Creating Notion page: {title}", file=sys.stderr)
            try:
                self.notion.pages.create(
                    parent={"type": "page_id", "page_id": self.notion_page_id},
                    properties={"title": {"title": [{"text": {"content": title}}]}},
                    children=[{
                        "object": "block",
                        "type": "paragraph",
                        "paragraph": {
                            "rich_text": [{
                                "type": "text",
                                "text": {"content": content}
                            }]
                        }
                    }]
                )
                print(f"Notion page '{title}' created successfully!", file=sys.stderr)
                return f"Notion page '{title}' created successfully!"
            except Exception as e:
                error_msg = f"Error creating Notion page: {str(e)}"
                print(error_msg, file=sys.stderr)
                traceback.print_exc(file=sys.stderr)
                return error_msg

    def run(self):
        """Start the MCP server."""
        try:
            print("Running MCP Server for GitHub PR Analysis...", file=sys.stderr)
            self.mcp.run(transport="stdio")
        except Exception as e:
            print(f"Fatal Error in MCP Server: {str(e)}", file=sys.stderr)
            traceback.print_exc(file=sys.stderr)
            sys.exit(1)

if __name__ == "__main__":
    analyzer = PRAnalyzer()
    analyzer.run()
The above code sets up an MCP Server to fetch GitHub PR changes and stores the analysis results in Notion. Let’s go through the key components:
dotenv module loads environment variables, ensuring API keys and credentials are securely accessed. PRAnalyzer class initializes an MCP server using the FastMCP() function that initializes the MCP server with the name github_pr_analysis and enables interaction with the Claude Desktop application..env file.fetch_pr() function retrieves pull request metadata from GitHub using the fetch_pr_changes() method from the github_integration.py file. If successful, it returns a dictionary containing PR details.create_notion_page() function generates a Notion page with the PR analysis results.run() method starts the MCP server using mcp.run(transport="stdio"), enabling the interaction between Claude Desktop and the PR review tools.Now that we have all the code pieces in place, we run our server with the following terminal command:
python pr_analyzer.py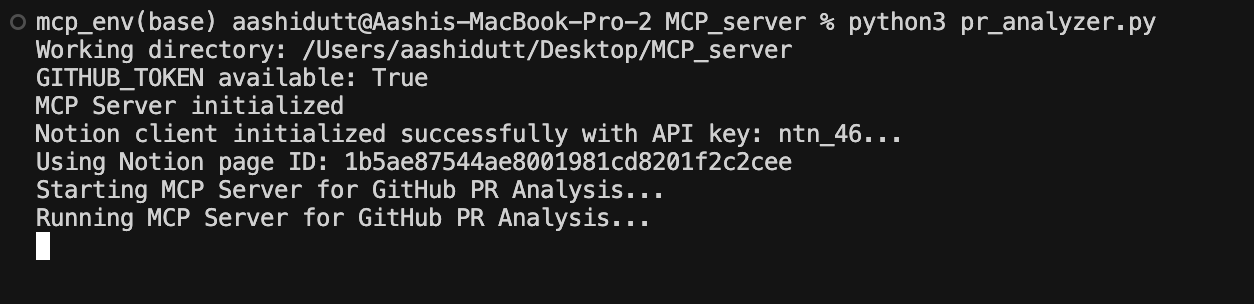
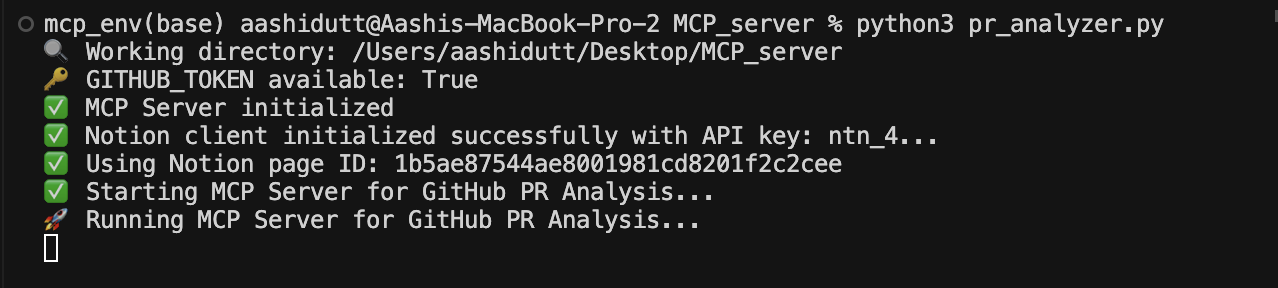
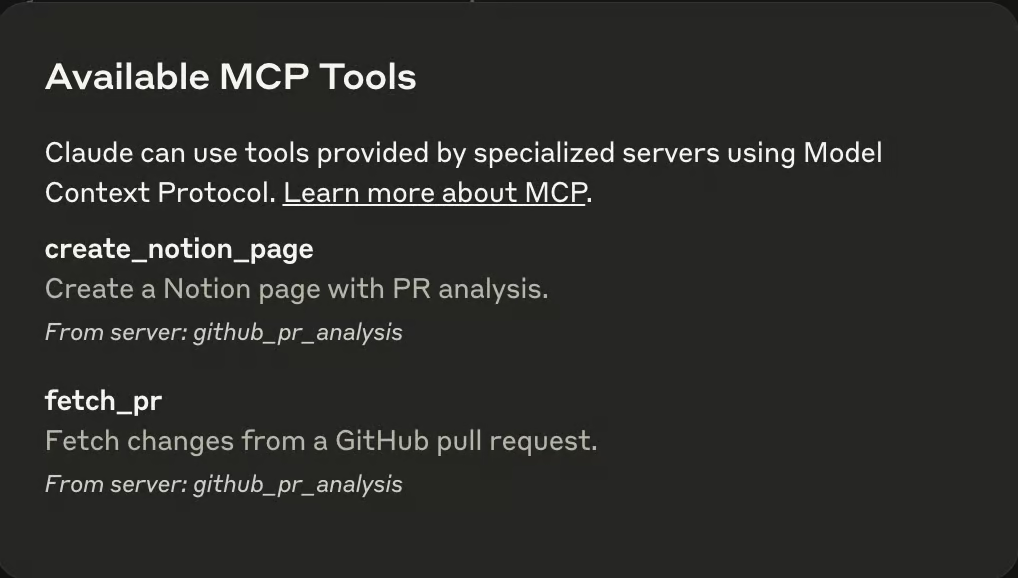
Once the server is up and running, open the Claude Desktop application, and you'll see a plug icon (🔌) in the textbox. This plug indicates the presence of an MCP in the Claude environment. In the same textbox, you'll notice a hammer-like icon (🔨) that displays all the available MCPs, as shown below.
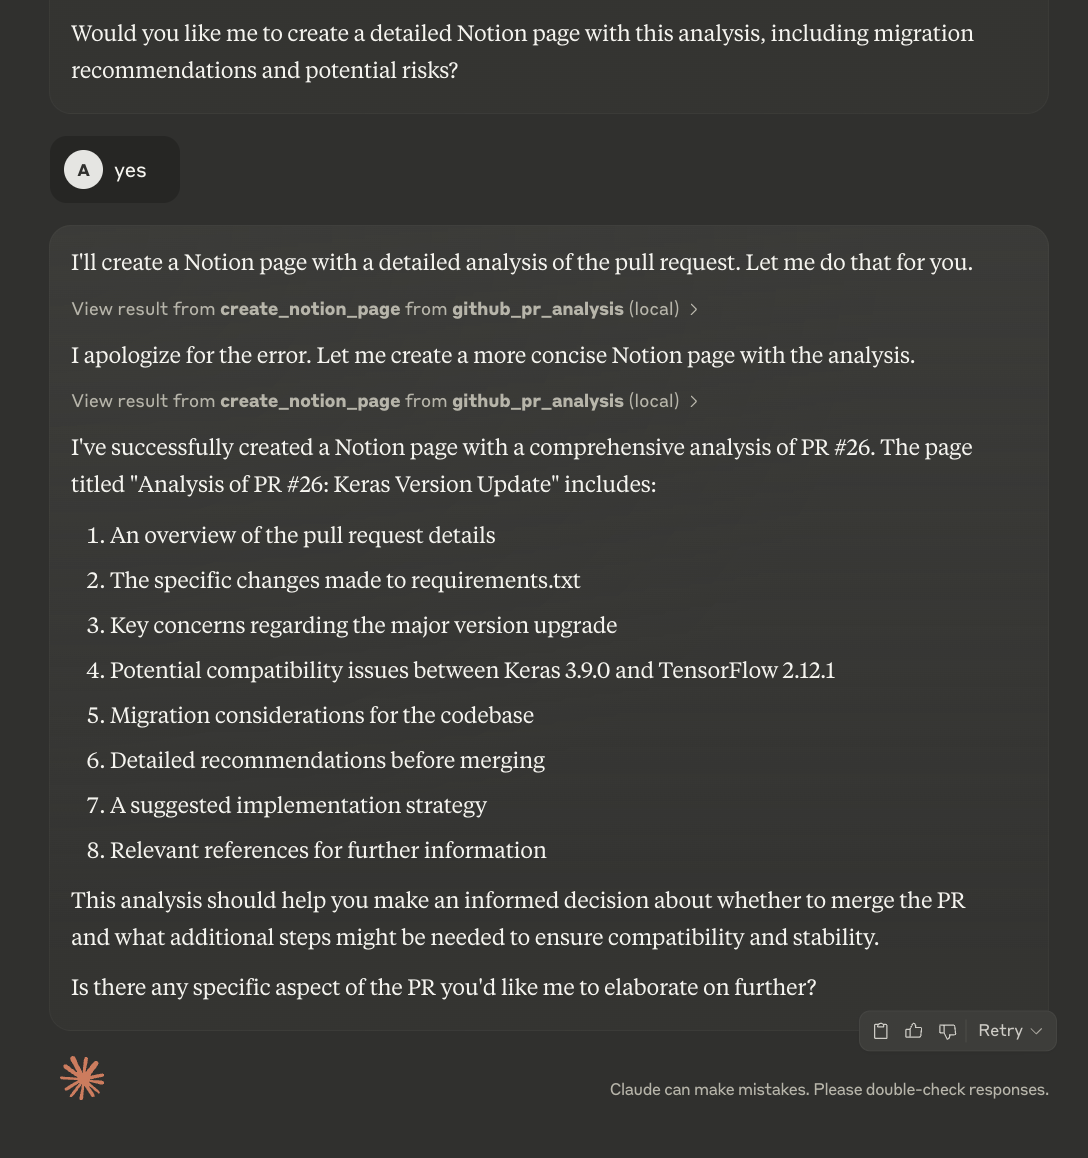
Now, pass the link to the PR you want to analyze and Claude will do the rest of the things for you.

Claude will first analyze the PR and then provide a summary and review of it. It will ask users if they want to upload the details to the Notion page. While you can automate that process, the current code allows you to review the summary before creating a new Notion page.
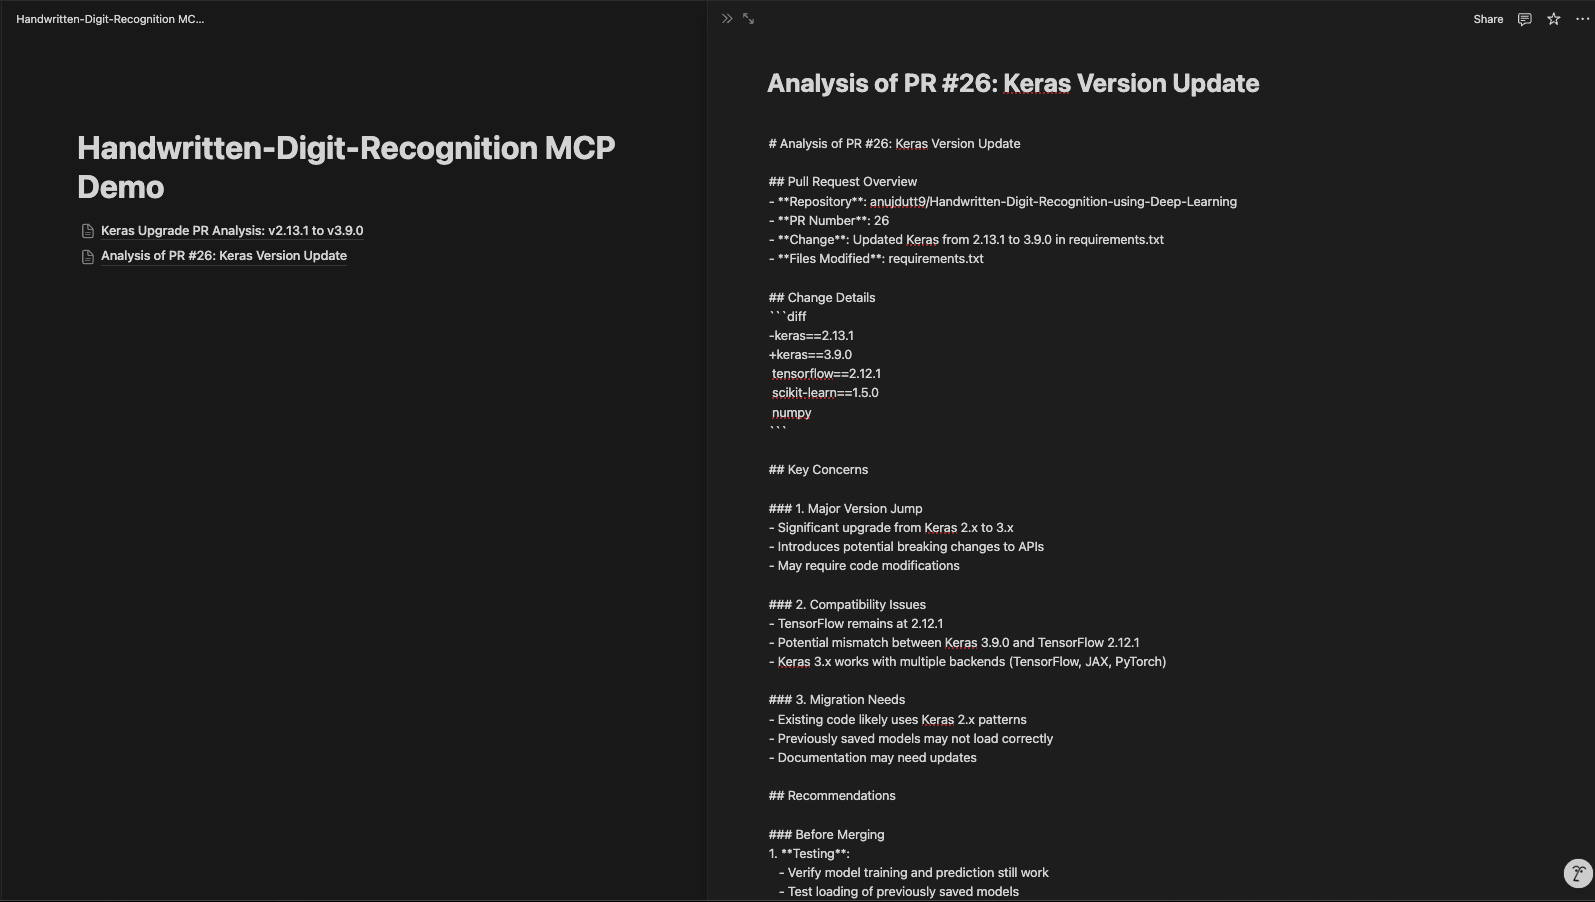
The updated Notion page looks like this:
Our PR Review MCP-based server improves code analysis and documentation, enhancing the review process for efficiency and organization. By using MCP, the GitHub API, and Notion integration, this system supports automated PR analysis, easy collaboration, and structured documentation. With this configuration, developers can quickly retrieve PR details, analyze code changes using Claude, and store insights in Notion for future reference.
To explore more recent AI tools, I recommend these blogs:
Learn AI with these courses!
Track
Course
Course
blog
Abid Ali Awan
15 min
Tutorial
Abid Ali Awan
Tutorial
Aryan Irani
Tutorial
Abid Ali Awan
Tutorial
Abid Ali Awan
Tutorial
Nikhil Adithyan