course
Working with the OpenAI API
3 timmar
141.9K
Starta Jupyter Notebook, skapa en ny cell och lägg till nödvändiga importer och projektkonfiguration.
import json
import os

import requests
from agents import Agent, AsyncOpenAI, ModelSettings, OpenAIChatCompletionsModel, RunConfig, Runner, function_tool, set_tracing_disabled
from IPython.display import Markdown, display
from pypdf import PdfReader
Definiera nu modellnamn, API-ändpunkter, max antal agentvarv, CV-sökväg och jobbföredraganden.
KIMI_MODEL = "kimi-k2.6"
KIMI_BASE_URL = "https://api.moonshot.ai/v1"
OLOSTEP_SEARCH_URL = "https://api.olostep.com/v1/searches"
OLOSTEP_SCRAPE_URL = "https://api.olostep.com/v1/scrapes"
MAX_AGENT_TURNS = 25


cv_path = "abid-resume.pdf"
preferences = """
Remote data science, AI writer, or technical writer roles in AI, machine learning, data science, or cloud.
Prefer technical content, tutorials, developer education, research writing, and AI product storytelling.
""".strip()


set_tracing_disabled(True)
Värdena KIMI_MODEL och KIMI_BASE_URL talar om för appen att använda Kimi K2.6 via Moonshot AIs OpenAI-kompatibla API-ändpunkt. Olostep-URL:erna används för livesökning av jobb och skrapning av sidor.
Variabeln cv_path pekar på kandidatens CV i PDF-format. Se till att PDF-filen är sparad i samma projektmapp, eller uppdatera sökvägen om den ligger någon annanstans.
Variabeln preferences talar om för agenten vilken typ av jobb som ska sökas. Du kan uppdatera den utifrån målroll, bransch, plats, senioritetsnivå eller föredragen arbetsstil.
Vi inaktiverar spårning med set_tracing_disabled(True) eftersom spårning är en funktion i OpenAI Agents SDK som är aktiverad som standard. Eftersom detta projekt använder Kimi via en OpenAI-kompatibel ändpunkt håller inaktiveringen av spårning den lokala installationen enkel och undviker problem relaterade till spårning hos en extern modellleverantör.
Ställ sedan in Kimi-klienten med API-nyckeln du sparade tidigare som en miljövariabel.
kimi_client = AsyncOpenAI(
   api_key=os.environ["MOONSHOT_API_KEY"],
   base_url=KIMI_BASE_URL,
)
Detta skapar API-klienten för Kimi. api_key laddas från MOONSHOT_API_KEY, och base_url pekar på Moonshot AIs OpenAI-kompatibla ändpunkt.
Omslut sedan Kimi-modellen så att den kan användas i OpenAI Agents SDK:
kimi_model = OpenAIChatCompletionsModel(
   model=KIMI_MODEL,
   openai_client=kimi_client,
)
Definiera nu modellinställningarna:
model_settings = ModelSettings(
   tool_choice="auto",
   parallel_tool_calls=True,
   extra_body={"thinking": {"type": "disabled"}},
)
Inställningen tool_choice="auto" låter agenten avgöra när verktyg ska anropas. Med parallel_tool_calls=True kan agenten köra flera verktygsanrop samtidigt vid behov.
Vi inaktiverar också Kimis tänkandeläge med extra_body={"thinking": {"type": "disabled"}}. Det håller utdata renare och bättre anpassade för en strukturerad jobbmatchningsrapport.
Skapa till sist körkonfigurationen:
run_config = RunConfig(
   workflow_name="JobFit AI Kimi Search",
   tracing_disabled=True,
)
workflow_name ger denna körning en tydlig etikett. Vi behåller också spårning inaktiverad här eftersom detta projekt använder Kimi via en OpenAI-kompatibel ändpunkt, inte OpenAIs spårningsbackend.
Använd sedan PdfReader för att ladda kandidatens CV och extrahera texten från varje sida.
reader = PdfReader(cv_path)
cv_text = "\n".join(page.extract_text() or "" for page in reader.pages)[:12000]
print(f"Loaded {len(cv_text):,} characters from {cv_path}")
Denna kod läser PDF-filen som definieras i cv_path, extraherar texten från varje sida och slår ihop den till en sträng.
Begränsningen [:12000] gör CV-texten tillräckligt kort för att få plats i agentens prompt, men ger ändå modellen tillräcklig kontext om kandidatens erfarenhet, färdigheter och preferenser.
Utdata kommer att se ut ungefär så här, beroende på namn och längd på din CV-fil:
Loaded 2,946 characters from abid-resume.pdfDetta bekräftar att CV:t laddades korrekt och visar hur många tecken som extraherades från PDF:en.
Definiera sedan instruktionerna som styr hur agenten ska söka, använda verktyg och formatera slutrapporten.
AGENT_INSTRUCTIONS = """
You are JobFit AI, a focused job-search agent.

Tool plan:
- Call search_jobs exactly once with limit 8.
- Read at most 3 direct job pages with read_job_page.
- After reading up to 3 pages, stop using tools and write the report.
- Search again only if the first search returns zero usable jobs.
- Avoid broad search pages, expired jobs, and LinkedIn unless no better source exists.

Report rules:
- Keep the report simple, clear, and practical.
- Use short bullets.
- Do not use em dashes.
- Do not use contractions.
- Do not add text before or after the report.
- End after the final Job Notes entry.
- Include at least 5 ranked jobs if the search results contain at least 5 usable jobs.
- If only 3 pages were scraped, use backup jobs from search results when they look usable.
- Every job must include a clickable Markdown link.
- Every job must have one apply decision: Apply, Maybe, or Do not apply.

Use exactly this Markdown structure:

# JobFit AI Report

## Best Match

- **Role:** <job title>
- **Company:** <company>
- **Apply decision:** Apply / Maybe / Do not apply
- **Fit score:** <score>/100
- **Link:** [Apply here](<job url>)

**Why this is the best match:**

- <specific reason>
- <specific reason>
- <specific reason>

## Ranked Jobs

| Rank | Role | Company | Apply? | Fit | Link |
| --- | --- | --- | --- | --- | --- |
| 1 | <role> | <company> | Apply / Maybe / Do not apply | <score>/100 | [Apply here](<url>) |

## Job Notes

### 1. <Role> at <Company>

- **Apply decision:** Apply / Maybe / Do not apply
- **Fit score:** <score>/100
- **Link:** [Apply here](<job url>)

**Why it fits:**

- <bullet>
- <bullet>

**Concerns:**

- <bullet>
- <bullet>

**Application angle:**

- <how the person should position their CV/application>
""".strip()
Dessa instruktioner håller agenten fokuserad. De begränsar arbetsflödet till en jobsökning, upp till tre sidläsningar och en fast Markdown-struktur för rapporten.
Rapportreglerna gör också utdata lättare att skumma genom att kräva korta punkter, klickbara länkar, matchningspoäng och ett tydligt beslut om att söka för varje roll.
När agentinstruktionerna är definierade skapar du promptmallen som skickas till agenten vid varje körning.
RUN_PROMPT_TEMPLATE = """
Find current job postings for this candidate and rank them by fit.

Keep the run simple:
- one search
- up to three page reads
- final report

The final report must follow AGENT_INSTRUCTIONS exactly.
Use simple wording. Do not use em dashes. Do not use contractions.

Candidate CV:
{cv_text}

Preferences:
{preferences}
""".strip()
Denna prompt kombinerar kandidatens CV-text och jobbföredraganden vid körning.
Platshållaren cv_text fylls med det extraherade CV-innehållet, medan preferences fylls med målrollernas preferenser som definierades tidigare. Tillsammans ger de agenten tillräcklig kontext för att söka efter relevanta jobb och ranka dem efter passform.
Nu när agentinstruktionerna och körtids-prompten är klara, lägg till två verktyg som låter agenten söka på webben och läsa annonssidor via Olostep.
Det första verktyget söker på webben efter jobbannonser och returnerar en kompakt lista med resultat.
@function_tool
def search_jobs(query: str, limit: int = 8) -> str:
    """Search the web for job listings and return compact JSON results."""
    response = requests.post(
        OLOSTEP_SEARCH_URL,
        headers={"Authorization": f"Bearer {os.environ['OLOSTEP_API_KEY']}", "Content-Type": "application/json"},
        json={"query": query},
        timeout=60,
    )
    response.raise_for_status()
    links = response.json().get("result", {}).get("links", [])[:limit]
    results = [
        {"title": item.get("title", "Untitled"), "url": item.get("url"), "description": item.get("description", "")}
        for item in links
        if isinstance(item, dict) and item.get("url")
    ]
    return json.dumps(results, ensure_ascii=False)
Dekoratorn @function_tool gör denna Python-funktion tillgänglig för agenten som ett anropbart verktyg.
När agenten behöver jobbannonser anropar den search_jobs med en sökfråga. Funktionen skickar frågan till Olosteps sök-ändpunkt, samlar de bästa resultaten och returnerar dem som JSON.
Varje resultat inkluderar:
Det andra verktyget låter agenten öppna och läsa en specifik annonssida.
@function_tool
def read_job_page(url: str) -> str:
    """Scrape one job listing URL and return markdown text."""
    response = requests.post(
        OLOSTEP_SCRAPE_URL,
        headers={"Authorization": f"Bearer {os.environ['OLOSTEP_API_KEY']}", "Content-Type": "application/json"},
        json={"url_to_scrape": url, "formats": ["markdown"]},
        timeout=120,
    )
    response.raise_for_status()
    markdown = response.json().get("result", {}).get("markdown_content") or ""
    return markdown[:8000]
Denna funktion skickar en jobb-URL till Olosteps skrap-ändpunkt och returnerar sidans innehåll i Markdown-format.
Begränsningen [:8000] håller den skrapade sidan tillräckligt kort för att agenten ska kunna bearbeta den, men fångar ändå de mest användbara detaljerna, såsom arbetsuppgifter, krav och företagsinformation.
Skapa nu agenten och koppla ihop alla delar du definierade tidigare: Kimi-modellen, modellinställningarna, Olostep-verktygen och agentinstruktionerna.
agent = Agent(
   name="JobFit AI",
   model=kimi_model,
   model_settings=model_settings,
   tools=[search_jobs, read_job_page],
   instructions=AGENT_INSTRUCTIONS,
)
Objektet Agent är huvudkontrollern för detta arbetsflöde.
Det använder:
kimi_model som resonemangsmodellmodel_settings för att styra verktygsanvändning och utdatasearch_jobs för att hitta aktuella jobbannonserread_job_page för att skrapa utvalda annonssidorAGENT_INSTRUCTIONS för att följa exakta sök- och rapportreglerNu är agenten redo att söka jobb, jämföra dem mot kandidatens CV och generera en strukturerad JobFit AI-rapport.
Kör nu JobFit AI-agenten med den extraherade CV-texten och jobbföredragandena som definierades tidigare.
Formatera först körtids-prompten:
prompt = RUN_PROMPT_TEMPLATE.format(cv_text=cv_text, preferences=preferences)Detta fyller promptmallen med kandidatens CV och målroller.
Starta sedan den strömmade agentkörningen:
print("Starting agent run")


result = Runner.run_streamed(
   agent,
   prompt,
   max_turns=MAX_AGENT_TURNS,
   run_config=run_config,
)
Metoden Runner.run_streamed() startar agentarbetsflödet och strömmar händelser i realtid. Det gör det lättare att se när agenten anropar ett verktyg, tar emot verktygsutdata och skapar slutmeddelandet.
Lägg nu till strömningsloopen:
async for event in result.stream_events():
   if event.type == "agent_updated_stream_event":
       print(f"Agent: {event.new_agent.name}")
   elif event.type == "run_item_stream_event":
       item = event.item
       if event.name == "tool_called":
           raw = item.raw_item
           tool_name = raw.get("name") if isinstance(raw, dict) else getattr(raw, "name", "tool")
           arguments = raw.get("arguments") if isinstance(raw, dict) else getattr(raw, "arguments", "")
           arguments = str(arguments).replace(chr(10), " ")[:500]
           print(f"Tool call: {tool_name}")
           if arguments:
               print(f"Parameters: {arguments}")
       elif event.name == "tool_output":
           print(f"Tool output: {len(str(item.output)):,} chars")
       elif event.name == "message_output_created":
           print("Final message ready")
Denna loop skriver ut användbara statusuppdateringar medan agenten körs. Till exempel visas när agenten söker jobb, läser en annonssida eller blir klar med rapporten.
Spara till sist slututdata i en variabel som heter report:
report = result.final_output
globals()["report"] = report


print("Run complete")
print(f"Model responses: {len(result.raw_responses)}")
print(f"Run items: {len(result.new_items)}")
print(f"Final output: {len(str(report)):,} chars")
Variabeln report lagrar den slutliga JobFit AI-rapporten, som du kan visa, spara eller använda i Gradio-appen.
Utdata ser ut ungefär så här:
Starting agent run
Agent: JobFit AI
Tool call: search_jobs
Parameters: {"query":"remote data science writer technical writer AI machine learning content editor","limit":8}
Tool output: 2,445 chars
Tool call: read_job_page
Parameters: {"url":"https://www.indeed.com/q-data-science-writer-jobs.html"}
Tool output: 8,000 chars
Tool call: read_job_page
Parameters: {"url":"https://www.builtinnyc.com/jobs/remote/data-analytics/data-science"}
Tool output: 8,000 chars
Tool call: read_job_page
Parameters: {"url":"https://www.virtualvocations.com/jobs/q-data+scientist+remote+jobs/c-writing/d-336"}
Tool output: 5,075 chars
Final message ready
Run complete
Model responses: 5
Run items: 13
Final output: 5,931 chars
Detta bekräftar att agenten sökte jobb, läste utvalda sidor och lyckades generera slutrapporten.
När agentkörningen är klar visar du slutrapporten i Markdown-format.
display(Markdown(report))Detta renderar den genererade JobFit AI-rapporten direkt i notebooken, vilket gör den mer lättläst än vanlig text.
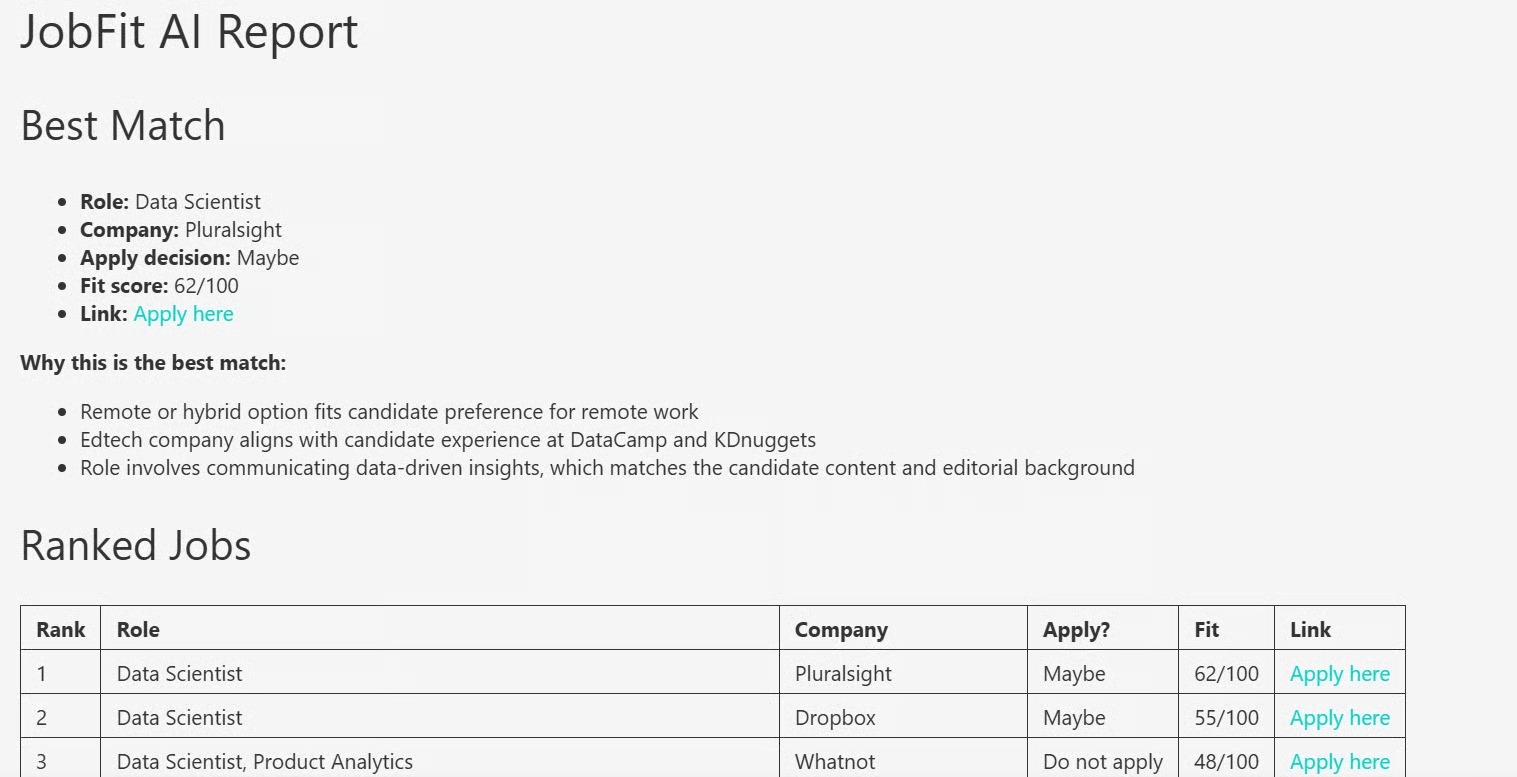
Rapporten innehåller bästa matchning, rankade jobb, matchningspoäng, beslut om att söka, farhågor och ansökningsvinkel.
Efter att ha testat arbetsflödet i notebooken kan du göra om det till en enkel Gradio-webbapp. Skapa en fil som heter app.py och kopiera sedan koden från filen JobFit-AI/app.py i GitHub-projektet och klistra in den i din lokala fil.
Kör appen med:
python app.py
Öppna sedan den lokala appen i din webbläsare på den lokala URL:en som visas (i detta fall http://127.0.0.1:7860/):
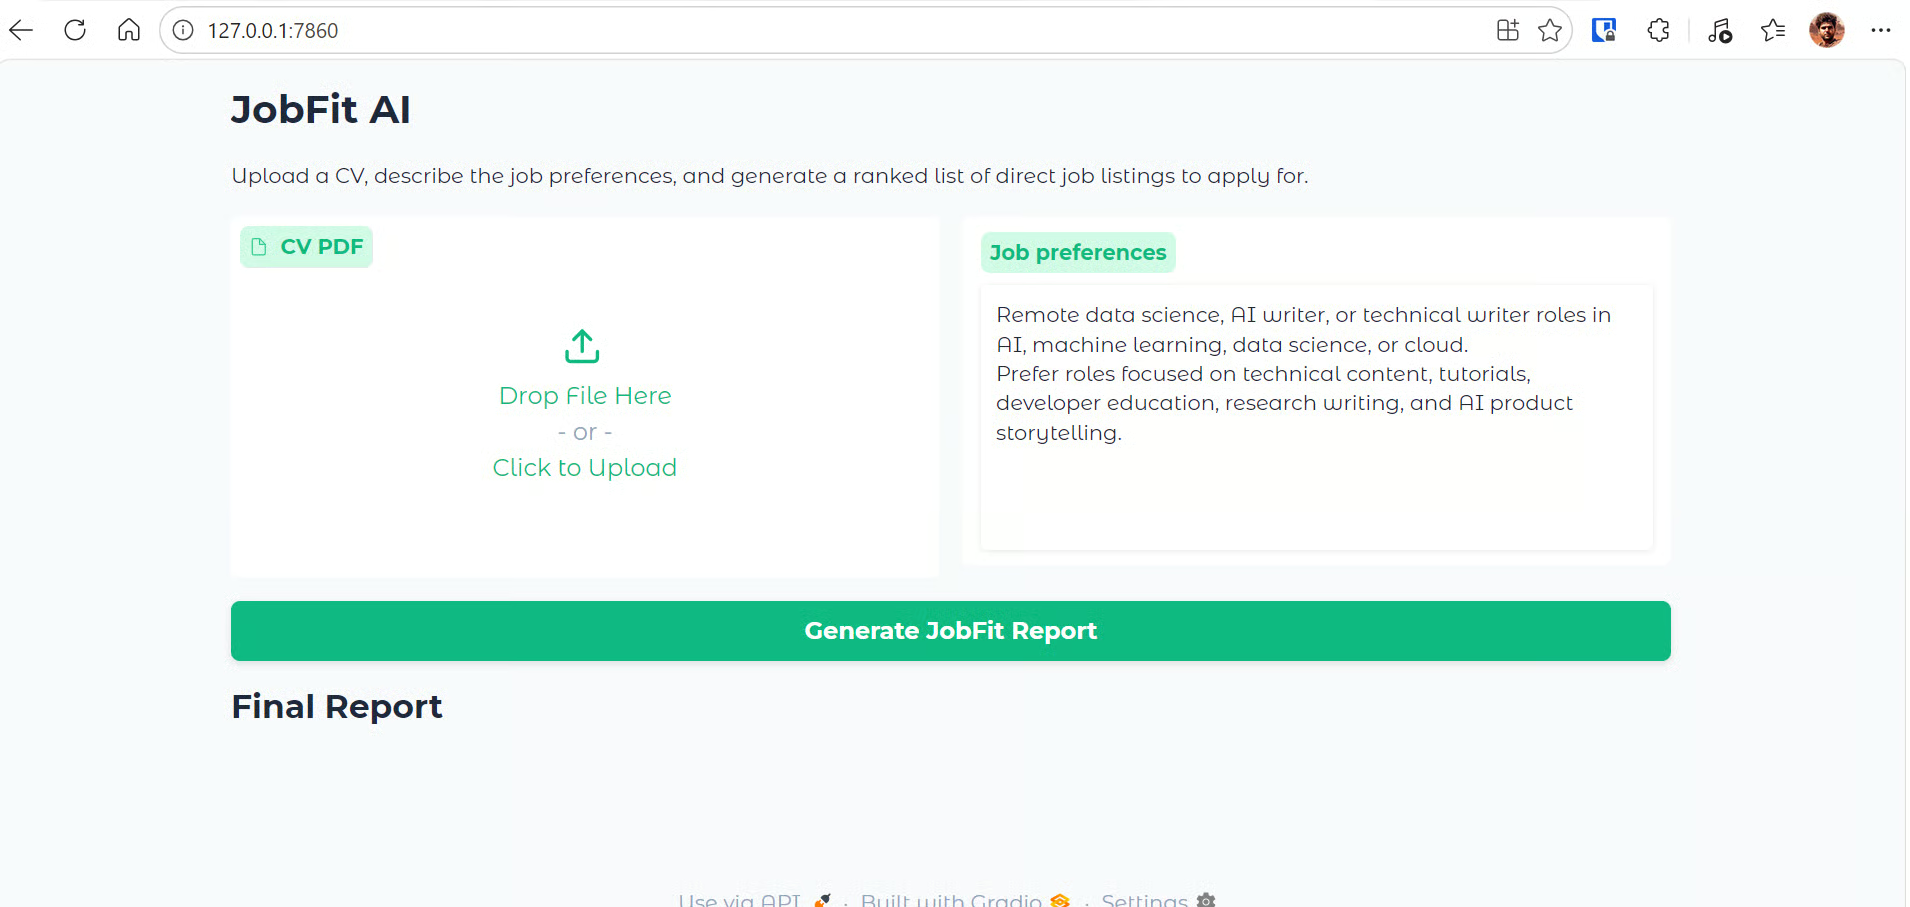
Gradio-appen ger ett enkelt gränssnitt för att generera jobbmatchningsrapporter. Den innehåller:
Under huven läser appen det uppladdade CV:t, extraherar texten, skickar CV:t och preferenserna till JobFit AI-agenten och söker aktuella jobbannonser med Olostep. Den läser upp till tre annonssidor och returnerar en strukturerad Markdown-rapport med rankade roller, matchningspoäng, beslut om att söka, farhågor och ansökningsvinklar.
Testa nu webbappen genom att ladda upp ett CV eller en meritförteckning i PDF och klicka på Generate JobFit Report.
I detta exempel laddade jag upp ett CV med ungefär tre års erfarenhet för att se om appen kunde hitta relevanta jobb baserat på kandidatens profil och preferenser. Rapporten genererades på under en minut.
Medan appen körs visar förloppsloggen varje steg i arbetsflödet, inklusive:
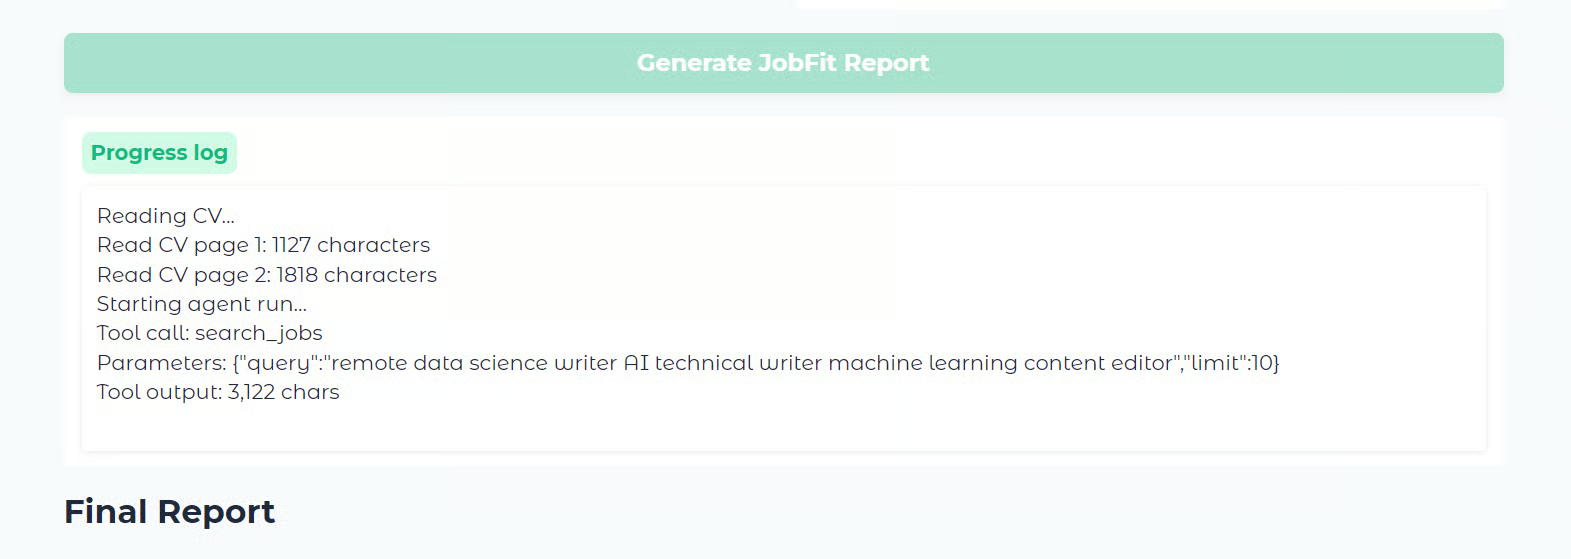
När körningen är klar visar appen slutrapporten i Markdown-format.
Rapporten börjar med bästa matchning, följt av en tabell med rankade jobb. Därefter ges mer detaljerade anteckningar för varje roll, inklusive matchningspoäng, beslut om att söka, skäl till att rollen passar, möjliga farhågor och en ansökningsvinkel.
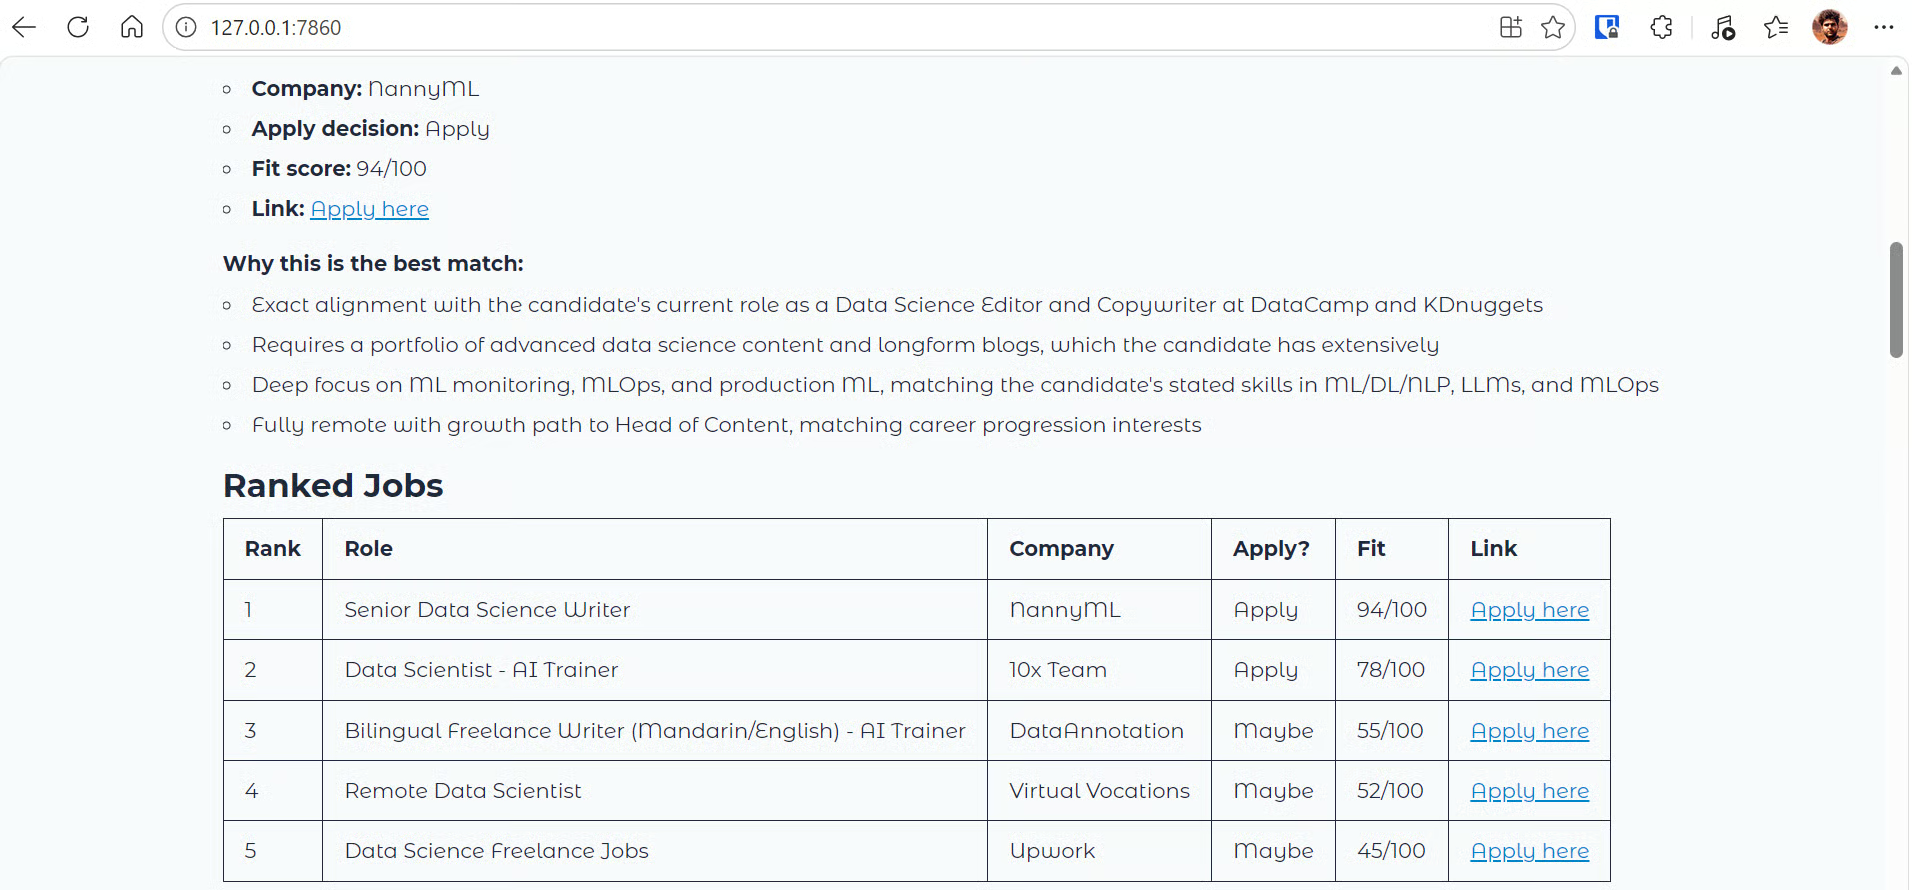
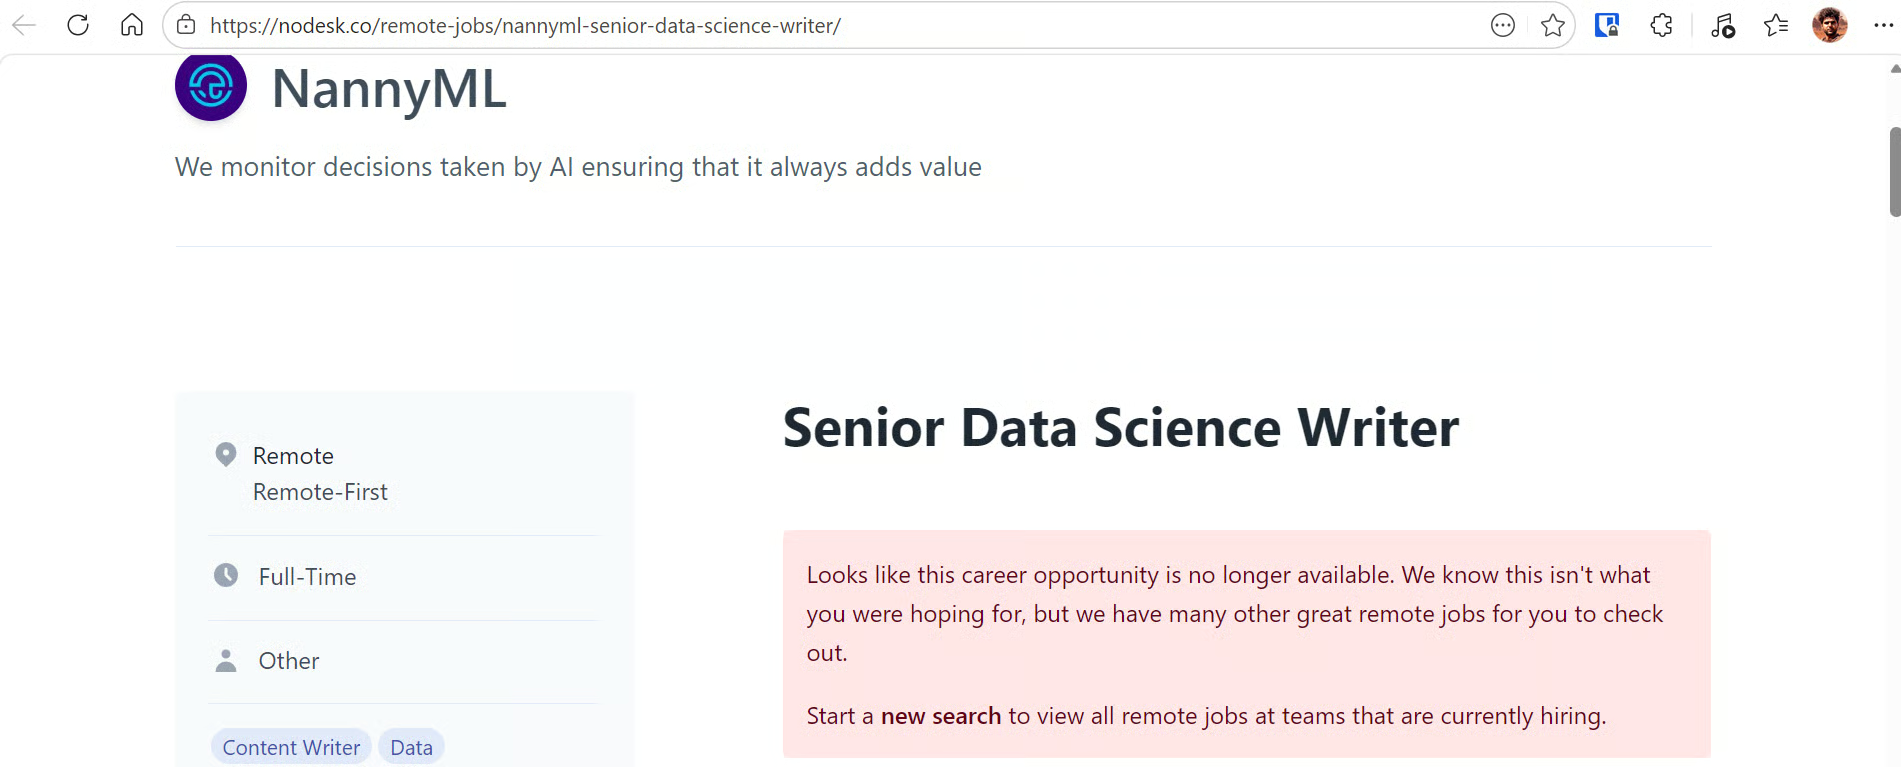
I detta exempel var toppresultatet en Senior Data Science Writer-roll på NannyML. Eftersom rollen matchade kandidatens bakgrund inom data science, tekniskt skrivande och AI-innehåll såg den ut att passa väl.
Du kan klicka på länken Apply here i rapporten för att öppna annonssidan och granska hela annonsen innan du bestämmer om du ska söka.
Observera: Om du stöter på problem med att köra projektet lokalt, kolla GitHub-repot: kingabzpro/JobFit-AI. Det innehåller notebooken, app.py-filen och installationsinstruktioner för att hjälpa dig installera beroenden och köra projektet lokalt.
JobFit AI använder Kimi K2.6, Olostep och OpenAI Agent SDK för att lösa två vanliga problem för personer som byter roll eller aktivt söker jobb.
Det första problemet är att veta var man ska söka. Det finns många jobbportaler, plattformar och företags karriärsidor, men det är inte alltid tydligt vilka roller som är värda din tid. Den här appen hjälper till att avgränsa genom att använda kandidatens CV och preferenser för att hitta jobb som är mer relevanta för deras erfarenhet.
Det andra problemet är att sålla bland alltför många jobbannonser. I stället för att manuellt kontrollera varje jobbsajt söker agenten i aktuella listningar, läser utvalda annonssidor och skapar en strukturerad rapport med bästa matchning, rankade jobb, matchningspoäng, farhågor och ansökningsvinklar. Detta gör det lättare att fokusera på roller som faktiskt är värda att söka.
Kimi K2.6-API:et presterade också bra i detta agentbaserade arbetsflöde. Det var snabbt, pålitligt och effektivt på att följa strukturerade instruktioner. Under testningen, när agenten tilläts upp till 25 varv, sökte och skrapade den flera sidor mer på djupet, men körningen tog runt fem minuter. För att balansera kvalitet och hastighet begränsade jag arbetsflödet till en sökning och upp till tre sidläsningar, vilket hjälpte till att generera rapporten på under en minut.
Du kan förbättra kvaliteten på jobbrapporten genom att öka antalet tillåtna steg, sökresultat eller sidläsningar. Om du till exempel ökar agentgränsen till 30 varv och låter den läsa fler annonssidor kan den ta fram en djupare rapport med fler roller och starkare rekommendationer. Detta ökar dock också körtid och API-användning.
Om du är intresserad av att skapa liknande agentiska verktyg kan du kolla in våra andra API-handledningar om att bygga:
Lär dig agentisk AI med DataCamp!
course
course
course