tracks
AI 에이전트 기초
6
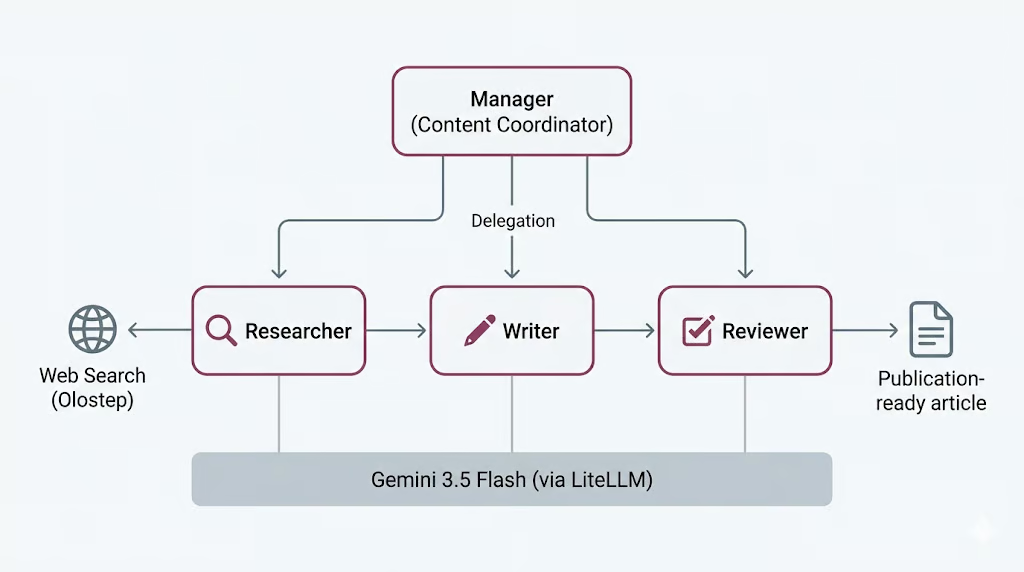
에이전트 스웜은 하나의 작업을 함께 수행하는 AI 에이전트들의 그룹입니다. 하나의 모델에 조사, 작성, 검토, 마무리를 모두 맡기는 대신, 에이전트 스웜은 이 일을 여러 전문 에이전트에 나눕니다. 각 에이전트의 역할이 분명하고, 시스템이 이들을 조율해 더 강한 최종 결과를 냅니다.
장점은 전문화입니다. 연구 중심 에이전트는 출처를 찾고 검증하는 데 집중하고, 작성 중심 에이전트는 구조와 명료성에 집중하며, 리뷰어는 방금 자신이 쓴 글에 휘둘리지 않고 원 연구에 비춰 초안을 점검할 수 있습니다.
조정 에이전트는 단계들을 엮고 다음에 무엇을 할지 결정합니다. 우리가 만드는 스웜에서는 이 역할이 Researcher, Writer, Reviewer, Manager에 곧바로 대응됩니다.
물론 공짜는 아닙니다. 에이전트가 늘수록 모델 호출도 늘고, 시간이 더 들며, 워크플로가 실패할 지점도 많아집니다. 이 트레이드오프는 실제 실행 비용을 본 뒤 마지막에 다시 다룹니다.
CrewAI는 멀티 에이전트 시스템을 구축하기 위한 오픈소스 프레임워크입니다. 에이전트를 정의하고 작업을 할당하며 조율 방식을 선택하는 깔끔한 방법을 제공하여, 연결을 위한 배관 작업 대신 역할과 워크플로에 집중할 수 있게 합니다.
핵심 개념은 세 가지입니다.
프로세스는 고정 순서로 작업이 실행되는 순차형이거나, 매니저 에이전트가 작업을 위임하고 출력을 검증하는 계층형일 수 있습니다. 여기서는 Manager가 위임을 담당하는 계층형을 사용합니다.
CrewAI는 또한 LiteLLM을 통해 모델 액세스를 처리합니다. LiteLLM은 여러 제공업체를 하나의 통합 인터페이스로 호출할 수 있게 해 주는 오픈소스 라이브러리입니다. 덕분에 단일 Gemini 3.5 Flash 모델을 정의해 아래 단계에서 만들 네 개 에이전트 모두에 재사용할 수 있습니다.
이제 설정을 시작하겠습니다.
시작 전에 다음을 준비하세요.
Jupyter Notebook 또는 JupyterLab을 실행하고, 환경에서 사용 가능한 최신 Python 커널로 노트북을 엽니다. 그런 다음 아래 셀을 실행해 필요한 패키지를 설치하세요.
%pip install --quiet -U \
    crewai \
    crewai-tools \
    google-genai \
    litellm \
    olostep \
    nest-asyncio
설치가 끝나면 다음 셀을 실행해 설치된 패키지 버전을 확인하세요. 모든 것이 올바르게 설치되었는지 확인하는 데 도움이 됩니다.
import importlib.metadata as md

for pkg in [
    "crewai",
    "crewai-tools",
    "google-genai",
    "litellm",
    "olostep",
    "nest-asyncio",
]:
    print(f"{pkg:>16}  {md.version(pkg)}")
다음과 유사한 출력이 보일 것입니다:
         crewai  1.14.6
    crewai-tools  1.14.6
      google-genai  2.8.0
          litellm  1.87.1
          olostep  1.1.0
nest-asyncio 1.6.0이 프로젝트에는 두 개의 API 키가 필요합니다.
먼저 Google AI Studio에서 Gemini API 키를 만듭니다. Google AI Studio를 열고, API key 섹션으로 이동하여 프로젝트의 새 키를 생성하세요. Gemini에는 무료 등급이 있지만 사용량과 속도 제한이 있습니다. Gemini를 더 안정적으로 테스트·실행하려면 Google 결제 계정을 연결하거나 무료 등급 한도를 초과할 때 요금이 청구되도록 Google 계정에 크레딧을 추가하세요.
다음으로 Olostep API 키를 생성합니다. Olostep에 가입하고 대시보드를 연 뒤, API keys 페이지에서 API 키를 발급하세요. 이 키는 Researcher 에이전트에 검색 및 페이지 스크래핑용 실시간 웹 액세스를 제공하는 데 사용합니다.
두 키가 준비되면 환경 변수로 저장하세요. Gemini는 CrewAI 에이전트를 구동하고, Olostep은 Researcher 에이전트가 웹에서 최신 정보를 수집하도록 합니다.
두 키를 만든 뒤, 노트북을 실행하기 전에 환경 변수로 저장하세요.
PowerShell:
$env:GEMINI_API_KEY="your-gemini-key"
$env:OLOSTEP_API_KEY="your-olostep-key"
macOS/Linux:
export GEMINI_API_KEY="your-gemini-key"
export OLOSTEP_API_KEY="your-olostep-key"
이제 아래 셀을 실행해 Gemini API 키가 올바르게 로드되었는지 확인합니다.
import os

api_key = os.getenv("GEMINI_API_KEY") or os.getenv("GOOGLE_API_KEY")

if not api_key:
    raise RuntimeError(
        "Set GEMINI_API_KEY or GOOGLE_API_KEY in your environment, "
        "then restart the notebook kernel."
    )
print(f"Gemini API key loaded")
다음이 표시되어야 합니다:
Gemini API key loaded이 프로젝트에서는 모든 CrewAI 에이전트의 공용 LLM으로 Gemini 3.5 Flash를 사용합니다. Gemini 3.5 Flash는 빠른 에이전틱 작업과 코딩 중심 워크로드에 적합합니다. 에이전트가 여러 단계를 추론하고, 지시를 따르고, 도구를 사용하며, 구조화된 출력을 생성해야 하므로 본 프로젝트에 유용합니다.
Gemini 3.5 Flash는 큰 컨텍스트 윈도, 긴 출력, 사고(thinking), 도구 사용을 지원하여 에이전트 워크플로에 적합한 선택입니다. 스웜은 Researcher, Writer, Reviewer, Manager 전반에서 모델을 여러 번 호출할 수 있으므로, Flash 모델을 사용하면 응답성을 유지하면서도 강한 추론·작문 품질을 기대할 수 있습니다.
최신 LLM과 비교하고 싶다면 Gemini 3.5 Flash vs GPT-5.5, Gemini 3.5 Flash vs Claude Opus 4.8 가이드를 참고하세요.
우리는 LiteLLM을 통해 Gemini에 액세스합니다. LiteLLM은 Gemini, OpenAI, Anthropic, Bedrock, Vertex AI 등 다수 제공업체를 하나의 통합 인터페이스로 호출할 수 있는 오픈소스 라이브러리입니다. 이 설정에서 CrewAI는 내부적으로 LiteLLM을 사용하므로, 간단한 provider/model 형식으로 Gemini 모델 이름을 전달할 수 있습니다.
이제 공유 CrewAI LLM을 생성하고 모든 에이전트에 재사용합니다. Researcher, Writer, Reviewer, Manager가 모두 동일한 Gemini 모델을 사용하므로 설정이 간단해집니다.
from crewai import LLM

GEMINI_MODEL = "gemini/gemini-3.5-flash"

gemini_llm = LLM(
    model=GEMINI_MODEL,
    api_key=os.getenv("GEMINI_API_KEY") or os.getenv("GOOGLE_API_KEY"),
    temperature=1.0,
)

print(f"LLM ready: {gemini_llm.model}")
print("Provider API: Google Gemini (via LiteLLM)")
다음과 유사한 출력이 보이면 됩니다:
LLM ready: gemini-3.5-flash
Provider API: Google Gemini (via LiteLLM)
이제 CrewAI가 LiteLLM을 통해 Gemini에 접근할 수 있음을 확인했습니다. 다음 단계에서 이 공유 gemini_llm 객체를 각 에이전트에 전달합니다.
Researcher 에이전트에는 최신 정보에 대한 액세스가 필요합니다. 이를 위해 사용자 정의 Olostep 검색 도구를 만들고 이후 Researcher 에이전트에 부여합니다.
이 도구는 두 가지 모드로 동작합니다. 검색 요약만 반환하는 빠른 모드와, 결과 페이지를 스크래핑해 마크다운으로 페이지 콘텐츠를 반환하는 모드입니다. 또한 에이전트가 웹 도구를 과도하게 호출하지 않도록 작은 검색 예산을 추가합니다.
from pydantic import Field, PrivateAttr
from crewai.tools import BaseTool

try:
    from olostep import Olostep, Olostep_BaseError
except ImportError:
    raise ImportError(
        "The 'olostep' package is not installed. Run %pip install -U olostep."
    )
먼저 환경 변수에서 Olostep API 키를 로드합니다.
olostep_api_key = os.getenv("OLOSTEP_API_KEY")

if not olostep_api_key or olostep_api_key == "your-olostep-api-key-here":
    print(
        "The Olostep tool will fail at call time unless OLOSTEP_API_KEY "
        "is set in the environment."
    )
else:
    print("Olostep API key loaded.")

_olostep_client = Olostep(api_key=olostep_api_key) if olostep_api_key else None
이제 사용자 정의 CrewAI 도구를 만듭니다.
class OlostepSearchTool(BaseTool):
    """Search the web with a strict research-call budget."""

    name: str = "olostep_web_search"
    description: str = (
        "Search the live web. Set scrape=false for fast discovery and "
        "scrape=true for full-page evidence. You have at most 3 discovery "
        "searches without scraping and 6 external search calls total. After "
        "3 discovery searches, use scrape=true on the strongest query or "
        "domain. Each call returns at most 3 results. Inputs: query, scrape, "
        "limit, and optional include_domains."
    )

    default_limit: int = Field(default=3, ge=1, le=3)
    max_chars_per_page: int = Field(default=4000, ge=500, le=12000)

    _total_calls: int = PrivateAttr(default=0)
    _discovery_calls: int = PrivateAttr(default=0)
    _call_history: list[dict] = PrivateAttr(default_factory=list)

    def _run(
        self,
        query: str,
        scrape: bool = False,
        limit: int | None = None,
        include_domains: list[str] | None = None,
    ) -> str:
        if _olostep_client is None:
            return (
                "OLOSTEP_API_KEY is not set. Set it in the environment "
                "and restart the kernel."
            )

        if self._total_calls >= 6:
            return (
                "Research search budget exhausted: 6 external calls have "
                "already been used. Stop searching and complete the task "
                "with the collected sources."
            )

        if not scrape and self._discovery_calls >= 3:
            return (
                "Discovery-search limit reached. Do not run another "
                "scrape=False search. Use scrape=True on the strongest query "
                "or selected domains, or finish with the sources already found."
            )

        clean_query = query.strip()
        if not clean_query:
            return "Search query cannot be empty."

        result_limit = max(1, min(limit or self.default_limit, 3))
        kwargs = {"query": clean_query, "limit": result_limit}

        if scrape:
            kwargs["scrape_options"] = {
                "formats": ["markdown"],
                "timeout": 25,
            }

        if include_domains:
            kwargs["include_domains"] = include_domains

        self._total_calls += 1
        if not scrape:
            self._discovery_calls += 1

        call_record = {
            "number": self._total_calls,
            "query": clean_query,
            "scrape": scrape,
            "limit": result_limit,
            "domains": include_domains or [],
            "status": "started",
            "results": 0,
        }
        self._call_history.append(call_record)

        try:
            search = _olostep_client.searches.create(**kwargs)
        except Olostep_BaseError as error:
            call_record["status"] = "error"
            call_record["error"] = f"{type(error).__name__}: {error}"
            return (
                f"Olostep search error: {type(error).__name__}: {error}\n"
                f"Budget used: {self._total_calls}/6 total calls; "
                f"{self._discovery_calls}/3 discovery calls."
            )

        if not search.links:
            call_record["status"] = "no_results"
            return (
                f"No results found for query: {clean_query!r}\n"
                f"Budget used: {self._total_calls}/6 total calls; "
                f"{self._discovery_calls}/3 discovery calls."
            )

        call_record["status"] = "success"
        call_record["results"] = len(search.links)

        chunks = [
            f"## Web results for: {clean_query!r}",
            f"Page scraping: {'enabled' if scrape else 'disabled'}",
            (
                f"Budget used: {self._total_calls}/6 total calls; "
                f"{self._discovery_calls}/3 discovery calls."
            ),
        ]

        for index, link in enumerate(search.links, 1):
            url = link.get("url", "")
            title = link.get("title") or url or "Untitled result"
            description = link.get("description") or "No description provided."

            chunks.append(
                f"### {index}. {title}\n"
                f"URL: {url}\n"
                f"Summary: {description}"
            )

            markdown = link.get("markdown_content")
            if scrape and markdown:
                body = markdown.strip()
                if len(body) > self.max_chars_per_page:
                    body = body[: self.max_chars_per_page] + "\n...[truncated]"
                chunks.append(f"Page content:\n{body}")

        return "\n\n".join(chunks)
마지막으로 도구 인스턴스를 생성합니다.
olostep_search_tool = OlostepSearchTool()
print(f"Tool ready: {olostep_search_tool.name}")
다음과 유사한 출력이 보일 것입니다:
Olostep API key loaded.
Tool ready: olostep_web_search
이로써 Olostep 웹 검색 도구가 준비되었음을 확인했습니다. 이후 이 도구를 Researcher 에이전트에 연결해 웹에서 최신 정보를 수집하게 합니다.
이제 스웜의 에이전트를 생성합니다. 작업 에이전트 셋과 매니저 에이전트 하나를 정의합니다. 작업 에이전트는 주요 작업을 수행하고, 매니저는 워크플로를 조율합니다.
Researcher 에이전트는 Olostep 도구로 최신 정보를 찾습니다. Writer 에이전트는 연구 내용을 초안으로 만듭니다. Reviewer 에이전트는 초안을 개선합니다. Manager 에이전트는 계층형 크루에서 작업 위임 방식을 결정합니다.
세 작업 에이전트부터 시작합니다.
from crewai import Agent

researcher = Agent(
    role="Senior Research Analyst",
    goal=(
        "Find accurate, current, and well-sourced information about {topic}. "
        "Produce concrete, verifiable points for the writer."
    ),
    backstory=(
        "You are a meticulous research analyst. You decide whether each web "
        "search needs page scraping. Use scrape=False when titles, URLs, and "
        "summaries are enough. Use scrape=True when you need full-page evidence "
        "to verify a claim or understand a source in detail. Cite source URLs."
    ),
    llm=gemini_llm,
    tools=[olostep_search_tool],
    verbose=True,
    allow_delegation=False,
)
다음으로 Writer 에이전트를 만듭니다.
writer = Agent(
    role="Blog Post Writer",
    goal=(
        "Turn the research into a complete, publication-ready educational "
        "article on {topic}. Include a strong title, an unlabeled italic "
        "summary, TL;DR, detailed body sections, conclusion, and FAQs. Add a "
        "table only when it makes a comparison or decision easier to understand."
    ),
    backstory=(
        "You are a seasoned technology educator and writer. You create "
        "practical, approachable articles similar in structure to high-quality "
        "DataCamp content, without copying its wording or branding. You use "
        "clear headings, short paragraphs, concrete examples, and sourced facts."
    ),
    llm=gemini_llm,
    verbose=True,
    allow_delegation=False,
)
이제 Reviewer 에이전트를 만듭니다.
reviewer = Agent(
    role="Senior Editor",
    goal=(
        "Review the draft for factual accuracy, clarity, structure, and "
        "completeness. Ensure it follows the required article order and return "
        "a polished, publication-ready version."
    ),
    backstory=(
        "You are a detail-oriented senior editor for an educational technology "
        "publication. You verify claims, improve flow, remove repetition, and "
        "ensure the title is followed by an unlabeled italic summary and TL;DR. "
        "You keep a table only when it adds real value, remove any Key Takeaways "
        "section, and ensure Conclusion appears immediately before FAQs."
    ),
    llm=gemini_llm,
    verbose=True,
    allow_delegation=False,
)마지막으로 Manager 에이전트를 만듭니다.
manager = Agent(
    role="Content Coordinator",
    goal=(
        "Coordinate research, writing, and review for {topic}. Delegate each "
        "task to the correct specialist and ensure the reviewed article is the "
        "final result."
    ),
    backstory=(
        "You are an experienced editorial lead. You keep the workflow simple: "
        "research first, writing second, and editorial review last."
    ),
    llm=gemini_llm,
    verbose=True,
    allow_delegation=True,
)
매니저는 계층형 크루를 구성할 때 별도로 설정됩니다. 그래서 아직 작업 에이전트 목록에는 추가하지 않습니다.
이제 에이전트 스웜의 작업을 정의합니다. 이 작업들은 곧바로 작업 에이전트에 할당되지 않습니다. 대신 Manager 에이전트가 어느 작업을 누가 처리할지 결정합니다.
이 워크플로에서는 첫 작업이 연구, 두 번째가 작성, 세 번째가 검토입니다. 각 작업에는 예상 출력도 포함되어 있어, 에이전트가 무엇을 만들어야 하는지 정확히 알 수 있습니다.
from crewai import Task

research_task = Task(
    description=(
        "Delegate to the Senior Research Analyst. Research '{topic}' using at "
        "most 6 web-tool calls. Use no more than 3 calls with scrape=False, "
        "then use scrape=True only when detailed evidence is needed. Collect "
        "5-7 useful findings, source URLs, and common reader questions."
    ),
    expected_output=(
        "Clear markdown research notes with 5-7 sourced findings and 3-5 "
        "potential FAQ questions."
    ),
)
다음으로 작성 작업을 만듭니다. 이 작업은 작성자가 수집된 연구를 바탕으로 글을 구성할 수 있도록 연구 작업을 컨텍스트로 사용합니다.
write_task = Task(
    description=(
        "Delegate to the Blog Post Writer. Write one complete educational "
        "markdown article on '{topic}', approximately 1,000-1,500 words. Start "
        "with one H1 title and an unlabeled italic summary. Then include TL;DR, "
        "an introduction, useful body sections, an optional table only when it "
        "improves understanding, a Conclusion, and FAQs. Use source links."
    ),
    expected_output=(
        "One continuous publication-ready markdown article with title, italic "
        "summary, TL;DR, body, Conclusion, and 3-5 FAQs."
    ),
    context=[research_task],
)
이제 검토 작업을 만듭니다. 이 작업은 작성물이 원 연구에 부합하는지 점검할 수 있도록 연구와 작성 작업 모두를 컨텍스트로 사용합니다.
review_task = Task(
    description=(
        "Delegate to the Senior Editor. Review the article for accuracy, "
        "clarity, structure, and source support. Return only the corrected full "
        "article. Keep the same continuous article format and ensure FAQs are "
        "the final section."
    ),
    expected_output=(
        "Only the final reviewed markdown article, beginning with its H1 title "
        "and ending with the final FAQ answer."
    ),
    context=[research_task, write_task],
)
마지막으로 세 가지 작업을 리스트에 추가합니다.
tasks = [research_task, write_task, review_task]

print(f"Defined {len(tasks)} manager-delegated tasks.")
다음이 표시됩니다:
Defined 3 manager-delegated tasks.이제 에이전트와 작업을 하나의 CrewAI 워크플로로 연결합니다. Manager 에이전트가 작업 에이전트를 조율하는 계층형 프로세스를 사용합니다.
이 설정에서는 Researcher, Writer, Reviewer를 작업 에이전트로 추가합니다. Manager는 위임과 조율을 담당하므로 manager_agent 매개변수를 통해 별도로 전달합니다.
from crewai import Crew, Process

crew = Crew(
    agents=[researcher, writer, reviewer],
    tasks=tasks,
    manager_agent=manager,
    process=Process.hierarchical,
    verbose=True,
    memory=False,
)
이제 크루 세부 정보를 출력해 워크플로가 올바르게 조립되었는지 확인합니다.
print("Hierarchical crew assembled.")
print(f"  Workers : {[a.role for a in crew.agents]}")
print(f"  Manager : {crew.manager_agent.role}")
print(f"  Tasks   : {len(crew.tasks)}")
print(f"  Process : {crew.process}")
다음과 유사한 출력이 보일 것입니다:
Hierarchical crew assembled.
  Workers : ['Senior Research Analyst', 'Blog Post Writer', 'Senior Editor']
  Manager : Content Coordinator
  Tasks   : 3
  Process : Process.hierarchical
이로써 계층형 에이전트 스웜이 준비되었음을 확인했습니다. 다음 단계에서는 주제를 입력해 크루를 실행하고 최종 응답을 생성합니다.
이제 에이전트 스웜을 실행할 수 있습니다. 주제를 제공하고 kickoff_async()로 워크플로를 시작합니다.
Jupyter는 이미 백그라운드에서 이벤트 루프를 실행합니다. 따라서 비동기 CrewAI 워크플로가 노트북 내에서 실행될 수 있도록 먼저 nest_asyncio를 적용합니다.
try:
    import nest_asyncio

    nest_asyncio.apply()

    print("nest_asyncio applied: CrewAI can now run inside this kernel.")

except ModuleNotFoundError:
    print("nest_asyncio not installed. Run: pip install nest-asyncio")
다음이 표시됩니다:
nest_asyncio applied: CrewAI can now run inside this kernel.다음으로 주제를 정의하고 크루를 실행하는 도우미 함수를 만듭니다.
from datetime import datetime
topic = "Learning Adaptive Thresholds for LLM Tool Use: When to Rely on Memory and When to Call a Tool"
async def run_crew(topic: str):
"""Run the CrewAI crew asynchronously."""
print(f"Starting crew at {datetime.now().isoformat(timespec='seconds')}")
print(f"Topic: {topic!r}\n")
result = await crew.kickoff_async(inputs={"topic": topic})
print(f"\nFinished at {datetime.now().isoformat(timespec='seconds')}")
print(f"Result type: {type(result).__name__}")
return result
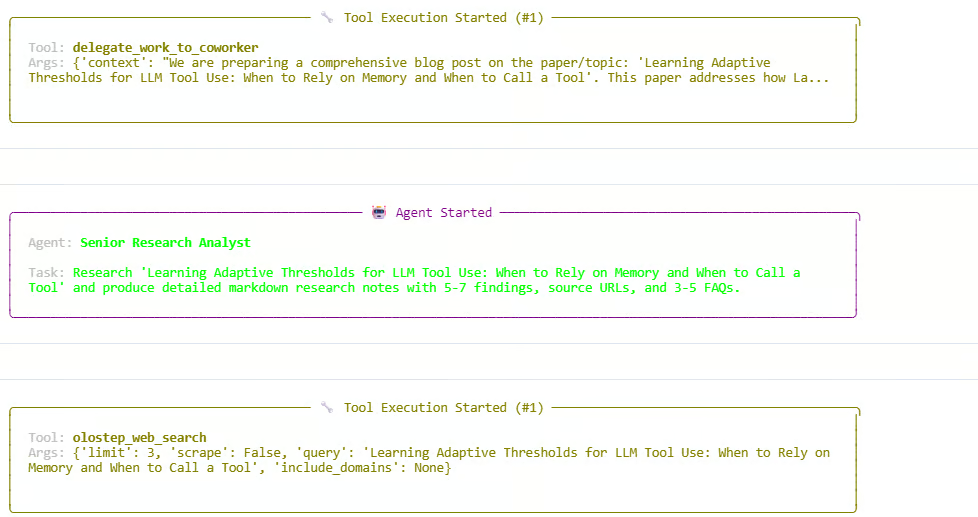
result = await run_crew(topic)워크플로가 시작되면 CrewAI는 먼저 Manager 에이전트에 작업을 전달합니다. Manager는 연구 작업을 Senior Research Analyst에 위임합니다. Researcher는 olostep_web_search 도구를 사용해 적응형 임계값, LLM 도구 사용, 메모리, 도구 호출 의사결정에 대한 정보를 검색합니다.
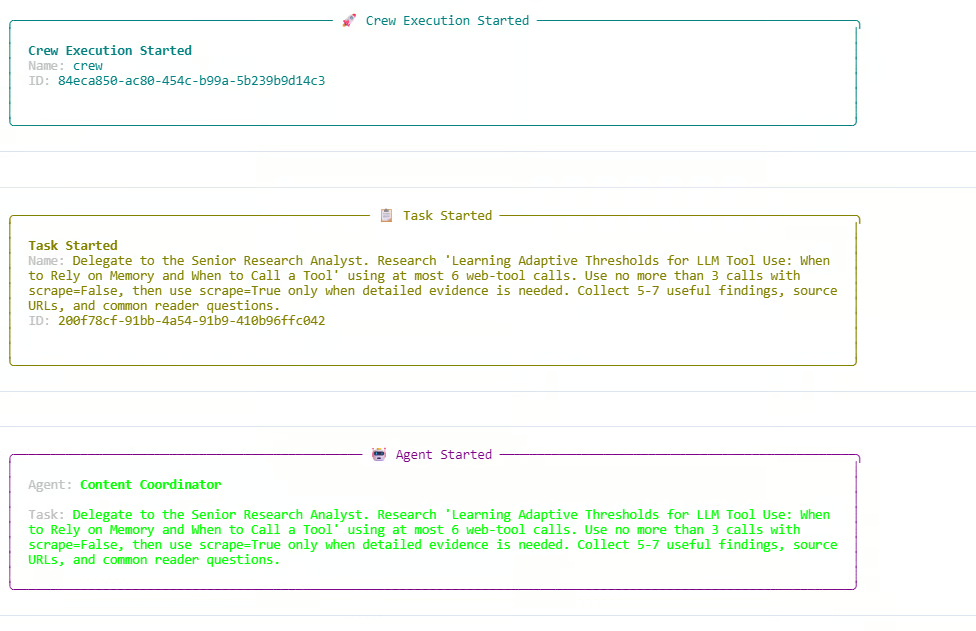
로그에서 Researcher는 검색 전용 호출과 스크래핑 호출을 모두 사용합니다. 검색 예산은 총 6/6 웹 호출과 검색 발견 3/3 호출까지 모두 소진됩니다. 검색 전용 추가 요청 하나는 이미 한도에 도달해 차단됩니다. 이는 사용자 정의 Olostep 도구 내부의 예산 규칙이 제대로 작동함을 보여줍니다.
연구 단계 후 Manager는 작성과 검토 단계를 계속 위임합니다. 에이전트는 연구 노트를 만들고, 글 초안을 작성하고, 최종 응답을 다듬습니다. 실행은 성공적으로 종료되며 CrewOutput 객체를 반환합니다.
다음과 유사한 출력이 보일 것입니다:
Starting crew at 2026-06-05T13:54:07
Topic: 'Learning Adaptive Thresholds for LLM Tool Use: When to Rely on Memory and When to Call a Tool'

Crew Execution Started
Task Started
Agent: Content Coordinator
Agent: Senior Research Analyst
Tool: olostep_web_search
Budget used: 6/6 total calls; 3/3 discovery calls

Finished at 2026-06-05T13:59:29
Result type: CrewOutput
이는 전체 스웜이 성공적으로 실행되었음을 의미합니다. Manager가 워크플로를 조율했고, Researcher가 최신 정보를 수집했으며, Writer가 초안을 만들고, Reviewer가 최종 출력을 개선했습니다.
스웜 실행이 끝나면 크루가 생성한 최종 글을 표시할 수 있습니다. result.raw 값에는 워크플로의 최종 응답이 들어 있습니다.
from IPython.display import Markdown, display

raw = result.raw

if "Blog Post" in raw:
    raw = raw.split("Blog Post", 1)[1].strip()

display(Markdown(raw))
이 코드는 노트북 내에서 최종 출력을 포매팅된 마크다운으로 렌더링합니다.
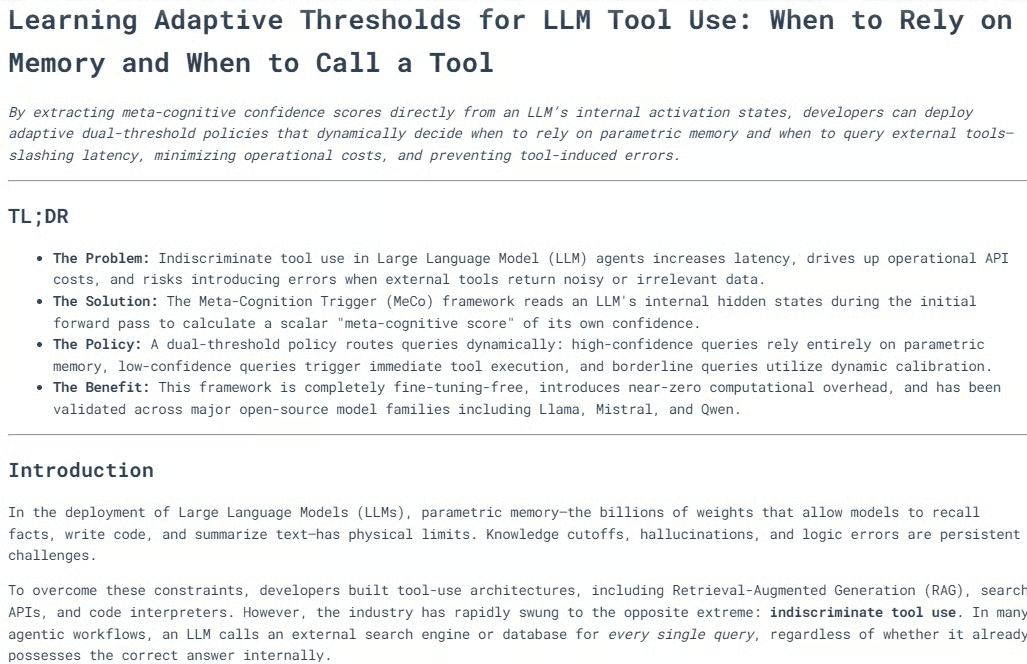
대부분의 경우 생성된 블로그는 여러 헤딩과 명확한 섹션, 필요 시 도식이나 시각적 설명, 강한 결론까지 갖춰 잘 구조화되어 있습니다.
연구, 작성, 편집 검토의 조합은 출판 가능한 콘텐츠를 만드는 데 도움이 됩니다. 출력을 검토한 뒤 개인적으로는 가벼운 수정만 거쳐도 출판에 충분하다고 판단했습니다.
다음으로 실행 트레이스를 출력할 수 있습니다. 스웜이 어떻게 작동했는지, 어떤 에이전트가 참여했는지, 웹 호출이 몇 번 있었는지, 각 작업이 어떻게 처리되었는지 이해하는 데 도움이 됩니다.
from collections import Counter

def role_name(value):
    """Return a readable role/name for CrewAI agent values."""
    if value is None:
        return "Not reported"
    if isinstance(value, str):
        return value
    return getattr(value, "role", None) or getattr(value, "name", None) or str(value)

print("=" * 70)
print("SWARM EXECUTION TRACE")
print("=" * 70)

# Hierarchical crew structure
print("\nCOORDINATION")
print(f"Process : {crew.process}")
print(f"Manager : {role_name(crew.manager_agent)}")
print(f"Workers : {', '.join(role_name(agent) for agent in crew.agents)}")
print(
    "Flow    : Manager receives each task, delegates specialist work, "
    "validates the response, and passes approved context to the next task."
)

Now print the web-tool usage recorded by the custom Olostep tool.
history = list(getattr(olostep_search_tool, "_call_history", []))
discovery_calls = sum(not item["scrape"] for item in history)
scrape_calls = sum(item["scrape"] for item in history)
successful_calls = sum(item["status"] == "success" for item in history)

print("\nWEB TOOL USAGE")
print(f"Total external calls : {len(history)}/6")
print(f"Without scraping     : {discovery_calls}/3")
print(f"With scraping        : {scrape_calls}")
print(f"Successful calls     : {successful_calls}")

if history:
    for item in history:
        mode = "scrape" if item["scrape"] else "search only"
        domains = ", ".join(item["domains"]) if item["domains"] else "all domains"
        print(
            f"  {item['number']}. {mode}; status={item['status']}; "
            f"results={item['results']}; scope={domains}"
        )
        print(f"     Query: {item['query']}")
else:
    print("  No Olostep calls were recorded.")

Finally, print the task-by-task trace.
print("\nTASK-BY-TASK TRACE")
agent_activity = Counter()

for index, task_out in enumerate(result.tasks_output, start=1):
    task = crew.tasks[index - 1] if index <= len(crew.tasks) else None
    reported_agent = role_name(getattr(task_out, "agent", None))
    processed_by = sorted(getattr(task, "processed_by_agents", set()) or [])
    participants = processed_by or [reported_agent]

    for participant in participants:
        agent_activity[role_name(participant)] += 1

    delegations = getattr(task, "delegations", 0) if task else 0
    used_tools = getattr(task, "used_tools", 0) if task else 0
    tool_errors = getattr(task, "tools_errors", 0) if task else 0
    start_time = getattr(task, "start_time", None) if task else None
    end_time = getattr(task, "end_time", None) if task else None
    duration = end_time - start_time if start_time and end_time else None

    print(f"\n--- Task {index} ---")
    print(f"Reported owner : {reported_agent}")
    print(f"Processed by   : {', '.join(map(role_name, participants))}")
    print(f"Delegations    : {delegations}")
    print(f"Tool uses      : {used_tools}")
    print(f"Tool errors    : {tool_errors}")
    if duration is not None:
        print(f"Duration       : {duration}")

    preview = getattr(task_out, "raw", "").strip().replace("\n", " ")
    print(f"Output preview : {preview[:300]}{'...' if len(preview) > 300 else ''}")

print("\nAGENT ACTIVITY")
for agent, count in agent_activity.most_common():
    print(f"{agent}: participated in {count} task(s)")

if not agent_activity:
    print("CrewAI did not expose per-agent processing metadata for this run.")
다음과 유사한 출력이 보일 것입니다:
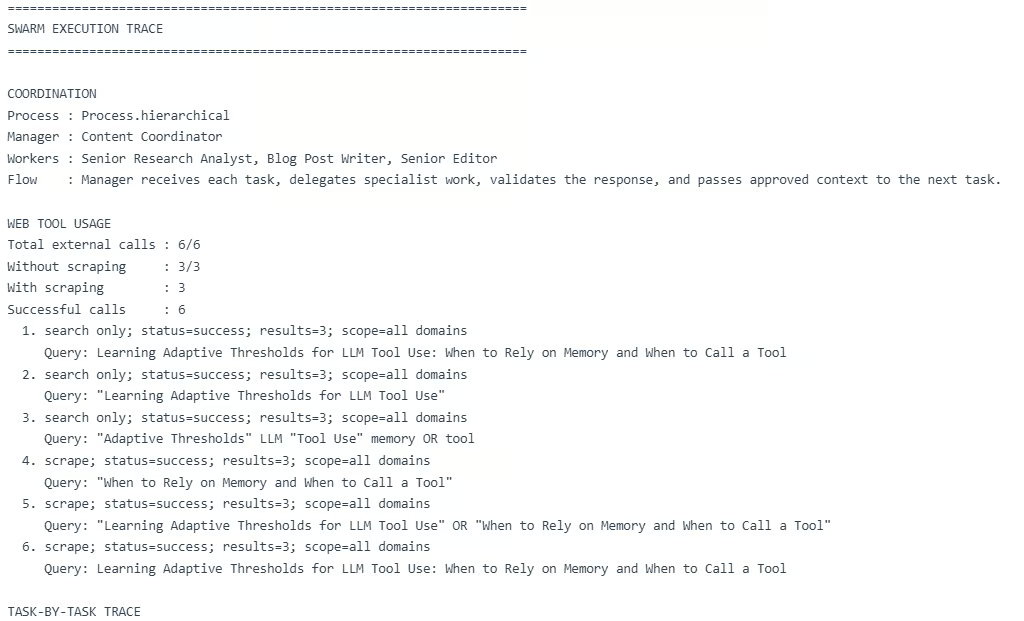
이 트레이스는 계층형 스웜이 예상대로 동작했음을 보여 줍니다. Manager가 세 가지 작업을 조율하고, Researcher가 연구 단계를 맡았으며, Writer가 글 초안을 만들고, Reviewer가 최종 응답을 개선했습니다.
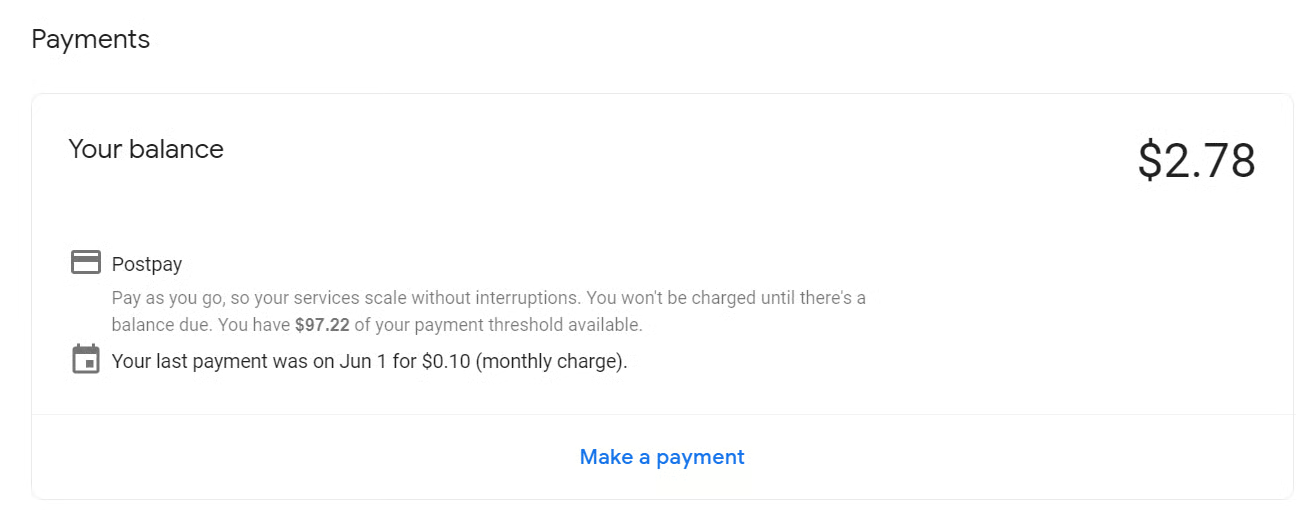
하지만 중요한 한계도 드러납니다. 멀티 에이전트 워크플로는 비용이 높아질 수 있습니다.
이 실행에서는 외부 웹 호출 6회와 Manager, Researcher, Writer, Reviewer 전반의 다수 LLM 호출이 사용되었습니다. 단일 실행 비용은 약 $0.28까지 들 수 있으며, 이 가이드를 작성하는 데 테스트 기간 동안 약 $2.78이 소요되었습니다. 단순한 튜토리얼 프로젝트치고는 높은 편입니다.
에이전트 스웜과 멀티 에이전트 워크플로는 개념적으로 매우 매력적입니다. Researcher, Writer, Reviewer, Manager가 함께 일하는 아이디어는 강력해 보이며, 이 가이드에서도 최종 출력은 약간의 편집만으로 출판 가능할 정도로 괜찮았습니다.
하지만 실제로는 비용이 더 들고 시간이 더 오래 걸리며 실패 지점도 늘어납니다. 제 경우 단일 실행에 약 $0.28, 이 가이드를 만드는 데 약 $2.78이 들었습니다. 단순한 튜토리얼 프로젝트로서는 많은 편입니다.
실제 애플리케이션에서는 항상 완전한 멀티 에이전트 스웜을 쓰지는 않을 것입니다. 간단한 작업은 코드나 규칙으로 처리하고, 복잡한 작업만 에이전트에 넘기는 보다 프로그래매틱한 구성을 선호합니다. 도구 호출을 제한하고, 에이전트 수를 줄이며, 프롬프트 길이를 줄이고, 계층형 대신 선형 워크플로를 사용해 비용을 낮출 수도 있습니다.
물론 최적화를 너무 밀어붙이면 더 이상 진정한 에이전트 스웜이 아닐 수 있습니다. 규칙 기반 AI 워크플로에 가까워집니다. 그래서 목표는 균형입니다. 진짜 가치를 더할 때는 에이전트 스웜을 쓰되, 그렇지 않을 때는 단순하게 유지하세요.
DataCamp으로 에이전틱 AI를 배워 보세요!
tracks
courses
courses