Track
एआई एजेंट मूलभूत बातें
6 घंटा
एजेंट स्वॉर्म AI एजेंट्स का एक समूह होता है जो मिलकर कोई कार्य पूरा करते हैं। एक मॉडल से खुद ही शोध, लेखन, समीक्षा, और अंतिम रूप देने को कहने के बजाय, एजेंट स्वॉर्म काम को कई विशेषज्ञ एजेंट्स में बाँट देता है। हर एजेंट की स्पष्ट भूमिका होती है, और सिस्टम उनका समन्वय करके बेहतर अंतिम परिणाम देता है।
इसका लाभ है विशेषज्ञता। शोध-केंद्रित एजेंट स्रोत ढूँढने और सत्यापित करने पर ध्यान दे सकता है, लेखन-केंद्रित एजेंट संरचना और स्पष्टता पर, और समीक्षक अपने ही लिखे मसौदे से विचलित हुए बिना मसौदे को मूल शोध के खिलाफ परख सकता है।
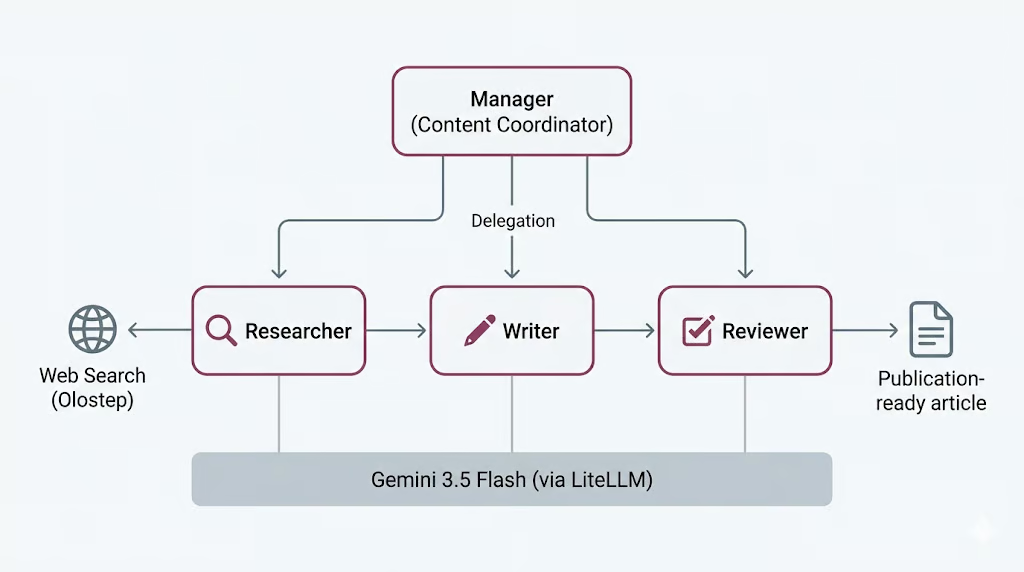
एक समन्वयक एजेंट इन चरणों को जोड़ता है और अगला कदम तय करता है। जिस स्वॉर्म का हम निर्माण कर रहे हैं, उसमें ये भूमिकाएँ सीधे Researcher, Writer, Reviewer, और Manager से मेल खाती हैं।
हालाँकि, यह मुफ़्त नहीं है। अधिक एजेंट्स का मतलब अधिक मॉडल कॉल्स, अधिक समय, और अधिक ऐसी जगहें जहाँ वर्कफ़्लो गलत हो सकता है; यह एक समझौता है जिस पर हम अंत में लौटेंगे, जब आप देख लेंगे कि इसे चलाने की वास्तविक लागत क्या है।
CrewAI एक ओपन-सोर्स फ्रेमवर्क है जो मल्टी-एजेंट सिस्टम बनाने के लिए इस्तेमाल होता है। यह एजेंट्स को परिभाषित करने, उन्हें कार्य सौंपने और उनके समन्वय का तरीका चुनने का साफ-सुथरा तरीका देता है, ताकि आप कनेक्टिविटी की जटिलताओं के बजाय भूमिकाओं और वर्कफ़्लो पर ध्यान दे सकें।
तीन अवधारणाएँ अधिकांश काम करती हैं।
यह प्रक्रिया या तो क्रमिक हो सकती है, जहाँ टास्क्स तय क्रम में चलते हैं, या पदानुक्रमित, जहाँ एक मैनेजर एजेंट काम बाँटता है और आउटपुट को मान्य करता है। हम यहाँ पदानुक्रमित प्रक्रिया का उपयोग करेंगे, जिसमें Manager डेलीगेशन संभालेगा।
CrewAI मॉडल एक्सेस भी संभालता है LiteLLM के माध्यम से, जो कई प्रदाताओं के लिए एक एकीकृत इंटरफ़ेस देने वाली ओपन-सोर्स लाइब्रेरी है। यही हमें एक Gemini 3.5 Flash मॉडल परिभाषित करने और उसे सभी चार एजेंट्स में पुन: उपयोग करने देता है, जिसे हम नीचे के चरणों में सेट अप करेंगे।
सेटअप से शुरू करते हैं।
शुरू करने से पहले, सुनिश्चित करें कि आपके पास ये हों:
Jupyter Notebook या JupyterLab लॉन्च करें और अपने वातावरण में उपलब्ध नवीनतम Python कर्नेल के साथ एक नोटबुक खोलें। फिर आवश्यक पैकेज इंस्टॉल करने के लिए निम्नलिखित सेल चलाएँ।
%pip install --quiet -U \
    crewai \
    crewai-tools \
    google-genai \
    litellm \
    olostep \
    nest-asyncio
इंस्टॉलेशन पूरा होने के बाद, इंस्टॉल्ड पैकेज वर्ज़न जाँचने के लिए अगला सेल चलाएँ। यह पुष्टि करने में मदद करता है कि सब कुछ सही तरीके से इंस्टॉल हुआ है।
import importlib.metadata as md

for pkg in [
    "crewai",
    "crewai-tools",
    "google-genai",
    "litellm",
    "olostep",
    "nest-asyncio",
]:
    print(f"{pkg:>16}  {md.version(pkg)}")
आपको इससे मिलता-जुलता आउटपुट दिखना चाहिए:
         crewai  1.14.6
    crewai-tools  1.14.6
      google-genai  2.8.0
          litellm  1.87.1
          olostep  1.1.0
nest-asyncio 1.6.0इस प्रोजेक्ट के लिए आपको दो API कुंजियाँ चाहिए होंगी.
पहले, Google AI Studio से एक Gemini API कुंजी बनाएं। Google AI Studio खोलें, API key सेक्शन में जाएँ, और अपने प्रोजेक्ट के लिए नई कुंजी बनाएँ। Gemini एक फ्री टियर देता है, लेकिन इसमें सीमित उपयोग और रेट लिमिट्स हैं। Gemini को अधिक भरोसेमंद तरीके से जाँचने और चलाने के लिए, अपना Google बिलिंग खाता कनेक्ट करें या अपने Google खाते में क्रेडिट जोड़ें ताकि फ्री टियर सीमाओं से आगे जाने पर उपयोग बिल हो सके।
अगले चरण में, एक Olostep API कुंजी बनाएँ। Olostep पर साइन अप करें, Olostep डैशबोर्ड खोलें, और API keys पेज से API कुंजी जनरेट करें। हम इस कुंजी का उपयोग Researcher एजेंट को सर्च और पेज स्क्रैपिंग के लिए लाइव वेब एक्सेस देने में करेंगे।
जब दोनों कुंजियाँ तैयार हो जाएँ, तो उन्हें वातावरण चर के रूप में सहेजें। CrewAI एजेंट्स को Gemini शक्ति देगा, जबकि Olostep Researcher एजेंट को वेब से वर्तमान जानकारी एकत्र करने देगा।
दोनों कुंजियाँ बनाने के बाद, नोटबुक चलाने से पहले उन्हें वातावरण चर के रूप में सहेजें।
PowerShell:
$env:GEMINI_API_KEY="your-gemini-key"
$env:OLOSTEP_API_KEY="your-olostep-key"
macOS/Linux:
export GEMINI_API_KEY="your-gemini-key"
export OLOSTEP_API_KEY="your-olostep-key"
अब नीचे दिया सेल चलाएँ ताकि जाँचा जा सके कि Gemini API कुंजी सही से लोड हुई है।
import os

api_key = os.getenv("GEMINI_API_KEY") or os.getenv("GOOGLE_API_KEY")

if not api_key:
    raise RuntimeError(
        "Set GEMINI_API_KEY or GOOGLE_API_KEY in your environment, "
        "then restart the notebook kernel."
    )
print(f"Gemini API key loaded")
आपको यह दिखना चाहिए:
Gemini API key loadedइस प्रोजेक्ट में, हम सभी CrewAI एजेंट्स के लिए साझा LLM के रूप में Gemini 3.5 Flash का उपयोग करेंगे। Gemini 3.5 Flash तेज़, एजेंटिक, और कोडिंग-केंद्रित वर्कलोड्स के लिए डिज़ाइन किया गया है। यह प्रोजेक्ट इसलिए उपयुक्त है क्योंकि हमारे एजेंट्स को कई चरणों में तर्क करना, निर्देशों का पालन करना, टूल्स के साथ काम करना, और संरचित आउटपुट बनाना होता है।
Gemini 3.5 Flash बड़ा कॉन्टेक्स्ट विंडो, लंबे आउटपुट, सोचने की क्षमता, और टूल उपयोग को सपोर्ट करता है, जो इसे एजेंट वर्कफ़्लोज़ के लिए अच्छा विकल्प बनाता है। चूँकि एक एजेंट स्वॉर्म Researcher, Writer, Reviewer और Manager एजेंट्स के बीच मॉडल को कई बार कॉल कर सकता है, Flash मॉडल का उपयोग वर्कफ़्लो को प्रतिक्रियाशील बनाए रखने में मदद करता है, साथ ही अच्छी तर्क और लेखन गुणवत्ता देता है।
यदि आप इस मॉडल की तुलना अन्य अत्याधुनिक LLMs से करना चाहते हैं, तो हमारे गाइड्स Gemini 3.5 Flash बनाम GPT-5.5 और Gemini 3.5 Flash बनाम Claude Opus 4.8 पढ़ने की सलाह देता हूँ।
हम Gemini तक पहुँच LiteLLM के माध्यम से करेंगे। LiteLLM एक ओपन-सोर्स लाइब्रेरी है जो Gemini, OpenAI, Anthropic, Bedrock, Vertex AI, और अन्य सहित कई LLM प्रदाताओं को कॉल करने के लिए एकीकृत इंटरफ़ेस देती है। इस सेटअप में, CrewAI पृष्ठभूमि में LiteLLM का उपयोग करता है ताकि हम Gemini मॉडल नाम को सरल provider/model फ़ॉर्मेट में पास कर सकें।
अब हम एक साझा CrewAI LLM बनाएँगे और उसे सभी एजेंट्स के लिए पुनः उपयोग करेंगे। इससे सेटअप सरल रहता है क्योंकि Researcher, Writer, Reviewer, और Manager सभी एक ही Gemini मॉडल का उपयोग करेंगे।
from crewai import LLM

GEMINI_MODEL = "gemini/gemini-3.5-flash"

gemini_llm = LLM(
    model=GEMINI_MODEL,
    api_key=os.getenv("GEMINI_API_KEY") or os.getenv("GOOGLE_API_KEY"),
    temperature=1.0,
)

print(f"LLM ready: {gemini_llm.model}")
print("Provider API: Google Gemini (via LiteLLM)")
आपको इससे मिलता-जुलता आउटपुट दिखना चाहिए:
LLM ready: gemini-3.5-flash
Provider API: Google Gemini (via LiteLLM)
यह पुष्टि करता है कि अब CrewAI, LiteLLM के माध्यम से Gemini तक पहुँच सकता है। अगले चरणों में, हम इस साझा gemini_llm ऑब्जेक्ट को प्रत्येक एजेंट को देंगे।
Researcher एजेंट को मौजूदा जानकारी तक पहुँच चाहिए। इसके लिए, हम एक कस्टम Olostep सर्च टूल बनाएँगे और बाद में इसे Researcher एजेंट को देंगे।
यह टूल दो मोड में काम कर सकता है। यह केवल सर्च सारांश लौटा सकता है, जो तेज़ है, या यह परिणाम पेजों को स्क्रैप कर सकता है और मार्कडाउन में पेज सामग्री लौटा सकता है। हम एक छोटा सर्च बजट भी जोड़ते हैं ताकि एजेंट वेब टूल को बहुत बार कॉल न करे।
from pydantic import Field, PrivateAttr
from crewai.tools import BaseTool

try:
    from olostep import Olostep, Olostep_BaseError
except ImportError:
    raise ImportError(
        "The 'olostep' package is not installed. Run %pip install -U olostep."
    )
सबसे पहले, वातावरण से Olostep API कुंजी लोड करें।
olostep_api_key = os.getenv("OLOSTEP_API_KEY")

if not olostep_api_key or olostep_api_key == "your-olostep-api-key-here":
    print(
        "The Olostep tool will fail at call time unless OLOSTEP_API_KEY "
        "is set in the environment."
    )
else:
    print("Olostep API key loaded.")

_olostep_client = Olostep(api_key=olostep_api_key) if olostep_api_key else None
अब कस्टम CrewAI टूल बनाइए।
class OlostepSearchTool(BaseTool):
    """Search the web with a strict research-call budget."""

    name: str = "olostep_web_search"
    description: str = (
        "Search the live web. Set scrape=false for fast discovery and "
        "scrape=true for full-page evidence. You have at most 3 discovery "
        "searches without scraping and 6 external search calls total. After "
        "3 discovery searches, use scrape=true on the strongest query or "
        "domain. Each call returns at most 3 results. Inputs: query, scrape, "
        "limit, and optional include_domains."
    )

    default_limit: int = Field(default=3, ge=1, le=3)
    max_chars_per_page: int = Field(default=4000, ge=500, le=12000)

    _total_calls: int = PrivateAttr(default=0)
    _discovery_calls: int = PrivateAttr(default=0)
    _call_history: list[dict] = PrivateAttr(default_factory=list)

    def _run(
        self,
        query: str,
        scrape: bool = False,
        limit: int | None = None,
        include_domains: list[str] | None = None,
    ) -> str:
        if _olostep_client is None:
            return (
                "OLOSTEP_API_KEY is not set. Set it in the environment "
                "and restart the kernel."
            )

        if self._total_calls >= 6:
            return (
                "Research search budget exhausted: 6 external calls have "
                "already been used. Stop searching and complete the task "
                "with the collected sources."
            )

        if not scrape and self._discovery_calls >= 3:
            return (
                "Discovery-search limit reached. Do not run another "
                "scrape=False search. Use scrape=True on the strongest query "
                "or selected domains, or finish with the sources already found."
            )

        clean_query = query.strip()
        if not clean_query:
            return "Search query cannot be empty."

        result_limit = max(1, min(limit or self.default_limit, 3))
        kwargs = {"query": clean_query, "limit": result_limit}

        if scrape:
            kwargs["scrape_options"] = {
                "formats": ["markdown"],
                "timeout": 25,
            }

        if include_domains:
            kwargs["include_domains"] = include_domains

        self._total_calls += 1
        if not scrape:
            self._discovery_calls += 1

        call_record = {
            "number": self._total_calls,
            "query": clean_query,
            "scrape": scrape,
            "limit": result_limit,
            "domains": include_domains or [],
            "status": "started",
            "results": 0,
        }
        self._call_history.append(call_record)

        try:
            search = _olostep_client.searches.create(**kwargs)
        except Olostep_BaseError as error:
            call_record["status"] = "error"
            call_record["error"] = f"{type(error).__name__}: {error}"
            return (
                f"Olostep search error: {type(error).__name__}: {error}\n"
                f"Budget used: {self._total_calls}/6 total calls; "
                f"{self._discovery_calls}/3 discovery calls."
            )

        if not search.links:
            call_record["status"] = "no_results"
            return (
                f"No results found for query: {clean_query!r}\n"
                f"Budget used: {self._total_calls}/6 total calls; "
                f"{self._discovery_calls}/3 discovery calls."
            )

        call_record["status"] = "success"
        call_record["results"] = len(search.links)

        chunks = [
            f"## Web results for: {clean_query!r}",
            f"Page scraping: {'enabled' if scrape else 'disabled'}",
            (
                f"Budget used: {self._total_calls}/6 total calls; "
                f"{self._discovery_calls}/3 discovery calls."
            ),
        ]

        for index, link in enumerate(search.links, 1):
            url = link.get("url", "")
            title = link.get("title") or url or "Untitled result"
            description = link.get("description") or "No description provided."

            chunks.append(
                f"### {index}. {title}\n"
                f"URL: {url}\n"
                f"Summary: {description}"
            )

            markdown = link.get("markdown_content")
            if scrape and markdown:
                body = markdown.strip()
                if len(body) > self.max_chars_per_page:
                    body = body[: self.max_chars_per_page] + "\n...[truncated]"
                chunks.append(f"Page content:\n{body}")

        return "\n\n".join(chunks)
अंत में, टूल का एक इंस्टांस बनाएँ।
olostep_search_tool = OlostepSearchTool()
print(f"Tool ready: {olostep_search_tool.name}")
आपको इससे मिलता-जुलता आउटपुट दिखना चाहिए:
Olostep API key loaded.
Tool ready: olostep_web_search
यह पुष्टि करता है कि Olostep वेब सर्च टूल तैयार है। बाद में, हम इस टूल को Researcher एजेंट से जोड़ेंगे ताकि वह वेब से मौजूदा जानकारी एकत्र कर सके।
अब हम अपने स्वॉर्म के लिए एजेंट्स बनाएँगे। हम तीन वर्कर एजेंट्स और एक मैनेजर एजेंट परिभाषित करेंगे। वर्कर एजेंट्स मुख्य कार्य करते हैं, जबकि मैनेजर वर्कफ़्लो का समन्वय करता है।
The Researcher एजेंट मौजूदा जानकारी खोजने के लिए Olostep टूल का उपयोग करेगा। Writer एजेंट शोध को मसौदे में बदलेगा। Reviewer एजेंट मसौदे में सुधार करेगा। Manager एजेंट पदानुक्रमित क्रू में काम कैसे बाँटना है, यह तय करेगा।
चलें, तीनों वर्कर एजेंट्स से शुरू करते हैं।
from crewai import Agent

researcher = Agent(
    role="Senior Research Analyst",
    goal=(
        "Find accurate, current, and well-sourced information about {topic}. "
        "Produce concrete, verifiable points for the writer."
    ),
    backstory=(
        "You are a meticulous research analyst. You decide whether each web "
        "search needs page scraping. Use scrape=False when titles, URLs, and "
        "summaries are enough. Use scrape=True when you need full-page evidence "
        "to verify a claim or understand a source in detail. Cite source URLs."
    ),
    llm=gemini_llm,
    tools=[olostep_search_tool],
    verbose=True,
    allow_delegation=False,
)
अब Writer एजेंट बनाएँ।
writer = Agent(
    role="Blog Post Writer",
    goal=(
        "Turn the research into a complete, publication-ready educational "
        "article on {topic}. Include a strong title, an unlabeled italic "
        "summary, TL;DR, detailed body sections, conclusion, and FAQs. Add a "
        "table only when it makes a comparison or decision easier to understand."
    ),
    backstory=(
        "You are a seasoned technology educator and writer. You create "
        "practical, approachable articles similar in structure to high-quality "
        "DataCamp content, without copying its wording or branding. You use "
        "clear headings, short paragraphs, concrete examples, and sourced facts."
    ),
    llm=gemini_llm,
    verbose=True,
    allow_delegation=False,
)
अब Reviewer एजेंट बनाएँ।
reviewer = Agent(
    role="Senior Editor",
    goal=(
        "Review the draft for factual accuracy, clarity, structure, and "
        "completeness. Ensure it follows the required article order and return "
        "a polished, publication-ready version."
    ),
    backstory=(
        "You are a detail-oriented senior editor for an educational technology "
        "publication. You verify claims, improve flow, remove repetition, and "
        "ensure the title is followed by an unlabeled italic summary and TL;DR. "
        "You keep a table only when it adds real value, remove any Key Takeaways "
        "section, and ensure Conclusion appears immediately before FAQs."
    ),
    llm=gemini_llm,
    verbose=True,
    allow_delegation=False,
)अंत में, Manager एजेंट बनाएँ।
manager = Agent(
    role="Content Coordinator",
    goal=(
        "Coordinate research, writing, and review for {topic}. Delegate each "
        "task to the correct specialist and ensure the reviewed article is the "
        "final result."
    ),
    backstory=(
        "You are an experienced editorial lead. You keep the workflow simple: "
        "research first, writing second, and editorial review last."
    ),
    llm=gemini_llm,
    verbose=True,
    allow_delegation=True,
)
जब हम पदानुक्रमित क्रू बनाएँगे, तो मैनेजर को अलग से कॉन्फ़िगर किया जाएगा। यही कारण है कि इसे अभी वर्कर एजेंट सूची में नहीं जोड़ा गया है।
अब हम एजेंट स्वॉर्म के लिए टास्क परिभाषित करेंगे। ये टास्क सीधे वर्कर एजेंट्स को असाइन नहीं किए जाते। इसके बजाय, Manager एजेंट तय करेगा कि किस वर्कर को कौन-सा टास्क संभालना चाहिए।
इस वर्कफ़्लो में, पहला टास्क शोध है, दूसरा लेखन, और तीसरा समीक्षा। प्रत्येक टास्क में अपेक्षित आउटपुट भी शामिल है, ताकि एजेंट्स को पता हो कि उन्हें क्या बनाना है।
from crewai import Task

research_task = Task(
    description=(
        "Delegate to the Senior Research Analyst. Research '{topic}' using at "
        "most 6 web-tool calls. Use no more than 3 calls with scrape=False, "
        "then use scrape=True only when detailed evidence is needed. Collect "
        "5-7 useful findings, source URLs, and common reader questions."
    ),
    expected_output=(
        "Clear markdown research notes with 5-7 sourced findings and 3-5 "
        "potential FAQ questions."
    ),
)
अब राइटिंग टास्क बनाएँ। यह टास्क रिसर्च टास्क को संदर्भ के रूप में उपयोग करता है, ताकि Writer एकत्रित शोध से लेख बना सके।
write_task = Task(
    description=(
        "Delegate to the Blog Post Writer. Write one complete educational "
        "markdown article on '{topic}', approximately 1,000-1,500 words. Start "
        "with one H1 title and an unlabeled italic summary. Then include TL;DR, "
        "an introduction, useful body sections, an optional table only when it "
        "improves understanding, a Conclusion, and FAQs. Use source links."
    ),
    expected_output=(
        "One continuous publication-ready markdown article with title, italic "
        "summary, TL;DR, body, Conclusion, and 3-5 FAQs."
    ),
    context=[research_task],
)
अब, रिव्यू टास्क बनाएँ। यह टास्क शोध और लेखन दोनों टास्क को संदर्भ के रूप में उपयोग करता है, ताकि Reviewer मूल शोध के मुकाबले लेख की जाँच कर सके।
review_task = Task(
    description=(
        "Delegate to the Senior Editor. Review the article for accuracy, "
        "clarity, structure, and source support. Return only the corrected full "
        "article. Keep the same continuous article format and ensure FAQs are "
        "the final section."
    ),
    expected_output=(
        "Only the final reviewed markdown article, beginning with its H1 title "
        "and ending with the final FAQ answer."
    ),
    context=[research_task, write_task],
)
अंत में, सभी तीनों टास्क को एक सूची में जोड़ें।
tasks = [research_task, write_task, review_task]

print(f"Defined {len(tasks)} manager-delegated tasks.")
आपको यह दिखना चाहिए:
Defined 3 manager-delegated tasks.अब हम एजेंट्स और टास्क्स को एक CrewAI वर्कफ़्लो में जोड़ेंगे। हम पदानुक्रमित प्रक्रिया का उपयोग करेंगे जिसमें Manager एजेंट वर्कर एजेंट्स का समन्वय करता है।
इस सेटअप में, Researcher, Writer, और Reviewer को वर्कर एजेंट्स के रूप में जोड़ा जाता है। Manager को अलग से manager_agent के माध्यम से पास किया जाता है, क्योंकि वही डेलीगेशन और समन्वय के लिए ज़िम्मेदार है।
from crewai import Crew, Process

crew = Crew(
    agents=[researcher, writer, reviewer],
    tasks=tasks,
    manager_agent=manager,
    process=Process.hierarchical,
    verbose=True,
    memory=False,
)
अब क्रू विवरण प्रिंट करें ताकि पुष्टि हो सके कि वर्कफ़्लो सही से असेंबल हुआ है।
print("Hierarchical crew assembled.")
print(f"  Workers : {[a.role for a in crew.agents]}")
print(f"  Manager : {crew.manager_agent.role}")
print(f"  Tasks   : {len(crew.tasks)}")
print(f"  Process : {crew.process}")
आपको इससे मिलता-जुलता आउटपुट दिखना चाहिए:
Hierarchical crew assembled.
  Workers : ['Senior Research Analyst', 'Blog Post Writer', 'Senior Editor']
  Manager : Content Coordinator
  Tasks   : 3
  Process : Process.hierarchical
यह पुष्टि करता है कि पदानुक्रमित एजेंट स्वॉर्म तैयार है। अगले चरण में, हम किसी विषय पर क्रू चलाएँगे और अंतिम प्रतिक्रिया जनरेट करेंगे।
अब हम एजेंट स्वॉर्म चला सकते हैं। हम एक विषय देंगे और kickoff_async() के साथ वर्कफ़्लो शुरू करेंगे।
Jupyter पहले से ही पृष्ठभूमि में एक इवेंट लूप चलाता है। इस कारण, हम पहले nest_asyncio लागू करते हैं, ताकि असिंक्रोनस CrewAI वर्कफ़्लो नोटबुक के अंदर चल सके।
try:
    import nest_asyncio

    nest_asyncio.apply()

    print("nest_asyncio applied: CrewAI can now run inside this kernel.")

except ModuleNotFoundError:
    print("nest_asyncio not installed. Run: pip install nest-asyncio")
आपको यह दिखना चाहिए:
nest_asyncio applied: CrewAI can now run inside this kernel.अगले चरण में, एक विषय परिभाषित करें और क्रू चलाने के लिए एक हेल्पर फ़ंक्शन बनाएँ।
from datetime import datetime
topic = "Learning Adaptive Thresholds for LLM Tool Use: When to Rely on Memory and When to Call a Tool"
async def run_crew(topic: str):
"""Run the CrewAI crew asynchronously."""
print(f"Starting crew at {datetime.now().isoformat(timespec='seconds')}")
print(f"Topic: {topic!r}\n")
result = await crew.kickoff_async(inputs={"topic": topic})
print(f"\nFinished at {datetime.now().isoformat(timespec='seconds')}")
print(f"Result type: {type(result).__name__}")
return result
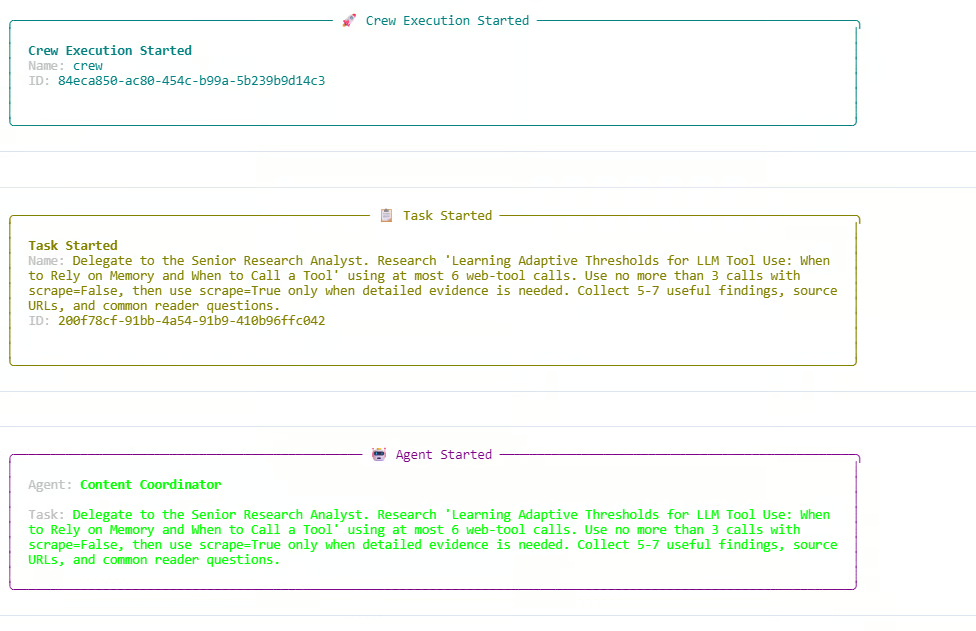
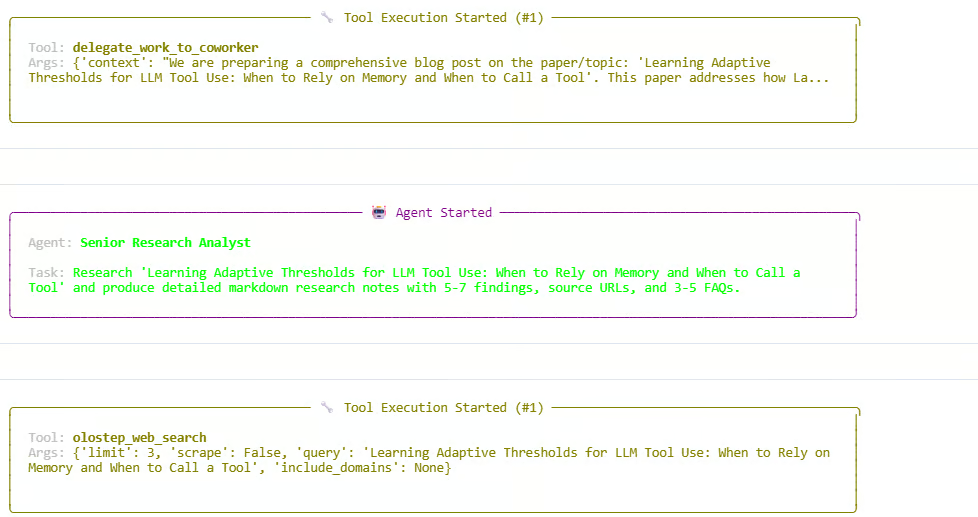
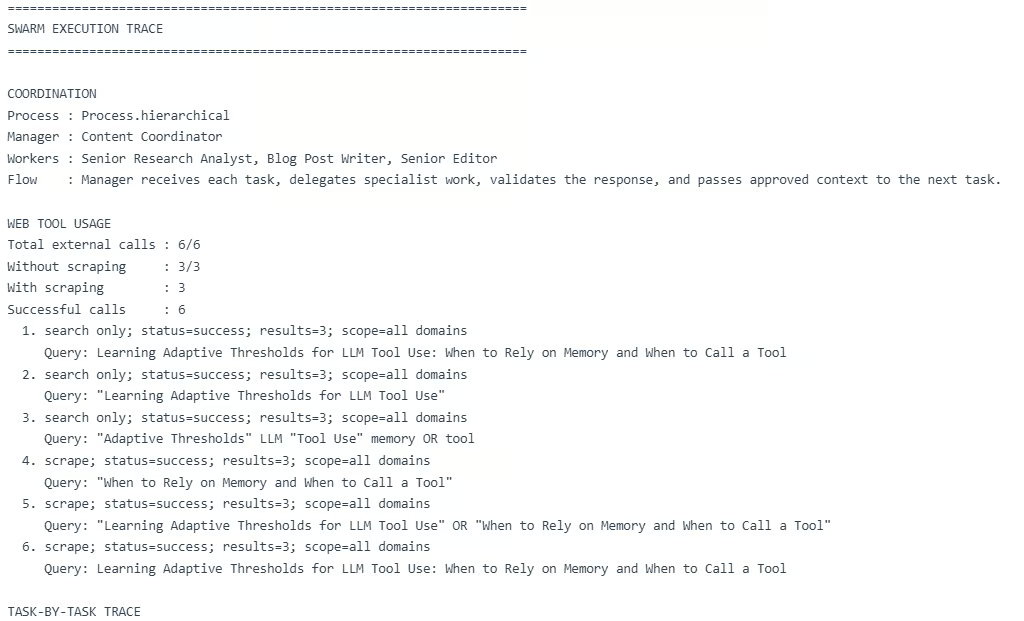
result = await run_crew(topic)जब वर्कफ़्लो शुरू होता है, तो CrewAI सबसे पहले टास्क Manager एजेंट को देता है। फिर Manager शोध कार्य को Senior Research Analyst को सौंपता है। Researcher olostep_web_search टूल का उपयोग करते हुए एडाप्टिव थ्रेशहोल्ड्स, LLM टूल उपयोग, मेमोरी, और टूल-कॉलिंग निर्णयों के बारे में जानकारी के लिए वेब सर्च करता है।
लॉग में, Researcher सर्च-ओनली कॉल्स और स्क्रैपिंग कॉल्स दोनों का उपयोग करता है। सर्च बजट पूरी तरह उपयोग हो जाता है, 6 में से 6 कुल वेब कॉल्स और 3 में से 3 डिस्कवरी कॉल्स तक पहुँचते हुए। एक अतिरिक्त सर्च-ओनली रिक्वेस्ट ब्लॉक हो जाती है क्योंकि डिस्कवरी- सर्च लिमिट पहले ही पूरी हो चुकी है। यह दिखाता है कि हमारे कस्टम Olostep टूल के अंदर बजट नियम सही ढंग से काम कर रहे हैं।
रिसर्च चरण के बाद, Manager लेखन और समीक्षा चरणों को डेलीगेट करके वर्कफ़्लो आगे बढ़ाता है। एजेंट्स रिसर्च नोट्स बनाते हैं, लेख का मसौदा तैयार करते हैं, और फिर अंतिम प्रतिक्रिया को पॉलिश करते हैं। रन सफलतापूर्वक पूरा होता है और एक CrewOutput ऑब्जेक्ट लौटाता है।
आपको इससे मिलता-जुलता आउटपुट दिखना चाहिए:
Starting crew at 2026-06-05T13:54:07
Topic: 'Learning Adaptive Thresholds for LLM Tool Use: When to Rely on Memory and When to Call a Tool'

Crew Execution Started
Task Started
Agent: Content Coordinator
Agent: Senior Research Analyst
Tool: olostep_web_search
Budget used: 6/6 total calls; 3/3 discovery calls

Finished at 2026-06-05T13:59:29
Result type: CrewOutput
इसका अर्थ है कि पूरा स्वॉर्म सफलतापूर्वक चला। Manager ने वर्कफ़्लो का समन्वय किया, Researcher ने मौजूदा जानकारी जुटाई, Writer ने मसौदा तैयार किया, और Reviewer ने अंतिम आउटपुट में सुधार किया।
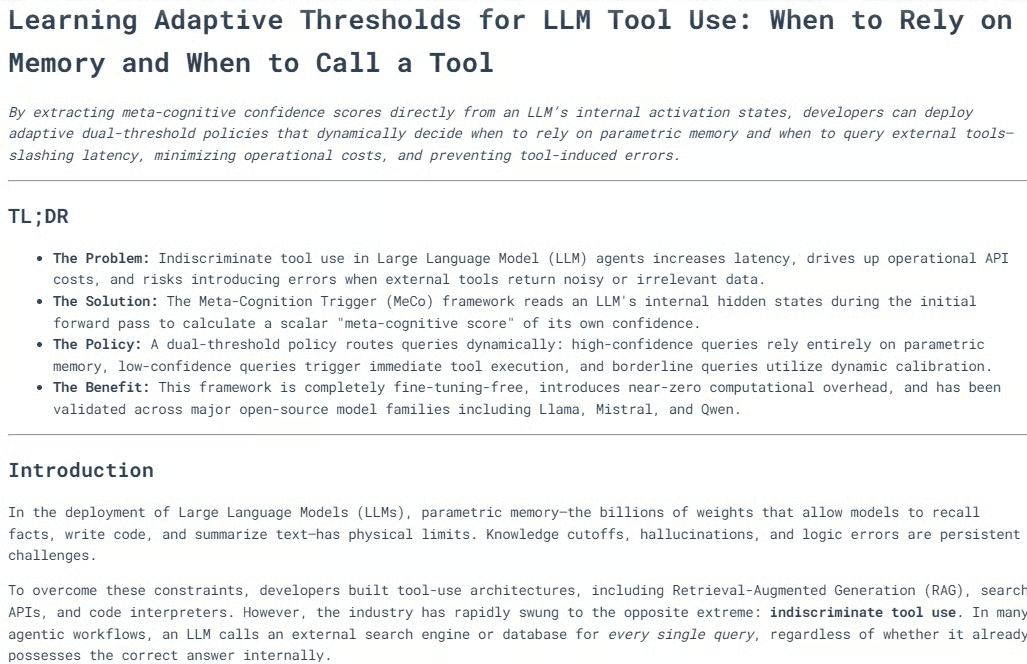
स्वॉर्म के रन ख़त्म होने के बाद, हम क्रू द्वारा जनरेट किया गया अंतिम लेख दिखा सकते हैं। result.raw वैल्यू में वर्कफ़्लो से अंतिम प्रतिक्रिया होती है।
from IPython.display import Markdown, display

raw = result.raw

if "Blog Post" in raw:
    raw = raw.split("Blog Post", 1)[1].strip()

display(Markdown(raw))
यह नोटबुक के अंदर अंतिम आउटपुट को फ़ॉर्मैटेड मार्कडाउन के रूप में रेंडर करेगा।
अधिकांश मामलों में, जनरेट किया गया ब्लॉग अच्छी तरह संरचित होता है, जिसमें कई हेडिंग्स, स्पष्ट सेक्शंस, आवश्यकता होने पर आरेख या दृश्य व्याख्याएँ, और मज़बूत निष्कर्ष होते हैं।
शोध, लेखन, और संपादकीय समीक्षा का संयोजन ऐसा कंटेंट बनाने में मदद करता है जो प्रकाशन-योग्य हो। आउटपुट की समीक्षा करने के बाद, मैं व्यक्तिगत रूप से इसे मामूली संपादनों के साथ प्रकाशन के लिए हरी झंडी दूँगा।
अगला, हम एक एक्जिक्यूशन ट्रेस प्रिंट कर सकते हैं। यह समझने में मदद करता है कि स्वॉर्म कैसे काम करता है, किन एजेंट्स ने भाग लिया, कितनी वेब कॉल्स हुईं, और प्रत्येक टास्क कैसे प्रोसेस हुआ।
from collections import Counter

def role_name(value):
    """Return a readable role/name for CrewAI agent values."""
    if value is None:
        return "Not reported"
    if isinstance(value, str):
        return value
    return getattr(value, "role", None) or getattr(value, "name", None) or str(value)

print("=" * 70)
print("SWARM EXECUTION TRACE")
print("=" * 70)

# Hierarchical crew structure
print("\nCOORDINATION")
print(f"Process : {crew.process}")
print(f"Manager : {role_name(crew.manager_agent)}")
print(f"Workers : {', '.join(role_name(agent) for agent in crew.agents)}")
print(
    "Flow    : Manager receives each task, delegates specialist work, "
    "validates the response, and passes approved context to the next task."
)

Now print the web-tool usage recorded by the custom Olostep tool.
history = list(getattr(olostep_search_tool, "_call_history", []))
discovery_calls = sum(not item["scrape"] for item in history)
scrape_calls = sum(item["scrape"] for item in history)
successful_calls = sum(item["status"] == "success" for item in history)

print("\nWEB TOOL USAGE")
print(f"Total external calls : {len(history)}/6")
print(f"Without scraping     : {discovery_calls}/3")
print(f"With scraping        : {scrape_calls}")
print(f"Successful calls     : {successful_calls}")

if history:
    for item in history:
        mode = "scrape" if item["scrape"] else "search only"
        domains = ", ".join(item["domains"]) if item["domains"] else "all domains"
        print(
            f"  {item['number']}. {mode}; status={item['status']}; "
            f"results={item['results']}; scope={domains}"
        )
        print(f"     Query: {item['query']}")
else:
    print("  No Olostep calls were recorded.")

Finally, print the task-by-task trace.
print("\nTASK-BY-TASK TRACE")
agent_activity = Counter()

for index, task_out in enumerate(result.tasks_output, start=1):
    task = crew.tasks[index - 1] if index <= len(crew.tasks) else None
    reported_agent = role_name(getattr(task_out, "agent", None))
    processed_by = sorted(getattr(task, "processed_by_agents", set()) or [])
    participants = processed_by or [reported_agent]

    for participant in participants:
        agent_activity[role_name(participant)] += 1

    delegations = getattr(task, "delegations", 0) if task else 0
    used_tools = getattr(task, "used_tools", 0) if task else 0
    tool_errors = getattr(task, "tools_errors", 0) if task else 0
    start_time = getattr(task, "start_time", None) if task else None
    end_time = getattr(task, "end_time", None) if task else None
    duration = end_time - start_time if start_time and end_time else None

    print(f"\n--- Task {index} ---")
    print(f"Reported owner : {reported_agent}")
    print(f"Processed by   : {', '.join(map(role_name, participants))}")
    print(f"Delegations    : {delegations}")
    print(f"Tool uses      : {used_tools}")
    print(f"Tool errors    : {tool_errors}")
    if duration is not None:
        print(f"Duration       : {duration}")

    preview = getattr(task_out, "raw", "").strip().replace("\n", " ")
    print(f"Output preview : {preview[:300]}{'...' if len(preview) > 300 else ''}")

print("\nAGENT ACTIVITY")
for agent, count in agent_activity.most_common():
    print(f"{agent}: participated in {count} task(s)")

if not agent_activity:
    print("CrewAI did not expose per-agent processing metadata for this run.")
आपको इससे मिलता-जुलता आउटपुट दिखना चाहिए:
यह ट्रेस दिखाता है कि पदानुक्रमित स्वॉर्म अपेक्षा के अनुसार काम करता है। Manager ने सभी तीन टास्क्स का समन्वय किया, Researcher ने रिसर्च चरण संभाला, Writer ने आर्टिकल मसौदा बनाया, और Reviewer ने अंतिम आउटपुट सुधारा।
हालाँकि, यह एक महत्वपूर्ण सीमा भी दिखाता है: मल्टी-एजेंट वर्कफ़्लो महँगे हो सकते हैं।
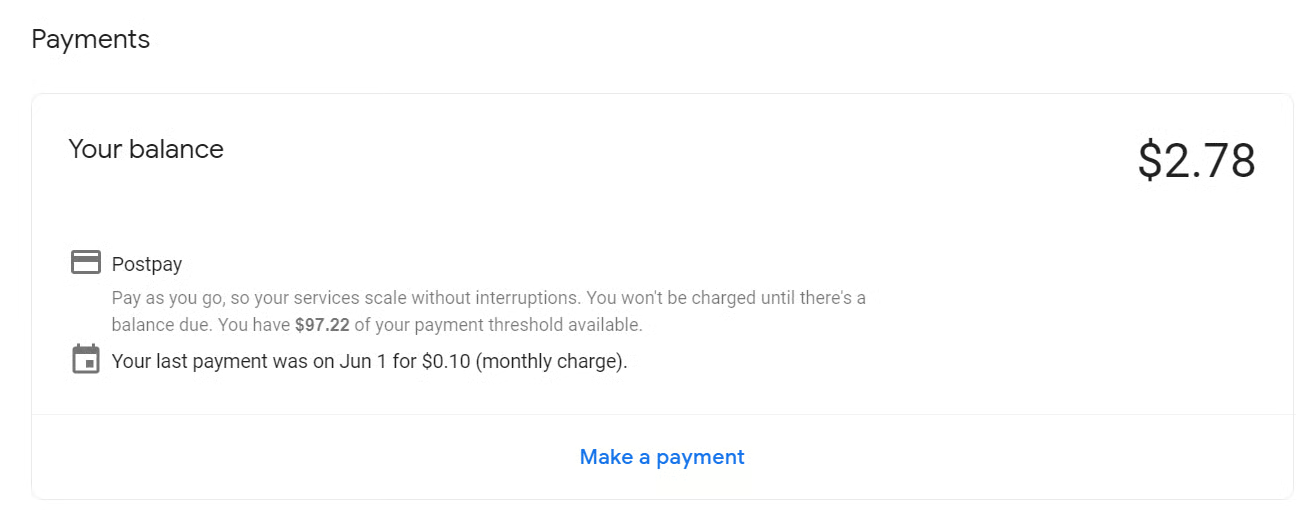
इस रन में, वर्कफ़्लो ने 6 बाहरी वेब कॉल्स और Manager, Researcher, Writer, और Reviewer में कई LLM कॉल्स का उपयोग किया। एक एकल रन की लागत लगभग $0.28 तक हो सकती है, और इस गाइड को बनाते समय परीक्षण में लगभग $2.78 खर्च हुए। यह एक सरल ट्यूटोरियल प्रोजेक्ट के लिए अधिक है।
एजेंट स्वॉर्म और मल्टी-एजेंट वर्कफ़्लो कागज़ पर बहुत अच्छे लगते हैं। Researcher, Writer, Reviewer, और Manager के साथ मिलकर काम करने का विचार शक्तिशाली लगता है, और इस गाइड में, अंतिम आउटपुट वास्तव में मामूली संपादनों के साथ प्रकाशित करने लायक था।
पर अभ्यास में, यह सेटअप ज़्यादा लागत वाला, अधिक समय लेने वाला, और विफलता के अधिक बिंदु पैदा करने वाला हो सकता है। मेरे मामले में, एक रन की लागत लगभग $0.28 है, और इस गाइड को बनाते समय लगभग $2.78 खर्च हुए। एक सरल ट्यूटोरियल प्रोजेक्ट के लिए यह काफ़ी है।
वास्तविक अनुप्रयोगों के लिए, मैं हर बार पूरा मल्टी-एजेंट स्वॉर्म इस्तेमाल नहीं करूँगा। मैं अधिक प्रोग्रामेटिक सेटअप पसंद करूँगा जहाँ सरल कार्य कोड या नियमों से संभाले जाएँ, और केवल जटिल कार्य एजेंट्स को सौंपे जाएँ। हम टूल कॉल्स को सीमित करके, कम एजेंट्स का उपयोग करके, प्रॉम्प्ट्स को छोटा करके, और पदानुक्रमित के बजाय रैखिक वर्कफ़्लो अपनाकर लागत कम कर सकते हैं।
बेशक, जब हम बहुत अधिक अनुकूलन कर देते हैं, तो यह शायद एक वास्तविक एजेंट स्वॉर्म नहीं रह जाता। यह अधिक नियम-आधारित AI वर्कफ़्लो जैसा हो जाता है। इसलिए लक्ष्य संतुलन है: एजेंट स्वॉर्म का उपयोग तब करें जब वे वास्तविक मूल्य जोड़ते हों, और जब न जोड़ें तो चीज़ों को सरल रखें।
DataCamp के साथ एजेंटिक AI सीखें!
Track
course
course