
Curso
Introducción a Docker
4 h
48.4K
El comando « docker pull » es bastante sencillo, pero hay muchas cosas que suceden en segundo plano que ni siquiera los expertos más experimentados conocen.
Todos los programadores deberían saber esto. Descargas imágenes a diario, pero cuando algo falla, es difícil determinar por qué ha ocurrido. O bien la autenticación falla sin motivo aparente, se activan los límites de velocidad o acabas con una versión incorrecta de la imagen en producción. Cada fallo te hace perder tiempo del tuyo para solucionarlo, cuando en realidad no debería haber ocurrido.
Comprender cómo funciona realmente docker pull te dará el control. Sabrás de dónde proceden las imágenes, cómo extraerlas y cómo solucionar los problemas antes de que lleguen a producción.
En este artículo, explicaré cómo funciona la extracción de imágenes en segundo plano, cómo intervienen los registros y cómo extraer imágenes tanto en entornos de desarrollo locales como en entornos de producción.
Si eres completamente nuevo en Docker, te recomiendo encarecidamente que leas nuestra curso Introducción a Docker , ya que cubre los fundamentos que necesitas para entender este artículo.
En esta sección, repasaré el funcionamiento del docker pull y aclararé cualquier confusión sobre lo que ocurre entre bastidores.
La sintaxis básica es sencilla:
docker pull python:3.14.2-bookworm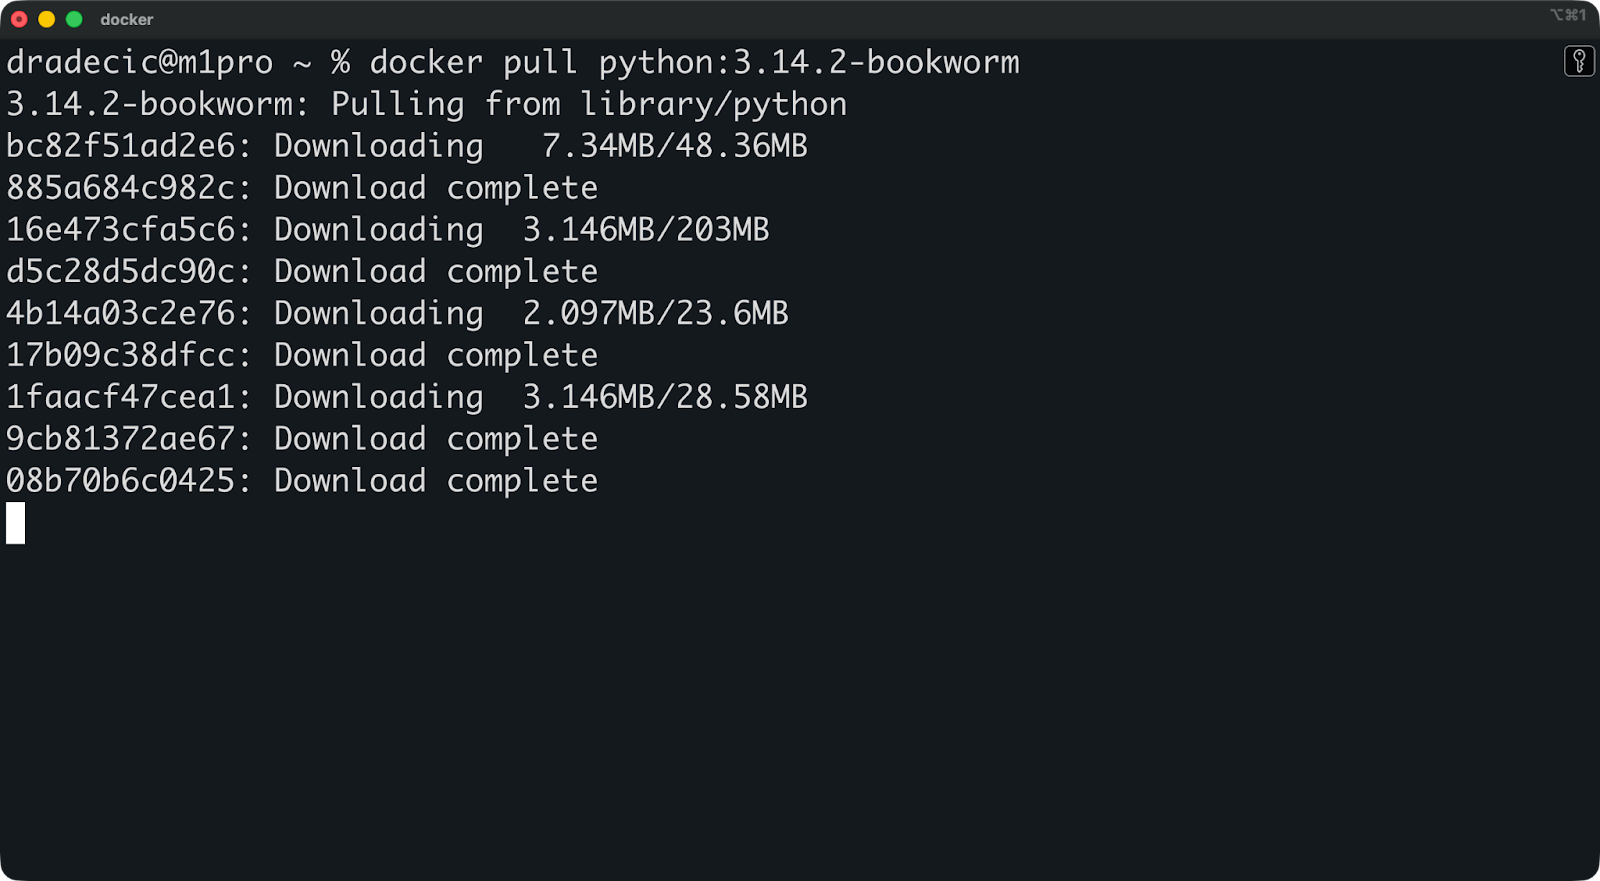
Este comando se comunica con Docker Hub de forma predeterminada, descarga la imagen de Python y la almacena localmente en tu máquina. Pero hay más de lo que parece a simple vista.
Este es el proceso:
Tu cliente Docker envía una solicitud al registro (Docker Hub, a menos que especifiques lo contrario).
El registro responde con el manifiesto de la imagen, que enumera todas las capas que componen la imagen.
/var/lib/docker en sistemas Linux, y en directorios gestionados por Docker Desktop (por ejemplo, en ~Library/Containers/… en macOS y C:\Users\[Username]\AppData\... en Windows).La etiqueta « :latest » es la predeterminada de Docker cuando no se especifica una versión. Ejecuta docker pull python sin etiqueta y obtendrás python:latest. Esto suena conveniente, pero es arriesgado. La etiqueta « :latest » no significa «la versión estable más reciente». Significa «lo que el administrador de la imagen haya etiquetado como más reciente». Eso podría cambiar entre tirones, rompiendo tus construcciones sin previo aviso.
Las imágenes de Docker se crean a partir de capas.
Cada capa representa un cambio con respecto a la anterior. Cuando creas una imagen, cada instrucción RUN, COPY o ADD en tu Dockerfile crea una nueva capa. La imagen final es una pila de estas capas, ensambladas en orden.
Por ejemplo, echa un vistazo a los comandos que hay detrás de la imagen anterior de imagen de Python 3.14 : hay mucho que ver.
El almacenamiento direccionable por contenido es lo que hace que esto funcione. Cada capa obtiene un hash único basado en su contenido. Si dos imágenes comparten la misma capa base (como ubuntu:24.04), Docker solo almacena esa capa una vez. Cuando descargas una nueva imagen que utiliza la misma base, Docker omite su descarga.
Esto reduce el ancho de banda y el almacenamiento. Extrae diez imágenes de Python con diferentes etiquetas y Docker reutilizará las capas comunes en todas ellas. Solo descargas lo que realmente es diferente.
Ambos comandos son funcionalmente idénticos. Extraen imágenes de los registros y las almacenan localmente.
La diferencia es organizativa. Docker introdujo el grupo de comandos « docker image » como parte de una reestructuración de la CLI para que los comandos fueran más intuitivos. En lugar de tener docker pull, docker rmi y docker images dispersos, agruparon los comandos relacionados con imágenes en docker image pull, docker image rm y docker image ls.
Utiliza el que prefieras. docker pull es más corto y más habitual en la documentación. docker image pull es más explícito y se adapta mejor a los scripts, donde la claridad es importante. Elige un estilo y manténlo en todo tu equipo.
Una referencia de imagen tiene hasta cinco partes: HOST/NAMESPACE/REPOSITORY:TAG@DIGEST.
Esto es lo que significa cada pieza:
HOST: La dirección del registro (por ejemplo, docker.io, gcr.io, quay.io). Si lo omites, Docker utilizará Docker Hub de forma predeterminada.
NAMESPACE: Normalmente, tu nombre de usuario u organización (por ejemplo, library para imágenes oficiales, o mycompany para imágenes privadas).
REPOSITORIO: El nombre real de la imagen (por ejemplo, python, nginx, redis).
TAG: El identificador de versión (por ejemplo, 3.14.2-bookworm, latest). Si lo omites, el valor predeterminado será :latest.
DIGEST: Un hash SHA256 del manifiesto de la imagen (por ejemplo, @sha256:abc123...). Esto es inmutable: las etiquetas pueden cambiar, pero los resúmenes no.
La mayoría de los tirones tienen este aspecto:
docker pull python:3.14.2-bookwormEsto se expande a docker.io/library/python:3.14.2-bookworm detrás de escena.
Para los registros privados, necesitas la referencia completa:
docker pull myregistry.example.com/myteam/myimageEl uso de referencias precisas (etiquetas específicas o resúmenes) garantiza que tus implementaciones sean reproducibles. Si hoy y el mes que viene abres python:3.14.2-bookworm, verás la misma imagen. Tira dos veces de un python:latest, y lo más probable es que no lo consigas.
Los registros son el lugar donde Docker almacena y distribuye imágenes; son la fuente de todos los comandos docker pull que ejecutas.
Docker Hub es el registro predeterminado para todos los comandos docker pull, a menos que se especifique lo contrario.
Ejecuta docker pull python:3.14.2-bookworm y Docker lo traducirá automáticamente a docker.io/library/python:3.14.2-bookworm. No es necesario iniciar sesión para ver las imágenes públicas: Docker Hub las sirve de forma anónima, aunque con límites de velocidad para los usuarios no autenticados.
Hay dos tipos de imágenes en Docker Hub: imágenes oficiales e imágenes de la comunidad.
Las imágenes oficiales proceden de editores verificados y son mantenidas por Docker o por los propios proveedores de software. Viven bajo el espacio de nombres library (que Docker te oculta). Cuando descargas python, nginx o redis, obtienes imágenes oficiales que siguen las mejores prácticas de Docker en materia de seguridad y actualizaciones periódicas.
Las imágenes de la comunidad son todo lo demás. Cualquiera puede publicar una imagen en Docker Hub con tu nombre de usuario u organización. Ejecuta « johndoe/python-custom » y confiarás en que johndoe mantenga esa imagen correctamente. Algunas imágenes de la comunidad son excelentes y están bien mantenidas. Otros no se han actualizado en años y contienen vulnerabilidades conocidas.
Aquí la confianza es importante. Las imágenes oficiales reciben parches de seguridad periódicos y cuentan con documentación clara. Sin embargo, en el caso de las imágenes de la comunidad, tú mismo debes verificar quién las mantiene y si son seguras de usar.
La mayoría de las empresas no quieren que sus imágenes de contenedor se encuentren en el Docker Hub público.
Los registros privados son lo más importante. Tú decides quién puede extraer imágenes, tú controlas las políticas de retención y tú mantienes el código propietario dentro de tu infraestructura. Esto es importante para el cumplimiento normativo, la seguridad y la gestión del acceso entre equipos.
Las soluciones comunes de registro privado incluyen:
Por supuesto, las referencias de imagen cambiarán cuando utilices un registro personalizado. En lugar de python:3.14.2-bookworm, ahora debes especificar la ruta completa:
docker pull myregistry.company.com/team/python:3.14.2-bookwormPrimero va el nombre de host del registro, luego tu espacio de nombres (normalmente el nombre de un equipo o proyecto) y, por último, el repositorio y la etiqueta. Docker no utilizará Docker Hub de forma predeterminada cuando detecte un nombre de host personalizado, sino que irá directamente a tu registro privado.
La autenticación es necesaria tanto para enviar como para descargar imágenes, y cobra especial importancia cuando alcanzas los límites de velocidad o accedes a registros privados.
Puedes utilizar el comando docker login para autenticarte en un registro:
docker loginEsto solicita tu nombre de usuario y contraseña de Docker Hub. Para registros privados, solo tienes que especificar el nombre de host:
docker login myregistry.company.com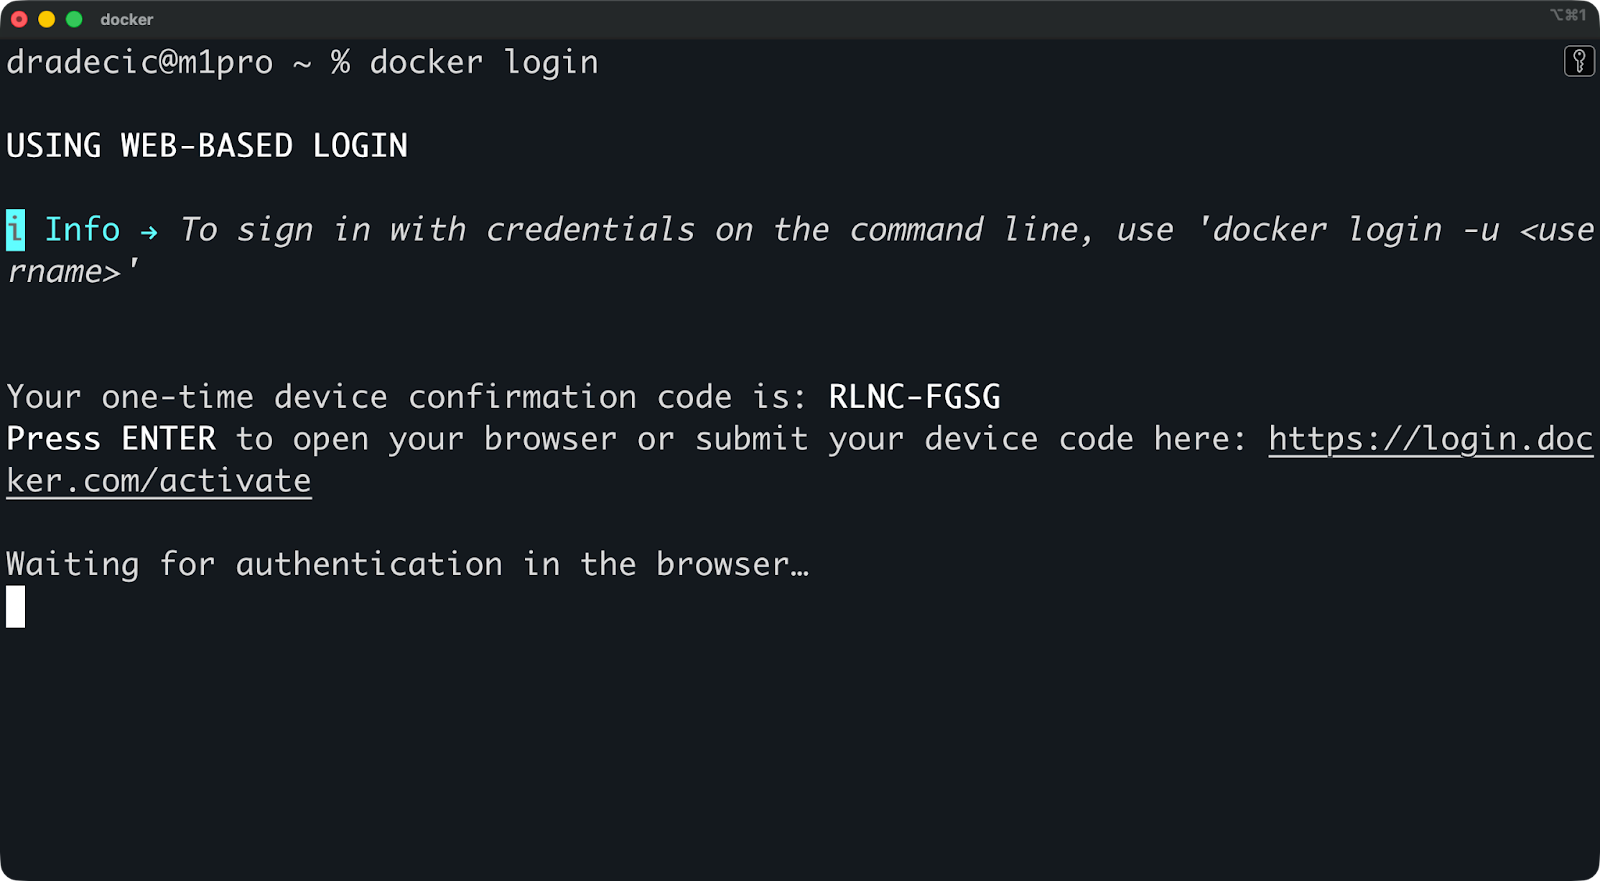
Docker almacena tus credenciales localmente después de iniciar sesión. En Linux, se colocan en ~/.docker/config.json. En macOS, Docker utiliza el llavero del sistema para mayor seguridad.
El problema es que el archivo de configuración almacena las credenciales en codificación base64 de forma predeterminada, lo cual no es cifrado. Cualquier persona con acceso a tu directorio de inicio puede descodificarlos. Para mitigar esto, puedes utilizar un asistente de credenciales: Docker admite cadenas de claves nativas del sistema operativo que almacenan las contraseñas de forma segura.
A continuación, se indican algunas prácticas recomendadas para la gestión de credenciales:
Utiliza ayudantes de credenciales (docker-credential-osxkeychain, docker-credential-wincred).
Nunca envíes config.json al control de versiones.
Utiliza tokens de acceso en lugar de contraseñas siempre que sea posible.
Cambia las credenciales con regularidad, especialmente en el caso de las cuentas compartidas.
Docker Hub limita el número de imágenes que puedes descargar en un intervalo de tiempo determinado.
Los usuarios anónimos (sin iniciar sesión) tienen derecho a 100 descargas cada seis horas por dirección IP. Los usuarios gratuitos autenticados obtienen 200 descargas cada seis horas. Los planes de pago tienen límites más altos o descargas ilimitadas, dependiendo del nivel.
Estos límites son importantes cuando ejecutas canalizaciones de CI/CD, extraes imágenes con frecuencia durante el desarrollo o trabajas en una infraestructura compartida en la que varios usuarios comparten la misma IP. Cuando alcances el límite, tus intentos fallarán hasta que se reinicie la ventana.
Puedes consultar tu estado actual de límite de velocidad:
TOKEN=$(curl "<https://auth.docker.io/token?service=registry.docker.io&scope=repository:ratelimitpreview/test:pull>" | jq -r .token)
curl --head -H "Authorization: Bearer $TOKEN" <https://registry-1.docker.io/v2/ratelimitpreview/test/manifests/latest>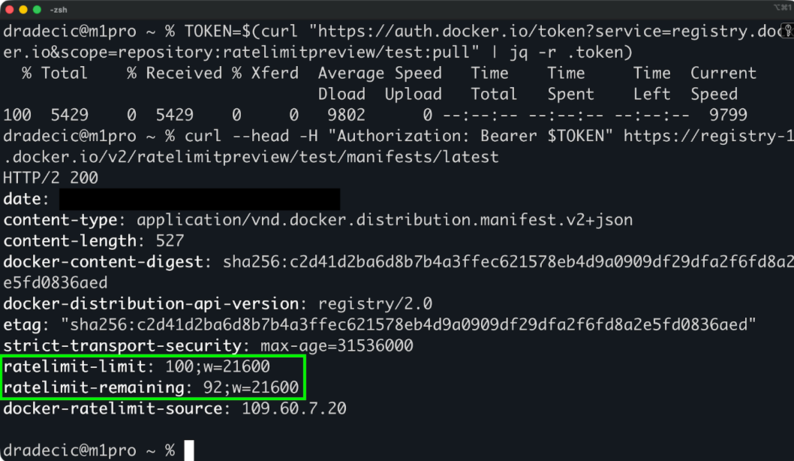
A continuación, se indican algunas formas de aumentar tu límite de velocidad (no supondrá un problema para la mayoría de los programadores):
La solución más fácil es simplemente iniciar sesión. Esto por sí solo duplica tu límite de velocidad.
Estas opciones avanzadas te proporcionan precisión y control, que es exactamente lo que necesitas en entornos de producción.
Los resúmenes son identificadores inmutables basados en el hash del contenido de la imagen.
Las etiquetas pueden cambiar. Alguien publica una nueva imagen con la misma etiqueta y, de repente, Python:3.14.2-bookworm apunta a un contenido diferente al de ayer. Los resúmenes no pueden cambiar: son hash SHA256 del manifiesto de la imagen. El mismo resumen siempre significa exactamente la misma imagen.
Extrae por resumen de la siguiente manera:
docker pull python@sha256:6d58c1a9444bc2664f0fa20c43a592fcdb2698eb9a9c32257516538a2746c19a
docker pull --platform linux/amd64 python:3.14.2-bookwormEsto es muy importante en CI/CD y producción. Se realiza una prueba con una imagen específica y se implementa esa imagen exacta. Sin sorpresas, sin desviaciones entre entornos. Si tu implementación depende de una versión específica, utiliza el resumen, no la etiqueta.
Las imágenes multiarchivo agrupan versiones para diferentes arquitecturas de CPU en una única referencia de imagen.
Ejecuta « python:3.14.2-bookworm » y Docker seleccionará automáticamente la versión adecuada para tu sistema: amd64 para máquinas x86 y arm64 para servidores Apple Silicon o ARM. El registro proporciona la arquitectura correcta sin que tengas que hacer nada.
Pero a veces necesitas una arquitectura específica. Utiliza la bandera « --platform »:
docker pull --platform linux/amd64 python:3.14.2-bookworm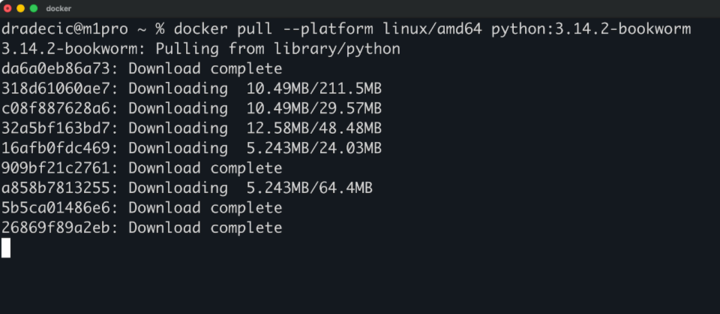
Esto resulta útil cuando desarrollas en Apple Silicon, pero necesitas probar la versión amd64 que se ejecutará en producción, o cuando creas imágenes para una arquitectura diferente a la de tu máquina de compilación.
La bandera « --all-tags » extrae todas las etiquetas de un repositorio:
docker pull --all-tags pythonEsto descarga todas las etiquetas de Python: docenas de versiones, variantes y arquitecturas. Terminarás con gigabytes de imágenes.
No lo uses a menos que sea realmente necesario. El ancho de banda cuesta dinero, el almacenamiento se llena rápidamente y probablemente no necesites todas las versiones de Python que se han lanzado hasta ahora. En su lugar, utiliza etiquetas específicas que realmente utilices.
Presiona Ctrl+C o CMD+C para cancelar una extracción en curso.
Docker deja de descargar nuevas capas, pero conserva las que ya ha terminado. La próxima vez que selecciones la misma imagen, se reanudará desde donde se quedó en lugar de comenzar desde el principio.
Esto resulta útil cuando descargas accidentalmente la imagen equivocada, cuando la descarga tarda demasiado debido a una conexión lenta o cuando te das cuenta de que en realidad no necesitas esa imagen en ese momento. Cancélalo, corrige tu comando y vuelve a intentarlo sin desperdiciar el trabajo ya realizado.
Las redes del mundo real tienen limitaciones, como restricciones de ancho de banda, proxies y conexiones lentas. Esto puede hacer que la descarga de imágenes tarde más de lo que debería, así que te voy a mostrar qué puedes hacer al respecto.
Docker descarga las capas de imagen de forma simultánea de forma predeterminada.
En lugar de extraer las capas una por una, Docker abre varias conexiones y descarga varias capas a la vez. Esto acelera las descargas en conexiones rápidas, pero no notarás mucha diferencia en redes lentas donde el ancho de banda es el cuello de botella.
Hay dos estrategias comunes que ayudan aún más:
Las redes corporativas dirigen el tráfico a través de proxies por motivos de seguridad, supervisión y control de acceso.
Docker necesita conocer estos proxies para extraer imágenes. Sin la configuración del proxy, las extracciones fallan con tiempos de espera de conexión agotados o errores de DNS, ya que Docker intenta acceder a los registros directamente en lugar de hacerlo a través del proxy.
Los proxies se configuran en dos niveles: el cliente Docker y el demonio Docker. El cliente (tu comando docker ) utiliza automáticamente la configuración del proxy HTTP de tu sistema. El demonio necesita una configuración explícita en /etc/docker/daemon.json o a través de los archivos de servicio de systemd.
Aquí tienes una lista práctica para cuando fallan los tirones, porque fallarán, y necesitas saber qué comprobar primero.
Los errores de autenticación aparecen como errores de «no autorizado» o «acceso denegado».
Comprueba si has iniciado sesión en docker login. Si es así, es posible que tus credenciales hayan caducado o sean incorrectas. Cierra sesión en docker logout y vuelve a iniciar sesión. Para registros privados, asegúrate de utilizar el nombre de host correcto en tu comando de inicio de sesión.
Las etiquetas que faltan te dan errores de «manifiesto desconocido» o «no encontrado».
La etiqueta no existe. Comprueba dos veces el nombre de la etiqueta, ya que es fácil cometer errores tipográficos. Consulta la interfaz web del registro para ver qué etiquetas existen realmente. Recuerda que las etiquetas se pueden eliminar, por lo que algo que funcionaba ayer puede que hoy no funcione.
Se producen tiempos de espera de red se producen cuando Docker no puede acceder al registro.
En primer lugar, comprueba tu conexión a Internet. A continuación, comprueba que puedes acceder directamente al registro: ejecuta ping registry-1.docker.io o curl -I . Si estás detrás de un proxy, asegúrate de que Docker lo sepa. Si el registro es privado, comprueba las reglas del cortafuegos y las conexiones VPN.
Los problemas de permiso aparecen como errores «denegados» incluso cuando estás autenticado.
Has iniciado sesión, pero tu cuenta no tiene acceso de extracción a este repositorio específico. Ponte en contacto con el propietario del repositorio o con el administrador del registro para obtener acceso. En el caso de Docker Hub, esto suele significar que la imagen es privada y que no estás en la lista de acceso.
Los fallos de DNS impiden que Docker encuentre el servidor de registro.
Verás errores como «no existe tal host» o «error temporal en la resolución del nombre». Lo que realmente ocurre es que Docker no puede traducir el nombre de host del registro a una dirección IP, por lo que no puede establecer la conexión.
Para resolverlo, comprueba la resolución DNS con nslookup registry-1.docker.io o dig registry-1.docker.io. Si estos comandos fallan, tu servidor DNS no está disponible o está mal configurado. Intenta cambiar temporalmente a un servidor DNS público como 8.8.8.8 para ver si eso soluciona el problema.
En las redes corporativas, es posible que el servidor DNS solo resuelva nombres de host internos. Asegúrate de que el nombre de host de tu registro privado esté en el servidor DNS o añádelo a /etc/hosts como solución provisional hasta que se solucione el problema del DNS.
Ahora pasemos a la parte divertida: cómo funciona el comando docker pull en situaciones que puedes encontrar en tu trabajo diario.
Kubernetes extrae imágenes automáticamente cuando implementas pods.
Tú defines un contenedor en la especificación de tu pod con una referencia de imagen, y Kubernetes se encarga de la extracción por ti. El kubelet de cada nodo comprueba si la imagen existe localmente. Si no es así, se extrae del registro antes de iniciar el contenedor.
Las políticas de extracción controlan cuándo Kubernetes extrae imágenes:
Always: Descarga la imagen cada vez, incluso si existe localmente.
IfNotPresent: Solo extrae si la imagen aún no está en el nodo (por defecto para imágenes etiquetadas).
Never: Nunca tires, falla si la imagen aún no está localizada.
Configura la política en la especificación de tu pod con imagePullPolicy. Utiliza Always para las etiquetas :latest en desarrollo y recibir actualizaciones. Utiliza IfNotPresent para etiquetas específicas en producción y así evitar descargas innecesarias.
imagePullSecrets proporciona a Kubernetes acceso a registros privados. Puedes crear un secreto con tus credenciales de registro y, a continuación, hacer referencia a él en la especificación de tu pod. Sin él, Kubernetes solo puede extraer imágenes públicas.
Compose automatiza las extracciones cuando inicias aplicaciones multiservicio.
Ejecuta docker compose up y Compose comprueba la imagen de cada servicio. Si falta una imagen, Compose la obtiene antes de iniciar los contenedores. No es necesario ejecutar manualmente docker pull para cada servicio, ya que Compose se encarga de ello por ti.
Esto funciona muy bien para el desarrollo. Puedes definir tus servicios en docker-compose.yml, ejecutar un comando y Compose se encargará de recopilar todo lo que necesitas. La primera vez que se ejecuta « up » tarda más tiempo mientras se descargan las imágenes, pero las ejecuciones posteriores son instantáneas si las imágenes no han cambiado.
Son dos comandos diferentes que hacen cosas diferentes.
docker compose up inicia tus servicios. Descarga automáticamente las imágenes que faltan, pero solo si no existen localmente. Si ya tienes instalado python:3.14.2-bookworm en tu equipo, Compose lo utilizará sin comprobar si hay actualizaciones disponibles.
docker compose pull extrae explícitamente todas las imágenes definidas en tu archivo compose, independientemente de si existen localmente o no. Esto comprueba si hay actualizaciones en los registros y descarga las versiones más recientes si están disponibles.
Aquí tienes cuándo necesitas un docker compose pull:
Estás utilizando etiquetas :latest y deseas la versión más reciente. Ejecuta primero « docker compose pull » para obtener las actualizaciones y, a continuación, « docker compose up » para empezar con imágenes nuevas.
Estás depurando y sospechas que tu imagen local está desactualizada o dañada. Descarga copias actualizadas con docker compose pull y, a continuación, reinicia.
Quieres precargar las imágenes antes de iniciar realmente los servicios. Ejecuta docker compose pull durante la implementación para almacenar las imágenes en caché, y luego docker compose up se ejecutará al instante sin tener que esperar a que se descarguen.
La diferencia clave es que up solo extrae lo que falta, y pull actualiza todo independientemente de lo que ya tengas.
El comando « docker pull » parece sencillo, pero hay muchas cosas que suceden bajo la superficie y hay muchos aspectos que puedes modificar. A continuación, se indican algunas prácticas recomendadas que debes recordar.
Utiliza etiquetas explícitas o resúmenes en lugar de :latest. Autentifica tus extracciones para evitar límites de velocidad. Ten en cuenta el ancho de banda y el almacenamiento al extraer imágenes, especialmente en canalizaciones de CI/CD, donde la extracción es constante.
Trata las extracciones de imágenes como parte de tu canal de seguridad. Cada extracción es un vector de ataque potencial si utilizas fuentes no fiables o imágenes obsoletas con vulnerabilidades conocidas. Verifica las fuentes, busca problemas y mantén actualizadas las imágenes base.
Los registros y las herramientas de Docker cambian con regularidad. Mantente al día con las actualizaciones de tu proveedor de registro para evitar sorpresas que interrumpan tu flujo de trabajo.
Cuando estés listo para llevar tus habilidades con Docker y la contenedorización a un nivel profesional, echa un vistazo a nuestro curso Docker intermedio o elige nuestro curso completo Contenedorización y virtualización con Docker y Kubernetes.
Aprende Docker con DataCamp
Curso
Curso
Curso