
Kursus
Pengantar Basis Data di Python
4 Hr
101.3K
Although MySQL functions the same across the board, the installation process varies slightly depending on your operating system. Windows, macOS, and Linux each have their own installation methods and configuration steps.
In this guide, I will show you how to install MySQL on your preferred operating system, perform basic configuration, verify that the server is running correctly, and troubleshoot common installation issues along the way.
If you are a bit unfamiliar with SQL, try our very popular, well-designed, and comprehensive Introduction to SQL course to get started.
Before I begin showing you the installation process, make sure your system meets these basic requirements for running MySQL. First, check that you have sufficient disk space and memory for optimal performance. You will also need administrator or root privileges on your computer to install the software and configure system services.
When choosing a version, download the latest stable General Availability (GA) release (currently MySQL 8.0 or 8.x). It includes the core database server and tools needed for development and production environments.
MySQL is available in two main editions:
Installing MySQL on Windows is straightforward when using the official MySQL Installer. Follow the steps below to download, install, and configure MySQL Server.
To download the MySQL Installer:
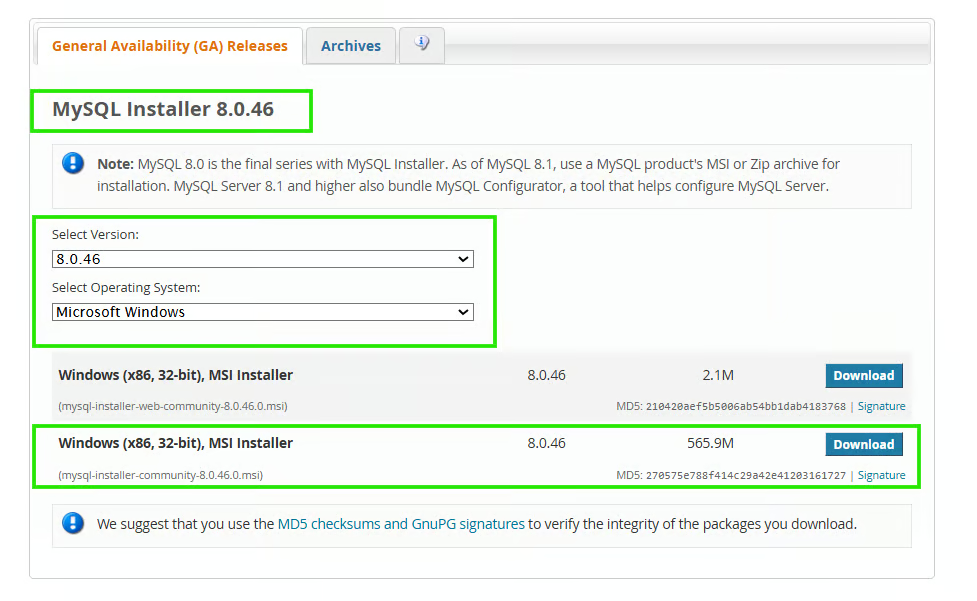
You will be presented with two download options for the Windows MSI Installer:
After downloading the file:
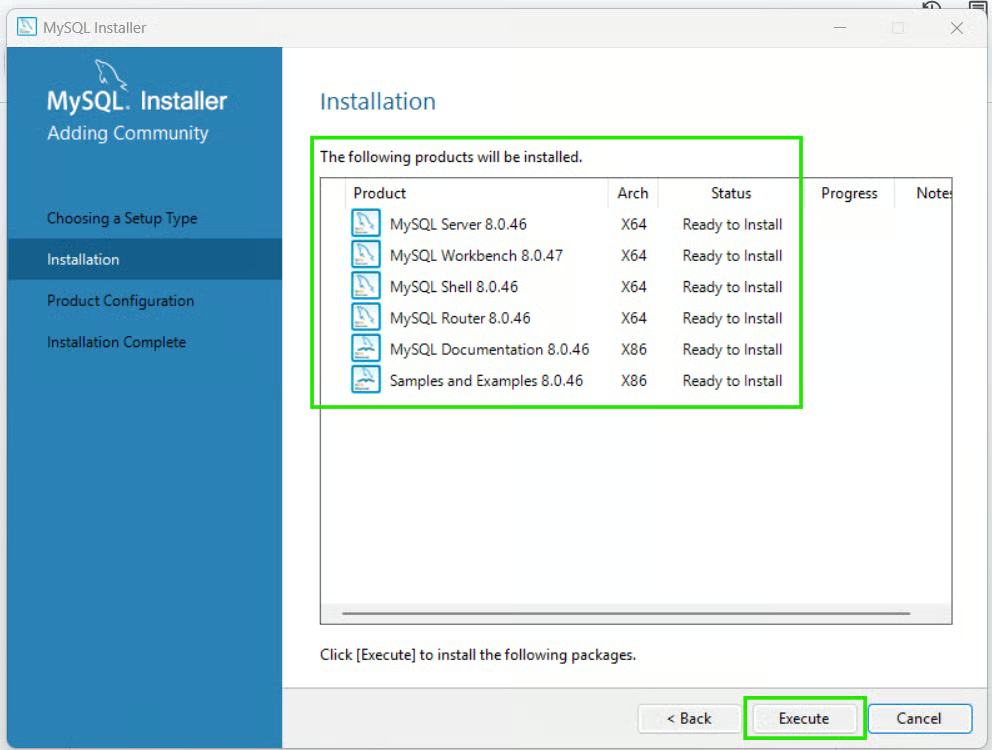
During setup, MySQL Installer opens, displaying the Choosing a Setup Type screen.
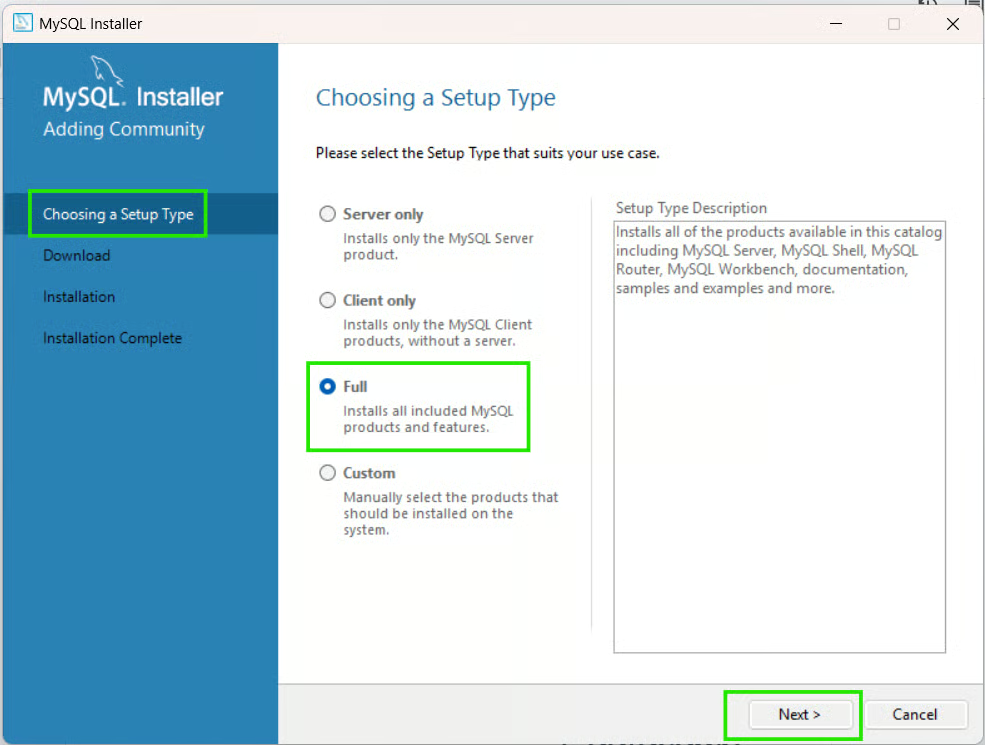
Select the option that best fits your development needs from:
|
Setup Type |
Decsription |
When to Use |
|
Developer/Full (default) |
This option installs MySQL Server, MySQL Workbench, MySQL Shell, connectors and development tools, documentation, and additional utilities |
When you plan to build applications using MySQL, or want a complete development environment. |
|
Server only |
This option installs only the MySQL Server component. |
If the computer will act primarily as a database server, or if you do not need graphical tools or development utilities |
|
Client only |
This option installs client tools only. |
Use it when you have systems that connect to existing servers |
|
Custom |
Allows you to manually select exactly which products, documentation, and versions you want to install. |
When you want specific MySQL products, or you need to control installation locations, or you want to minimize disk usage |
As a beginner, I recommend you choose Developer/Full and proceed with these steps:

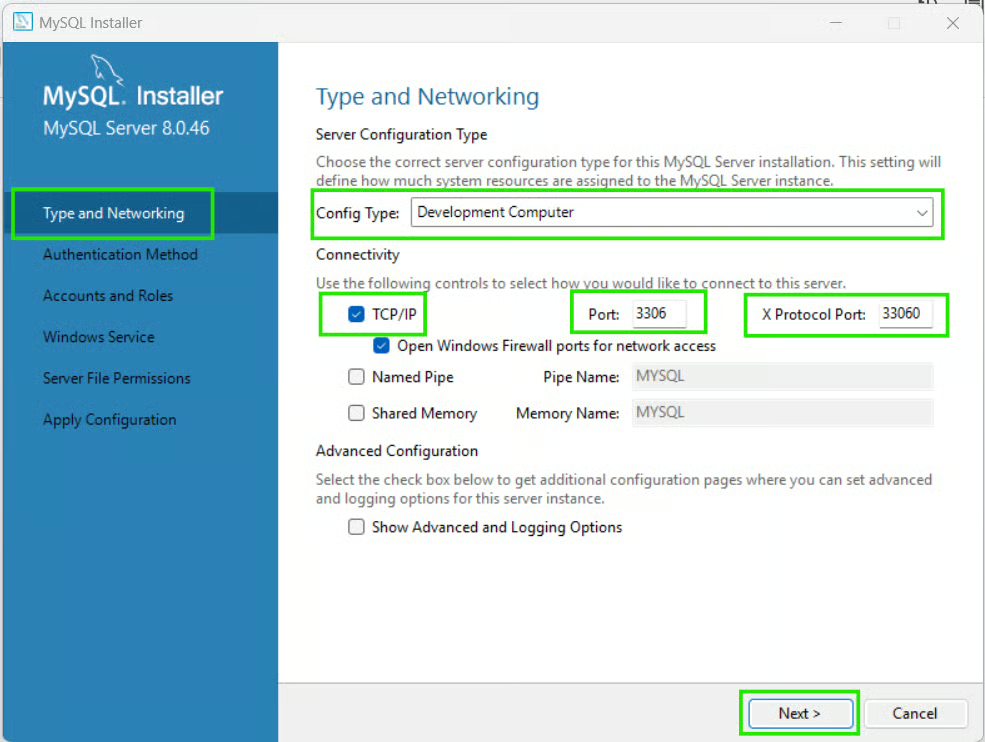
After installation, the MySQL Configuration Wizard launches automatically. Follow the steps below to begin modifying your server settings:
Step 1: Configure Server Type and Networking
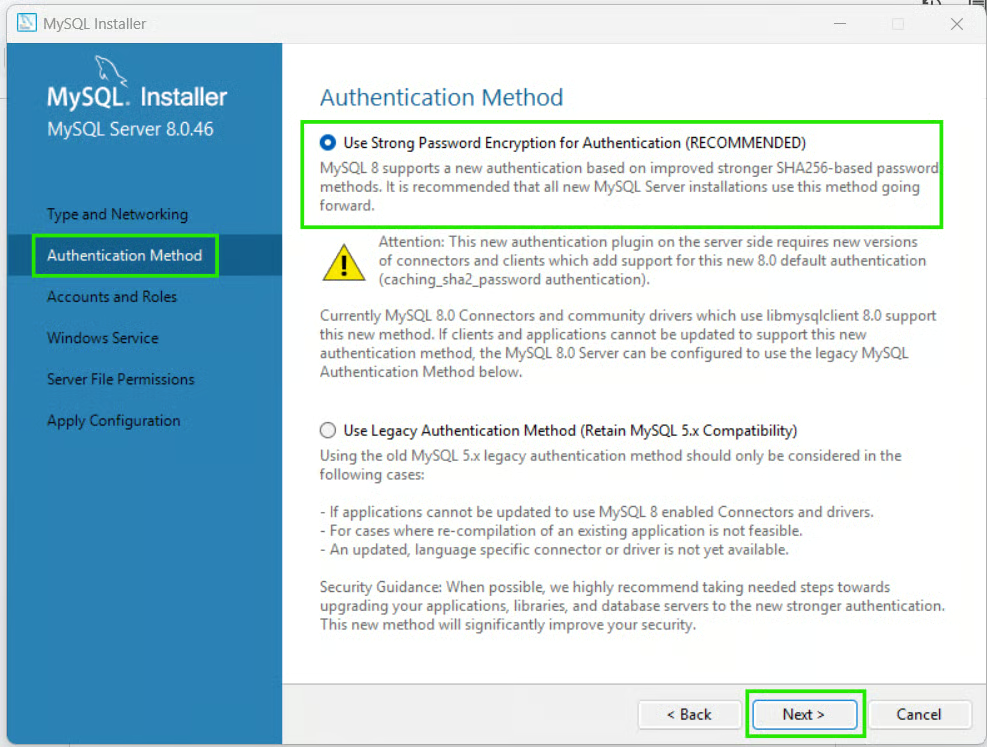
Step 2: Choose an Authentication Method
In the next step, you'll be asked to select an authentication method where:
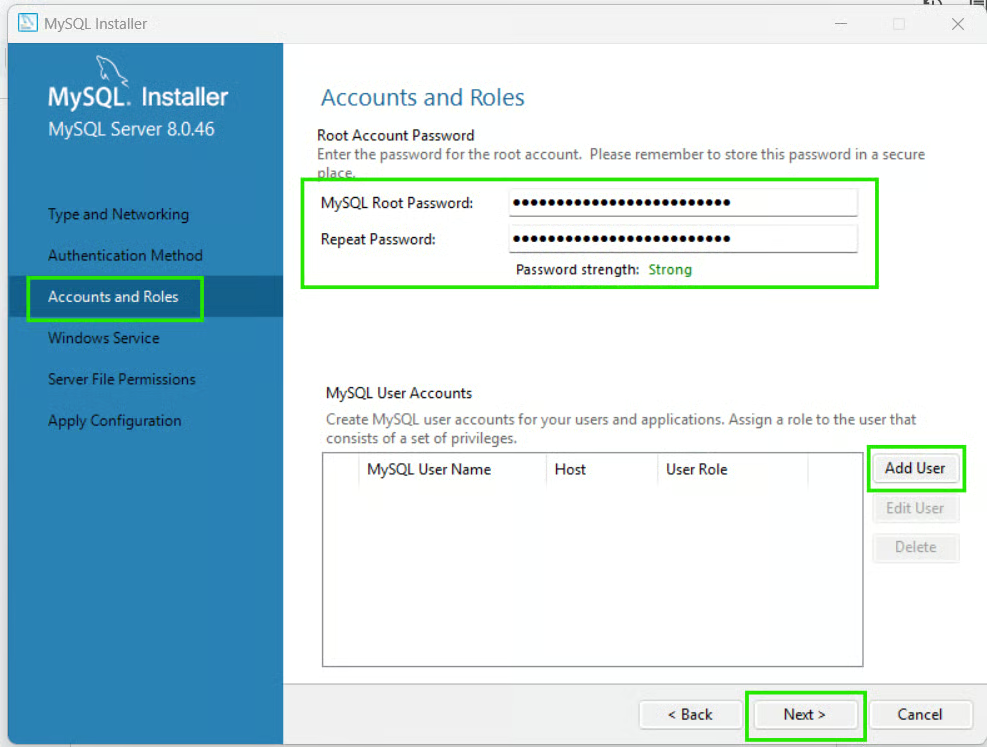
Step 3: Set the root password
The root account is the administrative account for MySQL.
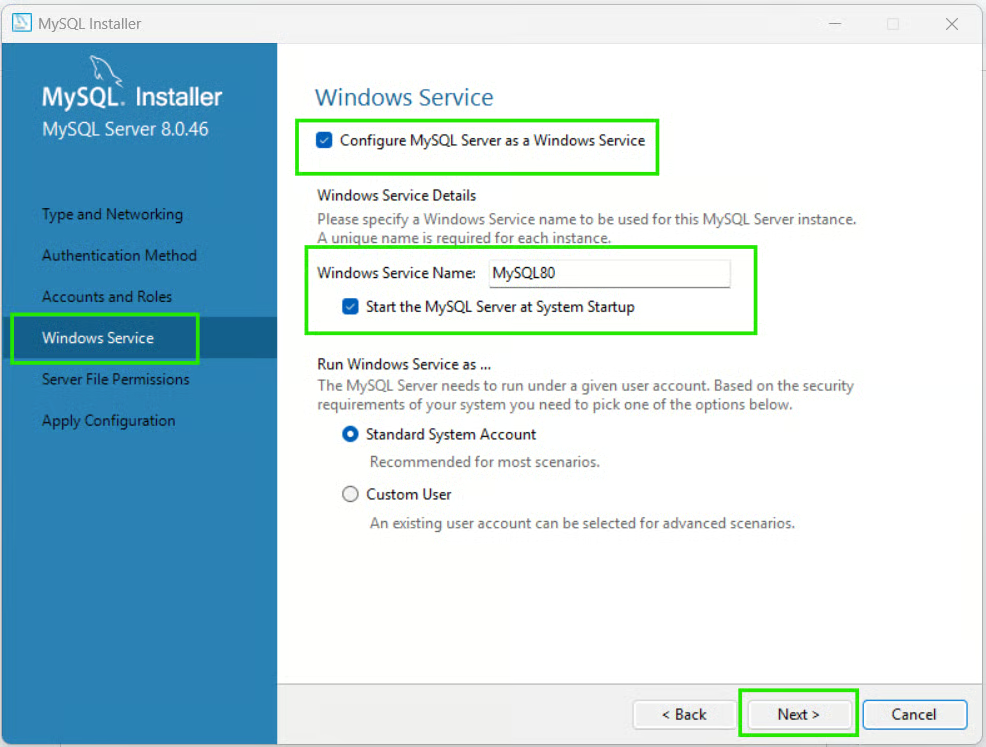
Step 4: Configure the Windows Service
MySQL can run automatically as a Windows service. This allows the database to start automatically whenever Windows boots. Use the steps below to set up this service:
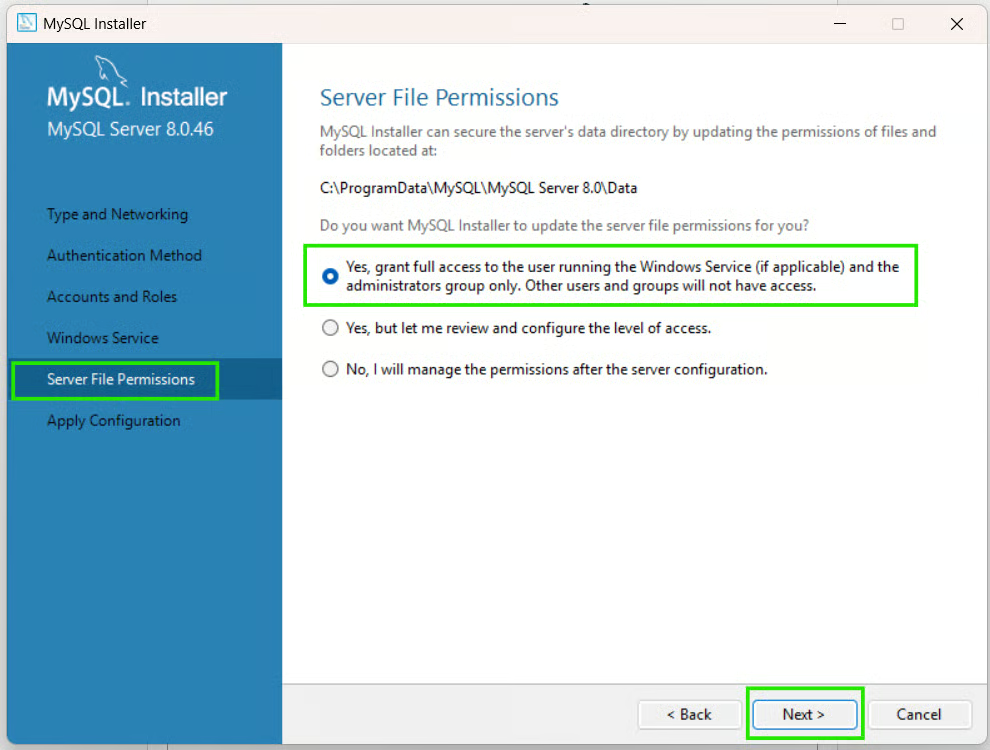
Step 5: Configure Server File Permissions
Allow the default permissions to let MySQL set strict server file permissions to protect your data.
Step 6: Apply configuration
On the Apply Configuration screen, you will see a checklist of actions.
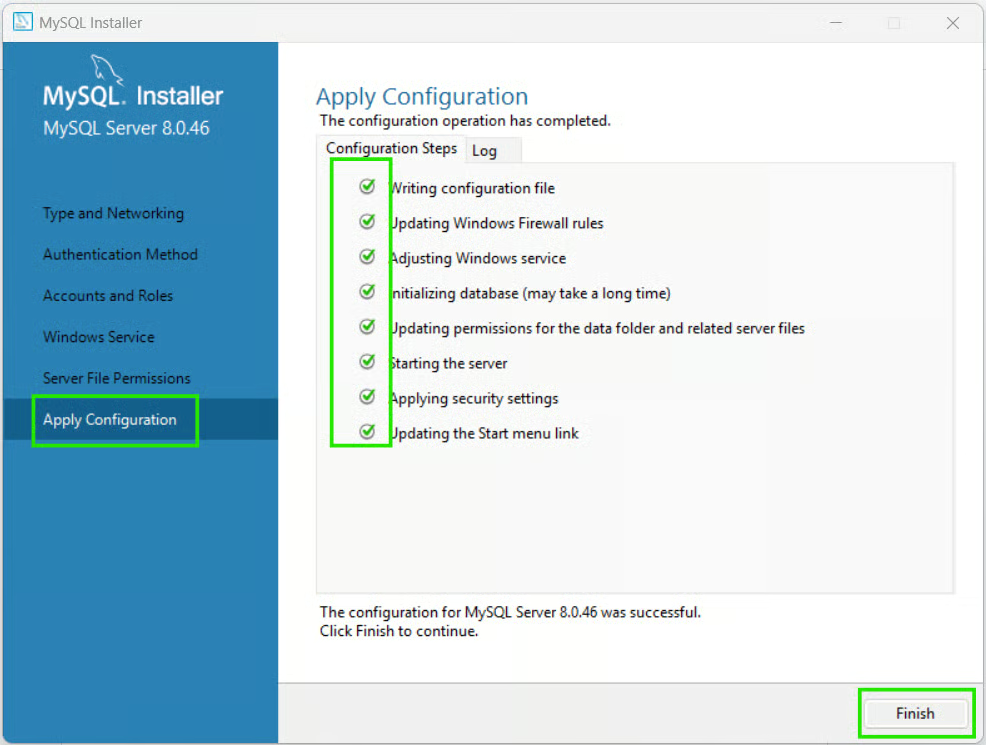
After configuration is finished:
MySQL Server is now installed and running on your Windows system.
To confirm if MySQL was installed successfully:
mysql -u root -pEnter the Root Password you created during setup.
If successful, your command prompt will change to a mysql> prompt.
To verify the server installation, run:
SELECT VERSION();You should see the installed MySQL version returned in the results.
You can install MySQL on macOS using either the official DMG package from MySQL or using Homebrew.
To install using the DMG package, download the installer using the steps below:
Run the package by doing the following:
Open the downloaded .dmg file.
Double-click the .pkg installer.
Follow the installation wizard.
Enter your macOS administrator password when prompted.
During installation, the installer may ask you to configure a root password or initialize the server. When the installation finishes, MySQL Server will be installed and available on your system.
Homebrew is a popular package manager for macOS that simplifies software installation from the command line. Follow the steps below to install MySQL using this method.
brew install mysqlbrew services start mysqlIf you want to verify whether the installation was successful:
mysql_secure_installationmysql -u root -pSELECT version();The installation steps for MySQL vary slightly by Linux distribution. In the examples below, I will cover the most common Linux families.
Ubuntu and Debian use the Advanced Package Tool (apt) to download and manage system software. Follow the steps below if you use these distributions:
sudo apt updatesudo apt install mysql-server -ysudo systemctl start mysql
sudo systemctl enable mysqlThe Red Hat-based enterprise distributions rely on the dnf (or older yum) package manager.
sudo dnf install https://dev.mysql.com/get/mysql80-community-release-el9-1.noarch.rpm -yIf you are using an older version like RHEL 8 or Rocky Linux 8, replace el9 in the URL above with el8.
sudo dnf module disable mysql -y
sudo dnf install mysql-community-server -ysudo systemctl start mysqld
sudo systemctl enable mysqldTo verify a successful installation, check the service status and confirm that the database service is actively running without errors by executing:
sudo systemctl status mysql    # On Ubuntu/Debian
sudo systemctl status mysqld   # On CentOS/Rocky/RHEL
Then check the software version by running a quick build check right from the command line:
mysql --versionAfter you have installed MySQL, it's important to secure the server before using it in development or production environments. The default installation may include settings and accounts that are convenient for setup, but not ideal from a security perspective.
To close these security gaps, MySQL provides a built-in security utility called mysql_secure_installation. This tool allows you to secure the system through a guided, step-by-step terminal script.
To initialize this tool, open a terminal or command prompt and run:
mysql_secure_installationThe script will prompt you to review and apply several security settings.
If you haven't already set a password for the administrative root user, the script will prompt you to create one. It will also ask if you want to enable the Validate Password Component.
Some MySQL installations create anonymous user accounts that allow connections without a username. These anonymous accounts present a security risk because they can allow unauthorized access. During the security script, select Yes when asked to remove anonymous users.
By default, the root administrative account should be accessible only locally (on the machine running the server). If you allow the root account to connect remotely, it increases the risk of unauthorized access and brute-force attacks. When prompted by mysql_secure_installation, choose “Yes” to disallow remote root logins.
During installation, MySQL automatically creates a database named test that anyone can access. This is unnecessary for a functioning server. While it is useful for experimentation, it is unnecessary in most environments. When prompted, remove the test database and associated permissions.
After applying security changes, MySQL reloads its privilege tables so the new settings take effect immediately. If prompted, choose Yes to reload privileges.
As we saw in the example above, you should always verify that MySQL is installed correctly, regardless of whether you are using Windows, macOS, or Linux. The following are ways to get MySQL running correctly.
You may occasionally need to manually start or stop the MySQL service.
If you are using Windows, open the Command Prompt.
To start MySQL, run:
net start MySQL80To stop MySQL, run:
net stop MySQL80If you are using macOS (Homebrew), open the terminal.
To start MySQL, run:
brew services start mysqlTo stop MySQL, run:
brew services stop mysqlIf you are on Linux (Ubuntu/Debian), open the terminal.
To start MySQL, run:
sudo systemctl start mysqlTo stop MySQL, run:
sudo systemctl stop mysqlTo check service status:
sudo systemctl status mysqlAfter you have verified the system is up, now verify the installation by checking the MySQL version. Open a terminal or command prompt and run:
mysql --versionIf version information is displayed, the MySQL client is installed correctly. For example:
![]()
To connect to the server using the MySQL command-line client, run:
mysql -u root -pEnter your root password when prompted. If the connection succeeds, you'll see the MySQL prompt, mysql>.
This confirms that the MySQL server is accepting connections.
Once connected, you can execute a simple query to verify that the database engine is functioning properly.
For example, you can run the following query to check the MySQL version:
SELECT VERSION(); 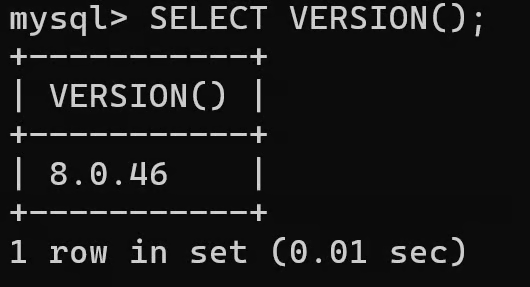
To list the available databases, run:
SHOW DATABASES; 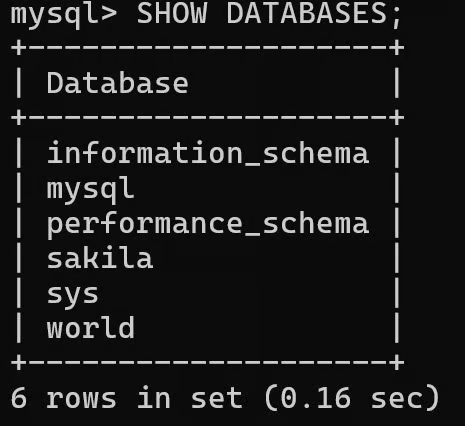
To exit the MySQL client, run:
EXIT;MySQL Workbench is the official graphical user interface (GUI) application for MySQL. It provides a user-friendly interface for working with MySQL databases without relying entirely on command-line tools.
MySQL Workbench helps you create and manage databases, run SQL queries, design database schemas, manage users and permissions, monitor server activity, and import/export data.
Although MySQL Workbench is optional, I highly recommend it for beginners and developers who prefer a visual interface.
If you selected Developer Default during MySQL installation, MySQL Workbench is installed automatically.
If it is not installed, follow the steps below:
If using the official MySQL installer, download the MySQL Workbench package separately and install it using the provided DMG file.
If using Homebrew, run the command below:
brew install --cask mysqlworkbenchIf you are using Ubuntu or Debian, run the query below:
sudo apt update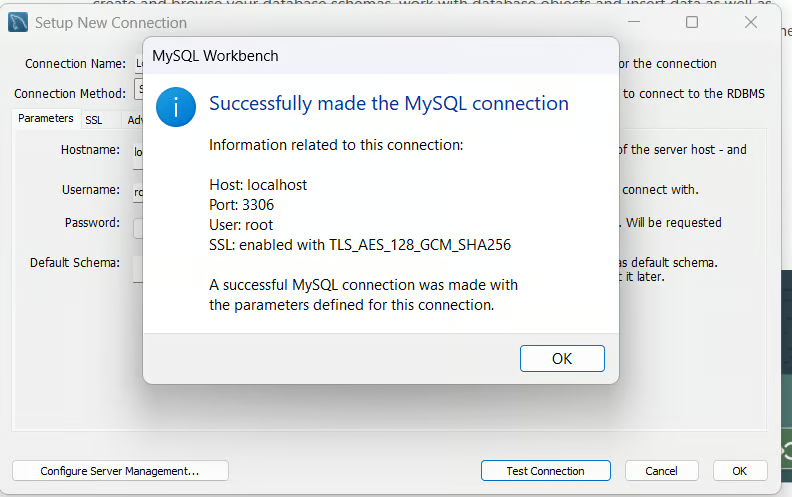
sudo apt install mysql-workbenchAfter launching MySQL Workbench:
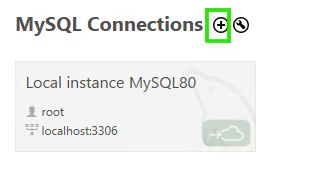
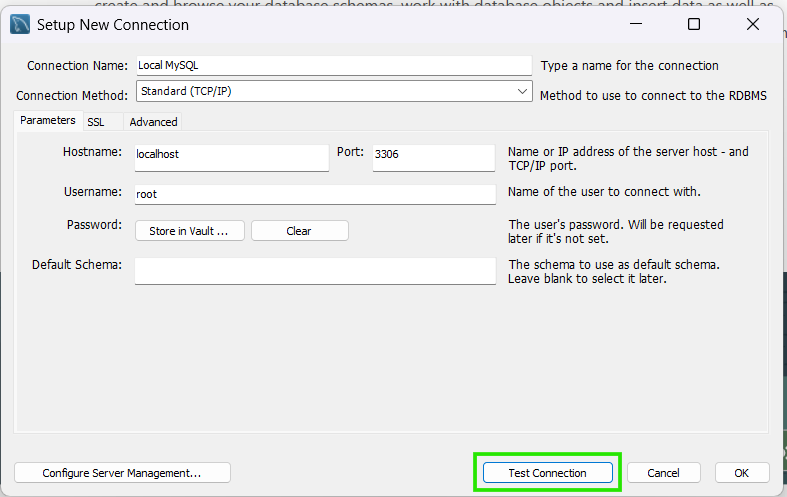
If the test succeeds, double-click the connection to connect to your MySQL server in Workbench.
Although installing MySQL is straightforward, you may occasionally encounter issues. Below are some common problems and how to fix them.
The problem occurs when the installer fails to start and shows an error message that port 3306 is blocked or that the server refuses to bind to it. This usually means another database instance, like an older MySQL install or a MariaDB/XAMPP stack, is already using it.
To fix the issue, identify the process using port 3306, then stop the conflicting application if appropriate. Alternatively, you can configure MySQL to use a different port, such as 3307.
This problem occurs when the MySQL service stops immediately after starting. The service startup may fail, or the server status remains offline or stuck in a “starting” loop.
To fix this, check the configuration file errors, existing port conflicts, corrupted data directories, or the available disk space. I also recommend you review MySQL error logs for detailed information about the failure.
This is a problem where you cannot log in because you misplaced or forgot the root password.
To solve the problem, reset the root password using MySQL's password recovery procedure for your operating system. The general steps are as follows:
This problem occurs when an older development framework or GUI client fails to connect to your fresh MySQL 8.x server, throwing an authentication plugin error. The probable cause is that MySQL 8.0 uses advanced password encryption that older clients don't understand.
To solve the problem, you can downgrade the root user's authentication method to the legacy format by logging into the MySQL terminal and running the query below:
ALTER USER 'root'@'localhost' IDENTIFIED WITH mysql_native_password BY 'your_password';
FLUSH PRIVILEGES;As we learned earlier, MySQL is available in both Community and Enterprise editions. The table below summarizes the difference between the two to help you choose the right one depending on your requirements, budget, and support needs.
|
Feature |
Community Edition |
Enterprise Edition |
|
Cost |
Free |
Commercial subscription |
|
Source Code |
Open source |
Commercial offering |
|
Monitoring Tools |
Basic |
MySQL Enterprise Monitor and |
|
Backup Features |
Standard options |
Enterprise backup tools |
|
Security Features |
Standard user privileges and firewall configurations. |
Advanced external authentication (LDAP/Active Directory), TDE encryption, and data masking. |
|
Technical Support |
Self-taught via community forums, documentation, and Stack Overflow. |
24/7 Oracle Premier Support with direct access to MySQL engineers. |
Now that your MySQL server is installed, configured, and secured, the next step is learning how to use it effectively. I recommend trying the following tasks to help you become familiar with MySQL and build a solid foundation for future projects.
By default, MySQL provides system-level databases after configuration. You can create your database for project practice. Log in to your MySQL client and run:
-- Create employees database
CREATE DATABASE employees;
USE employees;Databases store data inside structured tables. You can practice by defining columns and their data types, such as integers, text, and dates. For example, create a simple user directory:
-- Create users table
CREATE TABLE users (
    id INT AUTO_INCREMENT PRIMARY KEY,
    username VARCHAR(50) NOT NULL,
    email VARCHAR(100),
    created_at TIMESTAMP DEFAULT CURRENT_TIMESTAMP
);
The MySQL Basics Cheat Sheet will be a handy reference for common SQL queries as you build queries to filter data and aggregate tables.
Now that you have created your table, familiarize yourself with core CRUD operations (Create, Read, Update, Delete) to manipulate and retrieve the data. For example, focus on the commonly used SQL statements such as :
SELECT for retrieving data
INSERT for adding records
UPDATE for modifying data
DELETE for removing data
CREATE for creating database objects
Check out our SQL Order of Execution tutorial to learn how to write optimized queries and understand how query execution is different from the order of writing.
Most real-world MySQL usage involves connecting databases to applications. Try connecting your local MySQL server to a backend language or framework of your choice, such as Node.js, Python/Django, PHP, or Java. You will need to supply your database hostname (127.0.0.1), the port (3306), your database user (root or a custom user), and the password.
As we saw earlier, graphical tools such as MySQL Workbench, DBeaver, and TablePlus can simplify database administration and development. These GUI tools can help you browse databases visually, execute queries, manage users, design schemas, import and export data.
Whether you are using MySQL for learning, development, or personal projects, following a few best practices can improve security, reliability, and performance:
Installing MySQL is a straightforward process once you understand the steps for your operating system, whether you're using Windows, macOS, or Linux. After installation, take the time to verify that the server is running correctly, configure it properly, and secure it using recommended practices such as setting a strong root password and removing unnecessary default accounts.
Now you're ready to start practicing SQL! Take our Database Design course, where you will learn to create and manage databases, including granting users access and assigning roles.
Learn with DataCamp
Kursus
Kursus
Kursus
Tutorials
Bex Tuychiev
Tutorials
Kurtis Pykes
Tutorials
Sayak Paul
Tutorials
Aditya Sharma
Tutorials
Javier Canales Luna
Tutorials
Nic Raboy