
Program
Kontainerisasi dan Virtualisasi dengan Docker dan Kubernetes
13 Hr
I've spent countless hours manually managing Docker containers across development and production environments. Mismatched configurations, drifting states, and uncertainty about whether my local setup matched production plagued every deployment. When I discovered Terraform's Docker provider, everything changed.
In this tutorial, I'll walk you through integrating Terraform with Docker to create reproducible, version-controlled infrastructure. You'll learn how to provision containers, manage networks and volumes, implement resource constraints, and maintain state across your team.
Whether you're managing build servers or orchestrating microservices, grab your terminal and let's transform how you handle Docker infrastructure.
If you are new to Docker, I recommend getting started with our Introduction to Docker course.
Terraform is an infrastructure-as-code tool that manages resource lifecycles through a declarative workflow. Instead of running individual Docker commands, you define the desired infrastructure state in configuration files. Terraform then executes a plan-apply-destroy lifecycle: it calculates the required changes, shows a preview, and applies them only after approval.
The Terraform Docker provider serves as the translation layer between HashiCorp Configuration Language (HCL) code and the Docker API. When writing resource “docker_container" in a configuration, the provider converts that declaration into the appropriate Docker API calls. This abstraction means Docker resources can be managed using the same workflow used for cloud infrastructure.
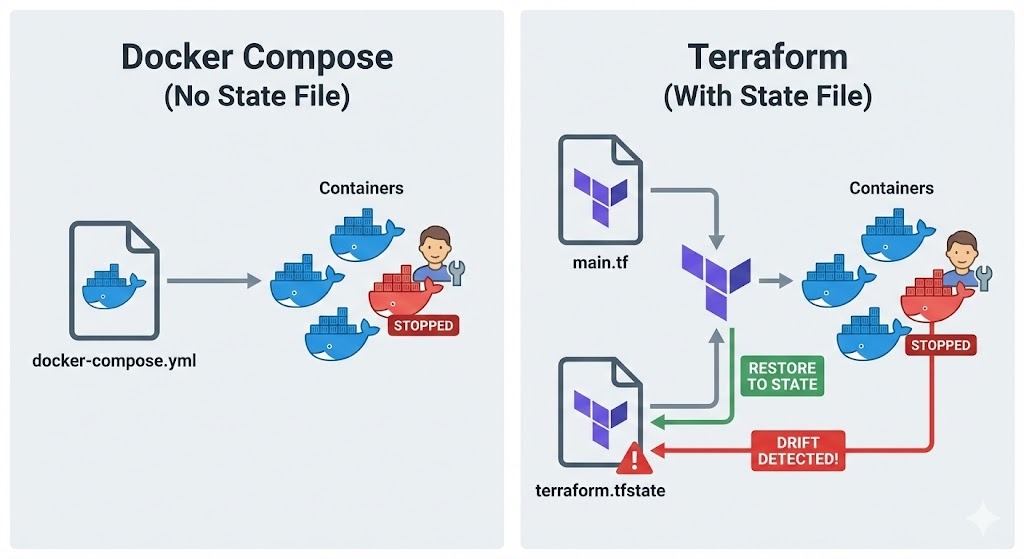
Here's where Terraform differs from Docker Compose.
While Compose manages containers through a project-based approach using YAML files, it doesn't maintain a state file tracking what actually exists.
Terraform, by contrast, records every resource it creates in terraform.tfstate, enabling it to detect drift between my configuration and reality. If someone manually modifies a container, Terraform will notice and can restore it to the defined state.
This approach shines in several scenarios:
Before diving into Terraform configurations, let's verify that the required tools are installed and properly configured.
First, verify that Docker Engine is running on your machine.
Linux: Check with docker ps
macOS or Windows: Ensure Docker Desktop is installed and running
The Terraform provider needs access to the Docker daemon, so you need to confirm your user has permission to access the Unix socket at /var/run/docker.sock on Linux or the named pipe on Windows.
Next, install the Terraform CLI from HashiCorp's official website. Installing Terraform varies by operating system:
Linux: Download the appropriate package or use your distribution's package manager.
macOS: Use Homebrew. First, install the HashiCorp tap using brew tap hashicorp/tap, and then install Terraform with the command brew install hashicorp/tap/terraform.
Windows: Download the binary from hashicorp.com and add it to your PATH, or use Chocolatey: choco install terraform.
Once installed, verify the installation by running terraform version.
With Docker and Terraform verified, the next step is organizing the project files for maintainability.
Terraform projects benefit from a clear and structured approach. Usually, I create a dedicated directory for my Terraform project and initialize version control:
mkdir terraform-docker-project
cd terraform-docker-project
git init
Version control is critical for infrastructure-as-code. Every change to the Docker infrastructure should be tracked, reviewed, and reversible. I normally add Terraform's working directory and state files to the .gitignore file to exclude them from version control:
.terraform/
*.tfstate
*.tfstate.backup
.terraform.lock.hcl
Finally, I create a blank main.tf file where I'll define my infrastructure. This file will hold the provider configuration and resource definitions.
With the project structure in place, it’s time to configure the Docker provider and start defining resources.
First, by adding the provider configuration to main.tf:
terraform {
  required_providers {
    docker = {
      source  = "kreuzwerker/docker"
      version = "~> 3.0"
    }
  }
}

provider "docker" {
  host = "unix:///var/run/docker.sock"
}
The required_providers block specifies where Terraform should download the provider plugin. Using version constraints (~> 3.0) allows minor version updates while preventing breaking changes. For remote Docker hosts, you can change the host parameter to something like tcp://192.168.1.100:2376.
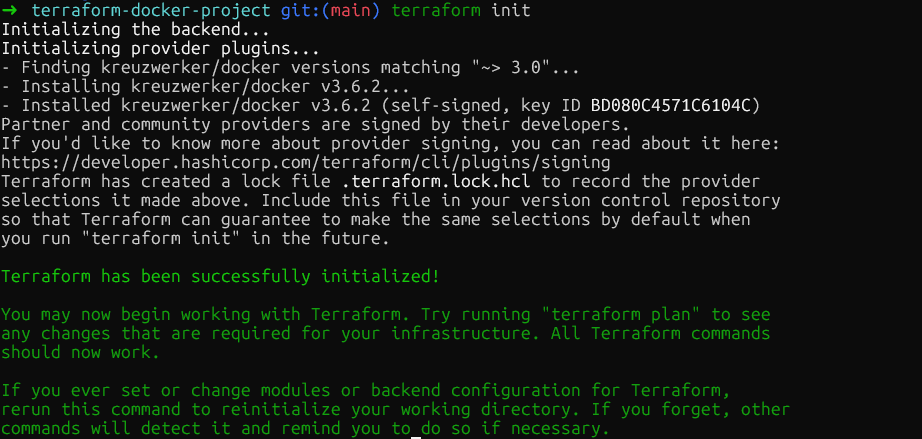
Now run terraform init in the project root directory. This downloads the Docker provider plugin and stores it in .terraform/providers/. The command outputs the exact version installed, and Terraform creates a lock file to ensure consistent provider versions across my team.
With the provider initialized, the next step is defining the container images. Before creating containers, you need to manage the images they'll use, so you need to define an image resource:
resource "docker_image" "nginx" {
  name         = "nginx:1.29"
  keep_locally = true
}
Add this resource directly after the provider block. The keep_locally parameter is important as it prevents Terraform from removing the image when I run terraform destroy. This is useful when multiple containers share the same image or when I want to preserve cached images between deployments.
For production deployments, pin images by their SHA256 digest to ensure immutability:
resource "docker_image" "nginx" {
 name = "nginx@sha256:b60f25eb5acdd79172de1a289891d9cfe4fc3669daddeeb68619240cbe839d9f"
}
The digest can be obtained from the container registry. For Docker Hub images like nginx, you can find them on the official Docker website under the Tags section. Using digests guarantees that the exact same image binary is deployed every time, even if someone pushes a new image with the same tag.
Once images are defined, the next step is creating containers that reference them:
resource "docker_container" "web" {
  name  = "nginx-web"
  image = docker_image.nginx.image_id

  ports {
    internal = 80
    external = 8080
  }

  env = [
    "NGINX_HOST=example.com",
    "NGINX_PORT=80"
  ]
}
The image is referenced using docker_image.nginx.image_id. This creates an implicit dependency as Terraform won't try to create the container until the image exists. The ports block maps the container's internal port 80 to my host's port 8080, equivalent to docker run -p 8080:80.
Environment variables go in the env list as strings. Terraform will recreate the container if any parameters change, ensuring the running infrastructure always matches the configuration.
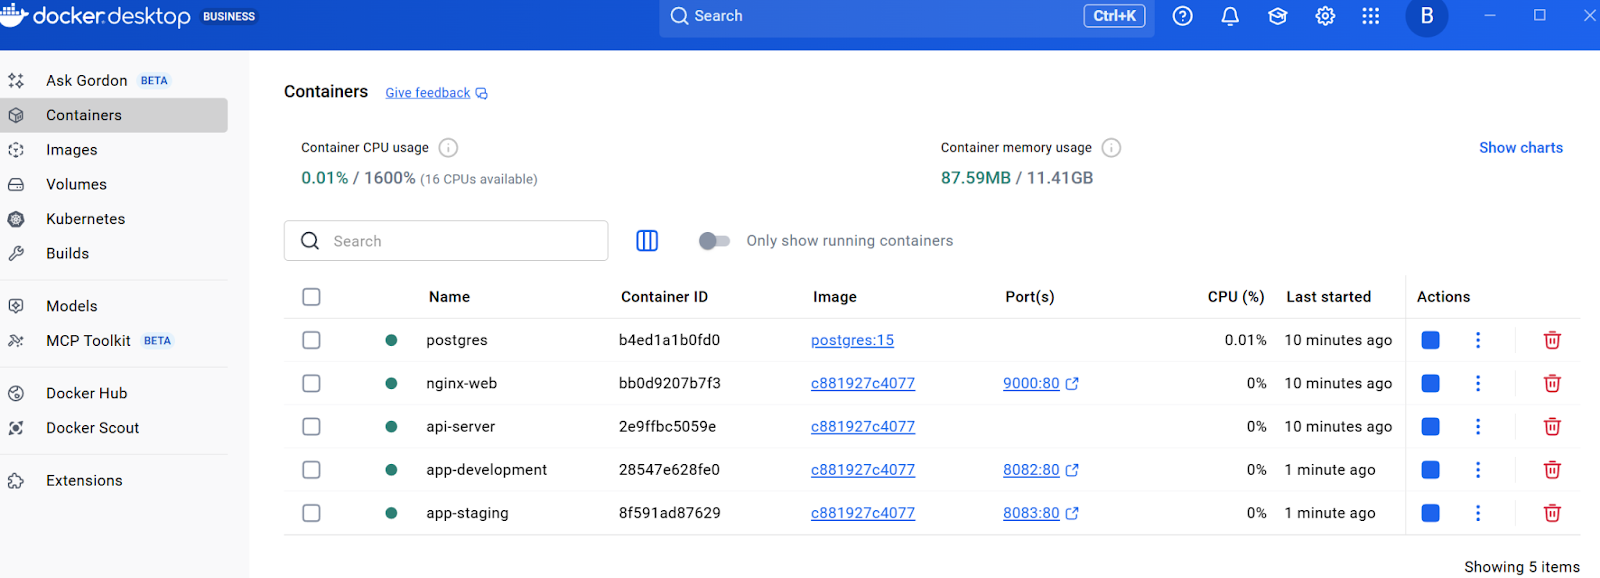
At this point, run terraform plan to see what Terraform will create, then terraform apply to provision the infrastructure. Terraform will create the image and container. You can verify this by checking the resource in Docker Desktop or by running docker ps in the terminal.
Now that you have a basic container running and understand the core workflow, let's expand the infrastructure with production-ready features. The next sections build upon this foundation by adding networking, persistent storage, and resource constraints, all essential for real-world deployments
To enable communication between containers while maintaining isolation, creating dedicated networks is essential. Here's how to create isolated networks to control container connectivity. Add the following resource to the main.tf file:
resource "docker_network" "app_network" {
  name   = "application_net"
  driver = "bridge"
}
Now add a second container that uses this network. Add this after the web container:
resource "docker_container" "api" {
name = "api-server"
image = docker_image.nginx.image_id
networks_advanced {
name = docker_network.app_network.name
}
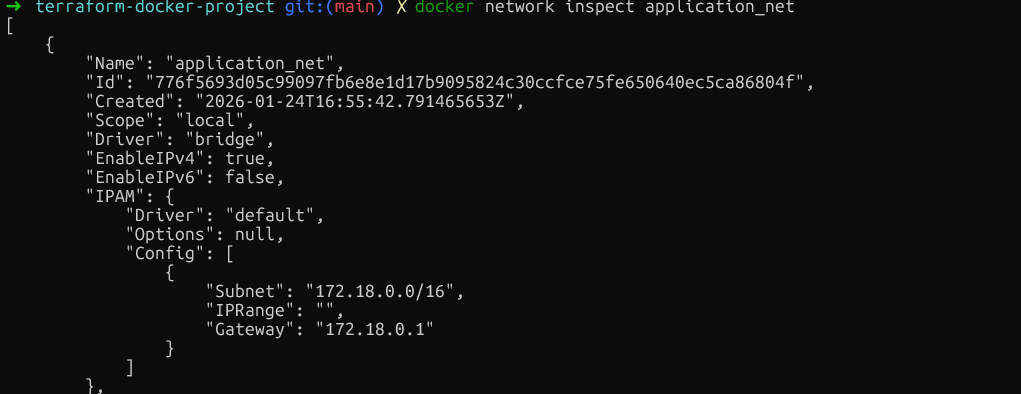
}This creates a dedicated bridge network and attaches the api container to it. Containers on the same network can communicate using their container names as hostnames, which is perfect for microservices architectures.
Verify the network isolation by running docker network inspect application_net and confirming that only the intended containers are connected. Make sure you run this command after creating the resources using terraform plan and terraform apply.
With networking configured for inter-container communication, the next critical aspect is data persistence.
For data that should survive container restarts, add volume resources. Insert these before the container definitions:
resource "docker_volume" "db_data" {
  name = "postgres_data"
}
Now add a database container that uses this volume:
resource "docker_container" "database" {
  name  = "postgres"
  image = "postgres:15"

 env = [
    "POSTGRES_PASSWORD=mysecretpassword"
  ]

  volumes {
    volume_name    = docker_volume.db_data.name
    container_path = "/var/lib/postgresql/data"
  }
}
Managed volumes like this are created and controlled by Docker, stored in Docker's data directory. For sharing configuration files from the host, use bind mounts by specifying host_path instead of volume_name.
volumes {
  host_path      = "/opt/app/config"
  container_path = "/etc/app/config"
  read_only      = true
}
After ensuring data survives container restarts, it's equally important to prevent any single container from monopolizing system resources.
Beyond storage, controlling how much CPU and memory each container can consume is critical for system stability. To prevent containers from consuming excessive resources, apply resource limits.
While Docker allows updating some resource limits in-place, Terraform's declarative model often requires replacing the container to ensure the state matches your configuration. To prevent downtime during this replacement, we use the create_before_destroy lifecycle rule.
Important: We must remove the fixed name argument to prevent naming conflicts during the replacement process. One option is to use the name_prefix argument instead.
resource "docker_container" "api" {
  name_prefix       = "api-server-"
  image      = docker_image.nginx.image_id
  memory     = 512
  cpu_shares = 1024

  networks_advanced {
    name = docker_network.app_network.name
  }

 lifecycle {
    create_before_destroy = true
  }
}
The memory parameter limits RAM in megabytes. The cpu_shares parameter works differently. It's a relative weight used when CPU contention occurs. A container with 1024 shares will get twice as much CPU time as one with 512 shares, but only when the host is under load.
For hard CPU limits, you can also use cpu_set to pin containers to specific CPU cores:
cpu_set = "0,1"
}
Validate these constraints by running docker inspect background-worker --format='{{.HostConfig.Memory}} {{.HostConfig.CpuShares}} and checking the Memory and NanoCpus values match the configuration.
Here again, as outlined above, you need to run terraform plan and terraform apply first to create the resources.
At this point, the main.tf file contains provider configuration, one image, one network, one volume, and three containers with various configurations.
As infrastructure grows, hardcoded values become inflexible. This section shows how to make the configuration reusable using variables, modules, and proper secret handling.
The first step in making configurations flexible is extracting hardcoded values into variables that can be easily changed without modifying the main code. This can be done by creating a new file called variables.tf in the same directory:
variable "web_port" {
  description = "External port for web container"
  type        = number
  default     = 8080

  validation {
    condition     = var.web_port > 1024 && var.web_port < 65535
    error_message = "Port must be between 1024 and 65535."
  }
}
Now update the web container in main.tf to use this variable:
resource "docker_container" "web" {
  name  = "nginx-web"
  image = docker_image.nginx.image_id

  ports {
    internal = 80
    external = var.web_port
  }

  env = [
    "NGINX_HOST=example.com",
    "NGINX_PORT=80"
  ]
}
The validation block prevents using privileged ports. To override the default value, create a terraform.tfvars file:
web_port = 9000When running terraform apply, Terraform will read values from this file automatically. Alternatively, pass values via command line: terraform apply -var="web_port=9000".
Variables solve the problem of hardcoded values, but what if you need to deploy the same entire pattern multiple times, complete with all its resources?
This is where modules excel. Think of a module as a blueprint that bundles all those separate pieces into a single package, allowing you to 'stamp out' that entire complex setup as a single unit.
Start by creating a module directory structure:
mkdir -p modules/web-appNow, create the file modules/web-app/variables.tf and add the following:
variable "environment" {
  description = "Environment name"
  type        = string
}

variable "port" {
  description = "External port"
  type        = number
}
Next, create a main file modules/web-app/main.tf with this resource:
resource "docker_container" "app" {
  name  = "app-${var.environment}"
  image = var.image_id

  ports {
    internal = 80
    external = var.port
  }
}
Finally, create an outputs file modules/web-app/outputs.tf, which is mainly used to show in the terminal the desired value after running terraform apply:
output "container_ip" {
  value       = docker_container.app.network_data[0].ip_address
  description = "IP address of the application container"
}
After adding the module definitions, run terraform init to install the modules, then terraform apply to create both containers from the same template. You should be able to see all resources in the Docker Desktop.
 With reusable infrastructure patterns established through modules, there's one more critical aspect of configuration management: securely handling sensitive information like passwords and API keys.
Sensitive values, such as database passwords, shall not be hardcoded. Instead, you can use the variables.tf file and set sensitive = true:
variable "db_password" {
  description = "Database root password"
  type        = string
  sensitive   = true
}
Now update the database container in main.tf to reference the database password:
resource "docker_container" "database" {
  name  = "postgres"
  image = "postgres:15"

  env = [
    "POSTGRES_PASSWORD=${var.db_password}"
  ]

  volumes {
    volume_name    = docker_volume.db_data.name
    container_path = "/var/lib/postgresql/data"
  }
}
Instead of putting the password in terraform.tfvars and hardcoding it, set it as an environment variable:
export TF_VAR_db_password="your-secure-password"
terraform apply
The sensitive = true flag prevents Terraform from displaying the value in console output.
However, these values are stored in plain text in terraform.tfstate, so to make sure this file is safe, we can secure it using remote backends with encryption. Let’s explore how to do this.
This section covers state mechanics and automation workflows essential for production deployments. But before implementing automation, it's essential to understand how Terraform tracks your infrastructure through its state file.
State is the foundation of Terraform's ability to manage infrastructure. The terraform.tfstate file maps configuration to real Docker container IDs and resource attributes. When running terraform apply, Terraform compares this state to the configuration and calculates the minimal changes needed.
Inspect the current state with terraform show, which displays every managed resource. For teams, local state files create problems, conflicts, and potential data loss. The solution is remote backends.
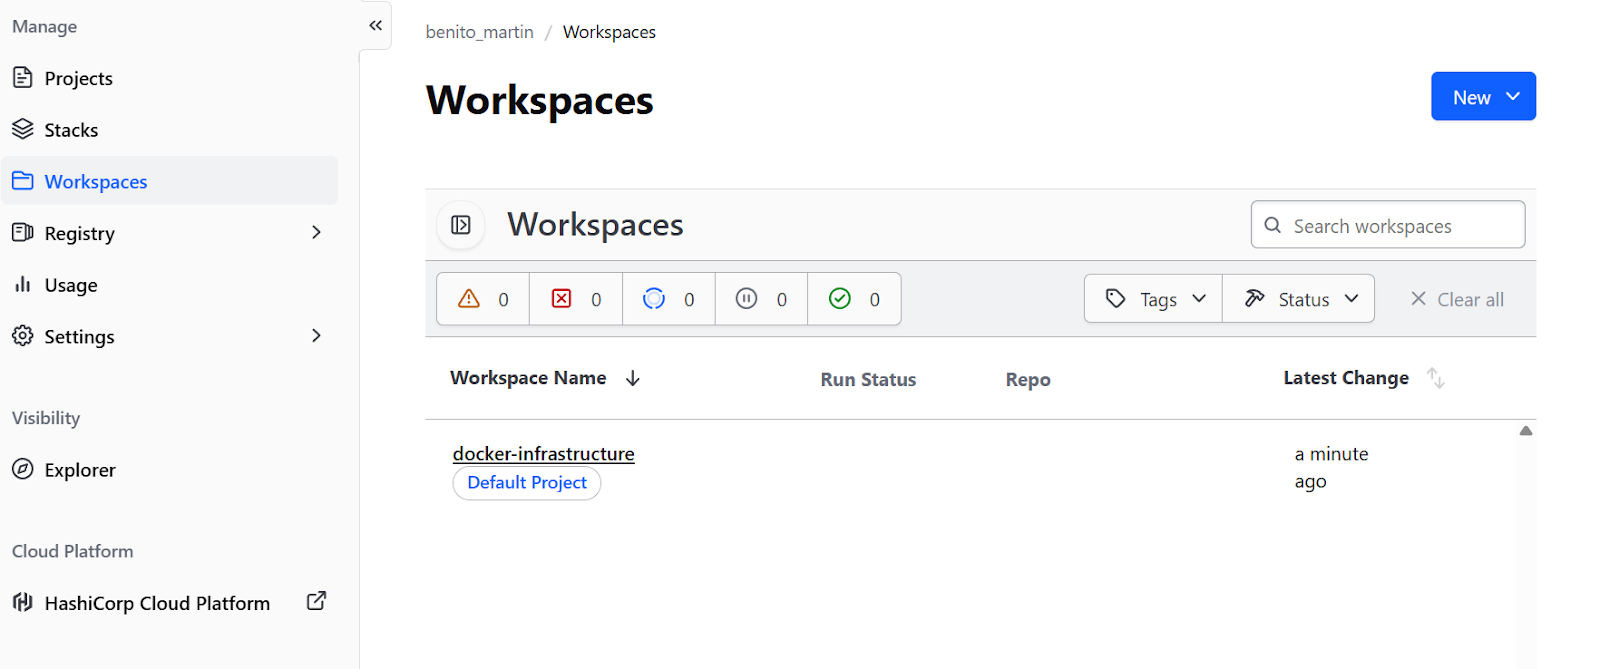
For Docker-focused workflows without cloud infrastructure, Terraform Cloud's free tier is ideal. Add a backend block to the terraform section in main.tf:
terraform {
  required_providers {
    docker = {
      source  = "kreuzwerker/docker"
      version = "~> 3.0"
    }
  }

  backend "remote" {
    organization = "your-org-name"

    workspaces {
      name = "docker-infrastructure"
    }
  }
}
Create a free account at the Terraform website. Then, run terraform login to authenticate with the provided token, and then terraform init to migrate state. This provides state locking in a remote workspace and team collaboration without cloud infrastructure.
However, it is also possible to create a remote backend in Cloud providers such as AWS or GCP.
With state management configured and stored remotely, the infrastructure is ready for team collaboration. The final piece is automating the deployment process through CI/CD pipelines, ensuring consistent and reviewable changes.
First, create .github/workflows/terraform.yml:
name: Terraform Docker Deploy

on:
  pull_request:
    branches: [main]
  push:
    branches: [main]

jobs:
  terraform:
    runs-on: ubuntu-latest
    steps:
      - uses: actions/checkout@v6

      - name: Setup Terraform
        uses: hashicorp/setup-terraform@v3

      - name: Terraform Init
        run: terraform init

      - name: Terraform Plan
        if: github.event_name == 'pull_request'
        run: terraform plan

      - name: Terraform Apply
        if: github.event_name == 'push' && github.ref == 'refs/heads/main'
        run: terraform apply -auto-approve
This workflow runs terraform plan on every pull request, showing reviewers what infrastructure changes will occur. When changes are merged to main, terraform apply executes automatically, ensuring every infrastructure change goes through the same review process as code changes.
Even with careful configuration, issues can arise. Understanding common problems and when to consider alternatives helps in making better architectural decisions.
The most common error on Linux is "permission denied" when connecting to the Docker socket. This happens when the user lacks permission to access /var/run/docker.sock. Fix it by adding the user to the docker group:
sudo usermod -aG docker $USERThen log out and back in.
On Windows with WSL2, connectivity issues arise because the socket path differs. Ensure Docker Desktop's "Expose daemon on tcp://localhost:2375 without TLS" setting is enabled, then update the provider in main.tf:
provider "docker" {
  host = "tcp://localhost:2375"
}For private Docker registries, add authentication to the provider block, define credentials as variables, and set them via environment variables to avoid problems because of hardcoding.
hclprovider "docker" {
  host = "unix:///var/run/docker.sock"

  registry_auth {
    address  = "registry.mycompany.com"
    username = var.registry_username
    password = var.registry_password
  }
}Beyond troubleshooting, it's equally valuable to understand when other tools might be more appropriate than Terraform for your specific use case.
Kubernetes offers far more sophisticated orchestration features:
For complex multi-node deployments with high availability requirements, Kubernetes is the better choice. Terraform can provision Kubernetes infrastructure, while Helm or Kubernetes manifests handle application deployment.
Ansible excels at configuration management inside containers. While Terraform provisions infrastructure, Ansible manages software configuration and package installation. The two tools often work together: Terraform creates Docker containers, then Ansible configures applications running inside them.
For simple local development environments, Docker Compose remains the most pragmatic choice. Terraform shines for reproducible deployments across environments and when integration with other infrastructure components is needed.
To help you decide which one to pick, I summarized the most important differences in this table:
|
Tool |
Core Strengths |
Best Use Case |
Comparison to Terraform |
|
Kubernetes |
Sophisticated orchestration (self-healing, advanced scheduling, load balancing). |
Complex multi-node deployments requiring High Availability. |
Complementary: Terraform provisions the infrastructure (the cluster), while Kubernetes manages the application deployment. |
|
Ansible |
Configuration management, package installation, and software setup. |
Managing the software and configuration inside the containers. |
Complementary: Terraform creates the Docker containers, and Ansible configures the applications running inside them. |
|
Docker Compose |
Simple, pragmatic project-based management. |
Simple local development environments. |
Alternative: Compose is easier for local dev, but Terraform is better for reproducible deployments across different environments. |
If you are searching for a tool to replace Docker, check out our guide on the top Docker alternatives.
Bringing Docker under Terraform's lifecycle management transforms container deployments from manual procedures into reproducible, version-controlled infrastructure. In this tutorial, I showed how to build a complete infrastructure step by step, starting with a provider and a single container, then progressively adding networking, storage, variables, modules, and automation.
The key distinction is that Terraform handles provisioning, creating, updating, and destroying resources based on declarative configuration. Full orchestration with automatic scaling and self-healing requires tools like Kubernetes or Docker Swarm. Terraform can provision these orchestrators, but it doesn't replace them.
For next steps, explore the official Terraform Registry documentation for the Docker provider to find advanced resource options like Docker services for Swarm, secret management, and plugin configurations.
If you want to get some hands-on experience with containers, I recommend enrolling in our interactive Containerization and Virtualization with Docker and Kubernetes skill track.
Docker Courses
Program
Kursus
Kursus
blogs
Joel Wembo
14 mnt
Tutorials
Marie Fayard
Tutorials
Derrick Mwiti
Tutorials
Karen Zhang
Tutorials
Moez Ali
Tutorials
Benito Martin