Track
AWS Cloud Practitioner (CLF-C02)
10 hr
I've spent countless hours clicking through the AWS Console, manually launching EC2 instances, configuring security groups, and inevitably making mistakes that take hours to debug. Sound familiar? You create an instance in the wrong availability zone, forget to tag a resource, or spend an afternoon recreating the exact configuration you built last month because you didn't document the steps.
Manual infrastructure provisioning isn't just tedious, it's error-prone, unscalable, and impossible to audit. That's where Terraform changes everything. Imagine defining your entire AWS infrastructure in text files that you can version control, review, and deploy automatically. No more clicking through dozens of screens. No more "but it worked on my machine" conversations with your team.
In this tutorial, I'll show you how to automate AWS infrastructure using Terraform, focusing on a real-world example: provisioning an EC2 instance with an automatically bootstrapped SSM (Systems Manager) agent. By the end, you'll understand Infrastructure as Code fundamentals and have working code you can deploy immediately to your own AWS account.
If you are new to AWS, consider taking one of our courses, such as AWS Concepts, Introduction to AWS Boto in Python, or AWS Security and Cost Management.
Terraform is an open-source Infrastructure as Code (IaC) tool created by HashiCorp that lets you define, provision, and manage cloud resources using HashiCorp Configuration Language (HCL).
Instead of clicking through cloud consoles or writing imperative bash scripts, you declare what infrastructure you want in configuration files, and Terraform handles the details of making it happen. This shift from imperative to declarative infrastructure represents a fundamental change in how we think about cloud resources.
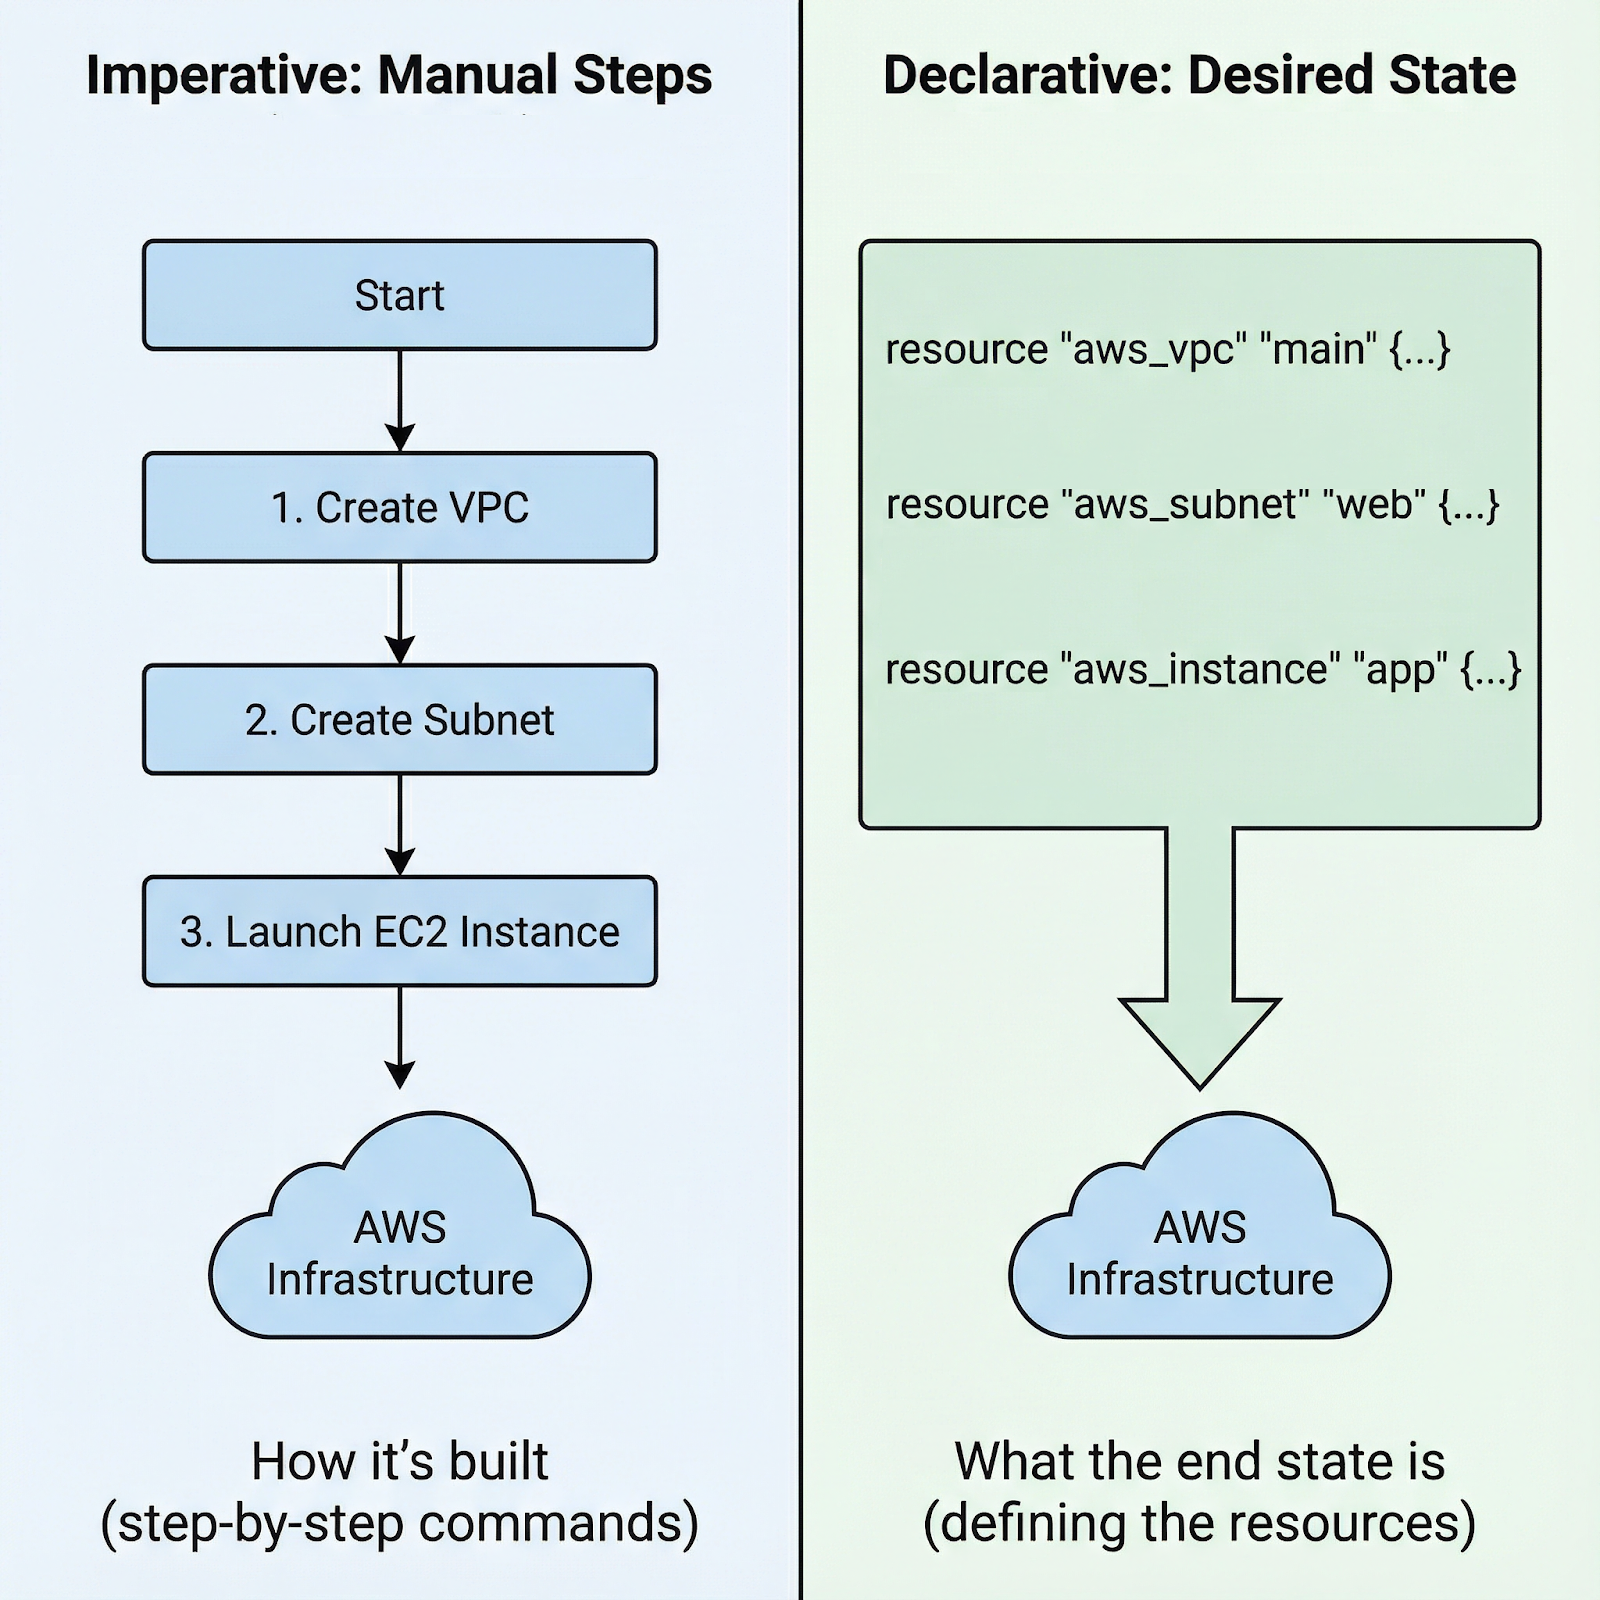
Imperative vs. declarative approach to launch an AWS EC2 instance
With imperative approaches, you write step-by-step instructions: "first create this security group, then wait for it to exist, then launch this instance with that security group, then attach this volume, then create these tags." You're responsible for the exact sequence and handling errors at each step.
With Terraform's declarative approach, you simply define the end state: "I want an EC2 instance with these specifications, connected to this security group, with these tags." Terraform analyzes dependencies, determines the correct order, and executes the plan. If something fails, Terraform knows exactly where it left off.
Why choose Terraform for AWS specifically?
Before diving into hands-on configuration, you need to understand three key concepts that form Terraform's foundation:
With these fundamentals clear, let's get your environment ready to start building actual infrastructure.
Before writing any Terraform code, you need the CLI installed and AWS credentials configured. Let me walk you through both.
Installing Terraform varies by operating system:
On macOS, use Homebrew: first install the HashiCorp tap with brew tap hashicorp/tap, then install Terraform with brew install hashicorp/tap/terraform.
On Windows, download the binary from hashicorp.com and add it to your PATH, or use Chocolatey: choco install terraform.
On Linux, download the appropriate package or use your distribution's package manager.
Once installed, verify the installation by running terraform version.
Configuring AWS credentials requires an AWS account, an access key, and a secret from IAM. Never use your root account. Instead, create an IAM user with programmatic access and appropriate permissions (AdministratorAccess). The standard approach uses the AWS credentials file at ~/.aws/credentials:
[default]
aws_access_key_id = YOUR_ACCESS_KEY
aws_secret_access_key = YOUR_SECRET_KEY
Alternatively, set environment variables: AWS_ACCESS_KEY_ID and AWS_SECRET_ACCESS_KEY. For production environments, use IAM roles attached to EC2 instances or CI/CD systems rather than long-lived credentials.
If you are thinking about using a different ecosystem than Amazon’s or simply want to get a good overview of how the “big three” compare, I recommend reading this AWS, Azure, and GCP Service Comparison for Data Science & AI.
With the foundation in place, let's build something real: an EC2 instance that automatically installs the SSM agent on startup.
Terraform projects benefit from a clear and structured approach. Create three files: main.tf for resource definitions, variables.tf for inputs, and outputs.tf for values you'll need after deployment. This separation keeps your code organized and maintainable.
 aws-terraform
├── main.tf
├── output.tf
└── variables.tf
Here's why this matters: as projects grow, mixing everything in one file becomes unmaintainable. Variables allow you to reuse the same code across different environments (dev, staging, production) by changing the inputs. Outputs provide values you'll need, such as instance IDs or IP addresses, without manually searching the AWS Console.
Now let’s create the infrastructure: an EC2 instance with the SSM agent pre-installed. In the main.tf file, add the following configuration:
terraform {
required_providers {
aws = {
source = "hashicorp/aws"
version = "~> 6.0"
}
}
}
provider "aws" {
region = "eu-central-1"
}
data "aws_ami" "amazon_linux" {
most_recent = true
filter {
name = "name"
values = ["amzn2-ami-hvm-*-x86_64-gp2"]
}
filter {
name = "virtualization-type"
values = ["hvm"]
}
owners = ["amazon"]
}
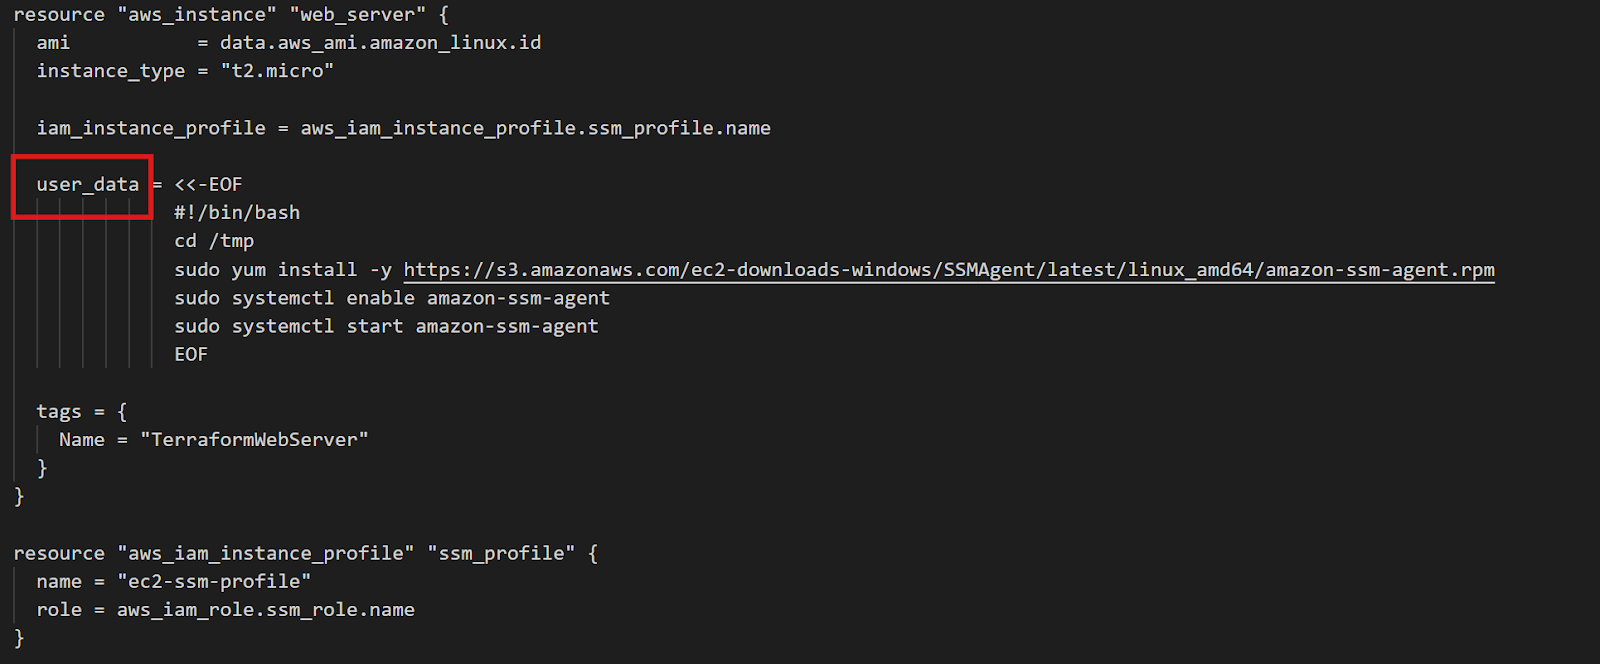
resource "aws_instance" "web_server" {
ami = data.aws_ami.amazon_linux.id
instance_type = "t2.micro"
iam_instance_profile = aws_iam_instance_profile.ssm_profile.name
user_data = <<-EOF
#!/bin/bash
cd /tmp
sudo yum install -y https://s3.amazonaws.com/ec2-downloads-windows/SSMAgent/latest/linux_amd64/amazon-ssm-agent.rpm
sudo systemctl enable amazon-ssm-agent
sudo systemctl start amazon-ssm-agent
EOF
tags = {
Name = "TerraformWebServer"
}
}
resource "aws_iam_instance_profile" "ssm_profile" {
name = "ec2-ssm-profile"
role = aws_iam_role.ssm_role.name
}
resource "aws_iam_role" "ssm_role" {
name = "ec2-ssm-role"
assume_role_policy = jsonencode({
Version = "2012-10-17"
Statement = [{
Action = "sts:AssumeRole"
Effect = "Allow"
Principal = {
Service = "ec2.amazonaws.com"
}
}]
})
}
resource "aws_iam_role_policy_attachment" "ssm_policy" {
role = aws_iam_role.ssm_role.name
policy_arn = "arn:aws:iam::aws:policy/AmazonSSMManagedInstanceCore"
}
Terraform EC2 Instance Configuration
The data block queries AWS for the most recent Amazon Linux 2 AMI. The filters ensure you get the right image type, and owners = ["amazon"] ensures you're using official Amazon AMIs. This approach works across all regions without modification—Terraform automatically finds the correct regional AMI.
The crucial part is user_data: a shell script that runs when the instance first boots. This script downloads and installs the SSM agent, then enables it to start automatically. The IAM role provides the permissions SSM needs to manage the instance.
The same pattern works for any agent. Want CloudWatch for logs and metrics? Just modify the user_data script to install the CloudWatch agent instead. The principle remains identical: define what you want installed, and Terraform ensures it happens on every instance.
For the output.tf file, you can add, for example, the instance ID. Then, once you run all Terraform commands that I will cover in the next chapter, the value will show in the terminal.
output "instance_id" {
  description = "EC2 instance ID for SSM connection"
  value       = aws_instance.web_server.id
}With your configuration written, the Terraform workflow has three commands. First, the following command downloads the AWS provider plugin and prepares your directory:
terraform init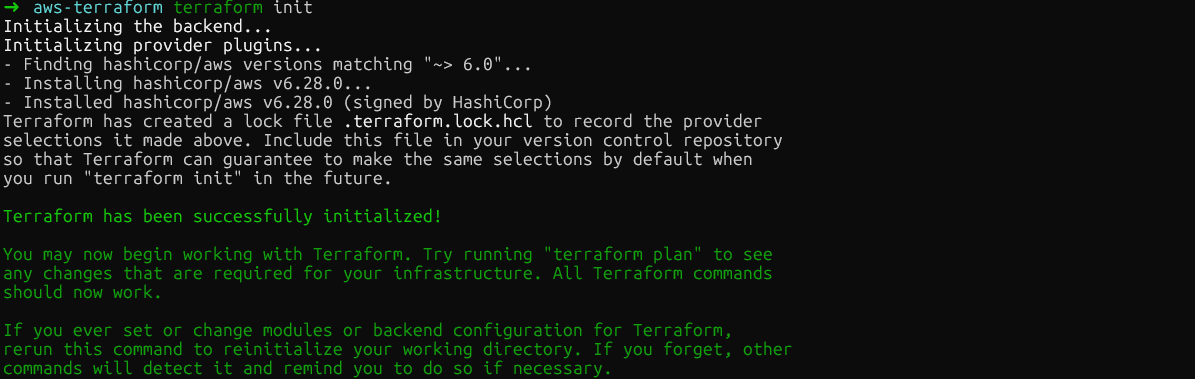
terraform init
Second, terraform plan shows exactly what Terraform will create, modify, or destroy. This preview lets you catch mistakes before making real changes:
terraform plan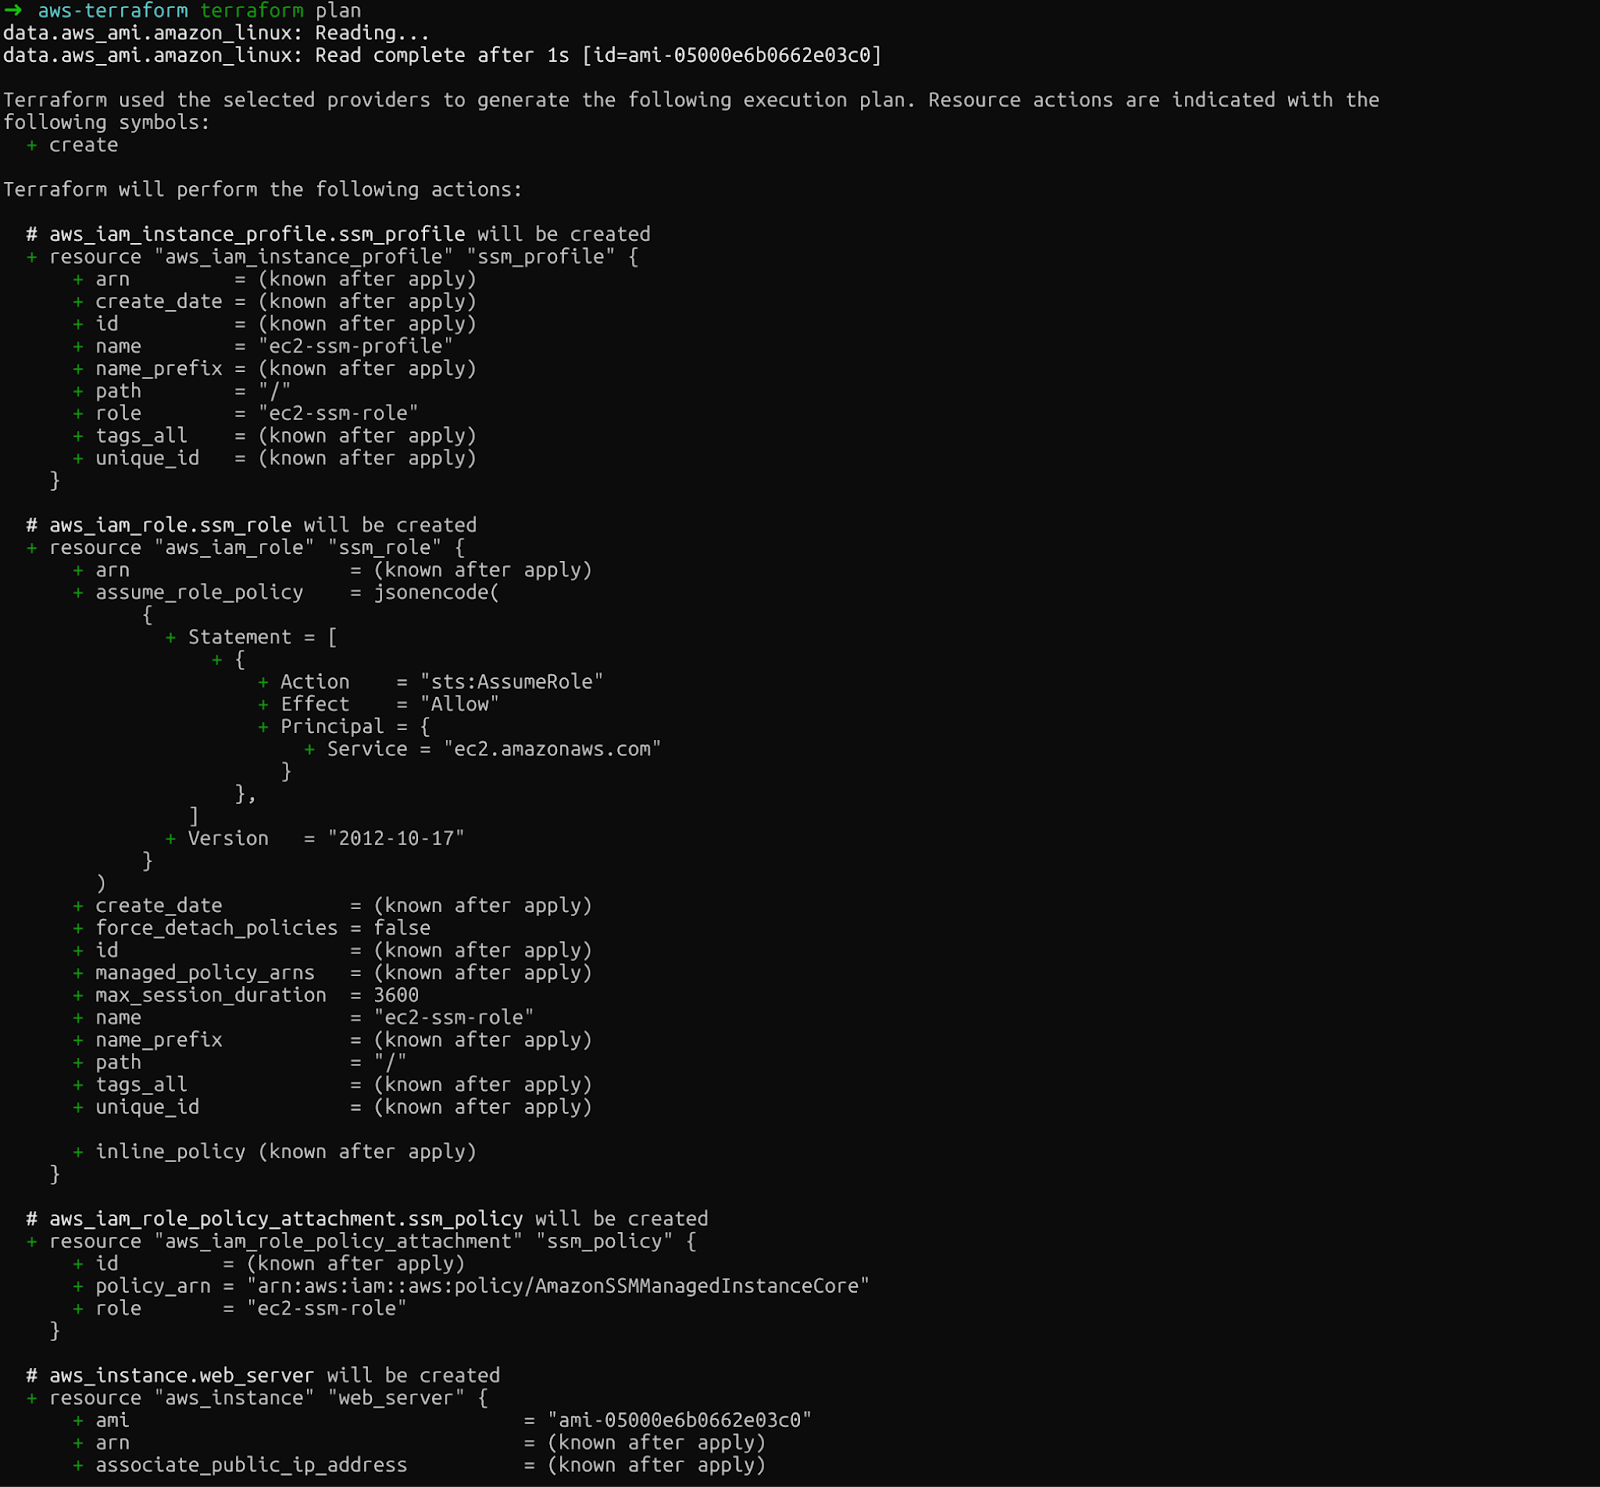
terraform plan
Review the output carefully. You'll see the EC2 instance, IAM role, instance profile, and policy attachment that Terraform will create.
Finally, terraform apply executes the changes. Terraform asks for confirmation before proceeding. Type yes after running this command:
terraform apply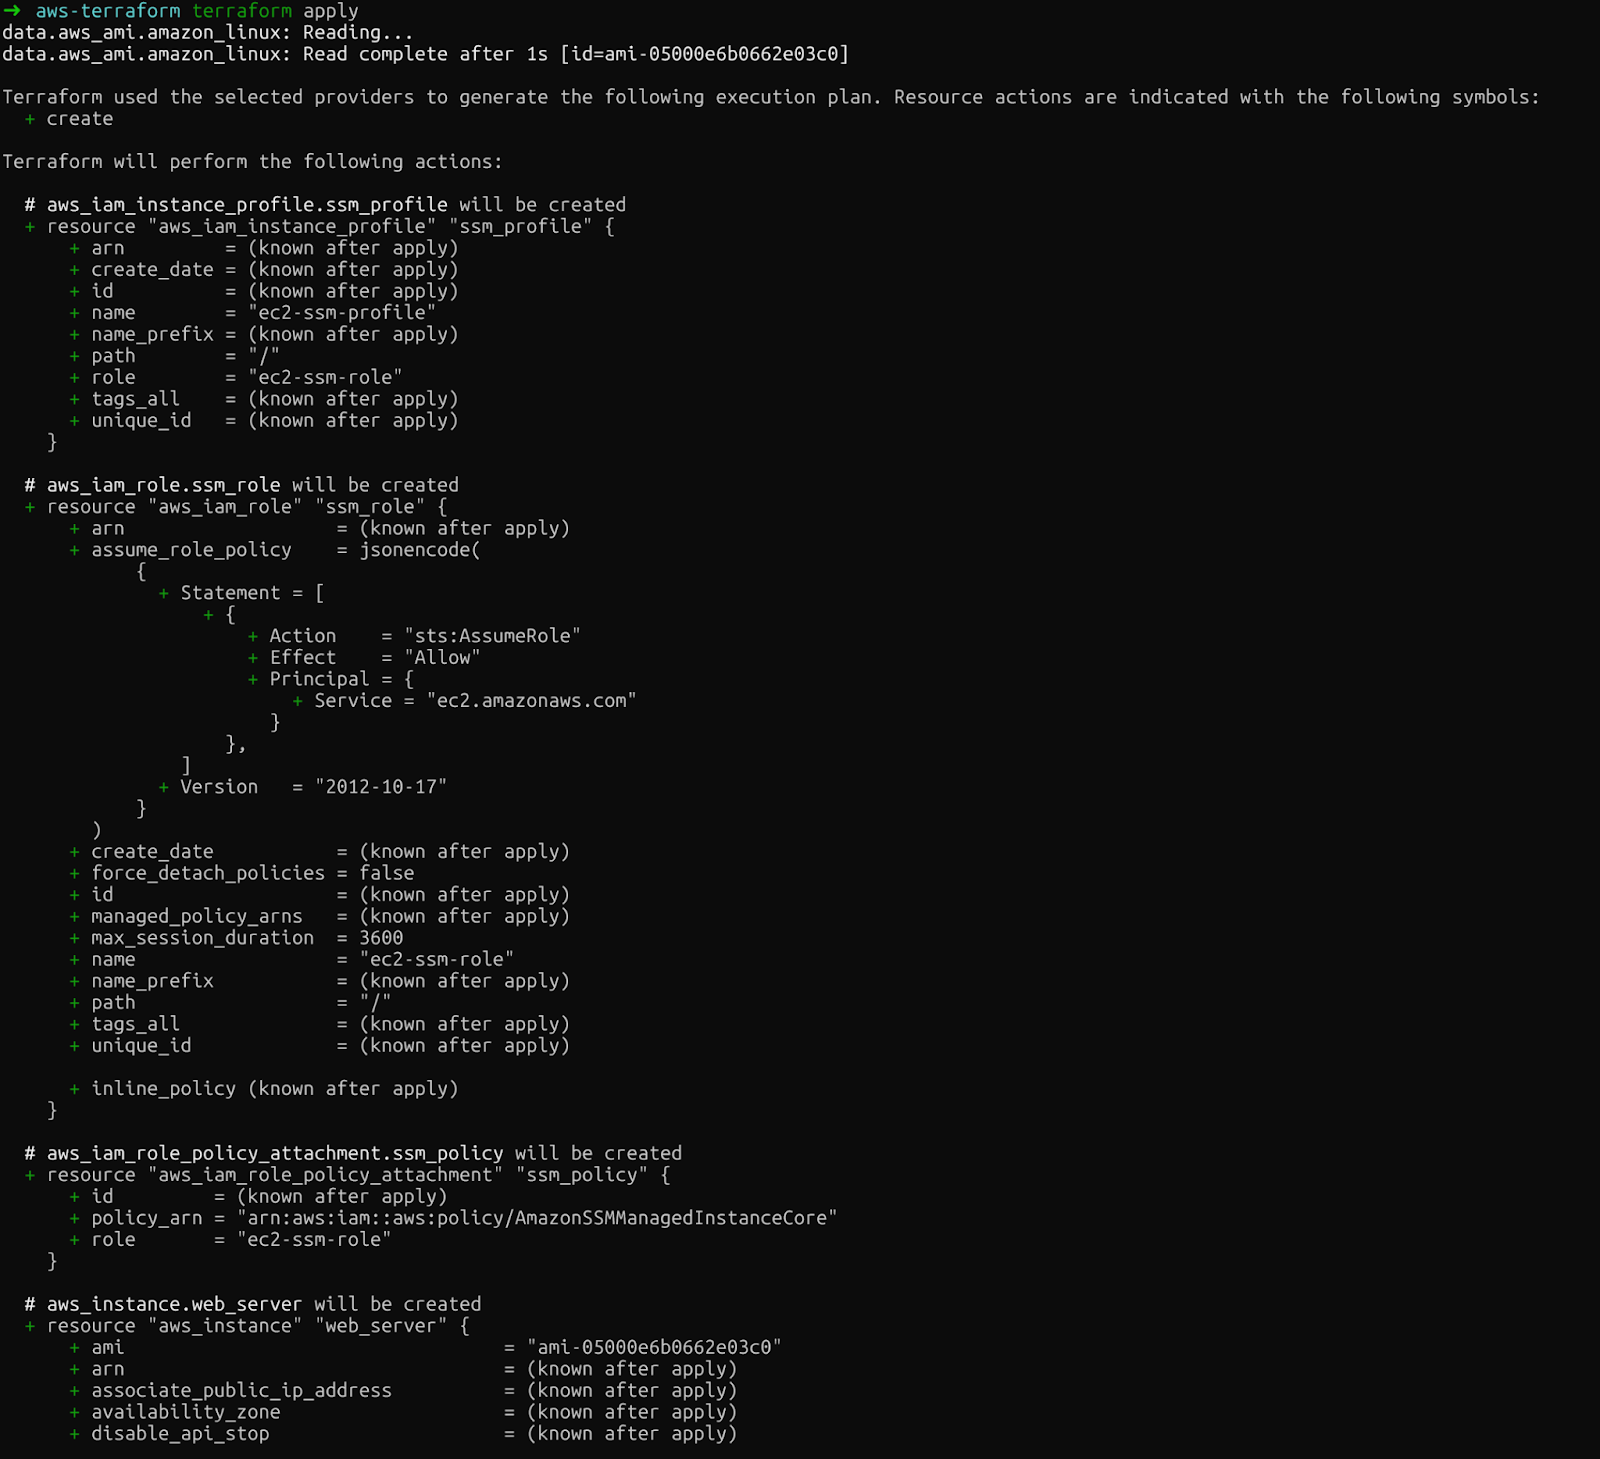
terraform apply
If everything works, you will see the following message once the resources have been created.

Confirmation: Terraform resources created
Within minutes, you'll have a running EC2 instance with SSM configured, accessible without SSH keys. Make sure you check the AWS Console to see the recently created resources.
After running the above commands, you will see a new file in the directory called terraform.tfstate. Terraform's state file maps your configuration to real AWS resources. Let’s go through this file to understand its content.
The state file contains every detail about your deployed infrastructure: resource IDs, IP addresses, and dependencies. Terraform compares this state to your configuration and AWS's actual state to determine what actions to take. Lose the state file, and Terraform loses track of everything it created.
Keeping state on your laptop is dangerous. If your machine crashes, the state vanishes. If multiple team members work on the same infrastructure, conflicting local states cause corruption. The solution: remote state storage.
For a deep dive into S3 and EFS, check out this AWS Storage Tutorial.
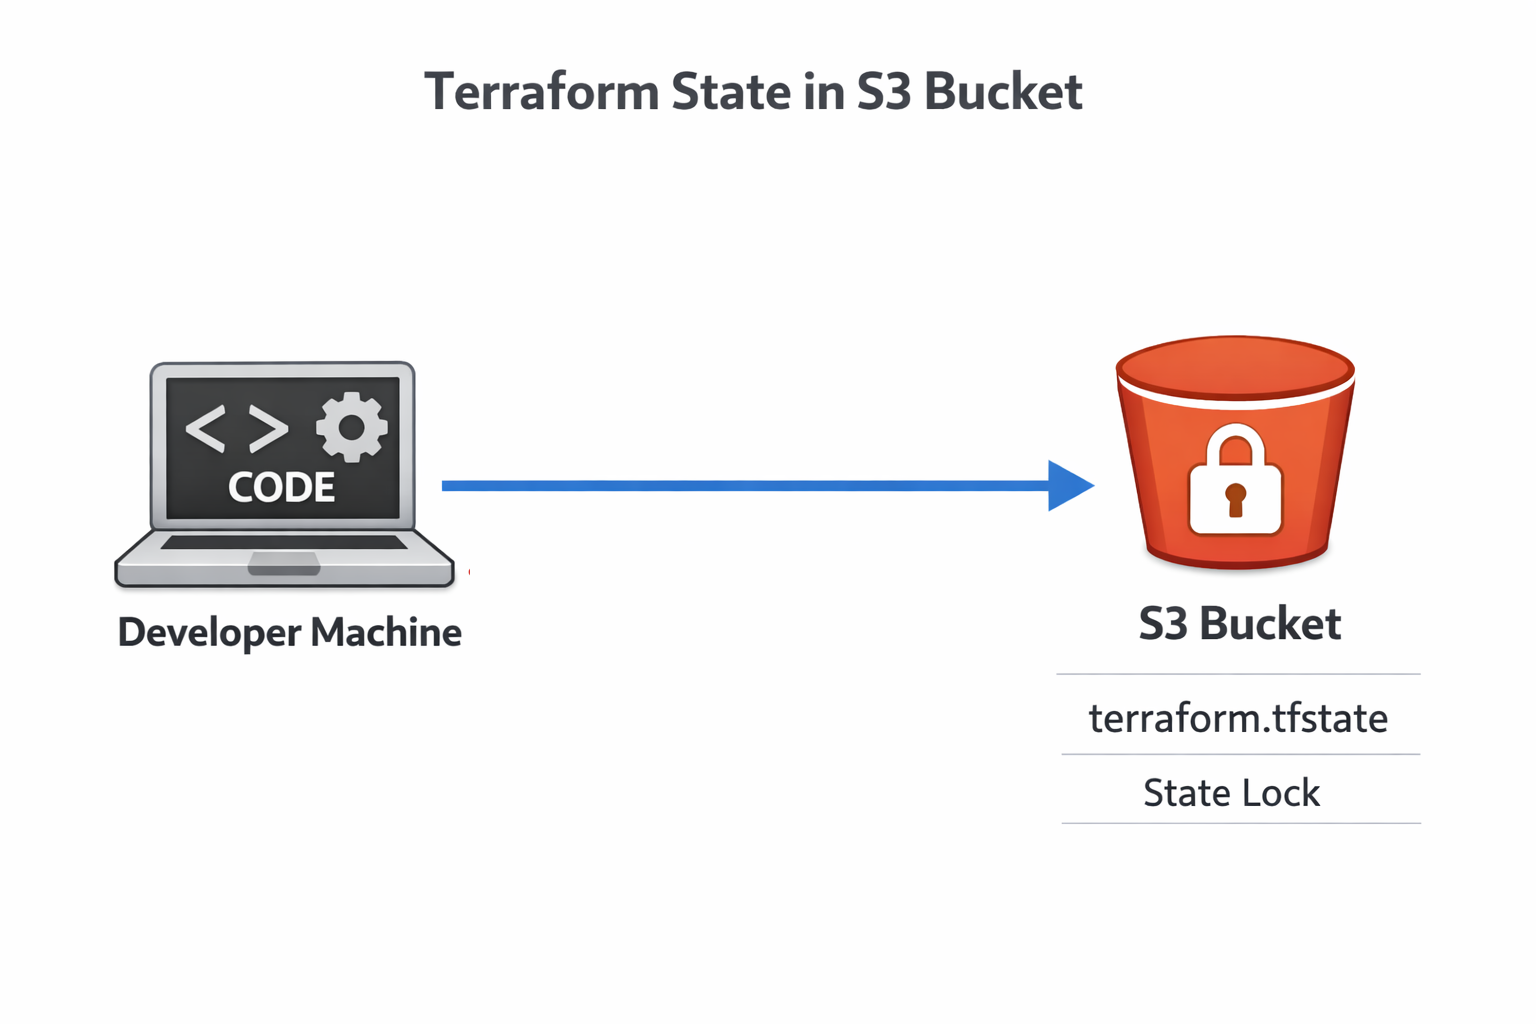
Terraform's S3 backend stores state in a centralized, durable location accessible to your entire team. First, create an S3 bucket:
aws s3api create-bucket \
  --bucket datacamp-terraform-state \
  --region eu-central-1 \
   --create-bucket-configuration LocationConstraint=eu-central-1

aws s3api put-bucket-versioning \
  --bucket datacamp-terraform-state \
  --versioning-configuration Status=Enabled
Versioning is critical: it lets you recover from accidents by rolling back to previous state versions.
Now, add the backend configuration to your Terraform code:
terraform {
  required_providers {
    aws = {
      source  = "hashicorp/aws"
      version = "~> 6.0"
    }
  }

  backend "s3" {
    bucket = "datacamp-terraform-state"
    key    = "terraform.tfstate"
    region = "eu-central-1"
    use_lockfile = true
  }
}
Run terraform init again to migrate your local state to S3. Terraform will ask for confirmation before moving the state file.
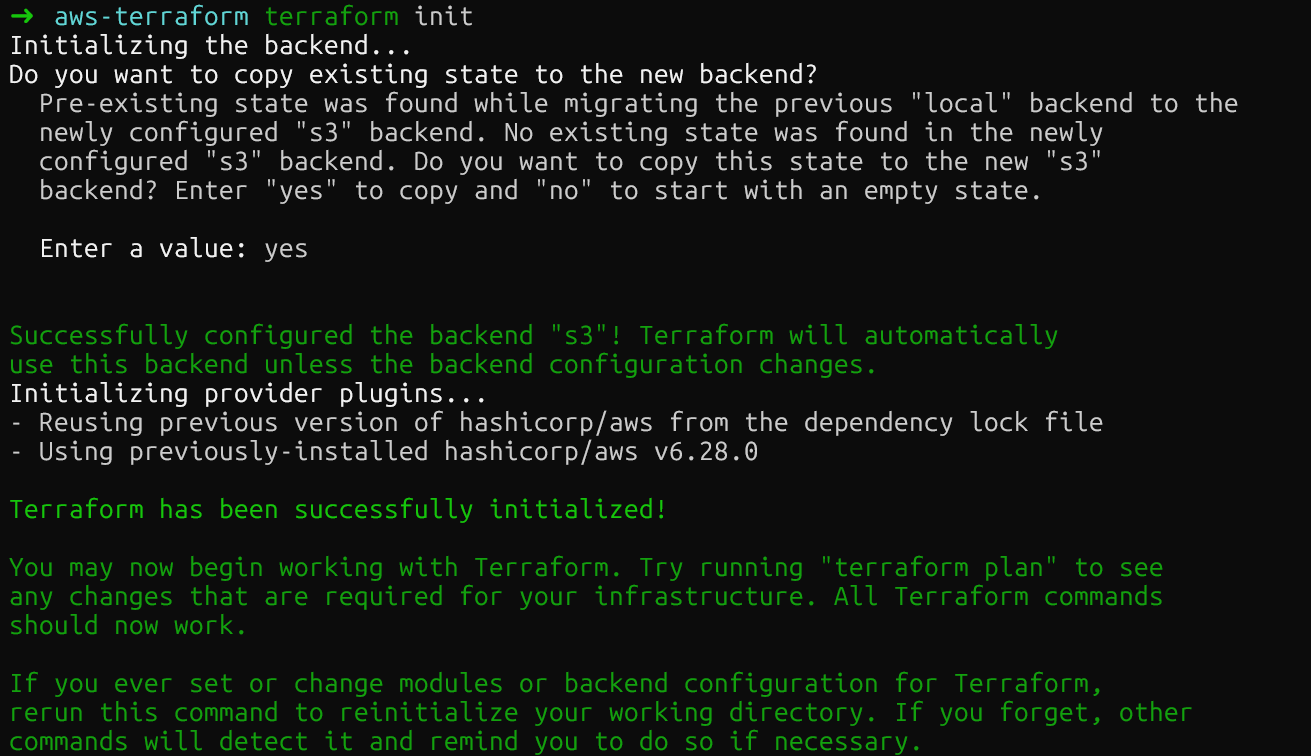
Terraform S3 remote backend
After running the command, the S3 bucket shall contain the new state file. You can check this in the AWS console.
You have probably seen that we have added the following command to the main.tf file: use_lockfile = true. This setting enables Terraform's newest feature: native S3 state locking. Previously, you needed a separate DynamoDB table for locking.
Terraform lock state
This simplification removes an entire AWS service from your infrastructure setup while providing the same protection against race conditions. Multiple engineers can work on infrastructure safely, knowing only one person's changes will apply at a time.
As your infrastructure grows, hardcoded values and copy-pasted code become maintenance nightmares. Terraform's variable system and modules solve this.
Previously, we created the file variables.tf. Now you can move the values, which were hardcoded in main.tf previously, into this new file that will contain our variables:
variable "aws_region" {
  description = "AWS region for resources"
  type        = string
  default     = "eu-central-1"
}

variable "instance_type" {
  description = "EC2 instance type"
  type        = string
  default     = "t2.micro"
}
Now reference the variables in your resources in the main.tf file:
provider "aws" {
  region = var.aws_region
}

resource "aws_instance" "web_server" {
  instance_type = var.instance_type
  # ... rest of configuration

  tags = {
    Environment = var.environment
  }
}
Note that AWS S3 buckets are unique, so you cannot use variables in the region in the backend parameter of main.tf. Here, you must keep your hardcoded region like “eu-central-1” instead of var.region_aws.
So now that our variables have been defined, you can also define different environments, like development or production, where variables may differ. This is done by creating new files with the extension .tfvars.
For instance, you can create a terraform-dev.tfvars for development and a terraform-prod.tfvars for production:
Development:
aws_region    = "eu-central-1"
instance_type = "t2.micro"
Production:
aws_region    = "eu-central-1"
instance_type = "t3.medium"
Then, you can deploy to the different environments by specifying the appropriate file:
terraform apply -var-file="terraform-dev.tfvars”Variables solve the problem of environment-specific values, but what about duplicating entire patterns of infrastructure? That's where modules become essential.
Modules package related resources into reusable components. The best way to use modules is by creating a specific folder. For example, you can create a directory structure like this:
modules/
  ec2-with-ssm/
    main.tf
    variables.tf
    outputs.tf
You can move the previously created variables.tf file (or create a new one) to the module folder. The key change happens in the main.tf file. The one in the module shall contain our resources. So everything from the AMI to the bottom of the file shall be moved there:
data "aws_ami" "amazon_linux" {
  most_recent = true

  filter {
    name   = "name"
    values = ["amzn2-ami-hvm-*-x86_64-gp2"]
  }

  filter {
    name   = "virtualization-type"
    values = ["hvm"]
  }

  owners = ["amazon"]
}

resource "aws_instance" "web_server" {
  ami           = data.aws_ami.amazon_linux.id
  instance_type = var.instance_type

  iam_instance_profile = aws_iam_instance_profile.ssm_profile.name

  user_data = <<-EOF
              #!/bin/bash
              cd /tmp
              sudo yum install -y https://s3.amazonaws.com/ec2-downloads-windows/SSMAgent/latest/linux_amd64/amazon-ssm-agent.rpm
              sudo systemctl enable amazon-ssm-agent
              sudo systemctl start amazon-ssm-agent
              EOF

  tags = {
    Name = "TerraformWebServer"
  }
}

resource "aws_iam_instance_profile" "ssm_profile" {
  name = "ec2-ssm-profile"
  role = aws_iam_role.ssm_role.name
}

resource "aws_iam_role" "ssm_role" {
  name = "ec2-ssm-role"

  assume_role_policy = jsonencode({
    Version = "2012-10-17"
    Statement = [{
      Action = "sts:AssumeRole"
      Effect = "Allow"
      Principal = {
        Service = "ec2.amazonaws.com"
      }
    }]
  })
}

resource "aws_iam_role_policy_attachment" "ssm_policy" {
  role       = aws_iam_role.ssm_role.name
  policy_arn = "arn:aws:iam::aws:policy/AmazonSSMManagedInstanceCore"
}
To replace this change, you keep the rest of the file but add a module parameter that refers to the specific module.
terraform {
  required_providers {
    aws = {
      source  = "hashicorp/aws"
      version = "~> 6.0"
    }
  }

  backend "s3" {
    bucket = "datacamp-terraform-state"
    key    = "terraform.tfstate"
    region = "eu-central-1"
    use_lockfile = true
  }
}

provider "aws" {
  region = var.aws_region
}

module "web_server" {
  source = "./modules/ec2-with-ssm"

  instance_type = var.instance_type
}
Now, if you run the commands init, plan, and apply with these set up, you will end up deploying the same resources as before. The difference is that modules let you launch infrastructure with similar configurations that can be reused. They're key to scaling Terraform beyond simple projects.
Now let’s move to another important topic: security.
Infrastructure code requires the same security rigor as application code. Therefore, it is critical to protect your Terraform deployments.
Never commit secrets to Git. Ever. Use AWS Secrets Manager for sensitive values. You can use the following resource in Terraform to do it:
resource "aws_secretsmanager_secret" "example" {
  name = "example"
}
For environment-specific secrets, you can use environment variables with the TF_VAR_ prefix.
For example, you could use variable "aws_access_key" {} in the variables.tf file and export it in the terminal with export TF_VAR_aws_access_key=<access_key_value>. Terraform automatically loads these as variable values without exposing them in code.
Another important configuration topic is drift. This occurs when someone modifies infrastructure through the AWS Console or CLI, bypassing Terraform. Run terraform plan regularly to detect drift. The plan output shows resources that exist but don't match your configuration.
When drift appears, you have two choices: update your Terraform code to match reality, or run terraform apply to force infrastructure back to the desired state. The correct choice depends on whether the manual change was intentional.
Finally, it is also important to remove all resources once we know we do not need them, to avoid unnecessary costs. You can clean up the resources with the following command:
terraform destroyReview the destruction plan carefully. Terraform will delete every resource it created. For production, consider using terraform destroy -target to remove specific resources rather than everything.
You've learned Terraform's core workflow: define infrastructure in code, preview changes with plan, apply them with apply, and track everything with state management. We covered EC2 deployment with automatic agent installation, moved state to S3 with native locking, scaled with variables and modules, and secured infrastructure with secrets management.
Treat infrastructure code with the same rigor as application code. Use version control, require code reviews for changes, and test in non-production environments first. CI/CD pipelines can automate terraform apply, making infrastructure updates as smooth as application deployments.
Your next step: explore GitHub Actions or GitLab CI to automatically run Terraform when you push code. This Infrastructure as Code approach, combined with automation, transforms how teams manage cloud resources, replacing manual console work with reliable, repeatable, version-controlled infrastructure.
My recommendation is to build on this knowledge and enroll in the AWS Cloud Practitioner (CLF-C02) skill track, which teaches you everything you need to know to get Amazon’s CLF-C02 certification.
AWS Courses
Track
Course
Course
Tutorial
Karen Zhang
Tutorial
Marie Fayard
Tutorial
DataCamp Team
Tutorial
Hesam Sheikh Hassani
Tutorial
Bex Tuychiev
code-along
Sowjanya Pandruju