
Course
Introduction to Docker
4 hr
48.3K
When I started working as a Machine Learning Engineer, I quickly realized that building models wasn’t the biggest challenge. Deploying them in a reliable and scalable way was.
That’s when I was introduced to Kubernetes, the container orchestration tool everyone in the industry seemed to be discussing.
At first, I struggled to understand its complex architecture. I tried to learn more by reading documentation and guides on Kubernetes that explained its fundamentals. But still, it was hard for me to understand.
But all that changed when I started implementing the concepts myself. By setting up my own Kubernetes cluster, experimenting with different configurations, and deploying small applications, I slowly began to connect the dots. The hands-on experience helped me to gain confidence, and I finally understood how Kubernetes could simplify application management at scale.
This tutorial is designed to give you the same hands-on experience. Whether you’re a beginner or looking to strengthen the fundamentals, this guide will walk you through setting up a local Kubernetes cluster, deploying applications, and managing resources efficiently.
By the end, you’ll have a solid understanding of Kubernetes basics and be ready to apply these skills to real-world applications!
Let’s review some prerequisites and tools you’ll need to follow along with this guide.
cd and ls and basic text editing using nano or vim.Do you want to learn about how Kubernetes and Docker compare? Check out this in-depth Kubernetes vs. Docker comparison to understand their roles in containerized environments.
Let’s now get concrete and set up your local Kubernetes cluster!
But what is a Kubernetes cluster? A Kubernetes cluster is a collection of nodes that work together to run your applications. It consists of two components:
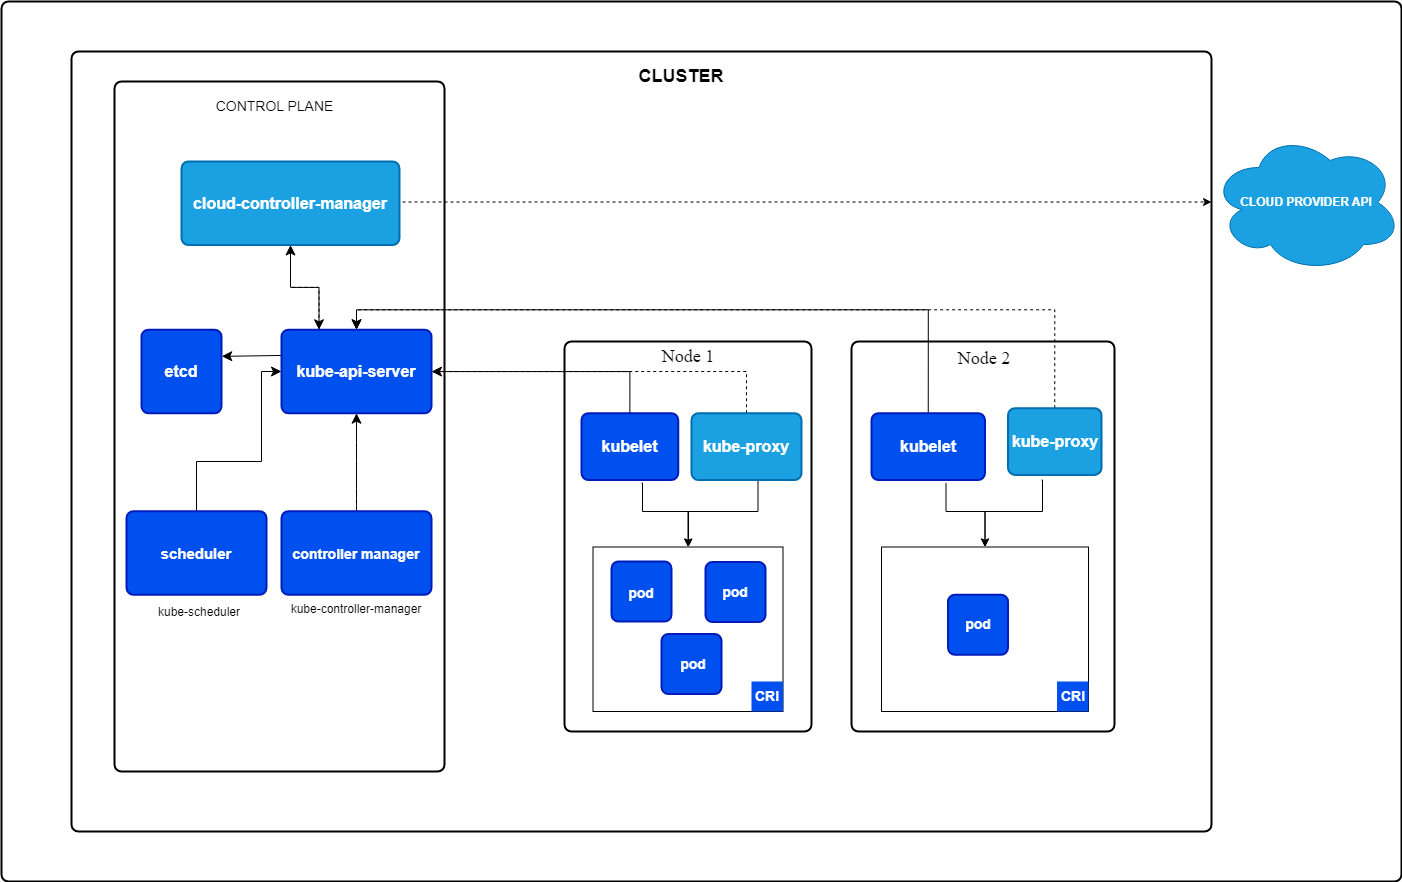
Core components of Kubernetes. Image by Kubernetes.io
Minikube can be installed on Windows, Linux, and MacOS. Please follow the instructions of the Get Started section in the official Minikube documentation.
I work on Windows but use WSL2 because I prefer the Linux interface. If you want to set up WSL2 for your Windows machine, please read the Microsoft Install guide.
kubectl is the command-line interface to your Kubernetes resources. You can install it by following the official Kubernetes documentation or using the integrated installation into minikube.
I recommend installing it using the official Kubernetes documentation, which lets you use kubectl as a standalone command. With minikube, you must run commands with the minikube prefix.
So now that we’ve installed minikube, we can start a cluster from a terminal with administrator access using the following command:
minikube startThis command will automatically pull the required Kubernetes binaries and start a single-node cluster for you.
We can now verify the status of the cluster to check whether everything is running as expected:
minikube statusIt should return something like this:
minikube
type: Control Plane
host: Running
kubelet: Running
apiserver: Running
kubeconfig: Configured
We can now take that one step further and use kubectl to retrieve all nodes of our cluster, which should be only one:
kubectl get nodes The command above should return something similar to the following:
NAME       STATUS   ROLES           AGE   VERSION
minikube Ready control-plane 10m v1.32.0In case you want to stop the cluster to free some resources if the cluster is not needed, you can run:
bash
minikube stop
Just start it again next time you want to continue working with Kubernetes.
In case you want to completely delete your minikube cluster and all resources added to it, you can run:
minikube deleteSo, now that we’ve set up a cluster and checked that everything works, it’s time to create our first application.
But before creating the first application, it’s essential to understand the basics of Kubernetes. If you want a more profound introduction to Kubernetes, I recommend you check out the Introduction to Kubernetes course.
The most basic concepts in Kubernetes are Pods, Deployments, and Services. Knowing these three resource types can help you create powerful applications. Therefore, let’s dive deeper into them.
A Pod is the smallest deployable unit in Kubernetes. It runs one or more tightly coupled containers with the same storage, network, and namespace. A Pod is always scheduled on a Kubernetes node.
You can define how many resources your Pod should get (e.g., CPU and memory).
An example application with two containers could be your application container and a helper container that aggregates the logs and sends them somewhere.
Features of a Pod:
Example YAML for creating a Pod:
apiVersion: v1
kind: Pod
metadata:
  name: my-pod
spec:
  containers:
  - name: nginx-container
    image: nginx:1.21
    ports:
    - containerPort: 80
You can then install the Pod using kubectl:
kubectl apply -f pod.yamlThis would start a Pod named my-pod, running an nginx webserver for you.
A Deployment is a higher-level Kubernetes object used to manage the lifecycle of Pods. It ensures that the desired number of Pod replicas are running and handles updates and rollbacks.
Features of a Deployment:
Let’s see how a Deployment YAML file would look like that again creates an nginx webserver, but this time with three replicas:
apiVersion: apps/v1
kind: Deployment
metadata:
  name: nginx-deployment
spec:
  replicas: 3
  selector:
    matchLabels:
      app: nginx
  template:
    metadata:
      labels:
        app: nginx
    spec:
      containers:
      - name: nginx
        image: nginx:1.21
        ports:
        - containerPort: 80
You can install that Deployment with kubectl:
kubectl apply -f deployment.yamlThe above would create a Deployment named nginx-deployment that creates three Pods, each running the nginx container.
Now let’s come to the last part: The services.
A Service is an abstraction that provides stable networking access to Pods, even if their IP addresses change. It acts as a bridge between your applications and external clients.
But why is that required? Each Pod has its IP address. So why can’t we directly use that IP address?
We can! But we shouldn’t. Why?
Because a Pod is ephemeral, it gets killed by the Deployment, and a new Pod gets scaled up whenever your Pod is unhealthy. This new Pod then has a different IP address. This would mean that the client wanting to use your application would have to permanently alter the IP address whenever a Pod crashes, which can happen often.
This is where a Service comes into play: it looks for all Pods matching a particular label and automatically routes the traffic to them. If a Pod gets unhealthy, the Service stops sending traffic to that Pod. And if a new Pod comes up, it will start sending traffic to the new Pod.
The Service also distributes the traffic among all replicas of your Deployment, which is fantastic as this means you can create more instances of your application to distribute the traffic without having to manage that via your application logic.
Types of Services:
Example YAML to expose our nginx web server to the outside of the cluster:
apiVersion: v1
kind: Service
metadata:
  name: nginx-service
spec:
  selector:
    app: nginx
  ports:
  - protocol: TCP
    port: 80
    targetPort: 80
  type: NodePort
You can again create that service using kubectl:
kubectl apply -f service.yamlThis Service would now distribute incoming traffic to all Pods with the label app=nginx on Port 80.
If you run a describe command on your newly created Service, you should see that there are now three endpoints, where each endpoint represents the IP address of the Pod that is currently running:
kubectl describe service nginx-serviceThe above command should return something similar to:
Name:                     nginx-service
Namespace:                default
Labels:                   <none>
Annotations:              <none>
Selector:                 app=nginx
Type:                     NodePort
IP Family Policy:         SingleStack
IP Families:              IPv4
IP:                       10.104.53.131
IPs:                      10.104.53.131
Port:                     <unset>  80/TCP
TargetPort:               80/TCP
NodePort:                 <unset>  32256/TCP
Endpoints:                10.244.0.5:80,10.244.0.6:80,10.244.0.7:80
Session Affinity:         None
External Traffic Policy:  Cluster
Events: <none>So, to quickly summarize:
Namespaces in Kubernetes allow you to organize and isolate resources within a cluster. You can think of them as virtual clusters within the same physical cluster.
Benefits of using Namespaces:
By default, Kubernetes comes with a few built-in namespaces:
You can create a namespace using a YAML file:
apiVersion: v1
kind: Namespace
metadata:
  name: my-namespace
Save that to a file called namespace.yaml and apply it using:
kubectl apply -f namespace.yamlWhen running the below command, you should see a list of all the listed default namespaces and the newly created one:
kubectl get namespacesYou can then create resources in that namespace by simply setting the namespace in the metadata section of your resource.
Our nginx Deployment would look like the following if we want to create it in your newly created namespace:
apiVersion: apps/v1
kind: Deployment
metadata:
  name: nginx-deployment
  namespace: my-namespace
spec:
  replicas: 3
  selector:
    matchLabels:
      app: nginx
  template:
    metadata:
      labels:
        app: nginx
    spec:
      containers:
      - name: nginx
        image: nginx:1.21
        ports:
        - containerPort: 80
Now, you need to explicitly state that you want to retrieve resources from your newly created namespace using the -n argument:
kubectl get deployment -n my-namespaceOk, now that you are familiar with the basic concepts of Kubernetes, it’s time to deploy our first web application to Kubernetes and try to access it.
In this chapter, we will create an nginx web server, expose that web server via a Service to the outside world, scale that application to simulate high-traffic behavior, and update the application using a rolling update to a newer version.
So, let’s start doing fun stuff!
The first step is to create a Deployment for our webserver that creates a container using the Nginx image.
Copy the below code and save it to a file called nginx-deployment.yaml.
apiVersion: apps/v1
kind: Deployment
metadata:
  name: nginx-deployment
spec:
  replicas: 1
  selector:
    matchLabels:
      app: nginx
  template:
    metadata:
      labels:
        app: nginx
    spec:
      containers:
      - name: nginx
        image: nginx:latest
        ports:
        - containerPort: 80
Then, apply that Deployment to your cluster using the following command:
kubectl apply -f nginx-deployment.yamlYou can then verify that the Pod is running:
kubectl get podsWe must expose the nginx web server via a Service to the outside world. For this, we are creating a NodePort-type Service, as we want to access the nginx webserver from our local machine outside the Kubernetes cluster.
So create a file called nginx-service.yaml and add the following content:
apiVersion: v1
kind: Service
metadata:
  name: nginx-service
spec:
  selector:
    app: nginx
  ports:
  - protocol: TCP
    port: 80
    targetPort: 80
  type: NodePort
You can then apply the Service with the below command:
kubectl apply -f nginx-service.yamlLast but not least, you can use minikube to get the URL to your nginx web server:
minikube service nginx-service --urlOpen that URL in your browser, and you should see the welcome page of your nginx web server.
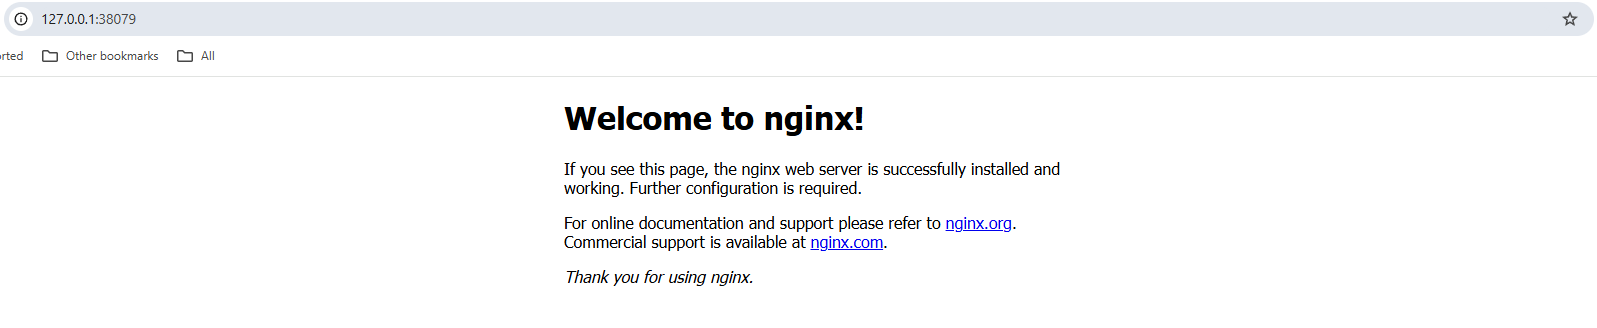
Screenshot of an nginx web server welcome page in a local browser.
So, we have one Pod up and running. But there may be a massive load of users visiting our webpage. This is why, in Kubernetes, you can quickly scale your application to have more Pods up and running.
The Service will automatically detect all Pods belonging to that Deployment and then load balance incoming requests to all Pods running the nginx web server. This helps to improve our web page's overall performance in case a lot of traffic is coming in.
So, let’s scale our application to 3 replicas using the below command:
kubectl scale deployment nginx-deployment --replicas=3You can now get all running Pods again, which should be three:
kubectl get podsYou can also use the command below to get all the endpoints to which our nginx-service is connected. This should return three endpoints, each endpoint being its own internal cluster IP address:
kubectl get endpoints nginx-serviceNow, we have another significant benefit of using Kubernetes: Rolling updates.
A rolling update aims to avoid any downtime of your web application. Just imagine the financial loss to companies like Amazon if their web page was down anytime Amazon rolled out a new version.
Using a rolling update, Kubernetes scales up a new Pod, checks if that one is healthy, and then scales down the old one.
By default, Kubernetes ensures that at least 75% of the desired number of Pods are up and running, with 25% as the maximum unavailable number. This means that for our case, where we have three replicas up and running, Kubernetes will only add one new Pod at a time, check if that one is healthy, and scale another Pod down if it is. It will repeat that process till all Pods are updated to the new version.
So let’s now do that by changing the version of our nginx image from latest to 1.23:
kubectl set image deployment/nginx-deployment nginx=nginx:1.23You can then monitor the rollout status using:
kubectl rollout status deployment/nginx-deploymentThe output should look similar to:
Waiting for deployment "nginx-deployment" rollout to finish: 1 out of 3 new replicas have been updated...
Waiting for deployment "nginx-deployment" rollout to finish: 1 out of 3 new replicas have been updated...
Waiting for deployment "nginx-deployment" rollout to finish: 1 out of 3 new replicas have been updated...
Waiting for deployment "nginx-deployment" rollout to finish: 2 out of 3 new replicas have been updated...
Waiting for deployment "nginx-deployment" rollout to finish: 2 out of 3 new replicas have been updated...
Waiting for deployment "nginx-deployment" rollout to finish: 2 out of 3 new replicas have been updated...
Waiting for deployment "nginx-deployment" rollout to finish: 1 old replicas are pending termination...
Waiting for deployment "nginx-deployment" rollout to finish: 1 old replicas are pending termination...
deployment "nginx-deployment" successfully rolled out
And while the rollout is ongoing, your web page is accessible all the time without any downtime!
Isn’t that great?
Kubernetes provides powerful tools to inspect, modify, and delete resources of all types. Understanding how to manage resources effectively ensures better troubleshooting, resource allocation, and overall cluster maintenance.
In this section, we’ll dive into other essential commands that help you manage your resources effectively and troubleshoot in case of issues.
Before changing any resources, viewing and inspecting the currently running resources in your cluster is essential.
You can, for example, list all running Pods, Services, and Deployments to see what’s going on in your cluster:
# list running Pods
kubectl get pods

# list running Services
kubectl get services

# list running Deployments
kubectl get deployments
If you want to dig deeper into a specific resource, you can make use of the describe command:
kubectl describe deployment nginx-deploymentThis will show more information, including rolling updates, scaling, or image pull events. This is the first point you can head to if something goes wrong.
You can also check the logs of a running Pod to see what’s going on inside that Pod using the below command:
kubectl logs <pod-name>It is also essential to clean up resources in case they are not used anymore to free up cluster resources for new applications.
You can delete a Pod using:
kubectl delete pod <pod-name>We can do this for one of our nginx pods. However, a new Pod should be scaled up instantly, as they are managed via a Deployment, which always tries to have three replicas up and running.
So here, we would need to delete the nginx-deployment:
kubectl delete deployment nginx-deploymentAfter running this command, all running nginx Pods should be deleted.
We can also delete all resources in a Namespace. The following command would delete all our resources, which were created in the default Namespace, by default:
kubectl delete all --allCongratulations! You reached the end and successfully took your first steps in Kubernetes.
By following this tutorial, you’ve learned how to:
Kubernetes can initially seem complex (at least it did for me). But breaking it down into fundamental concepts makes it more approachable.
Keep experimenting and deploy more applications.
The best way of learning Kubernetes is by doing, so start building!
To further improve your Kubernetes skills, consider exploring:
Lastly, the Containerization and Virtualization with Docker and Kubernetes track on DataCamp is an excellent resource for practicing with both Docker and Kubernetes.
Learn more about Docker and Kubernetes with these courses!
Course
Course
Course
blog
Josep Ferrer
11 min
blog
Joel Wembo
14 min
blog
Moez Ali
15 min
Tutorial
Abid Ali Awan
Tutorial
Moez Ali
Tutorial
Moez Ali
