
Track
Containerization and Virtualization with Docker and Kubernetes
13 hr
In this article, I’ll walk through the fundamentals of Helm charts—from understanding them to creating your own chart and finally deploying it to a Kubernetes cluster.
Whether you’re new to Helm or looking to solidify your knowledge, this guide will give you a hands-on understanding of how Helm simplifies Kubernetes application management.
Kubernetes is a powerful platform for managing containerized applications, but deploying and maintaining these applications can quickly become complex. That’s where Helm, the open-source package manager for Kubernetes, comes in. Helm streamlines the deployment process by allowing us to define, install, and manage Kubernetes applications using reusable templates known as Helm charts.
A Helm chart is essentially a collection of YAML files that describe a related set of Kubernetes resources. It acts as a template for our application, making it easy to deploy repeatable and version-controlled workloads across environments.
To solidify your foundational understanding of Kubernetes, check out the Introduction to Kubernetes course.
Managing Kubernetes applications involves writing and maintaining multiple YAML files, which can become tedious and error-prone as complexity grows.
Imagine needing to update a label in your Deployment resource and then having to manually update the corresponding selector in your Service definition just to keep things working. Or having to comment out specific resources in your manifests because they aren’t needed in one environment but are essential in another. Wouldn’t it be much more convenient if your Kubernetes manifests could adapt dynamically to changes in a few key values?
That’s exactly what Helm enables.
Helm charts bring a host of convenience that simplifies and standardizes the deployment of applications on Kubernetes. Here are some key benefits:
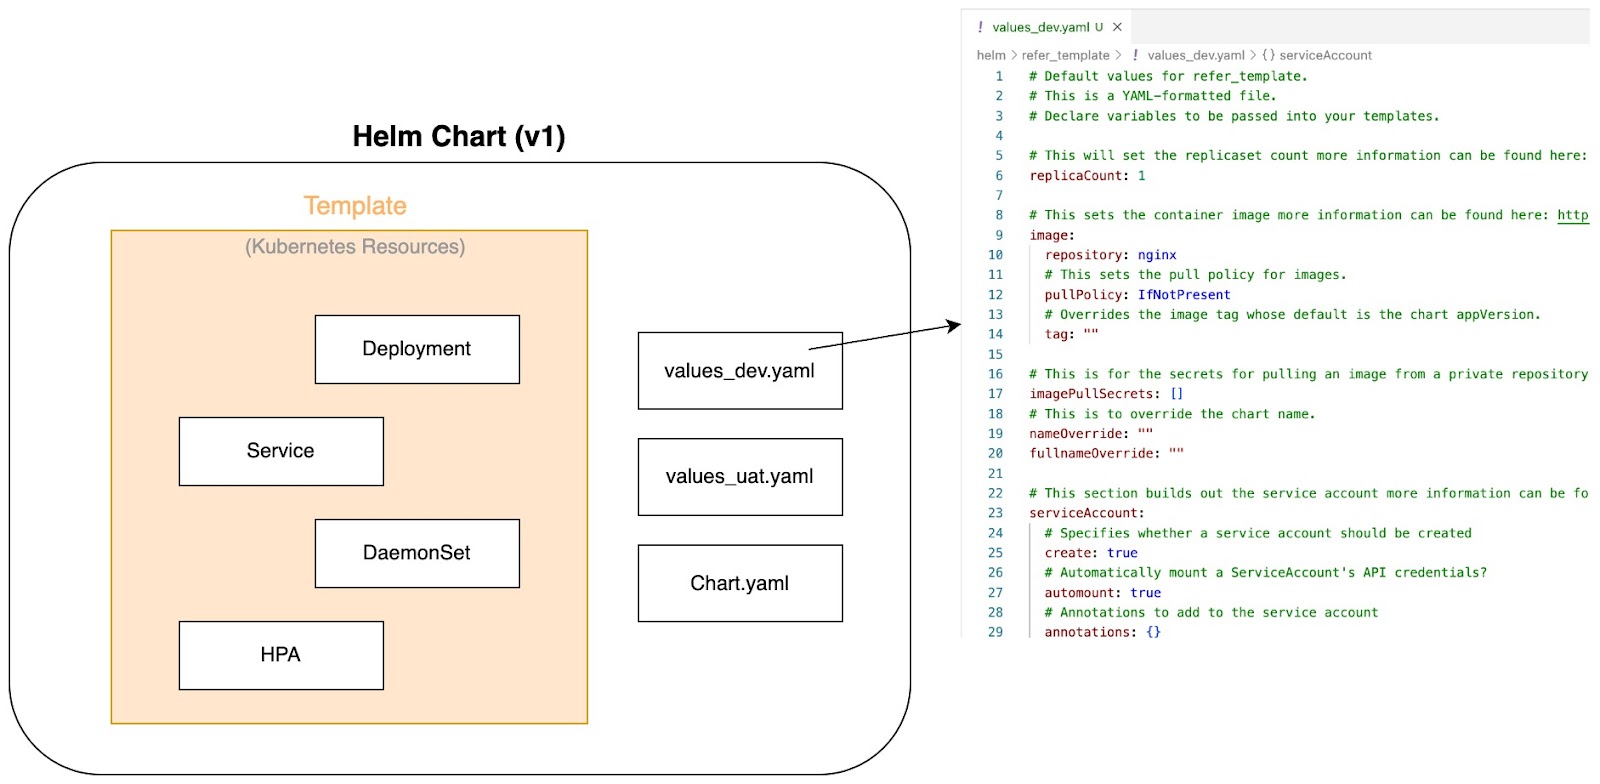
Parameterize Kubernetes manifests - image by Author.
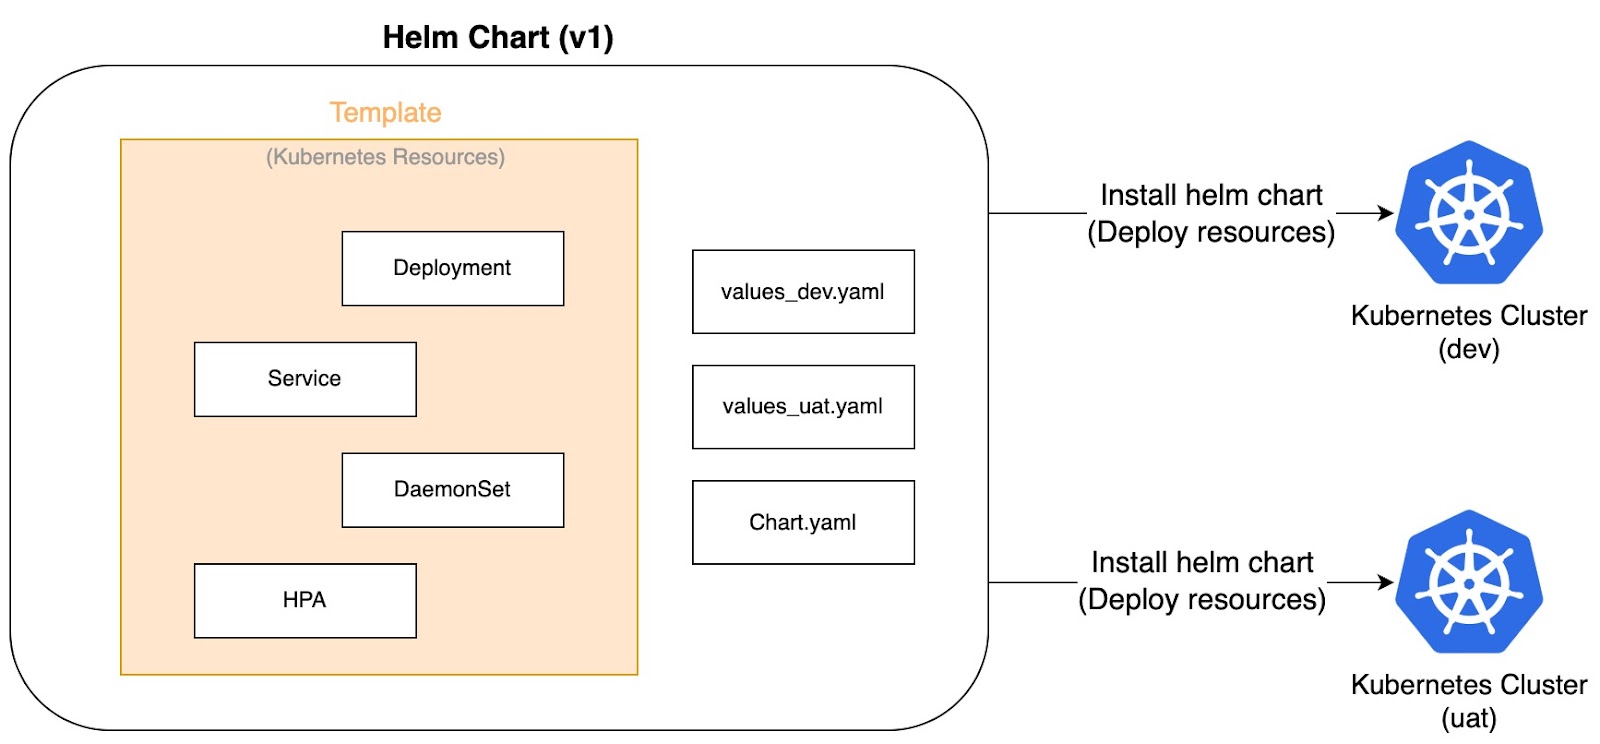
Single chart for multiple clusters - image by Author.
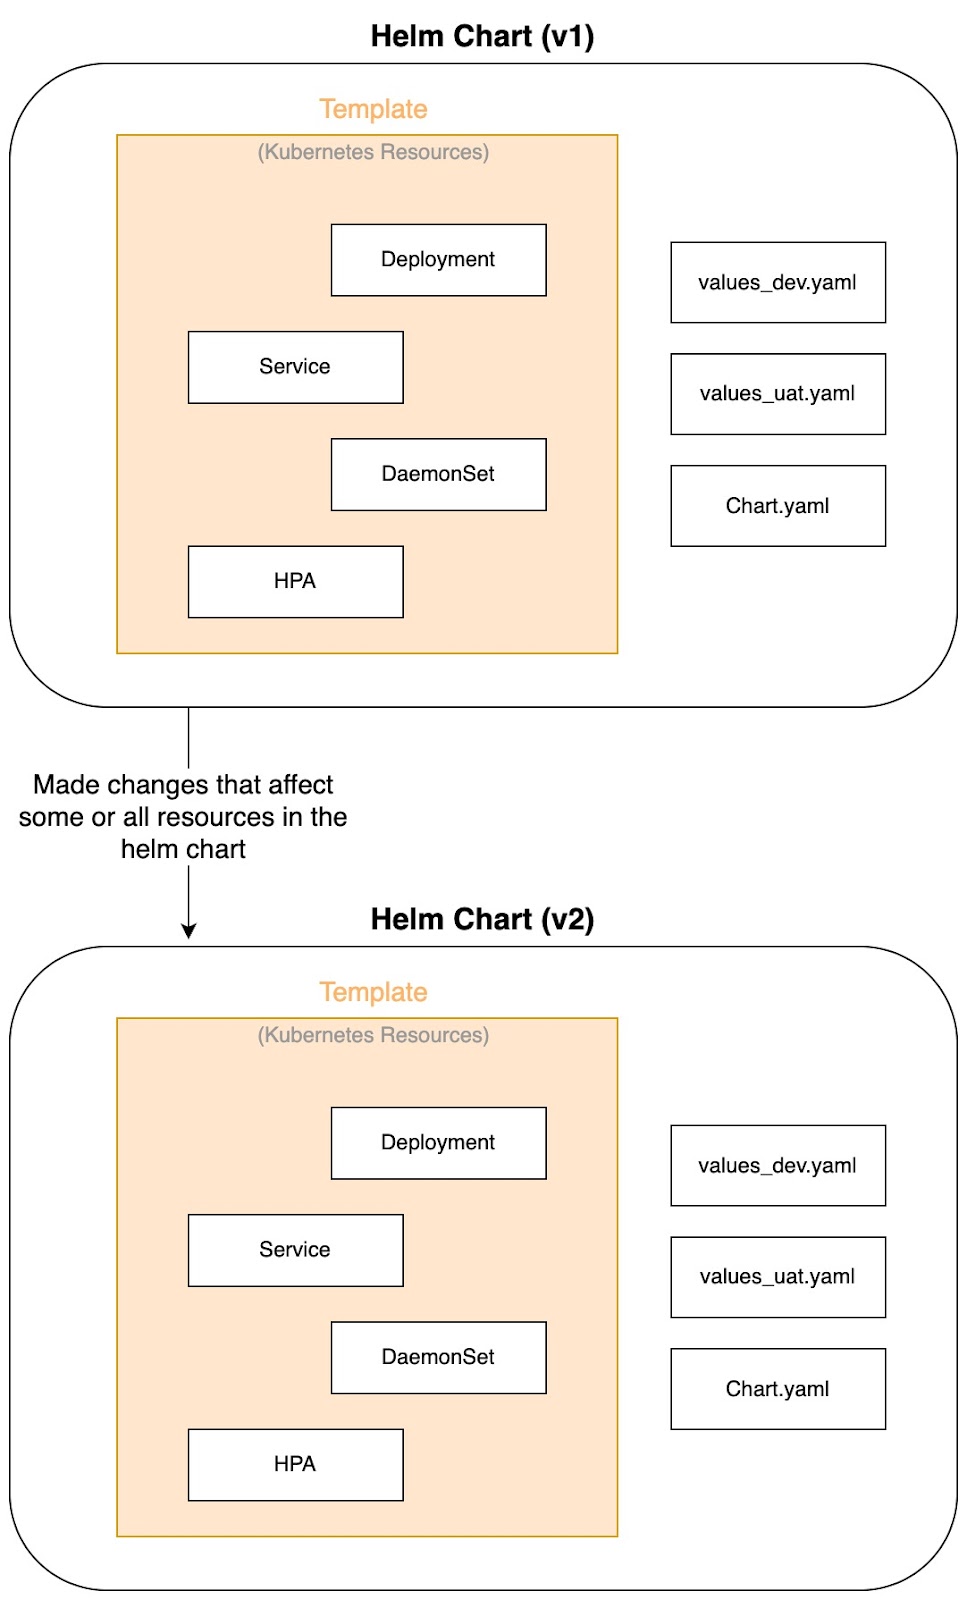
Versioning of charts - image by Author.
In addition, Helm tracks changes over time and allows rolling back to a previous release if something breaks. This is crucial for teams practicing CI/CD, where the ability to audit, test, and release specific versions of deployments ensures reliability and stability in production environments.
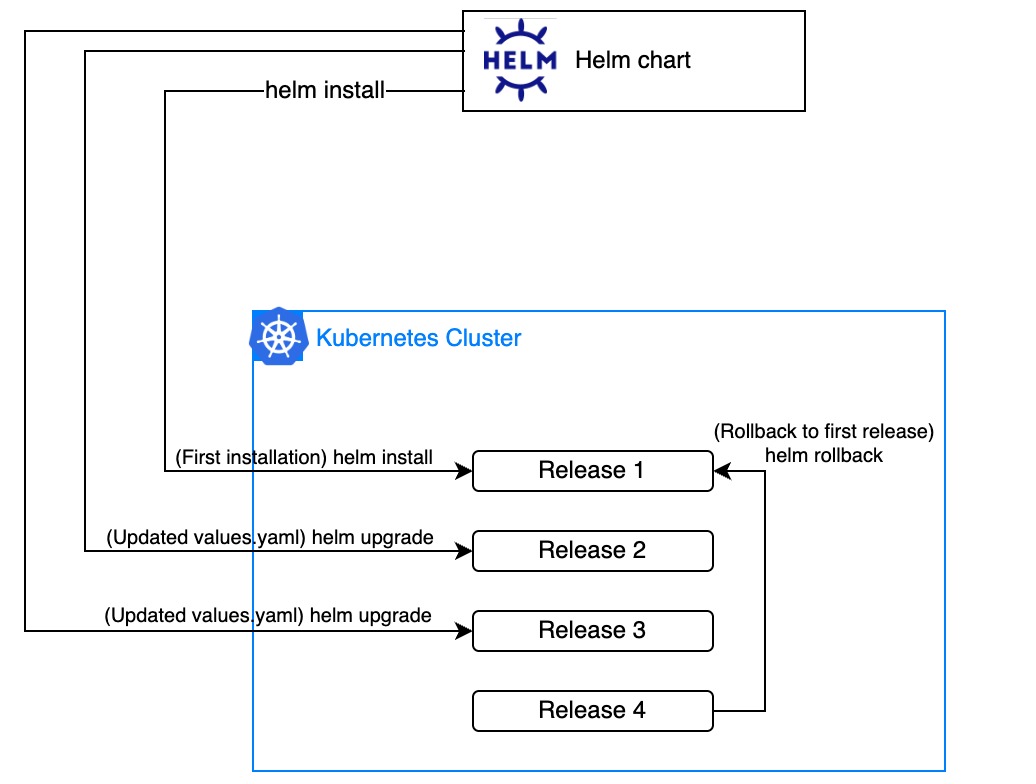
Putting it all together:
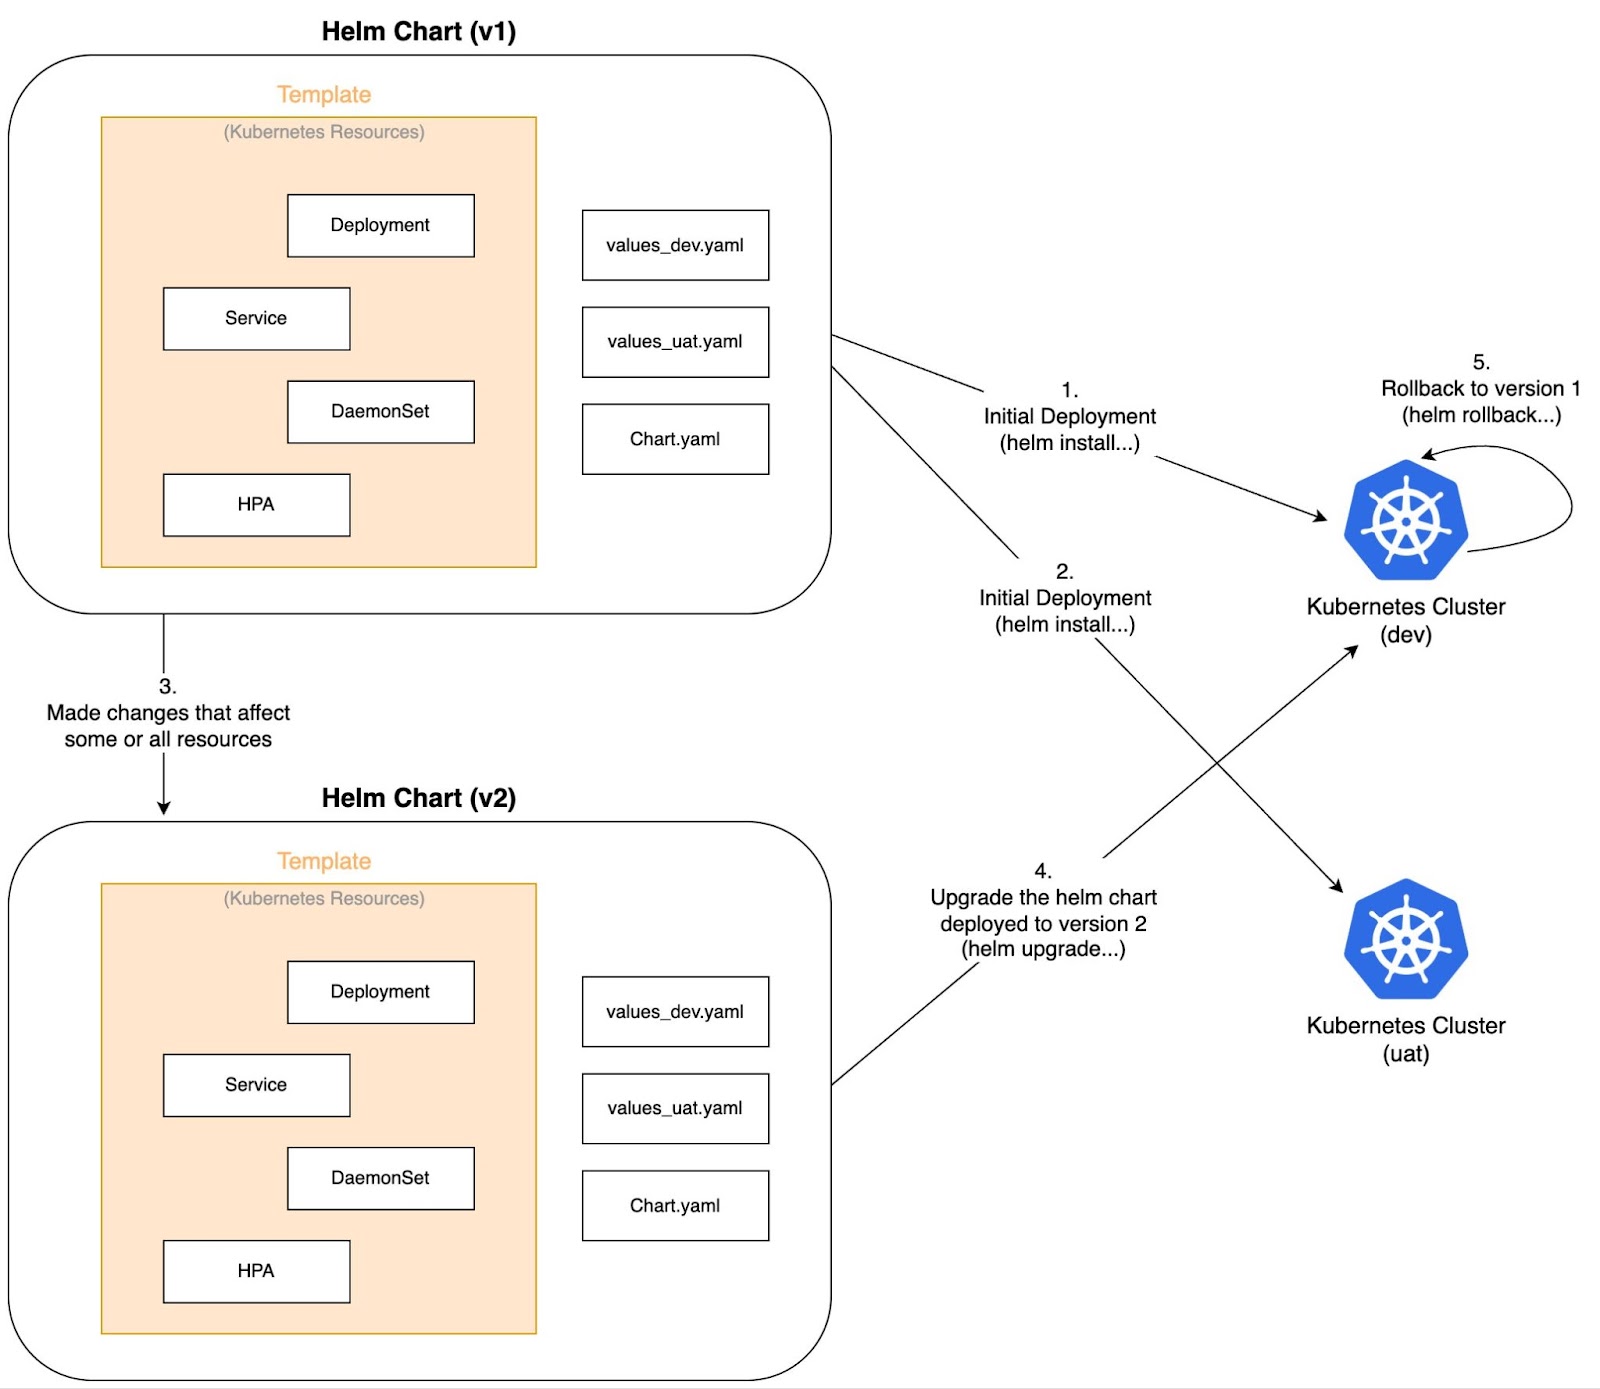
Interaction between Helm charts and Kubernetes clusters - image by Author.
If you're curious how Kubernetes differs from Docker, especially in orchestration vs. containerization, this comparison guide is worth exploring.
As seen above, Helm plays a vital role by bringing structure, reusability, and automation to application deployment.
In CI/CD pipelines, such as GitLab pipelines or GitHub actions, Helm charts allow teams to package applications and deploy them to different environments with consistent configuration and minimal manual intervention, similar to how IaC tools such as Terraform work. This not only accelerates delivery but also reduces the chance of human error.
Helm also perfectly aligns with GitOps practices, where all of Kubernetes' resources are managed declaratively through Git repositories. Application configurations can be templated and stored in Git, enabling automated and auditable deployments triggered by changes in code or configuration. This makes Helm a key enabler for modern DevOps workflows in Kubernetes environments.
For a broader understanding of how Helm fits within DevOps practices, take a look at our DevOps Concepts course.
We will walk through installing Helm CLI on Windows, Mac, and Linux.
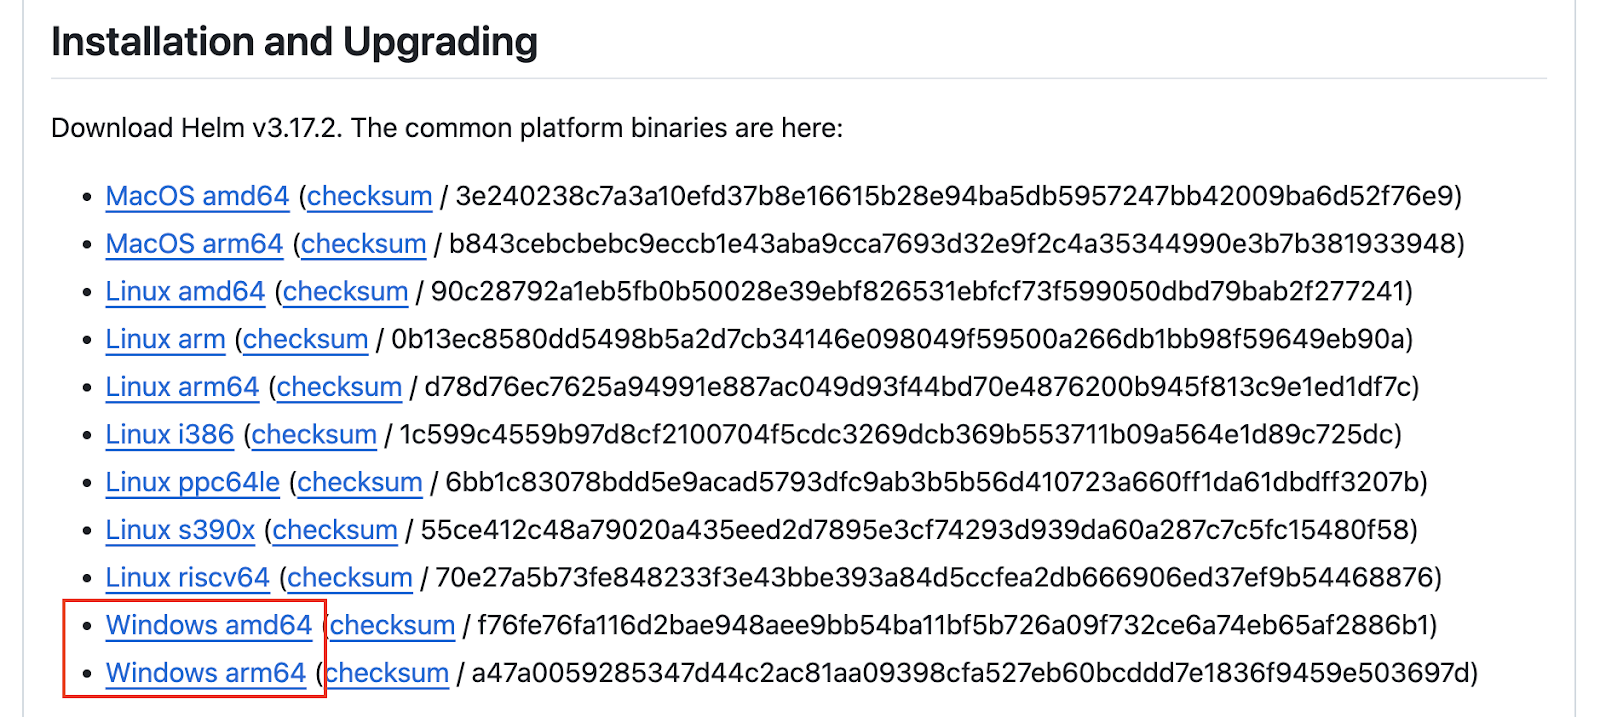
As of this writing, the latest version of Helm is 3.17.2. The examples covered in this article will be using version 3.17.2. You can find the latest binary from the official GitHub releases.
Download the correct binary corresponding to your system’s architecture from the GitHub releases link above.
Helm binary for Windows
Extract the downloaded ZIP file. You should obtain the files shown below.
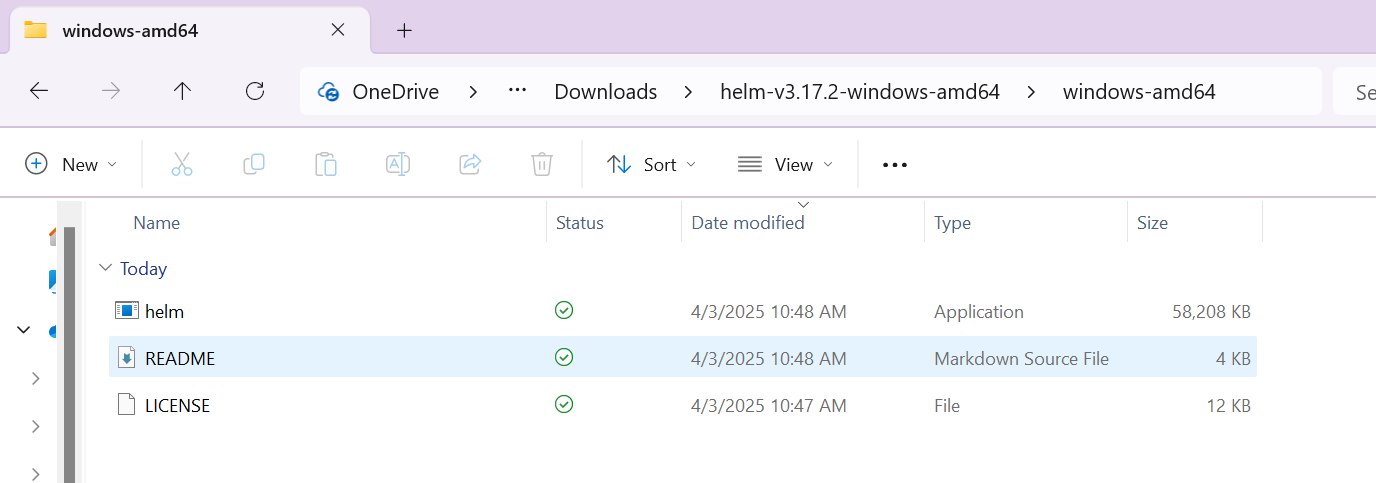
Helm binary
Create a folder named “helm” under the “C:\Program Files\” directory. Move the three files above there.
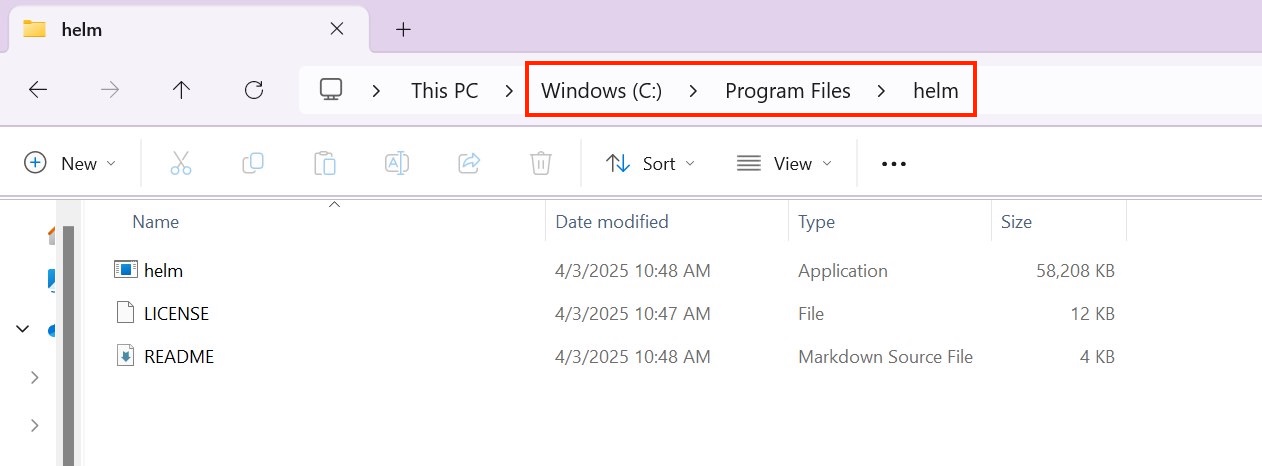
Move the files over to the newly created “helm” folder
We will now need to add a path in our environment variables to point to this newly created “C:\Program Files\helm” directory. Open the “Edit the system environment variables” setting.
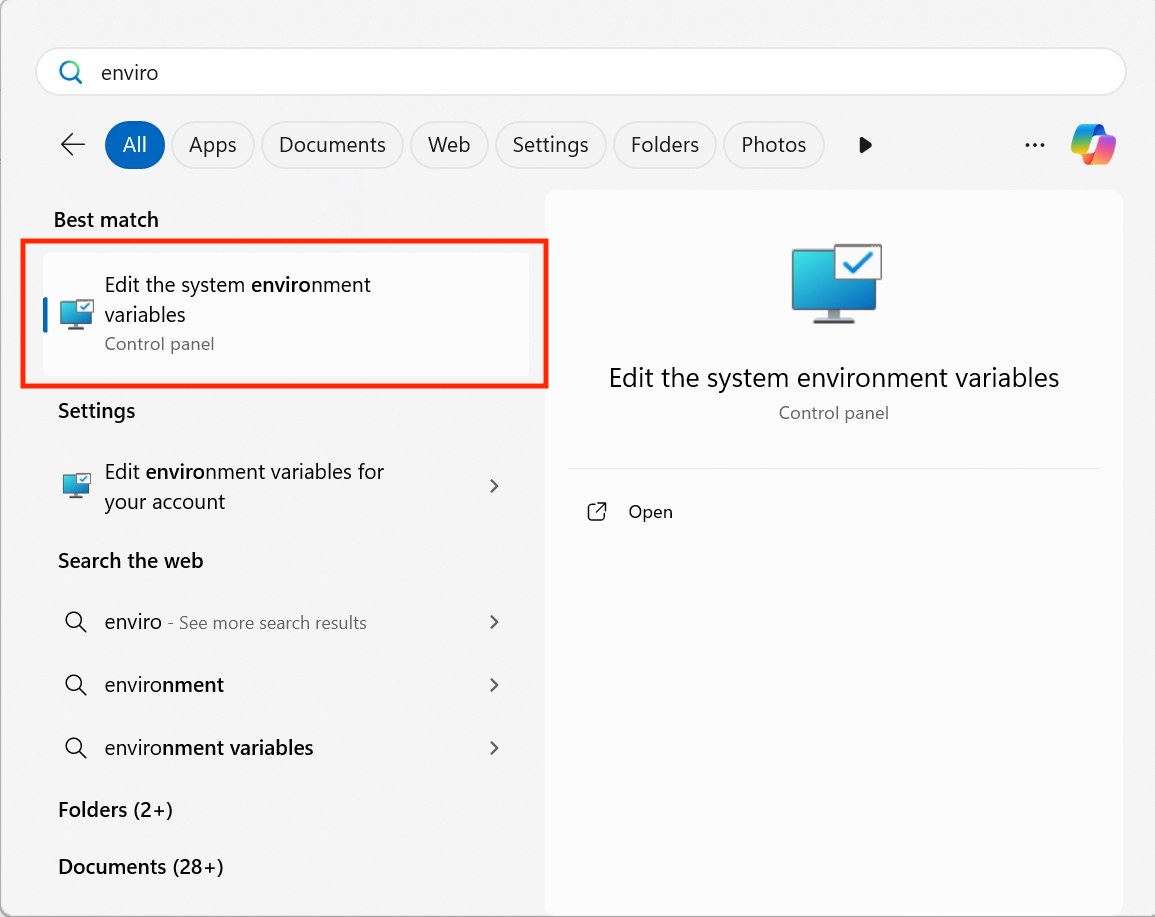
Edit the system environment variables
The “System Properties” window below will appear. Under the “Advanced” tab, select “Environment Variables…”
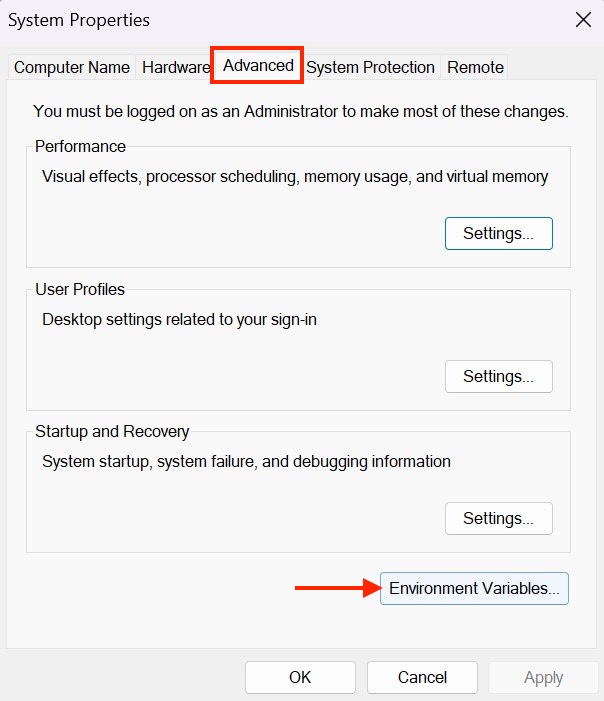
System properties
The “Environment Variables” window below will appear. Under “System variables”, select “Path”. Ensure that it’s highlighted in blue. Thereafter, select “Edit”.

Environment variables
The “Edit environment variable” window will appear. Select “New”, input the “C:\Program Files\helm” path, and select “OK”.
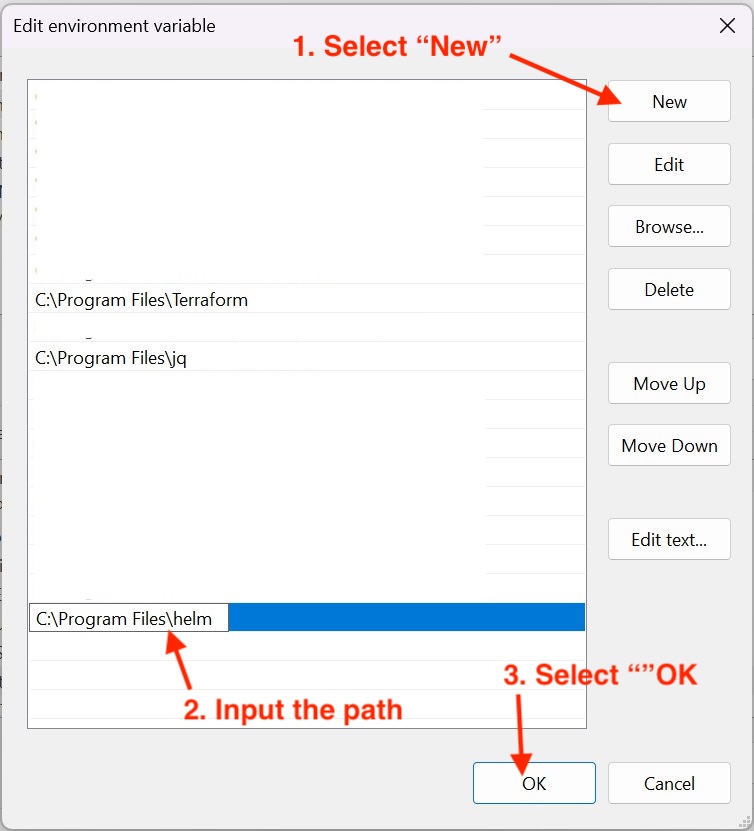
Edit the environment variable
Select “OK” on the “Environment Variables” and “System Properties” windows to close them. Open a fresh terminal and verify that the Helm command works.

Verify the Helm CLI installation
We can install the Helm CLI on macOS via Homebrew or the binary. I will cover both installation methods.
Open the terminal (zsh) and execute the following commands.
# Download the correct binary corresponding to your system’s architecture.
wget https://get.helm.sh/helm-v3.17.2-darwin-arm64.tar.gz

# Extract the binary
tar -zxvf helm-v3.17.2-darwin-arm64.tar.gz

# Move the helm binary to /usr/local/bin
sudo mv darwin-arm64/helm /usr/local/bin/

# Verify Helm CLI
helm version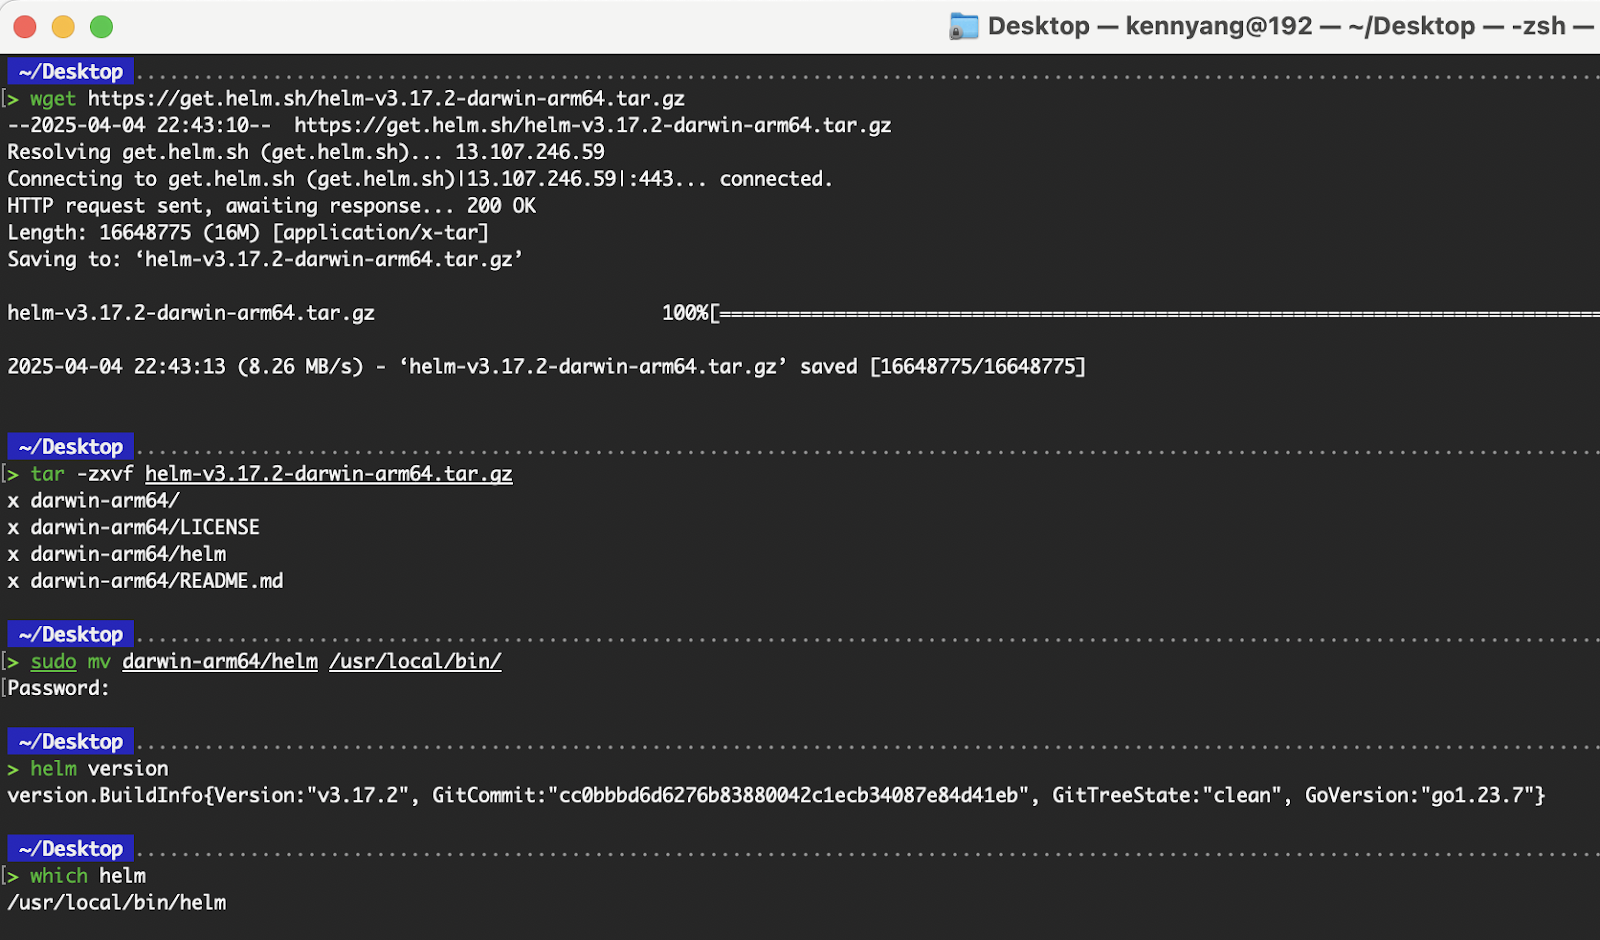
Helm installation via binary on macOS
Ensure you have Homebrew installed locally. To verify, run brew --version. Otherwise, you can refer to the official Homebrew page for installation instructions.
Execute the following commands to install the Helm CLI:
# With brew installed, update Homebrew's formulae and cask definitions
brew update

# Install Helm CLI
brew install helm

# Verify the installation
helm version

# Verify the location of the helm binary stored locally
which helm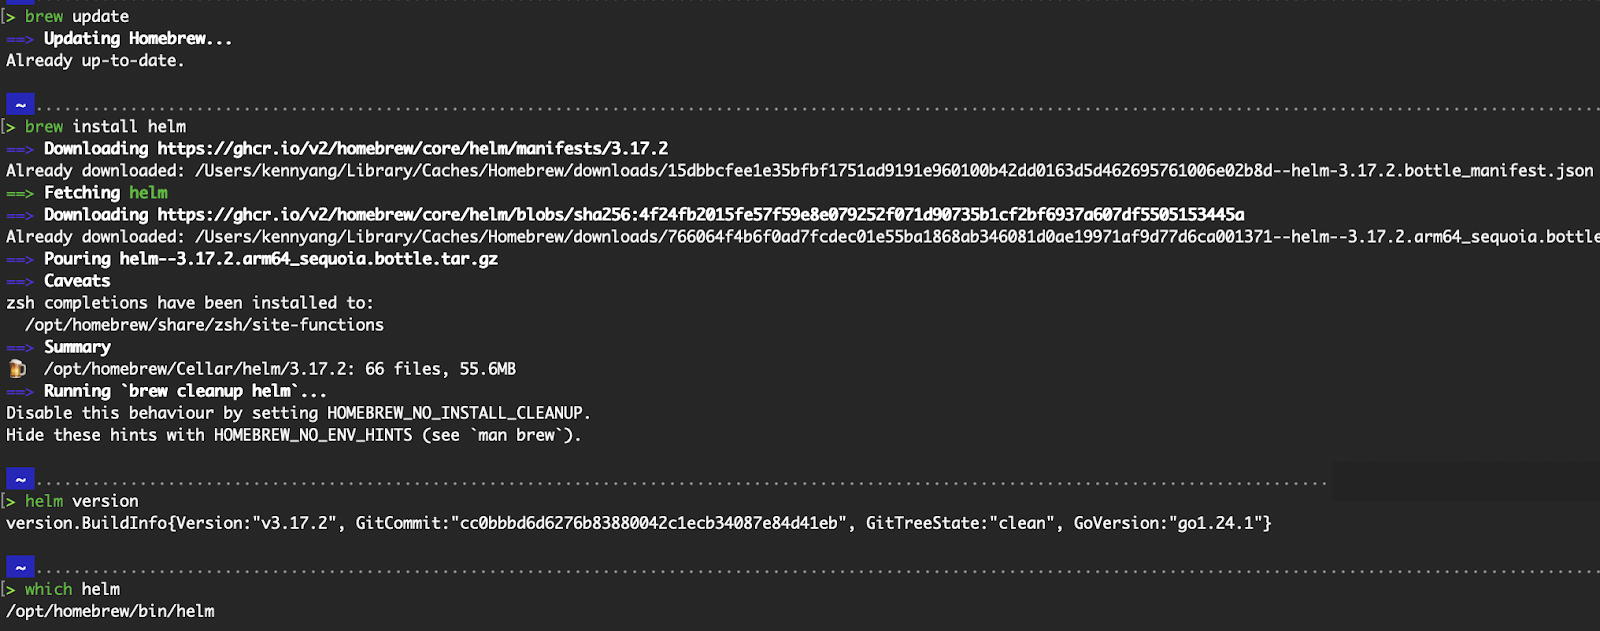
Helm installation via brew on macOS
To demonstrate installing on Linux, I spun up an Amazon Linux EC2 with the ami-065a492fef70f84b1 AMI.
# Switch to superuser
sudo su -

# Download the correct binary corresponding to your system’s architecture.
wget https://get.helm.sh/helm-v3.17.2-linux-amd64.tar.gz

# Extract the binary
tar -zxvf helm-v3.17.2-linux-amd64.tar.gz

# Move the helm binary to /usr/local/bin
mv linux-amd64/helm /usr/local/bin/helm

# Verify Helm CLI
helm version

# Clean-up
rm -rf linux-amd64
rm -f helm-v3.17.2-linux-amd64.tar.gz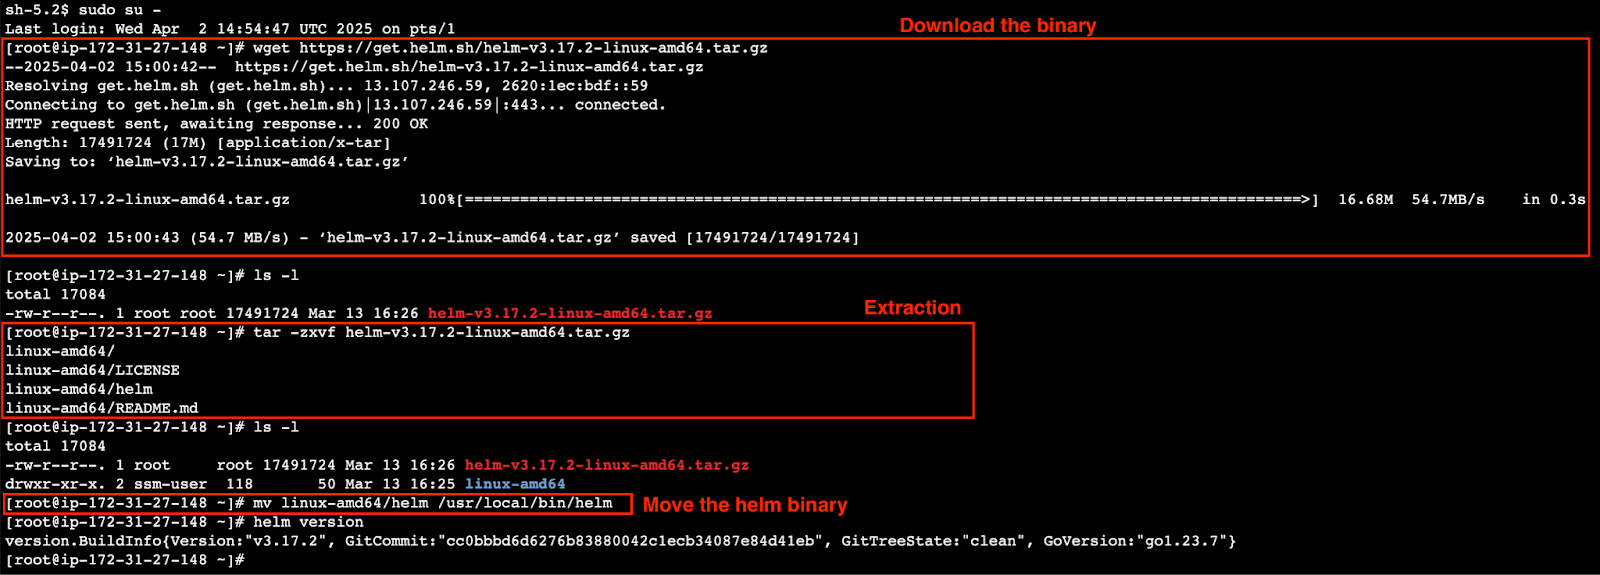
Download, extract, and move the binary
Identical to how kubectl is configured to communicate with a specific cluster, Helm also uses the ~/.kube/config file to know which cluster to execute the commands on.
# To find out which context (and therefore cluster) is currently being used
kubectl config current-context

# To view the entire ~/.kube/config file
kubectl config view

# If you’re running an EKS cluster on AWS, execute this command to update your .kubeconfig file and set it to the current context.
aws eks update-kubeconfig --name <Name of EKS cluster> --region <region>

# View helm charts installed in all namespaces on the cluster
helm list -A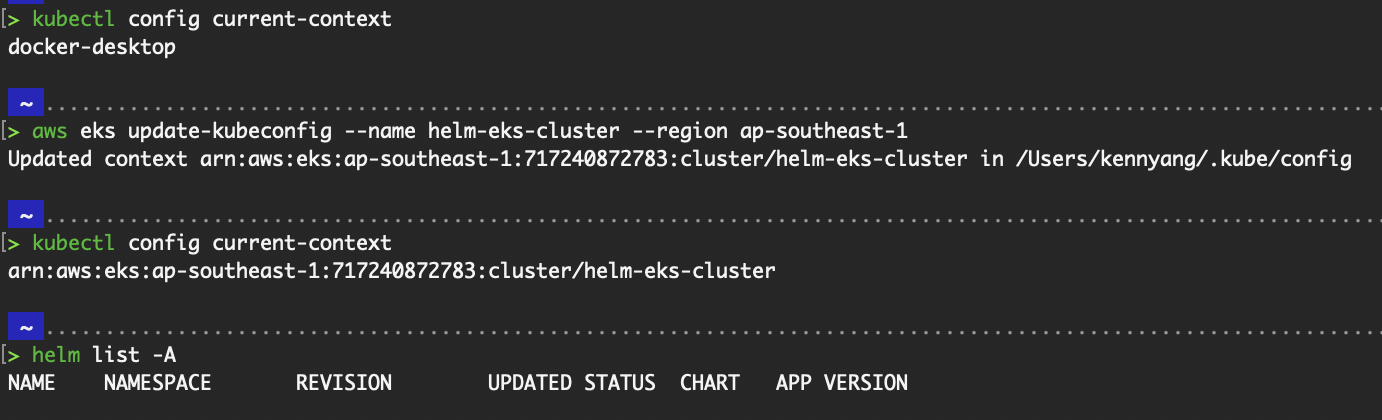
Output of kubectl config commands
Public Helm charts are stored in Helm repositories. Before using a public Helm chart, we must add some metadata from that repository to our local.
# Adds a Helm repository locally
helm repo add bitnami https://charts.bitnami.com/bitnami
Where does the helm repo add command save the information to? Run helm env.
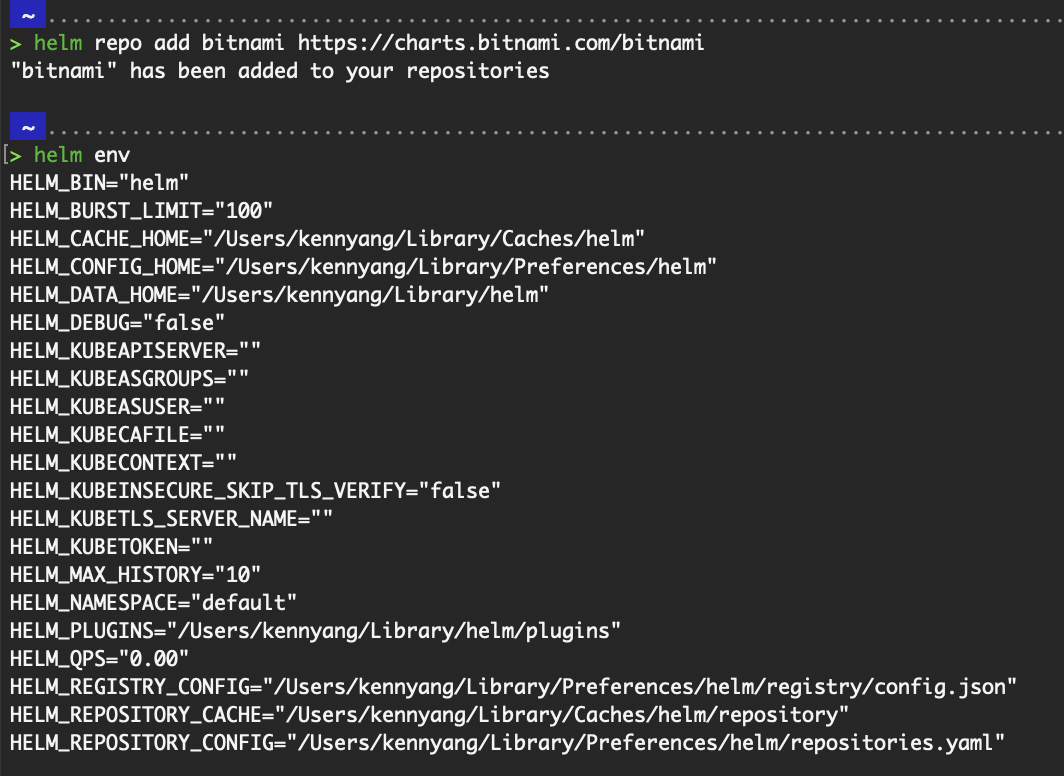
Output of helm repo add and helm env
The path shown by HELM_REPOSITORY_CONFIG is where the information of the repository is saved.
To list all repositories added locally, run the helm repo list command. It obtains the information from the value of HELM_REPOSITORY_CONFIG.
For myself, it will be the ~/Library/Preferences/helm/repositories.yaml file.
To list all charts within the repository, run helm search repo bitnami.
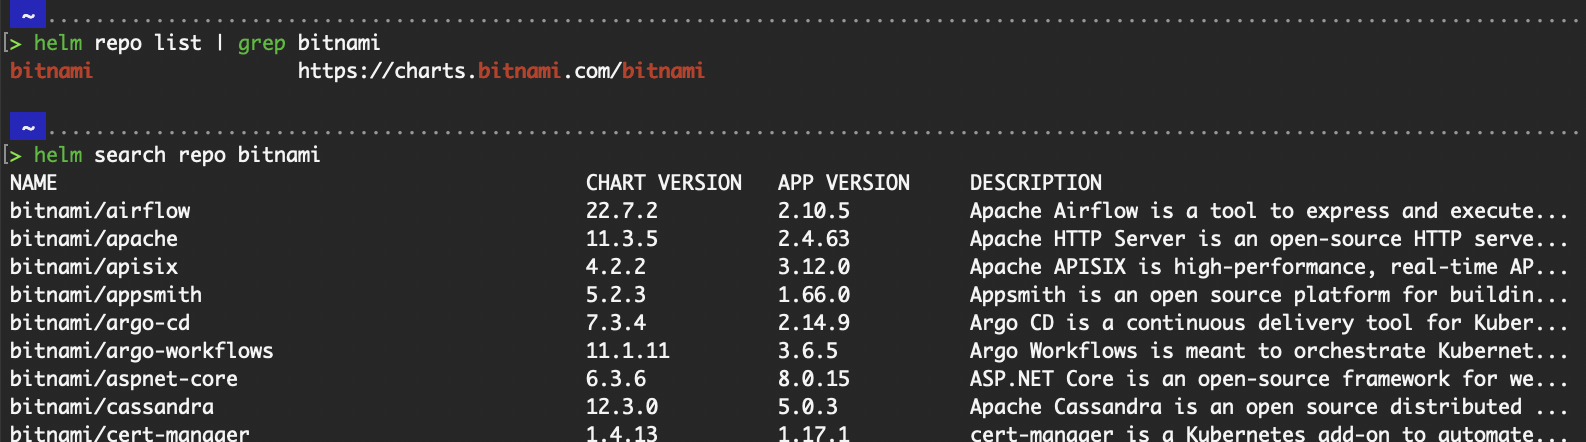
Output of helm repo list and helm search repo
As public repositories, they receive updates regularly from the respective contributors. To update the charts within the repository, simply update the entire repository.
# Update a repository
helm repo update bitnami
Output of helm repo update
To truly understand how Helm charts work, getting familiar with their structure is important.
A Helm chart is more than just a bundle of YAML files—it's a well-organized directory that defines a Kubernetes application by combining templates, configuration, and metadata.
In this section, I’ll break down the key components, including the overall chart directory layout, the role of the values.yaml file for configuration, and how Helm uses Go templating to dynamically generate Kubernetes manifests.
The default chart directory is as such, where demo-helm is the name of the chart that I have defined. We will be creating it in the next section.
Let’s touch briefly on the purpose of each file or folder within.
#    demo-helm/
#    ├── .helmignore   # Contains patterns to ignore when packaging Helm charts.
#    ├── Chart.yaml    # Information about your chart
#    ├── values.yaml   # The default values for your templates
#    ├── charts/       # Charts that this chart depends on
#    └── templates/    # The template files
# └── tests/ # The test files.helmignore file functions similarly to .gitignore or .dockerignore. If we want to exclude certain files or directories from our Helm chart, we can list their patterns in the .helmignore file. Any files or directories that match those patterns will be ignored during the execution of Helm commands.Chart.yaml contains metadata about the Helm chart, such as the chart name, description, chart version, and application version.values.yaml contains the default configuration values that render the Helm chart’s Go templates into Kubernetes manifests. Some common values defined in this file include:
charts/ folder directory stores chart dependencies. If our Helm chart depends on other charts (known as sub-charts), they will be placed here.templates/ folder, which contains the Go template files used to generate Kubernetes manifests. These templates define the resources that will be deployed, such as Deployment, ServiceAccount, Service, Ingress, and ConfigMap.The values.yaml is the default configuration file, providing a central location for defining input values that templates reference when rendering Kubernetes manifests.
When installing a Helm chart, Helm reads the values.yaml file and injects its contents into the chart’s templates via the templating engine. This enables us to parameterize the application setup, such as container image versions, resource limits, replica counts, ingress settings, and more, without altering the templates directly.
A snippet of the default values.yaml from a newly created Helm chart is as such:
# Default values for demo-helm.
# This is a YAML-formatted file.
# Declare variables to be passed into your templates.

# This will set the replicaset count more information can be found here: https://kubernetes.io/docs/concepts/workloads/controllers/replicaset/
replicaCount: 1

# This sets the container image more information can be found here: https://kubernetes.io/docs/concepts/containers/images/
image:
  repository: nginx
  # This sets the pull policy for images.
  pullPolicy: IfNotPresent
  # Overrides the image tag whose default is the chart appVersion.
  tag: ""

# This is for the secrets for pulling an image from a private repository more information can be found here: https://kubernetes.io/docs/tasks/configure-pod-container/pull-image-private-registry/
imagePullSecrets: []
# This is to override the chart name.
nameOverride: ""
fullnameOverride: ""

# This section builds out the service account more information can be found here: https://kubernetes.io/docs/concepts/security/service-accounts/
serviceAccount:
  # Specifies whether a service account should be created
  create: true
  # Automatically mount a ServiceAccount's API credentials?
  automount: true
These values are referenced in the template files using the . notation, such as {{ .Values.replicaCount }} or {{ .Values.image.repository }}. Helm allows overriding these default values at install or upgrade, which is done using either a custom values file or passing individual values inline.
# Install a helm chart with the default values from values.yaml
helm install demo-helm ./demo-helm

# Values defined in custom-values.yaml will override those in values.yaml.
# Nonetheless, values in values.yaml not found in custom-values.yaml will still be applied.
# “-f” flag is short for the “--values” flag
helm install demo-helm ./demo-helm -f custom-values.yaml

# Overwrite default values using the  “--set” flag
helm install demo-helm ./demo-helm --set replicaCount=3 --set image.tag=latestOne of Helm's most powerful features is its templating engine, which enables dynamic and reusable configuration of Kubernetes manifests. Go templates are at the heart of this feature, and the same templating language is used in many other Go-based tools and frameworks such as Terraform and Docker.
Instead of hardcoding values directly into our YAML files, Helm lets us define templates that reference dynamic inputs — most commonly from values.yaml. For example, in the deployment template snippet below:
apiVersion: apps/v1
kind: Deployment
metadata:
  name: {{ .Values.name }}
spec:
  replicas: {{ .Values.replicas }}
{{ .Values.name }} and {{ .Values.replicas }} are Go template expressions. Where .Values refer to either the contents of the values.yaml file, the file defined in the --values flag, or values passed inline. These placeholders get replaced with actual values when the chart is rendered.
For example, the deployment template below uses values such as replicaCount and image.repository.
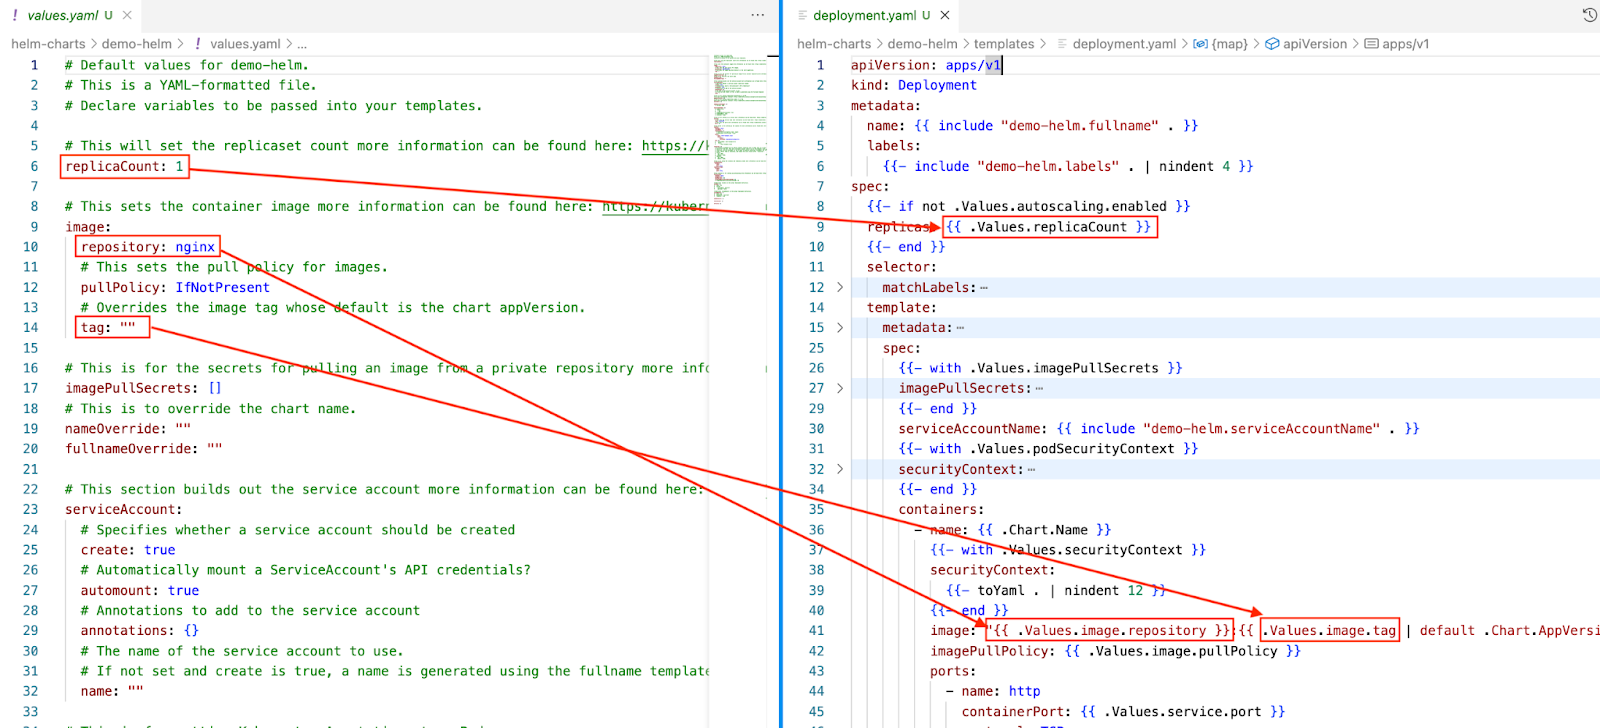
Mapping between values.yaml and deployment.yaml
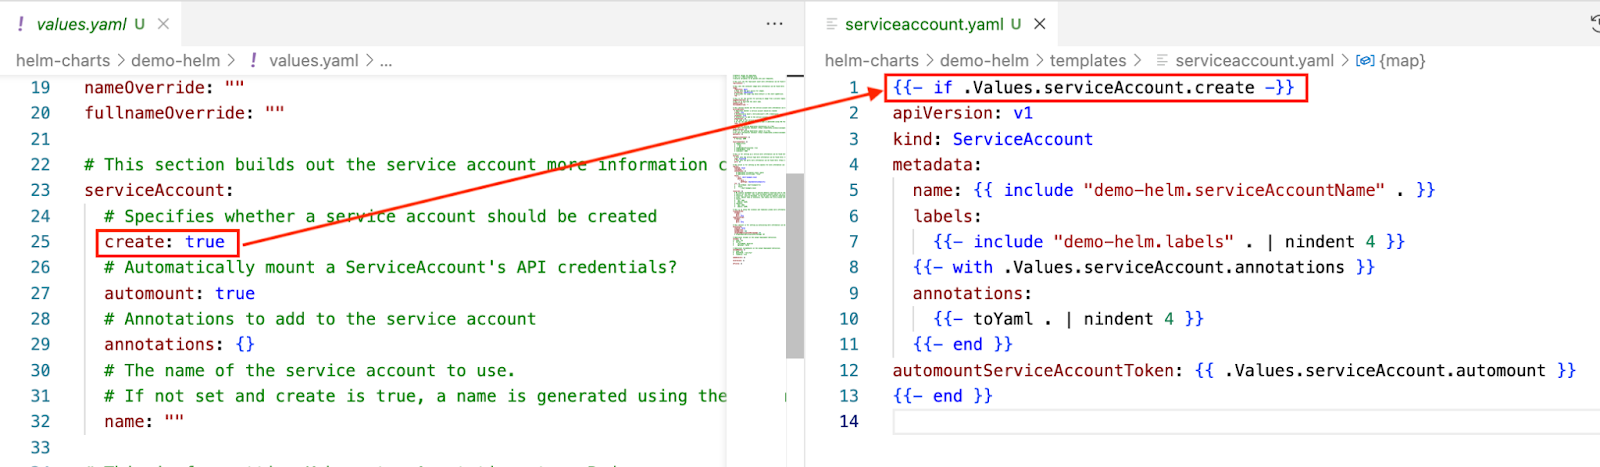
Meanwhile, the serviceAccount template uses serviceAccount.create. The entire serviceAccount resource will be omitted if the value is false.
Mapping between values.yaml and serviceaccount.yaml
To illustrate further, say you have the following configuration in your values.yaml.
replicaCount: 2
image:
  repository: nginx
  tag: "1.21.1"
Your deployment.yaml template (under templates/deployment.yaml) might look like this:
apiVersion: apps/v1
kind: Deployment
metadata:
  name: {{ .Release.Name }}
spec:
  replicas: {{ .Values.replicaCount }}
  selector:
    matchLabels:
      app: {{ .Release.Name }}
  template:
    metadata:
      labels:
        app: {{ .Release.Name }}
    spec:
      containers:
        - name: nginx
          image: "{{ .Values.image.repository }}:{{ .Values.image.tag }}"
          ports:
            - containerPort: 80
When Helm renders the Kubernetes manifest, either during helm template, helm install, or helm upgrade, it does so by injecting the values from values.yaml.
# helm template <release name> <chart name OR path to chart folder>
helm template my-nginx <chart name OR path to chart folder>
In which we will get the manifest below:
apiVersion: apps/v1
kind: Deployment
metadata:
  name: my-nginx
spec:
  replicas: 2
  selector:
    matchLabels:
      app: my-nginx
  template:
    metadata:
      labels:
        app: my-nginx
    spec:
      containers:
        - name: nginx
          image: "nginx:1.21.1"
          ports:
- containerPort: 80The easiest way to learn Helm is by building a chart ourselves. We will be walking through creating a basic chart, understanding its structure, and customizing it to deploy our application on Kubernetes.
Instead of using public Helm charts from Helm repositories, which we touched on above in the sub-section “Adding and updating Helm repositories”, let’s create one of our own.
# Creates a helm chart with the name “demo-helm”
helm create demo-helm
The directory structure will be as such:
#    demo-helm/
#    ├── .helmignore   # Contains patterns to ignore when packaging Helm charts.
#    ├── Chart.yaml    # Information about your chart
#    ├── values.yaml   # The default values for your templates
#    ├── charts/       # Charts that this chart depends on
#    └── templates/    # The template files
#        └── tests/    # The test files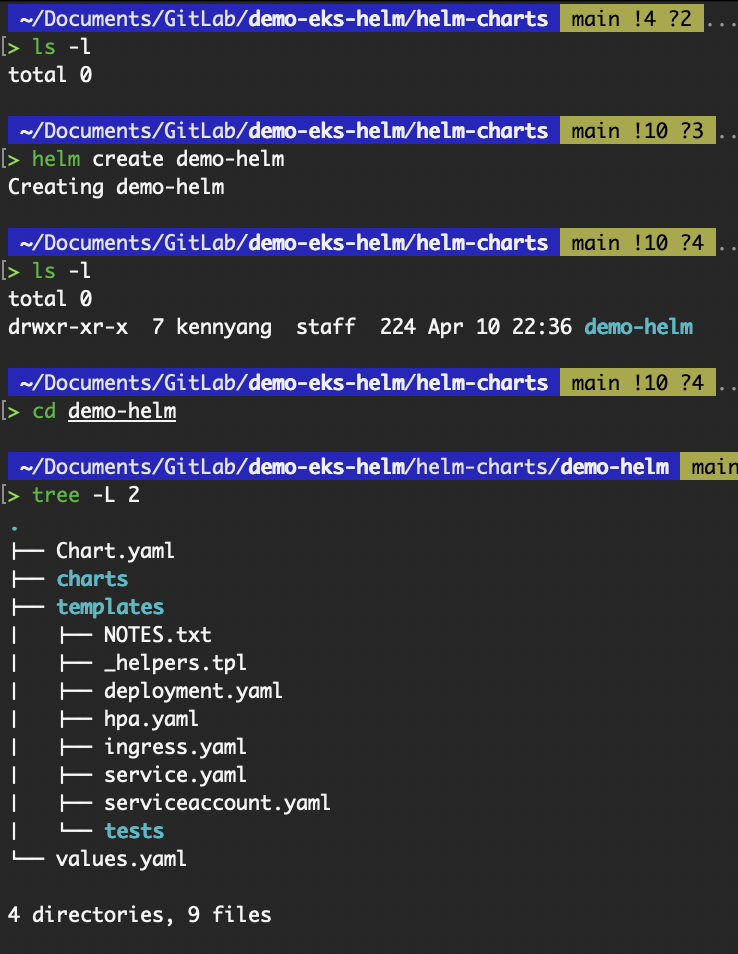
Output of the helm create command
Let’s explore the contents in the templates folder to understand it better before modifying it.

Contents in the template folder
The _helpers.tpl file stores reusable Go template helpers (similar to functions) that can be called from other templates within the chart, promoting code reusability and maintainability.
The image below shows how the sections in the _helpers.tpl file map to the service.yaml file.
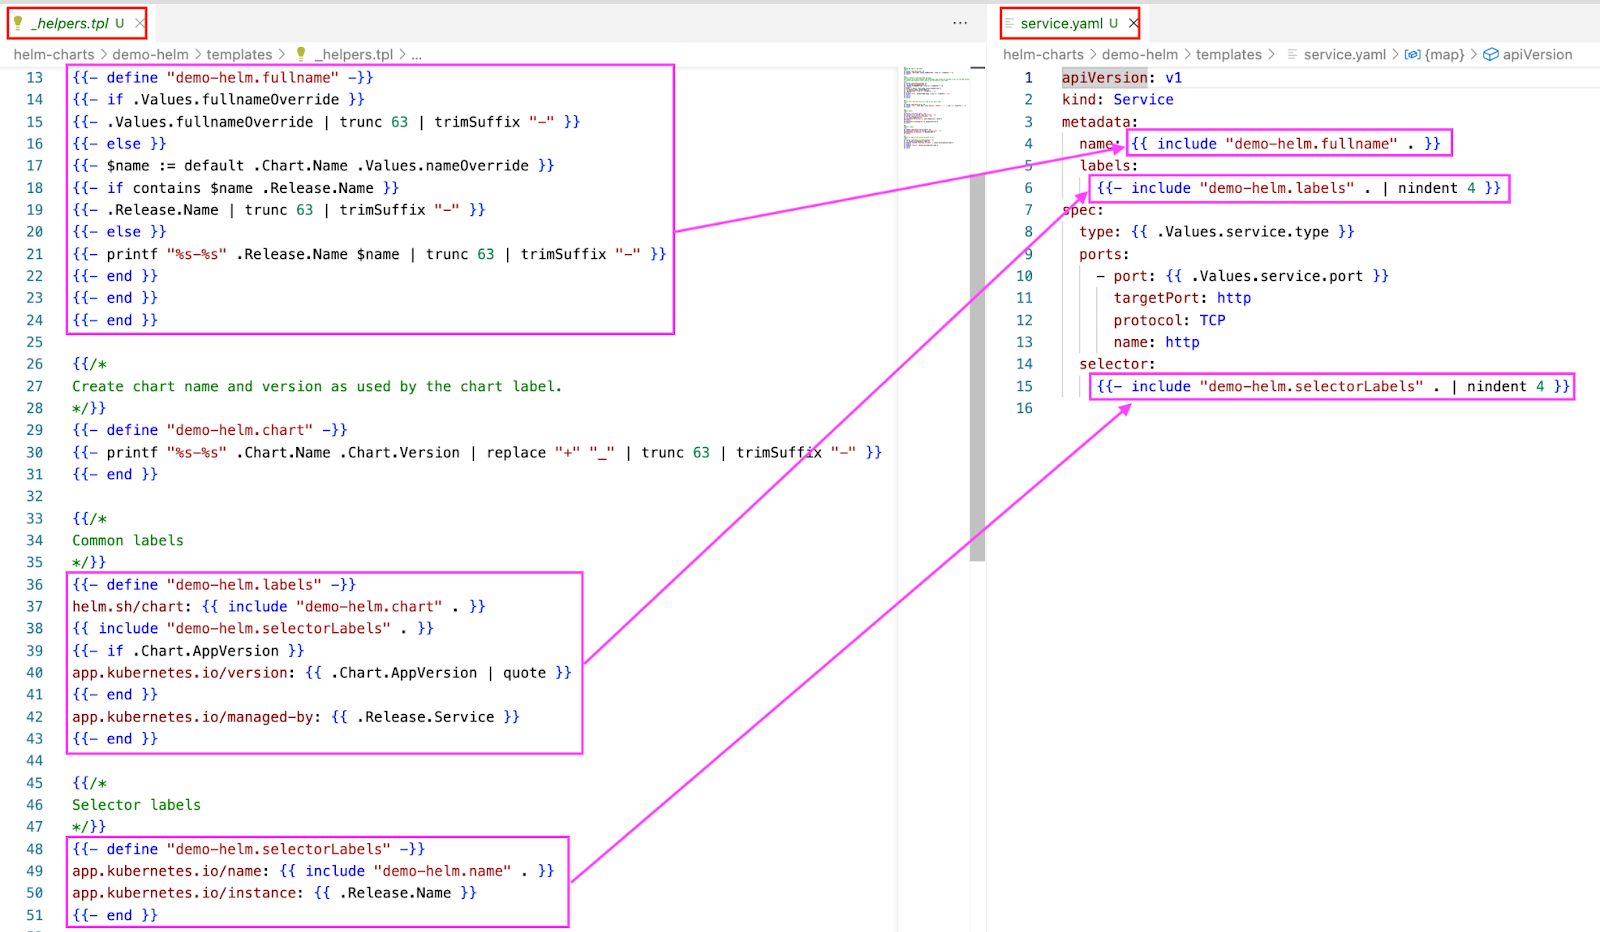
Mapping between _helpers.tpl and service.yaml
We can run the helm template command to obtain the rendered service.yaml. The command validates that the chart does not contain any errors and renders the manifest files.
# helm template <release name> <chart name OR path to chart folder>
helm template demo-helm ./demo-helm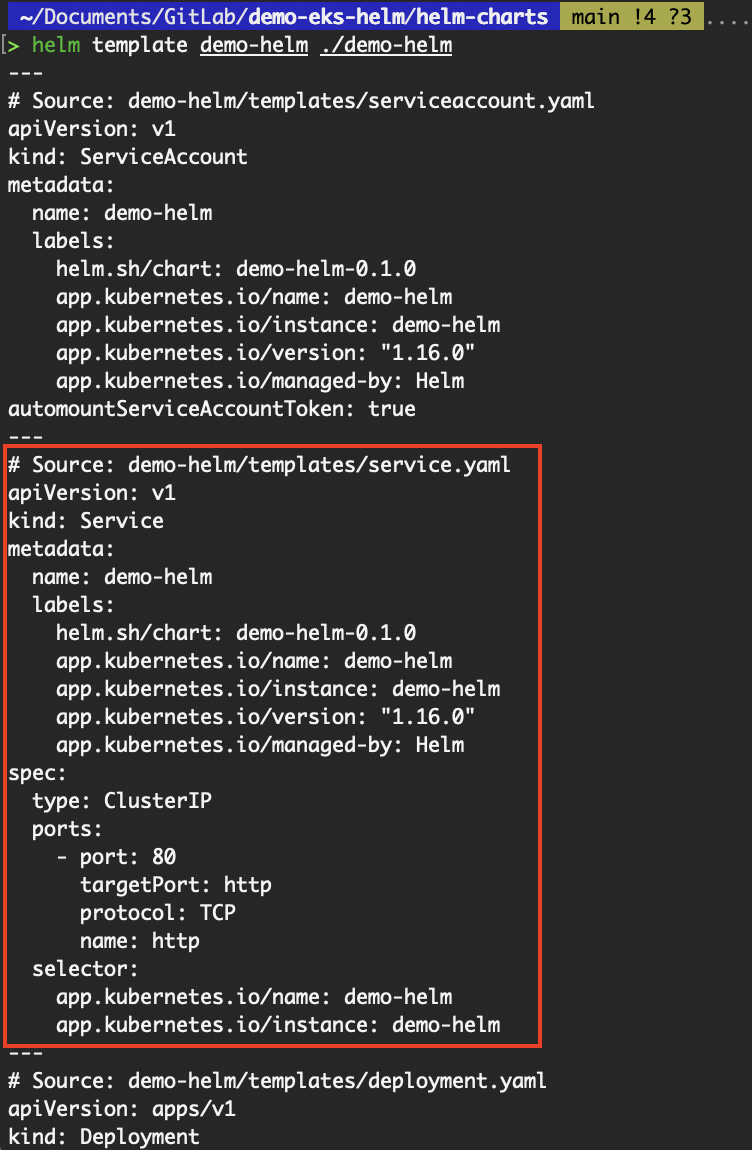
Output of the helm template command
We can add to or modify the contents in both the _helpers.tpl file or any of the template resources to suit our requirements. For example, to add a selector label to the service resource through the _helpers.tpl file:
{{- define "demo-helm.selectorLabels" -}}
app.kubernetes.io/name: {{ include "demo-helm.name" . }}
app.kubernetes.io/instance: {{ .Release.Name }}
app.kubernetes.io/custom: "testing" # Add this line
{{- end }}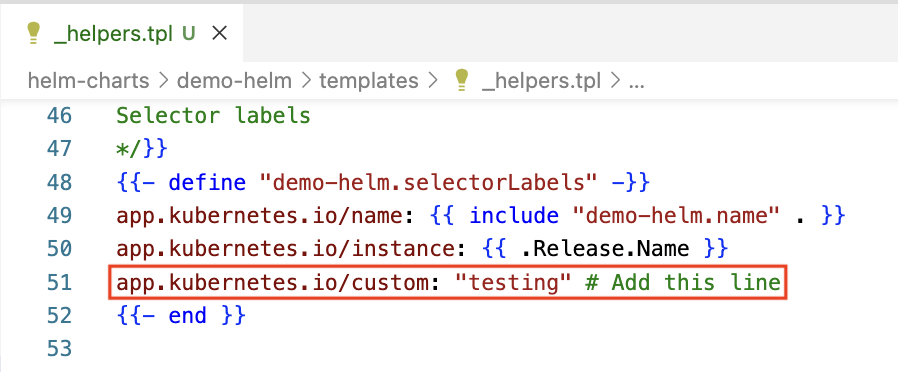
Add a selector label in _helpers.tpl
The quotation marks used around the value testing must be straight quotes ("testing") and not curly quotes (“testing”). Although helm template will not throw us an error, helm install will.
_helpers.tpl file and re-run the helm template command. You should see the selector being added to the service resource.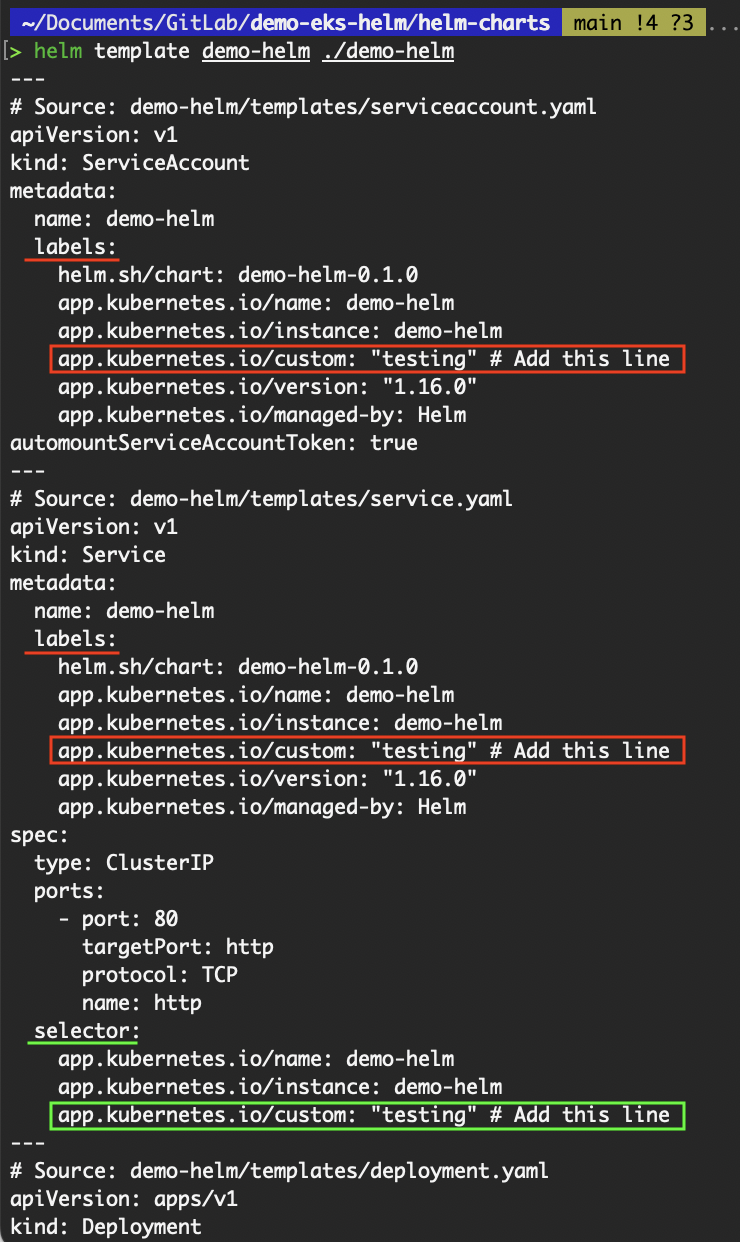
Updated output of the helm template command
Notice that in addition to being added to the selector, it has also been added to the labels of all resources. This is because the {{- define "demo-helm.labels" -}} contains the {{ include "demo-helm.selectorLabels" . }}. Thus, everything in the selectorLabels will be included in the labels.
Another example is that we can modify the deployment.yaml to expose another port on the container. By default, when we create a chart from the helm create command, the deployment template only exposes a port on the container.
deployment.yaml.- name: https
containerPort: 443
protocol: TCP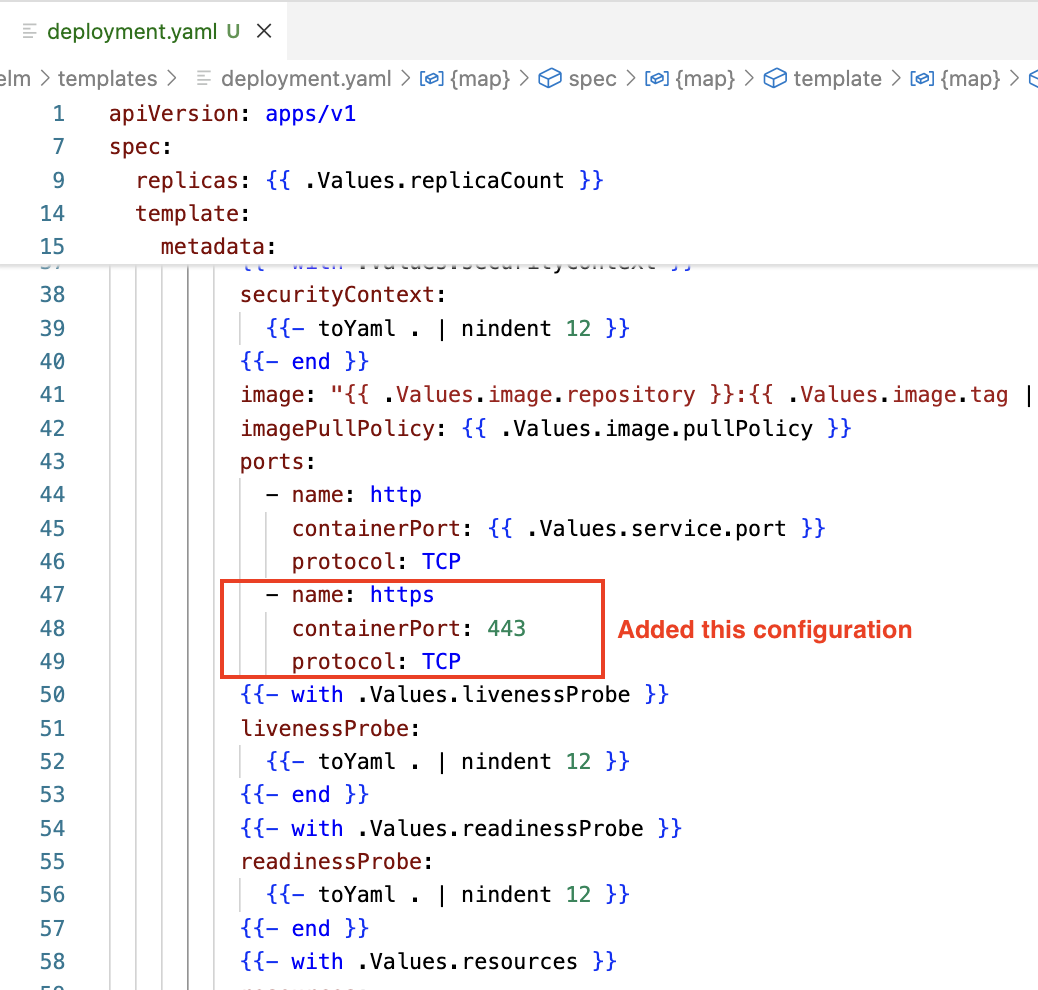
Added a port to the container in deployment.yaml
For simplicity, the containerPort value is hard-coded to 443. In the next subsection, we will explore how to use the values.yaml to parameterize it.
deployment.yaml file and run the helm template command again. The port should now be added to the container in the deployment resource.Just to point out, as indentation is crucial in YAML formatting, the template for the Kubernetes resources includes the nindent function to indent the required blocks accordingly.
apiVersion: v1
kind: Service
metadata:
  name: {{ include "demo-helm.fullname" . }}
  labels:
    {{- include "demo-helm.labels" . | nindent 4 }}
spec:
  type: {{ .Values.service.type }}
  ports:
    - port: {{ .Values.service.port }}
      targetPort: http
      protocol: TCP
      name: http
  selector:
{{- include "demo-helm.selectorLabels" . | nindent 4 }}Now that we have covered most of the contents in the template folder, we are ready to move on to the values.yaml.
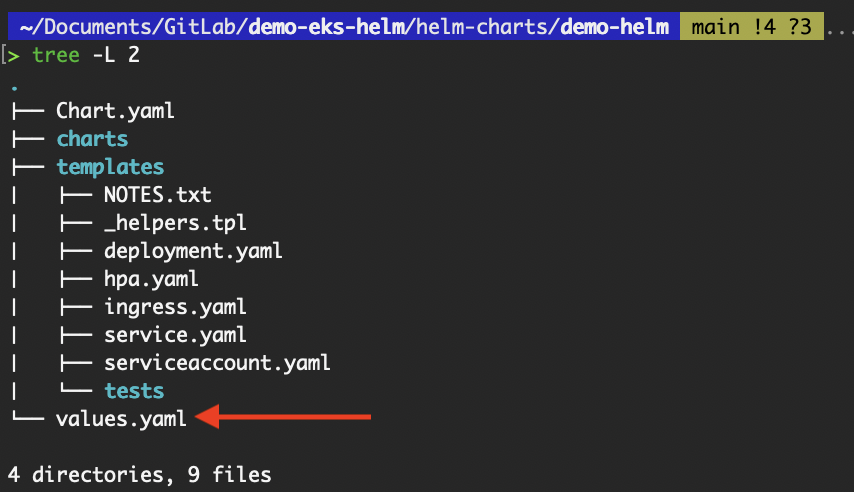
Helm chart directory
From the previous subsection, we have hard-coded the containerPort to be 443. Let’s parameterize it.
values.yaml, under the service key, add the nested key https_port with the value 443.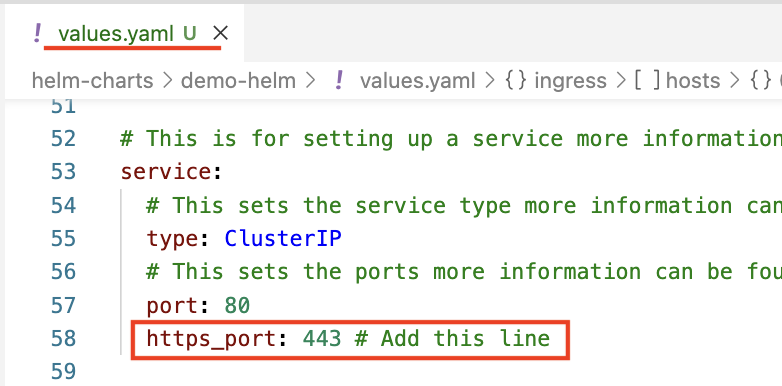
Add nested key
deployment.yaml to replace the hard-coded 443 with {{ .Values.service.port }}.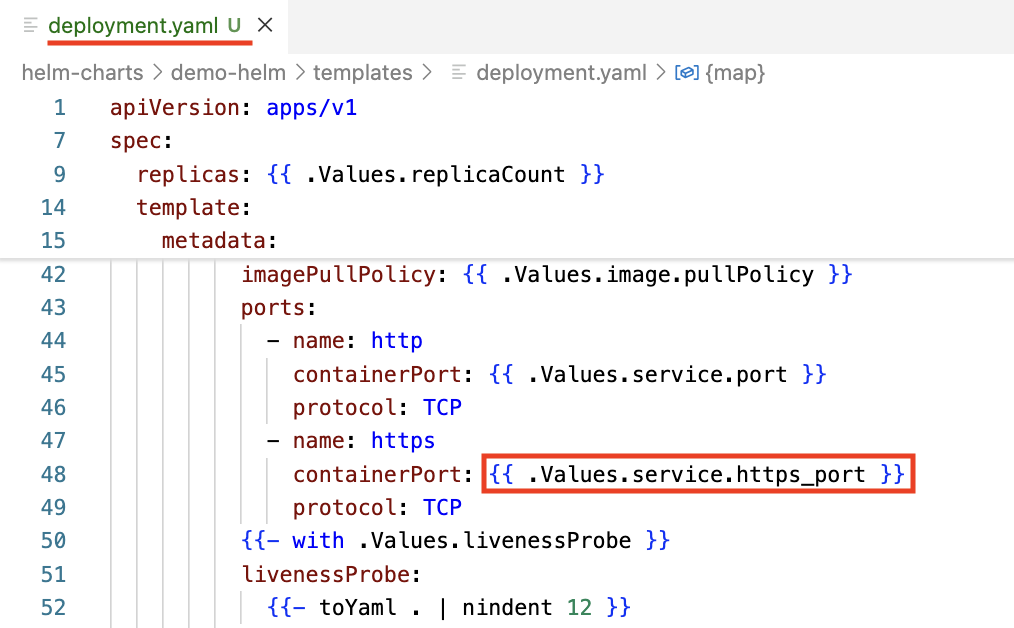
Parameterize the port number
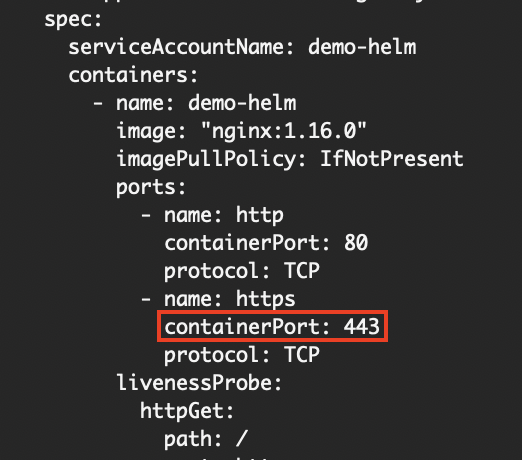
# helm template <release name> <chart name OR path to chart folder>
helm template demo-helm ./demo-helm
You should see that the value of 443 is correctly set on the containerPort.
Value of https_port rendered
If there are other locations within the Helm chart that require the value of this containerPort, simply use {{ .Values.service.https_port }}.
Now that we have created our own Helm chart, the next step would be to deploy it to a Kubernetes cluster.
Helm manages the lifecycle of the deployed Kubernetes resources as a release. In this section, we’ll explore how Helm handles deployments, upgrades, rollbacks, and the tracking of release history, giving us powerful control and visibility over our Kubernetes workloads.
In Helm, a release is a specific instance of a Helm chart that has been deployed to a Kubernetes cluster.
Each time we install a chart using helm install, Helm creates a new release with its own name, configuration, and version. Similarly, when we upgrade a release using helm upgrade, Helm creates a new revision of that release with the same name, but the configuration and version might differ. Essentially, a release is a new version of the same release with updated settings or chart content.
So, when we say "install a Helm chart," we’re really referring to "creating a Helm release."
Visual illustration of releases - image by Author.
Although only the most recent revision of a release is actively deployed in the cluster, Helm retains the full history of previous revisions. This means we can easily roll back to an earlier state using helm rollback.
When we perform a rollback, Helm doesn't restore the old release revision as-is — instead, it creates a new revision that replicates the configuration of the selected previous version. Each revision is numbered, and rollbacks increment the revision number, keeping the release history consistent and auditable.
Let’s walk through deploying a Helm release to a Kubernetes cluster. We will install two Helm charts: the one we created from the previous section and the bitnami/apache chart from the Bitnami public repository that we’ve already added to our local Helm setup.

bitnami/apache Helm chart
When installing a chart, we must specify a release name—this can be anything we choose and doesn’t need to match the chart name. However, it’s recommended to use a name that’s closely related to the chart to make it easier for users to understand what the release represents at a glance.
# Install the helm chart (in other words, create a helm release) into the default namespace
# helm install <release name> <chart name OR path to chart folder>
helm install datacamp-demo-helm ./demo-helm
# OR
helm upgrade --install datacamp-demo-helm ./demo-helm

# If installing to a specific namespace, add the -n flag
# Install the chart to the “app” namespace
helm install my-amazing-helm-demo ./demo-helm -n app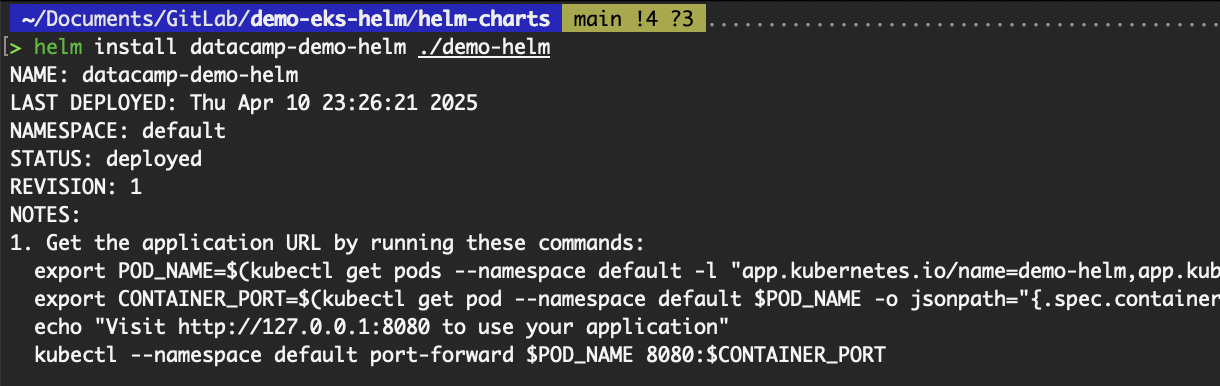
Deploy a custom Helm chart
# To validate the Kubernetes resources
# Get pods, service, and serviceaccount resources in the default namespace
kubectl get pods,svc,sa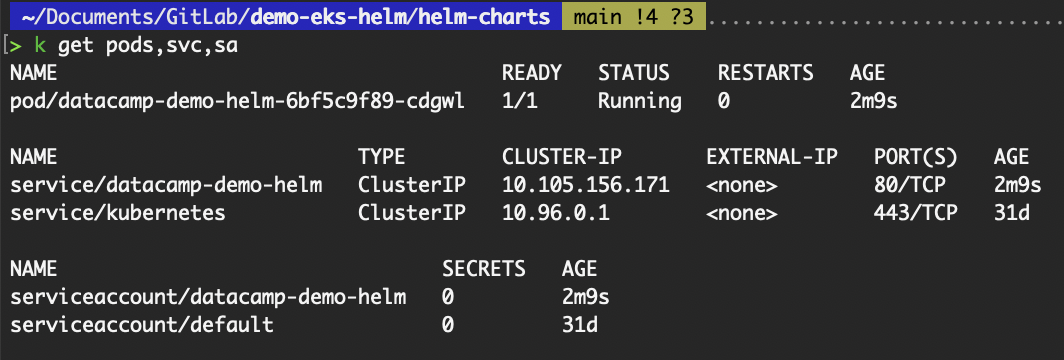
Validate resources deployed from the custom Helm chart
bitnami/apache chart:# Install the helm chart into the default namespace
helm install apache bitnami/apache
# OR
helm upgrade --install apache bitnami/apache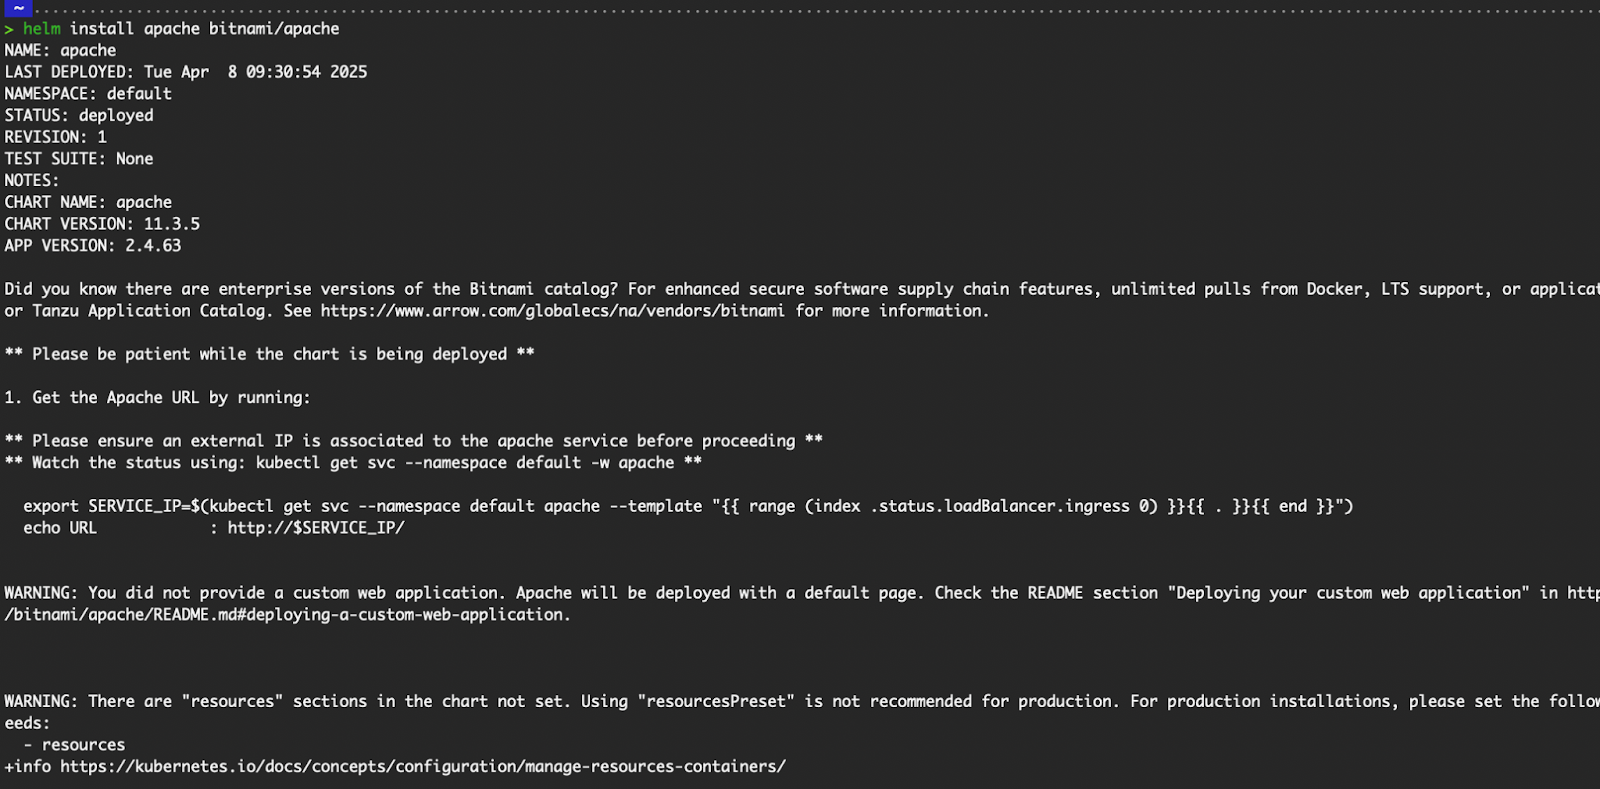
Output of helm install
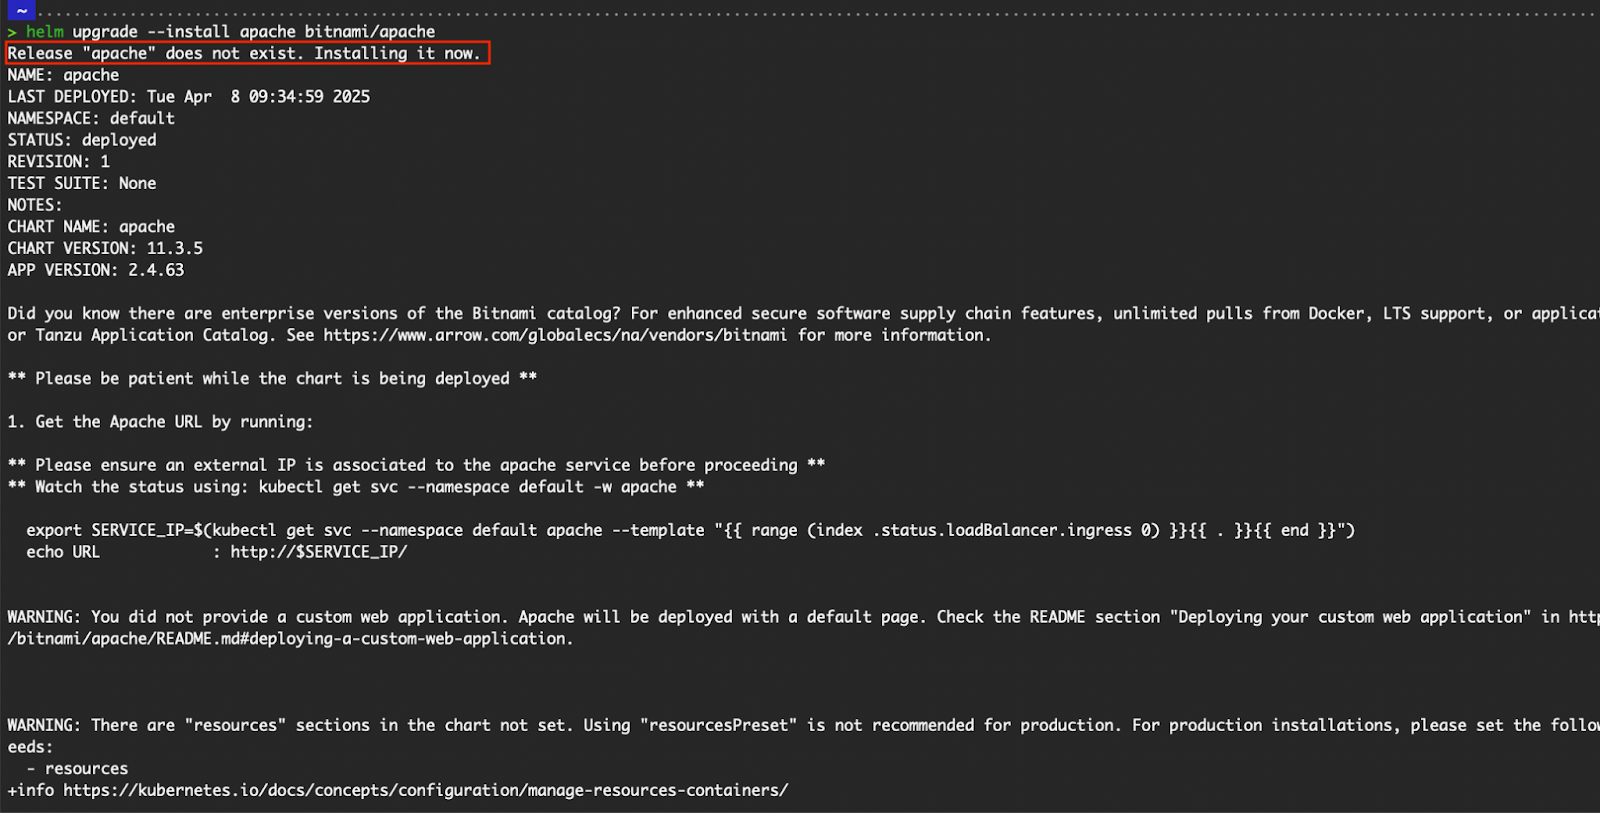
Output of helm upgrade --install
To view the Helm releases that have been deployed:
# List all helm releases in all namespaces
helm list -A
List all Helm releases
After the initial deployment of a Helm chart, updates are inevitable—whether changing the image tag, adjusting the number of replicas, enabling or disabling optional resources, or modifying configuration values.
Helm provides the helm upgrade command to apply these changes to an existing release without redeploying from scratch. This command allows us to update our running application by re-rendering the templates with the new configuration and applying the changes to the Kubernetes cluster, seamlessly managing updates with minimal disruption.
The application deployed via our custom helm chart runs an nginx image with the 1.16.0 tag. We can determine the tag by executing the helm get manifest command.
# Output the rendered Kubernetes manifest that was installed by the helm chart
# helm get manifest <release name>
helm get manifest datacamp-demo-helm
From the manifest of the deployment resource, you should see the following:
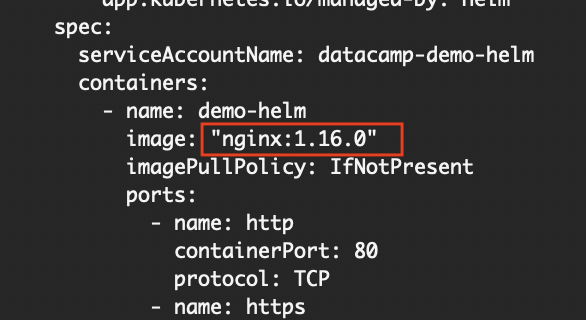
Image value
Where did the 1.16.0 tag come from? Our image.tag in values.yaml value is empty.
Examine the deployment.yaml template: the image key has the value "{{ .Values.image.repository }}:{{ .Values.image.tag | default .Chart.AppVersion }}". When the image.tag is not defined in values.yaml, Helm will obtain the value from the appVersion defined in the Charts.yaml.
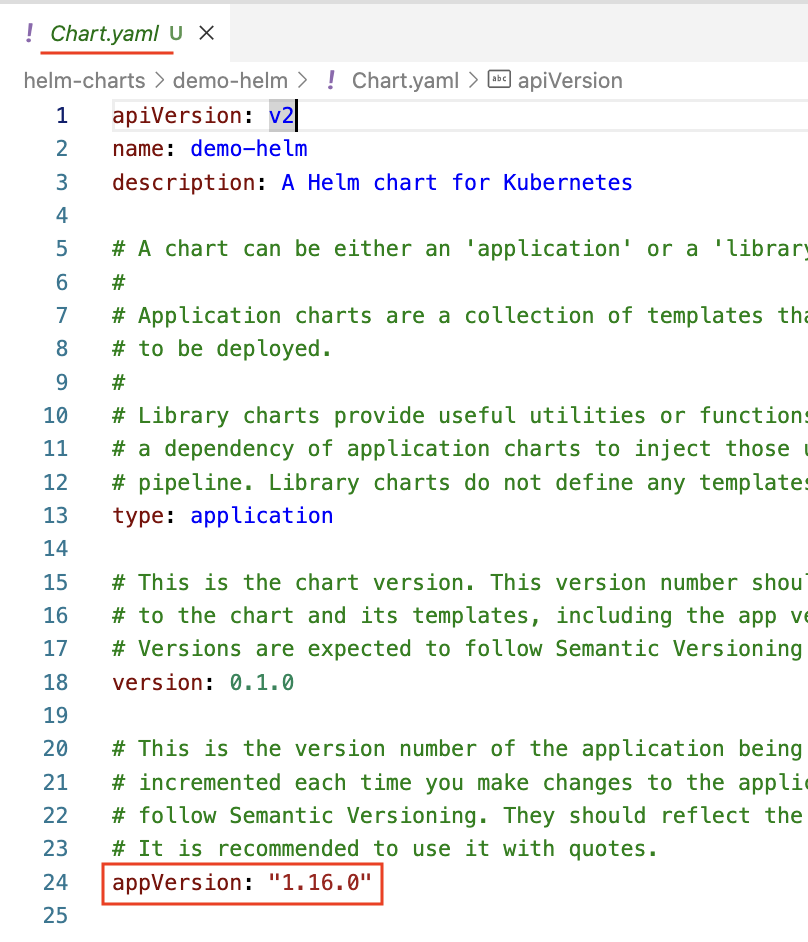
appVersion in Chart.yaml
values.yaml of our custom chart, update the image.tag to "1.26".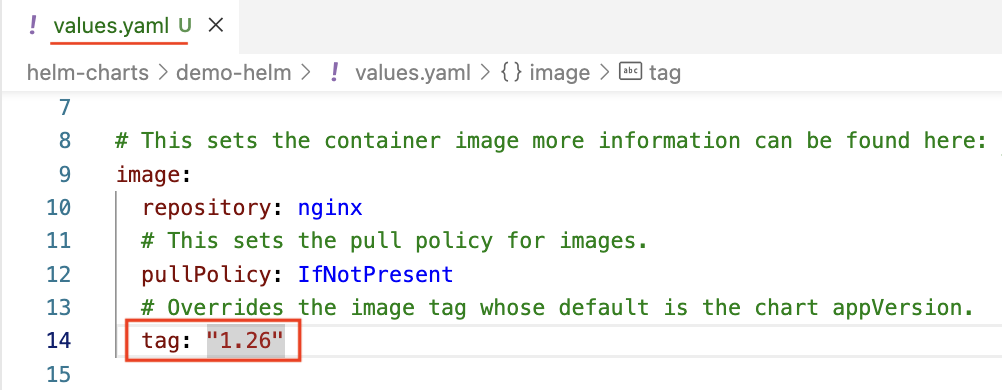
Update image.tag from "" to "1.26"
helm upgrade command.# helm upgrade <release name> <chart name or path to chart>
helm upgrade datacamp-demo-helm ./demo-helm
# Alternatively, you can update the value via the --set flag
helm upgrade datacamp-demo-helm ./demo-helm --set 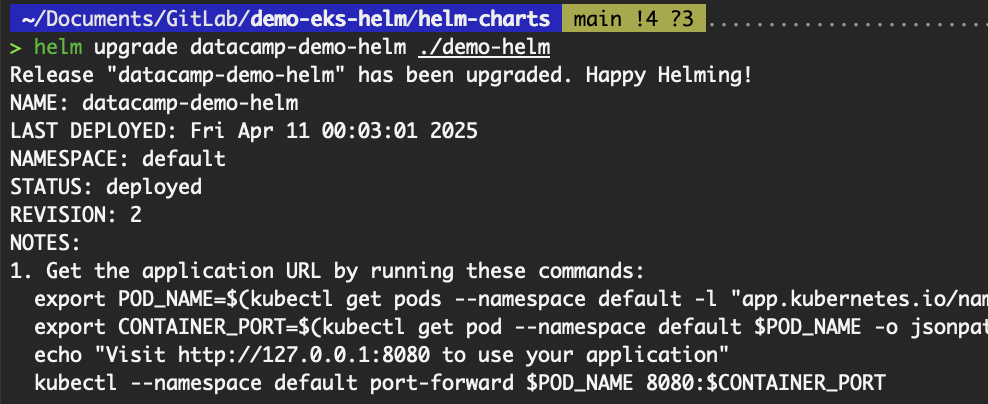
The output of the helm upgrade command
Examine the deployment resource; the image tag should be 1.26. Behind the scenes during an upgrade, Helm does the following:
deployment, configmaps, or secrets) are updated.# To view the release history. It also shows the revision numbers.
# helm history <release name>
helm history datacamp-demo-helm
Output of the helm history command
We’ve just upgraded a Helm release, but soon after, we notice the application isn't behaving as expected. While troubleshooting is important, in a production environment, the immediate priority is often stabilizing the system. That’s where Helm’s rollback feature comes in.
Helm makes it easy to revert to a previous, known-good release with a single command, allowing us to quickly recover from failed deployments and minimize downtime.
# The first argument of the rollback command is the name of a release, and the second is a revision (version) number. If this argument is omitted or set to 0, it will roll back to the previous release.
# helm rollback <release name> <revision number>
helm rollback datacamp-demo-helm 0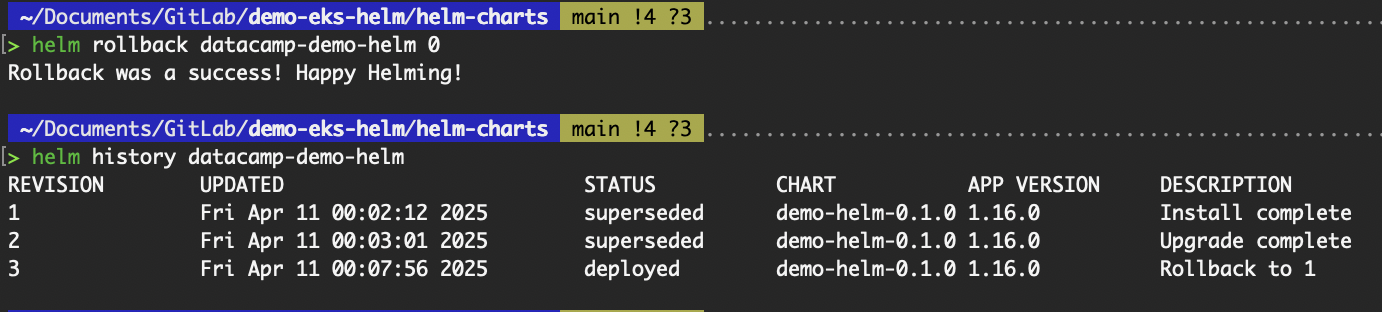
The output of the helm rollback command
Examine the datacamp-demo-helm deployment, and you should see the nginx image tag back to 1.16.0.
kubectl get deploy datacamp-demo-helm -oyamlTo uninstall the Helm release, in other words, to delete all Kubernetes resources deployed from the release, execute the helm uninstall command.
# helm uninstall <release name>
helm uninstall datacamp-demo-helm
helm uninstall apache
Output of helm uninstall command
To see how Helm supports scalable CI/CD pipelines, especially for ML workflows, explore the CI/CD for Machine Learning course.
One of Helm's greatest strengths is its flexibility. Whether we’re deploying to development, staging, or production, Helm makes it easy to customize our chart's behavior through configuration.
In this section, we'll explore how to tailor a Helm chart for different environments using tools like values.yaml, environment-specific overrides, and Helm's --set and -f flags.
Helm provides a flexible way to manage environment-specific configurations using multiple values.yaml files.
Instead of maintaining a single, complex values.yaml that tries to account for every possible setting across dev, staging, and production, or complex conditional statements in our templates to account for the different environments, we can split these into separate files, each tailored to a specific environment.
For example, our chart directory might include:
my-chart/
├── values.yaml                    # default values
├── values-dev.yaml           # development-specific overrides
├── values-staging.yaml    # staging-specific overrides
└── values-prod.yaml # production-specific overridesHelm allows us to override default values defined in values.yaml by using either the --set flag for inline overrides or the -f flag to provide an external values file. The -f flag is short for the --values flag.
To install or upgrade our Helm release with the -f flag:
# For installing on dev
helm install <release name> <chart name or path to chart> -f values-dev.yaml

# For upgrading on dev
helm upgrade <release name> <chart name or path to chart> -f values-dev.yaml

# For installing on staging
helm install <release name> <chart name or path to chart> -f values-staging.yaml

# For upgrading on staging
helm upgrade <release name> <chart name or path to chart> -f values-staging.yaml
To install or upgrade our Helm release with the --set flag:
# For installation
helm install <release name> <chart name or path to chart> --set image.tag=1.26

# For upgrading
helm upgrade <release name> <chart name or path to chart> --set image.tag=1.26
If both --set and -f are used during installation (or upgrade), Helm applies the values in the following order:
values.yaml (if present)-f--setThis means that if the same key appears in both the -f file and the --set flag, the value from --set will take precedence.
For example, if we defined image.tag to be 1.22 in values-dev.yaml, but set the image.tag to be 1.26 via the --set flag, the image.tag value that will be used to render the Kubernetes manifest will be 1.26.
# E.g. we defined image.tag to be 1.22 in values-dev.yaml
helm install <release name> <chart name OR path to chart> --set image.tag=1.26 -f values-dev.yamlWhen deploying applications to Kubernetes using Helm, handling sensitive data, such as API keys, database credentials, or TLS certificates, requires special care. While Helm supports the Kubernetes Secret resource, the values in the secret resource are simply base64 encoded, which can be decoded by anyone.
apiVersion: v1
kind: Secret
metadata:
  name: my-secret
  namespace: default
type: Opaque
data:
  key1: c3VwZXJzZWNyZXQ=  # ← This is base64 encoded
  key2: dG9wc2VjcmV0          # ← This is base64 encoded
# Decode the value of key1
echo "c3VwZXJzZWNyZXQ=" | base64 -d
# Decode the value of key2
echo "dG9wc2VjcmV0" | base64 -dStoring secrets directly in a values.yaml file or plain text within our chart is not secure and should be avoided, especially when committing files to version control.
To manage secrets securely in Helm charts across different environments, consider using tools specifically designed for this purpose. Two widely adopted solutions are Sealed Secrets and External Secrets.
Sealed Secrets is an open-source project developed by Bitnami that helps manage sensitive data in Kubernetes in a secure and GitOps-friendly way. It introduces a custom resource definition (CRD) called SealedSecret, which allows us to encrypt secrets before committing them to a Git repository.
Unlike regular Kubernetes secrets resources, which store data in base64 encoding and are not encrypted, SealedSecret resources contain encrypted values that can only be decrypted by the Sealed Secrets controller running inside the target Kubernetes cluster. This means the encrypted secrets can be safely stored in version control systems like Git.
To set up our cluster and local environment to use Sealed Secrets:
kube-system namespacekubectl apply -f https://github.com/bitnami-labs/sealed-secrets/releases/download/v0.29.0/controller.yaml
#OR
helm install sealed-secret bitnami/sealed-secrets -n kube-system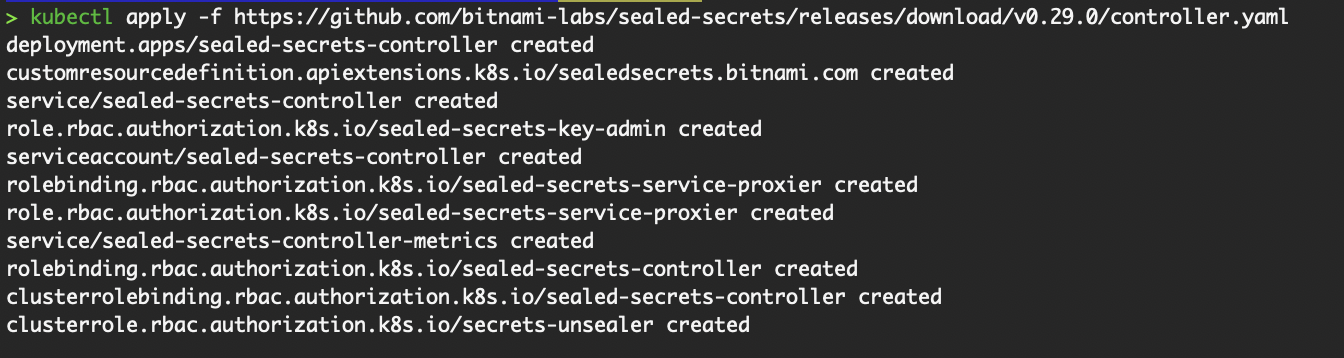
Install SealedSecret on our cluster via kubectl
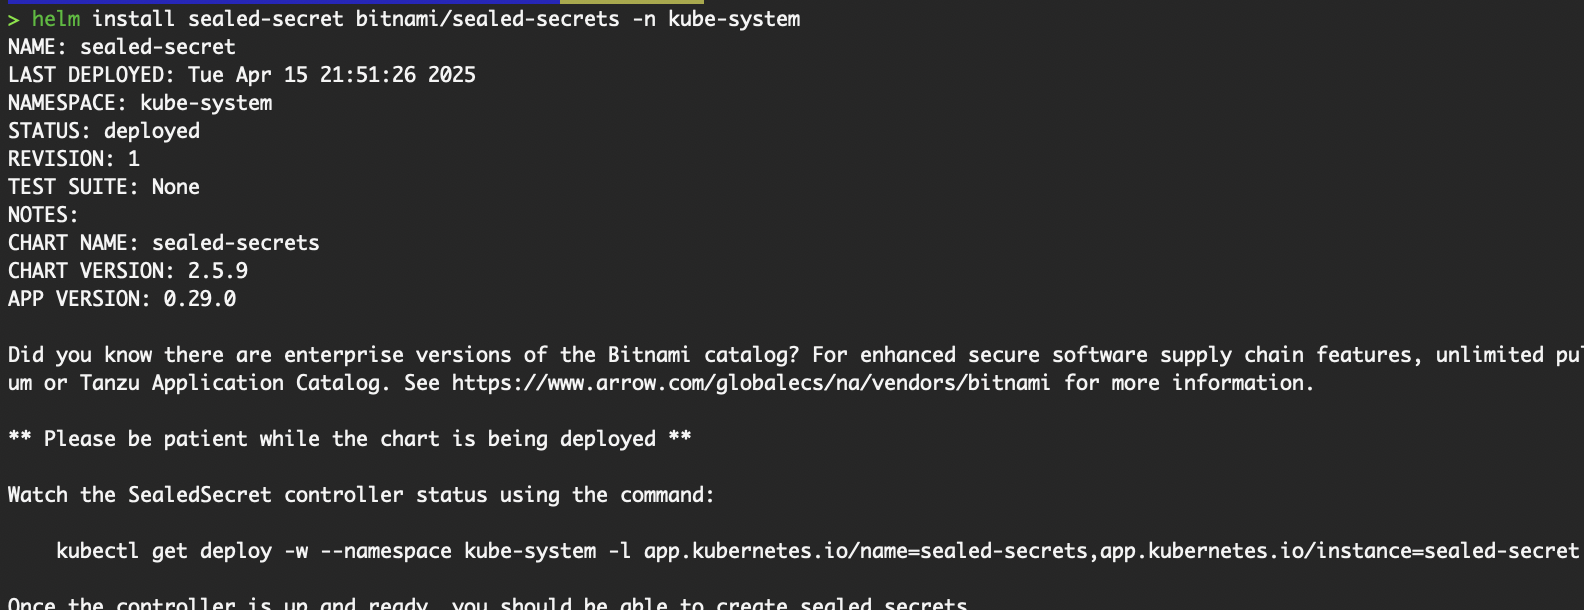
Install SealedSecret on our cluster via Helm
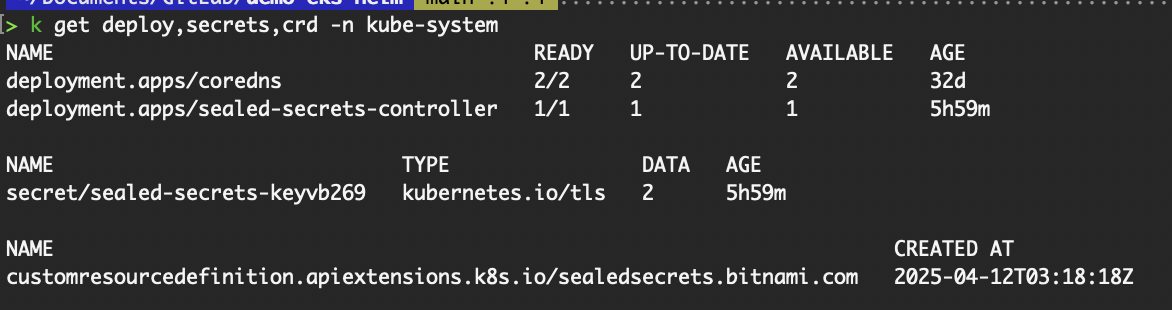
Verify resources from installing Sealed Secrets
kubeseal CLI on our local system.# Linux x86_64:
curl -OL "https://github.com/bitnami-labs/sealed-secrets/releases/download/v0.29.0/kubeseal-0.29.0-linux-amd64.tar.gz"
tar -xvzf kubeseal-0.29.0-linux-amd64.tar.gz kubeseal
sudo install -m 755 kubeseal /usr/local/bin/kubeseal
# macOS
brew install kubesealTo create the SealedSecret CRD resource:
# Pass the secret manifest to kubeseal for it to generate the SealedSecret CRD resource containing the encrypted secrets. Saves the SealedSecret CRD manifest in sealed-mysecret.yaml.
kubectl create secret generic mysecret --dry-run=client --from-literal key1=supersecret --from-literal key2=topsecret --output json | kubeseal | tee sealed-mysecret.yaml

# Or if you have the secret manifest saved in a JSON file
kubeseal -f mysecret.yaml -w sealed-mysecret.yaml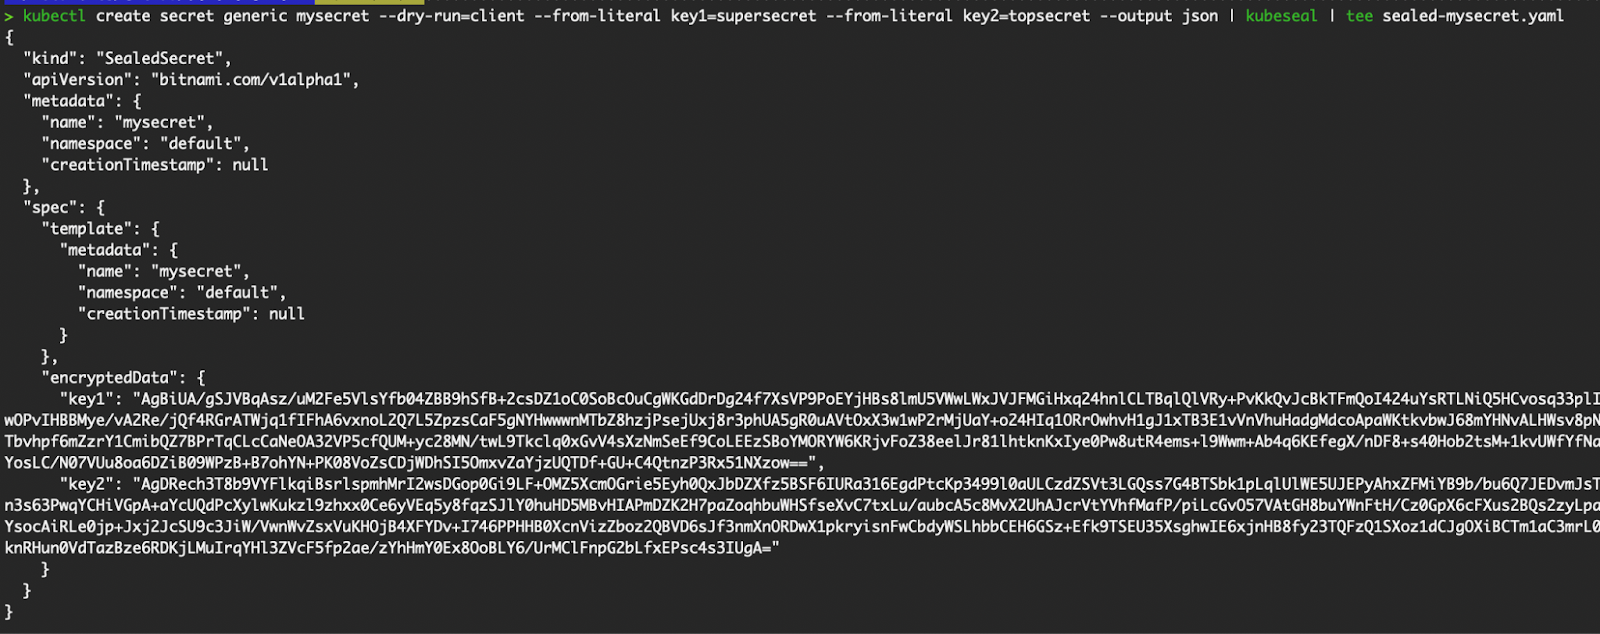
Generate and save the SealedSecret CRD resource
Apply the sealed-mysecret.yaml file. When a SealedSecret resource is created in the cluster, the controller automatically decrypts the sealed data and creates a standard Kubernetes secrets resource from it.
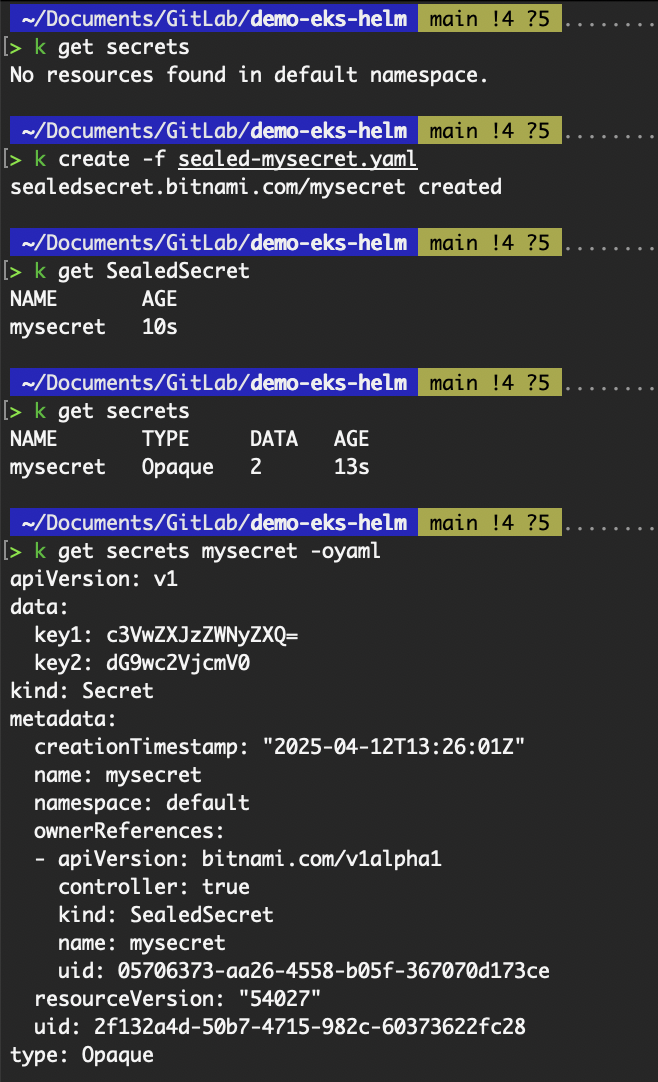
Create the SealedSecret CRD resource
This approach ensures that sensitive information remains secure throughout the CI/CD pipeline.
External Secrets Operator (ESO) is a Kubernetes operator that allows us to securely fetch and inject secrets from external secret management systems, such as AWS Secrets Manager, HashiCorp Vault, Google Secret Manager, Azure Key Vault, and others, into Kubernetes Secrets.
Instead of manually creating or updating Kubernetes Secrets, ESO retrieves the latest secret values from these external providers through their APIs and ensures that our Kubernetes cluster always has up-to-date credentials or sensitive data.
ESO introduces a set of custom resources—ExternalSecret and ClusterSecretStore—that abstract away the complexities of interacting with external secret backends. These resources define what secrets to fetch and from where, making it easier to manage secret lifecycles in a declarative and Kubernetes-native way.
For this example, we will be fetching a secret from AWS Secrets Manager.
external-secrets pod to fetch the secret from AWS Secrets Manager.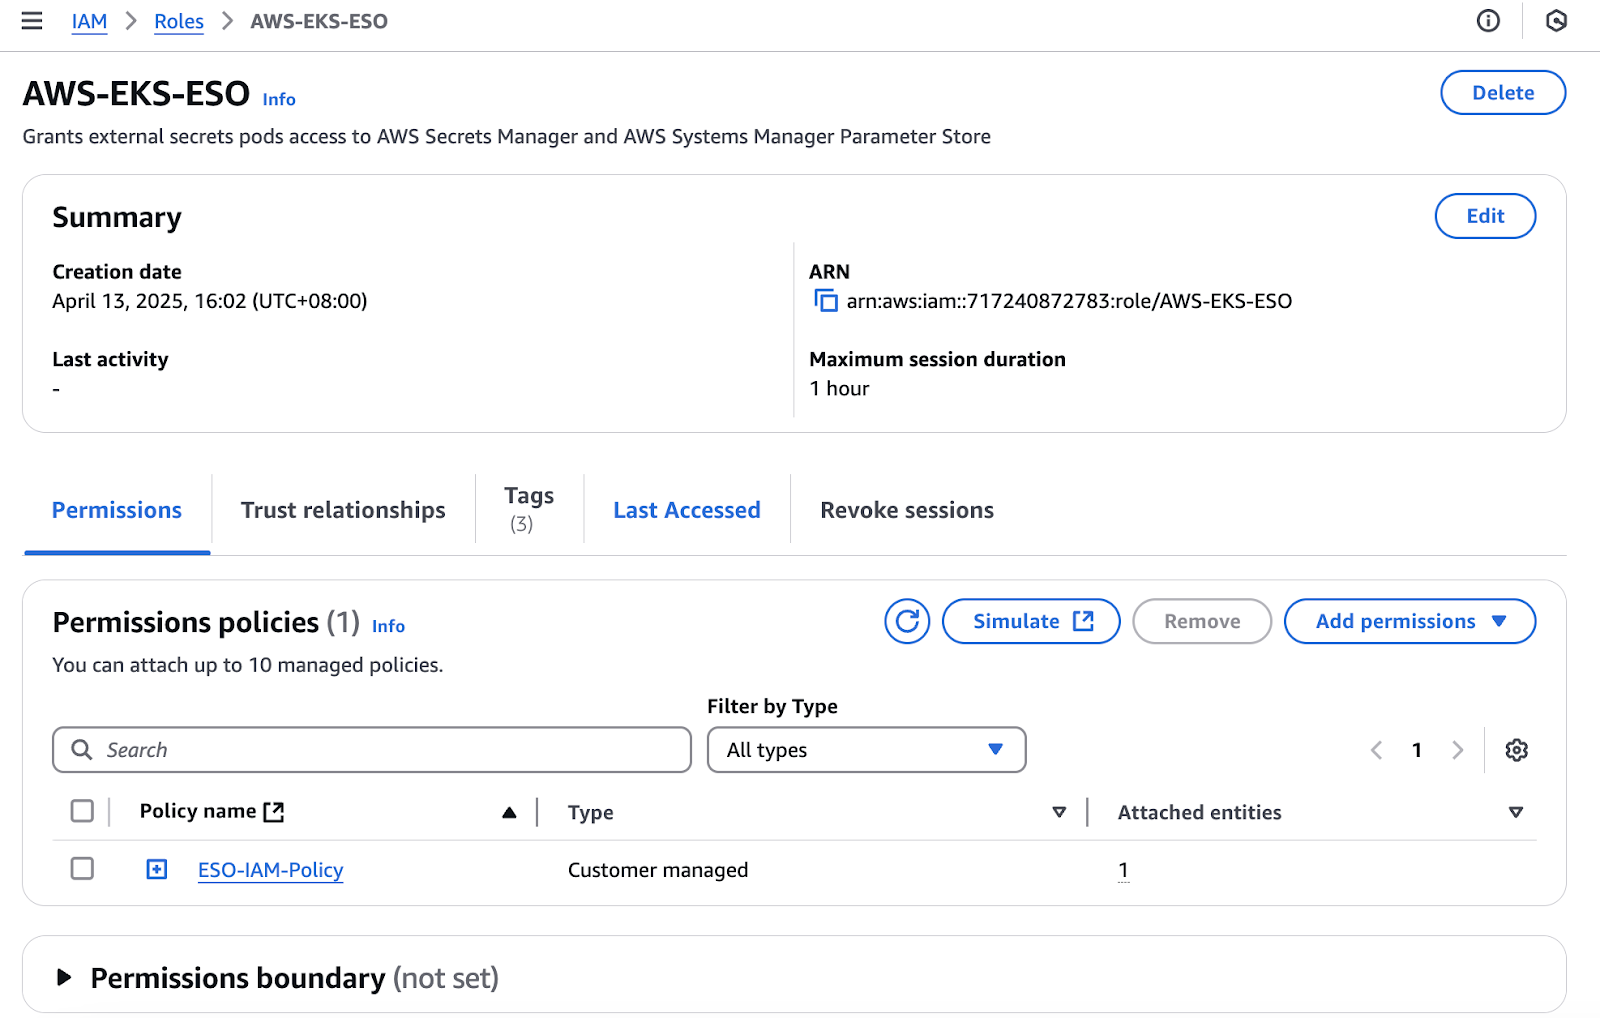
IAM Role for external-secrets pod
The IAM role permission policy is as follows:
{
    "Version": "2012-10-17",
    "Statement": [
        {
            "Sid": "ESO",
            "Effect": "Allow",
            "Action": [
                "secretsmanager:GetSecretValue"
            ],
            "Resource": "*"
        }
    ]
}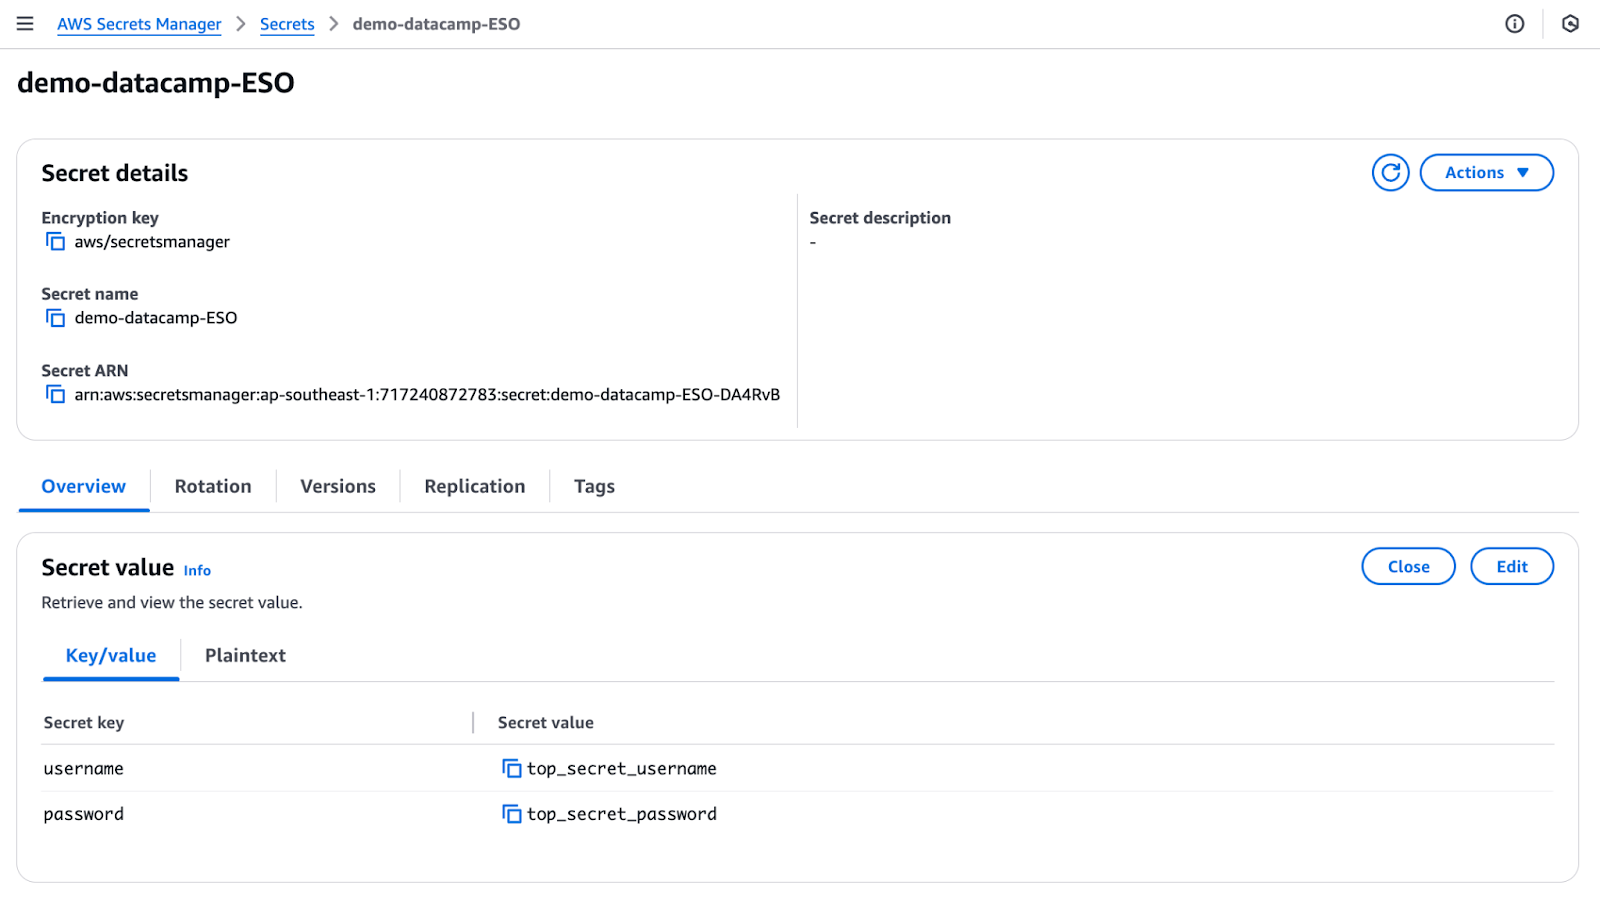
AWS Secrets Manager secret
To set up our cluster to use ESO:
helm repo add external-secrets https://charts.external-secrets.io


# Replace the ARN of the IAM role
helm install external-secrets external-secrets/external-secrets \
    -n external-secrets \
    --create-namespace \
    --version 0.15.1 \
    --set serviceAccount.annotations."eks\.amazonaws\.com/role-arn"="<ARN of IAM Role>"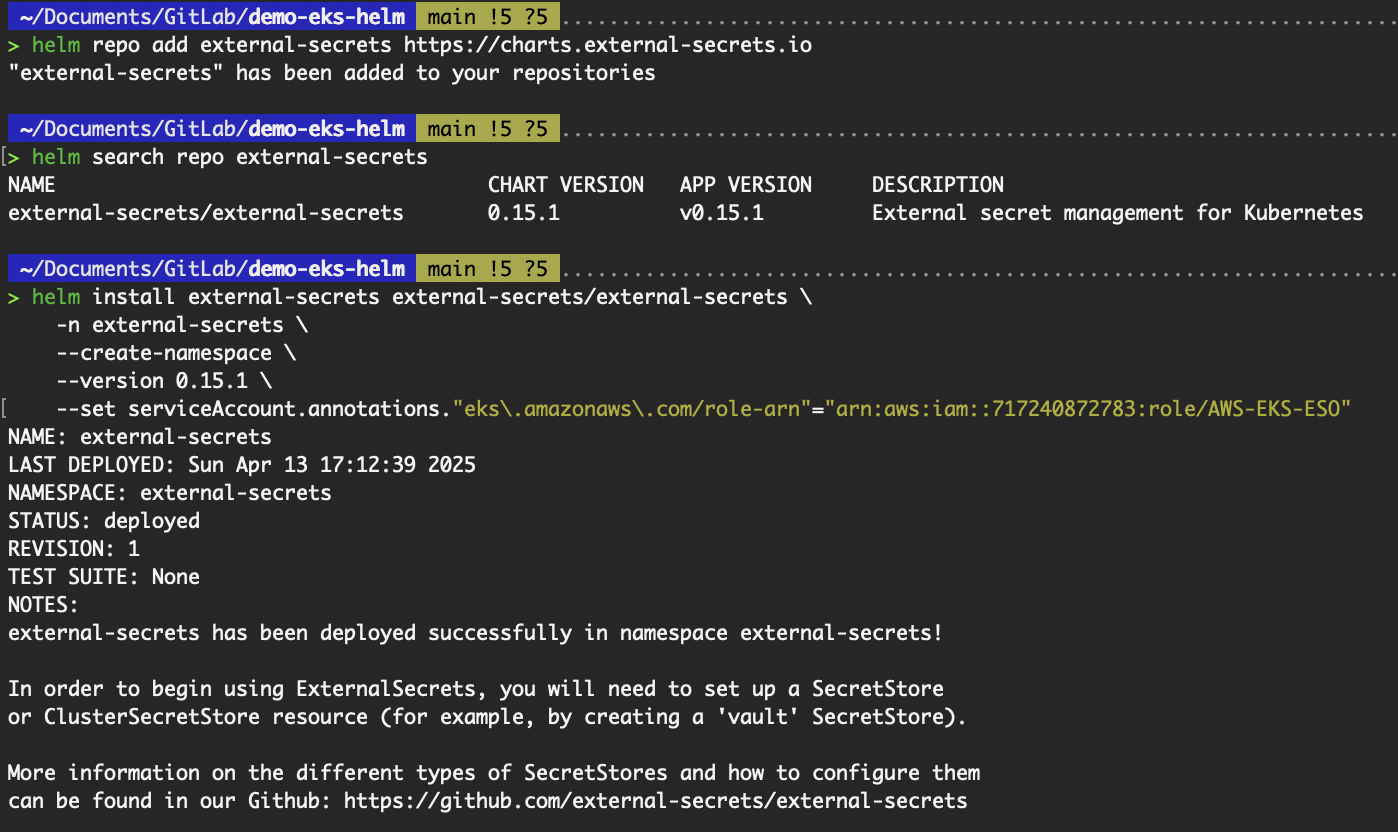
Output from installing external-secrets
kubectl get pods,crd -n external-secrets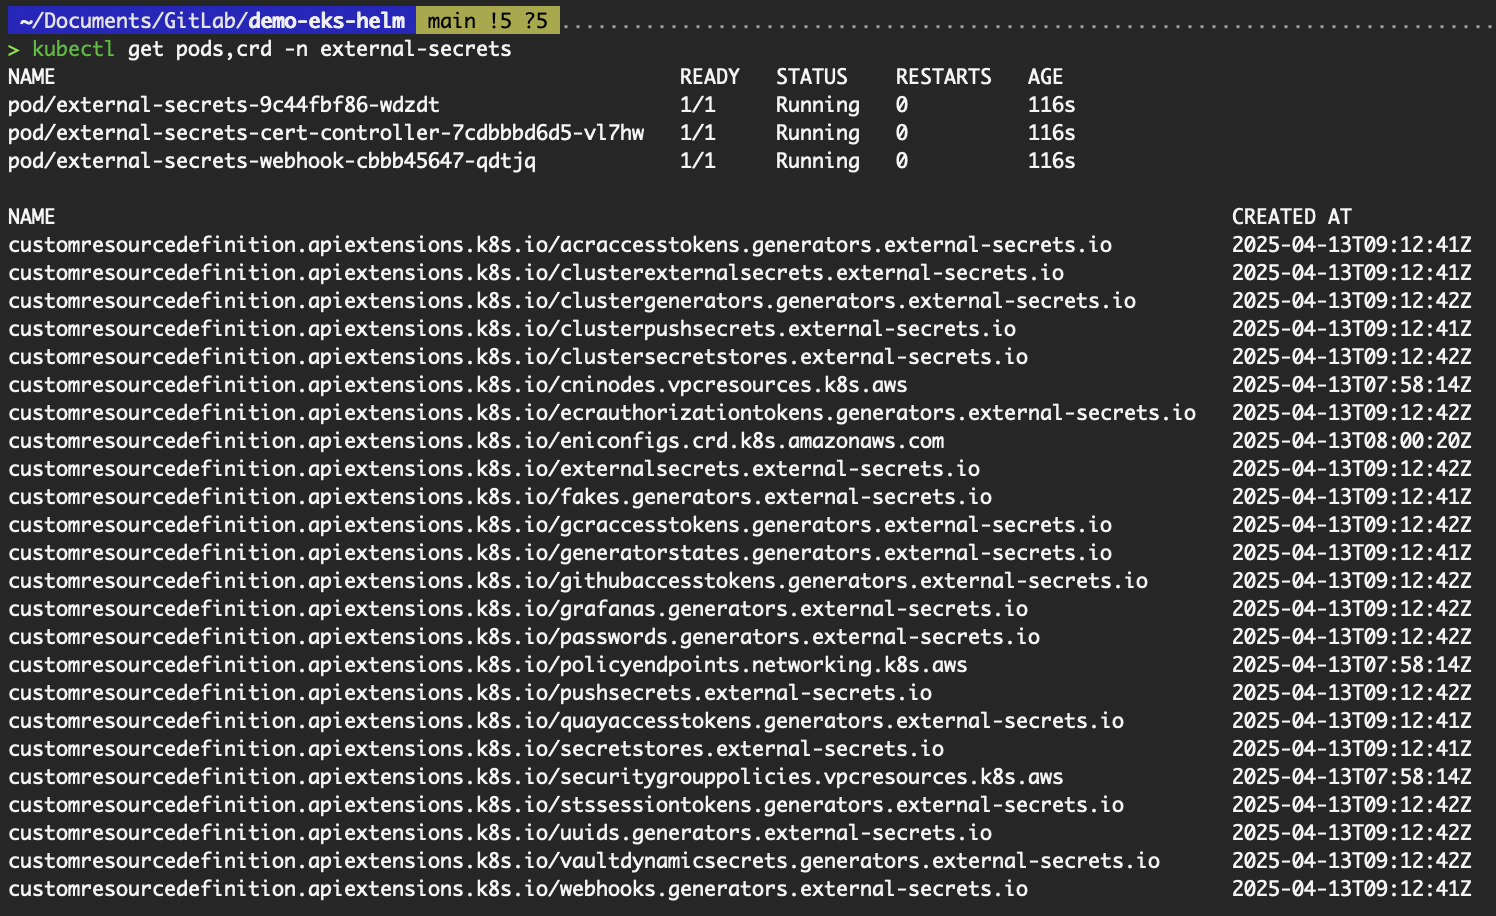
Verify resources from installing ESO
ClusterSecretStore resource, save the following to cluster-secret-store.yaml and create the resource.apiVersion: external-secrets.io/v1beta1
kind: ClusterSecretStore
metadata:
name: "cluster-secret-store"
spec:
provider:
aws:
service: SecretsManager
region: ap-southeast-1
auth:
jwt:
serviceAccountRef:
name: "external-secrets"
namespace: "external-secrets"kubectl create -f cluster-secret-store.yaml
kubectl get ClusterSecretStoreThe ClusterSecretStore custom resource is a cluster-wide SecretStore that can be referenced by ExternalSecrets from any namespace. It references the external-secrets serviceAccount to authenticate with AWS Secrets Manager.
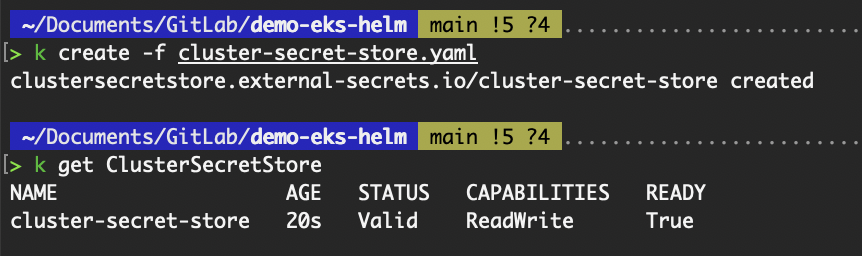
Validate creation of ClusterSecretStore resource
demo-datacamp-ESO secret from AWS Secrets Manager, deploy the ExternalSecret custom resource. We will be pulling the value of the password key. Save the following to external-secret.yaml and create the resource.apiVersion: external-secrets.io/v1beta1
kind: ExternalSecret
metadata:
name: demo-datacamp-secret
namespace: default # Change to your target namespace
spec:
refreshInterval: 1h # How often to refresh the secret
secretStoreRef:
name: cluster-secret-store # This references your ClusterSecretStore
kind: ClusterSecretStore
target:
name: demo-datacamp-k8s-secret # The name of the resulting Kubernetes Secret
creationPolicy: Owner # ESO manages lifecycle of the K8s secret
data:
- secretKey: password # Key name in the Kubernetes Secret
remoteRef:
key: demo-datacamp-ESO # AWS Secrets Manager secret name
property: password # Key in the AWS secret JSON objectkubectl create -f external-secret.yaml
kubectl get externalsecrets
kubectl get secrets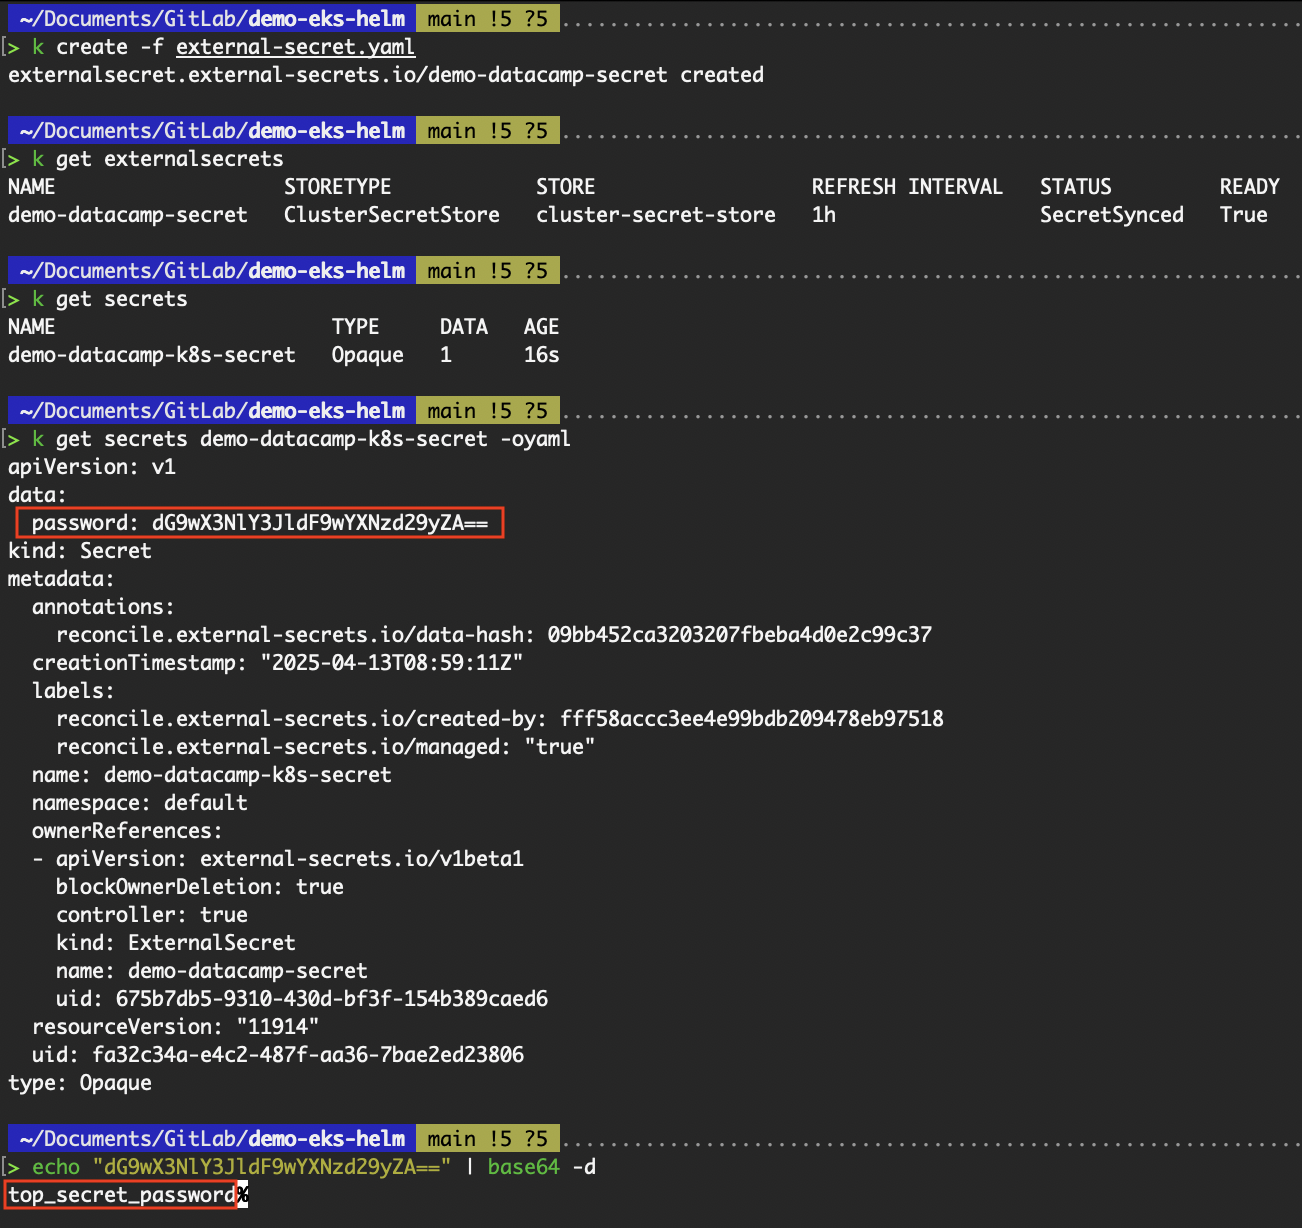
Verify successful fetching of the secret
From the above image, we can see that the value top_secret_password of the password key was successfully fetched from AWS Secrets Manager, and a Kubernetes secret was created containing the value.
As our usage of Helm grows beyond basic chart installation, it's important to follow best practices that promote maintainability, reusability, and reliability.
This section covers key development practices, such as using Helm plugins to extend functionality, structuring charts for reuse, validating our charts with linting tools, and effectively managing versions and dependencies.
Helm plugins are a powerful way to extend Helm’s core functionality and tailor it to your workflow. They allow us to add custom commands and integrate with external tools without modifying Helm itself.
Plugins can be installed from Git repositories, tarballs, or local directories, and once installed, they behave like native Helm commands. Helm plugins are installed locally on our machine, not on the Kubernetes cluster. This means they enhance our local Helm CLI capabilities and do not require any changes or deployments to the Kubernetes cluster. Each user or system running Helm must install the desired plugins independently.
A common plugin that is widely used especially on CI/CD pipelines is helm-diff. It compares a Helm release to a Helm chart and shows what changes would be applied. This is especially useful for previewing upgrades.
# Install the plugin
helm plugin install https://github.com/databus23/helm-diff

# List installed plugins
helm plugin list

# View the changes for an upgrade
helm diff upgrade datacamp-demo-helm ./demo-helm --set image.tag="1.26"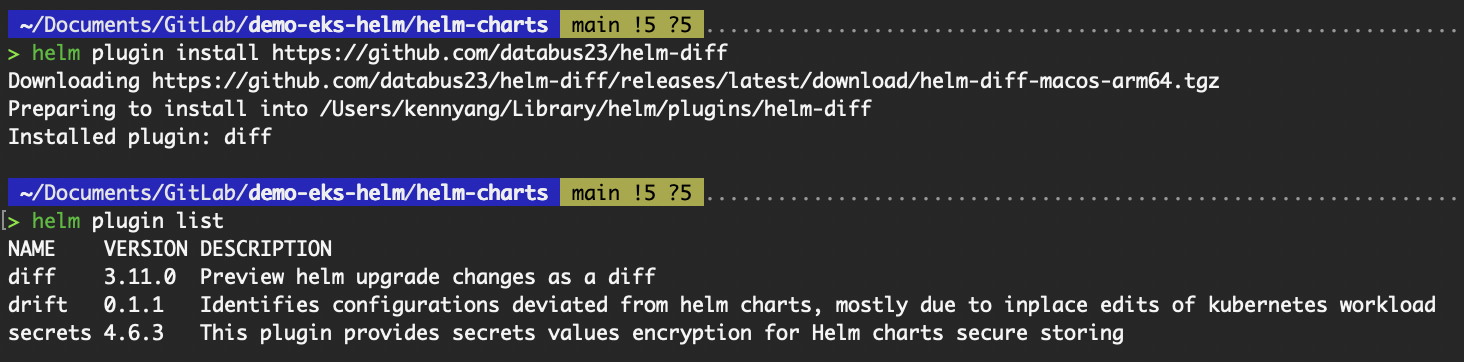
Output of helm plugin commands
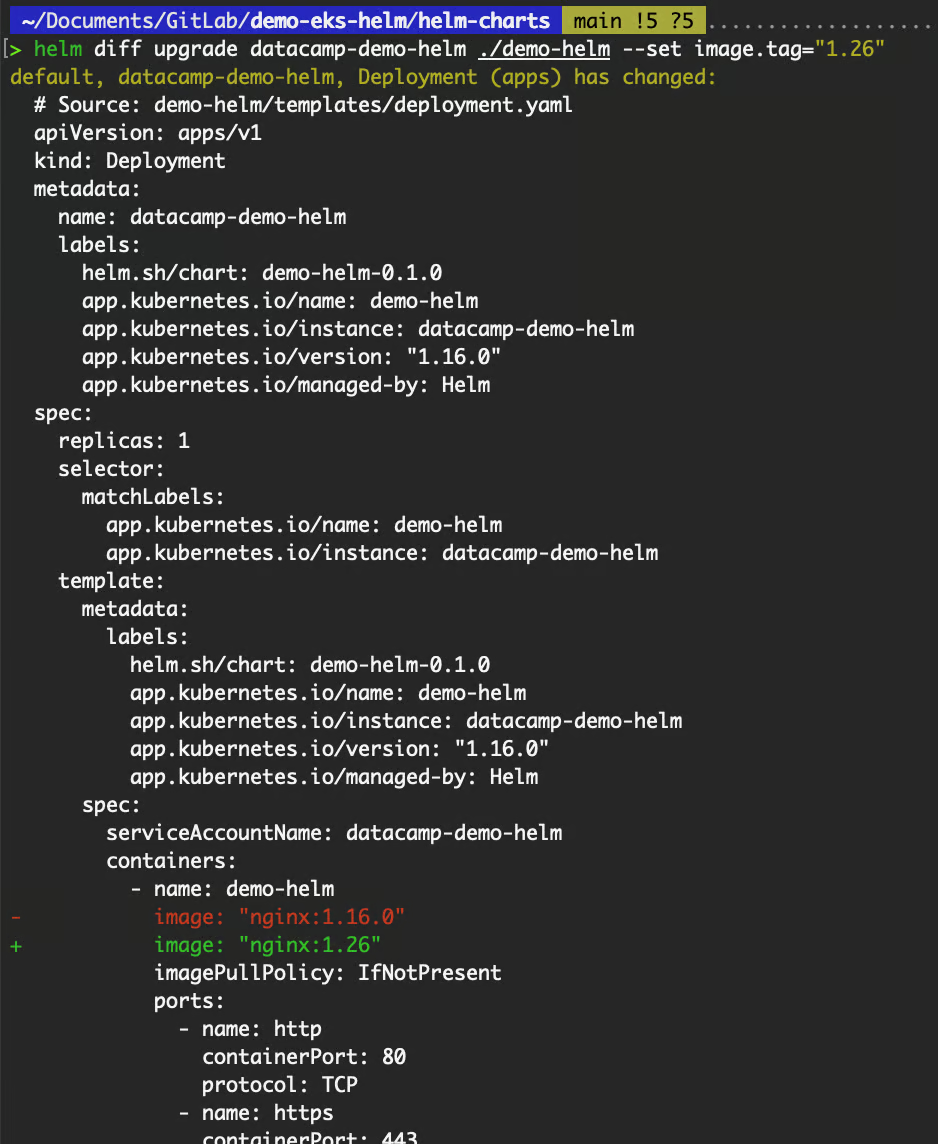
Output of the helm diff command
As our Helm usage grows, structuring our charts for reusability becomes crucial. A well-structured Helm chart promotes consistency, simplifies maintenance, and enables modular deployment patterns across projects. Here are two tips:
As demonstrated in the “Customizing templates” subsection in the “Creating Your First Helm Chart” section, we leveraged the _helpers.tpl file to add an additional selector to the deployment resource and labels to all resources. Using helper templates avoids duplication, thereby providing a single source of truth for commonly reused snippets. This improves consistency across your chart and makes maintenance easier—any future changes only need to be made in one place.
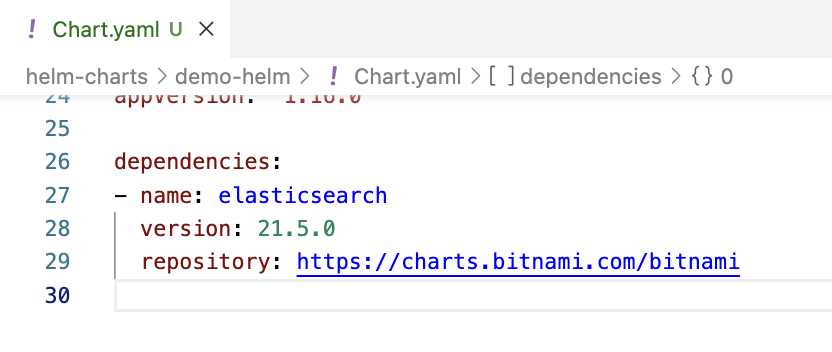
If our application consists of multiple loosely coupled components (e.g., a web app, database, and Redis), consider breaking the chart into subcharts. Place them inside the charts/ folder and manage them as dependencies via Chart.yaml.
dependencies:
  - name: redis
    version: 17.1.2
    repository: https://charts.bitnami.com/bitnami
Run helm dependency update to pull in those subcharts. This makes each component independently manageable and promotes reuse across different projects.
Before deploying a Helm chart to a Kubernetes cluster, it’s important to ensure that the chart is well-structured, syntactically correct, and logically sound. Helm provides built-in tools to help us catch issues early through linting and testing.
The helm lint command analyzes our chart for common errors and best practice violations. It checks the syntax of the templates, structure of the chart files, and the presence of required fields in Chart.yaml.
helm lint ./demo-helm
Output of the helm lint command
If we were to modify the value of name in Chart.yaml from "demo-helm" to "demo_helm", there would be an issue where helm lint would catch.
By linting and testing our charts before deployment, we reduce the risk of failed releases and misconfigurations in production. These practices are essential for maintaining high-quality Helm charts that behave predictably across environments.
As our Helm charts evolve and depend on other charts, it becomes critical to manage versions consistently and track dependencies accurately. Helm provides built-in mechanisms to support this through semantic versioning, the Chart.lock file, and Chart.yaml dependencies.
Helm uses Semantic Versioning for chart versions. A chart’s version is defined in Chart.yaml under the version key:
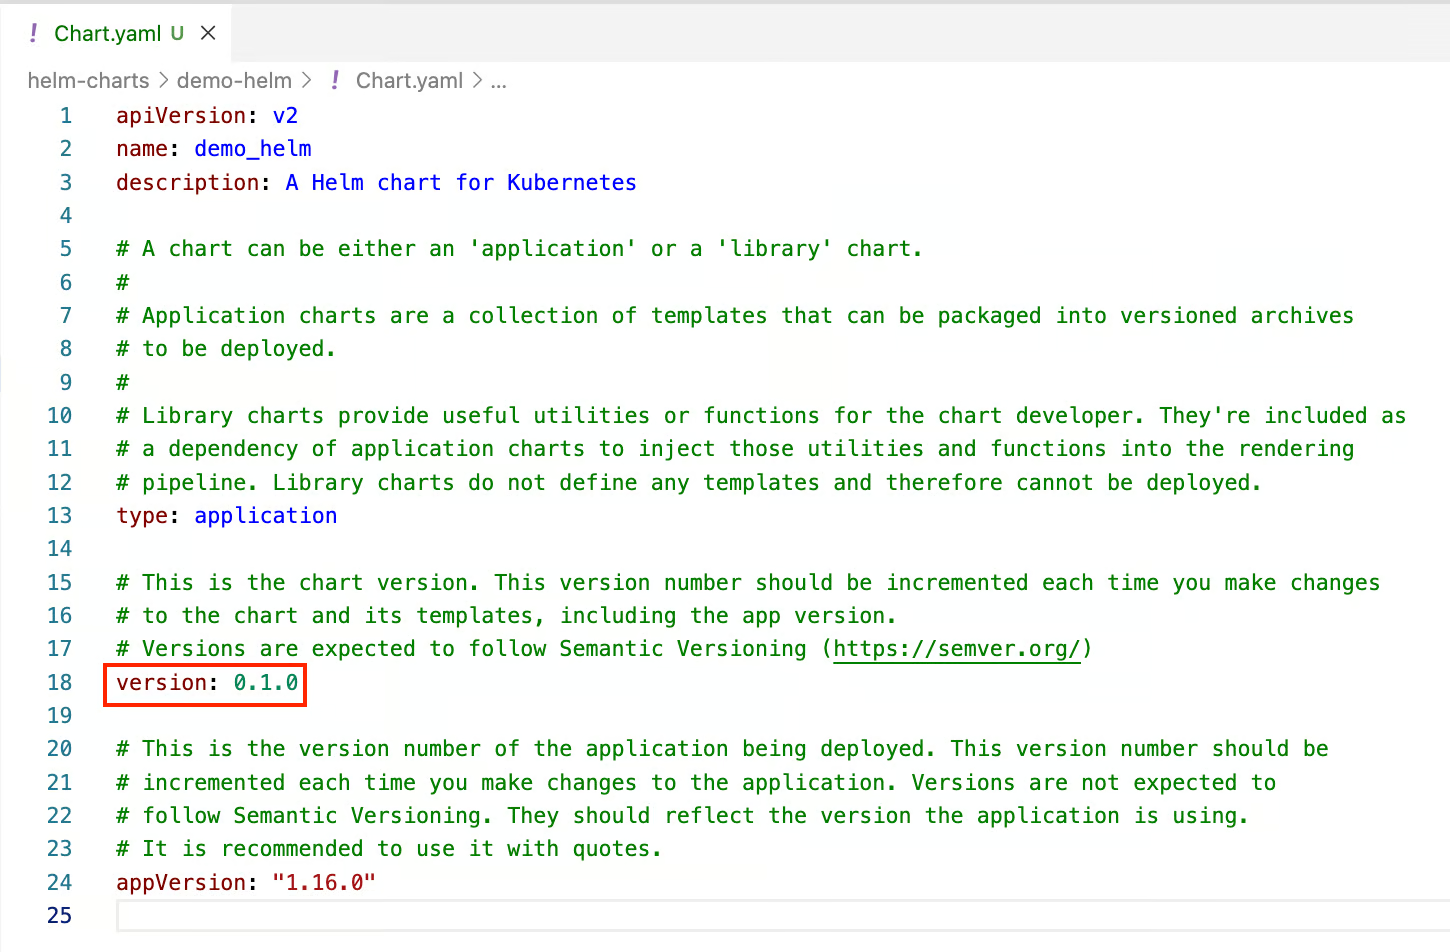
Chart version
Semantic versioning follows the format: MAJOR.MINOR.PATCH
The chart version should be incremented whenever there are changes to the chart itself, including its templates, values, or even the application version. At the same time, the application version reflects the version of the actual application the chart is deploying, typically aligned with the image tag used in the chart. It should be updated whenever the application image changes.
Proper versioning helps teams know whether an upgrade is safe or requires additional caution. It also allows Helm to manage upgrade paths and dependencies more reliably.
In Helm 3, which is what we have been using for this entire article, dependencies are defined directly in the Chart.yaml file under the dependencies section. It isn’t included by default when we create the chart. This replaces the requirements.yaml file from Helm 2.
Dependencies defined in Chart.yaml
The Chart.lock file is automatically generated when you run helm dependency update. It acts like a lockfile in many package managers, recording the exact versions of each dependency as defined in the dependencies section of Chart.yaml. This ensures reproducible builds and consistent behavior across environments and teams.
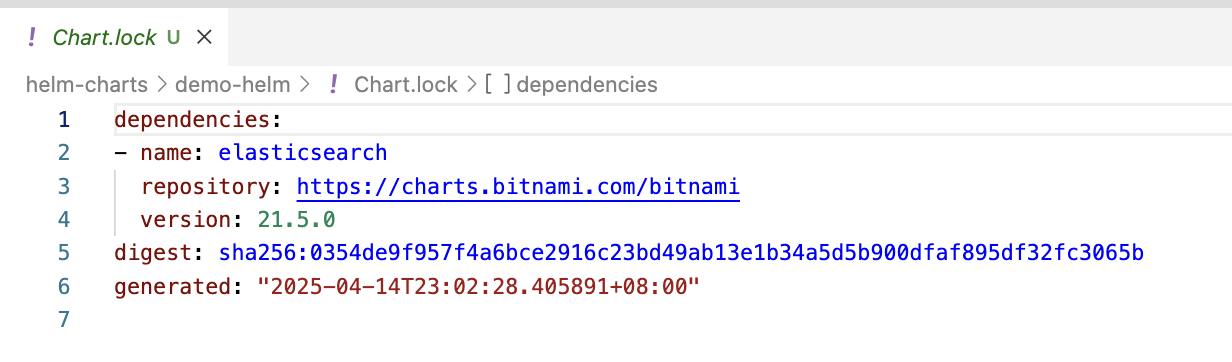
Contents in Chart.lock
If you’re familiar with Terraform, it’s similar in concept to the .terraform.lock.hcl file, which locks provider versions. While the underlying formats and ecosystems differ, both lock dependency versions to ensure stability and repeatability.
Helm charts provide a powerful, standardized way to package, configure, and deploy applications on Kubernetes. Throughout this article, we've explored what a Helm chart is, how it's structured, and how it simplifies the deployment process across different environments.
We walked through the key steps of:
helm create.values.yaml and environment-specific overrides.helm install, helm upgrade, and helm rollback.As you gain confidence working with Helm, take time to explore the vast ecosystem of public Helm charts, hosted by communities and vendors alike. These charts can accelerate your deployments and serve as valuable references for your own development.
Finally, consider contributing your charts to the community. Whether it's a custom internal tool or a well-packaged version of an open-source project, your charts can help others deploy more efficiently and consistently in the Kubernetes world.
Helm makes Kubernetes simpler—one chart at a time.
Learn more about Kubernetes with these courses!
Track
Course
Course
blog
Austin Chia
9 min
blog
Patrick Brus
15 min
blog
Josep Ferrer
11 min
Tutorial
Patrick Brus
Tutorial
Moez Ali
Tutorial
Eugenia Anello