
courses
인공 지능 이해하기
2
404K
Gemma 4 is Google DeepMind's open-weights model family, designed for both local deployment and research. It builds on the Gemma lineage with improved instruction following, longer context windows, and native multimodal input handling and is built from the same research infrastructure as Gemini 3.
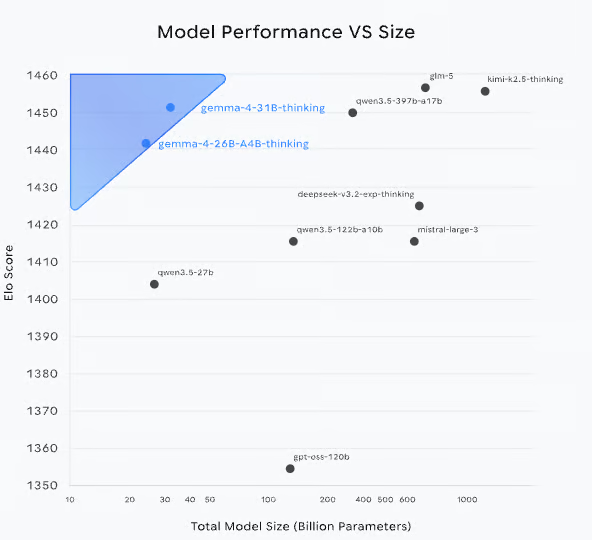
Figure: Model performance vs Size (source: Gemma 4 blog)
Models like Gemma-4-26B(MOE) and Gemma-4-31B achieve Elo scores comparable to much larger models, indicating strong performance-per-parameter. The 31B model currently ranks as 3rd open model in the world on the Arena AI text leaderboard, and the 26B model secures the 6th spot. This makes Gemma 4 particularly well-suited for local and resource-constrained deployments without sacrificing capability.
Gemma 4 is released in four versatile sizes including Effective 2B (E2B), Effective 4B (E4B), 26B Mixture of Experts (MoE), and 31B Dense models. The family splits into two distinct tiers based on deployment target:
|
Model |
Architecture |
Total Params |
Active/Effective Params |
Context Length |
Modalities |
|
Gemma-4-31B |
Dense Transformer |
31B |
31B |
256K tokens |
Text, Vision, Video |
|
Gemma-4-26B-A4B |
MoE (128 Experts) |
26B |
3.8B active |
256K tokens |
Text, Vision, Video |
|
Gemma-4-E4B |
Dense Transformer |
7.9B (with embeddings) |
4.5B effective |
128K tokens |
Text, Audio, Vision, Video |
|
Gemma-4-E2B |
Dense Transformer |
5.1B (with embeddings) |
2.3B effective |
128K tokens |
Text, Audio, Vision, Video |
Let’s dive deeper into each variant:
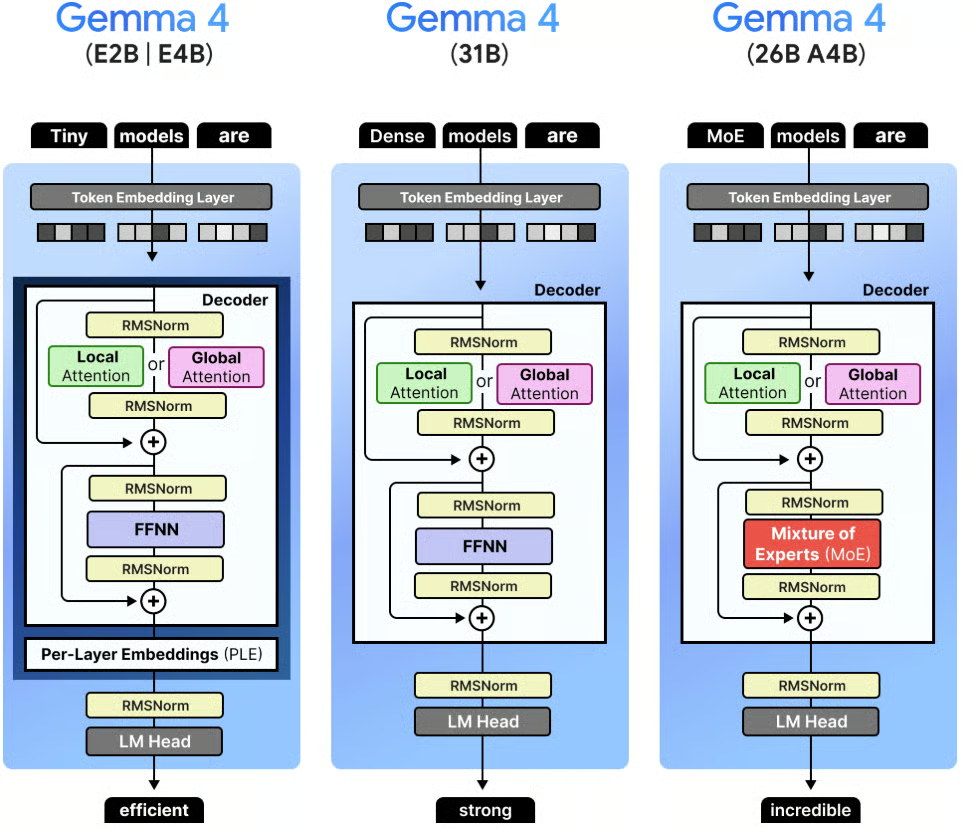
Figure: Visual Guide to Gemma 4 (source)
All four models are available under Apache 2.0 license and can be deployed locally via Ollama, vLLM, llama.cpp, or Unsloth.
For coding tasks, Gemma 4 excels at:
In this tutorial, we use the gemma4:e4b (9.6GB) variant via Ollama which is a quantized version well-suited for local inference on consumer hardware.
Ollama handles model downloading, quantization, serving and provides an OpenAI-compatible HTTP API. For this tutorial, Ollama acts as the inference backend, and our app communicates with it over localhost:11434.
To pull and run the model:
curl -fsSL https://ollama.com/install.sh | sh
ollama pull gemma4:e4b
ollama serve
The above commands installs Ollama locally using the official install script. We then download the gemma 4:e4b model variant locally for on device inference. Finally, ollama serve starts the Ollama server, enabling our app to send requests to the model.
Once the server is running, the Gradio app connects to it automatically.
In this section, we'll build the code assistant step by step. At a high level, here's what the app does:
Accepts a natural-language message in the chat panel, with optional image or file attachments
Injects the current editor code as context for the model
Sends a streaming request to Gemma 4 via Ollama's /api/chat endpoint
Optionally calls tools (code execution, math evaluation) in an agentic loop
Pushes extracted code blocks from the response into the live editor
Let's build it step by step.
The app requires a small set of libraries for the UI, image handling, and HTTP communication. Since the model runs locally through Ollama, there are no cloud SDK dependencies.
pip install gradio requests pillowIn this project, we'll use:
gradio for the split-pane editor and chat UI
requests to communicate with the Ollama HTTP API
pillow for image handling support in the UI
This keeps the environment lightweight and works on any machine running Ollama, including macOS with Apple Silicon, Linux, and Windows via WSL.
Before writing any logic, we define the imports, the model name, the Ollama base URL, supported languages, and a default system prompt. These constants control the behavior of the entire app.
import base64
import json
import math
import os
import re
import subprocess
import tempfile
from pathlib import Path
import gradio as gr
import requests

OLLAMA_BASE = "http://localhost:11434"
MODEL       = "gemma4:e4b"
LANGUAGES = [
    "python", "javascript", "typescript", "bash", "sql",
    "rust", "go", "java", "c", "cpp", "html", "css",
    "json", "yaml", "markdown", "plaintext",
]
TEXT_EXTS = {
    ".py", ".js", ".ts", ".jsx", ".tsx", ".html", ".css",
    ".json", ".yaml", ".yml", ".toml", ".md", ".txt",
    ".csv", ".sql", ".sh", ".bash", ".rs", ".go",
    ".java", ".c", ".cpp", ".h", ".hpp", ".rb", ".php",
}
IMAGE_EXTS = {".jpg", ".jpeg", ".png", ".webp", ".gif", ".bmp"}
DEFAULT_SYSTEM = """\
You are an expert coding assistant. When you write code:
- Always wrap it in a markdown code block with the language tag
- Write complete, working code — not fragments
- Briefly explain what the code does
You have a code-runner tool. Use it to validate logic when helpful.\
"""
The TEXT_EXTS and IMAGE_EXTS sets drive two different attachment behaviors. The text/code files are read and injected as context into the prompt, while image files are base64-encoded and sent in the images field for Gemma 4's vision capabilities.
The DEFAULT_SYSTEM prompt shapes the model's code generation style, specifically requesting complete code blocks with language tags, since the app parses these to push code into the editor.
The assistant can operate in an agentic mode where it calls tools during inference. We define two tools in the standard function-calling schema that Ollama supports:
TOOLS = [
    {
        "type": "function",
        "function": {
            "name": "run_code",
            "description": (
                "Execute Python code in a sandboxed subprocess and return "
                "stdout + stderr. Use this to validate, test, or demonstrate code."
            ),
            "parameters": {
                "type": "object",
                "properties": {
                    "code": {
                        "type": "string",
                        "description": "Python code to run (max ~50 lines, 5 s timeout).",
                    }
                },
                "required": ["code"],
            },
        },
    },
    {
        "type": "function",
        "function": {
            "name": "calculate",
            "description": "Evaluate a mathematical expression precisely.",
            "parameters": {
                "type": "object",
                "properties": {
                    "expression": {
                        "type": "string",
                        "description": "Python-compatible math expression, e.g. 'math.sqrt(2) * 100'",
                    }
                },
                "required": ["expression"],
            },
        },
    },
]
The above code snippet defines the run_code tool, which executes Python in a temporary file via a subprocess with a 5-second timeout and captures both stdout and stderr. This lets the model validate logic, run examples, or produce live output, not just generate static text.
However, the calculate tool evaluates math expressions in a restricted namespace using only the math module and safe built-ins. It handles cases where the model needs precise numeric results without spinning up a full Python process.
The execution layer maps tool names to their implementations. This is called during the agentic loop whenever the model returns a tool_calls block.
def _run_python(code: str) -> str:
    with tempfile.NamedTemporaryFile(mode="w", suffix=".py", delete=False) as f:
        f.write(code)
        tmp = f.name
    try:
        r = subprocess.run(
            ["python3", tmp],
            capture_output=True, text=True, timeout=5,
        )
        out = (r.stdout + r.stderr).strip()
        return out[:3000] if out else "(no output)"
    except subprocess.TimeoutExpired:
        return "⏱ Timed out (>5 s)"
    except Exception as e:
        return f"Error: {e}"
    finally:
        os.unlink(tmp)

def _calculate(expr: str) -> str:
    ns = {k: getattr(math, k) for k in dir(math) if not k.startswith("_")}
    ns.update({"abs": abs, "round": round})
    try:
        return str(eval(expr, {"__builtins__": {}}, ns))  # noqa: S307
    except Exception as e:
        return f"Error: {e}"

def execute_tool(name: str, args: dict) -> str:
    if name == "run_code":
        return _run_python(args.get("code", ""))
    if name == "calculate":
        return _calculate(args.get("expression", ""))
    return f"Unknown tool: {name}"
A few safety design choices worth noting from the tool execution stack are:
_run_python() function writes to a temp file and cleans it up, preventing leftover files even on error
Output is capped at 3,000 characters to avoid flooding the context with massive print dumps
The _calculate()function uses eval() with __builtins__ set to an empty dict, preventing any access to Python built-ins outside the explicitly allowlisted math functions
The timeout is a hard 5-second window, long enough for most validation tasks, short enough to prevent runaway processes
Before building the core chat logic, we need a few utility functions that handle file paths, image encoding, and code extraction. These helper functions are called throughout the streaming pipeline.
def encode_image(path: str) -> str | None:
    if not path:
        return None
    try:
        with open(path, "rb") as f:
            return base64.b64encode(f.read()).decode()
    except Exception:
        return None

def file_as_context(path: str) -> str | None:
    if not path:
        return None
    p = Path(path)
    if p.suffix.lower() not in TEXT_EXTS:
        return None
    try:
        content = p.read_text(encoding="utf-8", errors="replace")[:8000]
        lang = p.suffix.lstrip(".")
        return f"\n\n**Attached file — {p.name}:**\n```{lang}\n{content}\n```"
    except Exception:
        return None

def resolve_gradio_path(val) -> str | None:
    if val is None:
        return None
    if isinstance(val, Path):
        s = str(val)
        return s if s.strip() else None
    if isinstance(val, str):
        s = val.strip()
        return s if s else None
    if isinstance(val, dict):
        p = val.get("path")
        if isinstance(p, str) and p.strip():
            return p.strip()
        nested = val.get("file")
        if isinstance(nested, dict):
            np = nested.get("path")
            if isinstance(np, str) and np.strip():
                return np.strip()
        return None
    name = getattr(val, "name", None)
    if isinstance(name, str) and name.strip():
        return name.strip()
    return None

def is_image_path(path: str | None) -> bool:
    return bool(path) and Path(path).suffix.lower() in IMAGE_EXTS

def extract_last_code_block(text: str) -> tuple[str | None, str]:
    blocks = re.findall(r"```(\w*)\n(.*?)```", text, re.DOTALL)
    if blocks:
        lang, code = blocks[-1]
        return code.strip(), lang.strip() or "python"
    return None, "python"

def ollama_ok() -> bool:
    try:
        requests.get(f"{OLLAMA_BASE}/", timeout=2)
        return True
    except Exception:
        return False

def _gradio_content_to_text(content) -> str:
    if content is None:
        return ""
    if isinstance(content, str):
        return content
    if isinstance(content, list):
        parts: list[str] = []
        for block in content:
            if isinstance(block, dict):
                if block.get("type") == "text":
                    parts.append(str(block.get("text", "")))
                elif "text" in block:
                    parts.append(str(block["text"]))
            elif isinstance(block, str):
                parts.append(block)
        return "".join(parts)
    return str(content)

def _append_chat_turn(
    history: list | None, user_text: str, assistant_text: str
) -> list:
    base = list(history) if history else []
    return base + [
        {"role": "user", "content": user_text},
        {"role": "assistant", "content": assistant_text},
    ]

def run_code_btn(code: str) -> str:
    if not code.strip():
        return "Nothing to run."
    result = _run_python(code)
    return result
These utilities enable smooth handling of multimodal inputs and structured outputs:
encode_image() function: This function converts an image file into a base64 string so it can be passed to Ollama’s images field. This allows Gemma to process images alongside text for multimodal reasoning.
file_as_context() function: It reads text/code files and injects them directly into the prompt as a formatted markdown block. This avoids the need for a separate retrieval system as everything is passed inline as context.
resolve_gradio_path() function: This function normalizes different file formats returned by Gradio into a usable file path. This prevents edge-case bugs in file handling.
is_image_path() function: This is a quick check for whether a given file is an image or not. This helps to route image inputs correctly.
extract_last_code_block() function: Next, we extract the final code block from the model’s response.
ollama_ok() function: We verify that the local Ollama server is running before making requests.
_gradio_content_to_text() and _append_chat_turn() functions: We flatten Gradio’s structured message format into plain text for consistent processing and maintain chat history.
run_code_btn() function: Finally, we execute the generated code when the user hits the Run code Button in the UI using this function.
Now that we have our helper utilities in place, we can implement the core chat() function.
This function drives the entire interaction loop, from preparing inputs to streaming responses and handling tool execution.
At a high level, the chat() function:
def chat(
    message, history, image_path, file_path,
    editor_code, language, system_prompt,
    agentic, thinking, temperature,
):
The function follows the followingstep by step sequence:
We start by converting previous chatbot turns into Ollama’s message format. The system prompt is prepended to guide the model’s behavior which ensures the model has full conversational context before generating a response.
for h in history or []:
        if not isinstance(h, dict):
            continue
        role = h.get("role")
        if role not in ("user", "assistant"):
            continue
        messages.append(
            {"role": role, "content": _gradio_content_to_text(h.get("content"))}
        )
content = messageNext, we construct the current user message by injecting additional context. If the user is working with code, we append the editor contents:
if editor_code.strip() and editor_code.strip() != STARTER_CODE.strip():
    content += (
        f"\n\n**Current code in editor ({language}):**\n"
        f"```{language}\n{editor_code}\n```"
    )
Similarly, the uploaded files are added as inline context and images are base64-encoded and passed via the images field. This allows the model to reason over text, code, and images together.
The payload includes the model name, message history, streaming flag, and options as follows:
payload = {
    "model": MODEL,
    "messages": messages,
    "stream": True,
    "options": options,
}

if agentic:
    payload["tools"] = TOOLS
If thinking mode is enabled, options["think"] = True is set, which activates extended chain-of-thought reasoning in supported models.
If agentic mode is enabled, the model can return tool calls instead of text. This happens when each tool is executed and results are appended to the conversation. Then, a follow-up request is sent to continue generation.
if agentic and msg.get("tool_calls"):
    for tc in msg["tool_calls"]:
        fn_name = tc["function"]["name"]
        fn_args = tc["function"]["arguments"]
        result = execute_tool(fn_name, fn_args)
        if fn_name == "run_code" and fn_args.get("code"):
            new_code = fn_args["code"]
        messages.append(msg)
        messages.append({"role": "tool", "content": result})
    resp2 = requests.post(f"{OLLAMA_BASE}/api/chat", ...)
This creates a single-turn agentic loop where the model calls a tool, sees the result, and then continues generating the final response. Tool call logs are prepended to the chat for user.
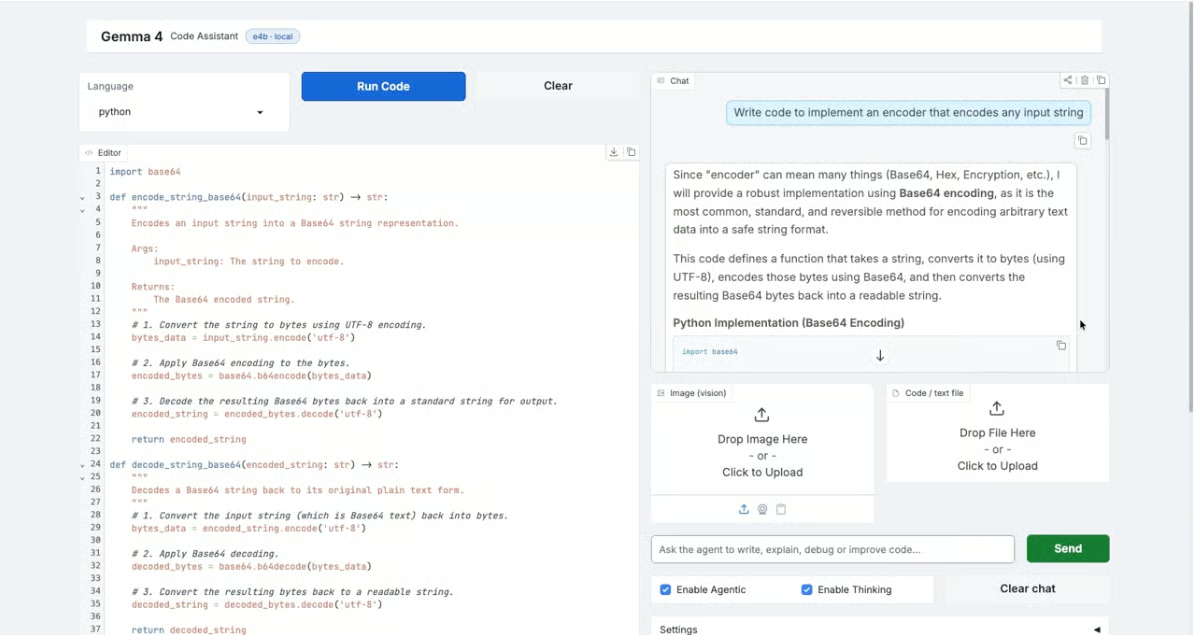
Finally, once streaming completes, we extract the last code block from the response:
extracted, _ = extract_last_code_block(full_response)

if extracted:
    new_code = extracted
So overall, the model generates code, the editor updates automatically and no manual copy-pasting is required.
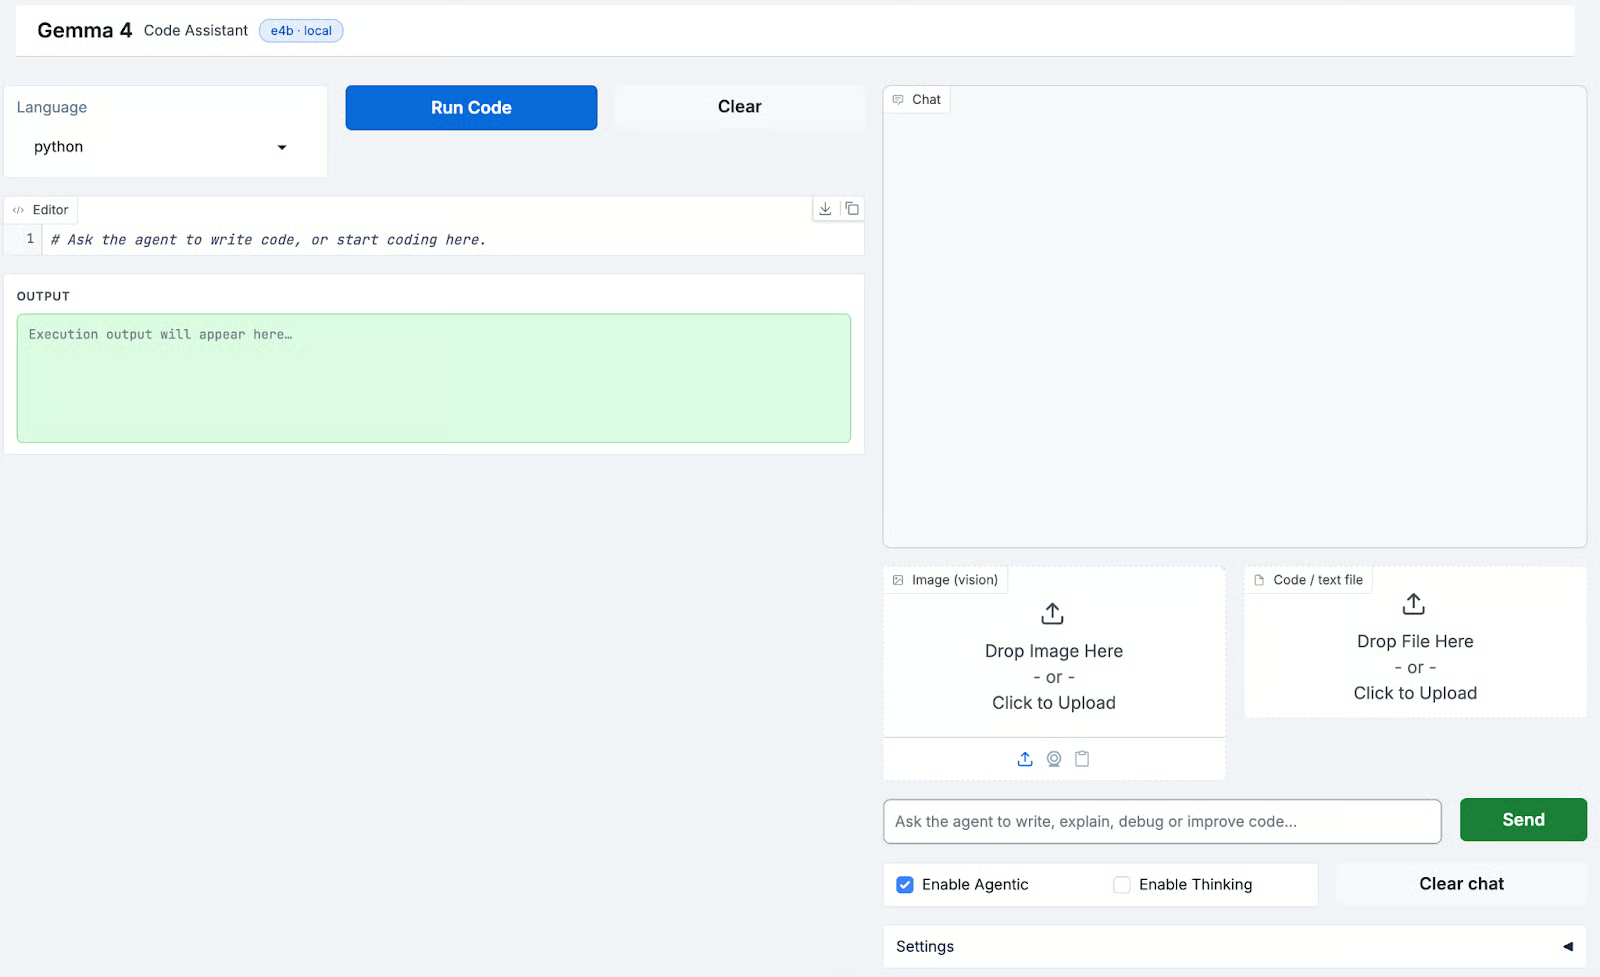
With the core logic in place, we now design the user interface using Gradio. The goal is to create a layout that supports both coding workflows and AI-assisted interaction side by side.
We use gr.Blocks to define a two-column layout:
with gr.Blocks(title="Gemma 4 · Code Assistant") as demo:
    with gr.Row(equal_height=False):
        # LEFT: Code Editor
        with gr.Column(scale=11):
            with gr.Row():
                lang_sel = gr.Dropdown(choices=LANGUAGES, value="python", label="Language")
                run_btn  = gr.Button("Run Code", elem_classes=["run-btn"])
                clear_ed = gr.Button("Clear")
            code_editor = gr.Code(
                value=STARTER_CODE,
                language="python",
                label="Editor",
                lines=24,
                interactive=True,
            )
            run_output = gr.Textbox(
                label="Output",
                lines=6,
                interactive=False,
                elem_id="run-output",
            )
        # RIGHT: Chat
        with gr.Column(scale=9):
            chatbot = gr.Chatbot(value=[], elem_id="chatbot", height=430)
            with gr.Row():
                image_upload = gr.Image(label="Image (vision)", type="filepath")
                file_upload  = gr.File(label="Code / text file")
            with gr.Row():
                msg_input = gr.Textbox(placeholder="Ask the agent...", scale=6)
                send_btn  = gr.Button("Send", variant="primary")
            with gr.Row():
                agentic_cb  = gr.Checkbox(label="Enable Agentic", value=True)
                thinking_cb = gr.Checkbox(label="Enable Thinking", value=False)
                clear_chat  = gr.Button("Clear chat")
            with gr.Accordion("Settings", open=False):
                sys_prompt  = gr.Textbox(value=DEFAULT_SYSTEM, label="System prompt")
                temperature = gr.Slider(minimum=0.0, maximum=2.0, value=0.7)
Let’s understand how UI works together with all components we described above:
The send and submit events share the same inputs and outputs, so both the button click and pressing Enter in the text box trigger identical behavior:
_inputs = [
    msg_input, chatbot, image_upload, file_upload,
    code_editor, lang_sel,
    sys_prompt, agentic_cb, thinking_cb, temperature,
]
_outputs = [chatbot, code_editor, msg_input]
send_btn.click(fn=respond, inputs=_inputs, outputs=_outputs)
msg_input.submit(fn=respond, inputs=_inputs, outputs=_outputs)
The respond() wrapper here resolves Gradio file path objects into plain file path strings before passing them into the streaming generator. It then yields (history, code, "") on every chunk so that the empty string clears the message input on the first yield.
To improve usability and visual consistency, we add a custom theme and CSS layer on top of Gradio’s default styling. This gives the app a polished, GitHub-inspired look with support for both light and dark modes. This is completely optional.
We start by defining a base theme using gr.themes.Base:
THEME = gr.themes.Base(
    primary_hue   = "blue",
    secondary_hue = "slate",
    neutral_hue   = "slate",
    font      = [gr.themes.GoogleFont("Inter"), "system-ui", "sans-serif"],
    font_mono = [gr.themes.GoogleFont("JetBrains Mono"), "monospace"],
)
This sets a consistent color palette and clean UI typography (Inter) with a developer-friendly monospace font (JetBrains Mono). Next, we override key CSS variables to control the app’s appearance:
gradio-app {
    --body-background-fill:   #f0f3f7;
    --block-background-fill:  #ffffff;
    --body-text-color:        #1f2328;
    --button-primary-background-fill: #1a7f37;
}

body.dark gradio-app {
    --body-background-fill:   #0d1117;
    --block-background-fill:  #1c2128;
    --body-text-color:        #e6edf3;
    --button-primary-background-fill: #238636;
}
Here, the first block defines the light theme, while the second block overrides values for dark mode. While this step is optional, adding custom theming and CSS significantly improves the overall user experience.
With the UI now fully structured and styled, we’re ready for the final step i.e, launching the application.
Finally, the app is launched with:
if __name__ == "__main__":
    print(f"Model  : {MODEL}")
    print(f"Ollama : {OLLAMA_BASE}")
    if not ollama_ok():
        print("Ollama not detected — run ollama serve before chatting")
    demo.launch(
        server_name="0.0.0.0",
        server_port=7860,
        share=False,
        theme=THEME,
        css=CSS,
    )
Here, server_name="0.0.0.0" makes the app accessible on your local network and setting share=False keeps everything local. The ollama_ok() check fires a quick GET request to localhost:11434 and warns on startup if Ollama isn't running, rather than surfacing the error only when the user first sends a message.
Finally, navigate to http://localhost:7860 once the app is running.
Here's the full execution flow from a user's perspective:
The user types a message in the chat panel, optionally uploading an image or code file and toggling agentic/thinking mode
On submit, the respond() function builds the full Ollama request, including the editor's current code and any attachments as context
The request streams token by token and partial responses are yielded to the Gradio chatbot for live rendering
If agentic mode is on and the model decides to call a tool, the tool runs locally, results are appended to the conversation, and a follow-up request streams the final answer
After streaming completes, the last fenced code block in the response is extracted and pushed to the editor automatically
In this tutorial, we built a fully local AI coding assistant using Gemma 4, Ollama, and Gradio. The app supports multimodal input, real tool use, streaming responses, and a live code editor, all running on your own machine without any external API.
The whole-context approach of injecting the editor's code directly into every prompt is simpler than RAG for a single-file workflow and works particularly well for tasks like explaining, refactoring, or extending code you're actively editing.
From here, you could extend the project in several directions:
Learn with DataCamp
courses
courses
courses
tutorials
François Aubry
tutorials
Aashi Dutt
tutorials
Aashi Dutt
tutorials
Aashi Dutt
tutorials
Aashi Dutt
tutorials
Aashi Dutt