Curso
Being able to query the relational database systems is a must-have skill for a data scientist. SQL or Structured Query Language lets you do this in a very efficient way. SQL not only enables you to you ask meaningful questions to the data but also allows you to you play with the data in many different ways. Without databases, practically no real-world application is possible. So, the knowledge of databases and being able to handle them are crucial parts of a data scientist's toolbox.
Quick fact: SQL is also called SE-QU-EL. It has got some historical significance - the initial name of SQL was Simple English Query Language.
Generally, relational databases look like the following -
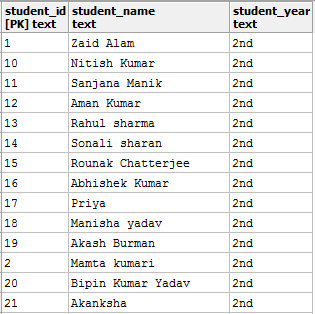
Relations are also called tables. There are a number of ways in which databases can be represented. This is just one of them and the most popular one.
This tutorial introduces the four most common operations performed with SQL, and they are Create, Read, Update and Delete. Collectively these four operations are often referred to as CRUD. In any application that involves user interaction when these four operations are always there.
You will be using PostgreSQL as the relational database management system. PostgreSQL is very light-weight, and it is free as well. In this tutorial, you will -
- Get up and Running with PostgreSQL
- Connect to a PostgreSQL database
- Create, read, update and delete tables in that database
- Run SQL on Jupyter Notebook
- Run SQL in Python
Let's get started.
Getting up and Running with PostgreSQL
PostgreSQL is a light-weight and an open source RDBMS. It is extremely well accepted by the industry. You can learn more about PostgreSQL from its official website.
To be able to start writing and executing queries in PostgreSQL, you will need it installed on your machine. Installing it is extremely easy. The following two short videos show you how PostgreSQL can be downloaded and installed on a 32-bit Windows-7 machine:
Note: While you are installing PostgreSQL take note of the password and port number that you are entering.
Once you have installed PostgreSQL successfully on your machine, open up pgAdmin. pgAdmin is a handy utility which comes with the PostgreSQL installation, and it lets you do regular database related tasks through a nice graphical interface. pgAdmin's interface looks like -
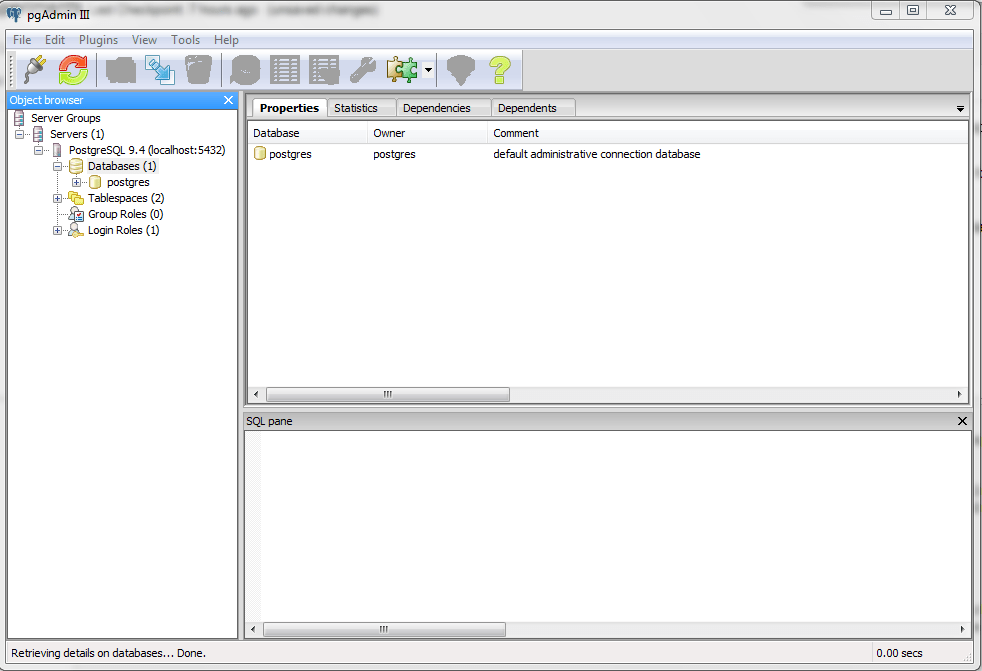
When you open up pgAdmin, you will see a server named "PostgreSQL 9.4 (localhost:5432)" enlisted in the interface -

Note: Your version may be different than the above and so the port number (5432).
Connect to the server by entering the password that you gave during the installation. For reference - https://www.loom.com/share/71708f6a99ee483a977991e9e8a25808.
Once you have successfully connected to the local database server, you will get an interface similar to the following -
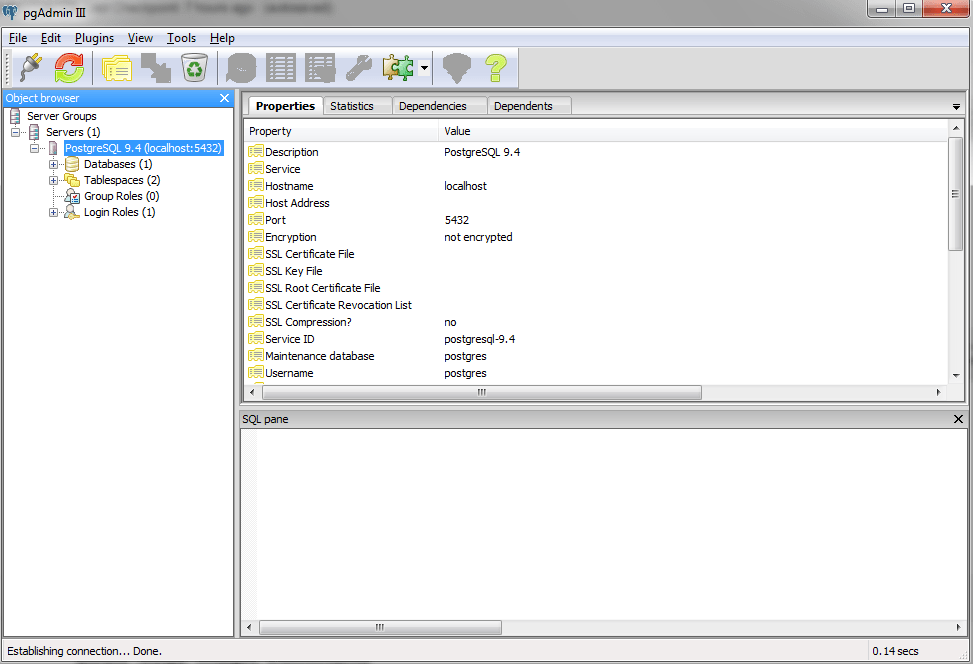
Your first task will be to create a database, and you can do so by right-clicking on the Databases tab and then selecting New Database from the drop-down options. Let's create a database named DataCamp_Courses. Once the database is created, you can proceed with the next sections of this tutorial.
CRUD Operations in PostgreSQL
Creating a table according to a given specification -
To be able to operate on a database you will need a table. So let's go ahead and create a simple table (also called relation) called datacamp_courses with the following specification (schema) -
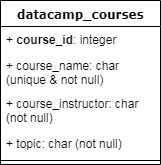
The specification gives us quite a few information on the columns of the table -
- The primary key of the table should be course_id (note that only this one is bold) and its data-type should be an integer. A primary key is a constraint which enforces the column values to be non-null and unique. It lets you uniquely identify a specific or a set of instanced present in the table.
- Rest of the information in the specification should be easy to interpret now.
To create a table, right-click on the newly created database DataCamp_Courses and select CREATE Script from the options. You should get something similar to the following -
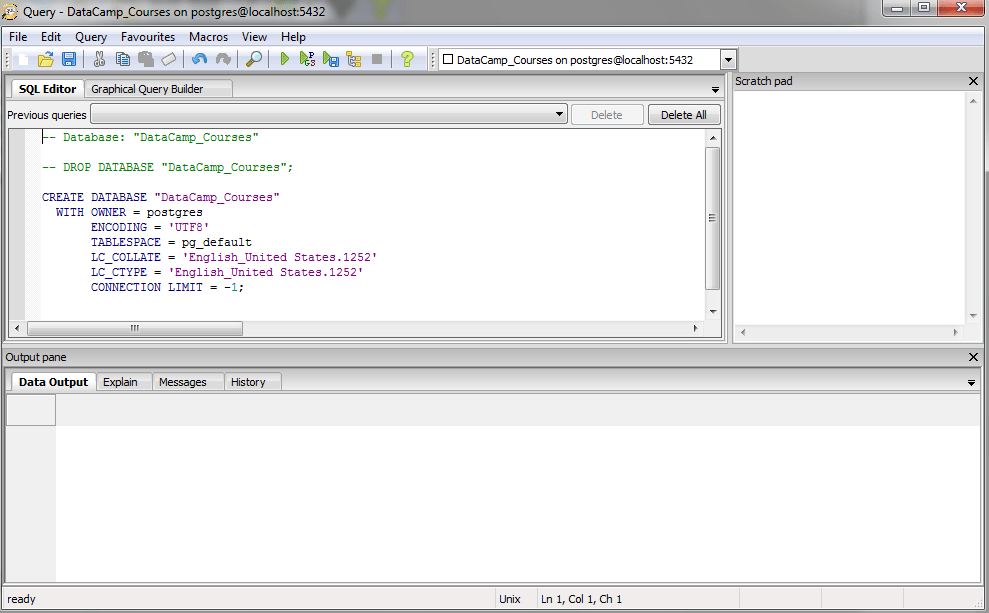
Let's execute the following query now -
CREATE TABLE datacamp_courses(
 course_id SERIAL PRIMARY KEY,
 course_name VARCHAR (50) UNIQUE NOT NULL,
 course_instructor VARCHAR (100) NOT NULL,
 topic VARCHAR (20) NOT NULL
);
For executing the query just select it and click the execute button from the menu bar -

The output should be -

The general structure of a table creation query in PostgreSQL looks like -
CREATE TABLE table_name (
 column_name TYPE column_constraint,
 table_constraint table_constraint
)
We did not specify any table_constraints while creating the table. That can be avoided for now. Everything else is quite readable except for the keyword SERIAL. Serial in PostgreSQL lets you create an auto-increment column. By default, it creates values of type integer. Serial frees us from the burden of remembering the last inserted/updated primary key of a table, and it is a good practice to use auto-increments for primary keys. You can learn more about serial from here.
Inserting some records to the newly created table -
In this step, you will insert some records to the table. Your records should contain -
- A course name
- Instructor's name of the course
- Course topic
The values for the column course_id will be handled by PostgreSQL itself. The general structure of an insert query in PostgreSQL looks like -
INSERT INTO table(column1, column2, …)
VALUES
 (value1, value2, …);
Let's insert some records -
INSERT INTO datacamp_courses(course_name, course_instructor, topic)
VALUES('Deep Learning in Python','Dan Becker','Python');

INSERT INTO datacamp_courses(course_name, course_instructor, topic)
VALUES('Joining Data in PostgreSQL','Chester Ismay','SQL');
Note that you did not specify the primary keys explicitly. You will see its effects in a moment.
When you execute the above two queries, you should get the following result upon successful insertions -
Query returned successfully: one row affected, 11 ms execution time.
Reading/viewing the data from the table -
This is probably something you will do a lot in your data science journey. For now, let's see how is the table datacamp_courses holding up.
This is generally called a select query, and the generic structure of a select query looks like -
SELECT
 column_1,
 column_2,
 ...
FROM
 table_name;
Let's select all the columns from the table datacamp_courses
SELECT * FROM datacamp_courses;
And you get -

Note the primary keys now. If you want to just see the names of the courses you can do so by -
SELECT course_name from datacamp_courses;
And you get -

You can specify as many column names as possible which you may want to see in your results provided they exist in the table. If you run select course_name, number_particpants from datacamp_courses; you will run into error as the column number_particpants does exist in the table. You will now see how you can update a specific record in the table.
Updating a record in the table -
The general structure of an update query in SQL looks like the following:
UPDATE table
SET column1 = value1,
    column2 = value2 ,...
WHERE
 condition;
You are going to update the record where course_instructor = "Chester Ismay" and set the course_name to "Joining Data in SQL". You will then verify if the record is updated. The query for doing this would be -
UPDATE datacamp_courses SET course_name = 'Joining Data in SQL'
WHERE course_instructor = 'Chester Ismay';
Let's see if your update query had the intended effect by running a select query -

You can see your update query performed exactly in the way you wanted. You will now see how you can delete a record from the table.
Deleting a record in the table -
The general structure of a delete query in SQL looks like following:
DELETE FROM table
WHERE condition;
You are going to delete the record where course_name = "Deep Learning in Python" and then verify if the record is deleted. Following the structure, you can see that the following query should be able to do this -
DELETE from datacamp_courses
WHERE course_name = 'Deep Learning in Python';
Keep in mind that the keywords are not case-sensitive in SQL, but the data is case-sensitive. This is why you see a mixture of upper case and lower case in the queries.
Let's see if the intended record was deleted from the table or not -

And yes, it indeed deleted the intended record.
The generic structures of the queries as mentioned in the tutorial are referred from PostgreSQL Tutorial.
You now know how to basic CRUD queries in SQL. Some of you may use Jupyter Notebooks heavily and may be thinking it would be great if there were an option to execute these queries directly from Jupyter Notebook. In the next section, you will see how you can achieve this.
SQL + Jupyter Notebooks
To be able to run SQL queries from Jupyter Notebooks the first step will be to install the ipython-sql package.
If it is not installed, install it using:
pip install ipython-sql
Once this is done, load the sql extension in your Jupyter Notebook by executing -
%load_ext sql
The next step will be to connect to a PostgreSQL database. You will connect to the database that you created - DataCamp_Courses.
For being able to connect to a database that is already created in your system, you will have to instruct Python to detect its dialect. In simpler terms, you will have to tell Python that it is a PostgreSQL database. For that, you will need psycopg2 which can be installed using:
pip install psycopg2
Once you installed psycopg connect to the database using -
%sql postgresql://postgres:postgres@localhost:5432/DataCamp_Courses
'Connected: postgres@DataCamp_Courses'Note the usage of %sql. This is a magic command. It lets you execute SQL statements from Jupyter Notebook. What follows %sql is called a database connection URL where you specify -
- Dialect (postgres)
- Username (postgres)
- Password (postgres)
- Server address (localhost)
- Port number (5432)
- Database name (DaaCamp_Courses)
You can now perform everything from you Jupyter Notebook that you performed in the pgAdmin interface. Let's start by creating the table _datacampcourses with the exact same schema.
But before doing that you will have to drop the table as SQL won't let you store two tables with the same name. You can drop a table by -
%sql DROP table datacamp_courses;
 * postgresql://postgres:***@localhost:5432/DataCamp_Courses
Done.


[]
The table _datacampcourses is now deleted from PostgreSQL and hence you can create a new table with this name.
%%sql
CREATE TABLE datacamp_courses(
 course_id SERIAL PRIMARY KEY,
 course_name VARCHAR (50) UNIQUE NOT NULL,
 course_instructor VARCHAR (100) NOT NULL,
 topic VARCHAR (20) NOT NULL
);
 * postgresql://postgres:***@localhost:5432/DataCamp_Courses
Done.


[]
Note the usage of
%sql%%sqlhere. For executing a single line of query, you can use%sql, but if you want to execute multiple queries in one go, you will have to use%%sql.
Let's insert some records -
%%sql
INSERT INTO datacamp_courses(course_name, course_instructor, topic)
VALUES('Deep Learning in Python','Dan Becker','Python');
INSERT INTO datacamp_courses(course_name, course_instructor, topic)
VALUES('Joining Data in PostgreSQL','Chester Ismay','SQL');
 * postgresql://postgres:***@localhost:5432/DataCamp_Courses
1 rows affected.
1 rows affected.


[]
View the table to make sure the insertions were done as expected -
%%sql
select * from datacamp_courses;
 * postgresql://postgres:***@localhost:5432/DataCamp_Courses
2 rows affected. | course_id | course_name | course_instructor | topic |
|---|---|---|---|
| 1 | Deep Learning in Python | Dan Becker | Python |
| 2 | Joining Data in PostgreSQL | Chester Ismay | SQL |
Let's maintain the flow. As the next step, you will update a record in the table -
%sql update datacamp_courses set course_name = 'Joining Data in SQL' where course_instructor = 'Chester Ismay';
 * postgresql://postgres:***@localhost:5432/DataCamp_Courses
1 rows affected.


[]
Pay close attention when you are dealing with strings in SQL. Unlike traditional programming languages, the strings values need to be wrapped using single quotes.
Let's now verify if your update query had the intended effect -
%%sql
select * from datacamp_courses;
 * postgresql://postgres:***@localhost:5432/DataCamp_Courses
2 rows affected. | course_id | course_name | course_instructor | topic |
|---|---|---|---|
| 1 | Deep Learning in Python | Dan Becker | Python |
| 2 | Joining Data in SQL | Chester Ismay | SQL |
Let's now delete a record and verify -
%%sql
delete from datacamp_courses where course_name = 'Deep Learning in Python';
 * postgresql://postgres:***@localhost:5432/DataCamp_Courses
1 rows affected.


[]
%%sql
select * from datacamp_courses;
 * postgresql://postgres:***@localhost:5432/DataCamp_Courses
1 rows affected. | course_id | course_name | course_instructor | topic |
|---|---|---|---|
| 2 | Joining Data in SQL | Chester Ismay | SQL |
By now you have a clear idea of executing CRUD operations in PostgreSQL and how you can perform them via Jupyter Notebook. If you are familiar with Python and if you interested in accessing your database through your Python code you can also do it. The next section is all about that.
Getting Started with SQLAlchemy and Combining it with SQL Magic Commands
For this section, you will need the SQLAlchemy package. It comes with the Anaconda distribution generally. You can also pip-install it. Once you have it installed, you can import it by -
import sqlalchemy
To able to interact with your databases using SQLAlchemy you will need to create an engine for the respective RDBMS where your databases are stored. In your case, it is PostgreSQL. SQLAlchemy lets you create an engine of the RDBMS in just a single call of create_engine(), and the method takes a database connection URL which you have seen before.
from sqlalchemy import create_engine
engine = create_engine('postgresql://postgres:postgres@localhost:5432/DataCamp_Courses')
print(engine.table_names()) # Lets you see the names of the tables present in the database
['datacamp_courses']You can see the table named _datacampcourses which further confirms that you were successful in creating the engine. Let's execute a simple select query to see the records of the table _datacampcourses and store it in a pandas DataFrame object.
You will use the read_sql() method (provided by pandas) which takes a SQL query string and an engine.
import pandas as pd

df = pd.read_sql('select * from datacamp_courses', engine)
df.head()
| course_id | course_name | course_instructor | topic | |
|---|---|---|---|---|
| 0 | 2 | Joining Data in SQL | Chester Ismay | SQL |
You can also pair up the %sql magic command within your Python code.
df_new = %sql select * from datacamp_courses
df_new.DataFrame().head()
 * postgresql://postgres:***@localhost:5432/DataCamp_Courses
1 rows affected. | course_id | course_name | course_instructor | topic | |
|---|---|---|---|---|
| 0 | 2 | Joining Data in SQL | Chester Ismay | SQL |
You came a long way!
Congrats and pat your back for yourself! In this tutorial, you not only got yourself started with PostgreSQL, but also you saw how you can execute SQL queries in several ways. As a next step, you should watch this webinar by David Robinson (Chief Data Scientist at DataCamp) where he shows how he uses SQL in his daily tasks. Check out our How to Install PostgreSQL on Windows and Mac OS X tutorial. If you want to improve your SQL skills, the following are some very good resources to start with -
