Curso
Manipulación de datos en SQL
4 h
324.2K
DataCamp Workspace builds on Jupyter notebooks, optimizing the experience to make you more productive.
One common pain point data analysts and data scientists have is that it can be tricky to get a Jupyter notebook hooked up to a database to start working. The problem can be even more acute for beginners: how can you learn to write SQL if you can't even connect to a database?
Workspace makes it effortless to write SQL - whether you are practicing your skills or working. This tutorial shows you how to get writing SQL in Workspace in seconds.
This tutorial assumes that you've used SQL before. If you haven't, read our SQL Tutorial for Beginners first, then try the examples from that tutorial in Workspace using the techniques shown here!
To use Workspace, you'll need to sign up to DataCamp. (A free account is fine to get started.)
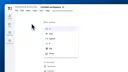
Once you have your account, use the top navigation bar to go to Workspace.

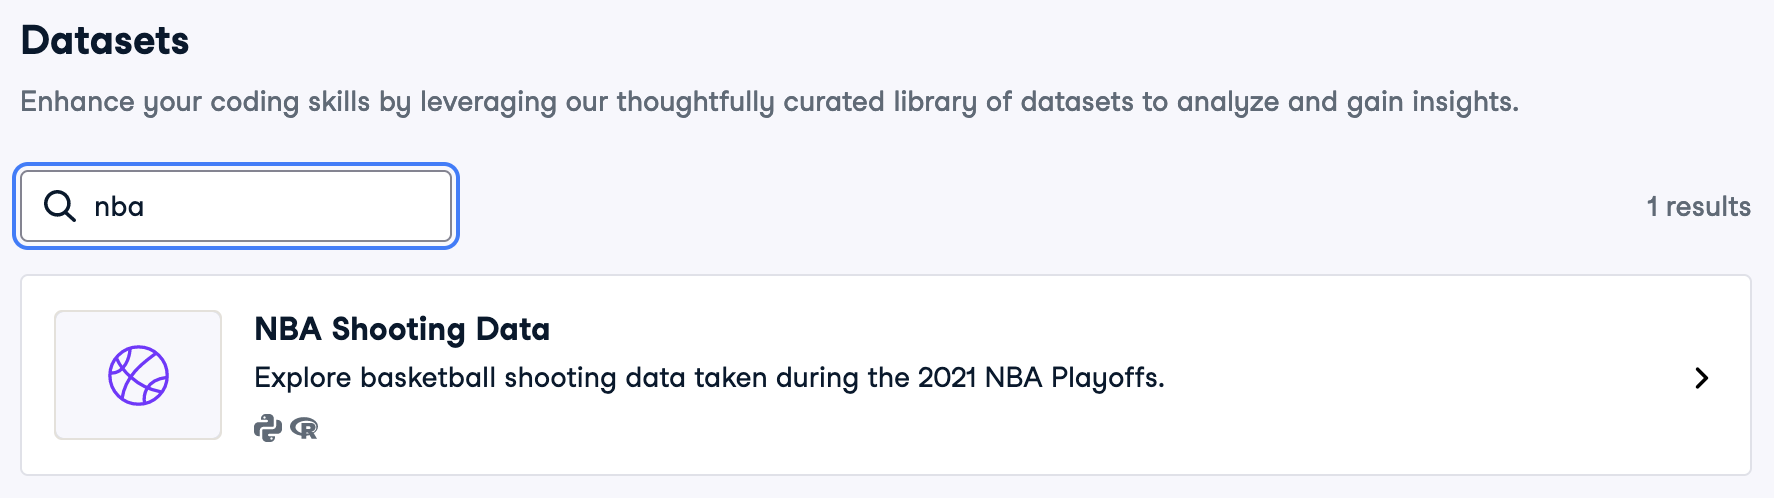
This tutorial will use the built-in NBA Shooting Data dataset. If you prefer to use your own dataset, skip to the section below.
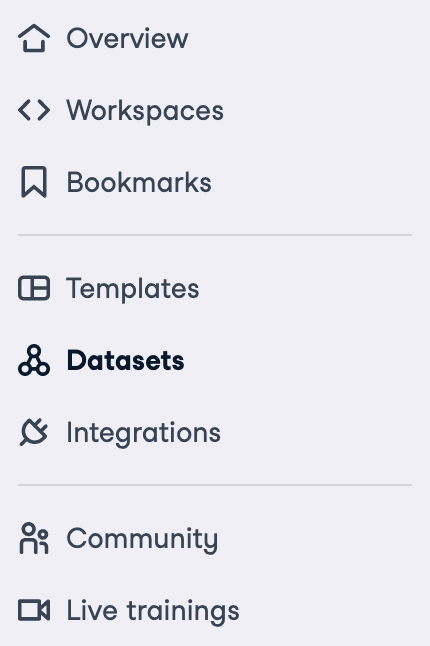
Use the left-hand navigation to go to the Datasets page.
Type "nba" into the search box and click on the dataset.
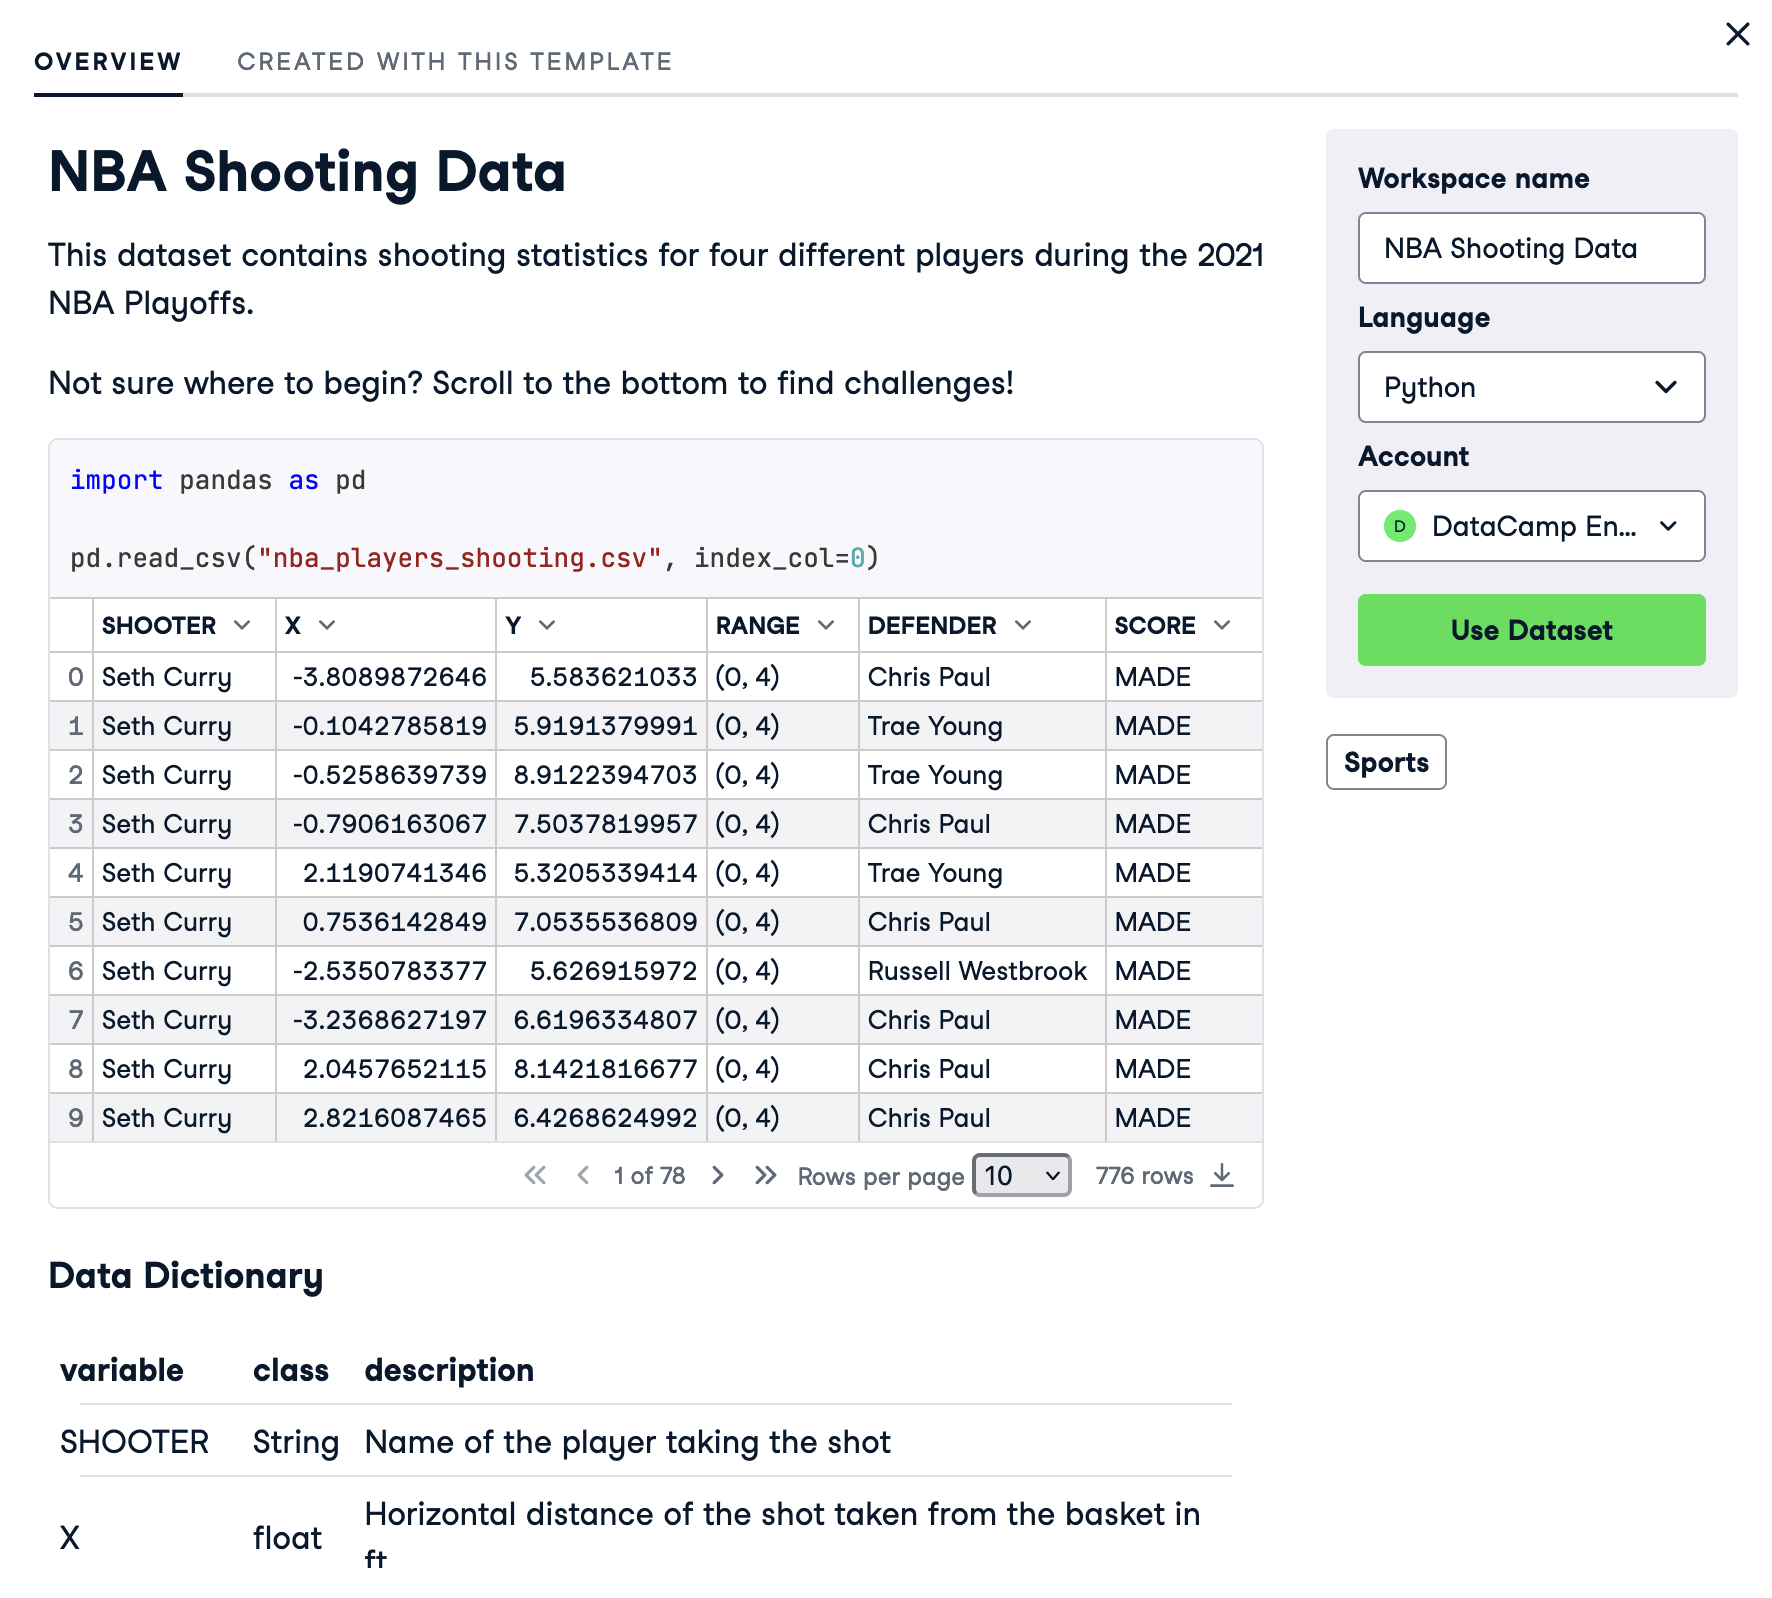
You'll see a preview of the dataset. Read through it, then click "Use Dataset".
You can use SQL to analyze any table-like data in Workspace. Currently, CSV files are best supported, so for learning purposes, if you supply your own dataset, it is recommended to use a CSV file.
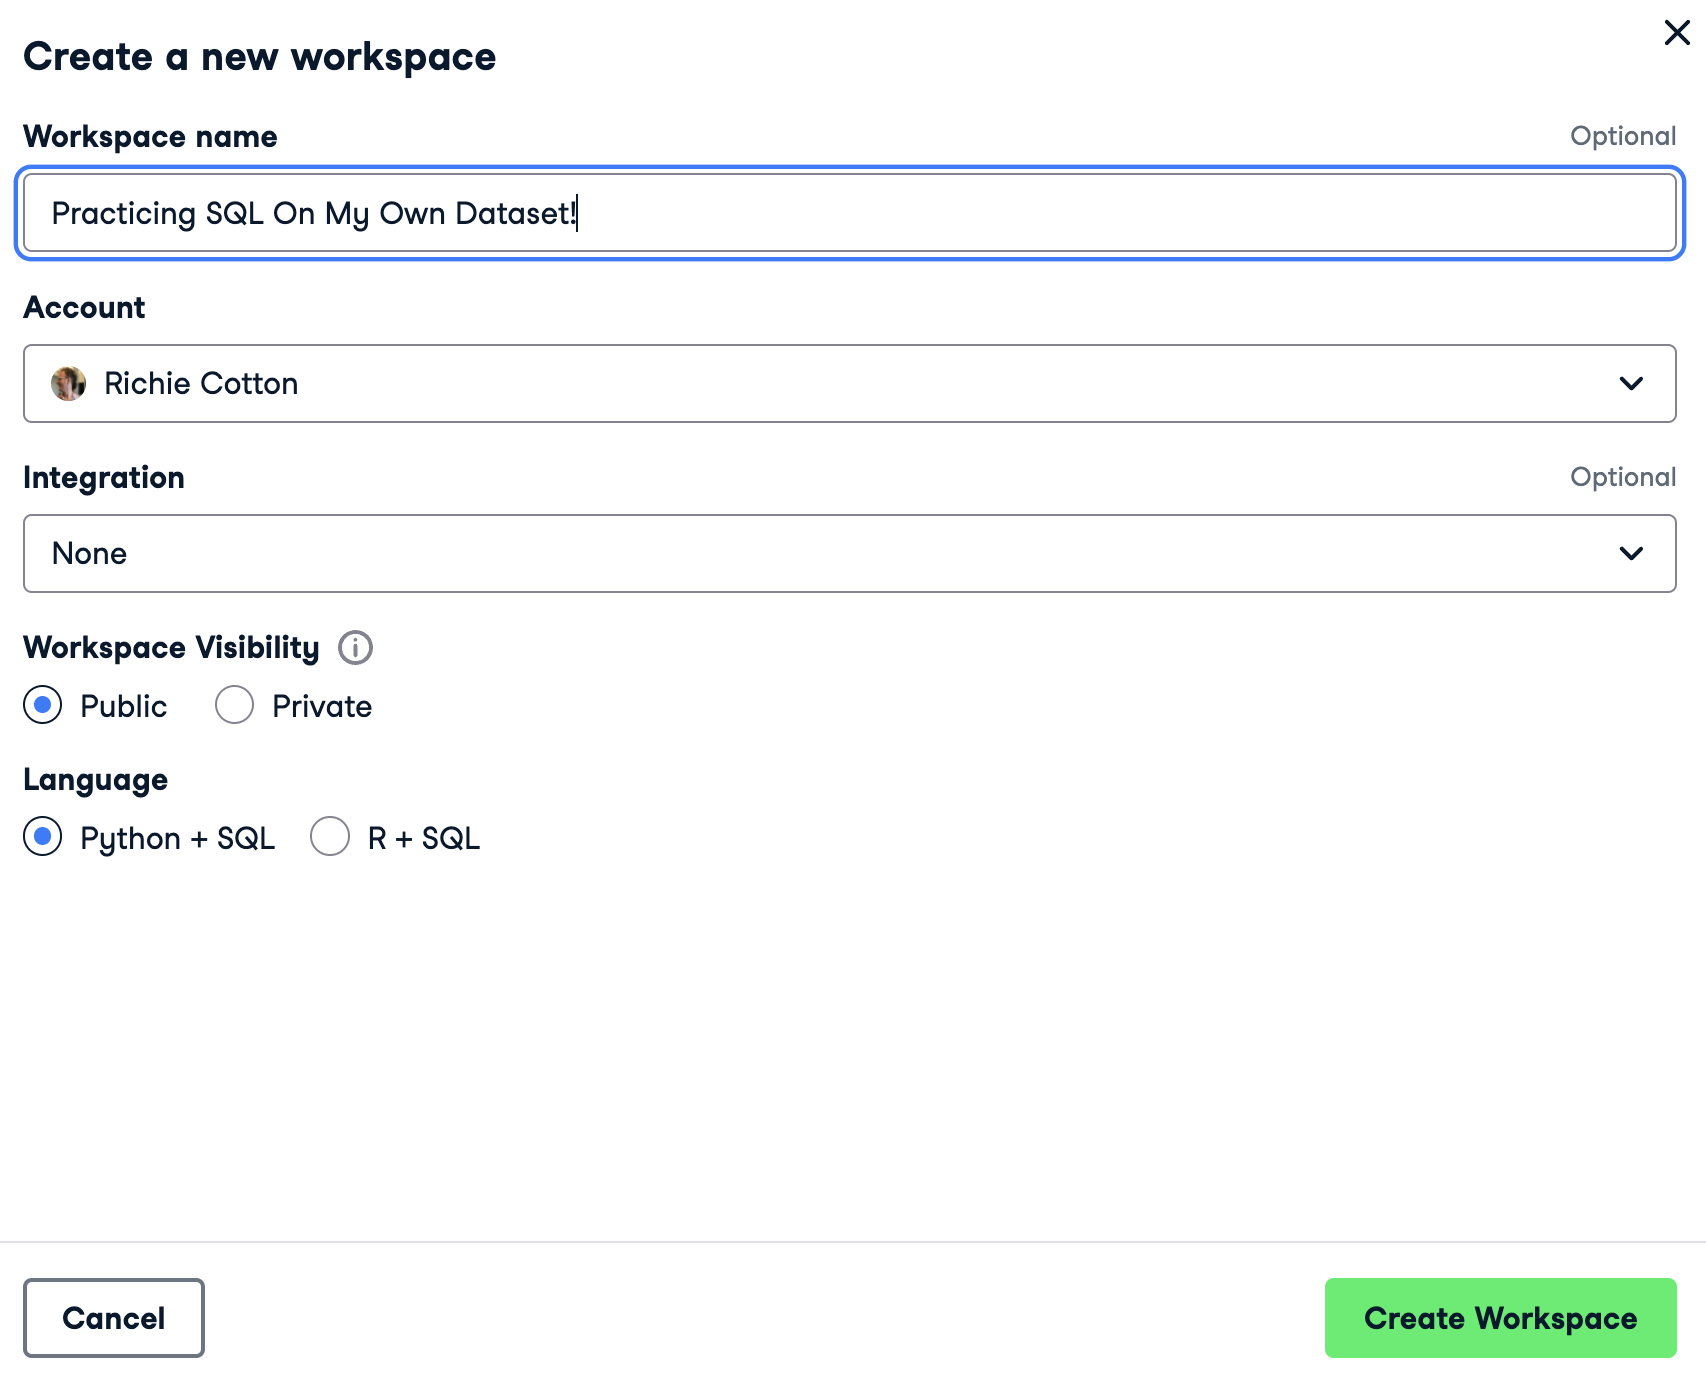
From the Overview page, click "Empty" to create an empty workspace.

Give your workspace a name, then click "Create Workspace."
In the left-hand toolbar, open the Files tool.
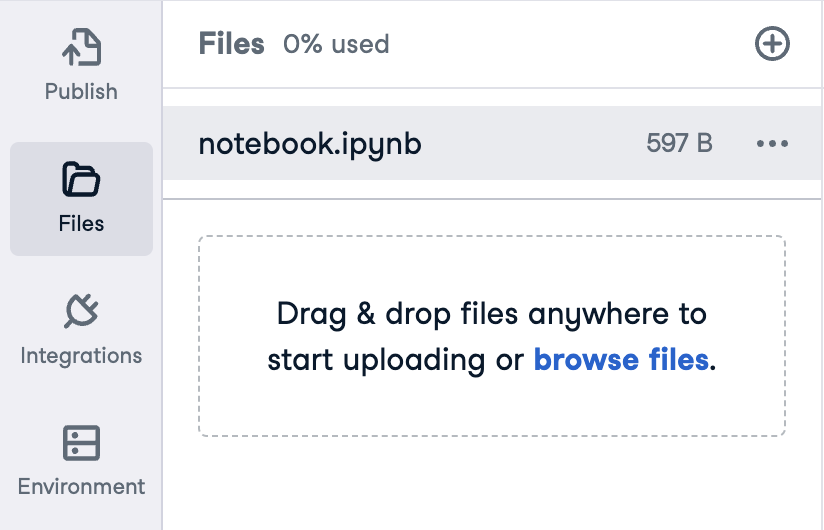
In the top-left of the tool, drag a data file into the file pane to upload it. (You can also click "browse files" or click the ⊕ button then Upload).
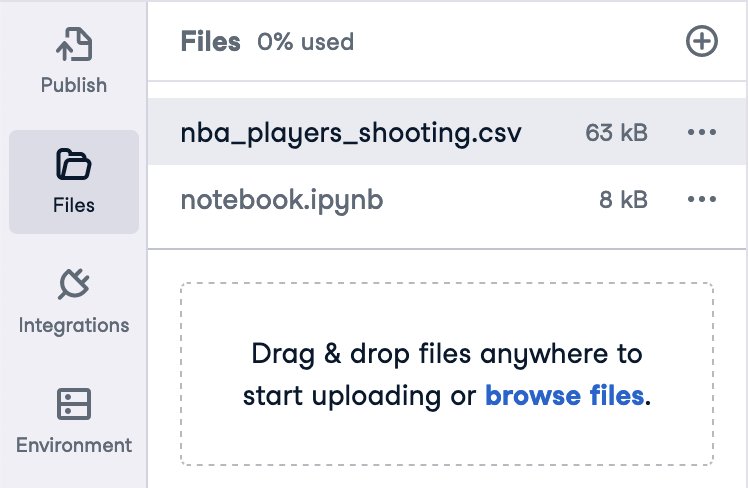
The NBA shooting data is in the nba_players_shooting.csv file. In the left-hand toolbar, open the Files tool to see the file.
The notebook in the workspace contains some Python code to import the dataset. However, in this case, we want to use SQL.
At the end of the notebook, click 'Add SQL.'

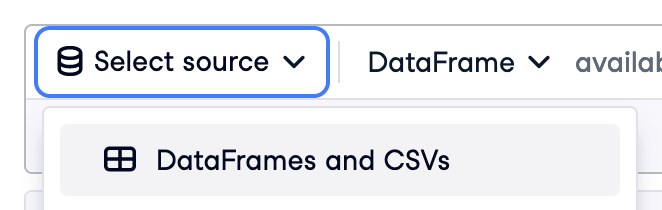
In the "Select source" dropdown, select "DataFrames and CSVs."
To write a SQL query against a CSV file, only one change to standard SQL is required. In the FROM clause, instead of naming the table, write the path to the CSV file in single quotes.
Let's calculate the proportion of shots made for each shooter, ordered from best to worst. In the SQL cell, type the following code.
SELECT
	shooter,
	SUM((SCORE = 'MADE')::DOUBLE) / COUNT(*) AS prop_score_made
	FROM 'nba_players_shooting.csv'
	GROUP BY shooter
	ORDER BY prop_score_made DESC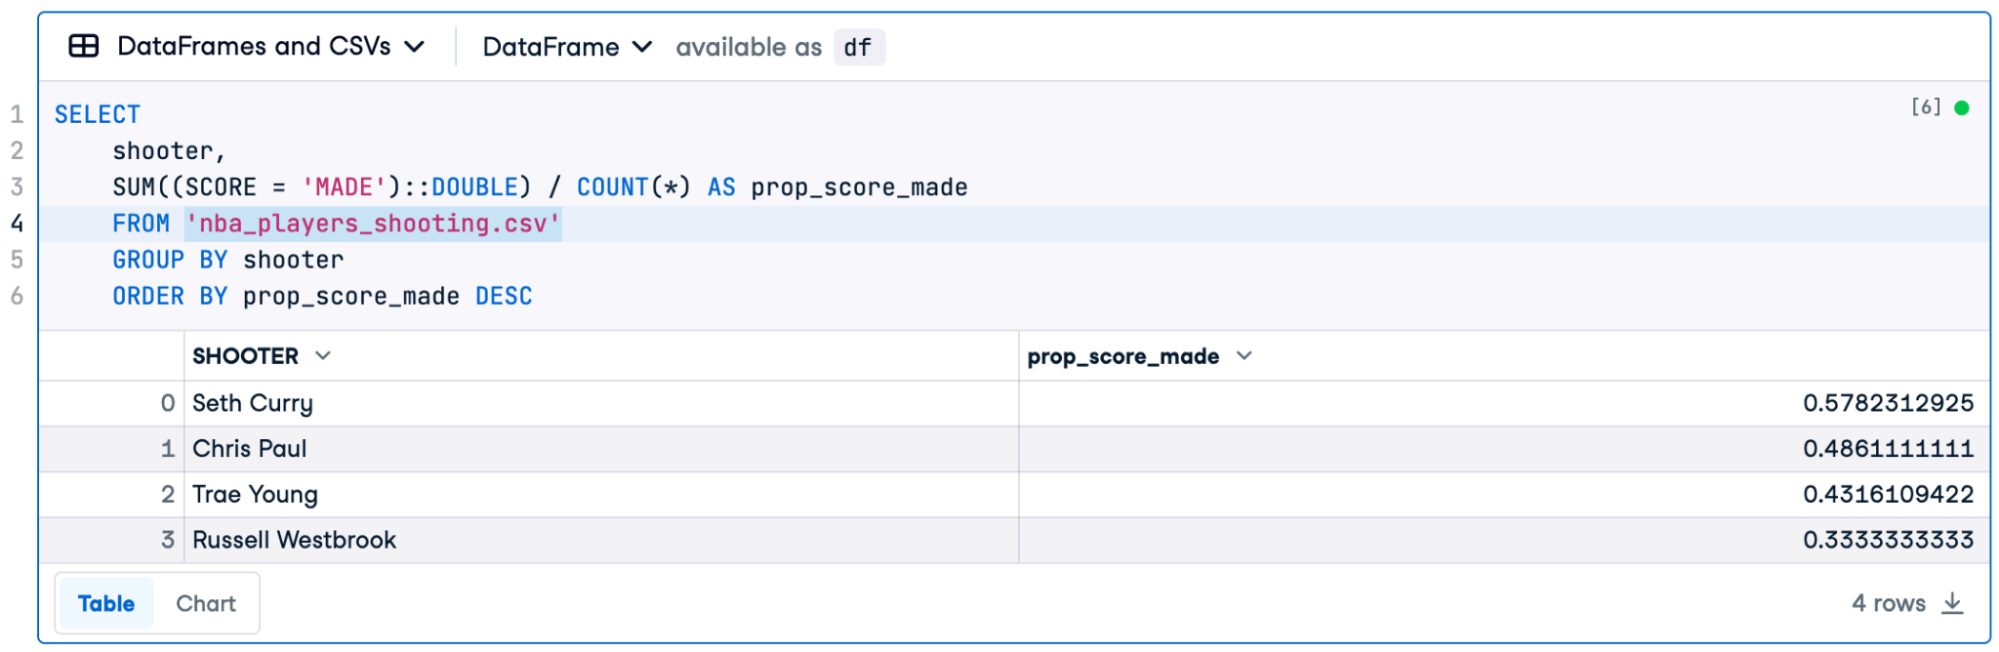
Note that the dialect of SQL used when you are working with a CSV file is DuckDB. Read more about this in DuckDB makes SQL a first-class citizen on DataCamp Workspace.
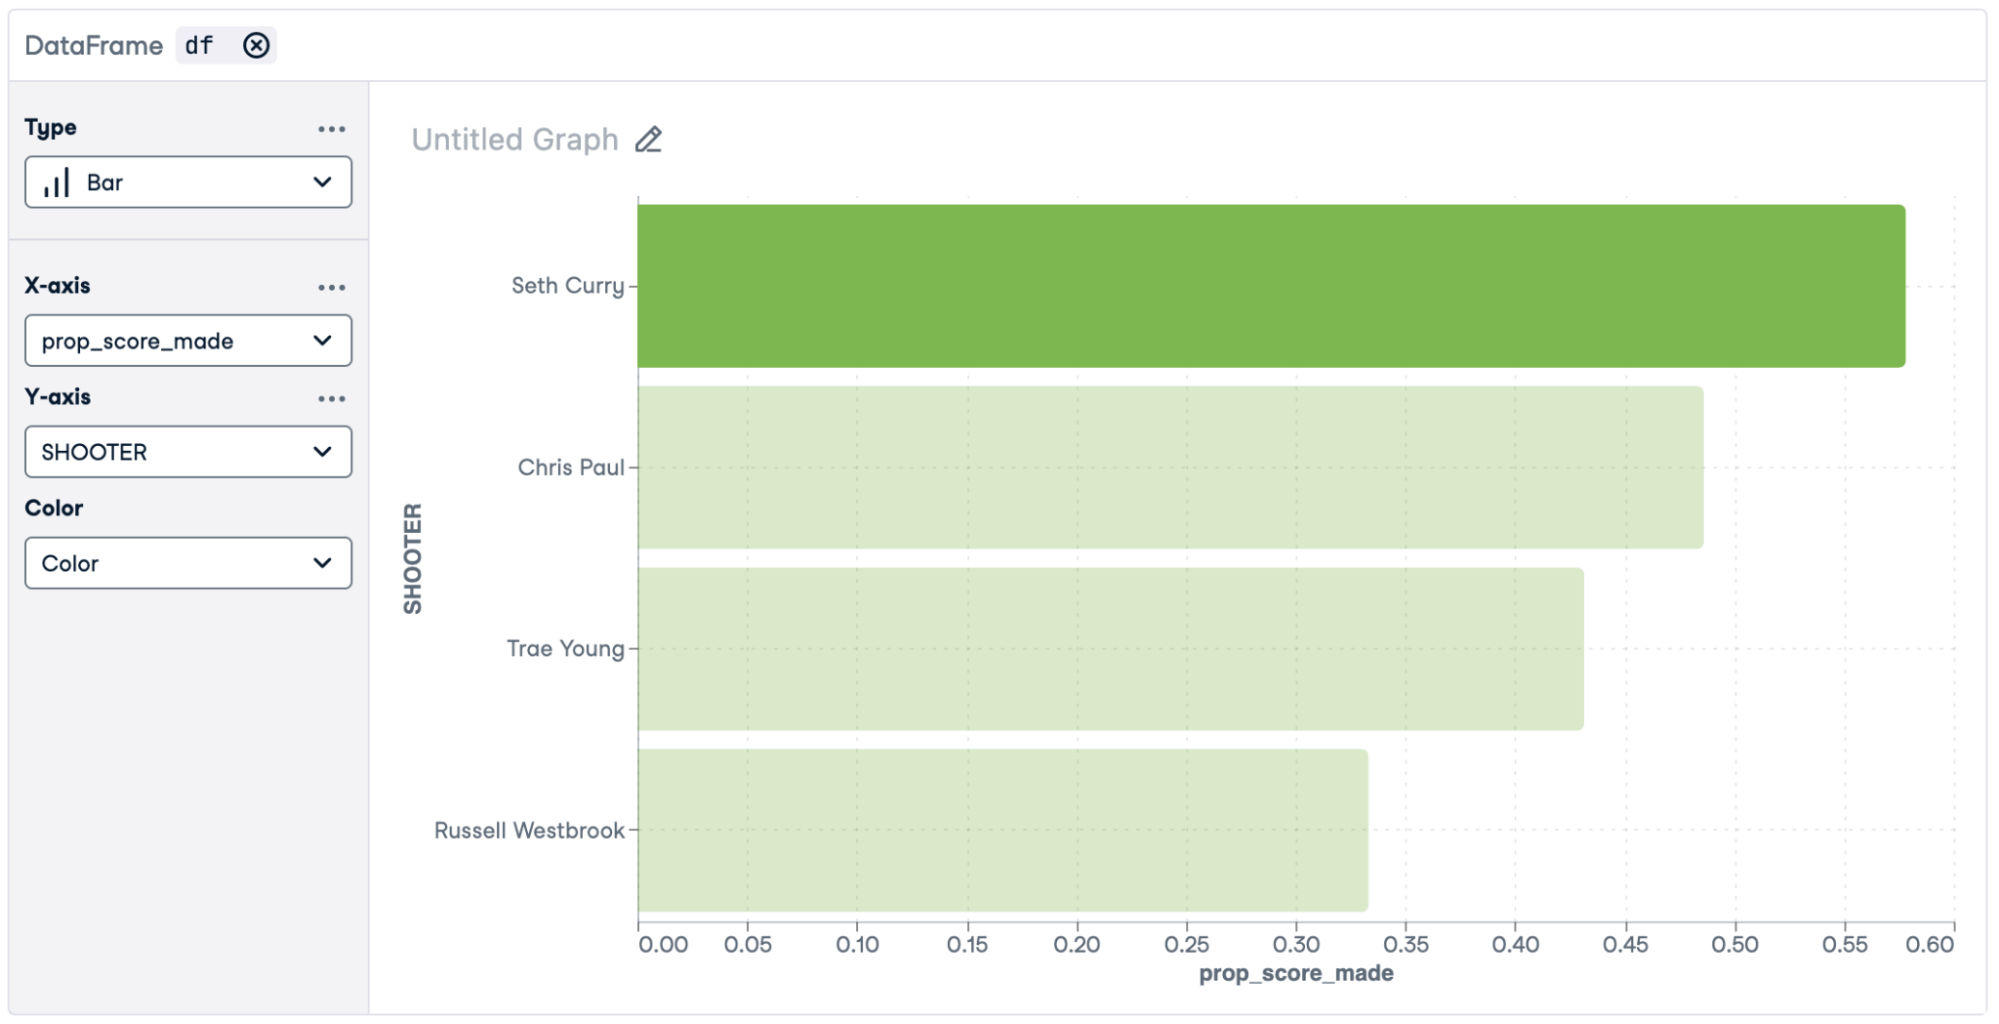
In the last example, we kept the default settings for the query return format. Look closely at the top of the SQL cell, and you'll see that it shows the return value as a DataFrame named df. That means you can continue to work on the results in Python (or in R, for R workspaces) or draw no-code plots.

Click 'Add Chart' to add a no-code chart.

Set the following options.
The SQL query that was run against the CSV file created a data frame named df. You can also write SQL queries against these pandas or R data frames. The only difference from standard SQL is that in the FROM clause, you provide the data frame name instead of the table name.
Here, we'll reuse the previous results in df and split the shooter column into separate first and last names. Add a SQL cell, select "DataFrames and CSVs" as the source, and use the following code.
SELECT
str_split(shooter, ' ')[1] AS first_name,
str_split(shooter, ' ')[2] AS last_name,
prop_score_made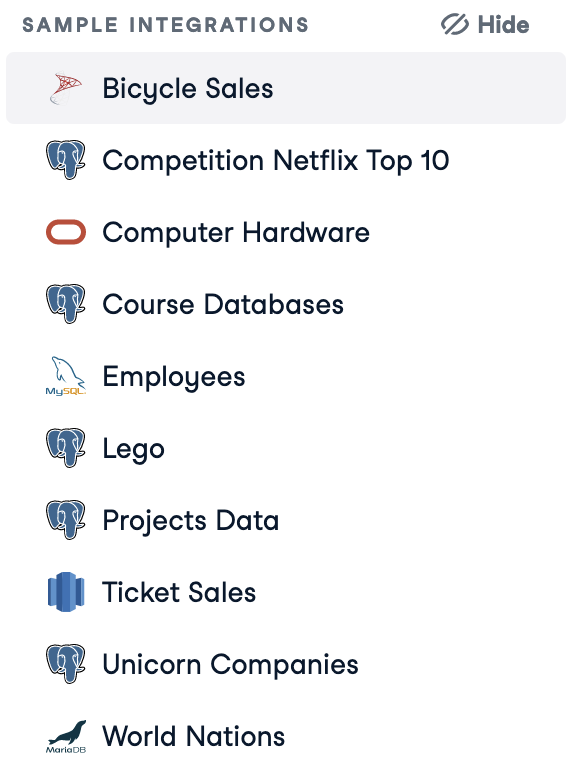
FROM dfWorkspace also provides several sample databases that you can use to practice your SQL skills.
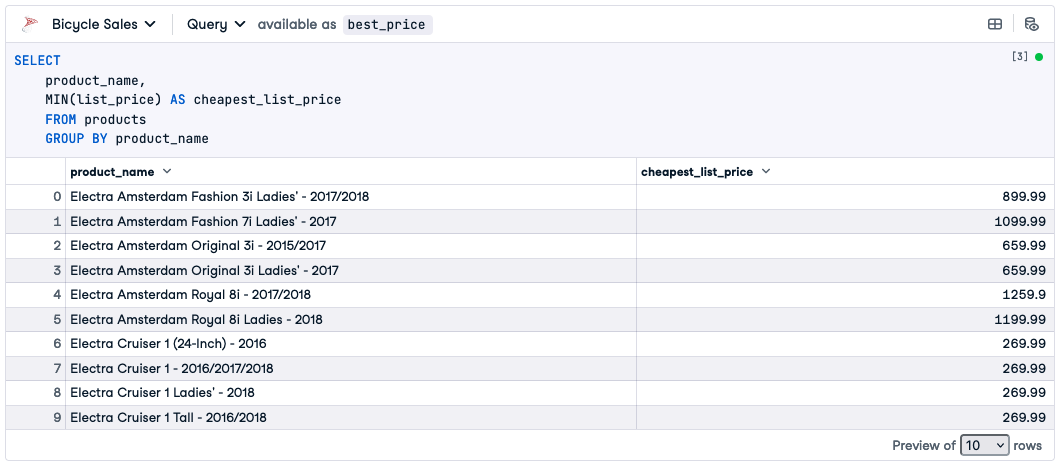
Add a SQL cell, and in the source dropdown, scroll down to the "Sample Integrations" section. Here, we'll use "Bicycle Sales."
A default query will appear. For the tutorial, let's replace it with a simpler query.
SELECT
product_name,
MIN(list_price) AS cheapest_list_price
FROM products
GROUP BY product_name
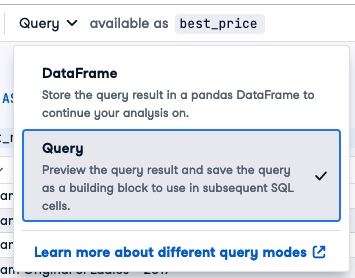
When you use a connection to a database (rather than writing SQL against a CSV file or dataframe), you get the option to return the results as a query. In the dropdown, select "Query." You can also name the resulting value. Here, change "query" to "best_price."
Running the query gives the following output.
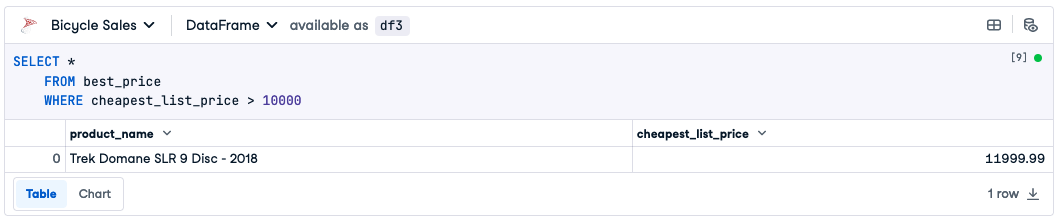
You can now use this result to write further SQL against. Essentially, you've written a common table expression (covered in the SQL Commands for Data Scientists tutorial) without having to use the common table expression syntax.
Add another SQL cell, and write this further query.
SELECT *
	FROM best_price
	WHERE cheapest_list_price > 10000
Running this query returns the following results.
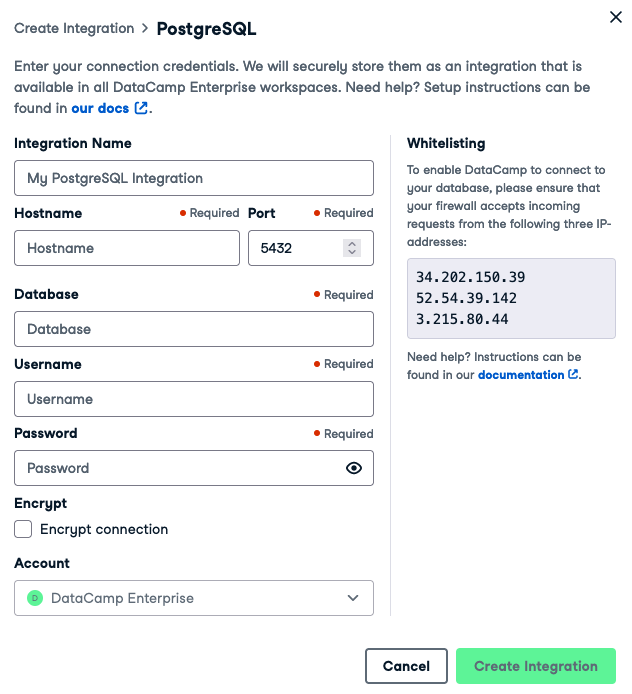
Workspace also allows you to connect to many types of database, including PostgreSQL, MySQL, Redshift, bigQuery, Athena, SQL Server, MariaDB, and Oracle Database. Full details of how to connect are provided in the Workspace Docs.
In the left-hand toolbar, click on "Integrations," then click the ⊕ button to create a new integration.
Choose the type of database that you are connecting to.

You'll be asked to provide connection details (these vary by the type of database).
While writing SQL can be fun and useful, getting an AI to write it for you can help you learn and make you more productive. You can read about the AI Assistant in From Data to Insights: Get There Faster with the DataCamp Workspace AI Assistant.
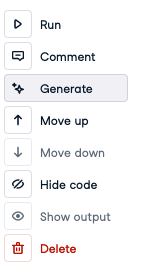
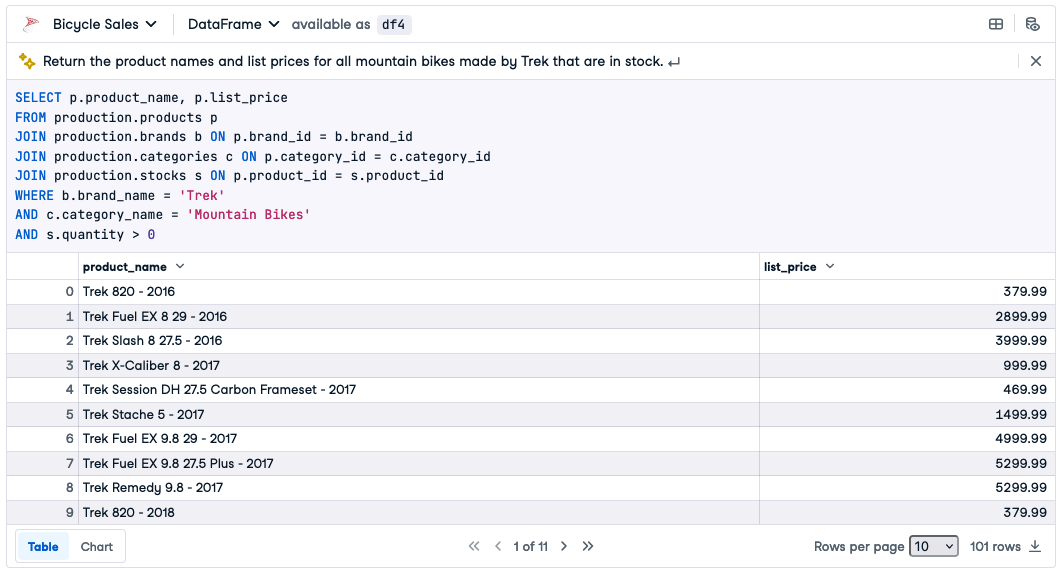
Add a SQL cell. In the right-hand context menu, click "Generate."
A textbox appears at the top of the SQL cell. In this, write a task for the AI. Choose your own task, or try the following.
Return the product names and list prices for all mountain bikes made by Trek that are in stock.
After typing your query, press Enter to get the AI to generate SQL code.

If you think that the code is reasonable, click "Accept & run" (or click "Accept," then "Run" later on) to see the results of the query.
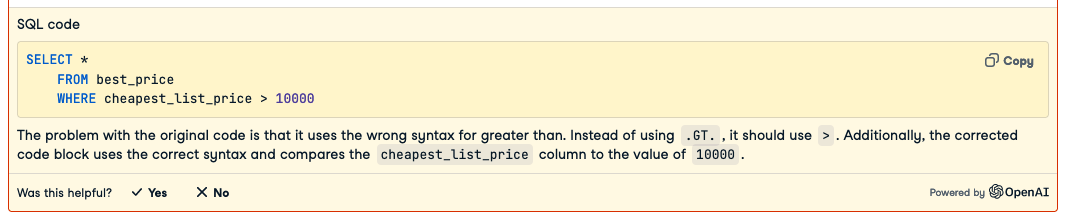
You can also use the AI built-in to Workspace to explain why errors occur in your SQL. Suppose you got confused while writing the query for the expensive bikes and used a Fortran-style .GT. instead of `>`.
SELECT *
    FROM best_price
    WHERE cheapest_list_price .GT. 10000
This results in an error. In the bottom-left of the SQL cell, click "Fix Error."
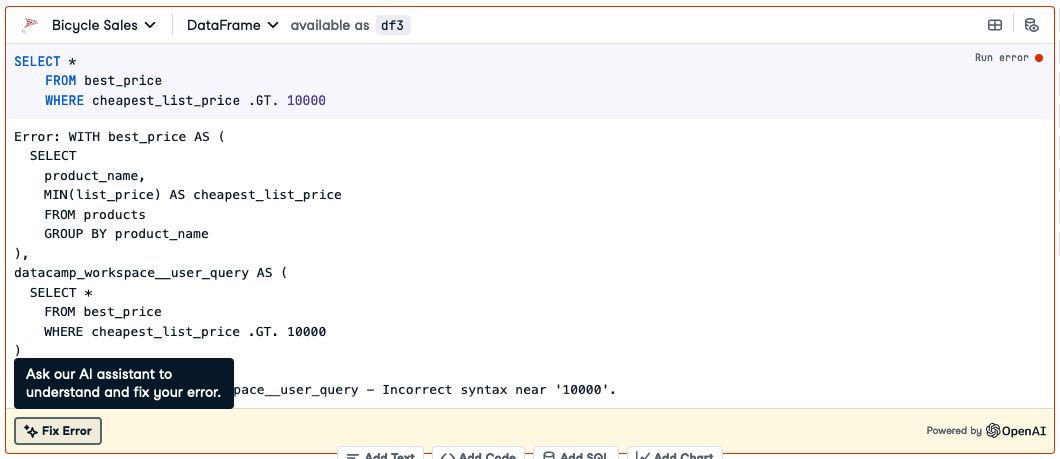
The AI provides the correct code, followed by an explanation of what you did wrong.
You've seen how to avoid setting up a database by writing SQL queries against CSV files and data frames. You used sample databases to practice writing code against. And you saw how to use AI to generate SQL with natural language and fix your errors.
These features make it much easier to get started writing SQL and to be more productive while learning and working.
Get started with SQL in Workspace by logging in or signing up for a DataCamp account. You can also master some of the SQL fundamentals in our skill track, which will give you all the skills you need to interact with and query your data.
Expand Your Knowledge
Curso
Curso
Curso
blog
Alena Guzharina
6 min
Tutorial
Parul Pandey
Tutorial
Emiko Sano
code-along
Filip Schouwenaars
code-along
Jasmin Ludolf
code-along
Filip Schouwenaars