

我们都知道 ChatGPT 的火爆,以及人们如何用它提升生产力。如果您是新手,值得先注册一个 ChatGPT 免费演示并亲自体验其功能。您还应参加我们的Introduction to ChatGPT课程,学习编写高效提示词的最佳实践,并了解在常见业务场景中如何利用这一强大的 AI 工具。
在本教程中,我们将学习如何使用 ChatGPT 完成一个端到端的数据科学项目。我们将通过各种提示来创建项目大纲、编写 Python 代码、开展研究并调试应用程序。此外,我们还会学习编写高效 ChatGPT 提示词的技巧。如果您对将 AI 用于不同目的感兴趣,不妨查看我们的适合各个水平的人工智能项目指南。
在端到端数据科学项目中使用 ChatGPT
在本项目中,我们将使用 DataLab 的贷款数据,并围绕它来规划数据科学项目。
这里有 80% 的工作可以交给 ChatGPT,我们只需掌握好提示词工程,就能把事情做好。为此,我们准备了出色的数据科学版 ChatGPT 速查表,包含 60+ 个基于 SQL、R 和 Python 的数据科学任务提示词。
项目规划
这是项目中最重要的部分,我们需要根据可用资源和目标制定最优策略。
您可以访问chat.openai.com发起一段新对话。随后,我们会说明手头可用的贷款数据集,并让 ChatGPT 给出构建端到端通用作品集项目的步骤。
提示词:“我有一个包含 9500 行、14 列的贷款数据集:['credit.policy', 'purpose', 'int.rate', 'installment', 'log.annual.inc','dti', 'fico', 'days.with.cr.line', 'revol.bal', 'revol.util', 'inq.last.6mths', 'delinq.2yrs', 'pub.rec', 'not.fully.paid']。请列出我需要遵循的步骤,以开发一个端到端的作品集项目。”
我们得到了清单,但忘记提及类别不平衡问题,以及项目目标是准确预测“贷款未还清”。
更新提示词:“请包含类别不平衡问题,并准确预测贷款是否未还清,而不是预测贷款是否已还清。”
另外,我们对模型监控不感兴趣,并希望构建一个 Gradio 应用并将其部署到 Huggingface Spaces。
更新提示词:“我们将使用 Gradio 创建一个 Web 应用并部署到 Spaces,且不会在生产环境中监控模型。”
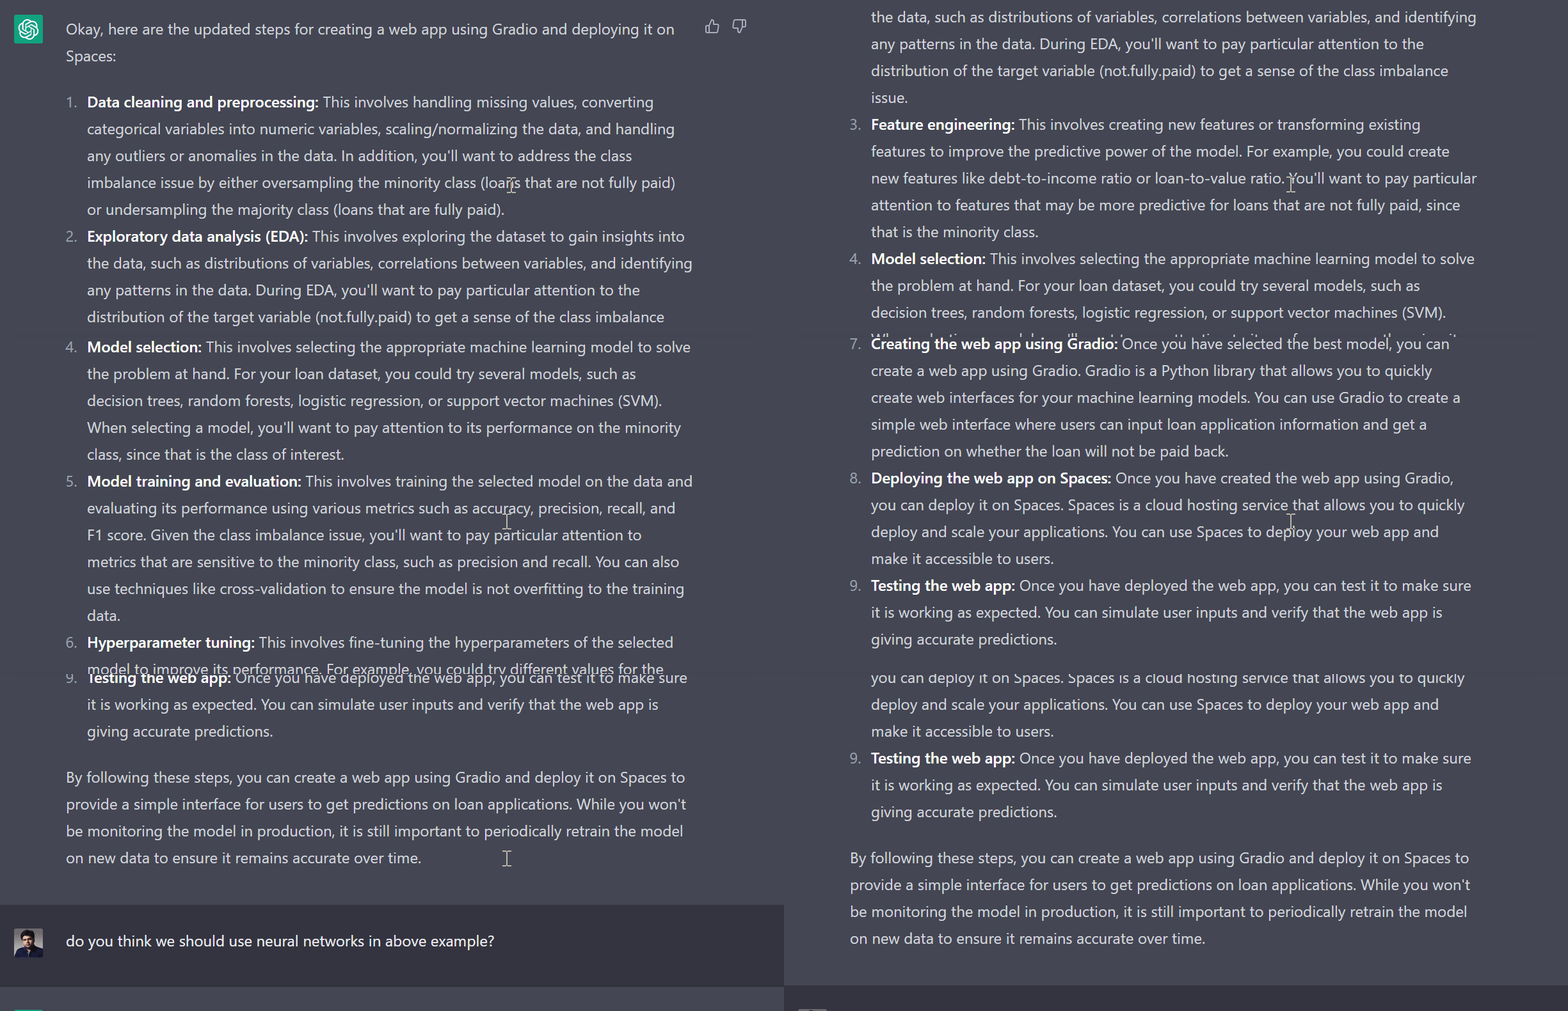
作者制作的动图 | 项目涉及步骤的最终清单
我们得到如上所示的 9 个步骤,以及每一步应如何开展的详细说明。
以下是本教程将要遵循的任务列表:
- 数据清洗与预处理。处理缺失值、将分类变量转换为数值变量、对数据进行缩放/归一化,并处理异常值或离群点。此外,您还需要通过对少数类(未还清贷款)进行过采样或对多数类(已还清贷款)进行欠采样来解决类别不平衡问题。
- 探索性数据分析(EDA)。探索数据集以获取洞见,例如变量分布、变量间的相关性,以及识别数据中的模式。
- 特征工程。创建新特征或转换现有特征,以提升模型的预测能力。
- 模型选择。尝试多种模型,如决策树、随机森林、逻辑回归或支持向量机(SVM)。
- 模型训练与评估。在数据上训练所选模型,并使用准确率、精确率、召回率和 F1 分数等多种指标评估其性能。
- 超参数调优。微调所选模型的超参数以提升性能。
- 使用 Gradio 创建 Web 应用。在选定最佳模型后,您可以使用 Gradio 创建 Web 应用。
- 将 Web 应用部署到 Spaces。创建好 Gradio 应用后,您可以将其部署到 Spaces。
- 测试 Web 应用。进行测试以确保其按预期运行。
探索性数据分析(EDA)
探索性数据分析主要涉及数据处理、统计分析和数据可视化。我们可以通过一个后续提示,来编写针对我们数据集的 EDA Python 代码,从而完成这一部分。
后续提示:“请编写 Python 代码来加载并对贷款数据集执行探索性数据分析(EDA)”
机器人会理解上下文,并给出带注释的 Python 代码,以及其工作原理的详细说明。
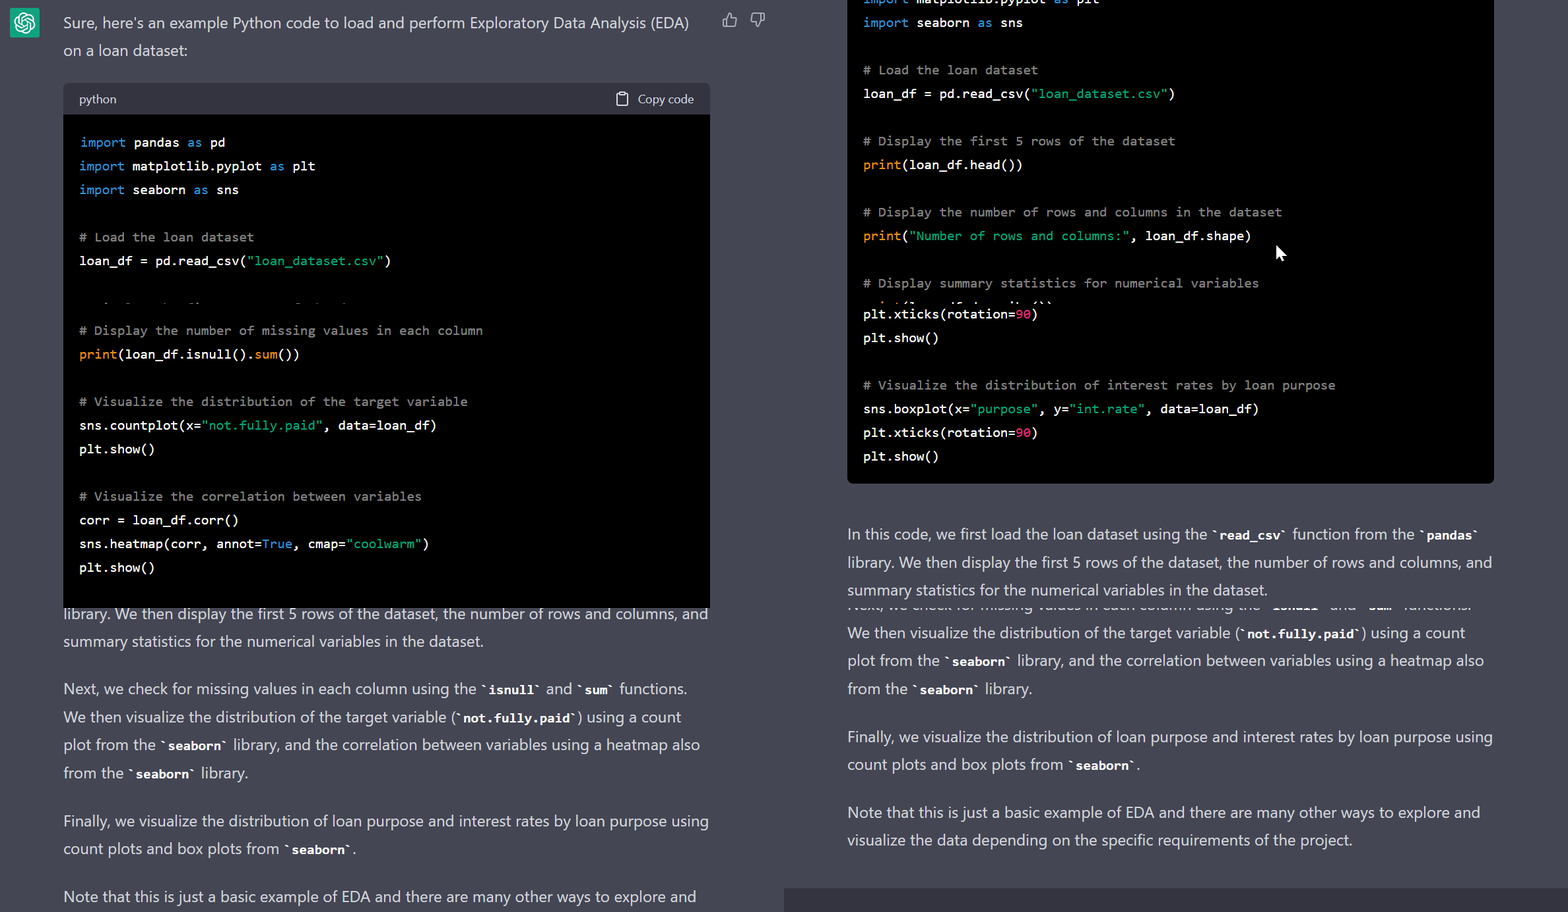
作者制作的动图 | 用于 EDA 的 Python 代码
- 将数据集加载为 Pandas DataFrame 并显示。
import pandas as pd
import matplotlib.pyplot as plt
import seaborn as sns
loan_df = pd.read_csv("loan_data.csv")
loan_df.head()
- 显示行列数以及数值变量的统计摘要。
# Display the number of rows and columns in the dataset
print("Number of rows and columns:", loan_df.shape)
# Display summary statistics for numerical variables
print(loan_df.describe())Number of rows and columns: (9578, 14)
credit.policy int.rate ... pub.rec not.fully.paid
count 9578.000000 9578.000000 ... 9578.000000 9578.000000
mean 0.804970 0.122640 ... 0.062122 0.160054
std 0.396245 0.026847 ... 0.262126 0.366676
min 0.000000 0.060000 ... 0.000000 0.000000
25% 1.000000 0.103900 ... 0.000000 0.000000
50% 1.000000 0.122100 ... 0.000000 0.000000
75% 1.000000 0.140700 ... 0.000000 0.000000
max 1.000000 0.216400 ... 5.000000 1.000000- 显示每列的缺失值。可以看到,没有缺失。
print(loan_df.isnull().sum())credit.policy 0
purpose 0
int.rate 0
installment 0
log.annual.inc 0
dti 0
fico 0
days.with.cr.line 0
revol.bal 0
revol.util 0
inq.last.6mths 0
delinq.2yrs 0
pub.rec 0
not.fully.paid 0- 可视化目标变量“not.fully.paid”的分布
sns.countplot(x="not.fully.paid", data=loan_df)
plt.show()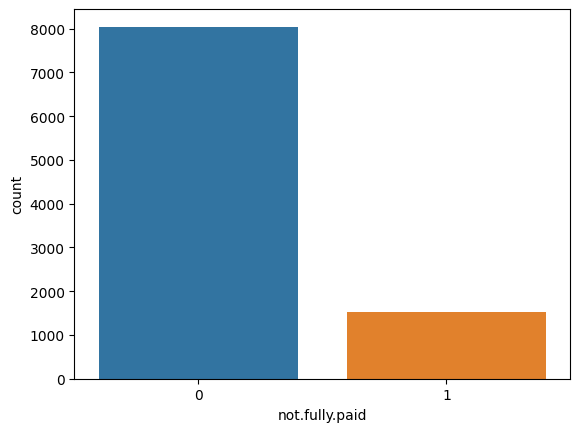
- 可视化变量之间的相关性。
corr = loan_df.corr()
sns.heatmap(corr, annot=True, cmap="coolwarm")
plt.show()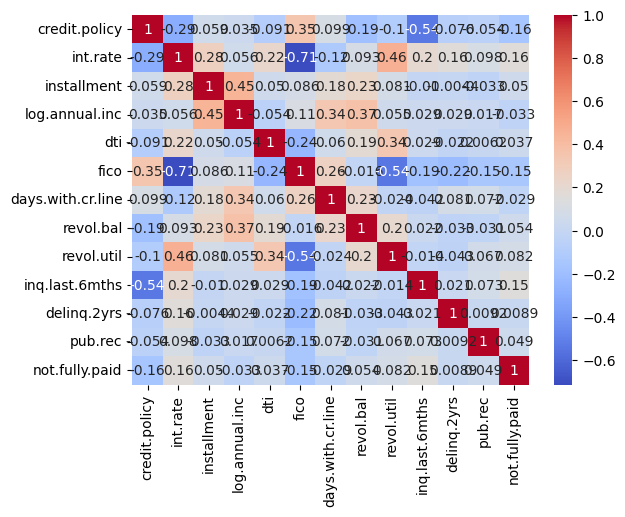
- 了解贷款用途的分布。
sns.countplot(x="purpose", data=loan_df)
plt.xticks(rotation=90)
plt.show()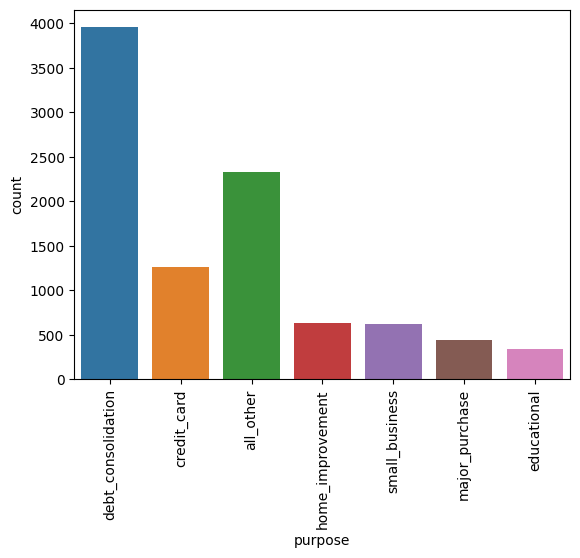
- 了解按贷款用途划分的利率分布。
sns.boxplot(x="purpose", y="int.rate", data=loan_df)
plt.xticks(rotation=90)
plt.show()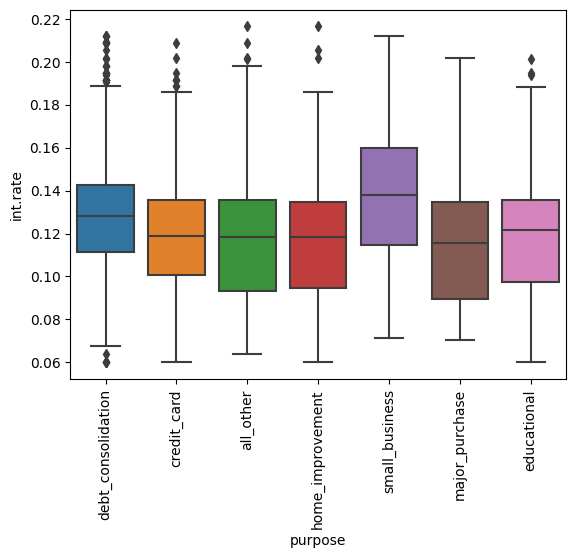
特征工程
我们将通过特征工程来简化预处理任务,而不是先进行繁琐的预处理与清洗。
后续提示:“编写执行特征工程的 Python 代码”
我们得到了正确的方案,但包含无关代码,因此需要写一个更新提示对其修改。
更新提示:“只添加特征工程部分。”
# Perform feature engineering
loan_df["installment_to_income_ratio"] = (
loan_df["installment"] / loan_df["log.annual.inc"]
)
loan_df["credit_history"] = (loan_df["delinq.2yrs"] + loan_df["pub.rec"]) / loan_df[
"fico"
]ChatGPT 建议了两个新特征:“installment_to_income_ratio”和“credit_history”。
数据预处理与类别平衡
再次强调,ChatGPT 已了解项目上下文。我们无需事无巨细地重复说明。因此,直接让它编写清洗和预处理数据的 Python 代码即可。
后续提示:“现在编写清洗和预处理数据集的 Python 代码”
- 删除不必要的列,并将分类变量转换为数值变量。
from sklearn.preprocessing import LabelEncoder, StandardScaler
loan_df = loan_df.drop(['credit.policy', 'days.with.cr.line', 'purpose'], axis=1)
# Convert categorical variables to numerical using LabelEncoder
le = LabelEncoder()
loan_df['not.fully.paid'] = le.fit_transform(loan_df['not.fully.paid'])- 使用 Standard Scaler 缩放数值特征。
scaler = StandardScaler()
numerical_cols = ['int.rate', 'installment', 'log.annual.inc', 'dti', 'fico', 'revol.bal', 'revol.util', 'inq.last.6mths', 'delinq.2yrs', 'pub.rec','credit_history','installment_to_income_ratio']
loan_df[numerical_cols] = scaler.fit_transform(loan_df[numerical_cols])- 使用 imblearn 的过采样方法处理类别不平衡。
from imblearn.over_sampling import SMOTE
sm = SMOTE(random_state=42)
X = loan_df.drop('not.fully.paid', axis=1)
y = loan_df['not.fully.paid']
X_resampled, y_resampled = sm.fit_resample(X, y)
loan_df = pd.concat([X_resampled, y_resampled], axis=1)
loan_df['not.fully.paid'].value_counts()如您所见,我们已成功平衡了类别。
0 8045
1 8045
Name: not.fully.paid, dtype: int64模型选择
在这一部分,我们让 ChatGPT 在多种模型上训练数据,以完成模型选择任务。
后续提示:“编写用于模型选择的后续 Python 代码。尝试决策树、随机森林、逻辑回归或支持向量机(SVM)。注意:只包含模型选择部分。”
它生成了用于将数据集划分为训练集与测试集,并在指定模型上训练并输出准确率指标的 Python 脚本。
from sklearn.model_selection import train_test_split
# Split the dataset into training and testing sets
X = loan_df.drop('not.fully.paid', axis=1)
y = loan_df['not.fully.paid']
X_train, X_test, y_train, y_test = train_test_split(X, y, test_size=0.3, random_state=42)
# Fit and evaluate decision tree classifier
dt = DecisionTreeClassifier(random_state=42)
dt.fit(X_train, y_train)
dt_score = dt.score(X_test, y_test)
print("Decision Tree Classifier Accuracy: {:.2f}%".format(dt_score*100))
# Fit and evaluate random forest classifier
rf = RandomForestClassifier(random_state=42)
rf.fit(X_train, y_train)
rf_score = rf.score(X_test, y_test)
print("Random Forest Classifier Accuracy: {:.2f}%".format(rf_score*100))
# Fit and evaluate logistic regression classifier
lr = LogisticRegression(random_state=42)
lr.fit(X_train, y_train)
lr_score = lr.score(X_test, y_test)
print("Logistic Regression Classifier Accuracy: {:.2f}%".format(lr_score*100))
# Fit and evaluate support vector machine classifier
svm = SVC(random_state=42)
svm.fit(X_train, y_train)
svm_score = svm.score(X_test, y_test)
print("Support Vector Machine Classifier Accuracy: {:.2f}%".format(svm_score*100))随机森林算法显著优于其他模型。
Decision Tree Classifier Accuracy: 81.21%
Random Forest Classifier Accuracy: 89.14%
Logistic Regression Classifier Accuracy: 61.32%
Support Vector Machine Classifier Accuracy: 66.54%超参数调优与模型评估
我们将选择表现更好的模型并进行模型评估。我们指定使用准确率、精确率、召回率和 F1 分数作为指标,并通过交叉验证确保模型稳定性。
后续提示:“选择 RandomForestClassifier 并编写模型评估的 Python 代码。使用准确率、精确率、召回率和 F1 分数作为指标,并通过交叉验证确保模型不过拟合训练数据。”
接下来,我们会更新 Python 以加入超参数调优任务,并保存表现最佳的模型。
更新提示:“在上述代码中也加入超参数调优,并保存表现最佳的模型”
最终版本的代码使用 GridSearchCV 进行超参数调优,采用五折交叉验证,并以 f1 指标进行评估来寻找最佳超参数。
之后,ChatGPT 自动添加了在测试集上选择最佳模型进行评估的代码,并展示了最佳超参数。
from sklearn.model_selection import GridSearchCV
from sklearn.metrics import accuracy_score, precision_score, recall_score, f1_score
# Define the parameter grid for hyperparameter tuning
param_grid = {
'n_estimators': [100, 200, 300],
'max_depth': [10, 20, 30, None],
'min_samples_split': [2, 5, 10],
'min_samples_leaf': [1, 2, 4]
}
# Perform grid search with cross-validation to find the best hyperparameters
grid_search = GridSearchCV(rf, param_grid, cv=5, scoring='f1')
grid_search.fit(X_train, y_train)
# Get the best model and its hyperparameters
best_model = grid_search.best_estimator_
best_params = grid_search.best_params_
# Evaluate the best model on the testing set
y_pred = best_model.predict(X_test)
accuracy = accuracy_score(y_test, y_pred)
precision = precision_score(y_test, y_pred)
recall = recall_score(y_test, y_pred)
f1 = f1_score(y_test, y_pred)
# Print the results
print("Random Forest Classifier Evaluation Results:")
print("Accuracy: {:.2f}%".format(accuracy * 100))
print("Precision: {:.2f}%".format(precision * 100))
print("Recall: {:.2f}%".format(recall * 100))
print("F1 Score: {:.2f}%".format(f1 * 100))
print("Best hyperparameters:", best_params)我们得到一个稳定的模型,准确率为 89.35。精确率与召回率相近。
Random Forest Classifier Evaluation Results:
Accuracy: 89.35%
Precision: 89.92%
Recall: 88.33%
F1 Score: 89.12%
Best hyperparameters: {'max_depth': None, 'min_samples_leaf': 1, 'min_samples_split': 2, 'n_estimators': 300}最后,我们将使用 joblib 保存模型。
import joblib
# Save the best model to disk
joblib.dump(best_model, 'loan_classifier.joblib')您可以在这个 DataLab 工作簿中查看带输出的源代码;您也可以轻松创建自己的副本,在浏览器中编辑并运行代码,无需在本地安装任何东西。
使用 Gradio 创建 Web 应用
现在到了最有趣的部分。我们只用提示词就能创建一个可完全自定义的 Web 应用,它将接收数值输入,并使用机器学习模型展示结果。
ChatGPT 已经了解了上下文,因此我们只需让它为贷款数据分类器编写一个 Gradio Web 应用。
后续提示:“编写用于贷款数据分类器的 Gradio Web 应用的 Python 代码。我们不使用列 ['credit.policy', 'days.with.cr.line', 'purpose']。”
请让 ChatGPT 仅包含 Gradio 应用部分,而不是训练与推理脚本。
更新提示:“只包含 gradio 应用部分。”
我们得到的代码会显示预测类别的概率,但我们希望展示分类标签。
更新提示:“修改代码以显示分类标签而非类别概率。”
运行代码后,我们看到多条警告和错误。您可以通过将错误反馈给 ChatGPT 来改进它。
我们需要了解 ChatGPT 的局限性。它训练于较早的数据集,如果您期望它用最新的 API 更新代码,往往会受限。相反,我们应阅读 Gradio 的文档并手动更新代码。
失败的提示词:“用 gradio.components 的组件更新 Gradio 代码”
在 Gradio 应用中,我们会加载已保存的模型,并接收用户输入来显示模型预测结果。
通过阅读Gradio 文档学习其工作方式。
import gradio as gr
import joblib
# Load the trained model
model = joblib.load("loan_classifier.joblib")
def predict_loan_status(
int_rate,
installment,
log_annual_inc,
dti,
fico,
revol_bal,
revol_util,
inq_last_6mths,
delinq_2yrs,
pub_rec,
installment_to_income_ratio,
credit_history,
):
input_dict = {
"int.rate": int_rate,
"installment": installment,
"log.annual.inc": log_annual_inc,
"dti": dti,
"fico": fico,
"revol.bal": revol_bal,
"revol.util": revol_util,
"inq.last.6mths": inq_last_6mths,
"delinq.2yrs": delinq_2yrs,
"pub.rec": pub_rec,
"installment_to_income_ratio": installment_to_income_ratio,
"credit_history": credit_history,
}
# Convert the dictionary to a 2D array
input_array = [list(input_dict.values())]
prediction = model.predict(input_array)[0]
if prediction == 0:
return "Loan fully paid"
else:
return "Loan not fully paid"
inputs = [
gr.Slider(0.06, 0.23, step=0.01, label="Interest Rate"),
gr.Slider(100, 950, step=10, label="Installment"),
gr.Slider(7, 15, step=0.1, label="Log Annual Income"),
gr.Slider(0, 40, step=1, label="DTI Ratio"),
gr.Slider(600, 850, step=1, label="FICO Score"),
gr.Slider(0, 120000, step=1000, label="Revolving Balance"),
gr.Slider(0, 120, step=1, label="Revolving Utilization"),
gr.Slider(0, 10, step=1, label="Inquiries in Last 6 Months"),
gr.Slider(0, 20, step=1, label="Delinquencies in Last 2 Years"),
gr.Slider(0, 10, step=1, label="Public Records"),
gr.Slider(0, 5, step=0.1, label="Installment to Income Ratio"),
gr.Slider(0, 1, step=0.01, label="Credit History"),
]
outputs = [gr.Label(num_top_classes=2)]
title = "Loan Approval Classifier"
description = (
"Enter the details of the loan applicant to check if the loan is approved or not."
)
gr.Interface(
fn=predict_loan_status,
inputs=inputs,
outputs=outputs,
title=title,
description=description,
).launch()您可以将上述代码保存为 app.py 文件,并在终端运行“python app.py”脚本,在浏览器中启动应用。

作者制作的动图 | 贷款审批分类器应用
尽管我们的应用运行正常,但 ChatGPT 完全忽略了我们对数值特征进行了缩放。因此,与其要求它更新代码,不如回到之前并保存标准化器参数。
scalar = joblib.load('std_scaler.bin')之后,在应用中使用 joblib 加载该标准化器。
input_array = [list(input_dict.values())]
scaled_array = scalar.transform(input_array)
prediction = model.predict(scaled_array)[0]为什么要手动处理?因为如果您让 ChatGPT 修改某一行代码,它可能会改动整段代码,甚至更改变量名。
是的,ChatGPT 并不完美,它也永远无法取代开发者。
将 Web 应用部署到 Spaces
您可以直接请 ChatGPT 教您如何将 gradio 应用部署到 Hugging Face Spaces,它会列出必要步骤。
提示词:“how to deploy gradio app to huggingface spaces.”
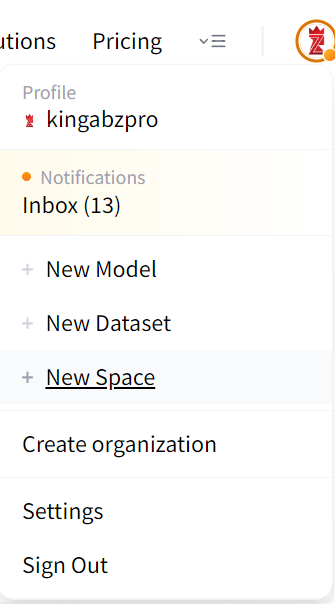
- 访问 Hugging Face 网站,点击左上角头像,选择“New Space”选项。
图片由作者提供
- 填写名称和许可证类型以创建应用仓库。
- 点击Files and Versions选项卡 > + Add file > Upload files,将文件上传至仓库。
- 拖拽 app.py、模型和标准化器文件,点击“Commit change to main”按钮,并填写提交说明保存提交。与 Git 相似。
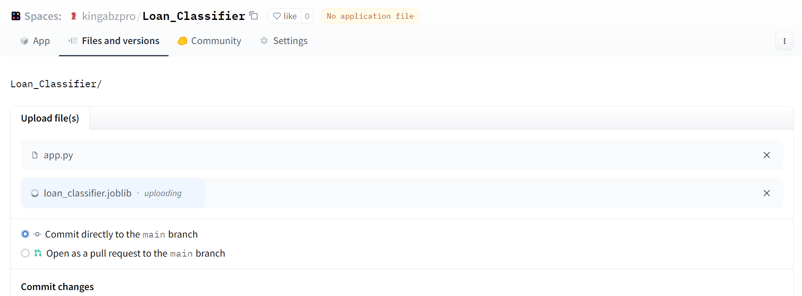
图片由作者提供
如果您遇到运行时错误,可能是忘记添加 requirements.txt 文件。选择Files and Versions 选项卡 > + Add file > Create a new file ,并按下图所示添加文件名与 Python 依赖库及其版本。
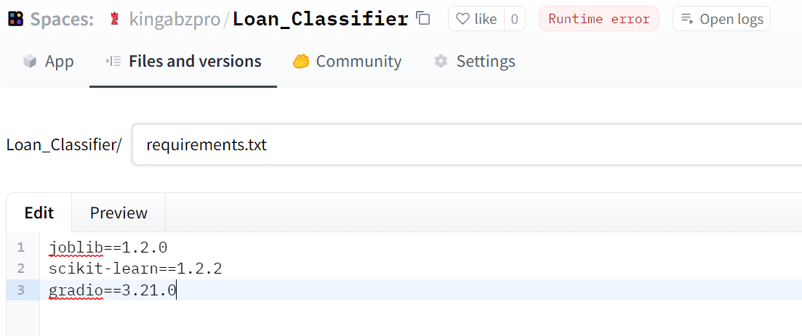
图片由作者提供
您的应用已准备就绪。您可以通过滑块调整输入,预测是否应向客户发放贷款。
您可以在由 kingabzpro 创建的 Hugging Face Space上试用在线演示。
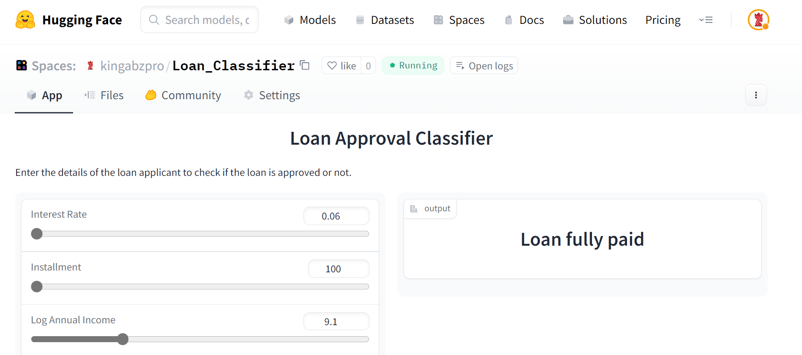
图片由作者提供 | Loan Classifier
编写高效 ChatGPT 提示词的技巧
在真实项目中使用提示词工程并不容易。我们需要了解哪些事情可以交给它,哪些地方必须亲自介入以修正 ChatGPT。
以下是一些建议,帮助您在不牺牲项目质量的前提下,提升使用 ChatGPT 的体验。
- 始终编写清晰、简明的提示词。请在一开始就详细说明您的需求。
- 建立项目的对话历史。ChatGPT 是一个聊天机器人,要让它有效理解上下文,您需要建立起对话历史。
- 不断尝试。并不存在标准化的提示词写法。以基础提示词起步,然后通过一系列后续更新提示不断改进。
- 指出代码错误。如果您在本地运行代码出现错误,尝试在后续提示中直接说明。ChatGPT 会据此快速改进并给出更好的方案。
- 手动做出更改。ChatGPT 训练于较早数据,如果您期待它提出新思路或最新 API 命令,往往会失望。尽量在可行处手动修改代码,因为生成的代码并不完美。
- 用于常见任务。对于常见任务,ChatGPT 成功率更高。
- 用于学习新知识。经常请 ChatGPT 解释新概念或提供“如何做”的教程。它会给出一系列简单步骤,帮助您完成工作。若您有学习障碍,也会很有帮助。
如果您对 ChatGPT 和 OpenAI API 感兴趣,欢迎注册网络研讨会:Getting Started with the OpenAI API and ChatGPT。您将学习如何使用 OpenAI API 执行语言与代码生成任务等内容。
结论
开发贷款审批分类器只是利用 ChatGPT 开展数据科学项目的众多示例之一。我们可以用它来生成合成数据、运行 SQL 查询、创建数据分析报告、进行机器学习研究等。生成式 AI 将长期存在,并让我们的生活更轻松。与其在项目上耗费数周或数月,您可以在数小时内开发、测试并部署数据科学应用。
在本教程中,我们学习了如何将 ChatGPT 用于项目规划、数据分析、数据清洗与预处理、模型选择、超参数优化,以及创建并部署 Web 应用。
使用 ChatGPT 也有前提。您需要具备统计分析与 Python 编码经验,才能理解项目中的不同任务;否则就像“盲人摸象”。从Data Scientist with Python职业路径开始您的数据科学之旅,掌握成为数据科学家所需的核心技能。