Was ist Git?
Git ist ein verteiltes, quelloffenes Versionskontrollsystem. Es ermöglicht Entwicklern und Datenwissenschaftlern, Code zu verfolgen, Änderungen zusammenzuführen und zu älteren Versionen zurückzukehren - AWS. Sie ermöglicht es dir, Änderungen mit einem entfernten Server zu synchronisieren. Aufgrund seiner Flexibilität und Beliebtheit ist Git zu einem Industriestandard geworden, da es fast alle Entwicklungsumgebungen, Kommandozeilenwerkzeuge und Betriebssysteme unterstützt.
Wie funktioniert Git?
Git speichert deine Dateien und ihre Entwicklungsgeschichte in einem lokalen Repository. Jedes Mal, wenn du deine Änderungen speicherst, erstellt Git einen Commit. Ein Commit ist ein Snapshot der aktuellen Dateien. Diese Commits sind miteinander verknüpft und bilden einen Entwicklungsverlaufsgraphen, wie unten dargestellt. Es ermöglicht uns, zum vorherigen Commit zurückzukehren, Änderungen zu vergleichen und den Fortschritt des Entwicklungsprojekts zu sehen - Azure DevOps. Die Commits werden durch einen eindeutigen Hash identifiziert, der zum Vergleichen und Rückgängigmachen der Änderungen verwendet wird.

Eine Grafik der Entwicklungsgeschichte
Zweige
Die Zweige sind Kopien des Quellcodes, die parallel zur Hauptversion arbeiten. Um die vorgenommenen Änderungen zu speichern, führe den Zweig mit der Hauptversion zusammen. Diese Funktion fördert eine konfliktfreie Teamarbeit. Jeder Entwickler hat seine Aufgabe, und durch die Verwendung von Zweigen können sie an der neuen Funktion arbeiten, ohne dass andere Teammitglieder eingreifen müssen. Sobald die Aufgabe abgeschlossen ist, kannst du die neuen Funktionen mit der Hauptversion (Master-Zweig) zusammenführen. Wenn du lernen willst, wie man einen Zweig klont, schau dir dieses Tutorial über Git Clone Branch an.

Neue Funktion zum Projektarchiv hinzufügen
Verpflichtet
Es gibt drei Zustände von Dateien in Git: modifiziert, staged und commit. Wenn du Änderungen an einer Datei vornimmst, werden die Änderungen im lokalen Verzeichnis gespeichert. Sie sind nicht Teil der Entwicklungsgeschichte von Git. Um einen Commit zu erstellen, musst du zuerst die geänderten Dateien bereitstellen. Du kannst Änderungen in der Staging Area hinzufügen oder entfernen und diese Änderungen dann als Commit mit einer Nachricht verpacken, die die Änderungen beschreibt.
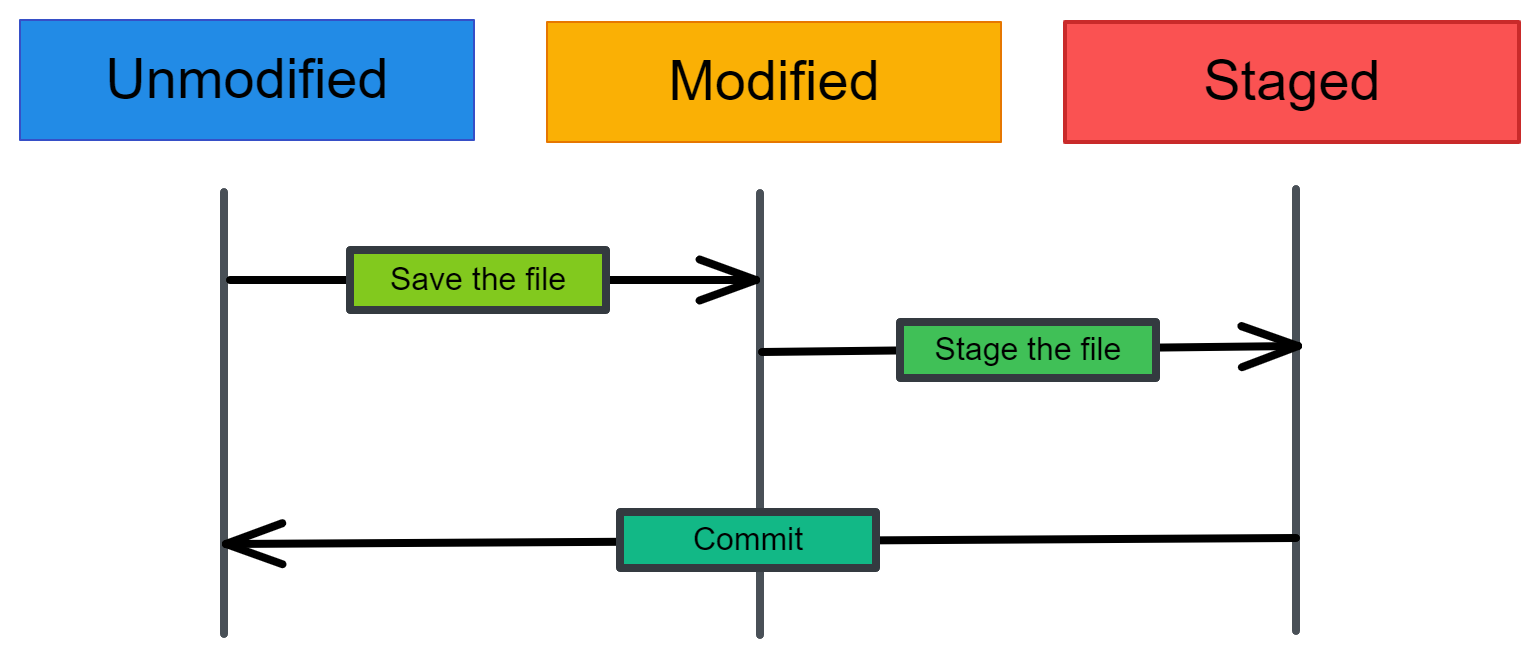
Drei Zustände von Dateien in Git
Was sind die Vorteile von Git?
- Änderungen verfolgen: Sie ermöglicht es Entwicklern, historische Änderungen einzusehen. Die Entwicklungsgeschichte macht es einfach, Fehler zu erkennen und zu beheben.
- IDE-Integration: Aufgrund seiner Beliebtheit ist die Git-Integration in allen Entwicklungsumgebungen verfügbar, zum Beispiel in VSCode und JupyterLab.
- Zusammenarbeit im Team: Ein Entwicklerteam kann seinen Fortschritt einsehen. Durch die Verwendung von Zweigen können sie individuell an einer Aufgabe arbeiten und Änderungen mit der Hauptversion zusammenführen. Pull Requests, das Lösen von Merge-Konflikten und Code-Reviews fördern die Zusammenarbeit im Team.
- Verteilte VSC: In einem verteilten System gibt es keinen zentralen Dateispeicher. Es gibt mehrere Sicherungen für dasselbe Projekt. Dieser Ansatz ermöglicht es Entwicklern, offline zu arbeiten und Änderungen zu übertragen.
Git für Data Science Projekte
Git bietet Versionskontrolle für Skripte, Metriken, Daten und Modelle. Mit der Git-Erweiterung git-lfs kannst du eine große Datenbank und Machine-Learning-Modelle speichern und versionieren. Bei einem typischen Data Science-Projekt hast du ein Jupyter-Notebook, einen Datensatz, ein Modell, Metadaten und Modellmetriken. Die Metadaten enthalten Dateien mit Metainformationen über das maschinelle Lernmodell, Merkmale, Modellparameter und Automatisierungsdateien. All das ist notwendig, um den Fortschritt von KI-Anwendungen zu überwachen und Probleme zu lösen.
Lernpfade für Data Science-Experimente helfen Wissenschaftlern, versehentliche Änderungen rückgängig zu machen, das beste Experiment anhand der Leistungskennzahlen auszuwählen und mit anderen Teamkollegen zusammenzuarbeiten. Das folgende Diagramm zeigt, wie sich Änderungen an Daten oder Code auf die Metadaten und die Ausgabe des Modells auswirken. Der Lernpfad kann auch anderen Teammitgliedern helfen, eine bessere Lösung zu finden. Erfahre alles über Git im neuesten Blog von Summer Worsley.
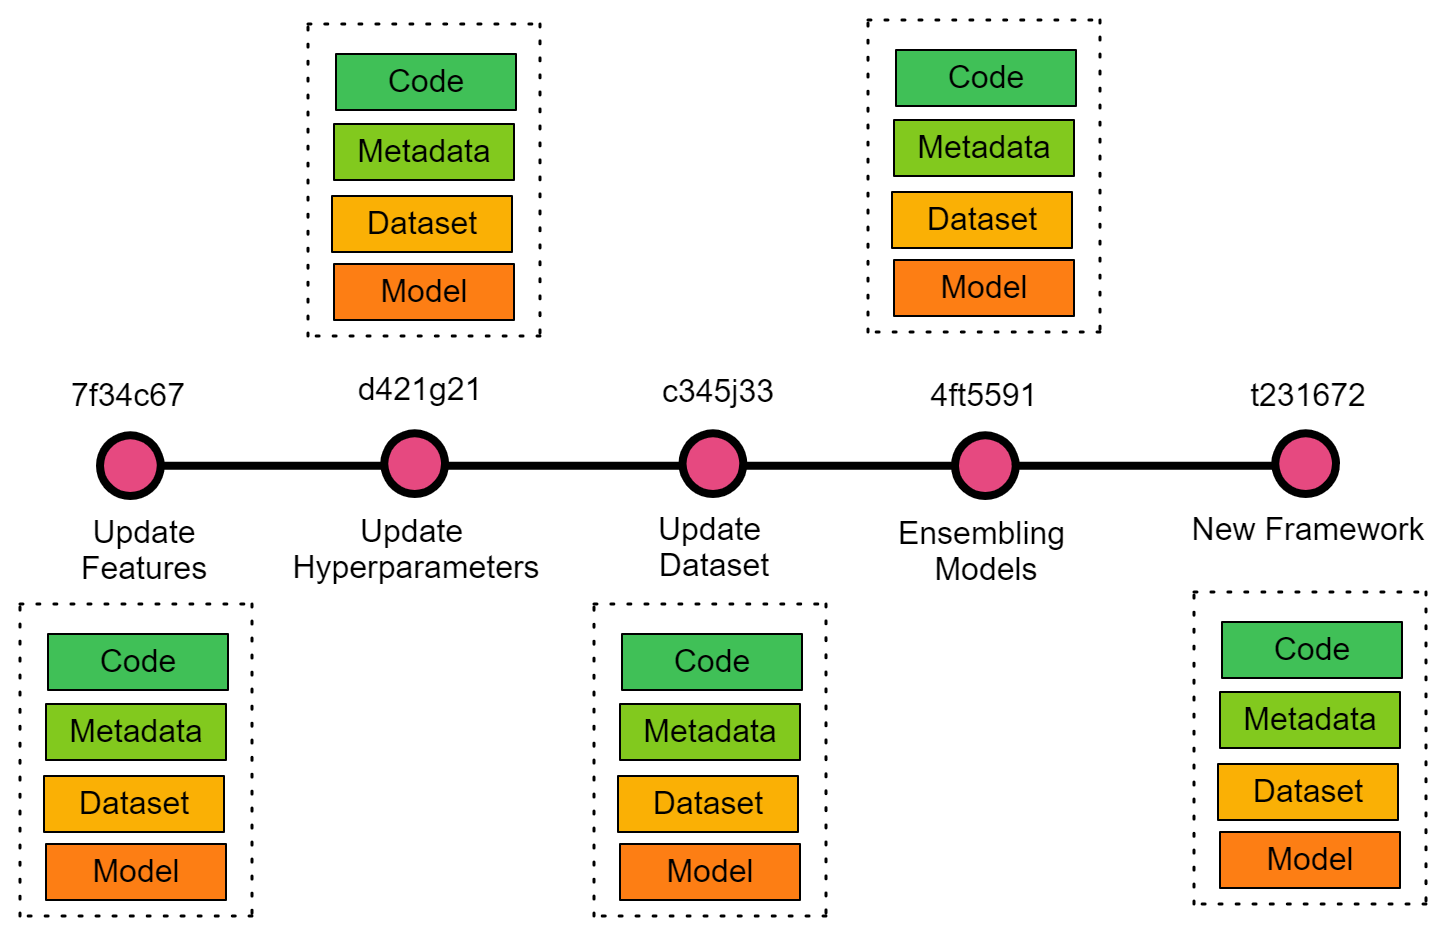
Git für ein datenwissenschaftliches Projekt
Zusammenarbeit mit GitHub
GitHub ist eine Cloud-Plattform für Softwareentwicklung. Es wird häufig zum Speichern von Dateien, zum Nachverfolgen von Änderungen und für die Zusammenarbeit bei Entwicklungsprojekten verwendet. In den letzten Jahren hat sich GitHub zur beliebtesten sozialen Plattform für Softwareentwicklungsgemeinschaften entwickelt. Einzelpersonen können zu Open-Source-Projekten und Fehlerberichten beitragen, neue Projekte diskutieren und neue Tools entdecken.
Datenwissenschaftler und Ingenieure für maschinelles Lernen folgen dem Weg der Softwareentwickler und integrieren den Workflow mit GitHub. Auf diese Weise können sie ihre Forschungsarbeit mit anderen teilen, Beiträge der Gemeinschaft ermöglichen und mit Datenteams zusammenarbeiten. Auf dieser Plattform findest du alle Arten von Data Science- und Machine Learning-Projekten, Anleitungen, Tutorials und Ressourcen. Für die Schüler/innen ist die Plattform eine Möglichkeit, Berufserfahrung zu sammeln und schließlich einen Job in einem angesehenen Unternehmen zu bekommen.
Portfolio
Die meisten technischen Personalvermittler werden nach den Portfolio-Projekten oder dem GitHub-Profil fragen. So können sie feststellen, ob ein Bewerber gut zu ihrem Unternehmen passt. Es wird dringend empfohlen, ein GitHub-Profil zu erstellen und es regelmäßig zu aktualisieren. Personalverantwortliche sind immer auf der Suche nach Bewerbern, die viel Erfahrung in der Softwareentwicklung haben und zu Open-Source-Projekten beitragen. Die Fähigkeit, das GitHub-Portfolio zu analysieren, hilft ihnen bei der Vorbereitung von Fragen für technische Vorstellungsgespräche.
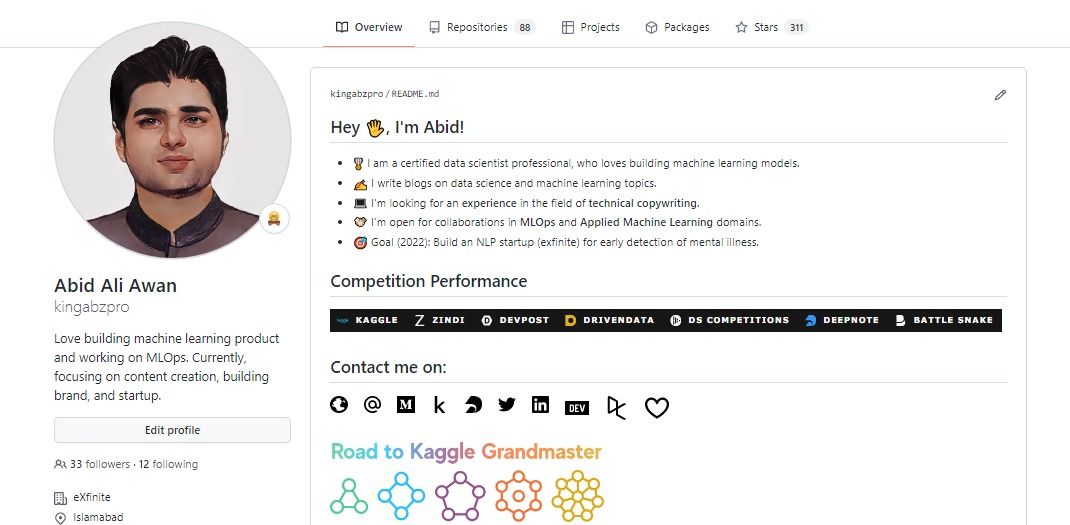
GitHub Profile
Auf GitHub können Datenwissenschaftler ihre Projekte vorstellen, und das kann auch als Berufserfahrung in deinem Lebenslauf zählen. Die Präsentation von Portfolio-Projekten bietet auch die Möglichkeit, zusammenzuarbeiten, ein Startup zu gründen und zu recherchieren.
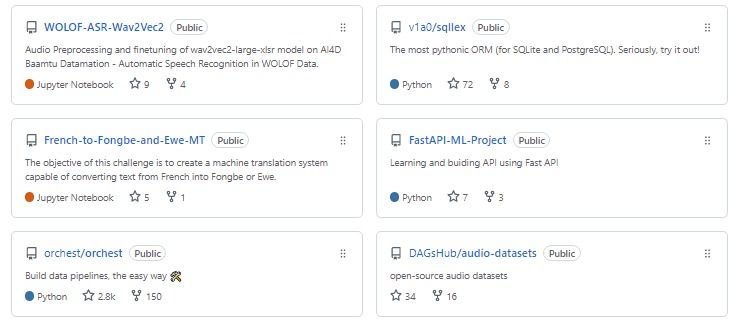
Portfolio Projects
Eigenschaften
GitHub bietet auch verschiedene andere Funktionen, die genauso wichtig sind wie die Präsentation eines Portfolios. Es ist wichtig, dass du die einzelnen Funktionen kennenlernst, damit du sie in deine Data Science-Projekte einbauen kannst.
- Open-Source: GitHub bietet ein komplettes Ökosystem für Open-Source-Projekte. Du kannst Maintainer sponsern, zu einem Projekt beitragen, das Open-Source-Tool in deinem bestehenden Projekt verwenden und für deine Arbeit werben.
- Gemeinschaftliche Zusammenarbeit: GitHub hat sich zu einer Community-Plattform entwickelt, auf der Probleme, Feature Requests, Code- und Dokumentationsbeiträge diskutiert werden können.
- Erforsche: Die Registerkarte GitHub Explore hilft dir, neue Projekte, aktuelle Tools und Veranstaltungen für Entwickler zu entdecken.
- GitHub Gists: Du kannst das Snippet deines Codes teilen oder in einen Blog oder eine Website einbetten.
- GitHub CLI: Damit kannst du über das Kommandozeilenprogramm Zusammenführungsanfragen stellen, Code überprüfen, Probleme kontrollieren und den Fortschritt überwachen.
- Kostenloser Speicherplatz: unbegrenzter Speicherplatz für private und öffentliche Repositories.
- Webhosting: Du kannst deine Portfolioseite oder deine Dokumentation veröffentlichen. GitHub-Seiten bieten eine einfach zu erstellende und zu nutzende Website.
- Codespace: eine Cloud-Entwicklungsumgebung, die mit deinem GitHub-Repository integriert ist.
- Projekt: ein anpassbares, flexibles Tool zur Planung und Verfolgung der Arbeit auf GitHub.
- Automatisierung: GitHub Action automatisiert Entwicklungsabläufe wie Build, Test, Veröffentlichung, Release und Deployment.
- Sponsor: Du kannst dein bevorzugtes Open-Source-Projekt oder deine Entwickler unterstützen, indem du eine monatliche oder einmalige Gebühr bezahlst. Es ermöglicht Entwicklern auch die Nutzung von Zahlungsplattformen von Drittanbietern wie Ko-Fi.
Grundlegende Befehle
Bevor wir uns mit der Verwaltung von Data-Science-Projekten befassen, wollen wir die gängigsten Git-Befehle kennenlernen, die du in jedem Data-Science-Projekt verwenden wirst. Zu den grundlegenden Befehlen gehören das Initialisieren des Git-Repositorys, das Speichern von Änderungen, das Überprüfen von Protokollen, das Pushen der Änderungen auf den Remote-Server und das Zusammenführen.
- git init erstellt ein Git-Repository in einem lokalen Verzeichnis.
- git clone <remote-repo-address>: Kopiert das gesamte Repository von einem entfernten Server in ein entferntes Verzeichnis. Du kannst es auch verwenden, um lokale Repositories zu kopieren.
- git add <Datei.txt>: Fügt eine einzelne Datei oder mehrere Dateien und Ordner zum Staging-Bereich hinzu.
- git commit -m "Nachricht": Erstellt einen Schnappschuss der Änderungen und speichert ihn im Repository.
- git config verwendet, um benutzerspezifische Konfigurationen wie E-Mail, Benutzername und Dateiformat festzulegen.
- git status zeigt die Liste der geänderten Dateien oder der Dateien, die noch nicht bereitgestellt und übertragen wurden.
- git push <remote-name> <branch-name>: sendet lokale Commits an den entfernten Branch des Repositorys.
- git checkout -b <branch-name>: erstellt einen neuen Branch und wechselt zu einem neuen Branch.
- git remote -v: zeigt alle entfernten Repositories an.
- git remote add <remote-name> <host-or-remoteURL>: fügt einen entfernten Server zum lokalen Repository hinzu.
- git branch -d <branch-name>: lösche den Branch.
- git pull führt Commits von einem entfernten Repository in einem lokalen Verzeichnis zusammen.
- git merge <branch-name>: Nach dem Auflösen von Konflikten beim Zusammenführen fügt der Befehl den ausgewählten Zweig in den aktuellen Zweig ein.
- git log zeigt eine detaillierte Liste der Commits für den aktuellen Branch.
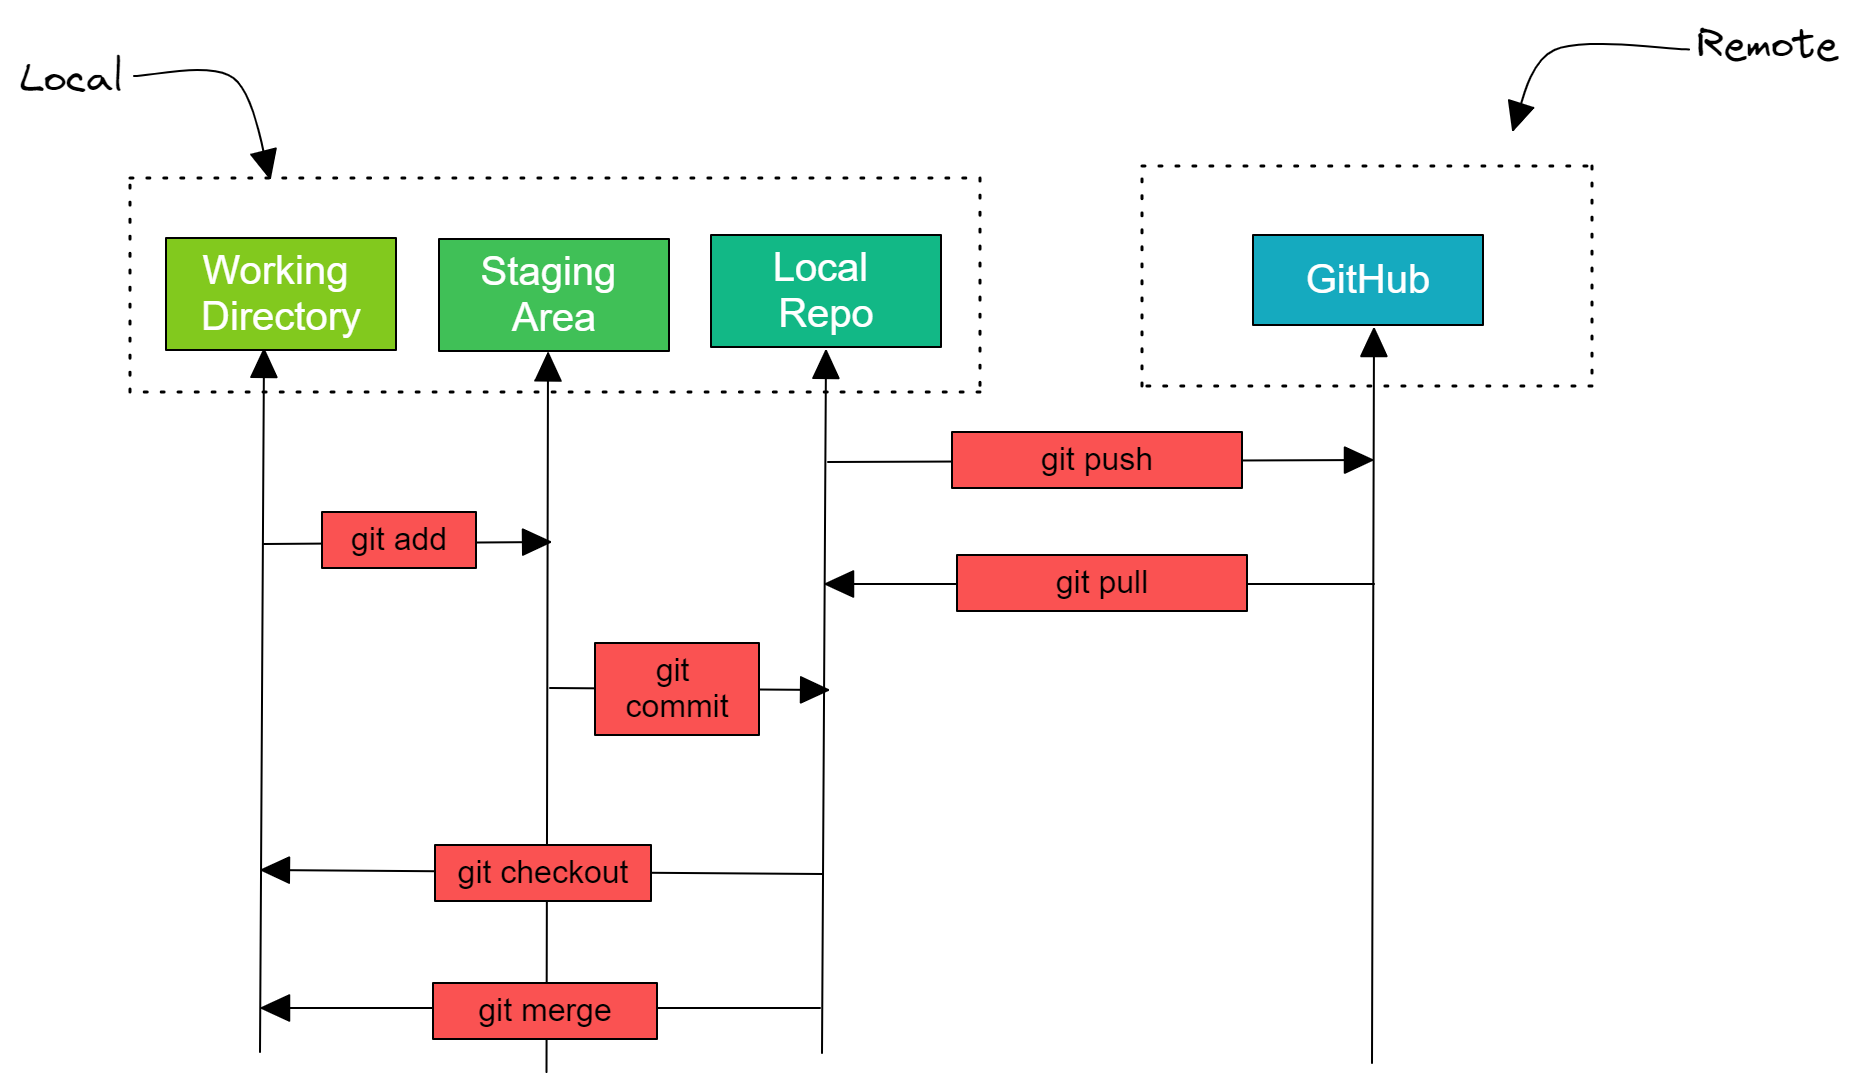
Vollständige Entwicklung mit GitHub
Wenn du mehr Befehle lernen möchtest, schau dir den Git-Spickzettel von Gitlab an.
Erste Schritte
In diesem Abschnitt werden wir Git als Lernpfad für ein Data Science-Projekt und GitHub als Remote-Server verwenden. Wir lernen, wie man Git installiert, ein Repository auf GitHub erstellt und klont, Experimente zum maschinellen Lernen durchführt und Änderungen (Notizbuch, Modell, Daten) mit Windows PowerShell 7 auf GitHub überträgt.
Git installieren
Git unterstützt alle Betriebssysteme. Du kannst es mit den Kommandozeilen-Tools installieren oder das Setup direkt herunterladen und installieren.
Linux
Für Debian/Ubuntu-basierte Betriebssysteme verwende `apt-get install git`. Wenn du ein anderes Linux-basiertes System verwendest, findest du die vollständige Liste der Installationsbefehle hier.
macOS
Wenn du Homebrew installiert hast, kannst du mit diesem Befehl Git herunterladen und installieren: `brew install git`. Du kannst auch den Binärinstaller herunterladen und das Setup ausführen.
Windows
Die Installation von Git unter Windows ist problemlos. Gehe einfach auf die Download-Seite, klicke auf die entsprechende Windows-Version und lade das Setup herunter und installiere es. Wenn du ein winget-Tool hast, kannst du es installieren, indem du in der PowerShell `winget install --id Git.Git -e --source winget` eingibst.
Nach der Installation von Git musst du sicherstellen, dass du den Benutzernamen und die E-Mail-Adresse konfiguriert hast. Diese Informationen werden verwendet, um die Commits zu signieren.
git config --global user.name "your-user-name"
git config --global user.email "your@email.com"
Ausführlichere Informationen zur Installation von Git findest du hier.
Initialisierung des Projekts
Wenn du ein GitHub-Konto hast, klicke auf die Schaltfläche + und wähle ein neues Repository aus. Danach gibst du den Namen des Repositorys ein und fügst eine einfache Beschreibung hinzu. Es wird ein leeres öffentliches Repository erstellt.
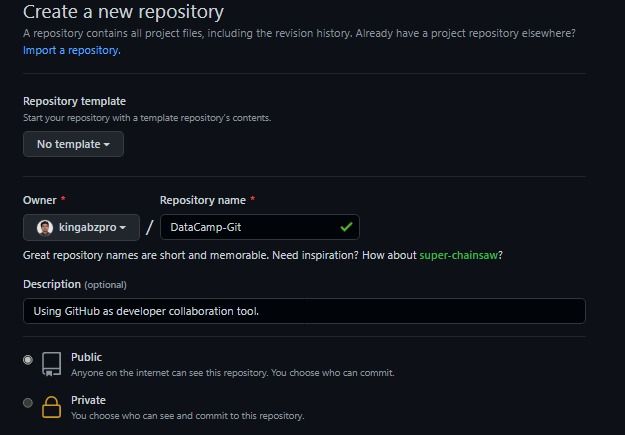
Projekt erstellen
Es gibt viele Möglichkeiten, entfernte Repositorys in das lokale Verzeichnis zu klonen. GitHub bietet eine ausführliche Anleitung zum Klonen, Hinzufügen von entfernten Repositorys und Initialisieren eines Git-Projekts.
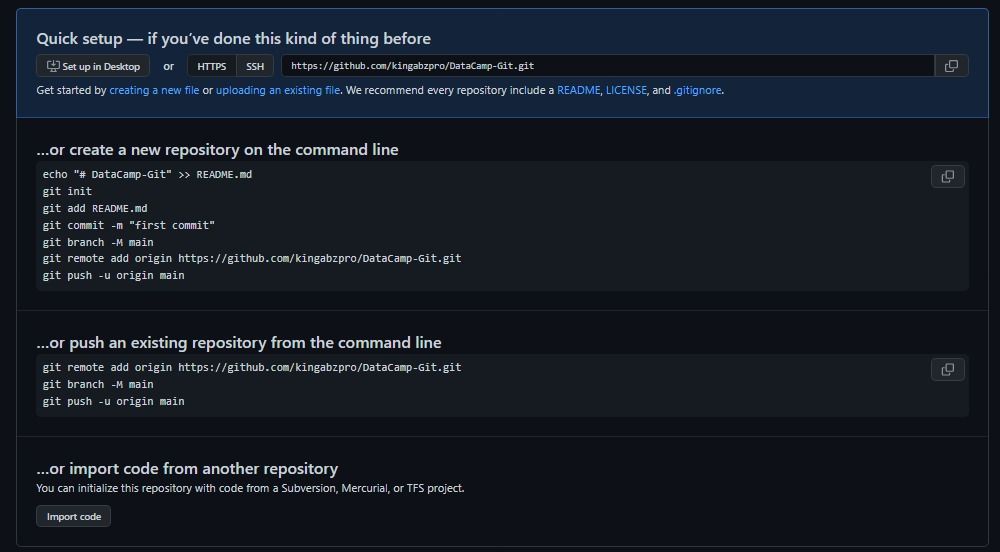
GitHub Clone
Wir können das Repository einfach klonen, indem wir einen HTTPS-Link bereitstellen. Stelle sicher, dass du dich im Arbeitsverzeichnis befindest, indem du die Eingabeaufforderung oder die PowerShell verwendest.
git clone https://github.com/kingabzpro/DataCamp-Git.git

>>> Cloning into 'DataCamp-Git'...
>>> warning: You appear to have cloned an empty repository.

cd .\DataCamp-Git\
OR
Erstelle ein neues Verzeichnis namens "DataCamp-Git" und initialisiere Git mit einem einfachen Befehl. Danach fügst du eine Verbindung zu dem entfernten Repository hinzu, damit du deine Arbeit mit GitHub synchronisieren kannst.
mkdir DataCamp-Git
cd .\DataCamp-Git
git init

>>> Initialized empty Git repository in C:/Repository/GitHub/DataCamp-Git/.git/

git remote add origin https://github.com/kingabzpro/DataCamp-Git.git
OR
Wenn du bereits ein Projekt in einem Verzeichnis hast, initialisiere Git einfach mit `git init` und füge GitHub remote hinzu, wie oben gezeigt.
Einfaches Commit
Bevor wir Dateien zu unserem Repository hinzufügen, solltest du sicherstellen, dass du dich im richtigen lokalen Verzeichnis befindest.
Wir fangen ganz einfach an und erstellen eine README-Datei mit dem Titel DataCamp-Git. Dann fügen wir sie mit "git add" zum Staging-Bereich hinzu.
echo "# DataCamp-Git" >> README.md
git add README.md
Der Git-Status zeigt an, dass wir uns auf dem Hauptzweig befinden und die Datei "README.md" bereitgestellt und bereit zum Übertragen ist.
git status

>>> On branch main
>>> No commits yet
>>> Changes to be committed:
  (use "git rm --cached ..." to unstage)
        new file:   README.md
Um unseren ersten Commit zu erstellen, verwenden wir `git commit` mit einer Nachricht. Wie wir sehen können, wird der erste Commit unter dem Hash ed9c886 hinzugefügt.
git commit -m "first commit"

>>> [main (root-commit) ed9c886] first commit
>>> 1 file changed, 1 insertion(+)
>>> create mode 100644 README.md
Hinzufügen von Projektdateien
Wir werden den DataCamp-Arbeitsbereich MasterCard Stock Price mit LSTM und GRU verwenden und Dateien herunterladen. Der Autor des Projekts hat die Daten vorverarbeitet und Zeitreihendaten für die LSTM- und GRU-Modelle trainiert. Erfahre mehr über das Projekt, indem du Recurrent Neural Network Tutorial (RNN) liest.
Um die Modelldatei zu speichern, haben wir eine neue Codezelle im Jupyter-Notizbuch des Projekts hinzugefügt. Das neue Skript erstellt ein neues Verzeichnis namens "model" und speichert sowohl LSTM- als auch GRU-Modelle.
!mkdir -p model
model_lstm.save('model/LSTM')
model_gru.save('model/GRU')
Wie wir sehen können, hat das Git-Repository einen Datenordner mit CSV-Dateien, den Modellordner mit dem Gewicht des Modells und Metadaten.
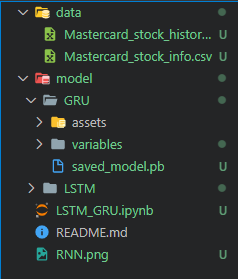
Wir werden nun alle Dateien bereitstellen. Du kannst jedes Verzeichnis, jede Datei oder Daten nach dem ersten Befehl hinzufügen.
git add .\data .\model LSTM_GRU.ipynb RNN.pngOR
Wenn du alle Dateien zum Staging-Bereich hinzufügen willst, dann verwende dot.
git add .Commit und Push
Wir werden alle Änderungen mit einer einfachen Nachricht übertragen und die Ausgabe zeigt alle neuen Dateien im Erstellungsmodus.
git commit -m "project files added"

>>> [main aa3e19a] project files added
>>>  10 files changed, 5020 insertions(+)
>>>  create mode 100644 LSTM_GRU.ipynb
>>>  create mode 100644 RNN.png
>>>  create mode 100644 data/Mastercard_stock_history.csv
>>>  create mode 100644 data/Mastercard_stock_info.csv
>>>  create mode 100644 model/GRU/saved_model.pb
>>>  create mode 100644 model/GRU/variables/variables.data-00000-of-00001
>>>  create mode 100644 model/GRU/variables/variables.index
>>>  create mode 100644 model/LSTM/saved_model.pb
>>>  create mode 100644 model/LSTM/variables/variables.data-00000-of-00001
create mode 100644 model/LSTM/variables/variables.index
Die Synchronisierung mit dem GitHub-Remote-Repository erfordert den Remote-Namen und den Branch-Namen `git push <remote-name> <branch-name>`. Wenn du nur einen Remote und einen Branch hast, funktioniert `git push`.
Nach `git push` fragt das Pop-up-Fenster nach den Anmeldedaten. Gib einfach deinen GitHub-Benutzernamen oder dein Passwort ein. Du kannst auch persönliche Zugangstoken erstellen und sie anstelle des Passworts hinzufügen. Erfahre mehr, indem du das Git Push und Pull Tutorial liest.
git push

>>> Enumerating objects: 21, done.
>>> Counting objects: 100% (21/21), done.
>>> Delta compression using up to 4 threads
>>> Compressing objects: 100% (19/19), done.
>>> Writing objects: 100% (21/21), 1.83 MiB | 1.59 MiB/s, done.
>>> Total 21 (delta 2), reused 0 (delta 0), pack-reused 0
>>> remote: Resolving deltas: 100% (2/2), done.
>>> To https://github.com/kingabzpro/DataCamp-Git.git
>>>  * [new branch]      main -> main
Wir überprüfen unser GitHub-Repository kingabzpro/DataCamp-Git, um zu sehen, ob wir die Änderungen erfolgreich an den Remote-Server übertragen haben. Das GitHub-Repository enthält alle Dateien, Daten und Modelle.
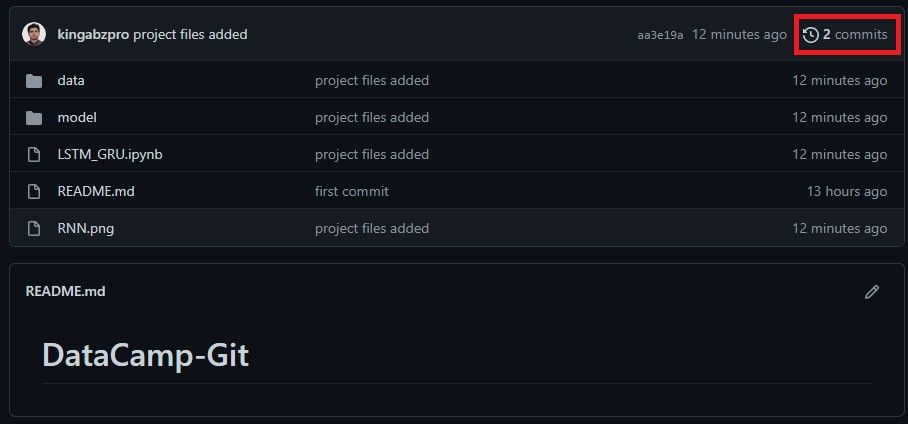
Fern-Push zu GitHub
Git-Zweige
Es wird empfohlen, mit Zweigen zu arbeiten: Wenn du zum Beispiel an der Projektdokumentation arbeiten willst, erstelle einen Dokumentationszweig mit `git checkout` oder `git branch`. Nimm Änderungen in der README-Datei vor und wenn du die Änderungen abgeschlossen hast, führe den Zweig mit der Basis zusammen.
In unserem Fall haben wir einen neuen Zweig mit dem Namen "readme" erstellt und zu diesem gewechselt.
git checkout -b readmeBearbeiten wir die README-Datei, indem wir eine Beschreibung des Projekts hinzufügen und den RNN DataCamp Arbeitsbereich und das Tutorial verlinken. Danach werden wir Änderungen durchführen und einen Schnappschuss der Änderungen mit einer Nachricht speichern.
git add README.md
git commit -m "project description and links to blog"

>>> [readme f3b8b9b] project description and links to blog
>>>  1 file changed, 8 insertions(+)
Das Remote-Repository hat keinen Readme-Zweig. Um einen neuen Zweig zu erstellen und Änderungen vorzunehmen, verwenden wir "readme:readme". Die Ausgabe des Befehls zeigt, dass neue Zweige erstellt wurden und sowohl die lokalen als auch die entfernten `readme`-Zweige synchronisiert sind.
git push origin readme:readme
>>> remote: Resolving deltas: 100% (1/1), completed with 1 local object.
>>> remote: Create a pull request for 'readme' on GitHub by visiting:
>>> remote:  https://github.com/kingabzpro/DataCamp-Git/pull/new/readme
>>> remote:
To https://github.com/kingabzpro/DataCamp-Git.git
>>>  * [new branch]      readme -> readme
Du kannst sehen, dass wir den lokalen Zweig mit einer geänderten Version der Datei README.md erfolgreich auf GitHub veröffentlicht haben.
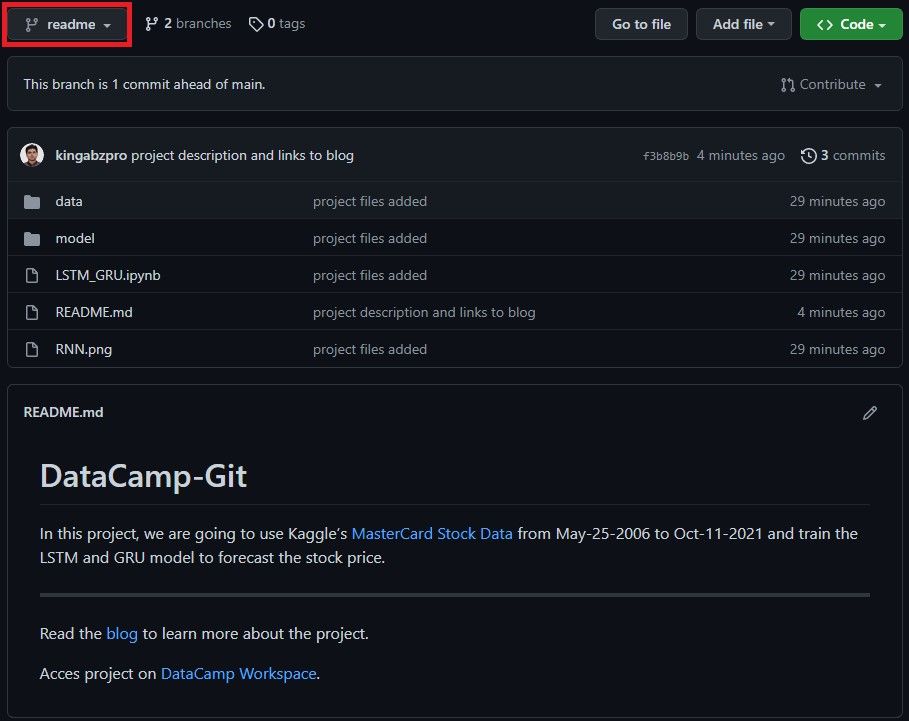
Readme-Zweig auf GitHub
Pull Request
Diese Funktion ist für Organisationen üblich. Ein Beispiel: Ein Softwareentwickler hat an einer neuen Funktion gearbeitet und möchte die Änderungen in den Hauptzweig einbringen. Jetzt erstellen wir Pull-Requests über die GitHub-GUI, indem wir auf den Pull-Request-Button klicken. Danach wählst du den Readme-Zweig aus, den wir mit der Basis (main) zusammenführen wollen. Du kannst eine ausführliche Erklärung schreiben, welche Funktionen hinzugefügt wurden, und auf den Pull-Request-Button klicken.
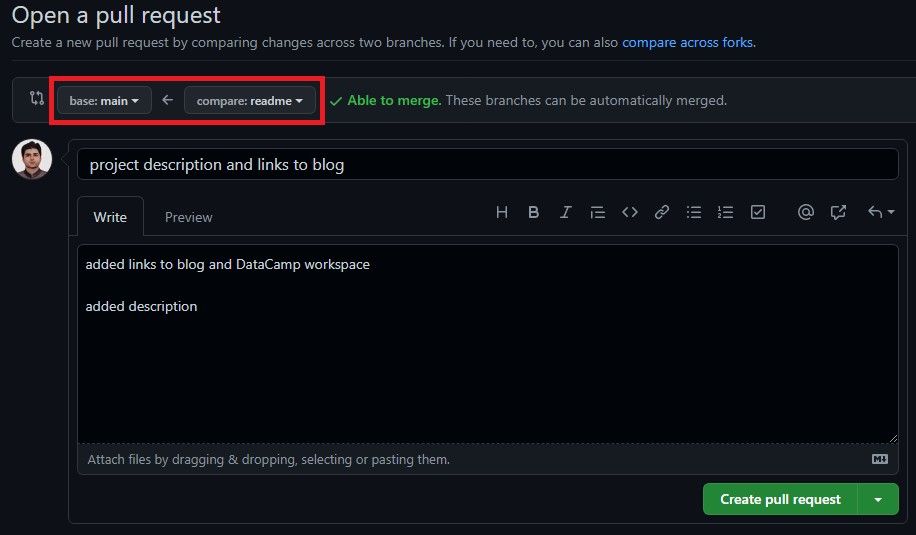
Pull-Anfrage von readme zum Hauptzweig
Der Betreuer des Repositorys vergleicht deine Änderungen und führt sie zusammen, wenn sie alle Tests bestanden haben. In unserem Fall bist du der Maintainer, also klicke auf den Merge Request, um die Änderungen mit dem Hauptzweig zu verschmelzen.

Zusammenführen von Pull Requests auf GitHub
Herzlichen Glückwunsch, wir haben erfolgreich einen Pull-Request erstellt und ihn mit dem Hauptzweig zusammengeführt. Du kannst die Änderungen im Hauptzweig hier einsehen.
Wenn du dir alle Änderungen in deinem Git-Repository ansehen möchtest, gib einfach `git log` ein und es werden die historischen Änderungen an deinem Projekt angezeigt. Die Protokollierung von Änderungen in Data-Science-Projekten ist wichtig, und Git hilft uns, alle Änderungen zu verfolgen, auch bei großen Datensätzen.
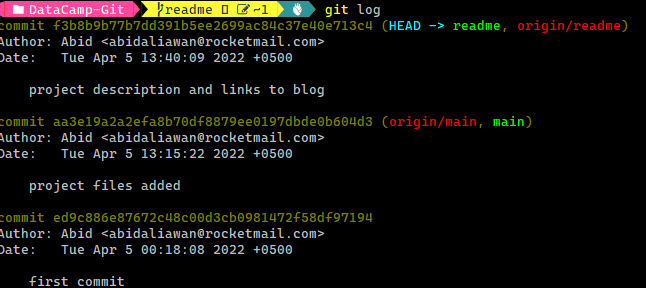
Geschichte der Git Logs
Fazit
GitOps sind entscheidend für die Entwicklung von Datenanwendungen. Sie sind zu einer unverzichtbaren Fähigkeit für alle Arten von IT-Jobs geworden; sogar akademische Forscher/innen nutzen sie, um experimentellen Code mit einem größeren Publikum zu teilen. Auf der anderen Seite spielt GitHub eine größere Rolle bei der Förderung von Open-Source-Projekten, indem es ein freies Softwareentwicklungs-Ökosystem für alle bereitstellt.
In diesem Tutorial haben wir Git und GitHub kennengelernt und erfahren, warum sie für Data Science-Projekte wichtig sind. Der Lernpfad führt dich auch in die grundlegenden Git-Befehle ein und vermittelt dir praktische Erfahrungen, wie du Änderungen an Daten, Modellen und Code verfolgen kannst. Wenn du mehr über Git erfahren möchtest, dann besuche den Kurs Einführung in Git auf DataCamp. Außerdem erfährst du, wie wichtig die GitHub-Zertifizierung ist und wie sie deine Karriere fördern kann.
Werde Dateningenieur
Git FAQs
Was ist Git?
Einn Open-Source-System zur verteilten Versionskontrolle. Sie ermöglicht es Entwicklern, Änderungen in einem Entwicklungsprojekt zu speichern, zu versionieren und zu visualisieren. Es fördert flexible Teamarbeit und optimierte Arbeitsabläufe.
Wofür steht Git?
Es ist kein Akronym. Seinem Schöpfer Linus Torvalds zufolge kann "Git alles bedeuten, je nach Stimmung". Es ist eine Kombination aus drei zufälligen Buchstaben, die von keinem UNIX-Befehl verwendet werden.
Wie kann ich ein Git-Repository klonen?
Jtippe in einem Terminal `git clone <remote repository address>` ein. Du kannst lokale und entfernte Repositories klonen. Es unterstützt sowohl SSH- als auch HTTPS-Protokolle.
Wie lösche ich einen Zweig in Git?
Um einen lokalen Zweig zu löschen, benutze `git branch -d <local_branch_name>`, und um den entfernten Zweig zu löschen, benutze `git push <remote_name> -d <remote_branch_name>`.
Wie wechselt man in Git die Zweige?
Wechsle zu einem bestehenden Zweig mit `git checkout <Zweigname>` oder erstelle einen neuen Zweig mit `git checkout -b <Zweigname>` und wechsle zu ihm.
Wie installiere ich Git?
Für Linux-Systeme verwenden Sie `apt-get install git`, und für andere Betriebssysteme besuchen Sie git-scm.com.
Ist Git frei?
Ja, sie ist frei und quelloffen unter der GPL-2.0-Lizenz.
Was ist Git Bash?
Es ist eine Microsoft Windows-Anwendung, die Unix-basierte Shell-Utilities und -Erfahrungen bietet.
Wie erstelle ich einen neuen Zweig in Git?
Verwende den Befehl `git branch <neuer-zweig> <basierender-zweig>` im Terminal. Um einen neuen Zweig zu erstellen und dorthin zu wechseln, benutze `git checkout -b <Zweigname>`.
Was macht git pull?
Er aktualisiert die lokale Version eines Repositorys von einem entfernten Server und kopiert alle Änderungen aus einem entfernten Repository und führt sie mit dem lokalen Verzeichnis zusammen. Dieser Prozess erfordert oft die Lösung von Konflikten bei der Zusammenführung.
Wie forke ich ein Repo in Git?
Beim Forking in GitHub wird eine Kopie eines Repositorys von einem anderen Konto auf das GitHub-Konto des Nutzers erstellt. Normalerweise wird es für einen Beitrag zur Gemeinschaft oder für Teamarbeit gemacht.
Wie benennt man einen Zweig in Git um?
Für das lokale Repository ist es ganz einfach: Benutze einfach `git branch -m <alter-Name> <neuer-Name>`. Um einen entfernten Zweig umzubenennen, müssen wir zuerst den alten Zweig mit `git push origin --delete <old-name>` entfernen und dann den neuen Zweig `git push -u origin <new_name>` pushen.
Wie kann ich das Git-Repository löschen?
Du kannst den lokalen Ordner löschen oder die .git Ordner mit `rm -fr .git` entfernen. Bei GitHub gehst du zu den Repository-Einstellungen und am Ende der Seite findest du die Option zum Löschen.
Wie installiere ich Git unter Windows?
Lade das Windows-Setup von der Website und führe das Setup aus. Dabei werden Git Bash, Git CDM und Git GUI installiert.
Wie macht man einen Commit in Git rückgängig?
Verwende `git revert <commit sha>`, das einen eindeutigen Hash-Code eines vorherigen Commits benötigt. Du kannst auch `git revert HEAD~2` verwenden, was zwei Commits hinter dem Head bedeutet.