Curso
¿Qué es Snowflake?
Si alguien me pidiera que describiera a Snowflake con el menor número de palabras posible, elegiría éstas:
- Almacenes de datos
- Datos a gran escala
- Nube múltiple
- Separación
- Escalable
- Flexible
- Simple
Si querían que me explayara, encadenaba las palabras así:
Snowflake es una plataforma en la nube de datos de IA muy popular. Destaca entre sus competidores por su capacidad para manejar datos y cargas de trabajo a gran escala con mayor rapidez y eficacia. Su rendimiento superior procede de su arquitectura única, que utiliza capas separadas de almacenamiento y cálculo, lo que le permite ser increíblemente flexible y escalable. Además, se integra de forma nativa con múltiples proveedores de nubes. A pesar de estas funciones avanzadas, sigue siendo sencillo de aprender y aplicar.
Si piden aún más detalles, bueno, entonces escribiría este tutorial. Si eres totalmente nuevo en el tema, nuestro curso Introducción a Snowflake es un excelente punto de partida.
¿Por qué utilizar Snowflake?
Snowflake da servicio a más de 8.900 clientes en todo el mundo y procesa 3.900 millones de consultas al día. Ese tipo de estadísticas de uso no es una coincidencia ni mucho menos.
A continuación te indicamos las mejores ventajas de Snowflake que tienen tanto atractivo:
1. Arquitectura basada en la nube
Snowflake opera en las nubes, lo que permite a las empresas ampliar y reducir recursos en función de la demanda sin preocuparse de la infraestructura física (hardware). La plataforma también se encarga de las tareas rutinarias de mantenimiento, como las actualizaciones de software, la gestión del hardware y el ajuste del rendimiento. Esto alivia la carga de los gastos generales de mantenimiento, permitiendo a las organizaciones centrarse en lo que importa: obtener valor de los datos.
2. Elasticidad y escalabilidad
Snowflake separa las capas de almacenamiento y computación, permitiendo a los usuarios escalar sus recursos informáticos independientemente de sus necesidades de almacenamiento. Esta elasticidad permite gestionar eficazmente diversas cargas de trabajo con un rendimiento óptimo y sin costes innecesarios.
3. Concurrencia y rendimiento
Snowflake gestiona fácilmente la alta concurrencia: varios usuarios pueden acceder a los datos y consultarlos sin pérdida de rendimiento.
4. Compartir datos
Las garantías de seguridad de Snowflake permiten compartir datos con otras organizaciones, departamentos internos, socios externos, clientes u otras partes interesadas. No necesitas complejas transferencias de datos.
5. Viaje en el tiempo
Snowflake utiliza un término elegante "Viaje en el tiempo" para el versionado de datos. Cada vez que se realiza un cambio en la base de datos, Snowflake toma una instantánea. Esto permite a los usuarios acceder a datos históricos en distintos momentos.
6. Rentabilidad
Snowflake ofrece un modelo de pago por uso gracias a su capacidad para escalar los recursos dinámicamente. Sólo pagarás por lo que utilices.
Todas estas ventajas combinadas convierten a Snowflake en una plataforma en la nube muy deseable para la IA de datos.
Ahora, echemos un vistazo a la arquitectura subyacente de Snowflake que desbloquea estas funciones.
Conviértete en Ingeniero de Datos
¿Qué es un almacén de datos?
Antes de sumergirnos en la arquitectura de Snowflake, repasemos los almacenes de datos para asegurarnos de que todos estamos en la misma página.
Un almacén de datos es un depósito centralizado que almacena grandes cantidades de datos estructurados y organizados procedentes de diversas fuentes para una empresa. Diferentes personas (empleados) de las organizaciones utilizan los datos que contienen para obtener diferentes perspectivas.
Por ejemplo, los analistas de datos, en colaboración con el equipo de marketing, pueden realizar una prueba A/B para una nueva campaña de marketing utilizando la tabla de ventas. Los especialistas en RRHH pueden consultar la información de los empleados para hacer un seguimiento de su rendimiento.
Estos son algunos de los ejemplos de cómo las empresas de todo el mundo utilizan los almacenes de datos para impulsar el crecimiento. Pero sin una implantación y gestión adecuadas mediante herramientas como Snowflake, los almacenes de datos siguen siendo conceptos elaborados.
Puedes aprender más sobre el tema con nuestro curso de Almacenamiento de Datos.
Arquitectura Snowflake
La arquitectura única de Snowflake, diseñada para consultas analíticas más rápidas, proviene de su separación de las capas de almacenamiento y computación. Esta distinción contribuye a los beneficios que hemos mencionado antes.
Capa de almacenamiento
En Snowflake, la capa de almacenamiento es un componente crítico, que almacena los datos de forma eficiente y escalable. He aquí algunas características clave de esta capa:
- En la nube: Snowflake se integra perfectamente con los principales proveedores de nubes, como AWS, GCP y Microsoft Azure.
- Formato columnar: Snowflake almacena los datos en un formato columnar, optimizado para las consultas analíticas. A diferencia de los formatos tradicionales basados en filas que utilizan herramientas como Postgres, el formato columnar es muy adecuado para la agregación de datos. En el almacenamiento columnar, las consultas sólo acceden a las columnas concretas que necesitan, por lo que es más eficiente. Por otra parte, los formatos basados en filas requieren acceder a todas las filas de la memoria para operaciones sencillas como calcular promedios.
- Micropartición: Snowflake utiliza una técnica llamada micropartición que almacena las tablas en memoria en pequeños trozos. Cada trozo suele ser inmutable y de sólo unos megabytes de tamaño, lo que hace que la optimización y ejecución de las consultas sea mucho más rápida.
- Clonación de copia cero: Snowflake tiene una característica única que le permite crear clones virtuales de datos. La clonación es instantánea y no consume memoria adicional hasta que se realizan cambios en la nueva copia.
- Escala y elasticidad: La capa de almacenamiento escala horizontalmente, lo que significa que puede manejar volúmenes de datos crecientes añadiendo más servidores para distribuir la carga. Además, este escalado se produce independientemente de los recursos informáticos, lo que es ideal cuando deseas almacenar grandes volúmenes de datos pero analizar sólo una pequeña fracción.
Veamos ahora la capa de cálculo.
Capa de cálculo
Como su nombre indica, la capa de cálculo es el motor que ejecuta tus consultas. Trabaja conjuntamente con la capa de almacenamiento para procesar los datos y realizar diversas tareas computacionales. A continuación encontrarás más detalles sobre el funcionamiento de esta capa:
- Almacenes virtuales: Puedes pensar en los Almacenes Virtuales como equipos de ordenadores (nodos de cálculo) diseñados para gestionar el procesamiento de consultas. Cada miembro del equipo se encarga de una parte diferente de la consulta, lo que hace que la ejecución sea impresionantemente rápida y paralela. Snowflake ofrece Almacenes Virtuales de distintos tamaños y, por consiguiente, a distintos precios (los tamaños incluyen XS, S, M, L, XL).
- Arquitectura multiclúster y multinodo: La capa de cálculo utiliza varios clusters con múltiples nodos para una alta concurrencia, permitiendo que varios usuarios accedan a los datos y los consulten simultáneamente.
- Optimización automática de consultas: El sistema de Snowflake analiza todas las consultas e identifica patrones para optimizar utilizando datos históricos. Las optimizaciones habituales incluyen la poda de datos innecesarios, el uso de metadatos y la elección de la ruta de ejecución más eficiente.
- Caché de resultados: La capa de cálculo incluye una caché que almacena los resultados de las consultas ejecutadas con frecuencia. Cuando se vuelve a ejecutar la misma consulta, los resultados se devuelven casi instantáneamente.
Todos estos principios de diseño de la capa de cálculo contribuyen a la capacidad de Snowflake para gestionar cargas de trabajo diferentes y exigentes en la nube.
Capa de servicios en la nube
La última capa son los servicios en la nube. Como esta capa se integra en todos los componentes de la arquitectura de Snowflake, hay muchos detalles sobre su funcionamiento. Además de las funciones relacionadas con otras capas, tiene las siguientes responsabilidades adicionales:
- Seguridad y control de acceso: Esta capa aplica medidas de seguridad, como la autenticación, la autorización y la encriptación. Los administradores utilizan el Control de Acceso Basado en Funciones (RBAC) para definir y gestionar las funciones y permisos de los usuarios.
- Compartir datos: Esta capa implementa protocolos seguros de intercambio de datos entre diferentes cuentas e incluso organizaciones de terceros. Los consumidores de datos pueden acceder a ellos sin necesidad de moverlos, lo que fomenta la colaboración y la monetización de los datos.
- Soporte de datos semiestructurados: Otra ventaja exclusiva de Snowflake es su capacidad para manejar datos semiestructurados, como JSON y Parquet, a pesar de ser una plataforma de gestión de almacenes de datos. Puede consultar fácilmente datos semiestructurados e integrar los resultados con las tablas existentes. Esta flexibilidad no se ve en otras herramientas RDBMS.
Ahora que tenemos una imagen de alto nivel de la arquitectura de Snowflake, vamos a escribir algo de SQL en la plataforma.
Configurar Snowflake SQL
Snowflake tiene su propia versión de SQL llamada Snowflake SQL. La diferencia entre éste y otros dialectos de SQL es similar a la diferencia entre los acentos del inglés.
Muchas de las consultas analíticas que realizas en dialectos como PostgreSQL no cambian, pero hay algunas discrepancias en los comandos DDL (Lenguaje de Definición de Datos).
Ahora, ¡vamos a ver cómo ejecutar algunas consultas!
Snowsight: Interfaz web

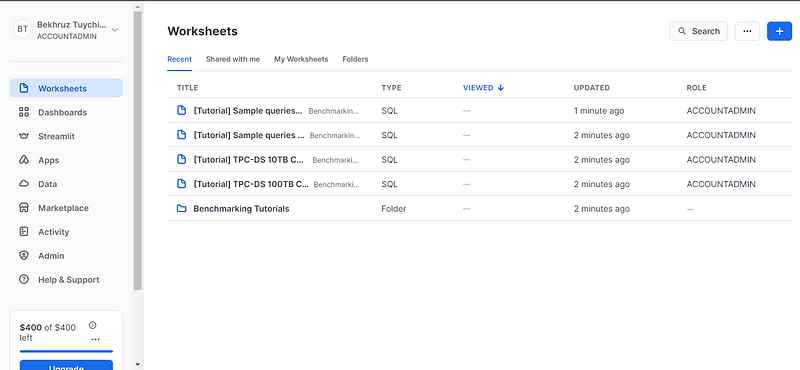
Para empezar a utilizar Snowsight, ve a la página de prueba gratuita de 120 días de Snowflake y crea una cuenta. Introduce tus datos personales y selecciona cualquier proveedor de nube de la lista. Esto proporciona una prueba gratuita de 120 días en lugar de la prueba más estándar de 30 días que puedes encontrar en otros sitios. La prueba también incluye créditos por valor de 400 $.
Al inscribirse para una prueba, se recomienda que los usuarios elijan AWS y la región Oeste de EEUU-Oregón. Entre otras razones, Oregón es una de las regiones con costes más bajos para la infraestructura de AWS y, en consecuencia, los créditos de prueba duran más.
Tras verificar tu correo electrónico, serás redirigido a la página Hojas de trabajo. Las hojas de trabajo son entornos interactivos de codificación en vivo en los que puedes escribir, ejecutar y ver los resultados de tus consultas SQL.

Para realizar algunas consultas, necesitamos una base de datos y una tabla (no utilizaremos los datos de muestra de Snowsight). Para empezar, te sugiero que intentes crear una nueva base de datos (podrías llamarla algo así como test_db) y una tabla con el nombre de un archivo CSV local. Puedes descargar el archivo CSV ejecutando el código de este gist de GitHub en tu terminal.
Después, se te dirigirá a una nueva hoja de cálculo donde podrás ejecutar cualquier consulta SQL que desees. La interfaz de la hoja de cálculo me parece bastante sencilla y muy funcional. Tómate unos minutos para familiarizarte con los paneles, los botones y sus respectivas ubicaciones.
Conclusión y aprendizaje posterior
¡Uf! Empezamos con algunos conceptos sencillos, pero hacia el final, nos metimos de lleno en los detalles escabrosos. Bueno, esa es mi idea de un tutorial decente.
Probablemente habrás adivinado que Snowflake es mucho más de lo que hemos visto. De hecho, ¡la documentación de Snowflake incluye guías de inicio rápido que en realidad duran 128 minutos! Pero antes de abordarlas, te recomiendo que te mojes las manos con otros recursos. ¿Qué te parecen éstas?
- Curso de Introducción a Snowflake
- Un seminario web sobre la modernización de la analítica de ventas con Snowflake
- Análisis de datos en Snowflake con código Python
- Guías de usuario oficiales de Snowflake
- Snowflake Northstar para saber más sobre la visión a largo plazo de Snowflake.
¡Gracias por leer!
Certifícate en el puesto de Ingeniero de Datos de tus sueños
Nuestros programas de certificación te ayudan a destacar y a demostrar que tus aptitudes están preparadas para el trabajo a posibles empleadores.


Soy un creador de contenidos de ciencia de datos con más de 2 años de experiencia y uno de los mayores seguidores en Medium. Me gusta escribir artículos detallados sobre IA y ML con un estilo un poco sarcastıc, porque hay que hacer algo para que sean un poco menos aburridos. He publicado más de 130 artículos y un curso DataCamp, y estoy preparando otro. Mi contenido ha sido visto por más de 5 millones de ojos, 20.000 de los cuales se convirtieron en seguidores tanto en Medium como en LinkedIn.
