
Cursus
Conteneurisation et virtualisation avec Docker et Kubernetes
13 h
L'erreur Docker « espace disque insuffisant » survient généralement au moment le plus inopportun : au milieu d'un déploiement, lors d'une compilation critique ou lors du téléchargement d'une image essentielle. J'ai parfois rencontré cette erreur, et je peux vous affirmer que supprimer des fichiers sans diagnostic approprié peut entraîner une perte de données.
Ce qui rend cette erreur particulièrement complexe, c'est qu'elle a rarement une seule cause. Vous pourriez être confronté à des images Docker accumulées, des journaux de conteneurs incontrôlables, des inodes épuisés provenant de millions de petits fichiers, ou même de l'espace « fantôme » consommé par des fichiers supprimés mais toujours ouverts par des processus en cours d'exécution. Chaque situation nécessite une solution distincte.
C'est pourquoi je mets toujours l'accent sur le diagnostic avant l'action. Comprendre la cause profonde vous permet d'appliquer efficacement des solutions ciblées et d'éviter de perturber votre environnement de production. Dans ce guide, je vous présenterai une approche systématique pour diagnostiquer, résoudre et prévenir ce problème frustrant.
Si vous débutez avec Docker, je vous recommande de suivre notre formation pratique Introduction à Docker , qui couvre tous les aspects nécessaires pour vous lancer dans la conteneurisation.
Lorsque Docker affiche cette erreur, cela indique l'un des deux problèmes fondamentaux suivants liés au stockage de votre système :
Il est essentiel de comprendre la distinction entre ces causes afin d'appliquer la solution appropriée.
La première cause, et la plus évidente, est l'épuisement des blocs physiques du disque.. Votre système de fichiers n'a plus d'espace de stockage disponible pour enregistrer des données. Voici le scénario le plus courant : vous avez simplement rempli votre disque avec des images Docker, des conteneurs, des journaux ou d'autres fichiers.
La deuxième cause, moins évidente, est l'épuisement des inodes.. Même avec plusieurs gigaoctets d'espace libre disponible, votre système de fichiers peut manquer d'inodes (structures de métadonnées utilisées pour suivre les fichiers et les répertoires). Chaque fichier et répertoire utilise un inode. Par conséquent, les applications qui créent des millions de petits fichiers (tels que les fichiers de session PHP ou les répertoires npm node_modules ) peuvent épuiser les inodes tout en laissant de l'espace disque inutilisé.
Docker utilise généralement le pilote de stockage overlay2, qui est basé sur Linux OverlayFS. OverlayFS superpose plusieurs répertoires sur un seul hôte et les présente comme un système de fichiers unifié. Les couches d'image sont montées en tant que répertoires inférieurs en lecture seule, tandis que chaque conteneur en cours d'exécution ajoute une fine couche supérieure inscriptible. La vue fusionnée est présentée comme un répertoire unique au conteneur.
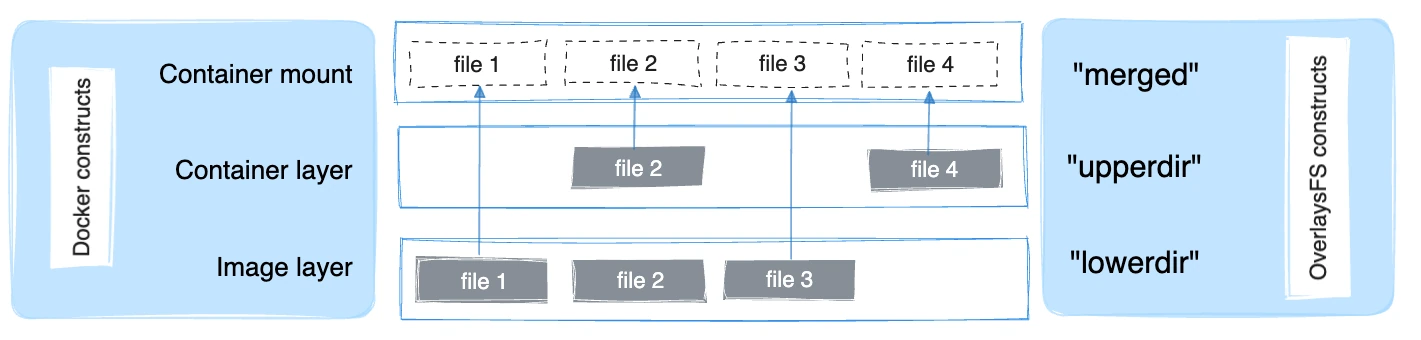
Le pilote overlay2 prend en charge nativement jusqu'à 128 couches OverlayFS inférieures en théorie, mais le magasin de couches de Docker impose une limite pratique de 125 couches de base par image. Il permet une composition d'image efficace et améliore les performances pour des opérations telles que l'docker build, et l'docker commit.
Bien que overlay2 soit conçu pour consommer moins d'inodes que les pilotes de stockage précédents, les environnements Docker qui créent régulièrement des images, extraient des couches ou créent des conteneurs peuvent néanmoins exercer une pression importante sur les blocs de disque et les inodes au fil du temps, en particulier lorsque les images ou les couches d'application contiennent de nombreux petits fichiers.
La manière dont cette erreur apparaît dépend de l'environnement de déploiement :
Sur les systèmes Linux natifs, cela affecte le système de fichiers qui soutient /var/lib/docker.
Sur Docker Desktop pour Windows ou macOS, la limitation existe au sein de l'image disque de la machine virtuelle Docker (telle qu'un fichier .raw ou .vhdx ), ce qui introduit des considérations supplémentaires lors de la récupération ou du redimensionnement du stockage.
Avant de procéder à tout retrait, je commence toujours par effectuer un diagnostic approfondi. Cet investissement de quelques minutes peut vous éviter des heures de dépannage et prévenir la perte accidentelle de données.
Commencez par examiner l'utilisation du disque de votre système hôte à l'aide de la commande « df -H » (df signifie « disk free ») :
df -H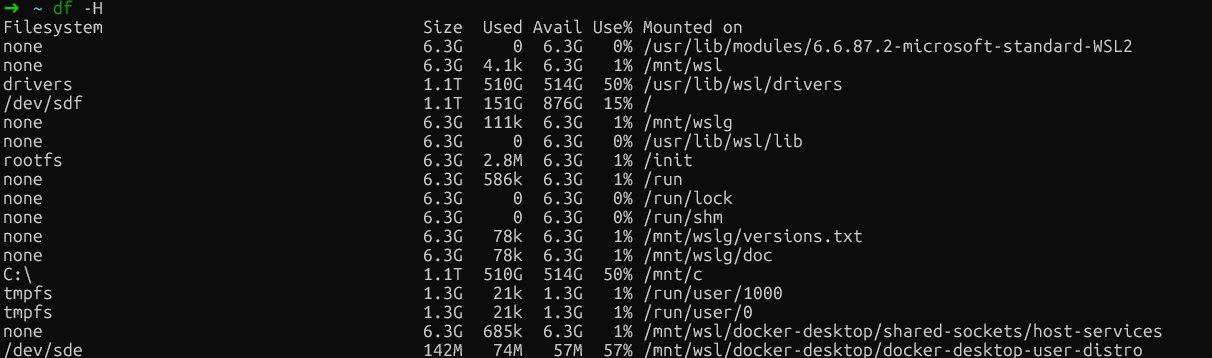
Vérification gratuite du disque dans WSL
Cette commande affiche l'utilisation du disque dans un format lisible par l'utilisateur. Veuillez rechercher les systèmes de fichiers dont la capacité est proche de 100 %.
Sur les installations Linux natives, veuillez prêter une attention particulière à la partition où se trouve /var/lib/docker. Il s'agit généralement de votre partition racine (/) ou d'une partition Docker dédiée.
Sur Docker Desktop (Windows/Mac), veuillez rechercher le montage du système de fichiers principal (généralement /dev/sdf ou similaire), qui contient les données de la machine virtuelle Docker, plutôt que des références spécifiques à /var/lib/docker, car Docker s'exécute dans une machine virtuelle.
Ensuite, veuillez vérifier l'épuisement des inodes à l'aide de la commande ` df -i` :
df -i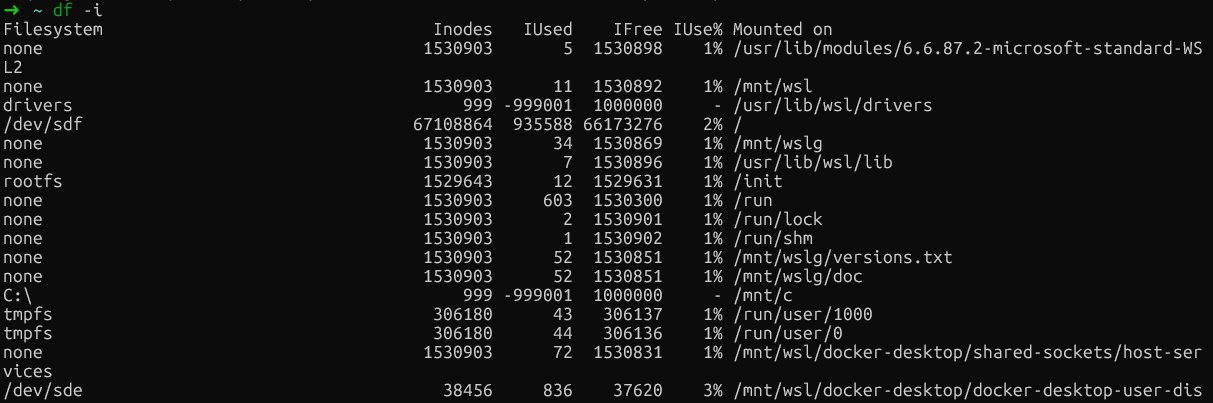
Vérification de l'épuisement des inodes
Si vous constatez une utilisation des inodes à 100 % (IUse%) sur un système de fichiers, vous avez identifié le problème. Ce scénario est étonnamment courant dans les serveurs de compilation et les environnements CI/CD, où Docker crée et détruit de manière répétée des conteneurs contenant de nombreux petits fichiers.
|
Système métrique |
Ordre |
Ce qu'il convient de rechercher |
|
Espace disque |
|
Partitions à plus de 90 % d'utilisation |
|
Inodes |
|
|
|
Répertoire Docker |
|
Consommation totale en taille |
Maintenant que nous avons déterminé si le problème provient de l'espace disque ou des inodes, approfondissons notre analyse et examinons la consommation spécifique des ressources par Docker. La commande ` docker system df ` fournit un résumé de haut niveau qui fonctionne de manière universelle sur toutes les installations Docker :
docker system dfCette sortie classe l'utilisation de l'espace en quatre catégories : Images, conteneurs, volumes locaux et cache de compilation.
La rubrique « RECLAIMABLE » est particulièrement intéressante. Il indique l'espace que vous pouvez récupérer sans affecter les conteneurs en cours d'exécution. Il est essentiel de comprendre la différence entre ces deux mesures : l'espace « actif » est actuellement utilisé par les conteneurs en cours d'exécution, tandis que l'espace « récupérable » peut être libéré en toute sécurité.
Pour obtenir des informations plus détaillées, veuillez ajouter l'indicateur « verbose » :
docker system df -v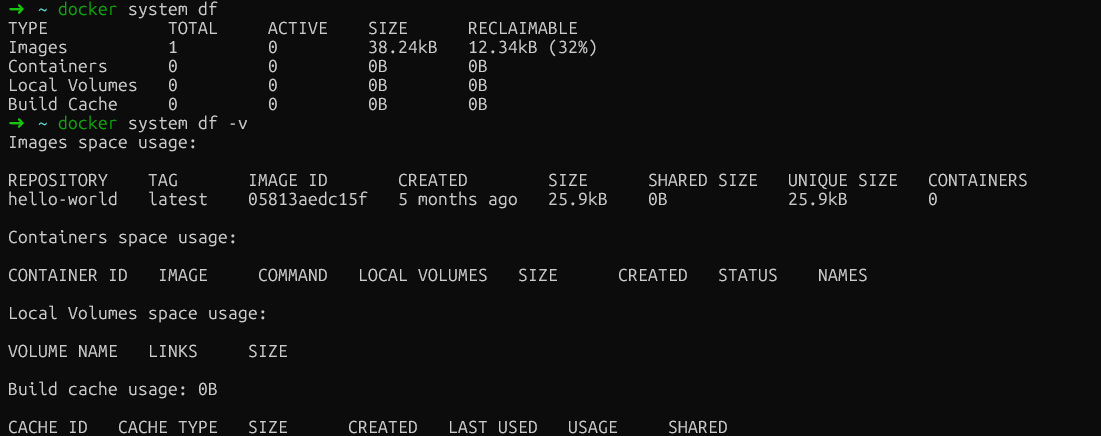
Analyse de l'utilisation de Docker
Cette sortie détaillée répertorie individuellement chaque image, conteneur et volume avec leur taille, fournissant ainsi la ventilation précise dont vous avez besoin pour identifier les éléments qui occupent le plus d'espace. Voici ce qu'il convient de rechercher dans chaque section :
Images : Affiche la taille de chaque image et indique si elle est actuellement utilisée. Veuillez rechercher les images de grande taille qui ne sont pas utilisées ou qui sont dupliquées avec des balises différentes. Les images marquées comme « inutilisées » peuvent être supprimées en toute sécurité sans affecter les conteneurs en cours d'exécution.
Conteneurs : Affiche la taille de la couche inscriptible pour chaque conteneur. Si un conteneur arrêté affiche une augmentation significative de l' SIZE, cela signifie qu'il a écrit des données dans son système de fichiers. La colonne « CREATED » (Conteneurs inactifs) permet d'identifier les anciens conteneurs qui auraient pu être oubliés.
Volumes : Répertorie les tailles des volumes et indique s'ils sont en cours d'utilisation. Les volumes marqués comme inutilisés peuvent être supprimés en toute sécurité, mais veuillez toujours vérifier qu'ils ne contiennent pas de données importantes avant de procéder à leur suppression.
Construire le cache : Souvent le plus grand consommateur et fréquemment négligé. Il s'agit de couches intermédiaires issues d'opérations d'docker build s que Docker conserve afin d'accélérer les builds ultérieurs.
Pour les utilisateurs Linux natifs qui souhaitent obtenir des informations encore plus détaillées sur le système de fichiers, il est possible d'examiner directement les sous-répertoires afin d'identifier ceux (overlay2, containers, volumes) qui occupent le plus d'espace :
sudo du -h --max-depth=1 /var/lib/docker | sort -hCependant, pour les utilisateurs de Docker Desktop, /var/lib/docker se trouve à l'intérieur de la machine virtuelle cachée de Docker et n'est pas directement accessible. La bonne nouvelle est que docker system df -v fournit toutes les informations exploitables dont vous avez besoin, quelle que soit votre plateforme, ce qui en fait l'approche diagnostique la plus fiable.
Après avoir identifié où l'espace est utilisé, je peux le récupérer en toute sécurité à l'aide des commandes d'élagage intégrées à Docker. Ces opérations sont conçues pour supprimer uniquement les ressources inutilisées, minimisant ainsi le risque de perturber les services en cours d'exécution.
Docker fait la distinction entre les ressources « en suspens » et les ressources « inutilisées ». Une image flottante est une image sans balise ni référence de conteneur. Généralement, une couche intermédiaire provenant d'une construction qui a échoué ou qui a été remplacée. Il est toujours possible de les retirer en toute sécurité.
Commencez par la commande de base commande prune:
docker system pruneCela supprime tous les conteneurs, réseaux et images inutilisés. Il ne traitera pas les images ou les volumes marqués, sauf indication contraire explicite. Docker demandera une confirmation avant de continuer.
Pour être plus rigoureux et supprimer toutes les images inutilisées (et pas seulement celles qui sont en suspens), veuillez ajouter le drapeau --all:
docker system prune --all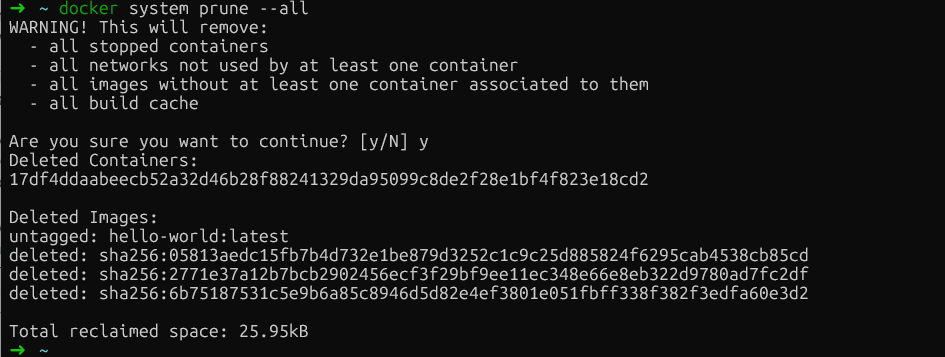
Nettoyage du système Docker
Cette commande supprime toute image qui n'est actuellement associée à aucun conteneur. Veuillez noter que les déploiements ultérieurs devront à nouveau récupérer les images supprimées.
Si vous souhaitez inclure des volumes dans le nettoyage (qui contiennent des données persistantes), veuillez ajouter l'indicateur d'--volumes:
docker system prune --all --volumesAvertissement : Cette opération supprime définitivement les données des volumes inutilisés. Veuillez toujours vérifier que les volumes ne contiennent pas de données importantes avant d'utiliser cet indicateur.
C'est ici que les choses deviennent intéressantes. Le cache de compilation, qui stocke les couches intermédiaires issues des opérations de compilation Docker, est souvent le plus grand consommateur d'espace, mais docker system prune l'exclut délibérément afin de préserver les performances de compilation.
Pour cibler spécifiquement le cache de compilation :
docker builder pruneSi vous souhaitez être sélectif et conserver les couches de cache récentes, veuillez utiliser des filtres basés sur le temps :
docker builder prune --filter "until=24h"Cela supprime uniquement les couches de cache datant de plus de 24 heures, tout en conservant votre travail récent intact.
Les volumes nécessitent une attention particulière car ils contiennent des données persistantes, telles que des bases de données, des fichiers téléchargés et l'état des applications. La suppression du mauvais volume entraîne une perte définitive des données.
Tout d'abord, veuillez identifier les volumes suspendus (ceux qui ne sont rattachés à aucun conteneur) :
docker volume ls -f dangling=trueVeuillez examiner attentivement cette liste. Si vous êtes certain que ces volumes ne sont pas nécessaires, veuillez les supprimer :
docker volume pruneDocker demandera une confirmation avant de poursuivre. En cas de doute, veuillez sauvegarder les volumes avant de procéder à la suppression.
Les journaux des conteneurs peuvent occuper de manière significative un espace disque important, dépassant parfois 50 Go par conteneur.
Le pilote de journalisation par défaut d' json-file s de Docker enregistre toutes les informations d' stdout s et d' stderr s des conteneurs dans des fichiers JSON. Sans paramètre de taille maximale (la valeur par défaut est -1, illimitée), ces fichiers peuvent atteindre une taille illimitée.
Veuillez vérifier les dimensions des conteneurs dans tous les environnements :
docker ps -a --format "table {{.ID}}\t{{.Names}}\t{{.Size}}"Pour vérifier la taille du fichier journal d'un conteneur spécifique :
ls -lh $(docker inspect --format='{{.LogPath}}' <container-name>)Pour Linux natif uniquement, veuillez identifier directement les fichiers journaux les plus volumineux :
sudo find /var/lib/docker/containers/ -name "*-json.log" -exec du -h {} + | sort -h | tail -10Si docker logs devient lent ou si les conteneurs ne démarrent pas, cela est probablement dû à des journaux trop volumineux. Pour résoudre ce problème, vous pouvez tronquer les journaux.
La suppression des journaux permettra de libérer davantage d'espace. Cependant, veuillez ne jamais supprimer les fichiers journaux avec rm lorsque les conteneurs sont en cours d'exécution. Le démon Docker conserve les descripteurs de fichiers ouverts vers ces journaux, et leur suppression crée des fichiers « supprimés mais ouverts » qui continuent à occuper de l'espace jusqu'au redémarrage du démon.
L'approche sécurisée consiste à tronquer les journaux à zéro :
sudo truncate -s 0 $(docker inspect --format='{{.LogPath}}' <container-name>)Cela libère immédiatement de l'espace sans interrompre les descripteurs de fichiers. Le conteneur continue d'enregistrer dans le même fichier.
Lorsque le nettoyage standard échoue, vous êtes probablement confronté à l'un de ces problèmes moins courants, mais tout aussi importants :
Épuisement des inodes : Votre système de fichiers a épuisé ses structures de métadonnées de fichiers malgré l'espace disque disponible.
Fichiers supprimés mais ouverts : Les processus conservant les descripteurs de fichiers supprimés, créant une utilisation d'espace « fantôme »
Encombrement du disque virtuel Docker Desktop : Le fichier hôte .raw ou .vhdx ne se réduit pas après la suppression des données à l'intérieur de la machine virtuelle.
Examinons chacun de ces scénarios de manière systématique.
Cela peut être dû à des applications qui créent des millions de petits fichiers, tels que des sessions PHP, des npm node_modules ou des artefacts de compilation qui consomment des inodes à un rythme alarmant.
Tout d'abord, veuillez vérifier l'épuisement des inodes :
df -iUtilisation des commandes Docker (tous les environnements) :
docker ps -a | wc -l             # Check container count
docker images | wc -l         # Check image count
docker image prune -a      # Remove unused images to free inodes
Pour les installations Linux, veuillez identifier les répertoires contenant un nombre important d'inodes :
for dir in /var/lib/docker/*/; do
    echo "$dir: $(sudo find $dir -type f 2>/dev/null | wc -l) files"
done
La suppression des images inutilisées à l'aide d'docker rmi permet également de libérer des inodes. Pour les problèmes liés aux applications, veuillez effectuer un nettoyage au sein des conteneurs ou utiliser des montages de volumes pour les fichiers temporaires.
Lorsqu'un fichier est supprimé alors qu'un processus l'a toujours ouvert, le système de fichiers ne libère pas l'espace tant que le processus n'a pas fermé le descripteur de fichier (utilisation d'espace « fantôme »).
Pour les utilisateurs Linux, vous pouvez vérifier si cela se produit en recherchant les entrées « supprimées » dans la liste des fichiers ouverts.
Tout d'abord, veuillez identifier les fichiers suivants :
sudo lsof | grep deleted 
Fichiers supprimés par Docker
Ensuite, pour libérer de l'espace, veuillez redémarrer le processus spécifique (en utilisant le PID obtenu à partir de lsof) ou redémarrer Docker. Une fois cette opération effectuée, si vous exécutez à nouveau la commande, les fichiers n'apparaîtront plus, ce qui signifie qu'ils ont été correctement supprimés.
Nous allons maintenant examiner la dernière stratégie de dépannage avancée, qui s'applique uniquement à Docker Desktop : la gestion des disques virtuels.
Docker Desktop stocke les données dans un fichier disque virtuel (.raw sur Mac, .vhdx sur Windows) qui s'agrandit de manière dynamique mais ne se réduit pas automatiquement lorsque vous supprimez des données. Vous réduisez la taille des images et des conteneurs, constatez une augmentation de l'espace libre dans la machine virtuelle, mais votre disque hôte reste plein.
Pour gérer cela, l'approche la plus sûre consiste à utiliser fstrim pour compacter le disque sans perdre de données :
docker run --privileged --pid=host alpine nsenter -t 1 -m -u -i -n fstrim /Cette commande réduit le système de fichiers de la machine virtuelle Docker Desktop, libérant ainsi les blocs inutilisés vers votre système hôte. Vos images, conteneurs et volumes restent intacts.
Sinon, si vous souhaitez repartir de zéro (ceci supprimera toutes les données), veuillez utiliser Paramètres Docker Desktop → Dépannage → Réinitialiser les paramètres d'usine.
Avertissement : Cette opération est irréversible et supprime toutes les images, tous les conteneurs, tous les volumes et tous les paramètres. Cela ne devrait être envisagé qu'en dernier recours, si toutes les autres solutions échouent.
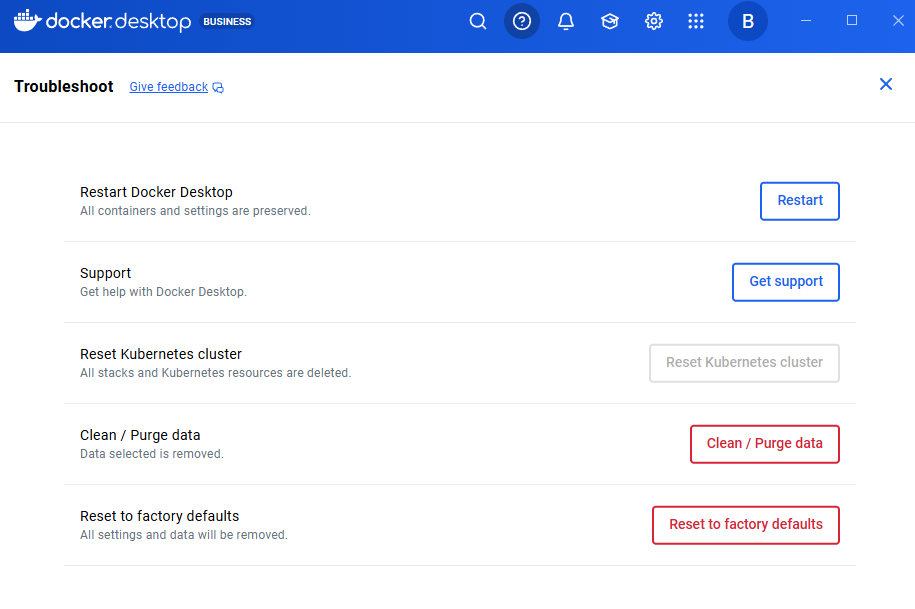
Réinitialiser aux paramètres d'usine par défaut
Maintenant que nous avons résolu la crise immédiate, nous allons mettre en œuvre des changements structurels afin d'éviter qu'elle ne se reproduise. Ces configurations nécessitent une planification, mais elles offrent des avantages considérables en termes de stabilité du système.
Les utilisateurs de Docker Desktop ne peuvent pas facilement modifier l'emplacement de la racine des données. Au lieu de cela, vous pouvez :
Augmenter l'espace disque : Veuillez appliquer les méthodes de compactage du disque virtuel décrites à l'étape 4.
Pour le backend WSL2 : Veuillez gérer les limites via un fichier .wslconfig, comme indiqué dans Paramètres de Docker Desktop → Ressources.
Toutefois, si vous utilisez Linux et que votre partition racine est limitée, mais que vous disposez d'une partition plus grande (par exemple, un disque dédié aux données), le déplacement du répertoire de données de Docker constitue une solution permanente.
Tout d'abord, veuillez arrêter Docker :
sudo systemctl stop dockerVeuillez modifier le fichier /etc/docker/daemon.json afin de spécifier le nouvel emplacement :
{
  "data-root": "/mnt/docker-data"
}
Veuillez migrer les données existantes afin de préserver vos images et conteneurs :
sudo rsync -aP /var/lib/docker/ /mnt/docker-data/Enfin, veuillez redémarrer Docker :
sudo systemctl start dockerDocker stocke désormais toutes les données dans le nouvel emplacement. Veuillez vérifier avec docker info | grep "Docker Root Dir" pour confirmer le chemin d'accès au nouveau répertoire.
La rotation des journaux est la stratégie de prévention la plus efficace que j'ai mise en œuvre. Par défaut, le pilote Docker json-file est configuré sur max-size: -1 (illimité), ce qui peut entraîner des problèmes en production.
Pour les installations Linux natives, veuillez modifier le fichier /etc/docker/daemon.json afin d'appliquer les limites de manière globale :
{
  "log-driver": "json-file",
  "log-opts": {
    "max-size": "10m",
    "max-file": "3"
  }
}
Après avoir modifié le fichier, veuillez redémarrer Docker.
Pour les utilisateurs de Docker Desktop, il n'est pas nécessaire de modifier directement le fichier /etc/docker/daemon.json. Au lieu de cela :
{
  "log-driver": "json-file",
  "log-opts": {
    "max-size": "10m",
    "max-file": "3"
  }
}
Enfin, veuillez cliquer sur Appliquer et redémarrer.
Cette configuration limite chaque conteneur à trois fichiers journaux de 10 Mo chacun (30 Mo au total par conteneur).
Remarque importante : Ces paramètres s'appliquent uniquement aux conteneurs nouvellement créés. Les conteneurs existants conservent leur configuration de journal d'origine. Il est nécessaire de recréer les conteneurs pour appliquer les nouvelles limites.
Pour une compression et des performances encore meilleures, envisagez l'utilisation du pilote de journalisation local :
{
  "log-driver": "local",
  "log-opts": {
    "max-size": "10m",
    "max-file": "3",
    "compress": "true"
  }
}
De plus, vous pouvez également remplacer les paramètres de journalisation par service dans docker-compose.yml:
services:
  web:
    image: nginx
    logging:
      driver: "json-file"
      options:
        max-size: "50m"
max-file: "5"Une autre bonne pratique consiste à automatiser certains processus. Il est souvent dit que la prévention est préférable à la gestion de crise. Par conséquent, je recommande d'automatiser le nettoyage à l'aide d'une tâche cron qui s'exécute pendant les fenêtres de maintenance :
# Create a cleanup script
sudo cat > /usr/local/bin/docker-cleanup.sh << 'EOF'
#!/bin/bash
docker system prune -f
docker builder prune -f --filter "until=168h"
EOF

sudo chmod +x /usr/local/bin/docker-cleanup.sh

# Add to crontab to run weekly on Sundays at 2 AM
echo "0 2 * * 0 /usr/local/bin/docker-cleanup.sh" | sudo crontab -
Ce script crée une tâche planifiée qui supprime automatiquement les conteneurs arrêtés et les données inutilisées tous les dimanches à 2 heures du matin. Il supprime également en toute sécurité les couches de cache de compilation datant de plus d'une semaine (168 heures) afin d'éviter que l'utilisation du disque ne continue d'augmenter indéfiniment.
De plus, optimisez vos fichiers Dockerfiles à l'aide de builds multi-étapes afin de réduire la taille des images. Les builds multi-étapes vous permettent d'utiliser une étape pour la compilation et la construction (avec tous les outils de développement lourds), puis de copier uniquement les artefacts finaux vers une étape de production propre et minimale.
Cela élimine les dépendances de compilation, le code source et les fichiers intermédiaires de votre image finale, réduisant ainsi considérablement sa taille et sa surface d'attaque.
# Build stage
FROM node:16 AS builder
WORKDIR /app
COPY package*.json ./
RUN npm install
COPY . .
RUN npm run build

# Production stage
FROM node:16-alpine
WORKDIR /app
COPY --from=builder /app/dist ./dist
COPY --from=builder /app/node_modules ./node_modules
CMD ["node", "dist/index.js"]
Ce modèle réduit la taille de l'image de production en excluant les outils de compilation et le code source.
La résolution de l'erreur « Espace disque insuffisant » suit un schéma prévisible : commencez par diagnostiquer le problème afin de déterminer s'il s'agit de blocs de disque ou d'inodes, procédez à un nettoyage en toute sécurité pour récupérer de l'espace sans perte de données, puis optimisez la configuration pour éviter que le problème ne se reproduise.
Au cours de mes années passées à gérer des environnements Docker, j'ai appris que la rotation des journaux est la stratégie de prévention la plus efficace. Une simple configuration de l'daemon.json peut prévenir la plupart des incidents liés à l'épuisement de l'espace.
Je vous encourage à vérifier dès maintenant la configuration de votre daemon.json. Si vous n'avez pas défini max-size et max-file pour votre pilote de journalisation, veuillez les ajouter immédiatement. Votre futur vous remerciera lorsque vous éviterez la prochaine crise spatiale.
Êtes-vous prêt à devenir un expert en Docker ? Ensuite, l'étape suivante consiste à vous inscrire à notre formation sur la conteneurisation et la virtualisation avec Docker et Kubernetes, qui est un cursus que je recommande vivement.
Cours sur Docker
Cursus
Cours
Cours