
{count, plural, one {Cursus} other {Cursussen}}
AI-ondersteund coderen voor developers
{hours} uur {minutes} min
10.9K
Zero-shot classification has been around for years, but recently TypeSafe AI introduced Jev, a new decision model that takes things further.
Instead of generating long responses, it makes decisions by selecting from predefined options, returning probabilities, or assigning scores. This makes it faster and more efficient for tasks where we do not need an LLM to generate text.
Now, OpenAI has introduced its Decisions API, bringing a similar approach to its ecosystem.
It supports both text and images, allowing developers to classify inputs, score results, and make structured decisions quickly, with no charge for output tokens.
In this tutorial, we will explore the OpenAI Decisions API using the Playground and Python. We will test different decision types, combine multiple questions in a single request, and try image classification. Finally, we will compare it with Jev from TypeSafe AI, Clef from Cloudflare, and Microsoft-Decision-1 to see how they differ in terms of features, speed, and pricing.
The OpenAI Decisions API is a specialized API designed for applications that need to make fast, structured decisions rather than generate lengthy text responses.
Instead of asking a language model to explain its reasoning in paragraphs, developers can provide an input, define specific questions, and receive structured answers with probability and confidence information.
Powered by GPT-6 Luna, the API supports text and image inputs and is optimized for tasks such as classification, routing, scoring, and automated decision-making.
It is designed to reduce the latency and overhead associated with using a general-purpose language model for simple decisions.
The API is currently in public beta. OpenAI expects general availability in the coming weeks, and GPT-6 Luna is the only supported model for now, so details may change.
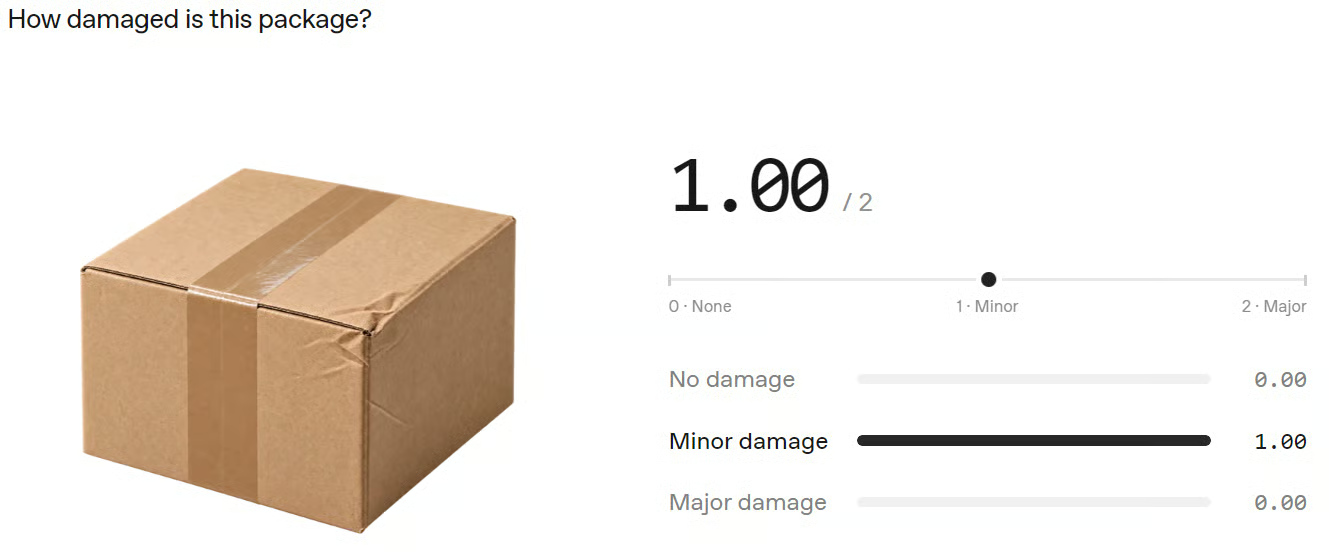
Source: Decisions | OpenAI API
The API supports three main question types:
| Type | What it does | Example |
|---|---|---|
| predicate | Estimates the probability that a condition is true | Does this support ticket require escalation? |
| choice | Selects the most appropriate option from predefined choices | Should this ticket go to billing, sales, or technical support? |
| score | Evaluates an input against an ordered scoring scale | How severe is this incident? |
For example, when a customer submits a support ticket, the API can determine whether it requires escalation, identify the appropriate team, and assign a severity score.
Multiple questions can be evaluated in a single API request, avoiding the need for separate model calls.
Unlike traditional language-model APIs, which generate text that may require further parsing, the Decisions API returns structured results that applications can use directly.
Its probability and confidence information also allows developers to define thresholds, automate high-confidence decisions, and route uncertain cases for human review.
These estimates should still be validated against real-world data rather than treated as guarantees of accuracy.
The API is particularly useful for:
It is especially valuable in systems that must evaluate large volumes of requests quickly and consistently.
The main distinction is simple: the Responses API is designed to generate content, while the Decisions API is designed to help applications choose what to do next.
Before writing any code, the easiest way to understand the Decisions API is to try it in the OpenAI Playground.
Make sure you have at least $1 in API credits as a recommended balance for testing, and that your account has access to GPT-6 Luna and the Decisions API, which is open to all developers in public beta.
Some newer models and features require organization verification, so you may need to verify your account first.
The key thing to remember is simple:
The Prompt describes what you want the model to decide, while the Input box contains the information it should evaluate.
Let’s begin with a yes-or-no decision.
Set the decision type to Predicate and use this prompt:
Does this order appear to have arrived damaged?Then add this as the input:
A customer says their package arrived with the outer box crushed and the laptop screen cracked.Run the decision.
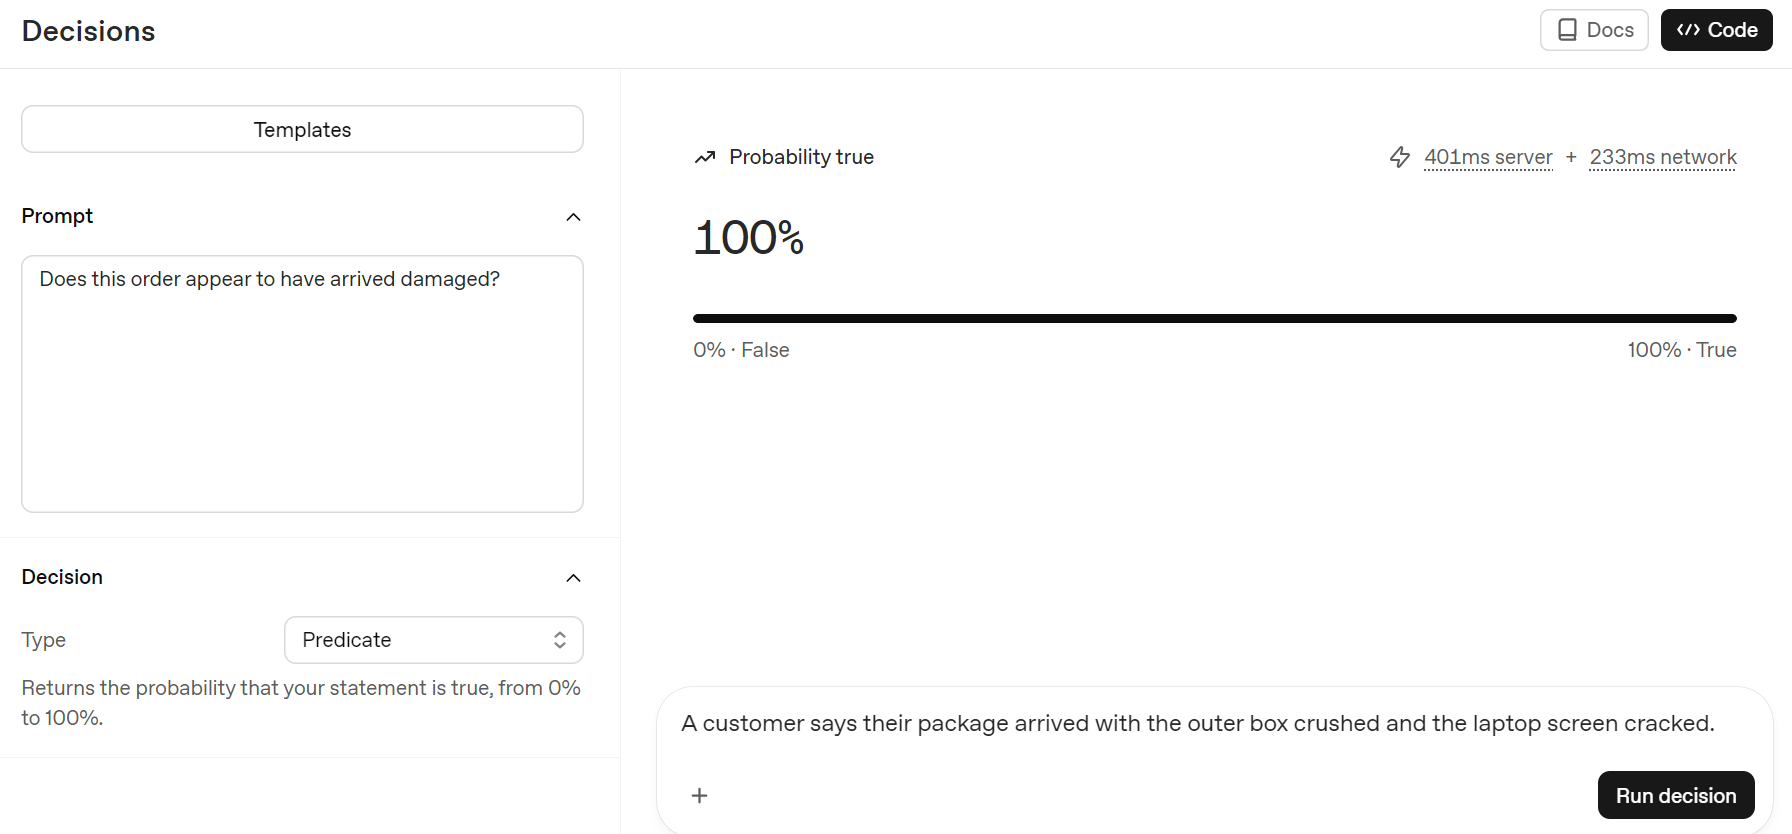
The Playground returns a 100% probability, meaning the model is highly confident that the package arrived damaged.
Now change only the input:
The package arrived on time, the box was intact, and the laptop is working perfectly.Run it again.
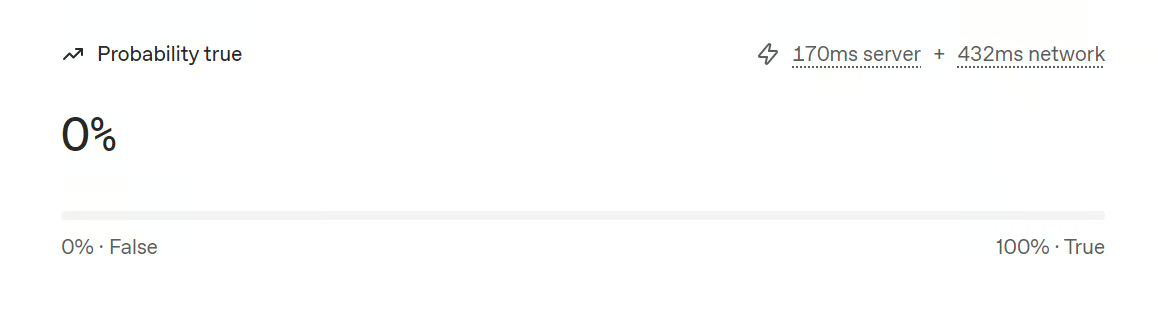
This time, the model returns 0% probability, correctly identifying that there is no indication of damage. The response took around 170 milliseconds, which is fast.
This is how a predicate works.
You define a condition, provide the model with some information, and get back a probability instead of a lengthy explanation.
Next, change the decision type to Choice.
Use this prompt:
Which team should handle this customer request?Add these options:
Then use this input:
Every time I upload a CSV file, the dashboard crashes and I lose my progress.Run the decision.
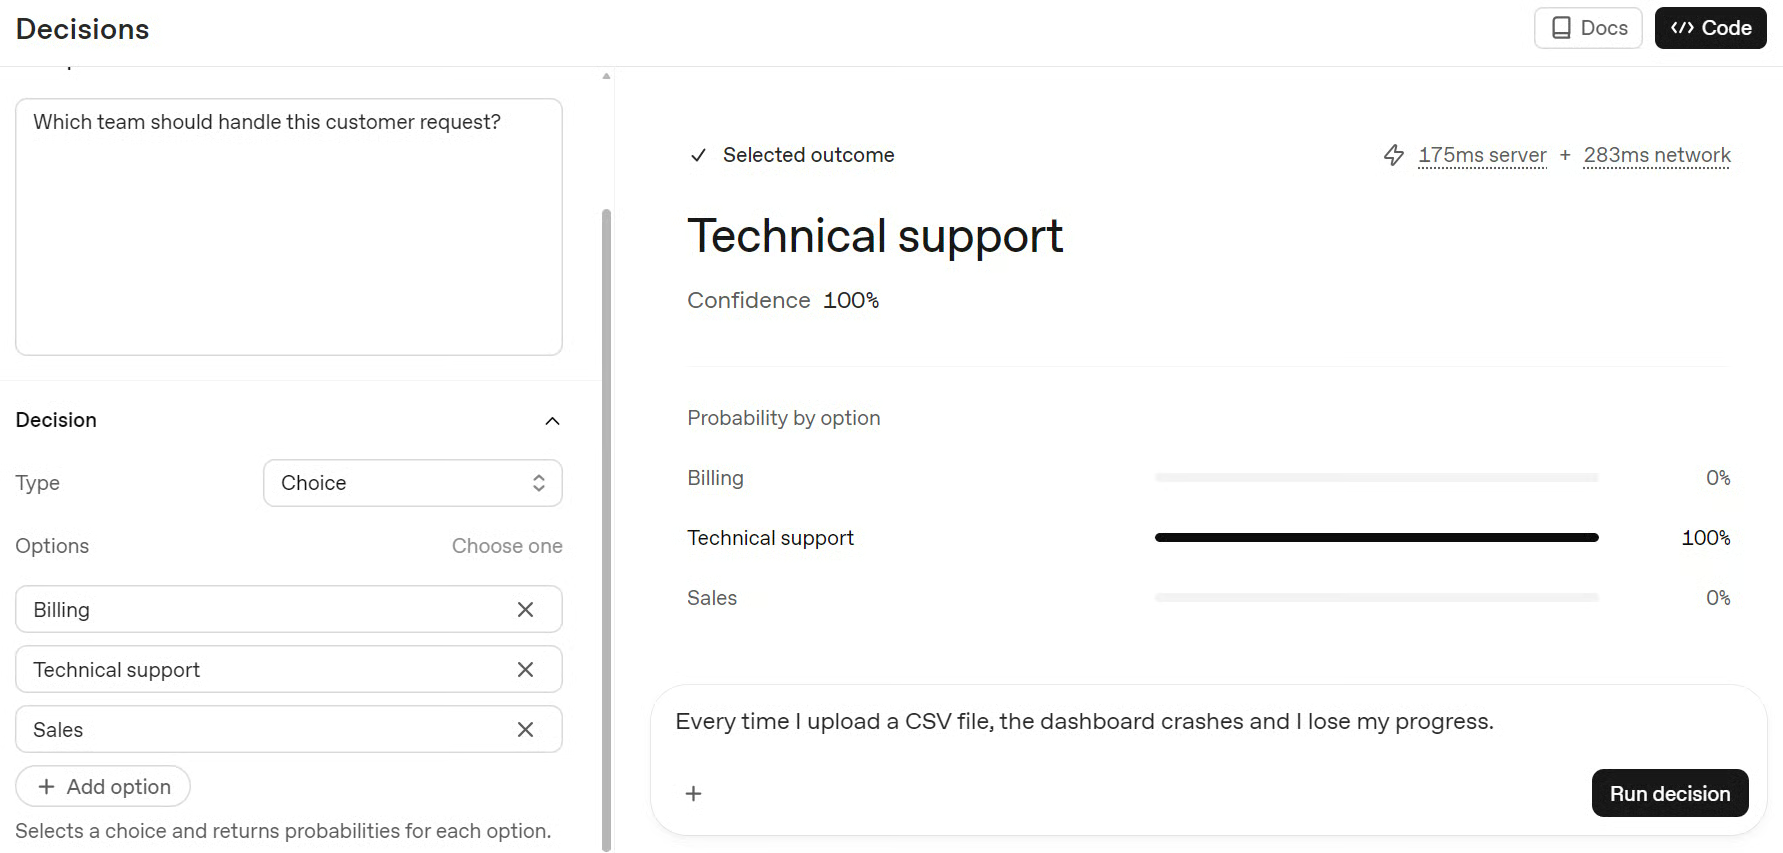
The model returns Technical support with 100% probability, correctly identifying that the customer is reporting a technical issue.
Now change the input to:
We want to purchase 100 licenses for our company and need information about enterprise pricing.This time, the model selects Sales with 100% probability, correctly identifying that the request is related to purchasing licenses.
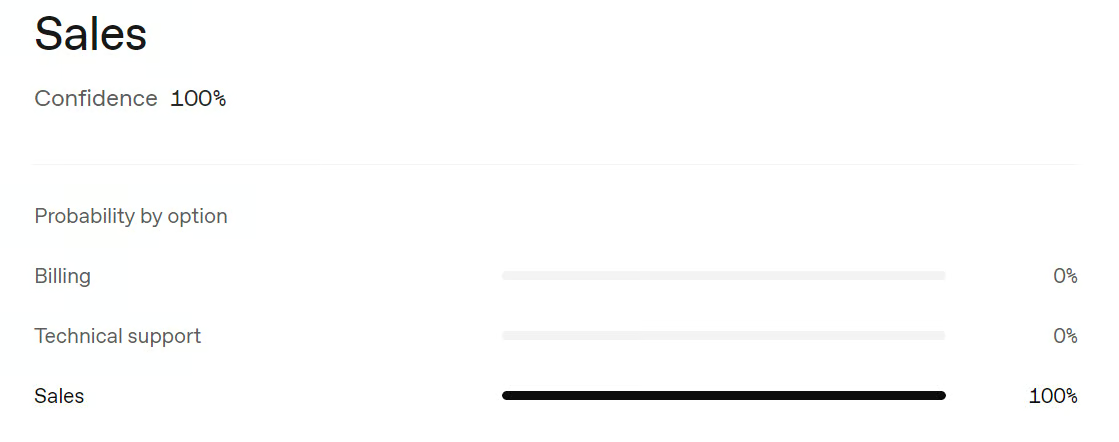
Unlike predicate, which evaluates whether a statement is true, choice is useful when you need to classify inputs into categories, route customer requests, or select the right AI agent for a task.
So far, we have tested two decision types in the Playground: predicate and choice. Both worked well, but there is much more we can do with the API.
In this section, we will explore both decision types in more detail, try the third option, score, and learn how to evaluate multiple questions in a single API request, something we cannot do directly in the Playground.
Before getting started, you need to generate an OpenAI API key and set it as an environment variable named OPENAI_API_KEY.
On Windows PowerShell:
$env:OPENAI_API_KEY = "your_api_key_here"On macOS or Linux:
export OPENAI_API_KEY="your_api_key_here"Next, install the OpenAI Python SDK:
pip install --upgrade openaiThen open a Jupyter Notebook and run the following code to import the OpenAI SDK and create the client:
from openai import OpenAI

client = OpenAI()
The client automatically reads your API key from the OPENAI_API_KEY environment variable, so you do not need to include it in your code.
From here, most examples follow the same simple pattern: provide information in input, define what you want the model to decide in questions, and read the structured results from decision.answers.
Let’s start with a simple yes-or-no decision before moving to more advanced examples.
A predicate is the simplest decision type.
You give the model some information and ask whether a particular statement is true.
In this example, the input is a customer message explaining that they canceled their subscription but were still charged. The instruction asks the model to decide whether the customer appears to need a refund.
decision = client.decisions.create(
    model="gpt-6-luna",
    input="""
    I cancelled my annual subscription on September 28 and received a
    cancellation confirmation. On October 1, my card was still charged $120
    for another year. Please reverse that renewal payment.
    """,
    questions=[
        {
            "type": "predicate",
            "name": "refund_needed",
            "instructions": "Does this customer appear to need a refund?"
        }
    ],
)


answer = decision.answers[0]
print(f"Refund needed: {answer.probability:.0%}")
Output:
Refund needed: 98%Instead of returning a long explanation, the API gives us a probability. Here, 98% means the model is highly confident that the customer needs a refund based on the information provided.
That probability can immediately become part of normal application logic:
answer = decision.answers[0]

if answer.probability > 0.9:
    print("Send to refund workflow")
else:
    print("Send for manual review")
Output:
Send to refund workflowBecause the probability is above our 90% threshold, the request is automatically sent to the refund workflow.
This is what makes the API simple to use in applications. We do not need to ask the model for JSON, parse a written response, or search its answer for words such as “yes.” We get a number that our code can use directly.
Sometimes the decision is not simply true or false. We may want the model to select the best option from a predefined list.
Here, the input describes a problem with an invoice. We then give the model three possible destinations: billing, technical, or account.
decision = client.decisions.create(
    model="gpt-6-luna",
    input='Our finance team needs a corrected invoice for order INV-2048. The company name and VAT number are wrong, so we cannot submit it for reimbursement.',
    questions=[
        {
            "type": "choice",
            "name": "department",
            "instructions": "Which team should handle this request?",
            "choices": [
                {
                    "value": "billing",
                    "description": "Payments, charges, invoices, and refunds"
                },
                {
                    "value": "technical",
                    "description": "Product errors, bugs, or technical problems"
                },
                {
                    "value": "account",
                    "description": "Login, profile, or account management"
                }
            ]
        }
    ],
)


answer = decision.answers[0]
print(f"Department: {answer.choice}")
print(f"Confidence: {answer.confidence:.0%}")
Output:
Department: billing
Confidence: 100%
The result is straightforward: the API selects billing and reports 100% confidence in that decision.
Notice that we define the possible answers ourselves. The model is not free to invent a new department or return an unexpected string. It must choose from the options we provide.
That makes choice particularly useful for routing tasks, selecting agents, categorizing requests, or sending work into different application workflows.
Not every decision fits into a yes-or-no answer or a single category. Sometimes we want to measure how severe, risky, important, or urgent something is.
In this example, the input describes an outage affecting every customer, across all regions, with no workaround available.
We define four severity levels ranging from Low to Critical.
decision = client.decisions.create(
    model="gpt-6-luna",
    input="""
    Since this morning's deployment, every customer gets an error when
    saving a document. All regions are affected, 860 customers have reported
    the problem, and there is no workaround. It has continued for 25 minutes.
    """,
    questions=[
        {
            "type": "score",
            "name": "severity",
            "instructions": "Rate the operational severity of this incident.",
            "levels": [
                {
                    "label": "Low",
                    "description": "Minimal customer impact"
                },
                {
                    "label": "Medium",
                    "description": "Limited customer impact"
                },
                {
                    "label": "High",
                    "description": "Significant customer impact"
                },
                {
                    "label": "Critical",
                    "description": "Widespread outage or severe business impact"
                }
            ]
        }
    ],
)


answer = decision.answers[0]
print(f"Severity score: {answer.score:.2f} / 3")
print(f"Confidence: {answer.confidence:.0%}")
Output:
Severity score: 2.98 / 3
Confidence: 98%
The score is 2.98 out of 3, putting this incident almost entirely at the top end of the scale. The 98% confidence also tells us that the model is very certain about that assessment.
The useful part here is that the API does more than assign a label. We get a numeric value that can be used for ranking or thresholds.
For example, an application could automatically page an on-call engineer when the severity score crosses a certain level.
This is where the Decisions API becomes especially useful.
So far, we have asked one question at a time. But a real application often needs to make several decisions about the same piece of information.
Instead of sending the incident to the model three separate times, we can ask all three questions in one request.
decision = client.decisions.create(
    model="gpt-6-luna",
    input="""
    After this morning's deployment, checkout returns HTTP 500 for every
    card payment in all regions. We have recorded 1,240 failed orders in
    20 minutes. Retrying and switching browsers does not help.
    """,
    questions=[
        {
            "type": "predicate",
            "name": "needs_escalation",
            "instructions": "Does this issue require human escalation?"
        },
        {
            "type": "choice",
            "name": "owner",
            "instructions": "Which team should investigate this issue?",
            "choices": [
                {
                    "value": "billing",
                    "description": "Payments and charges"
                },
                {
                    "value": "engineering",
                    "description": "Technical failures"
                },
                {
                    "value": "support",
                    "description": "Customer support issues"
                }
            ]
        },
        {
            "type": "score",
            "name": "severity",
            "instructions": "Rate the severity of the incident.",
            "levels": [
                {
                    "label": "Low",
                    "description": "Very limited impact"
                },
                {
                    "label": "Medium",
                    "description": "Noticeable impact"
                },
                {
                    "label": "High",
                    "description": "Major impact"
                },
                {
                    "label": "Critical",
                    "description": "Widespread outage"
                }
            ]
        }
    ],
)


escalation, owner, severity = decision.answers


print(f"Needs escalation: {escalation.probability:.0%}")
print(f"Owner: {owner.choice}")
print(f"Owner confidence: {owner.confidence:.0%}")
print(f"Severity score: {severity.score:.2f} / 3")
print(f"Severity confidence: {severity.confidence:.0%}")
Output:
Needs escalation: 100%
Owner: engineering
Owner confidence: 96%
Severity score: 2.98 / 3
Severity confidence: 98%
From a single incident description, we now get three useful decisions:
What is nice about this is how little extra code is required.
The same input is shared across all three questions, and each question can use a different decision type.
A production system could take these results and immediately route the incident to engineering, mark it as critical, and trigger an escalation workflow.
That is the core idea behind the Decisions API: give the model the evidence, define exactly what decisions you need, and get structured values that your application can use directly.
The Decisions API is not limited to text.
You can also give it an image and ask it to make structured decisions based on what it sees.
This is useful when your application needs to turn visual information into something actionable.
A good example is an e-commerce return workflow, where a customer uploads a photo of a damaged product.
The first step is to read the image and convert it to base64:
import base64

with open("damaged_laptop.jpg", "rb") as image_file:
    encoded_image = base64.b64encode(
        image_file.read()
    ).decode("utf-8")
This gives us a text representation of the image that we can include directly in the API request.
Now we send both a short text instruction and the image itself to the Decisions API:
decision = client.decisions.create(
    model="gpt-6-luna",
    input=[
        {
            "role": "user",
            "content": [
                {
                    "type": "input_text",
                    "text": "Inspect this returned product."
                },
                {
                    "type": "input_image",
                    "image_url": f"data:image/jpeg;base64,{encoded_image}",
                    "detail": "high"
                }
            ]
        }
    ],
    questions=[
        {
            "type": "predicate",
            "name": "visible_damage",
            "instructions": "Is there visible physical damage to the product?"
        },
        {
            "type": "score",
            "name": "damage_severity",
            "instructions": "Rate the severity of the visible damage.",
            "levels": [
                {
                    "label": "None",
                    "description": "No visible damage"
                },
                {
                    "label": "Minor",
                    "description": "Small cosmetic damage"
                },
                {
                    "label": "Major",
                    "description": "Significant visible damage"
                },
                {
                    "label": "Severe",
                    "description": "Product appears unusable"
                }
            ]
        },
        {
            "type": "choice",
            "name": "return_action",
            "instructions": "Choose the next step based on the visible product damage.",
            "choices": [
                {
                    "value": "Return workflow",
                    "description": "Clear, significant physical damage requiring damaged-product return handling"
                },
                {
                    "value": "Manual review",
                    "description": "Minor damage, no visible damage, or an unclear photo"
                }
            ]
        }
    ],
)
The important part is that we are still using the same decision types as before.
The predicate question asks a simple yes-or-no question: is there visible damage?
The score question goes a step further and measures how serious that damage appears to be.
The choice question then turns that visual assessment into an action: either send the item through the return workflow or send it for manual review.
So the image is the evidence, while the three questions describe exactly what we want the model to decide.
Next, we read the three answers:
damage, severity, action = decision.answers
severity_label = max(severity.probabilities, key=lambda level: level.probability).label

print(f"Visible damage: {damage.probability:.0%}")
print(f"Damage severity: {severity_label}")
print(f"Return action: {action.choice}")
Output:
Visible damage: 100%
Damage severity: Severe
Return action: Return workflow
The first result tells us that the model is 100% confident that visible damage is present.
For the severity decision, the API returns probabilities across the levels we defined. The max(...) line simply finds the level with the highest probability. In this case, that level is Severe.
Finally, the choice result selects Return workflow, meaning the image contains enough evidence of significant damage to follow the damaged-product return path.
The flow is simple:
Image → visual decision → severity → actionThat same pattern could also be used for quality inspection, insurance claims, document checks, inventory review, moderation, or any workflow where a visual input needs to lead to a structured decision.
Right now, OpenAI Decisions, Jev from TypeSafe AI, Clef from Cloudflare, and Microsoft-Decision-1 are four notable options for fast, structured AI decision-making. All four are available as hosted APIs, and Clef also ships open weights under the Apache 2.0 license.
All four follow a similar approach: instead of generating lengthy responses, they evaluate inputs and return predefined choices, probabilities, or scores.
You can also find open-source alternatives that run locally without relying on a hosted API. I have covered seven of them, including Laya, SemIf, Kev, and NanoJev, in my article: Top 7 Open-Source TypeSafe Jev Alternatives.
For this comparison, we will focus on the four hosted options and see how they differ in features, pricing, and response speed.
Pricing and specifications below are as of 13 October 2026, and none of the four charges for output tokens. Jev calls its yes/no question type noul, which is the equivalent of OpenAI’s predicate.
| OpenAI Decisions | Jev | Clef family | Microsoft-Decision-1 | |
|---|---|---|---|---|
| Provider | OpenAI | TypeSafe AI | Cloudflare | Microsoft |
| Model | GPT-6 Luna (public beta) | Jev | Clef / Clef-flash / Clef-omni | Microsoft-Decision-1 (public preview) |
| Binary decision | predicate | noul | noul | noul |
| Multiple choice | choice | choice | choice | choice |
| Scoring | score | score | score | score |
| Text input | ✅ | ✅ | ✅ | ✅ |
| Image understanding | ✅ | ❌ Text only | ✅ Up to 4 images (Clef-omni also takes audio and video) | ❌ Text only |
| Returns probabilities | ✅ | ✅ | ✅ | ✅ |
| Hosted API | ✅ | ✅ | ✅ | ✅ |
| Open weights | ❌ | ❌ | ✅ Apache 2.0 | ❌ |
| Context window | 272K tokens (up to 1M at twice the price) | 64K tokens | Clef: 64K; Clef-flash: 24K (hosted); Clef-omni: 64K | 32K tokens |
| Pricing | $0.10 / 1M input tokens | $0.042 / 1M input tokens | Clef: $0.24 / 1M; Clef-flash: $0.038 / 1M; Clef-omni: $0.15 / 1M input tokens | $0.042 / 1M input tokens |
| Measured median latency | 268 ms in an independent benchmark | 269 ms in the same independent benchmark | Clef: 209.3 ms; Clef-flash: 38.8 ms in Cloudflare testing at launch | No independent benchmark yet |
| Published speed | OpenAI says Decisions is up to 10× faster than GPT-6 Luna through the Responses API | TypeSafe reports 70–500 ms end-to-end and roughly 40–200× faster for suitable System One workloads | At launch, Cloudflare measured Clef 2.5× faster than Jev and Clef-flash 13× faster than Jev at median latency. Clef is now up to 2× faster. | Microsoft says it is about 35× faster than GPT-6 Sol at median latency |
| Best fit | Multimodal decisions and applications already using OpenAI | Low-cost text decisions with longer inputs | Clef for stronger decisions; Clef-flash for the lowest price and latency on short inputs; Clef-omni for audio and video | Text-only decisions in Azure and Foundry workflows |
One interesting finding is that OpenAI Decisions and Jev performed almost identically in an independent latency comparison, with median response times of 268 ms and 269 ms.
On price, Cloudflare cut Clef-flash to $0.038 per million input tokens on 9 October, just below Jev and Microsoft-Decision-1 at $0.042. The trade-off is a hosted context window of 24K tokens, compared with 64K for Jev, so Jev remains the better low-cost choice for longer text inputs.
OpenAI Decisions and the Clef models accept images, and Clef-omni adds audio and video. Clef-flash also looks promising for speed, although its published latency comes from a separate benchmark.
The main takeaway is that all four are designed for similar tasks, but the best option depends on whether you prioritize cost, response speed, context length, or the types of input you need to handle.
I think the OpenAI Decisions API fits well into the existing OpenAI ecosystem.
It uses the same Python SDK, is easy to set up, and OpenAI says it is up to 10 times faster than GPT-6 Luna through the Responses API. Input costs the same $0.10 per million tokens as Luna, but output tokens are not billed.
If you are already using OpenAI, it makes sense to stick with it.
However, if you are exploring other options, I would recommend Clef-flash for price and speed on short inputs, Jev for low-cost text decisions with longer inputs, and OpenAI Decisions or Clef for image understanding. Microsoft-Decision-1 is worth testing if your stack already runs on Azure.
You can also run open-source or open-weight alternatives locally, including Clef, especially if you handle sensitive data or process a lot of requests.
Just keep in mind that you will need to manage the hosting and optimization yourself.
For most use cases, I would still go with a hosted API. It is easier to maintain, and providers keep improving their models and performance.
In this tutorial, we explored the OpenAI Decisions API through the Playground and Python. We tested classification, scoring, request routing, multiple decisions in a single request, and image understanding. We also compared it with other decision models to see how they stack up.
Overall, the biggest takeaway is that we do not always need an LLM to generate a full response.
Sometimes, a simple decision is enough, and these APIs make that process faster and easier to build into real applications, with no output tokens to pay for.
Top DataCamp Courses
{count, plural, one {Cursus} other {Cursussen}}
{count, plural, one {Cursus} other {Cursussen}}
{count, plural, one {Cursus} other {Cursussen}}
{count, plural, one {Tutorial} other {Tutorials}}
Bexruz (Bex) Tuychiev
12 min
{count, plural, one {Tutorial} other {Tutorials}}
Bexruz (Bex) Tuychiev
13 min
{count, plural, one {Tutorial} other {Tutorials}}
Aashi Dutt
8 min
{count, plural, one {Tutorial} other {Tutorials}}
Arunn Thevapalan
13 min
{count, plural, one {Tutorial} other {Tutorials}}
François Aubry
15 min
{count, plural, one {Tutorial} other {Tutorials}}
Abid Ali Awan
9 min