
课程
在 Python 中使用 DeepSeek
3 小时
1.3K
Mistral 发布了其首个推理模型Magistral,包含两个版本:Magistral Small(开放权重)和 Magistral Medium(闭源模型)。
本文将重点介绍Magistral Small,一款开放权重的推理模型,适用于需要结构化逻辑、多语种理解以及可追溯解释的任务。搭配 vLLM 等高吞吐推理引擎或 Ollama 等易用工具时,它在调试有缺陷的逻辑与处理推理任务方面表现出色。
在本教程中,我将逐步讲解如何:
我们通过每周五的免费通讯 The Median 为读者带来最新 AI 动态,快速解析一周要闻。订阅即可每周用几分钟保持敏锐:
Magistral 是 Mistral AI 的首个专用推理模型,面向逐步逻辑、多语种准确性与可追溯输出。它作为双版本发布的模型,包含:
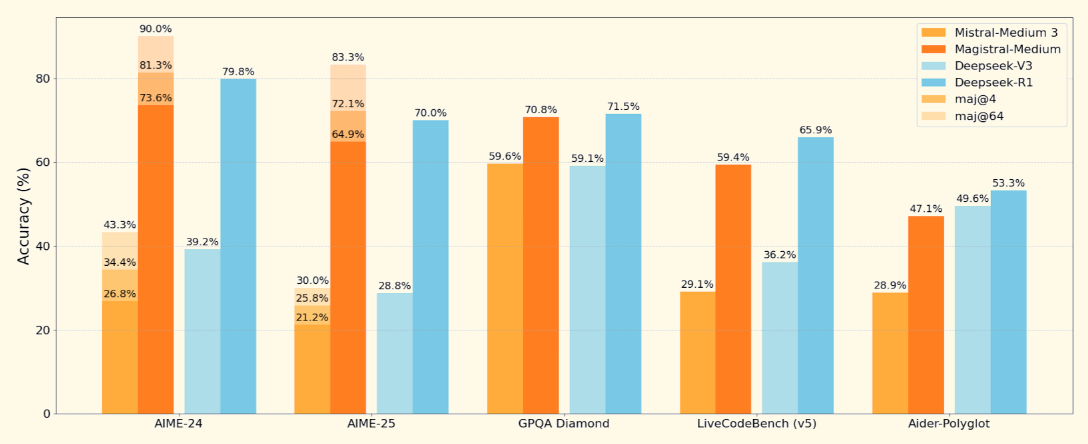
来源:Mistral
我们关注的开源模型 Magistral Small 支持 128K 上下文窗口(建议 40K 以保证稳定)。其训练方式为基于 Magistral Medium 的推理轨迹进行监督微调与强化学习相结合。
本节我们将使用 Ollama 在本地对 Mistral 的 Magistral 模型进行推理。请注意,该模型约需 14GB 空间,量化后可在单张 RTX 4090 或 32GB 内存的 MacBook 上运行。我在 M3 MacBook Pro 上完成了演示。
从以下地址下载适用于 macOS、Windows 或 Linux 的 Ollama:https://ollama.com/download。
按照安装向导完成安装,之后在终端运行以下命令进行验证:
ollama --version接着,运行以下代码拉取 Magistral 模型:
ollama pull magistral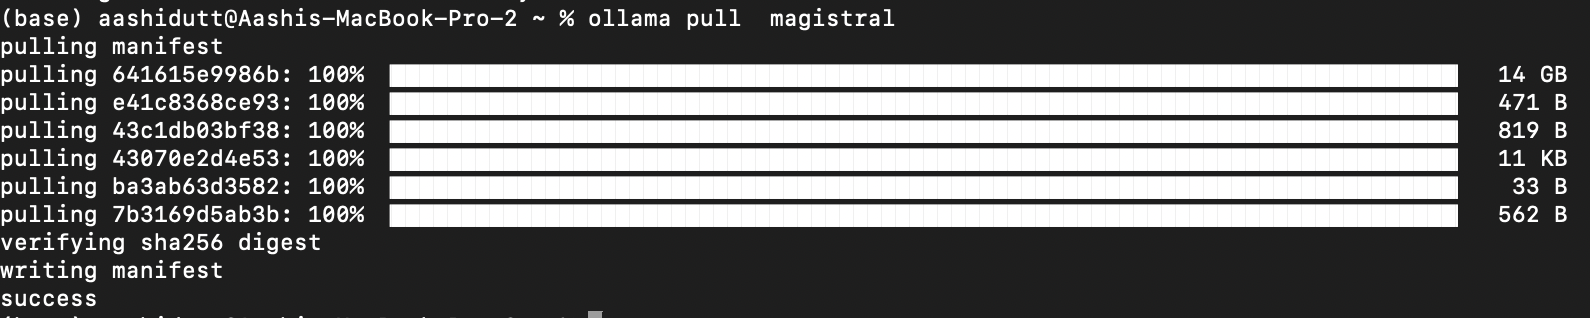
这将把 Magistral 模型下载到本地。注意:模型约 14GB,下载需要一定时间。
我们先安装所有必需的依赖。
pip install ollama
pip install requests
安装完成后,我们就可以开始推理了。
现在,我们来设置一个提示模板结构(参考原始Magistral 论文),以引导模型的思考过程。
import gradio as gr
import requests
import json
def build_prompt(flawed_logic):
    return f"""<s>[SYSTEM_PROMPT]
A user will ask you to solve a task. You should first draft your thinking process (inner monologue) until you have derived the final answer. Afterwards, write a self-contained summary of your thoughts.
Your thinking process must follow the template below:
<think>
Your thoughts or/and draft, like working through an exercise on scratch paper. Be as casual and detailed as needed until you're confident.
</think>
Do not mention that you're debugging — just present your thought process and conclusion naturally.
[/SYSTEM_PROMPT][INST]
Here is a flawed solution. Can you debug it and correct it step by step?
\"\"\"{flawed_logic}\"\"\"
[/INST]
"""
上述函数返回一个格式化的提示,引导 Magistral:
这种结构对像 Magistral 这样经过工具增强提示训练的模型尤为重要。同样的系统提示结构也适用于数学与编码类问题。
本步骤中,我们使用 Ollama 的本地 API 实时流式输出 Magistral 的结果。由于我们聚焦于以可追溯、逐步推理的方式来调试错误逻辑,因此让用户看到模型如何得出结论很重要。最后,我们通过简洁的Gradio 界面展示解释。
def call_ollama_stream(flawed_logic):
    prompt = build_prompt(flawed_logic)
    response_text = ""
    with requests.post(
        "http://localhost:11434/api/generate",
        json={"model": "magistral", "prompt": prompt, "stream": True},
        stream=True,
    ) as r:
        for line in r.iter_lines():
            if line:
                content = json.loads(line).get("response", "")
                response_text += content
    return response_text
with gr.Blocks(theme=gr.themes.Base()) as demo:
    gr.Markdown("## Chain-of-Logic Debugger (Magistral + Ollama)")
    gr.Markdown("Paste a flawed logical argument or math proof, and Magistral will debug it with step-by-step reasoning.")
    with gr.Row():
        input_box = gr.Textbox(lines=8, label="Flawed Logic / Proof")
        output_box = gr.Textbox(lines=15, label="Debugged Explanation")
    debug_button = gr.Button("Run Debugger")
    debug_button.click(fn=call_ollama_stream, inputs=input_box, outputs=output_box)
demo.launch(debug = True, share=True)
其大致流程如下:
build_prompt() 函数,将用户输入包装为带 <think> 推理标签的结构化提示。call_ollama_stream() 通过流式 POST 请求向 Ollama 的 HTTP API(localhost:11434)发送提示。requests.iter_lines() 按行监听流式响应。每接收一行,就从 JSON 负载中提取 response 字段并追加到缓冲区。我尝试的输入如下:
Assume x = y. Then, x² = xy. Subtracting both sides gives x² - y² = xy - y². So, (x+y)(x−y) = y(x−y). Cancelling x−y gives x+y = y. But since x = y, this means 2y = y → 2 = 1.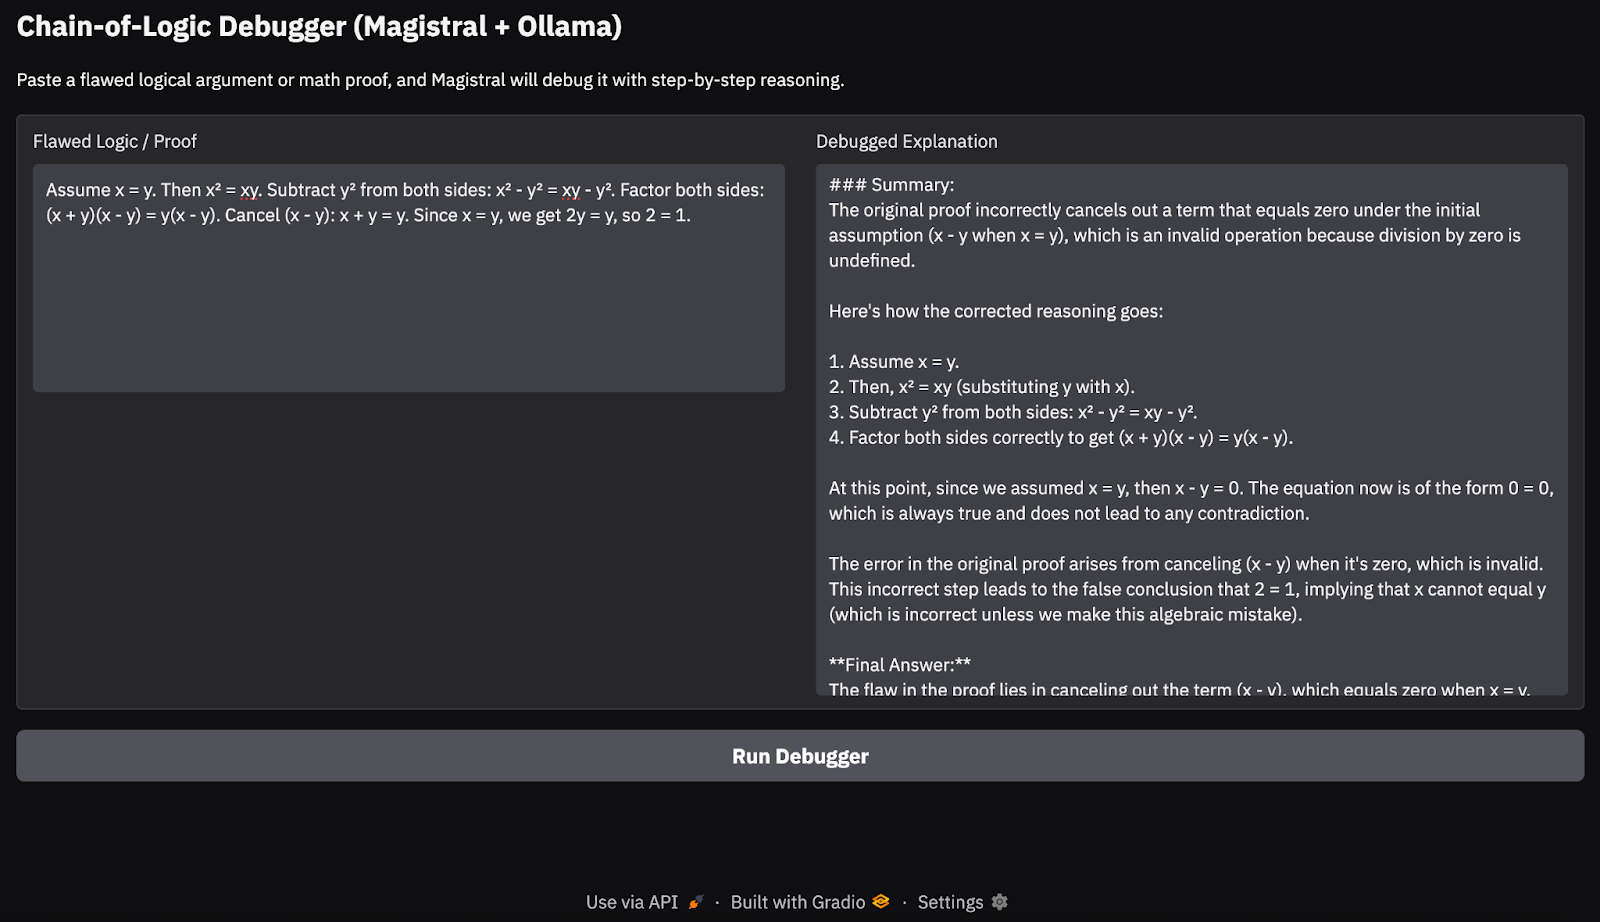
在我的 M3 MacBook Pro 测试中,模型对简单的逻辑链与数学证明处理得相当不错。但对于更深层的推理任务或更长的思考链,偶尔会漏掉边界情况,这在 24B 的开源模型上是可以预期的。该方法非常适合轻量级推理演示或端侧链式思考应用,无需依赖云端 API。
本节将讲解如何在 RunPod 上申请高性能 GPU 实例,使用vLLM 部署 Mistral 的 Magistral 模型,并暴露一个兼容 OpenAI 的 API,以供本地或远程推理。
在启动模型之前,请确保您的 RunPod 账户已完成设置:
现在,我们来申请一台可承载模型的 pod。设置步骤如下:
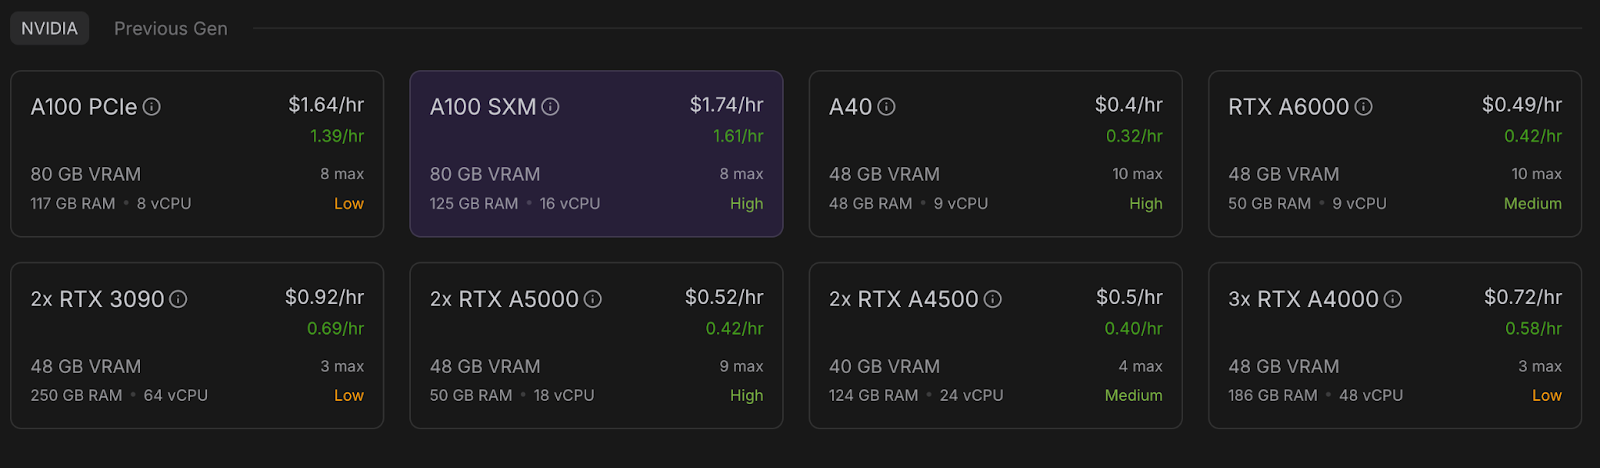
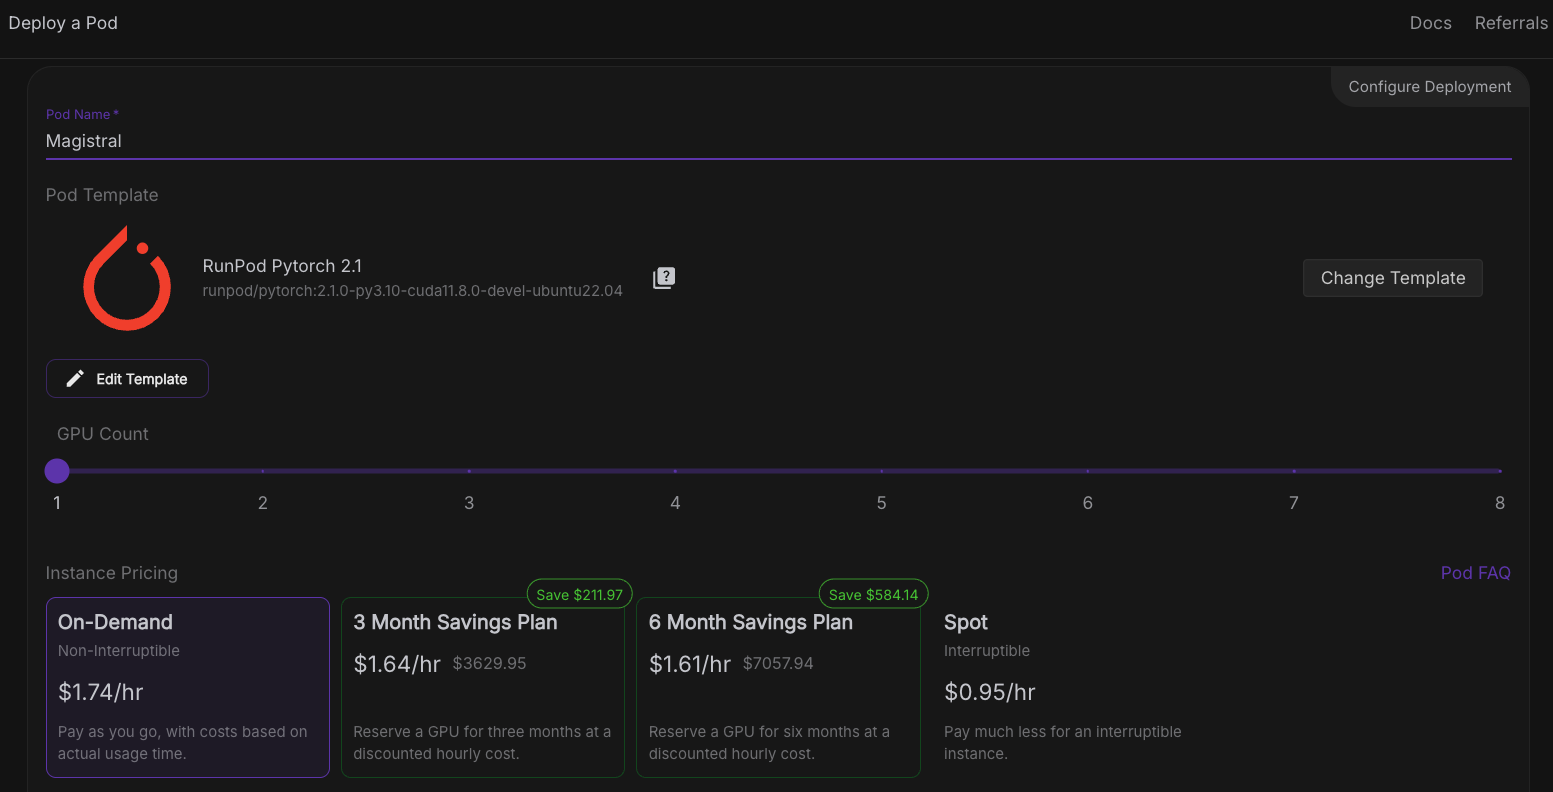
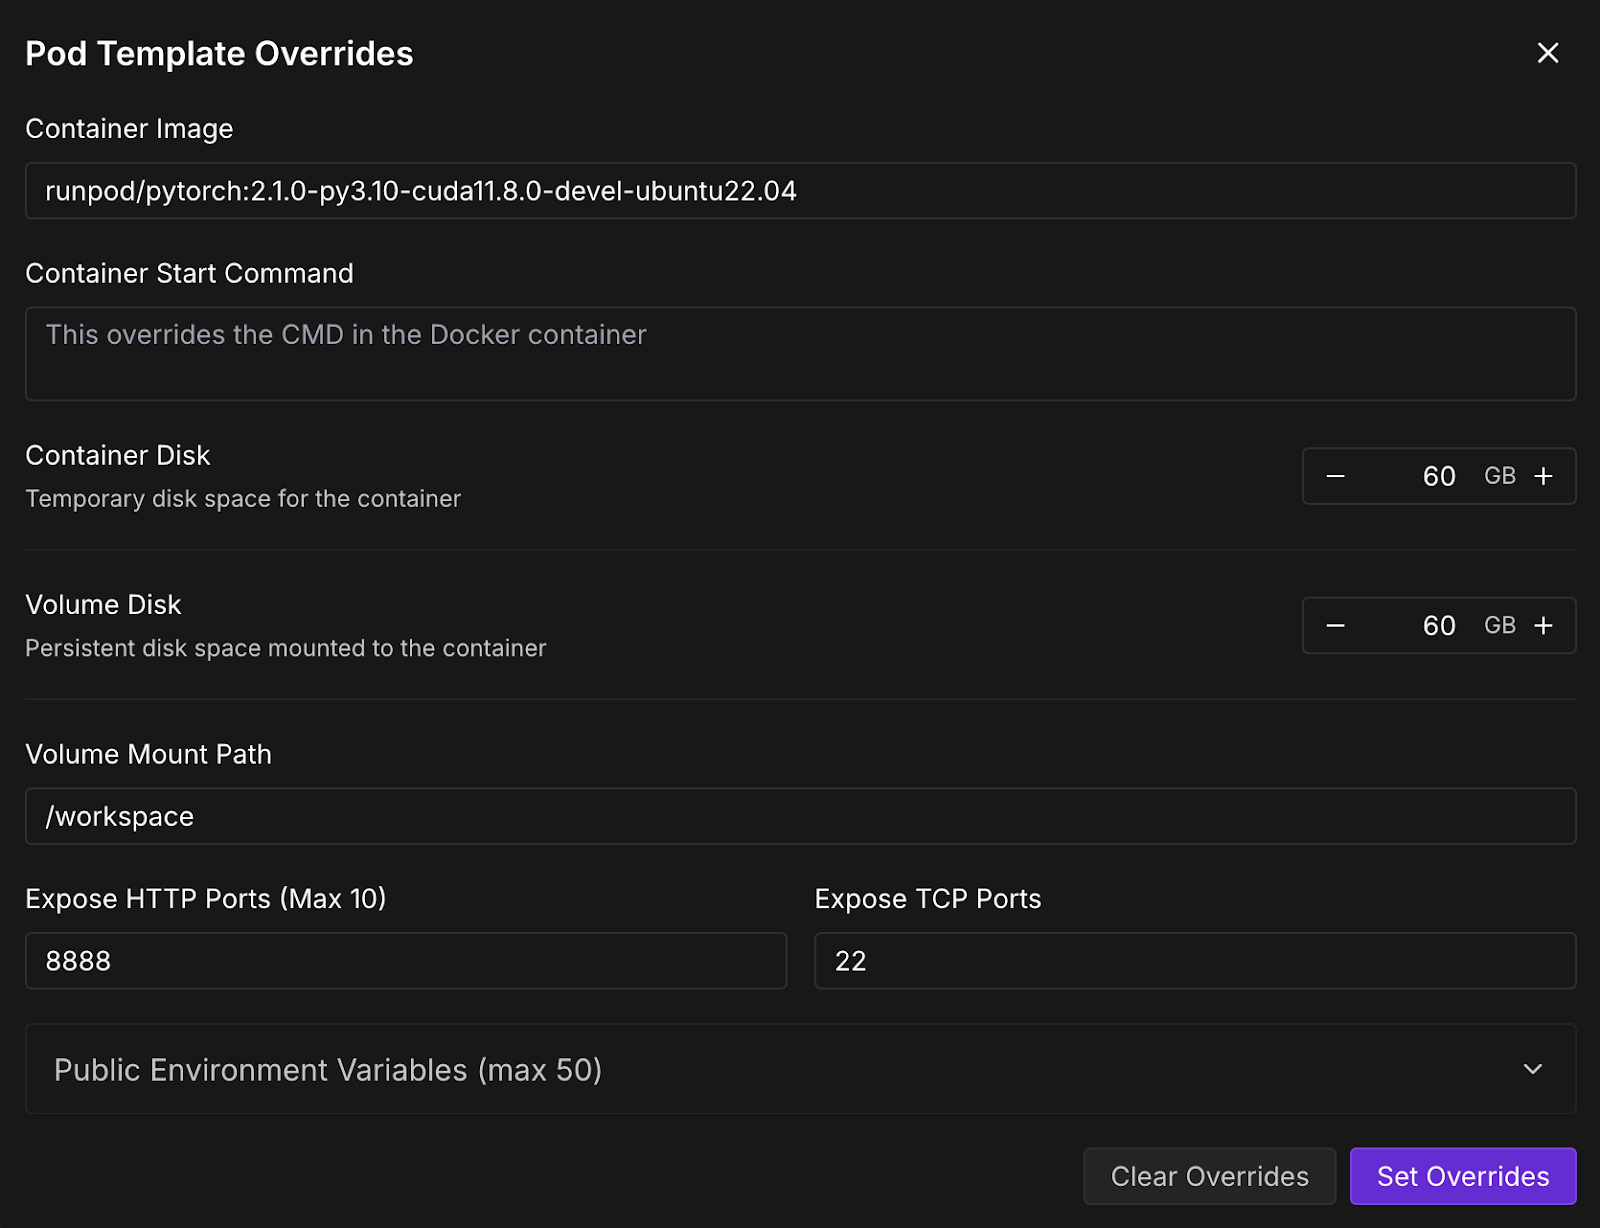
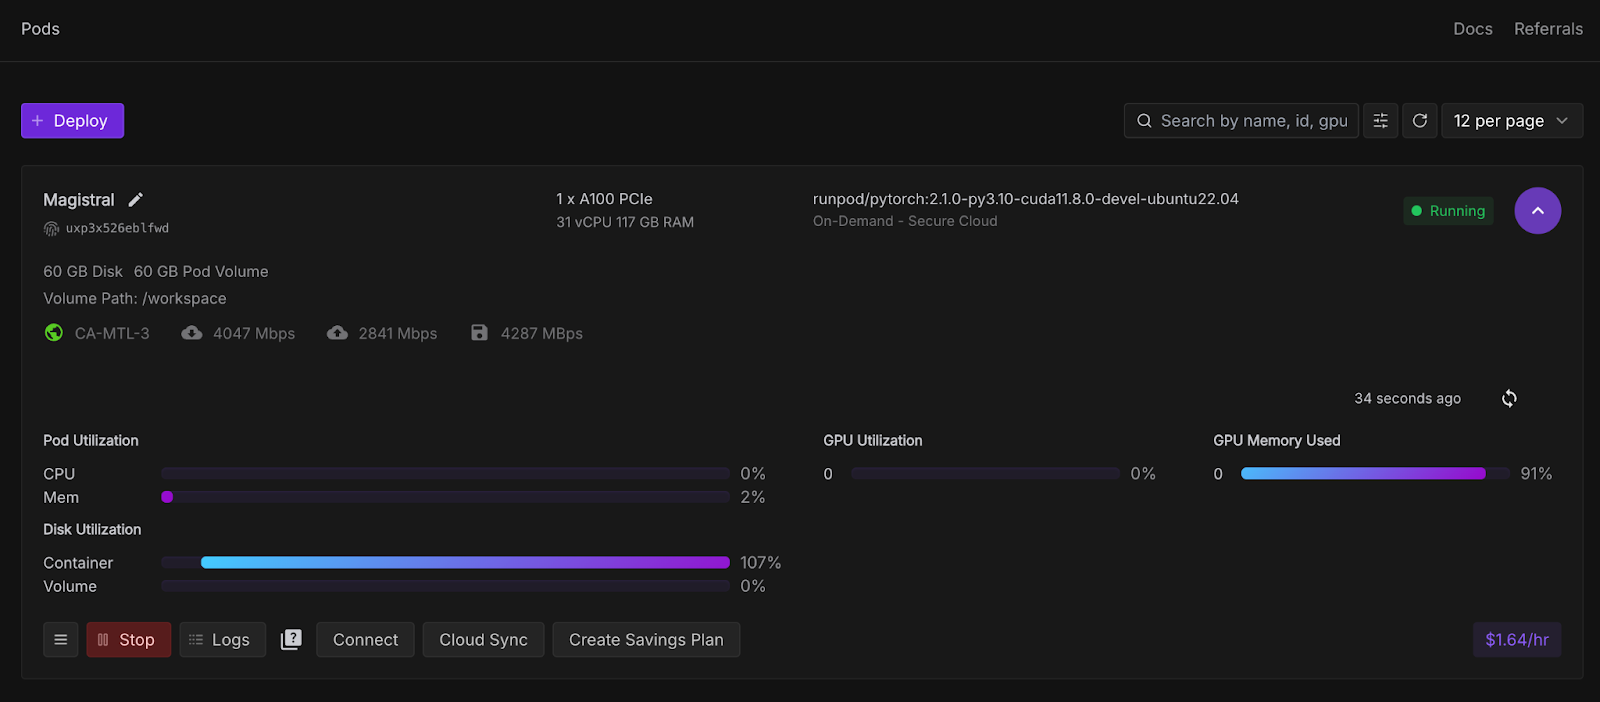
当Connect 按钮变为可点击后,点击它。您会看到多种连接方式——您可以:
注意:等待直到在 Jupyter Lab 下方看到绿色圆点 🟢与 Ready 标识。
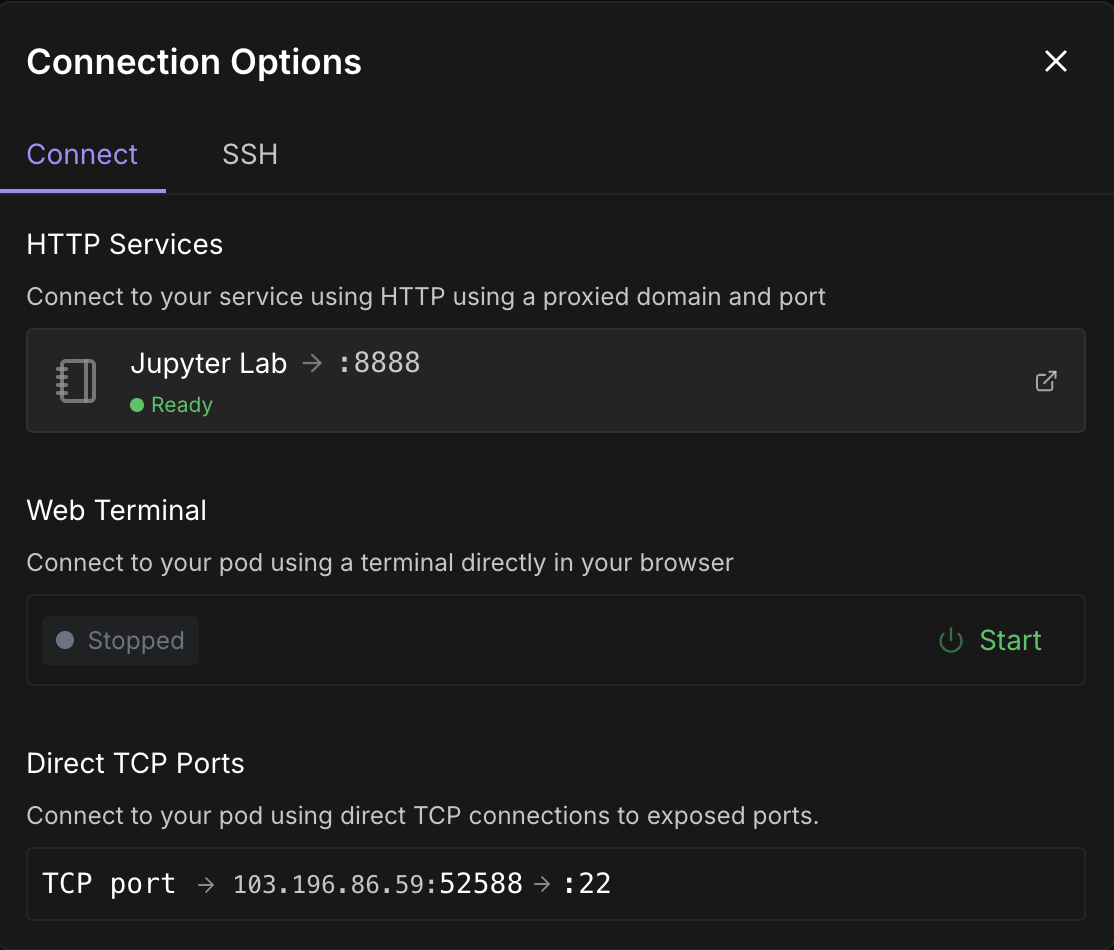
点击Jupyter Lab——它会打开新窗口,提供创建新 Jupyter 笔记本的选项。打开一个新终端或新建 Python 文件。
在 pod 内的终端或 Jupyter 笔记本中安装 vLLM 及其依赖。
pip install -U vllm --pre --extra-index-url https://wheels.vllm.ai/nightly
pip install gradio
同时确保 mistral_common >= 1.6.0,运行:
python -c "import mistral_common; print(mistral_common.__version__)"现在来启动模型。点击左上角 “+”,选择终端(Terminal),然后运行以下命令:
vllm serve mistralai/Magistral-Small-2506 \
  --tokenizer_mode mistral \
  --config_format mistral \
  --load_format mistral \
  --tool-call-parser mistral \
  --enable-auto-tool-choice
保持该终端运行。此命令将通过 vLLM 启动 Magistral Small 模型,并在一个快速、兼容 OpenAI 的 API 端点(http://localhost:8000/v1)提供服务。以下是各标志位的说明:
|
Flag |
Description |
|
|
这是一个 Hugging Face 模型标识。若本地不存在,vLLM 会自动下载。 |
|
|
确保分词器按 Mistral 专用逻辑解释。 |
|
|
指示模型配置为 Mistral 的自定义格式,而非 Hugging Face 默认格式。 |
|
|
按 Mistral 预期的布局加载权重(对兼容性很重要)。 |
|
|
启用按 Mistral 结构解析的工具调用语法。 |
|
|
在使用工具调用时,基于输入自动选择最佳工具。可选,但对经工具推理训练的模型很有用。 |
我们将构建一个演示,让 Magistral 调试错误的逻辑或数学证明。模型会输出包裹在<think> 标签中的详细内部独白,以及最终摘要。
首先在 Jupyter Notebook 中完成导入并初始化 OpenAI 客户端。然后按照原始 Magistral 论文建议设置系统提示。
import gradio as gr
from openai import OpenAI
import re
import time
client = OpenAI(api_key="EMPTY", base_url="http://localhost:8000/v1")
SYSTEM_PROMPT = """<s>[SYSTEM_PROMPT]system_prompt
A user will ask you to solve a task. You should first draft your thinking process (inner monologue) until you have derived the final answer. Afterwards, write a self-contained summary of your thoughts.
<think>
Your thoughts or draft, like working through an exercise on scratch paper.
</think>
Here, provide a concise summary that reflects your reasoning and presents a clear final answer to the user.
Problem:
[/SYSTEM_PROMPT]"""
SYSTEM_PROMPT 定义了模型的结构化输出格式:
接下来根据 Magistral 原始博文的建议,设置 temperature、top_p 与 max_tokens,并处理模型的流式输出。
# Streaming logic with stop control
def debug_faulty_logic_stream(faulty_proof, stop_signal):
    stop_signal["stop"] = False
    messages = [
        {"role": "system", "content": SYSTEM_PROMPT},
        {"role": "user", "content": f"Here is a flawed logic or math proof. Can you debug it step-by-step?\n\n{faulty_proof}"}
    ]
    try:
        response = client.chat.completions.create(
            model="mistralai/Magistral-Small-2506",
            messages=messages,
            stream=True,
            temperature=0.7,
            top_p=0.95,
            max_tokens=2048
        )
        buffer = ""
        for chunk in response:
            if stop_signal.get("stop"):
                break
            delta = chunk.choices[0].delta
            if hasattr(delta, "content") and delta.content:
                buffer += delta.content
                filtered = re.sub(r"<think>.*?</think>", "", buffer, flags=re.DOTALL).strip()
                yield filtered
            time.sleep(0.02)
    except Exception as e:
        yield f"Error: {str(e)}"
# Set stop flag when stop button is clicked
def stop_streaming(stop_signal):
    stop_signal["stop"] = True
    return gr.Textbox.update(value="Stopped.")
以上代码处理来自模型的逐 token 实时流式输出。stop_signal 允许用户点击“Stop”按钮中断流。
缓冲区会累积全部内容,但通过正则表达式仅输出摘要(排除<think> 标签)。若出现错误(如网络问题),将返回错误信息。
我们用一个简单的 Gradio 应用把上述流程串起来,让用户粘贴其错误逻辑或证明并提交给模型推理。
with gr.Blocks() as demo:
    gr.Markdown("## Chain-of-Logic Debugger (Streaming via Magistral + vLLM)")

    input_box = gr.Textbox(
        label="Paste Your Faulty Logic or Proof",
        lines=8,
        placeholder="e.g., Assume x = y, then x² = xy..."
    )
    output_box = gr.Textbox(label="Corrected Reasoning (Streaming Output)")

    submit_btn = gr.Button("Submit")
    stop_btn = gr.Button("Stop")

    stop_flag = gr.State({"stop": False})

    submit_btn.click(
        fn=debug_faulty_logic_stream,
        inputs=[input_box, stop_flag],
        outputs=output_box
    )

    stop_btn.click(
        fn=stop_streaming,
        inputs=stop_flag,
        outputs=output_box
    )

if __name__ == "__main__":
    demo.launch(share=True, inbrowser=True, debug=True)
上述代码创建了一个简洁的 Gradio 界面,包含:
它使用 gr.State 记录用户是否希望中断流式过程。随后 launch() 会在本地运行应用并在浏览器中打开。我尝试的输入如下:
Assume x = y. Then, x² = xy. Subtracting both sides gives x² - y² = xy - y². So, (x+y)(x−y) = y(x−y). Cancelling x−y gives x+y = y. But since x = y, this means 2y = y → 2 = 1.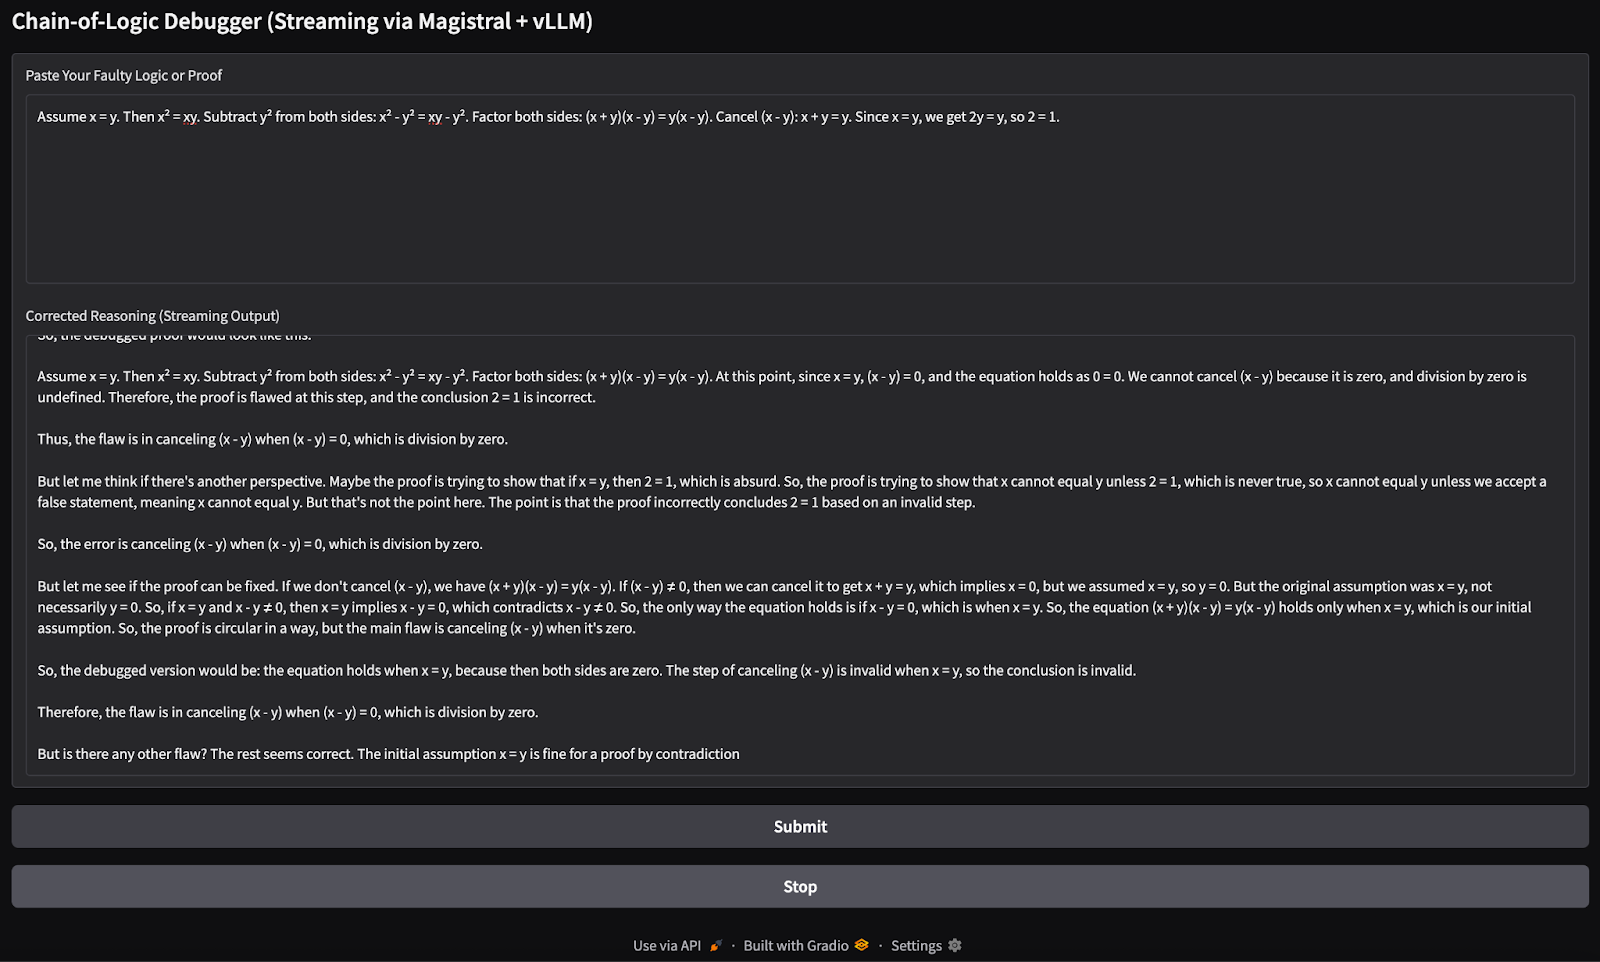
您可以切换到正在运行 vLLM 服务的终端,查看 KV 缓存的使用日志,以及在模型输出时命中率的上升情况。
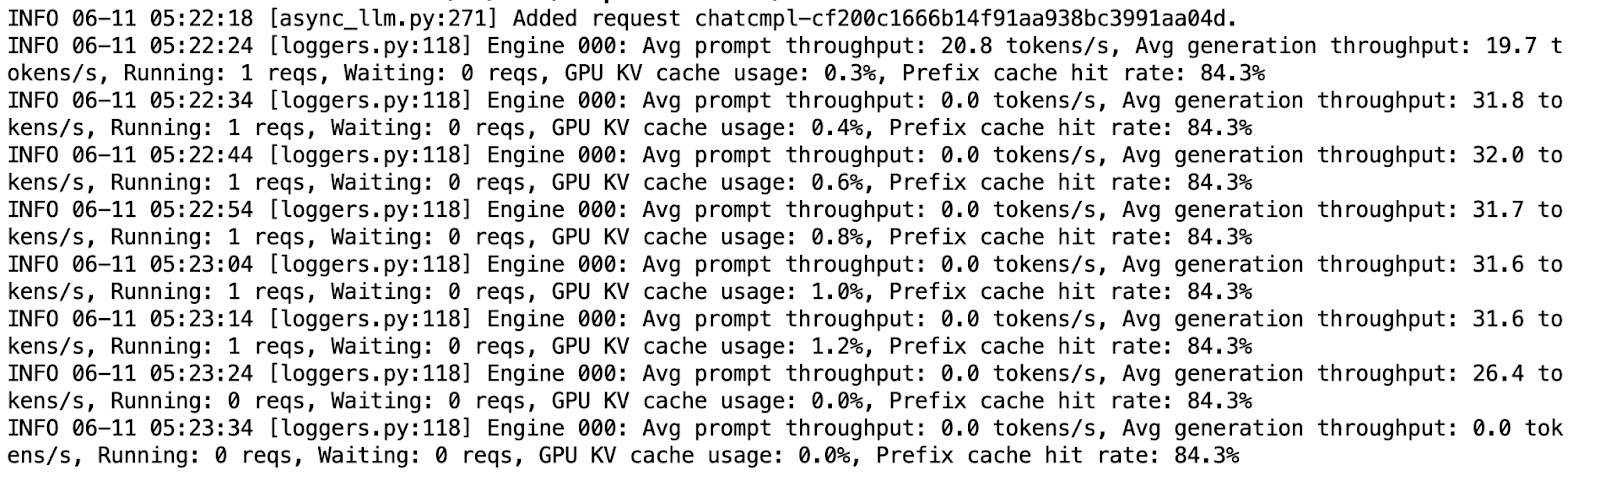
相较于 Ollama,vLLM 在推理时明显更快也更稳定。流式表现顺畅,输出大多结构清晰。但模型有时会在<think> 段落中重复思路,这可能源于在无采样惩罚的自回归解码中产生的特性。
Ollama 支持模型的 4-bit 量化版本,便于在设备端高效推理;而 vLLM 需要 GPU 加速,运行成本略高(本项目约 $5)。4-bit 量化的 Magistral 模型约需 14GB 内存,可部署在单张 RTX 4090 或 32GB 内存的 MacBook 上。但受限于算力,推理可能较慢,每次响应最长可达 4 分钟。
对比之下,部署在 A100 SXM 等高性能 GPU 上的 vLLM 推理速度更快(通常小于 1 分钟/次),更适合需要高响应性的应用或规模化部署。
如果只是试验且有本地资源,Ollama 由于设置成本低更为理想;而在生产级性能或更大工作负载场景,建议选择 vLLM。请注意,即使在本地运行 vLLM,也仍需具备足够能力的 GPU。
本教程使用 Mistral 的推理优先型 LLM——Magistral Small——构建了一个逐步逻辑调试器。我们同时演示了基于 Ollama 的本地快速测试,以及基于 vLLM 的高吞吐 GPU 推理并提供兼容 OpenAI 的 API。此外,我们还通过 Gradio 应用测试了模型的推理能力。无论您是在调试错误逻辑,还是在构建推理型 AI 工具,Magistral Small 都是不错的选择。
用这些课程学习 AI!
课程
课程
课程