Course
Developing LLM Applications with LangChain
3 hr
46.2K
Mistral has released its first reasoning model, Magistral, available in two variants: Magistral Small (open-weight) and Magistral Medium (closed model).
My focus in this blog will be on Magistral Small, an open-weight reasoning model designed for tasks requiring structured logic, multilingual understanding, and the ability to provide traceable explanations. When paired with high-throughput inference engines like vLLM or easy-to-use tools like Ollama, it becomes a great tool for debugging flawed logic and reasoning tasks.
In this tutorial, I’ll explain step by step how to:
We keep our readers updated on the latest in AI by sending out The Median, our free Friday newsletter that breaks down the week’s key stories. Subscribe and stay sharp in just a few minutes a week:
Magistral is Mistral AI's first dedicated reasoning model, built for step-by-step logic, multilingual accuracy, and traceable outputs. It is a dual-release model that comes in two variants:
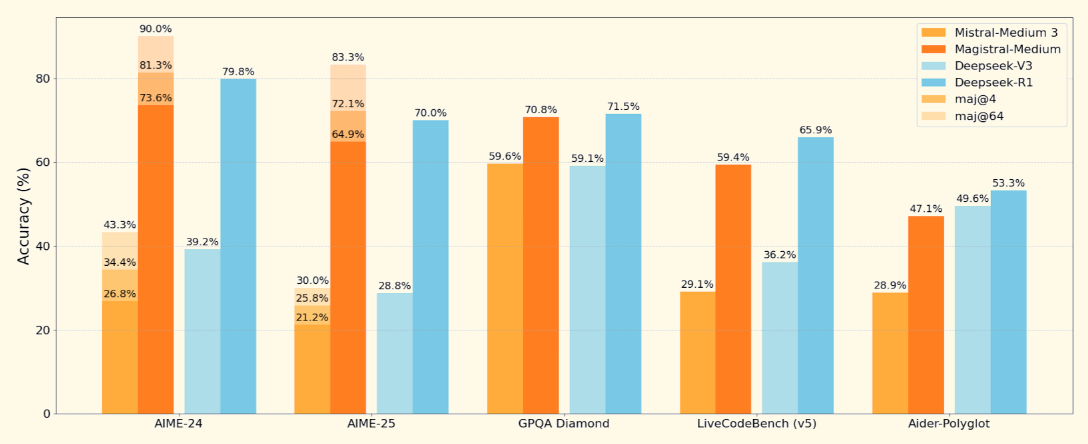
Source: Mistral
Magistral Small, the open model we'll focus on, supports a 128K context window (40K recommended for stable performance). It is trained using supervised fine-tuning on Magistral Medium traces and reinforcement learning.
In this section, we are going to perform inference on Mistral’s Magistral model locally using Ollama. Note that this model requires approximately 14GB of space and can be fitted within a single RTX 4090 or a 32GB RAM MacBook once quantized. I ran this demo on an M3 MacBook Pro.
Download Ollama for macOS, Windows, or Linux from: https://ollama.com/download.
Follow the installer instructions, and after installation, verify by running this in the terminal:
ollama --versionNext, pull the Magistral model by running the following code:
ollama pull magistral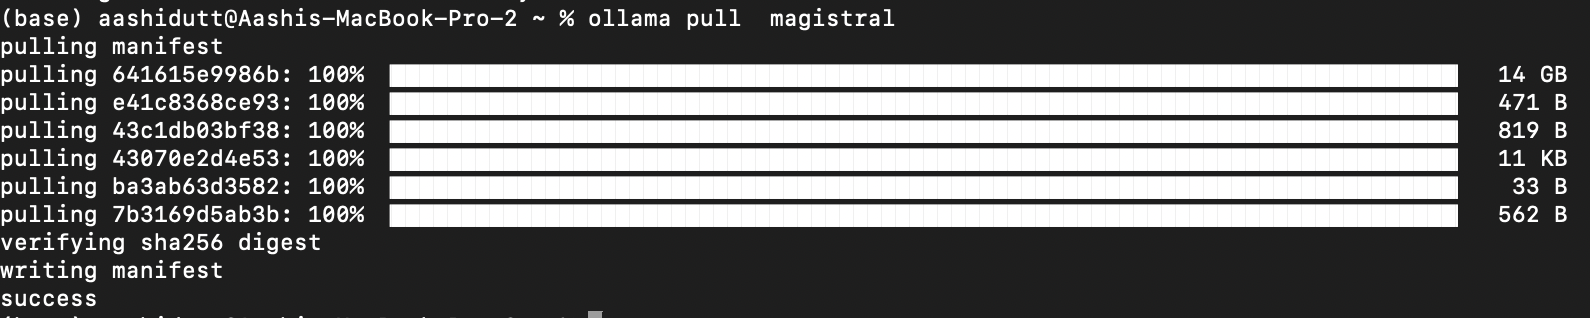
This will pull the Magistral model to your local machine. Note: It will take some time as the model is about 14 GB.
Let’s begin with installing all the required dependencies.
pip install ollama
pip install requests
With the dependencies installed, we're ready to run inference.
Now, we set up a prompt template structure (as mentioned in the original Magistral paper) that guides the model’s thinking.
import gradio as gr
import requests
import json
def build_prompt(flawed_logic):
    return f"""<s>[SYSTEM_PROMPT]
A user will ask you to solve a task. You should first draft your thinking process (inner monologue) until you have derived the final answer. Afterwards, write a self-contained summary of your thoughts.
Your thinking process must follow the template below:
<think>
Your thoughts or/and draft, like working through an exercise on scratch paper. Be as casual and detailed as needed until you're confident.
</think>
Do not mention that you're debugging — just present your thought process and conclusion naturally.
[/SYSTEM_PROMPT][INST]
Here is a flawed solution. Can you debug it and correct it step by step?
\"\"\"{flawed_logic}\"\"\"
[/INST]
"""
The above function returns a formatted prompt that guides Magistral to:
This structure is important for models like Magistral that have been trained with tool-augmented prompts. The same system prompt structure can also be utilized for both mathematical and coding problems.
In this step, we stream the Magistral model’s output in real-time using Ollama’s local API. Since we’re focused on debugging flawed logic with traceable, step-by-step reasoning, it’s important that the user can see how the model arrives at its conclusions. Finally, we display the explanation through a clean Gradio interface.
def call_ollama_stream(flawed_logic):
    prompt = build_prompt(flawed_logic)
    response_text = ""
    with requests.post(
        "http://localhost:11434/api/generate",
        json={"model": "magistral", "prompt": prompt, "stream": True},
        stream=True,
    ) as r:
        for line in r.iter_lines():
            if line:
                content = json.loads(line).get("response", "")
                response_text += content
    return response_text
with gr.Blocks(theme=gr.themes.Base()) as demo:
    gr.Markdown("## Chain-of-Logic Debugger (Magistral + Ollama)")
    gr.Markdown("Paste a flawed logical argument or math proof, and Magistral will debug it with step-by-step reasoning.")
    with gr.Row():
        input_box = gr.Textbox(lines=8, label="Flawed Logic / Proof")
        output_box = gr.Textbox(lines=15, label="Debugged Explanation")
    debug_button = gr.Button("Run Debugger")
    debug_button.click(fn=call_ollama_stream, inputs=input_box, outputs=output_box)
demo.launch(debug = True, share=True)
Here is an outline of what’s happening here:
build_prompt() function to wrap user input into a structured prompt that guides the model with <think> reasoning tags.call_ollama_stream() function sends the prompt to Ollama’s HTTP API at localhost:11434 using a streaming POST request.requests.iter_lines(). For each line received, it extracts the response field from the JSON payload and appends it to a running text buffer.Here’s the input I tried:
Assume x = y. Then, x² = xy. Subtracting both sides gives x² - y² = xy - y². So, (x+y)(x−y) = y(x−y). Cancelling x−y gives x+y = y. But since x = y, this means 2y = y → 2 = 1.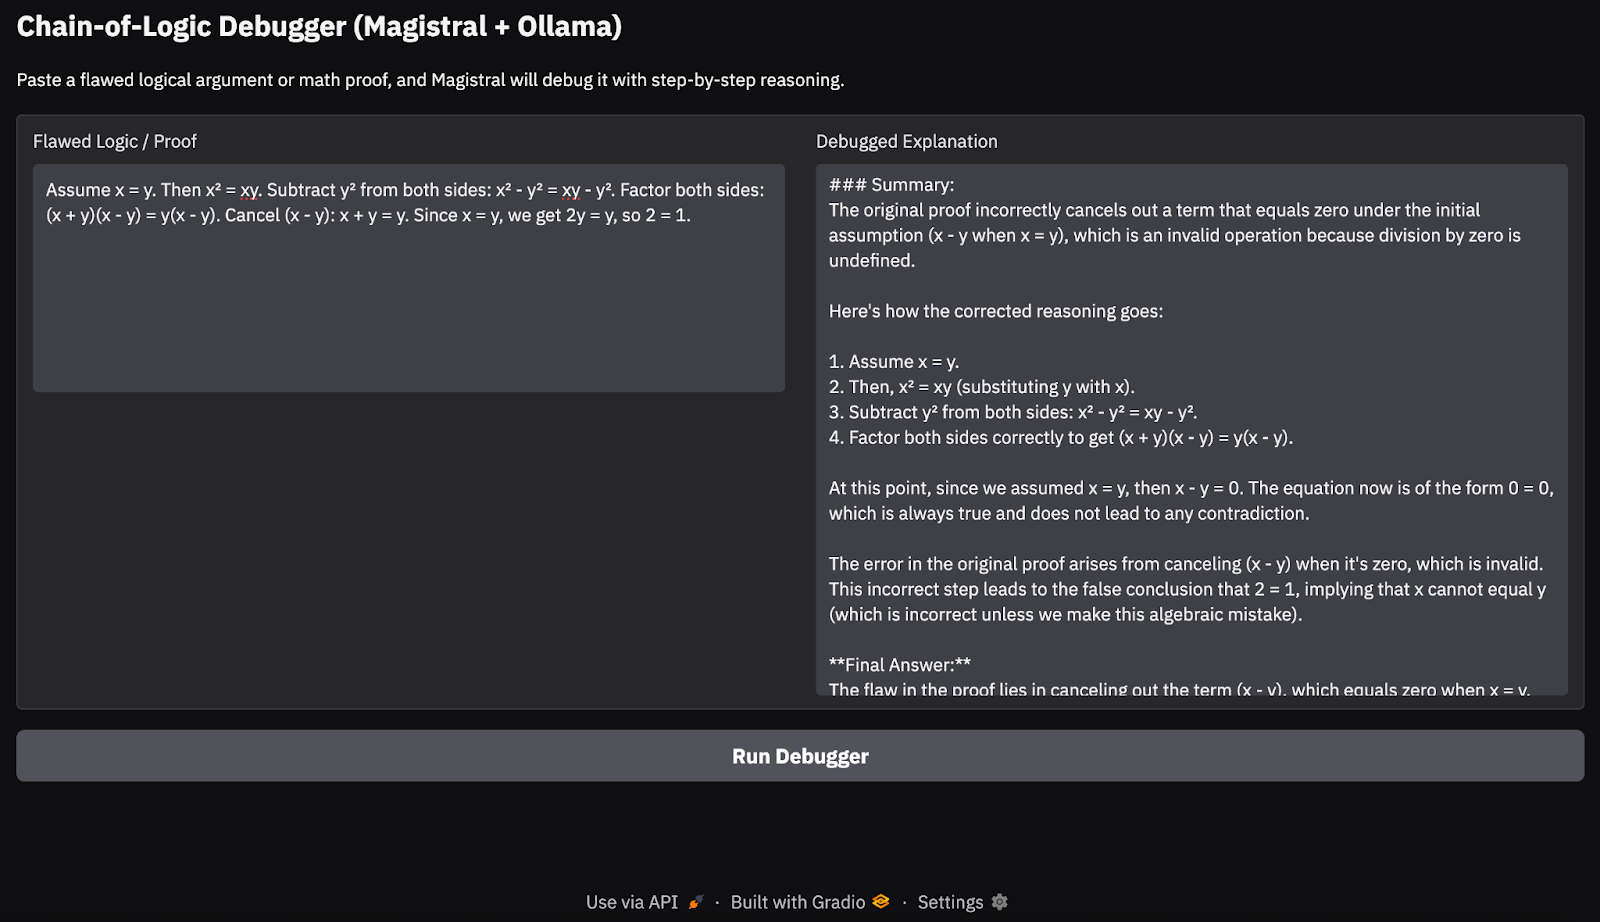
In my testing on an M3 MacBook Pro, the model handled simple logical chains and math proofs fairly well. However, for deeper reasoning tasks or longer chains of thought, it occasionally missed edge cases, something to be expected from a 24B open model. This approach is ideal for lightweight reasoning demos or on-device chain-of-thought applications, without relying on cloud APIs.
In this section, I’ll explain how to provision a powerful GPU instance on RunPod, deploy Mistral’s Magistral model using vLLM, and expose an OpenAI-compatible API for both local and remote inference.
Before launching the model, make sure your RunPod account is set up:
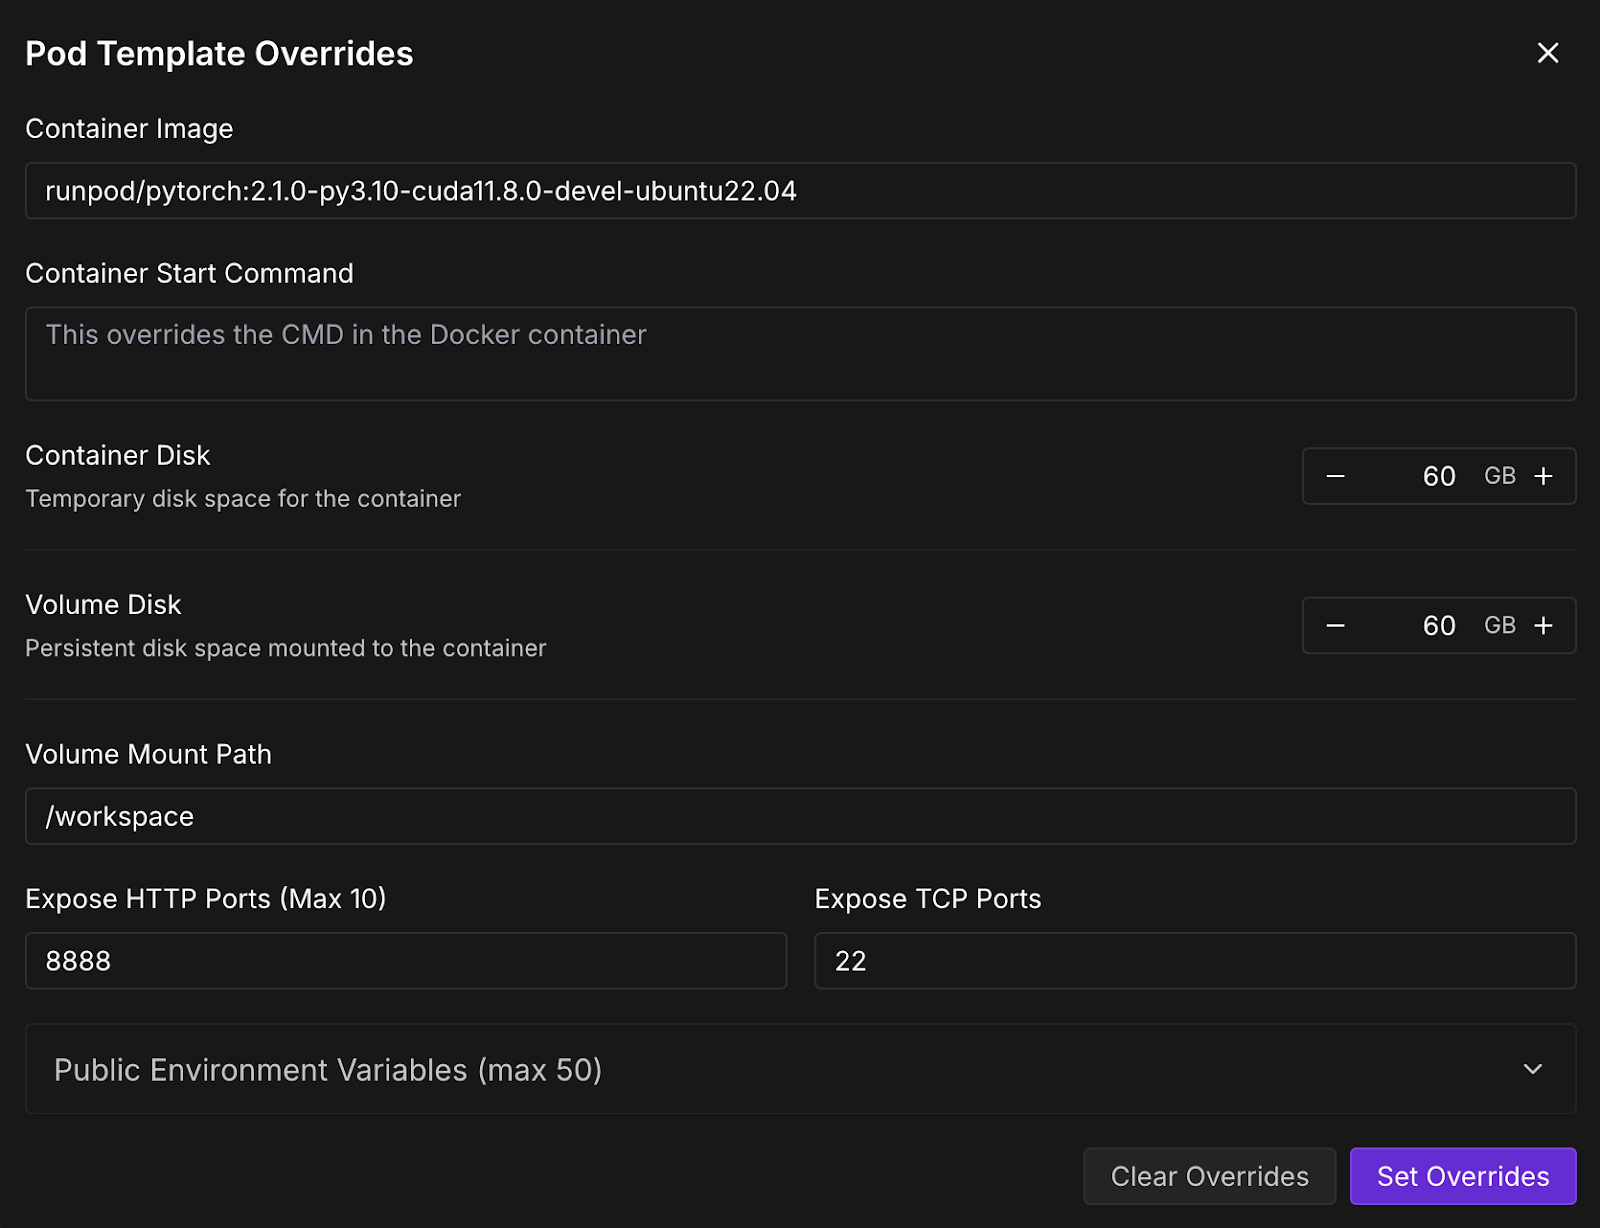
Now, let’s provision a pod capable of hosting the model. For setting up a pod, follow these steps:
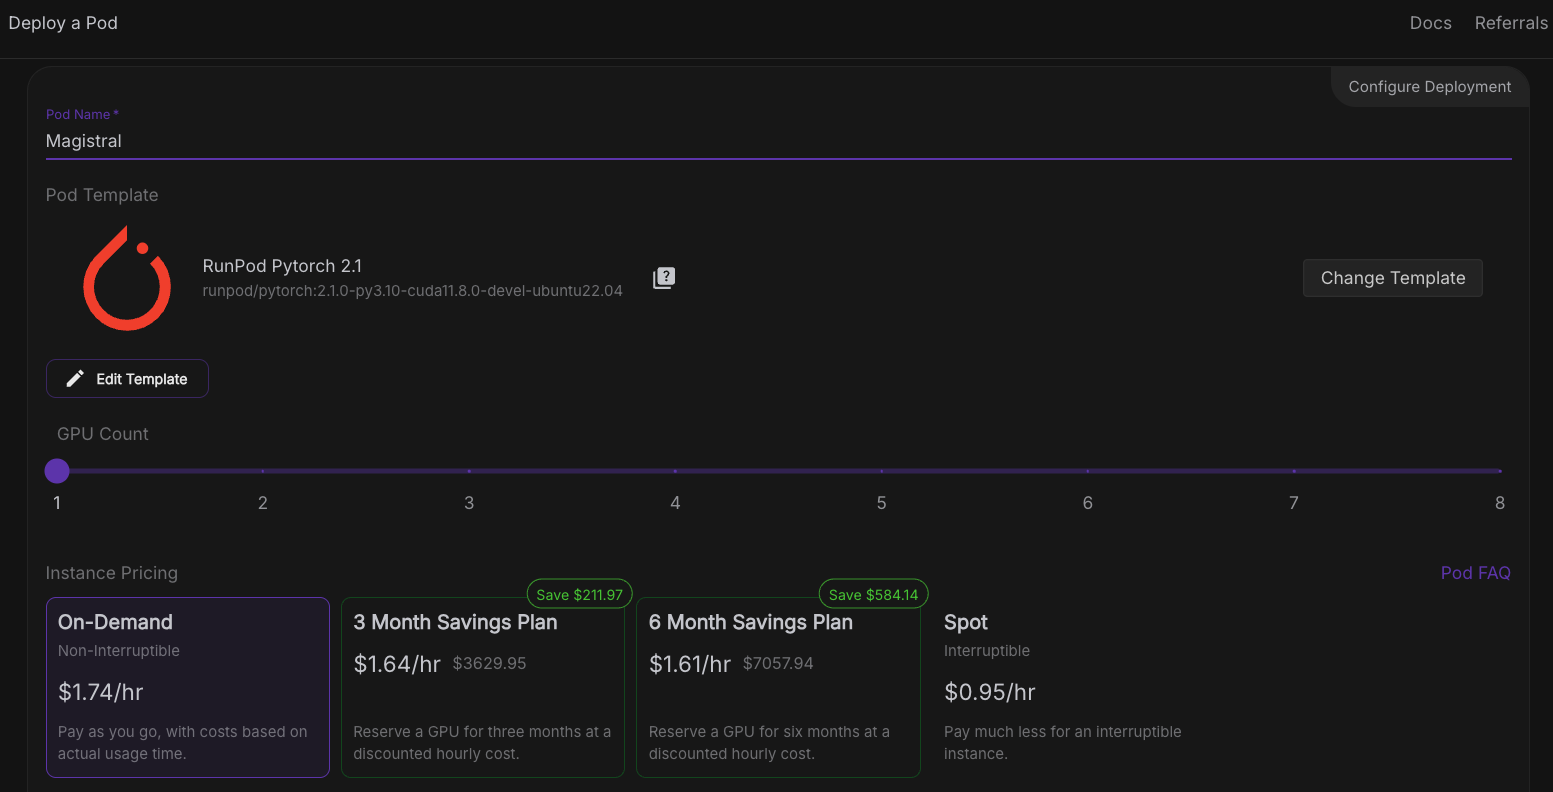

Once the Connect button turns clickable, click it. You'll see multiple connection options—you can either:
Note: Wait till you see a green dot 🟢with a Ready sign under Jupyter Lab.
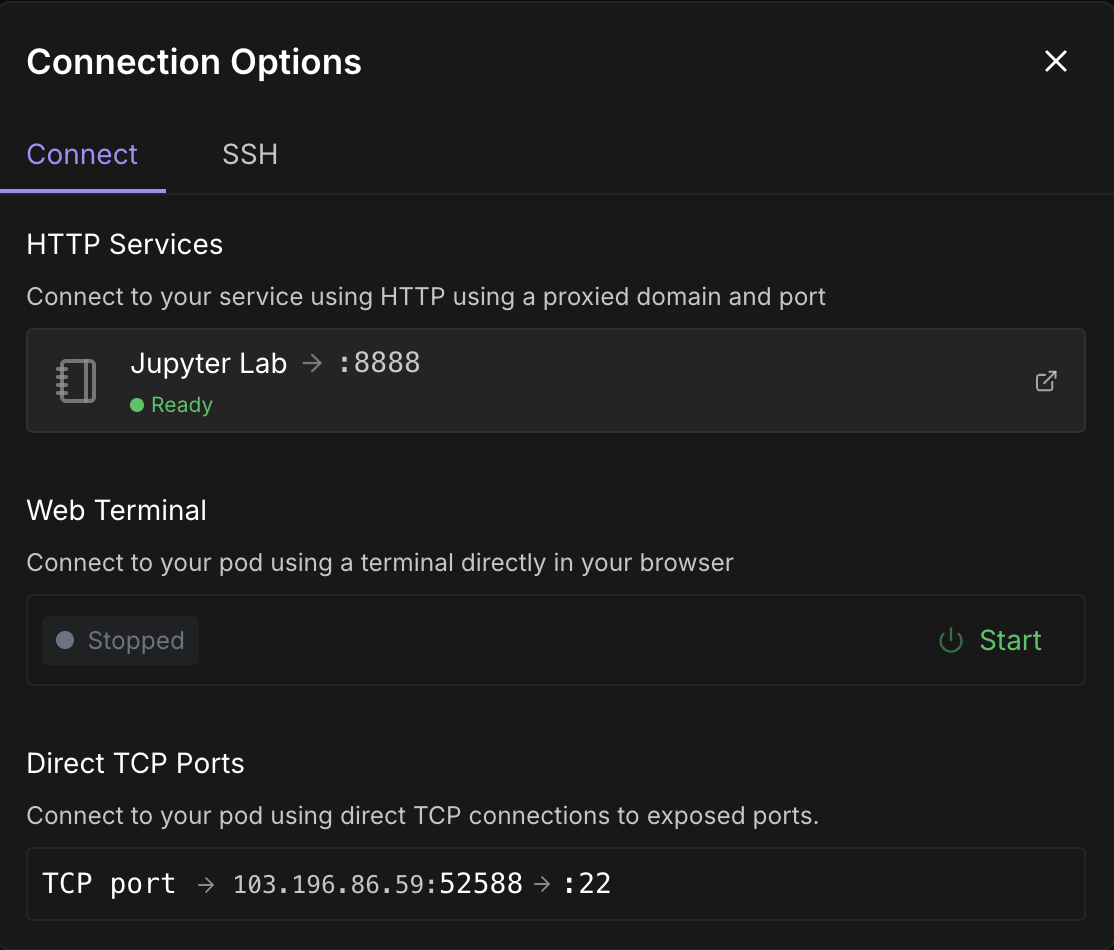
Click on Jupyter Lab—it will lead you to another window with options to create a new Jupyter notebook. Open a new terminal or set up a new Python file.
Either in the terminal or Jupyter Notebook inside your pod, install vLLM and its dependencies.
pip install -U vllm --pre --extra-index-url https://wheels.vllm.ai/nightly
pip install gradio
Also, ensure that you are running mistral_common >= 1.6.0 by running:
python -c "import mistral_common; print(mistral_common.__version__)"Now, let’s serve the model. Click on a “+” sign on the left-hand top corner and select terminal from options, then run the following command:
vllm serve mistralai/Magistral-Small-2506 \
  --tokenizer_mode mistral \
  --config_format mistral \
  --load_format mistral \
  --tool-call-parser mistral \
  --enable-auto-tool-choice
Keep this terminal running as this command launches the Magistral Small model using vLLM and makes it available at a fast, OpenAI-compatible API endpoint (http://localhost:8000/v1). Here's a breakdown of each flag:
|
Flag |
Description |
|
|
It is a Hugging Face model identifier. vLLM automatically downloads this model if not already present. |
|
|
This ensures that the tokenizer is interpreted using the Mistral-specific logic |
|
|
It indicates that the model config is in Mistral’s custom format, not Hugging Face's default. |
|
|
This loads the model weights using Mistral's expected layout (important for compatibility). |
|
|
It enables a parsing tool-calling syntax according to Mistral’s structure. |
|
|
Automatically selects the best tool based on the input if tool calling is used. This is optional but useful for models trained with tool reasoning. |
We’ll now build a demo where Magistral is asked to debug a flawed logic or math proof. The model will output a detailed inner monologue wrapped in <think> tags and a final summary.
We start by setting up the imports and initializing the OpenAI client in Jupyter Notebook. Then we set up the Magistral’s system prompt as suggested in the original Magistral paper.
import gradio as gr
from openai import OpenAI
import re
import time
client = OpenAI(api_key="EMPTY", base_url="http://localhost:8000/v1")
SYSTEM_PROMPT = """<s>[SYSTEM_PROMPT]system_prompt
A user will ask you to solve a task. You should first draft your thinking process (inner monologue) until you have derived the final answer. Afterwards, write a self-contained summary of your thoughts.
<think>
Your thoughts or draft, like working through an exercise on scratch paper.
</think>
Here, provide a concise summary that reflects your reasoning and presents a clear final answer to the user.
Problem:
[/SYSTEM_PROMPT]"""
The SYSTEM_PROMPT defines the structured format for how the model should respond:
Next, we handle model output streaming by setting the required temperature, top_p, and max_tokens as suggested in the Magistral original blog.
# Streaming logic with stop control
def debug_faulty_logic_stream(faulty_proof, stop_signal):
    stop_signal["stop"] = False
    messages = [
        {"role": "system", "content": SYSTEM_PROMPT},
        {"role": "user", "content": f"Here is a flawed logic or math proof. Can you debug it step-by-step?\n\n{faulty_proof}"}
    ]
    try:
        response = client.chat.completions.create(
            model="mistralai/Magistral-Small-2506",
            messages=messages,
            stream=True,
            temperature=0.7,
            top_p=0.95,
            max_tokens=2048
        )
        buffer = ""
        for chunk in response:
            if stop_signal.get("stop"):
                break
            delta = chunk.choices[0].delta
            if hasattr(delta, "content") and delta.content:
                buffer += delta.content
                filtered = re.sub(r"<think>.*?</think>", "", buffer, flags=re.DOTALL).strip()
                yield filtered
            time.sleep(0.02)
    except Exception as e:
        yield f"Error: {str(e)}"
# Set stop flag when stop button is clicked
def stop_streaming(stop_signal):
    stop_signal["stop"] = True
    return gr.Textbox.update(value="Stopped.")
The above code snippet handles live token-by-token output streaming from the model. stop_signal allows users to interrupt the streaming by clicking a "Stop" button.
While the buffer accumulates all content, but only yields the summary (excluding the <think> tag) using a regular expression. If any error occurs (e.g., network issue), it returns the error message.
Let’s bring this together with a simple Gradio app that allows users to add in their flawed logic or proof and submit it to the model for reasoning.
with gr.Blocks() as demo:
    gr.Markdown("## Chain-of-Logic Debugger (Streaming via Magistral + vLLM)")

    input_box = gr.Textbox(
        label="Paste Your Faulty Logic or Proof",
        lines=8,
        placeholder="e.g., Assume x = y, then x² = xy..."
    )
    output_box = gr.Textbox(label="Corrected Reasoning (Streaming Output)")

    submit_btn = gr.Button("Submit")
    stop_btn = gr.Button("Stop")

    stop_flag = gr.State({"stop": False})

    submit_btn.click(
        fn=debug_faulty_logic_stream,
        inputs=[input_box, stop_flag],
        outputs=output_box
    )

    stop_btn.click(
        fn=stop_streaming,
        inputs=stop_flag,
        outputs=output_box
    )

if __name__ == "__main__":
    demo.launch(share=True, inbrowser=True, debug=True)
The above code creates a simple Gradio interface with:
It uses gr.State to keep track of whether the user wants to interrupt the streaming process. Then, the launch() method runs the app locally and opens it in your browser. Here’s the input I tried:
Assume x = y. Then, x² = xy. Subtracting both sides gives x² - y² = xy - y². So, (x+y)(x−y) = y(x−y). Cancelling x−y gives x+y = y. But since x = y, this means 2y = y → 2 = 1.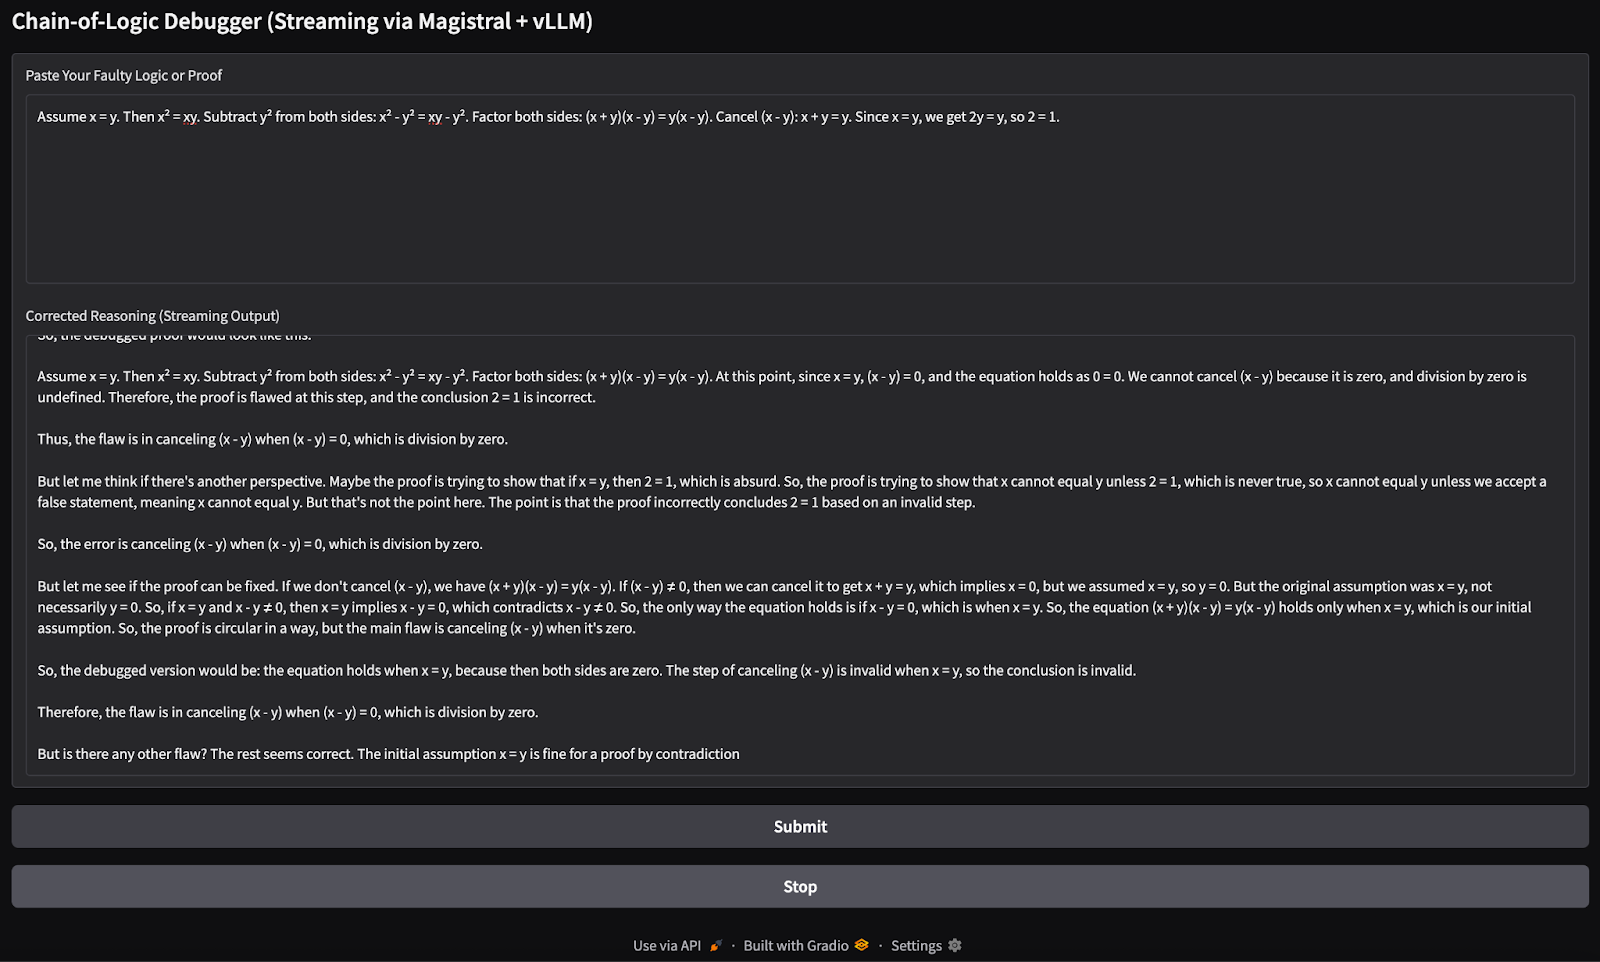
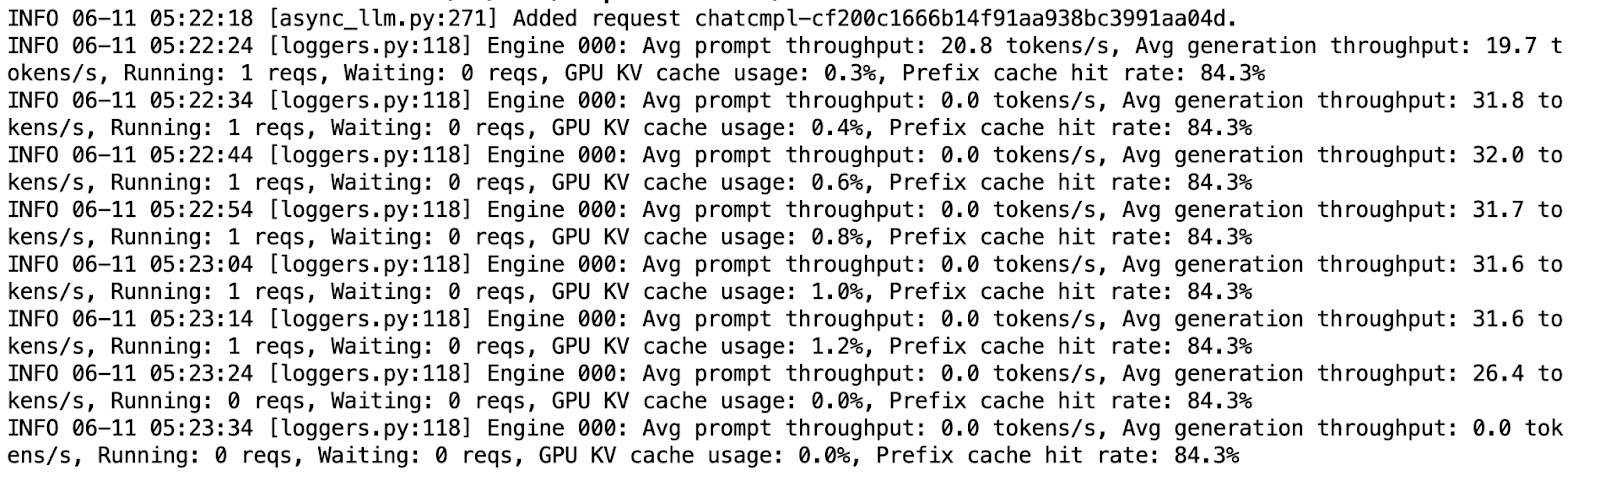
You can switch to the already running terminal where vLLM is serving to check logs of the KV cache usage, as well as the hit rate going up when the model is returning any output.
Compared to Ollama, vLLM was noticeably faster and more stable during inference. The streaming felt smooth, and the outputs were mostly well-structured. That said, the model sometimes repeated thoughts within <think> sections, likely due to the nature of autoregressive decoding without sampling penalties.
While Ollama supports a quantized 4-bit version of the model for efficient on-device inference, vLLM requires GPU acceleration, making it slightly more expensive to run (around $5 for this project). The 4-bit quantized Magistral model requires approximately 14GB of memory, which can be hosted on a single RTX 4090 GPU or even a MacBook with 32GB of RAM. However, inference can be slow, up to 4 minutes per response due to limited compute.
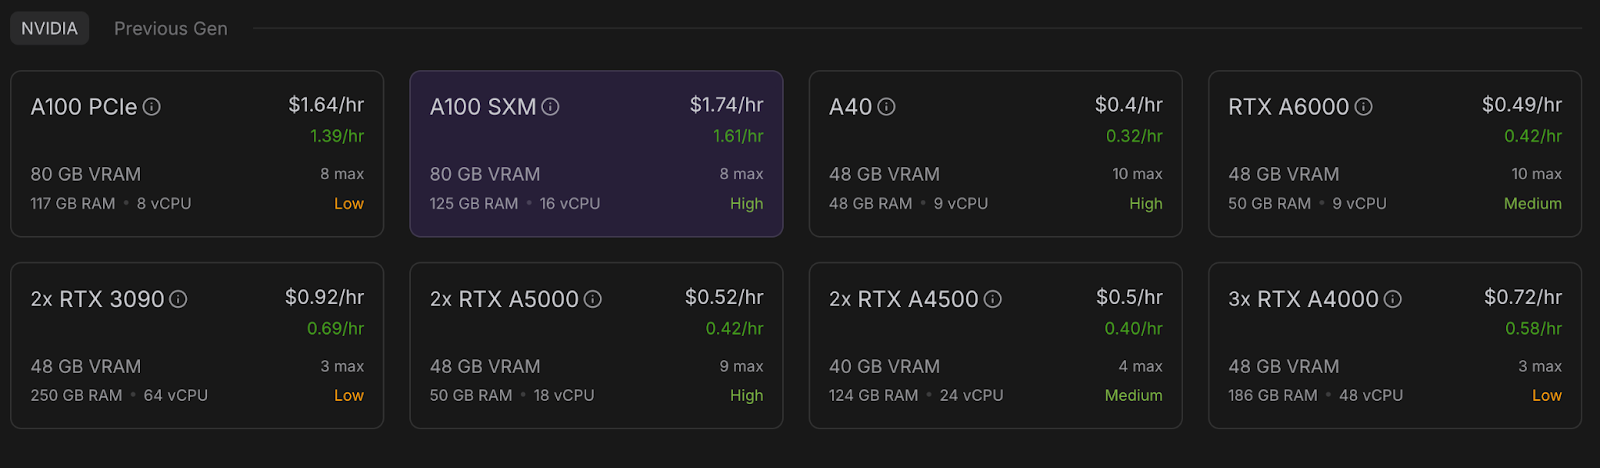
In contrast, vLLM offers significantly faster inference (roughly less than a minute per response) when deployed on high-performance GPUs like the A100 SXM, making it a better fit for responsive apps or scaled deployments.
If you're just experimenting and have local resources, Ollama is ideal due to its low setup cost. But for production-grade performance or larger workloads, vLLM is the recommended choice. Keep in mind that while vLLM can run locally, it still requires a capable GPU.
In this tutorial, we used Magistral Small—a reasoning-first LLM from Mistral—to build a step-by-step logic debugger. We deployed the model locally using both Ollama for quick on-device testing and vLLM for high-throughput GPU inference with OpenAI-compatible APIs. We also tested the model’s reasoning capabilities with a Gradio application. Whether you're debugging flawed logic or building reasoning AI tools, Magistral Small can be a good solution.
Learn AI with these courses!
Course
Course
Course
Tutorial
Aashi Dutt
Tutorial
Ryan Ong
Tutorial
Abid Ali Awan
Tutorial
Abid Ali Awan
Tutorial
Ryan Ong
Tutorial
Hesam Sheikh Hassani