
Kurs
Finanzmodellierung in Excel
3 Std.
25.9K
Excel files grow over time as data is added, copied, and formatted. This is obvious.
But what is less obvious is that Excel often retains hidden data in the background even after a cleanup.
A large file size by itself is not an issue. The real problem is that as file size increases, performance suffers. Workbooks end up taking longer to open, and formulas recalculate more slowly. In fact, sharing also becomes harder because large files create friction when people try to collaborate.
In this guide, I’ll explain practical ways to safely reduce Excel file size by removing unnecessary weight without breaking formulas, reports, or workflows.
Once you understand what’s causing file bloat, it becomes much easier to fix and prevent the same issues from coming back.
Start by checking the file’s actual size and basic workbook details. This gives you a baseline before making changes.
To check file size on Windows:
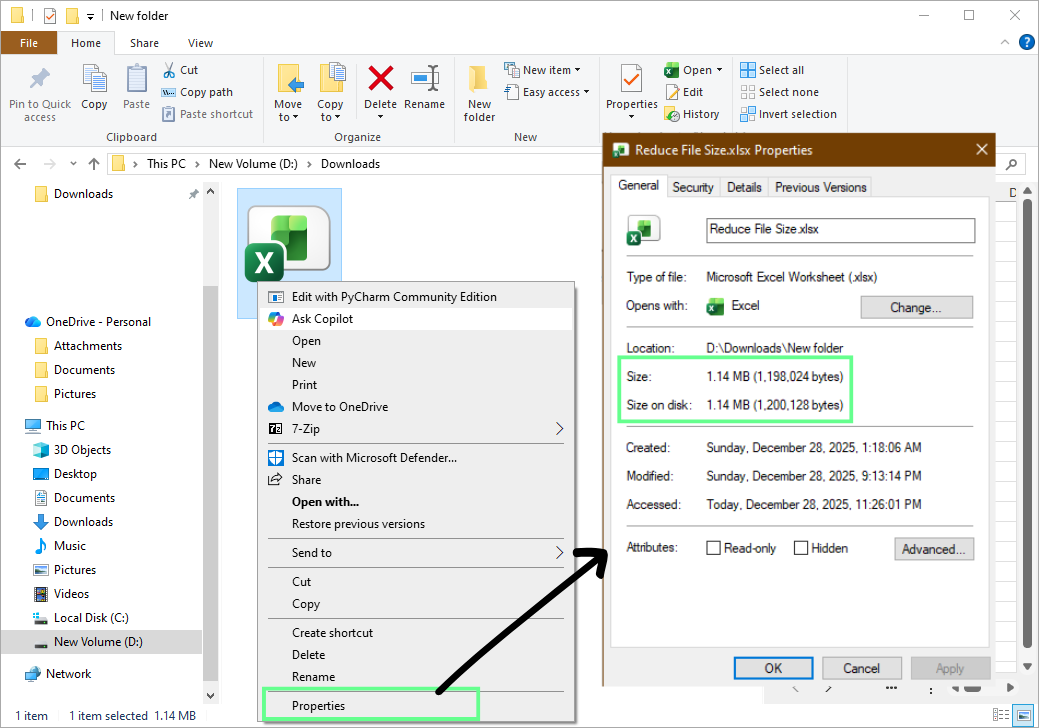
Check the Excel file size with Windows Explorer. Image by Author.
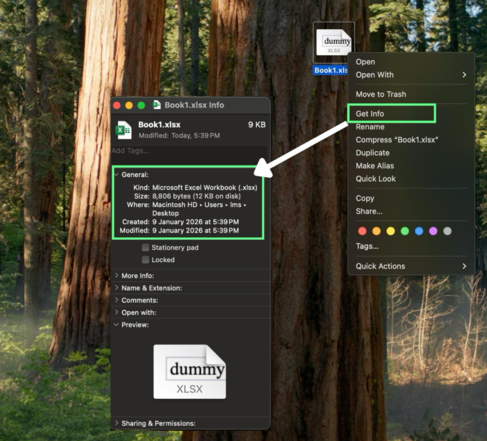
To check file size on macOS:
To check the workbook properties inside Excel:
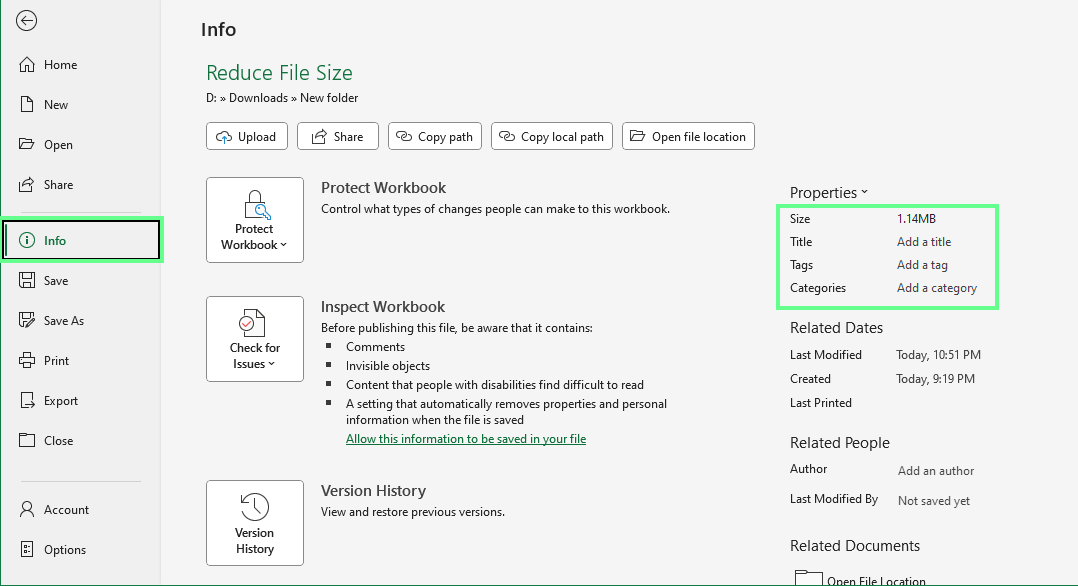
Excel workbook properties. Image by Author.
Note: A workbook can contain very little visible data and still be large. That’s because the Excel file size also depends on formatting, images, charts, formulas, hidden objects, and stored metadata.
Excel tracks a “used range” for every worksheet. The used range includes any cell that has ever contained data or formatting, even if the cell now appears empty.
If data or formatting once existed far down a sheet, Excel continues to store that area. This inflates file size and slows performance.
To check the used range:
Excel jumps to the last cell in the used range. If this cell is far beyond your actual data, the worksheet contains unused stored cells.
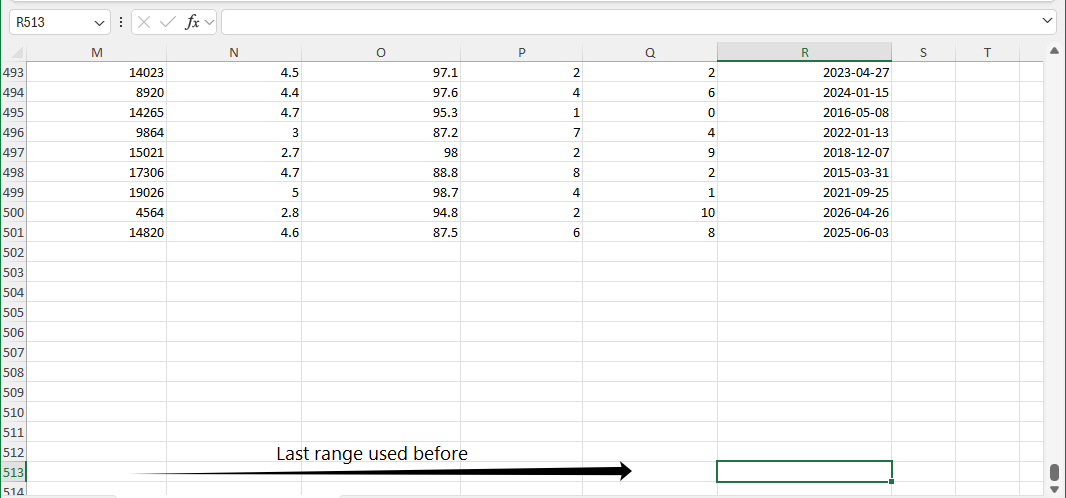
Identify the cells used before, but they look empty. Image by Author.
Note: Sheets with unusually large used ranges are often major contributors to file size and should be reviewed before cleanup.
Hidden objects can also increase file size without being obvious. These include:
Some of these may be hidden behind cells or placed off-screen. To find them:
The Selection Pane lists all objects on the active sheet and lets you show or hide them individually.
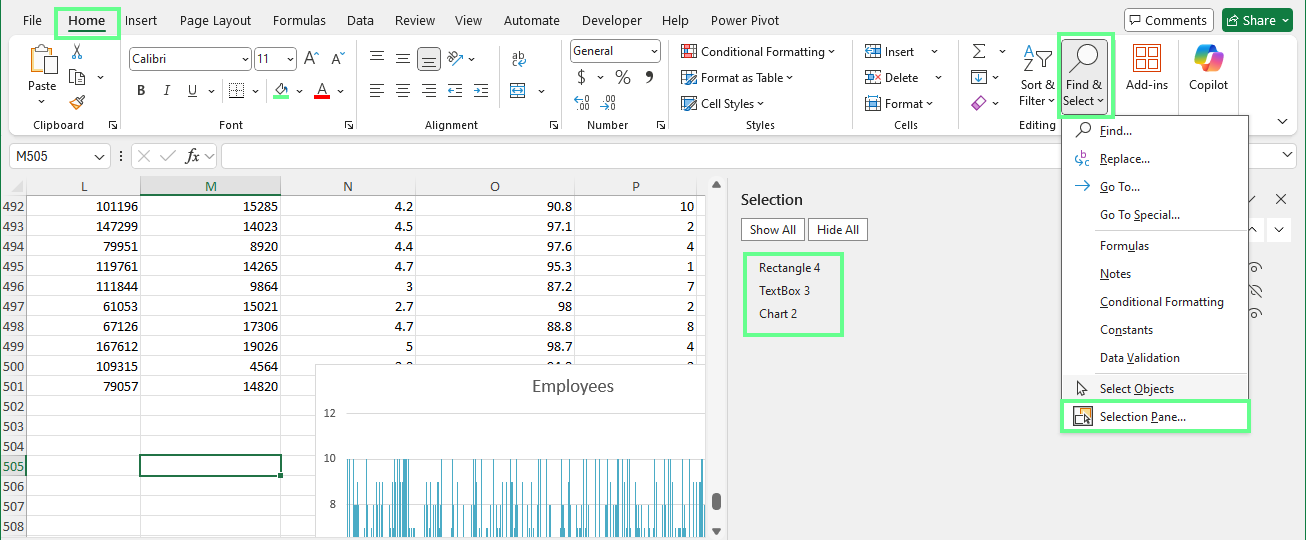
Check for the hidden object using the Selection pane. Image by Author.
Excessive formatting can also add unnecessary weight. Conditional formatting, custom styles, and repeated cell formats all increase file size over time. Even unused formatting remains stored until it’s removed, which is why formatting cleanup is necessary.
For complex or long-lived workbooks, manual checks may not be enough. Excel’s Inquiry Add-in provides a deeper analysis of file structure and hidden elements.
To enable it:
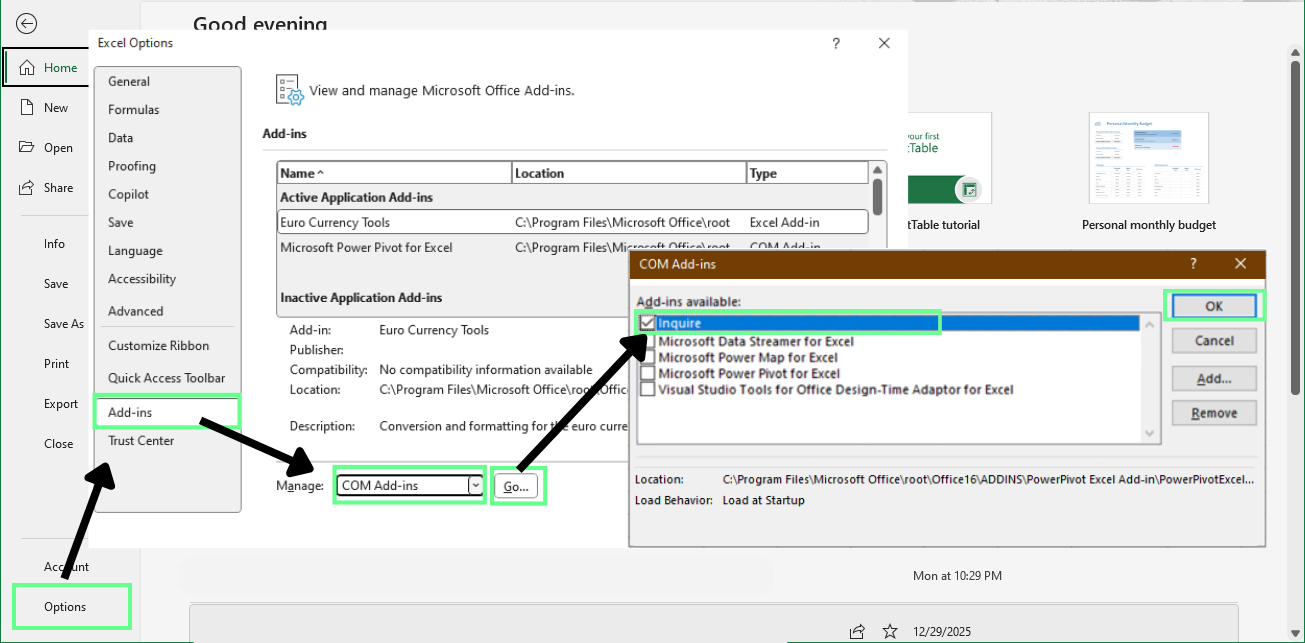
Enable the Inquiry add-in. Image by Author.
Once enabled, you can run a workbook analysis to find formulas, links, hidden sheets, unused styles, and other elements that affect file size.
This level of analysis is most helpful for large files shared across teams or maintained for long periods, where hidden issues accumulate.
Note: The Inquiry Add-in is included only with Professional Plus and Enterprise versions of Microsoft Office and Microsoft 365.
Unused data and leftover formatting are among the biggest contributors to Excel file size. Let’s see how to remove them:
Deleting visible blank rows and columns isn’t enough. Excel still stores cells that once contained data or formatting, even if they appear empty.
To identify unused ranges:
If that cell is far beyond your actual data, the worksheet contains unused stored rows or columns.
To reset the used range:
Repeat this process for each worksheet.
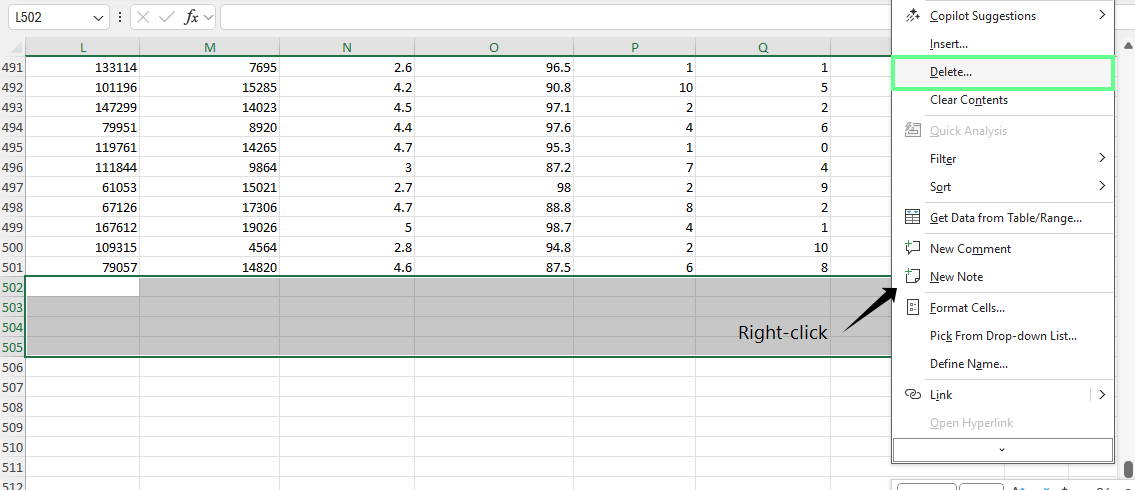
Delete blank and unused rows. Image by Author.
Formatting accumulates as workbooks are edited over time. So even if you clear the cell contents, it doesn't remove the formatting because Excel continues to store it.
To remove excess formatting safely:
This removes formatting while preserving data and formulas.
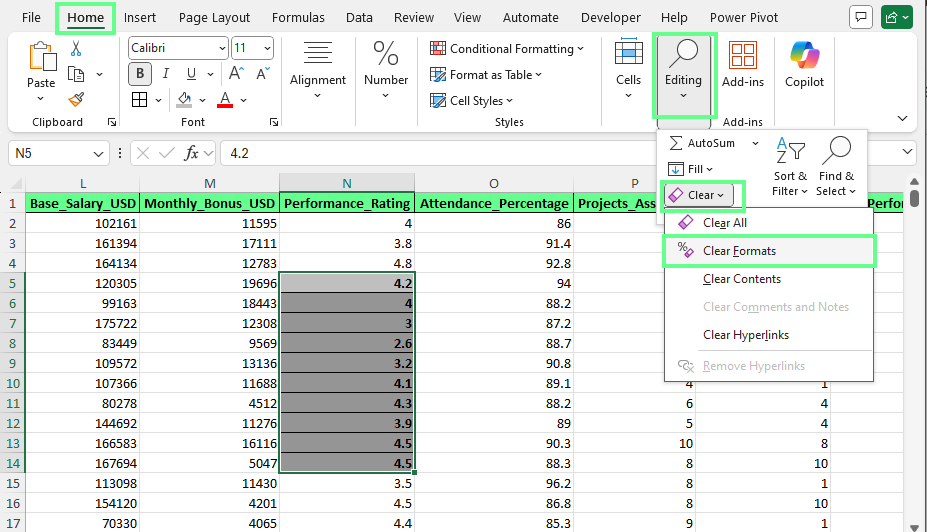
Clear the formatting. Image by Author.
Cell styles also contribute to file size, especially in long-lived workbooks. Custom styles are often created unintentionally and never reused.
To clean them up:
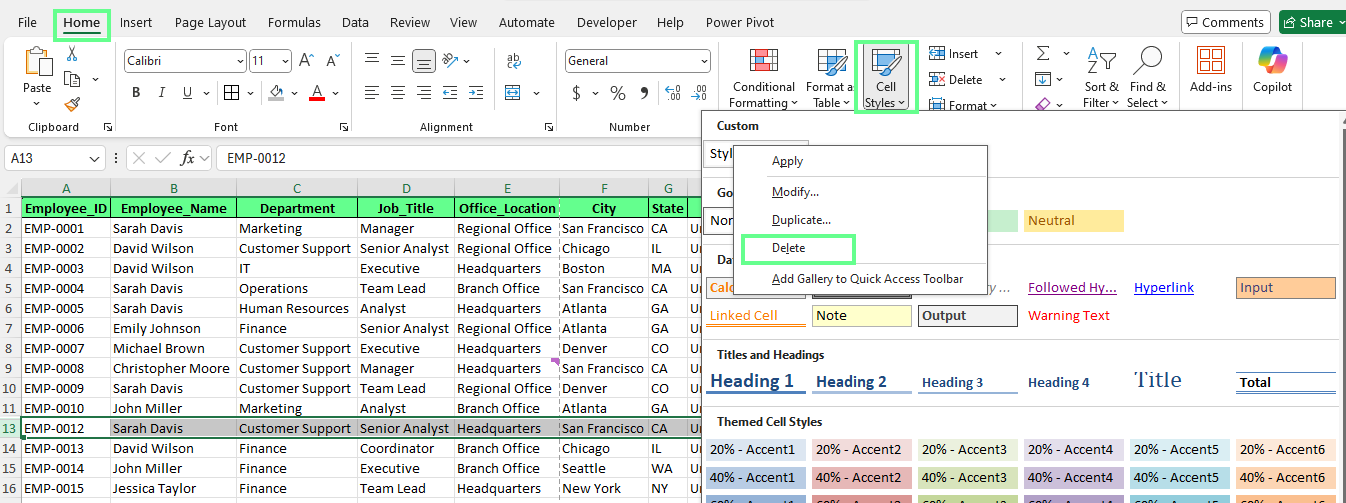
Remove custom unused cell styles. Image by Author.
Every worksheet adds to the file size, even if it contains little data. Hidden sheets are often forgotten but still store formulas, formatting, and metadata.
To review hidden sheets:
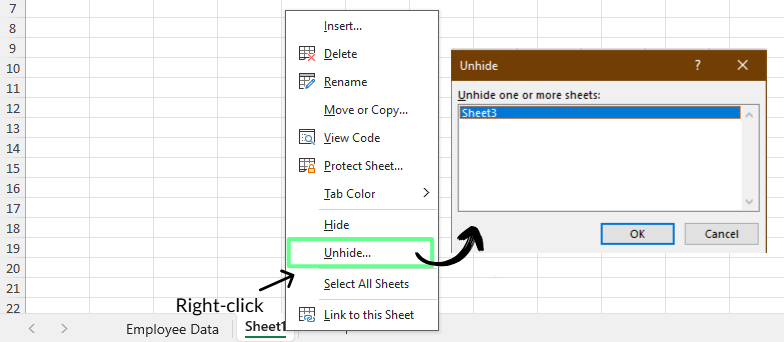
Unhide the sheets in Excel. Image by Author.
Once visible, confirm whether each sheet is still required. Delete sheets that are no longer referenced or used.
Named ranges can also inflate file size, especially when they point to deleted or oversized ranges.
To review them:
Embedded images and visual objects can dramatically increase the size of an Excel file. So let’s see how to optimize or remove them.
Excel includes a built-in image compression tool that reduces resolution and removes hidden image data.
To compress images:
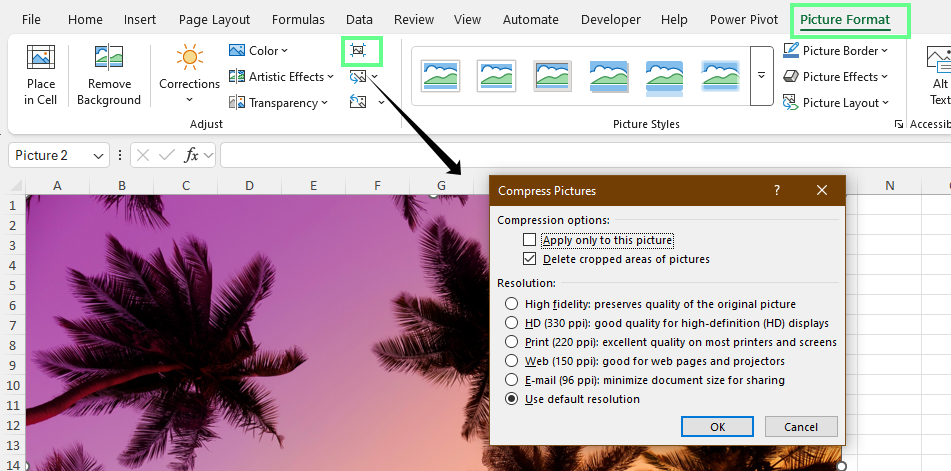
Compress the image size using Picture Format. Image by Author.
Note: Image compression may slightly reduce visual quality, especially at lower resolutions.
The most effective way to control file size is to optimize images before inserting them into Excel. So, before adding an image:
Choose the right image format:
Insert only final, optimized images because if you rely on Excel to handle large originals, it unnecessarily increases the workbook size.
Charts, shapes, SmartArt, and embedded objects increase file size because they store layout data, styles, and rendering information.
To review and remove unnecessary objects:
Tip: Limit visuals to charts and objects that serve a clear purpose. Fewer visuals reduce file size and make workbooks easier to share.
The file format you choose affects both Excel file size and performance. Some formats store data more efficiently, while others add overhead.
Excel supports multiple file formats, each with different storage behavior:
Note: Macro-enabled files are larger because Excel must store the macro code and related structures, regardless of how often the macros are used.
Converting a workbook to XLSB can reduce file size and improve performance. To convert a file:
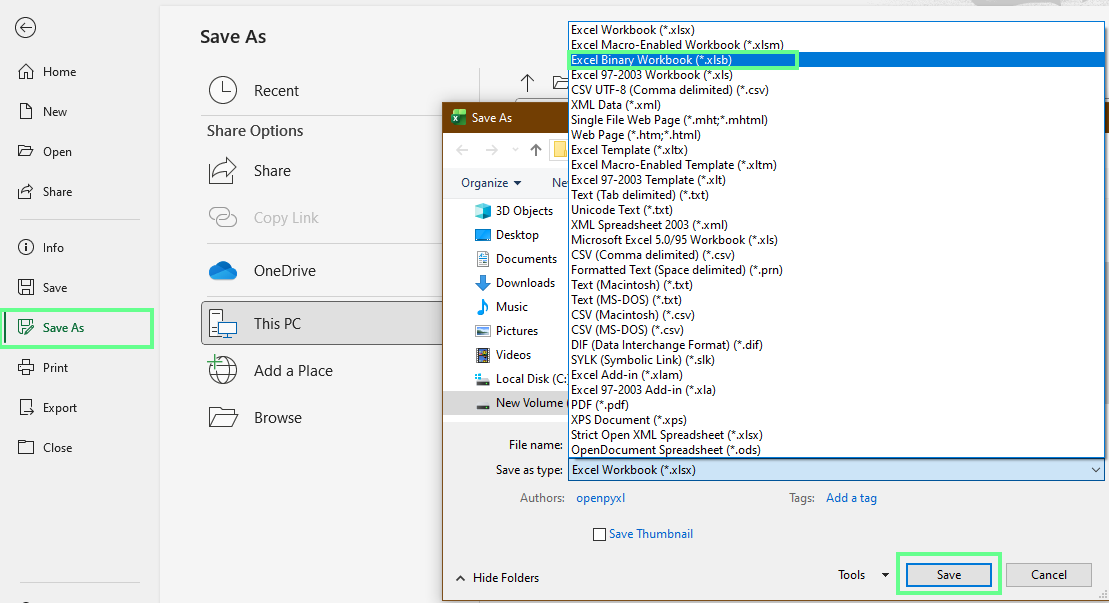
Save the file as .XLSB. Image by Author.
XLSB works best for large, data-heavy files used internally or by experienced Excel users. But, it is not recommended when:
Excel files are already compressed, but additional ZIP compression can still reduce size slightly for sharing. To create a ZIP file on Windows:
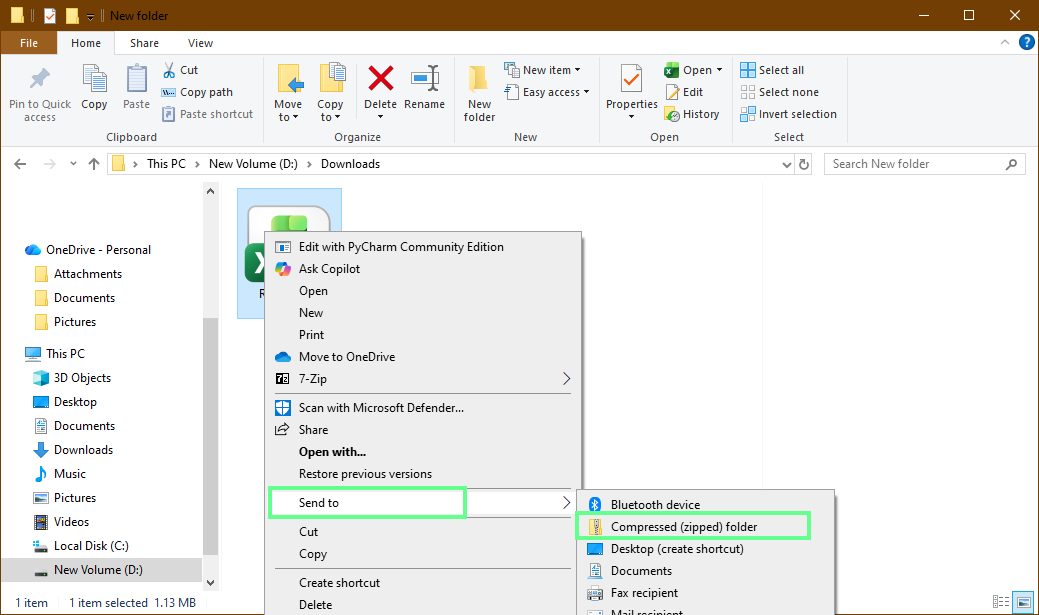
Compress the Excel file to a ZIP folder. Image by Author.
ZIP compression can help when email or upload size limits are strict. But the trade-off is collaboration friction. Recipients must extract the file before editing, and multiple extracted copies can lead to version confusion. So, use ZIP compression mainly for one-time transfers, not active collaboration.
Formulas can quietly make an Excel file heavy and slow. When too many calculations run in the background, the file stores more information than it really needs.
Some formulas recalculate every time Excel makes a change. These are known as volatile functions and they include:
Because volatile formulas recalculate constantly, Excel must repeatedly track dependencies and update results. In large workbooks, this increases processing overhead and slows performance.
Long formulas copied across thousands of cells also add weight. Each cell stores its own formula logic, which compounds as the file grows. Over time, this structure becomes harder to manage and contributes to file bloat.
Here is a quick, easy fix for long, volatile formulas:
INDEX() instead of OFFSET() to avoid unnecessary recalculation.By default, Excel recalculates formulas automatically. In large files, this can considerably slow editing.
To improve performance while making changes:
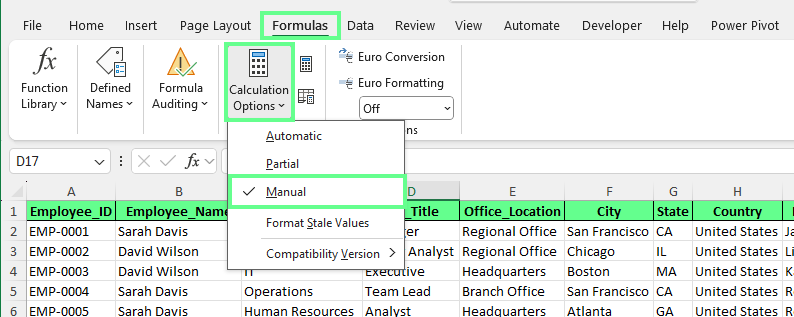
Switch calculation option to manual. Image by Author.
Manual calculation is best used temporarily. While it’s enabled, formula results may appear outdated until recalculation is turned back on.
Pivot tables and external links often increase file size without being obvious. Cached data and old connections stay stored even when they are no longer needed.
Each PivotTable stores a copy of its source data in a pivot cache. This cache allows fast interaction without rereading the original data source.
When multiple PivotTables are created separately from the same dataset, Excel may store multiple caches. Each cache contains a full copy of the data, which can quickly expand the file size.
In addition, hidden or deleted PivotTables can also leave caches behind. Even if a PivotTable is no longer visible, its cached data may still exist in the workbook.
On top of it, large datasets amplify the issue. A single cache can add several megabytes, and multiple caches compound the problem.
The most effective way to control cache growth is to reuse existing caches. Instead of creating new PivotTables from scratch, copy an existing PivotTable and paste it. Excel reuses the same cache, preventing duplicate data storage.
If PivotTables are no longer needed:
For finalized reports, convert PivotTables to static values. Copy the PivotTable and paste it as values. This removes the cache while preserving the results.
Workbooks often retain links to other files without making them obvious. These links remain stored even if the source file was moved or deleted.
To review external file links:
Breaking a link converts formulas into fixed values, so save a copy of the file before doing this.
Excel can also retain unused data connections:
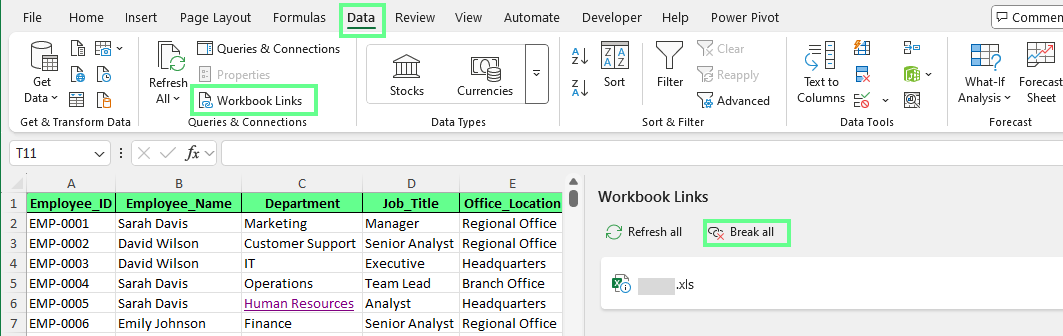
Remove the external workbook link. Image by Author.
Links may also exist inside named ranges:
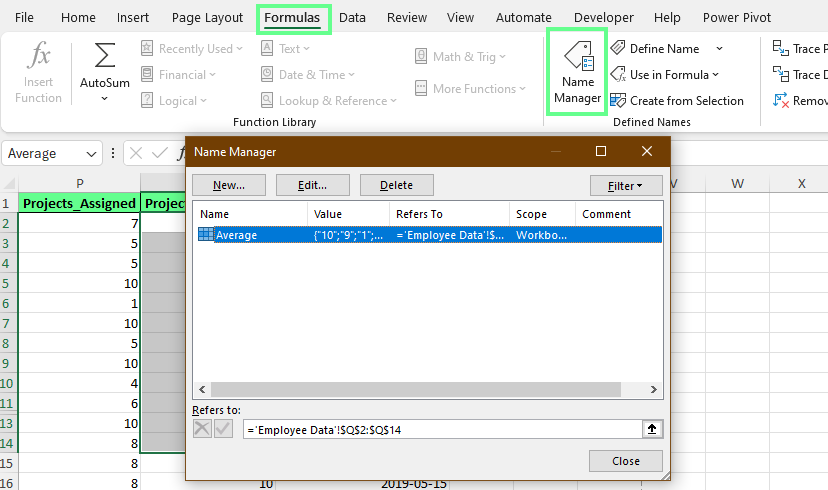
Look for the old links in Name Manage. Image by Author.
Once links and connections are cleaned up, the file becomes smaller, opens faster, and is easier to share.
Note: The Workbook Links option only appears when a workbook is actually linked to another Excel file. Standard web hyperlinks do not count.
Excel workbooks often store hidden information that isn’t visible on the worksheet. This hidden content can affect privacy and, in some cases, contribute to unnecessary file weight.
Excel stores metadata in the background, including author names, company details, file history, and other document properties. Even when this information isn’t visible, it remains embedded in the file.
To remove it:
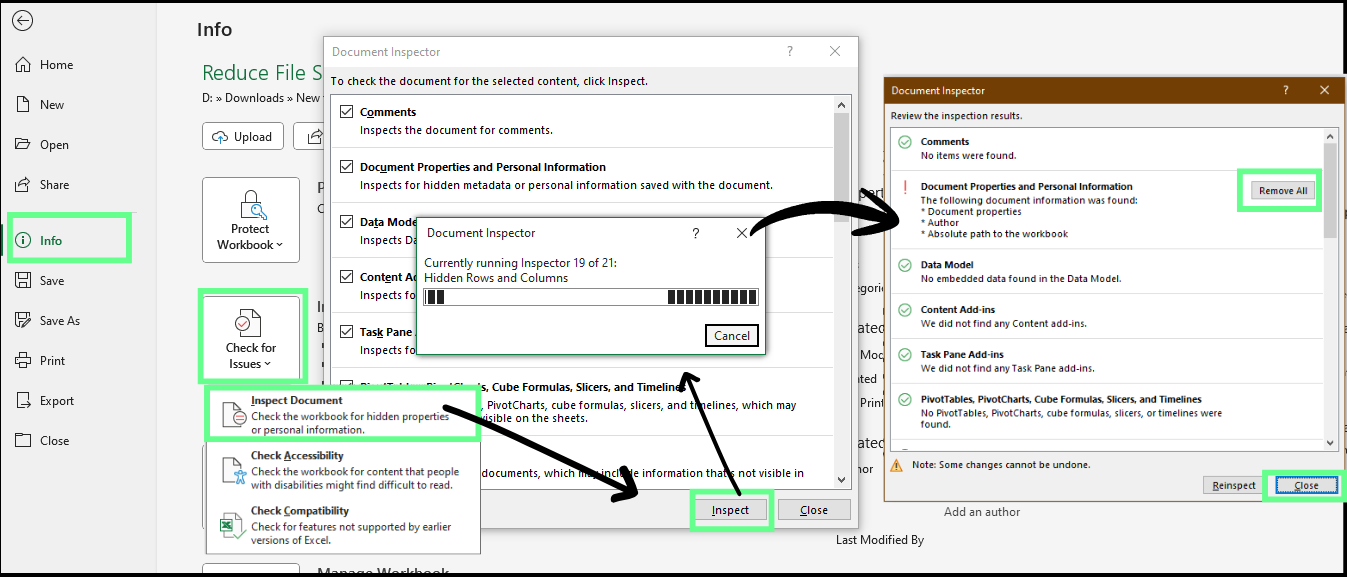
Remove metadata. Image by Author.
This permanently removes embedded metadata and protects privacy when sharing files externally. While metadata usually has a small impact on file size, removing it may eliminate hidden clutter.
Comments, notes, and other collaboration artifacts can remain stored even after a file is finalized. To remove comments and notes:
Select all the cells by pressing Ctrl + A
Go to the Review tab. In the Comments group, click Delete
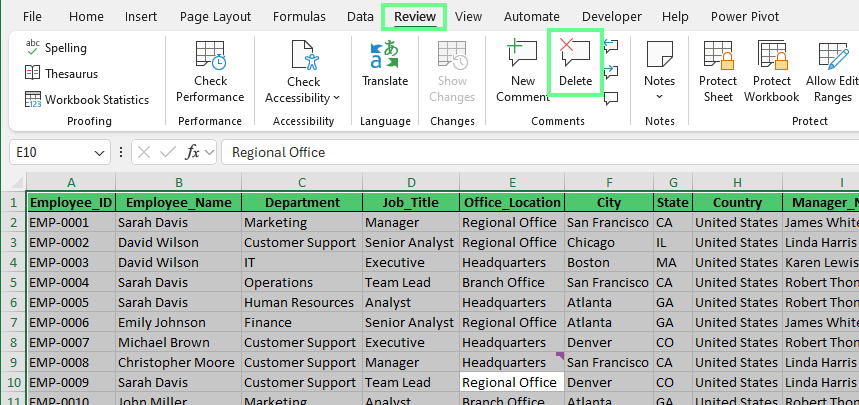
Delete comments. Image by Author.
This will delete all the comments present in the active sheet.
To delete notes and comments all at once, do this:
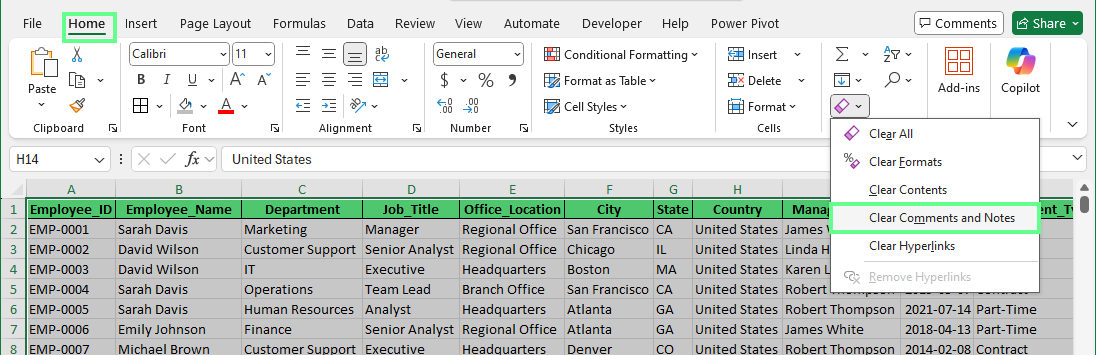
Clear comments and notes. Image by Author.
To track the changes, like who made, where, and what:
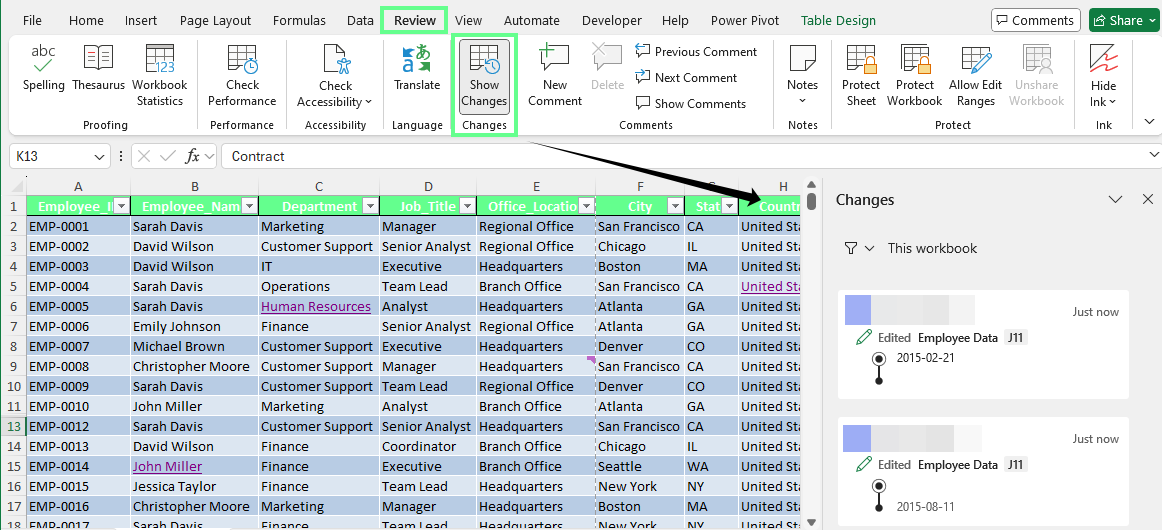
Check the edit history. Image by Author.
Note: Show Changes only works if the file is saved to OneDrive or SharePoint and opened in a way that supports shared editing. If the file is saved only on your computer, this feature will grey out.
Hidden rows, columns, and worksheets can also store unused data and formatting. To prevent this:
After cleaning, save, close, and reopen the file. This final step helps Excel release stored information, keeping the file lighter and cleaner.
Most file size issues can be solved inside Excel, but some situations require external tools. These options are best used when files are extremely large or need to move between systems.
Online Excel compressors upload your file to a remote server, process it, and return a smaller version. Some tools reduce size by stripping unused elements or re-saving the file more efficiently.
These tools can help when:
However, results vary. Online compressors may struggle with macro-enabled files, PivotTables, or complex formulas. Some features may break or be removed entirely.
Security is also a major consideration. If you upload files to third-party services, it exposes content beyond your control. So, avoid using online compressors for confidential or internal data.
Excel files often become large because they store more raw data than they need to.
Cleaning up a large Excel file helps, but preventing bloat in the first place is easier. So, let’s see how to maintain a well-structured workbook that stays small.
Excel files often grow because the same data is copied across multiple sheets for reporting or analysis.
Instead, keep a single source of truth. Store raw data in one main table, then build reports, charts, and PivotTables from that dataset.
For example, rather than duplicating sales data into separate monthly sheets, keep all records in one table and use PivotTables to summarize by month. This ensures Excel stores the data once instead of repeating it.
Consolidation reduces file size and makes updates easier. When the source data changes, all dependent reports update automatically.
Power Query allows you to clean, transform, and combine data before loading it into a worksheet. This reduces file size by preventing unnecessary data from ever being stored in the workbook.
With Power Query, you can:
To clean data without loading everything into the worksheet:
Excel opens the Power Query Editor instead of loading the data directly into the sheet. You can remove unnecessary columns, filter rows, and combine tables.
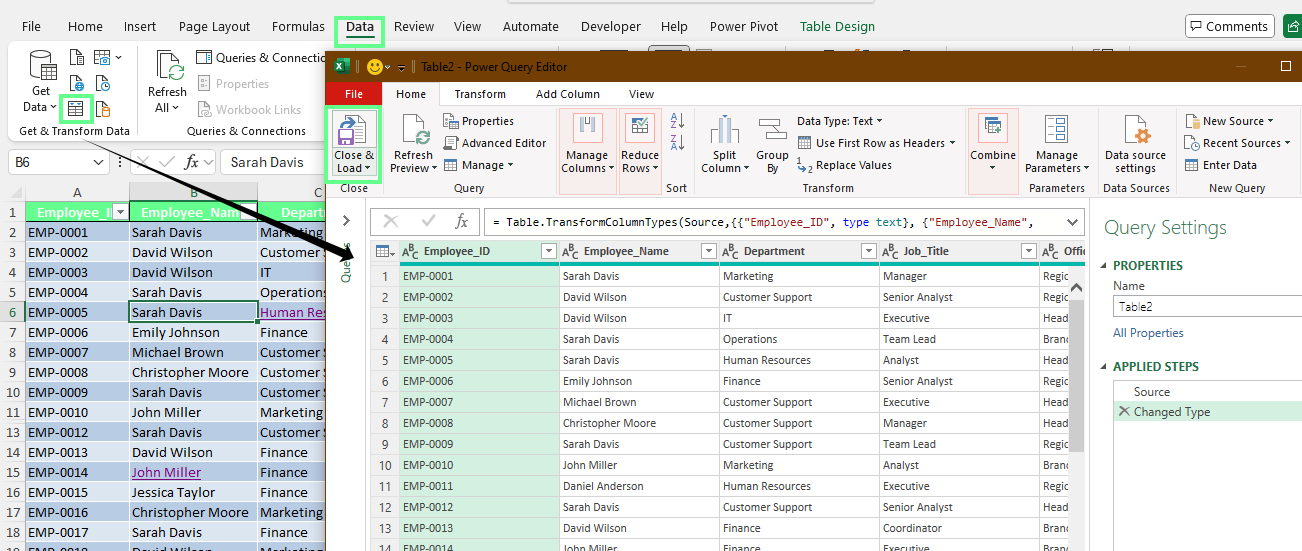
Power Query Editor. Image by Author.
Only the final output is loaded into Excel. When the source data changes, you refresh the query instead of reimporting everything. This avoids repeated copies of the same data and keeps files lean.
Not all data needs to live in one workbook. Older or inactive data still adds weight, even if it’s rarely used.
When a file grows too large, move historical data into separate archive files. Keep only current or active data in the working workbook.
Common archiving strategies include splitting data by year, month, or project. This keeps active files fast while preserving access to older records when needed.
Choose one large workbook you use regularly and run a quick audit: check used ranges, review PivotTables and links, clean unused formatting, and confirm calculation settings.
Make this part of your workflow before sharing files or adding new data sources. A few minutes of maintenance can prevent hours of performance issues later.
If you use Excel files in your day-to-day work, check out our Excel Fundamentals track or Data Preparation in Excel course to keep learning how to improve your Excel skills.
Learn Excel with DataCamp
Kurs
Kurs
Kurs