Working on a data science project is always exciting - whether you're a data science enthusiast looking to get started, or a data scientist with years of experience.
However, setting up your working environment, installing requisite packages, safe storage of all project files, and overcoming the computing limitations of your machine can often be challenging.
In this guide, you'll learn how Google Colab can help simplify and supercharge your data science workflow.
Table of Contents:
- What is Google Colab?
- Creating your first Google Colab notebook
- Why you should consider using Google Colab
- Pre-installed data science libraries
- Easy sharing and collaboration
- Seamless Integration with GitHub
- Working with data from various sources
- Loading data from your local machine
- Mounting Google drive to Colab instance
- Cloning a GitHub repo into Colab instance
- Fetching remote data
- Automatic storage and version control
- Access to computer hardware accelerators such as GPUs, TPUs
- DataLab: An Overview
- Limitations of Google Colab
- Conclusion
What is Google Colab?
Google Colab is a cloud-based Jupyter notebook environment from Google Research. With its simple and easy-to-use interface, Colab helps you get started with your data science journey with almost no setup.
If you're interested in data science with Python, Colab is a great place to kickstart your data science projects without worrying about configuring your environment. Google Colab facilitates writing and execution of Python code right from your browser, and also comes with some of the most popular Python data science libraries pre-installed.
In the subsequent sections, you'll learn more about Google Colab's features.
Creating your first Google Colab notebook
The best way to understand something is to try it yourself. Let's start by creating our very first colab notebook:
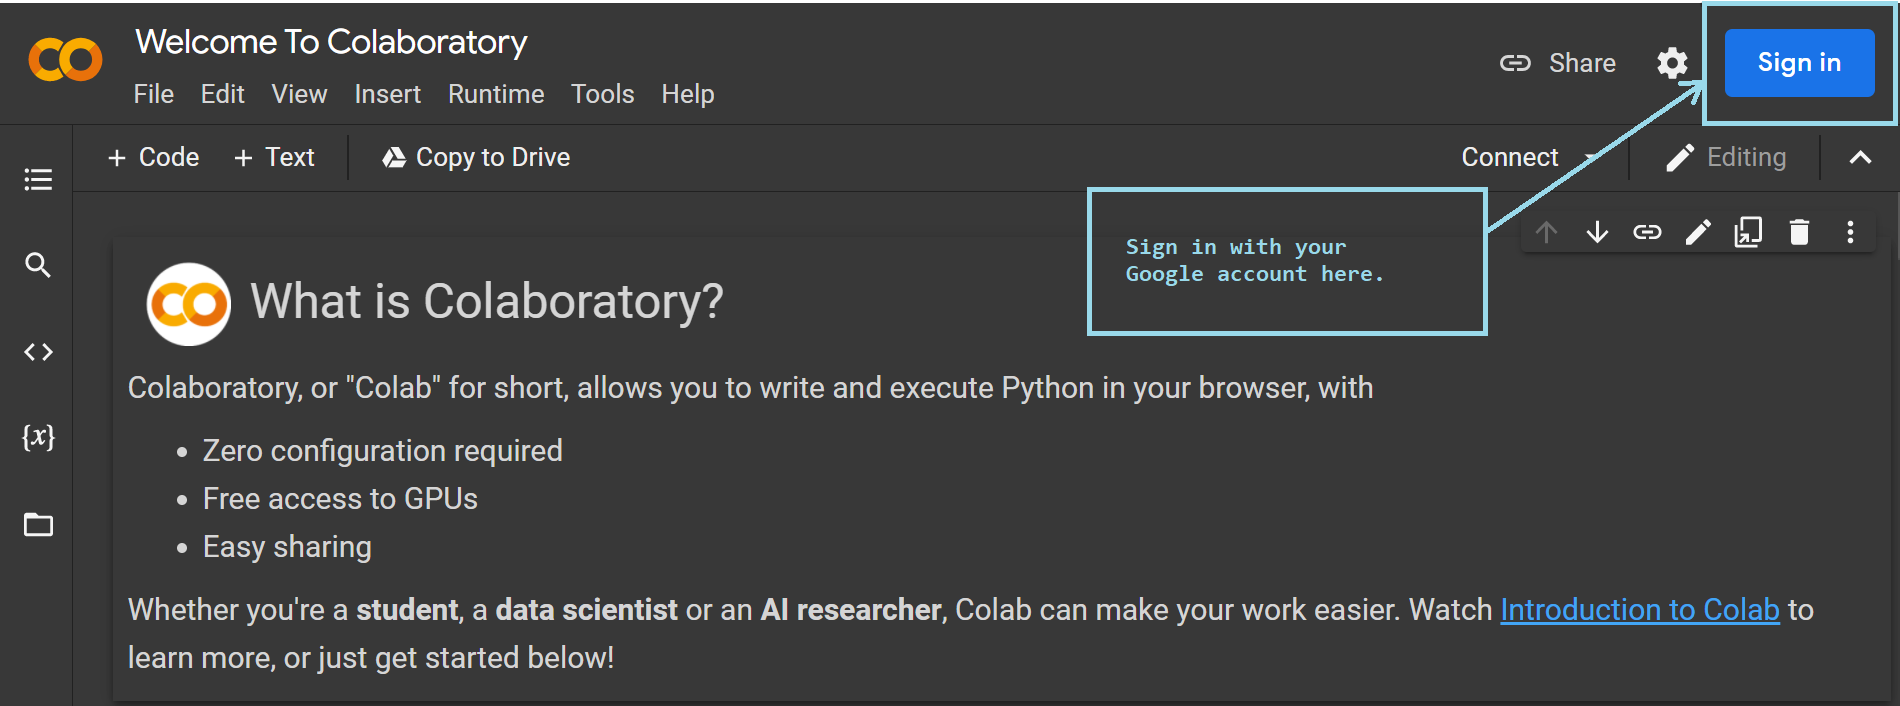
- Head over to colab.research.google.com. You'll see the following screen. To be able to write and run code, you need to sign in with your Google credentials. This is the only step that's required from your end. No other configuration is needed.
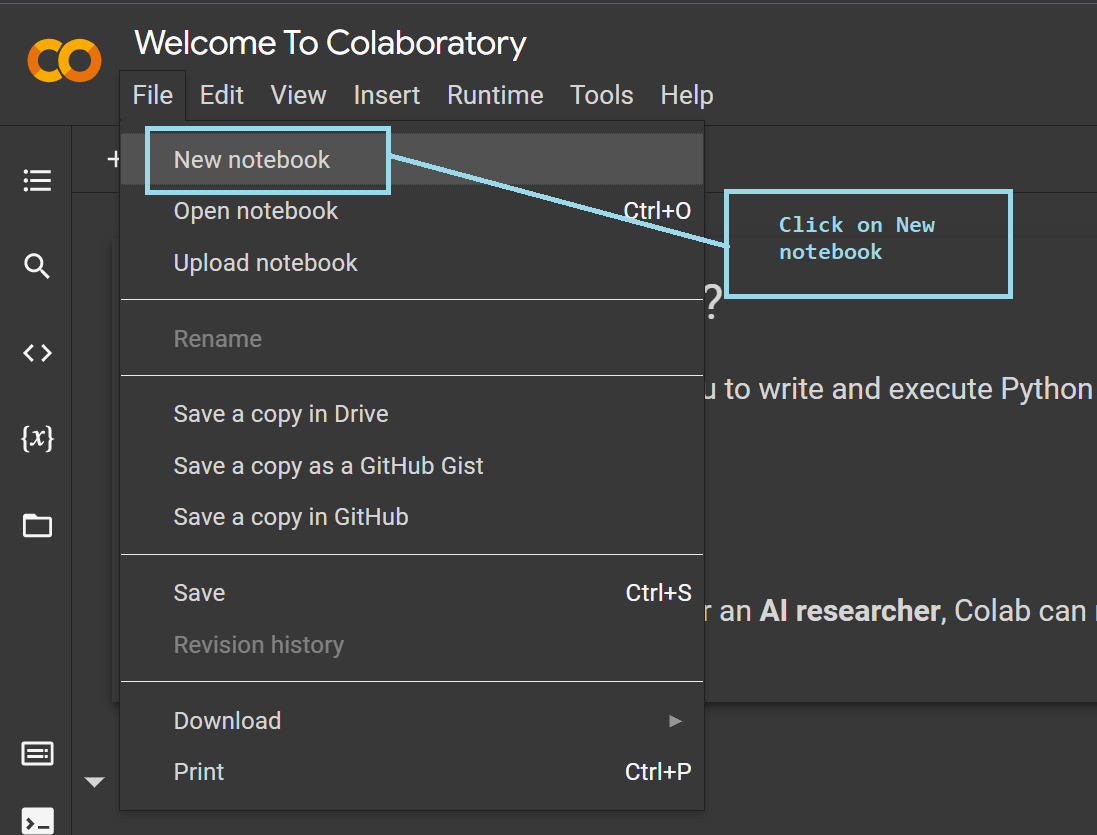
- Once you've signed in to Colab, you can create a new notebook by clicking on 'File' → 'New notebook', as shown below:
After you've created a new notebook, you can rename the notebook to a name of your choice. You're now all set to code your way through the project.
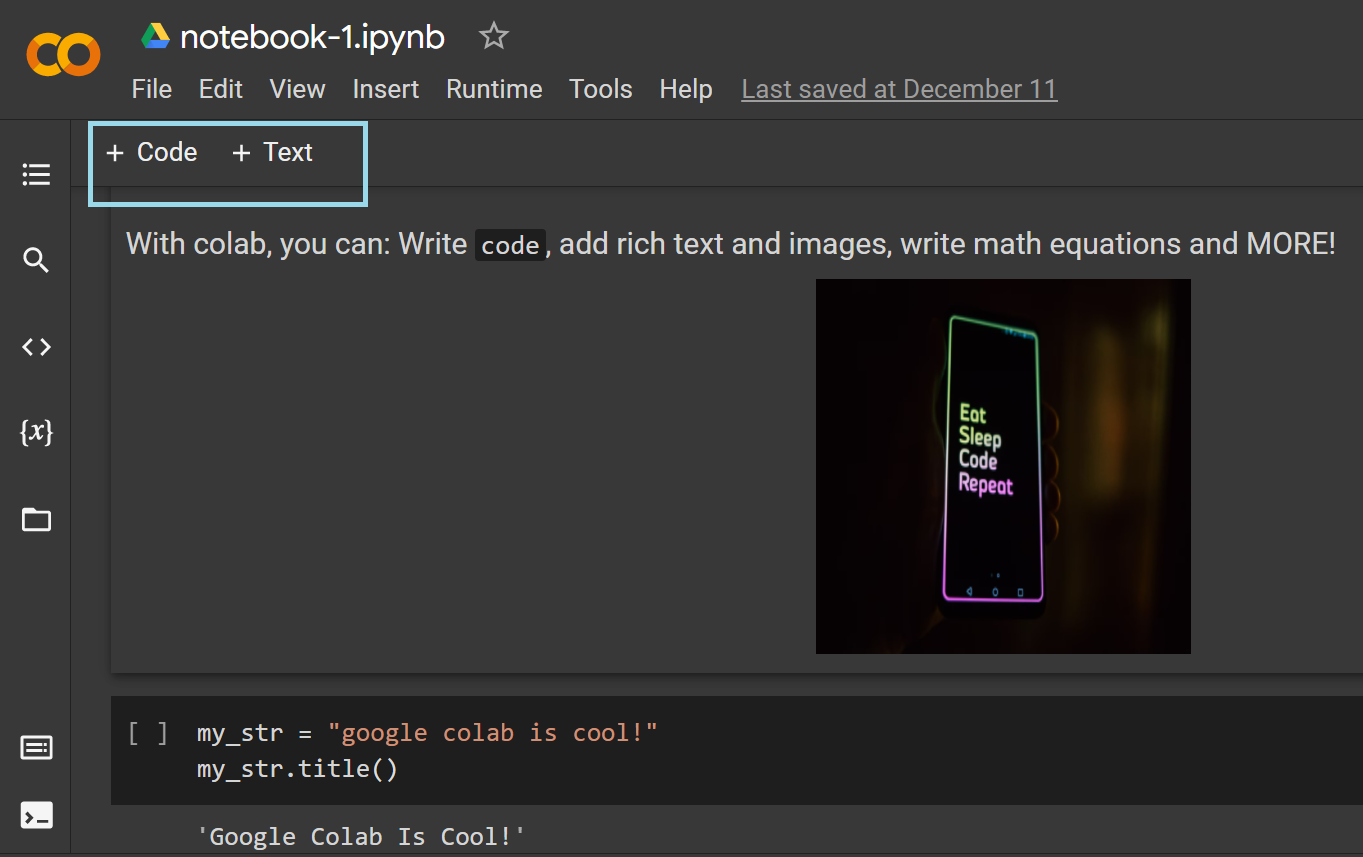
- Google Colab is a self-contained environment. It allows you to write Python code as well as text—using markdown cells—to include rich text and media, as shown below. This helps in adding instructions for a step-by-step walkthrough of the project, thereby improving readability.
Now that you've learned how to create a Colab notebook, let's look at its advantages in the next sections.
Why you should consider using Google Colab
Apart from being a browser-based environment that requires a simple Google sign-in, Colab has several useful features that make it helpful for the data science community. The following are some of the advantages:
- Pre-installed data science libraries
- Easy sharing and collaboration
- Seamless integration with GitHub
- Working with data from various sources
- Automatic storage and version control
- Access to hardware accelerators such as GPUs and TPUs
Pre-installed data science libraries
Pre-installed libraries are one of the reasons why Colab is a popular choice to set up your data science project almost instantly.
Colab comes with pre-installed Python libraries for data analysis and visualization, such as NumPy, pandas, matplotlib, and seaborn. This means you can go straight ahead and import them into your current project, and use any of the modules as needed without having to install them.
As you may know, these libraries suffice for most data analysis projects, and for successfully finishing the data preprocessing and exploratory data analysis (EDA) steps in the ML pipeline for larger projects.
If you're interested in gaining proficiency over these data science libraries, be sure to check out DataCamp's Data Analyst with Python track.
In addition to these, Colab has machine learning libraries pre-installed, including scikit-learn, and deep learning libraries such as PyTorch, TensorFlow and Keras.
It is possible to build machine learning and deep learning projects with absolutely no installation required. All you need is access to a browser, and you can get your project up and running in a few minutes.
Working on a project as a group is a great learning experience. In the next section, you'll learn how Colab facilitates collaboration.
Easy sharing and collaboration
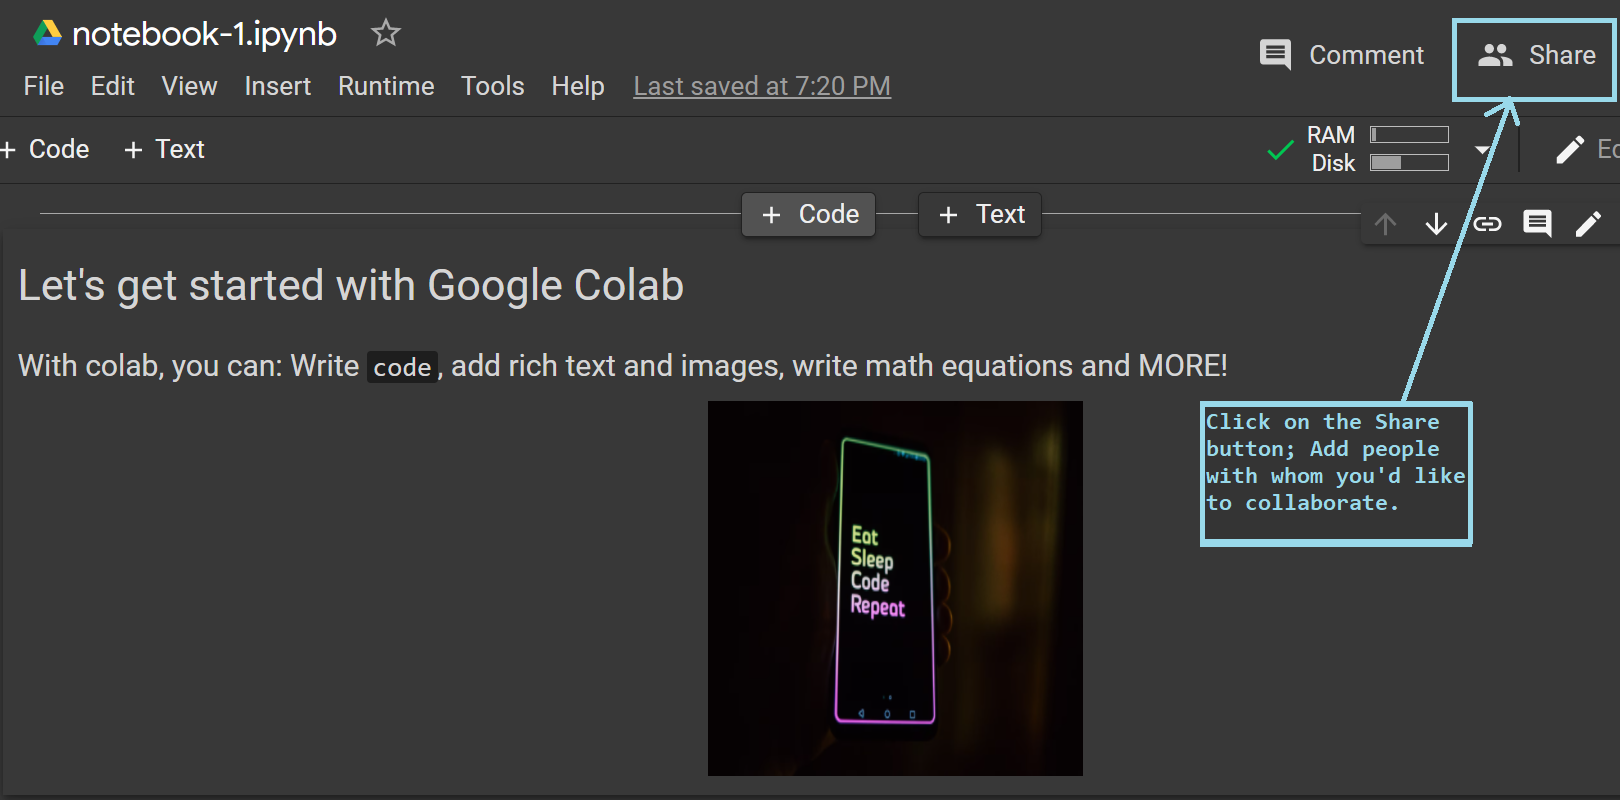
Working in a Jupyter notebook environment in your local machine has limitations when it comes to collaborating with others. However, with Colab, you can share your notebook and collaboratively work on it with your friends and colleagues.
You can enable sharing in one easy step, as shown in the image below.
Seamless Integration with GitHub
As a developer, you'll use GitHub all the time to keep track of changes to the different files in your project, and integrating it with Colab can only make things better.
Let's see how you can save your notebooks to GitHub repositories:
Saving Colab notebooks to GitHub
- To save your notebook to a GitHub repository, go to 'File' → 'Save a copy in GitHub'.
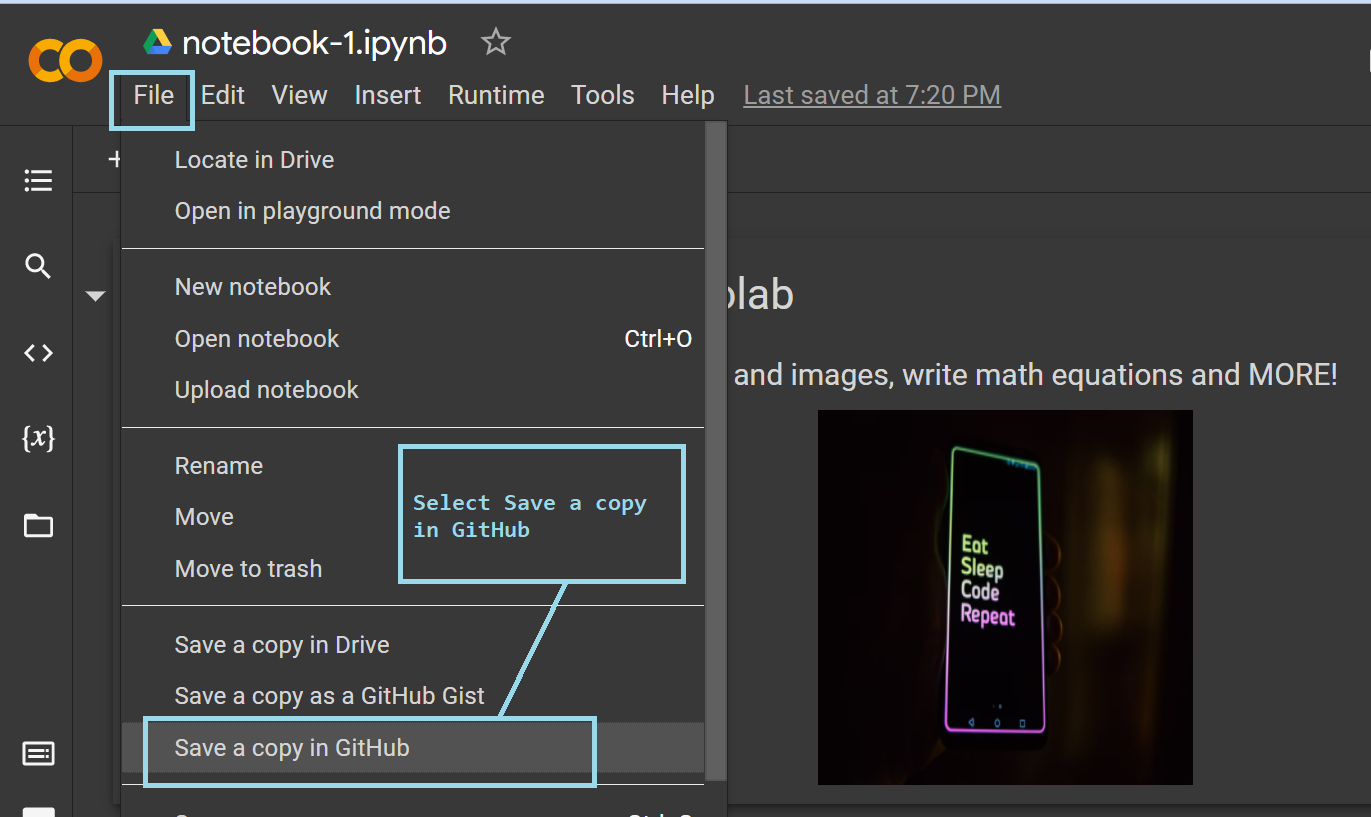
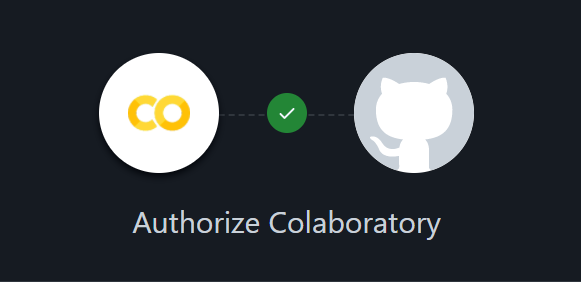
- You'll then be prompted to authorize Colab. This authorization is required for Colab to be able to push commits to your repository.
-
You'll then have to confirm access following the prompts on the screen.
-
Once the authorization is successful, the following window should pop up on your screen.
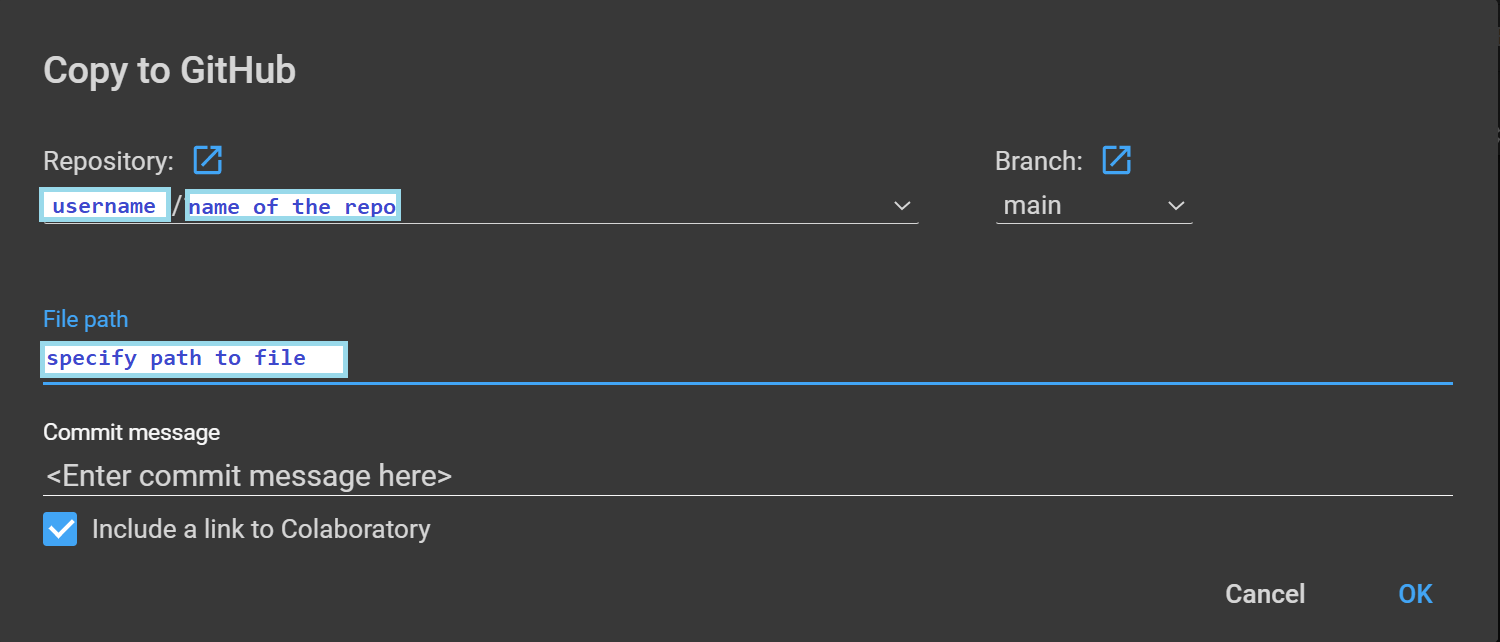
In the above image:
- The 'username' and 'name of the repo' are placeholders. You'll see your GitHub username, and can choose the repository that you'd like to push the current notebook to as the "name of the repo".
- The default branch is the 'main' branch of the chosen repository, but you can choose any branch you'd like. You can also customize the file path as needed.
- Finally, write a good commit message and click 'Ok'—your commit will now be pushed to the chosen GitHub repository.
This way, you can host all your Colab notebooks in GitHub repositories. This also facilitates knowledge dissemination, and thriving open-source projects.
Working with data from various sources
In any data science project, you'll have to start by importing the dataset into your working environment. In this section, you'll learn about the different ways you can do this in Google Colab.
Loading data from your local machine
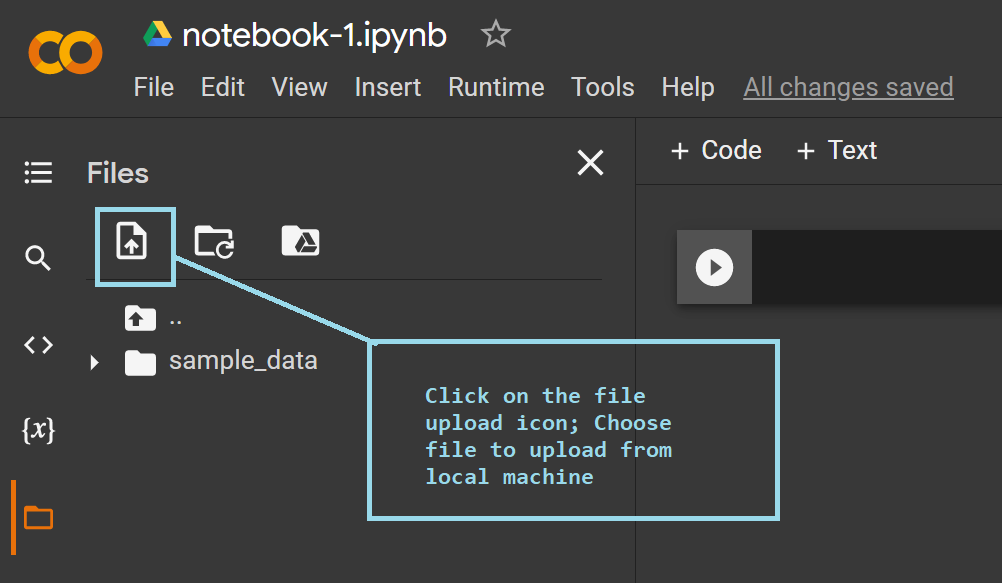
To upload files containing the data from your local machine, click on the 'File upload' icon in the 'Files' tab as shown below, and choose the file that you'd like to upload.
Mounting Google drive to Colab instance
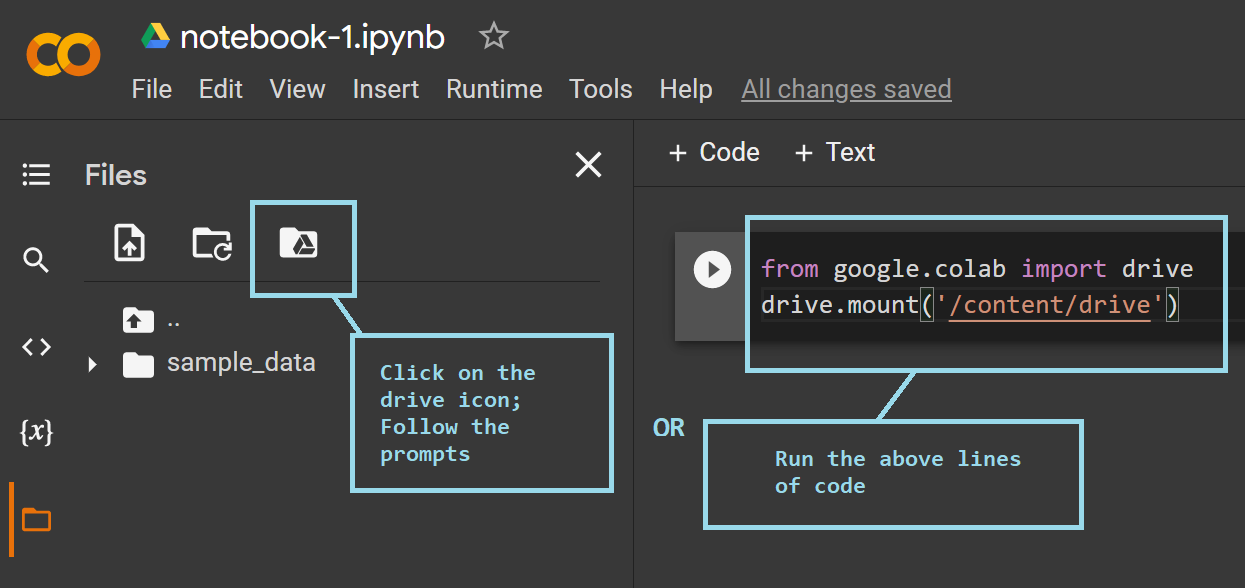
If you prefer storing all your files in Google drive, you can easily mount it onto the current instance of Colab. This will enable you to access all the datasets and files that are stored in your drive.
There are a couple of ways you can do this:
- You can click on the 'drive' icon in the 'Files' tab and follow the prompts on the screen.
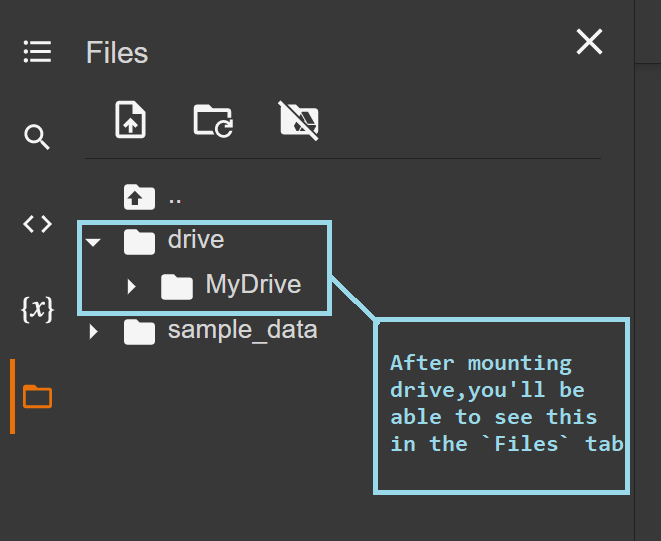
- After your drive has been mounted successfully, you should be able to view the 'drive' folder listed as an available directory in the 'Files' tab.
To mount your Google drive to the current Colab instance, you could alternatively run the following lines of code in a code cell in your notebook.
from google.colab import drive
drive.mount('content/drive')
You'll be prompted to grant access. Choose option 'Connect to Google Drive'. As with the previous method, you should be able to view the 'drive' folder listed in the 'Files' tab.
Cloning a GitHub repo into Colab instance
If you need access to all files in a particular GitHub repository, you can clone it into your current workspace as follows.

Running the following line of code will enable you to clone any remote GitHub repository—simply replace the placeholder
!git clone <URL of the repo>
Fetching remote data
Sometimes, you may need to fetch your dataset from the web; here's how to do so:
As you can run common shell commands inside the notebook environment, you may use the '!wget' command to fetch remote data by specifying its URL.
Let's now try to fetch the Boston housing dataset that's used in DataCamp's Supervised Learning with scikit-learn course.
The dataset can be found at this URL, and the following image shows how you can successfully retrieve it.

Automatic storage and version control
Have you ever had a hard time recovering lost files in your project?
With Colab, losing your project files is not a problem as all notebooks are auto-saved to the drive of the Google account that you've signed in with.
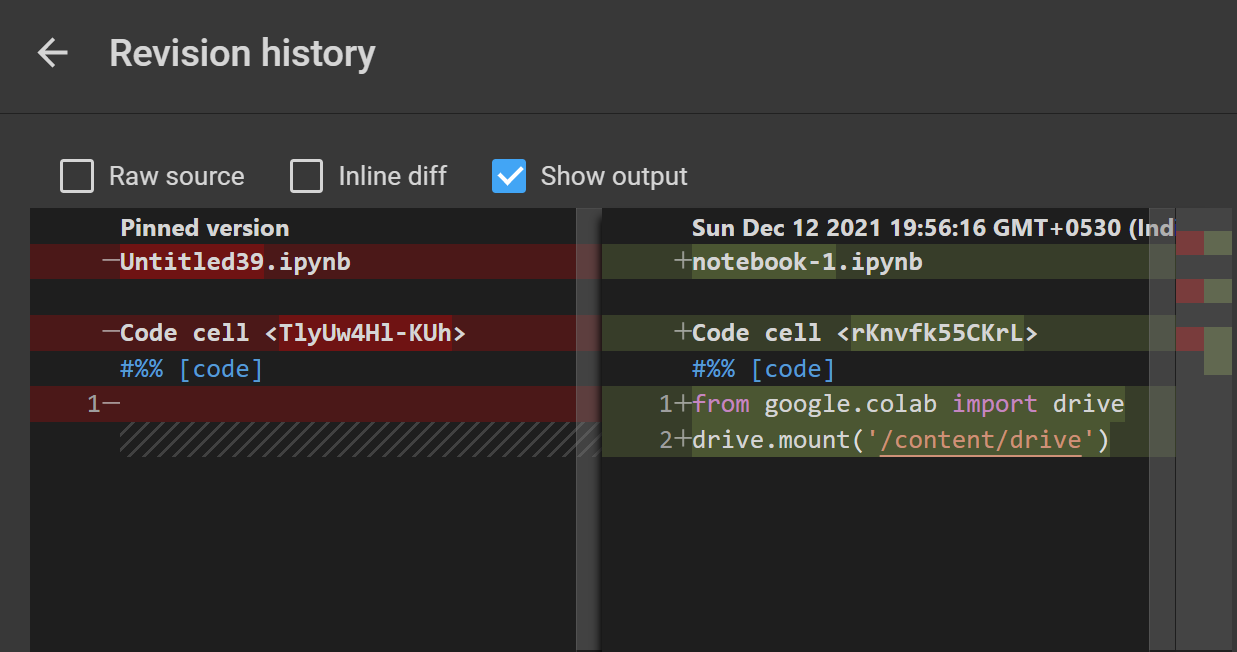
Even when you're collaborating with your friends and colleagues on a project, you can track all changes made to the notebook over time by looking up the revision history. Go to 'File' → 'Revision History' and you'll be able to view the changes and when a particular change was made.
Here's a sample revision history:
Access to computer hardware accelerators such as GPUs and TPUs
More often than not, the specifications of your local machine, and the constraints on processing power, can be a concern, especially when working with large deep learning models.
To overcome these limitations of your hardware, Colab provides access to hardware accelerators—Graphics Processing Unit (GPU) and Tensor Processing Unit (TPU) to train deep learning models faster.
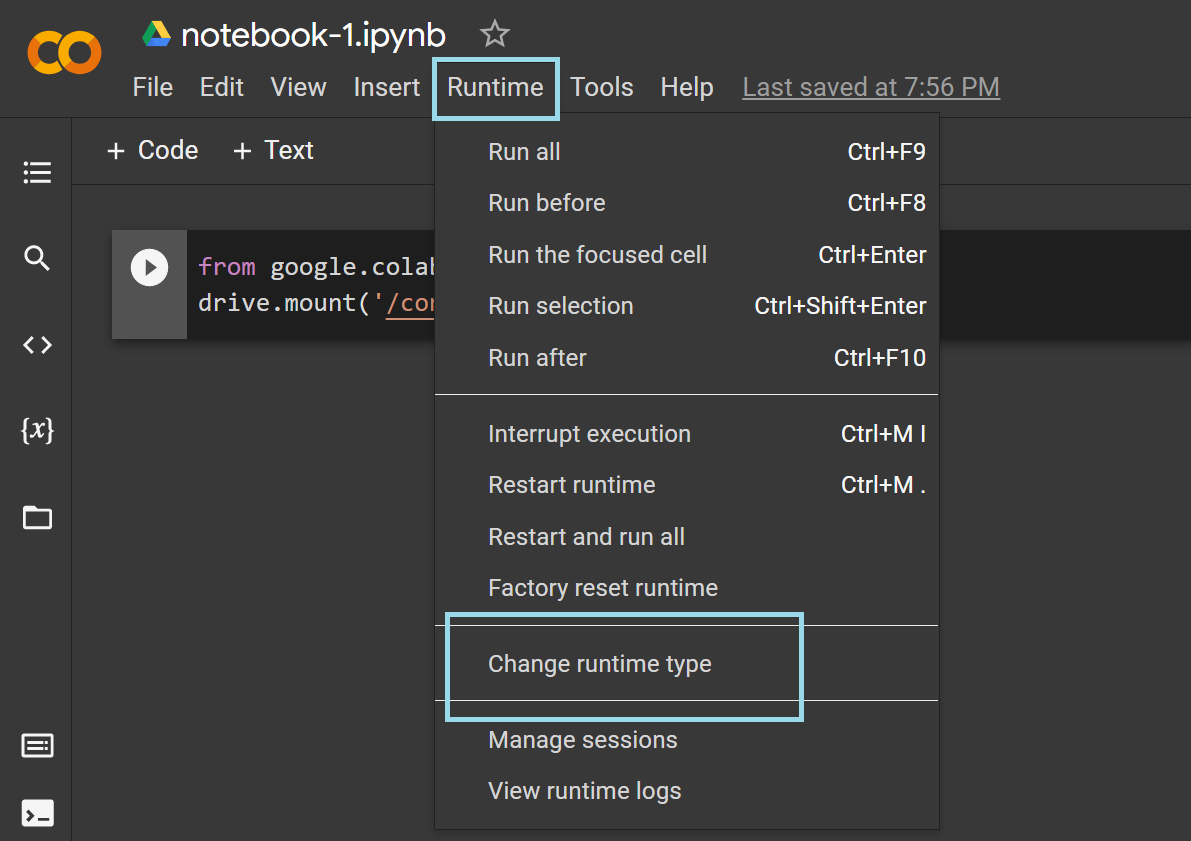
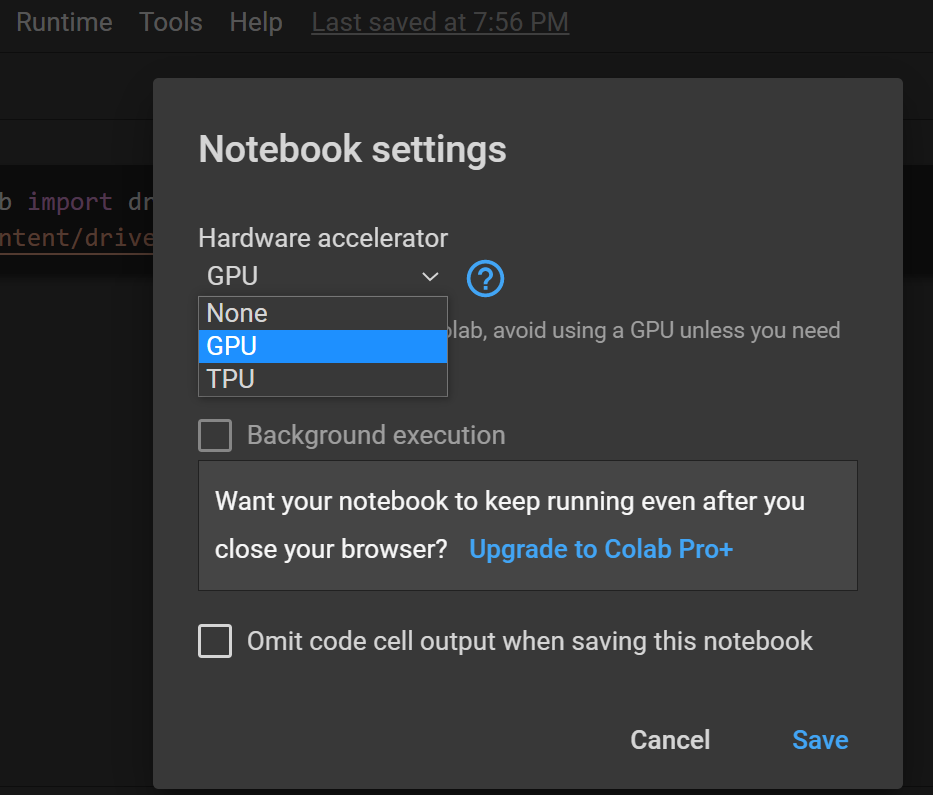
The following figures illustrate how you can enable the use of GPUs in Colab notebook—it can be done in two simple steps.
- Go to 'Runtime' → 'Change runtime type'
- Set the hardware accelerator to either GPU or TPU as needed.
So far, you've learned about useful features of Colab for data science.If this sounds exciting at all, you might also be interested in checking DataLab. You start using DataLab by signing up for a free DataCamp account.
DataLab: An Overview
DataLab provides a fully browser-based environment for all your data science needs. You can code in Python or R with built-in support for SQL, and collaborate with others with absolutely no setup.
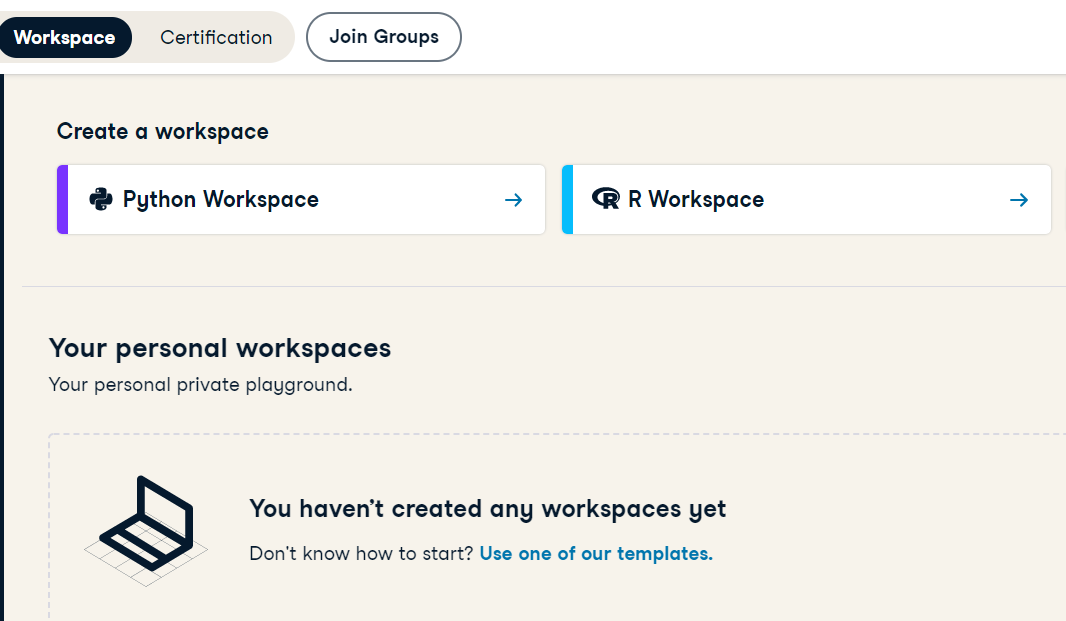
- If you're looking to start building your data science portfolio, DataLab can be a great choice. You can create a new Python or R DataLab, or you might as well start working with a GitHub repository.
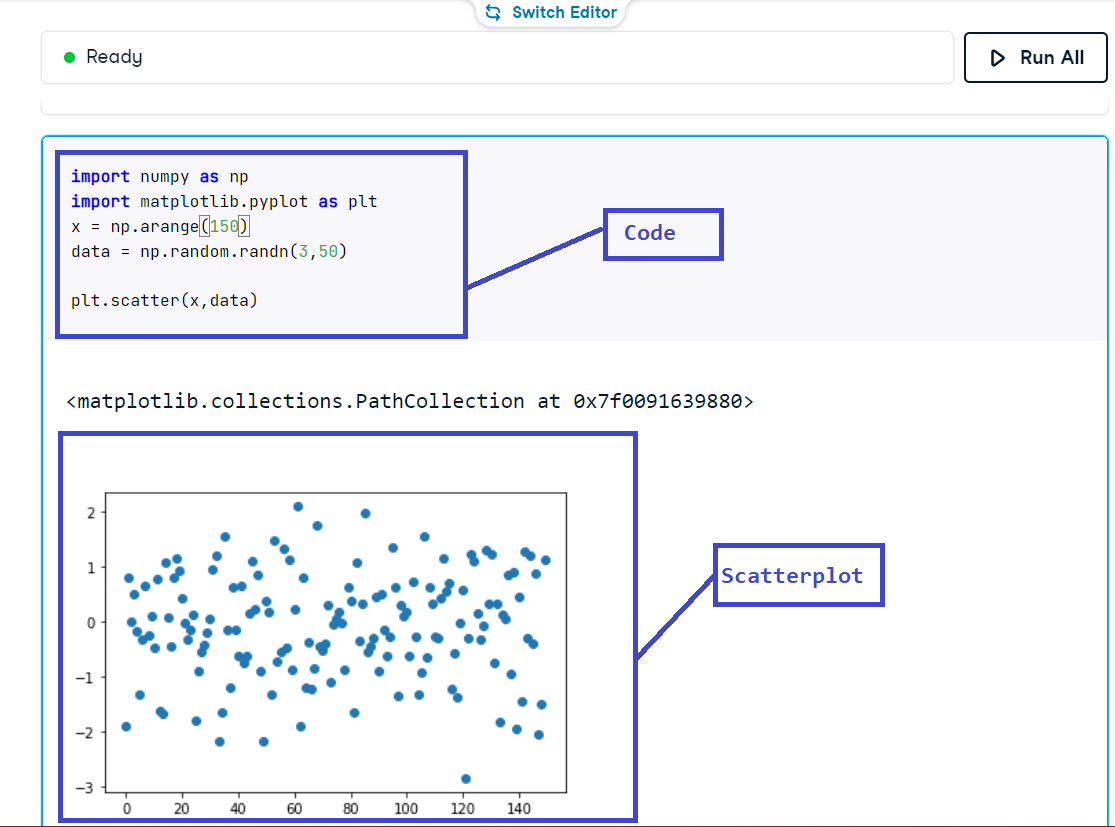
- Similar to Google Colab, DataLab has several features: pre-installed libraries, preloaded datasets, integrations to common data sources, and much more. You can write and execute Python and R code, as well as add rich text and images.
- Once you've published a notebook, you can easily share and collaborate with others.
-
DataLab has several preloaded datasets, templates, and playbooks on a wide range of areas—such as unsupervised learning, market analysis, natural language processing, and many more. These templates provide you with enough direction to start building projects right from the get go.
-
You don't have to host your notebooks in a GitHub repository. All your notebooks are accessible from your DataCamp profile, so you can access your whole data science portfolio via your free DataCamp account.
-
To learn more about DataLab head over to the docs.
Limitations of Google Colab
Although Colab makes things easier, the following are some limitations that you should be aware of:
- The free instance of Colab suffices for small to medium-scale projects. However, there's a constraint on the use of GPUs. The typical duration for which you can train your models on the GPU is 12 hours, after which the runtime gets disconnected. For extended usage of GPUs and TPUs, you'll have to upgrade to Colab Pro for enhanced usage.
- Google Colab is tailor-made for data science in Python. However, there are times when you may want to use R, SQL or other programming languages to retrieve data from databases. Colab currently supports only Python. If you'd prefer to use R for your data science needs, and require integrations to MySQL databases, be sure to check out DataLab.
- In Colab, the demand for and allocation of hardware accelerators all happens in real time. At times, this may result in fluctuations in GPU and TPU access.
-
The files and libraries that you install and import are specific to the particular instance of Colab. Upon disconnecting the runtime, you'll lose all files and packages in the instance. If you need to work on the notebook in multiple sprints, you'll have to connect to a runtime, and install all required packages yet again.
-
Colab imposes a disk space limitation in every instance, depending on the machine that you've been allocated for that instance. This may be prohibitive for very large datasets.
Conclusion
In this tutorial, you've learned about the useful features of Google Colab from a data science viewpoint. You've also learned how DataLab can help you build a data science portfolio right from the browser, and can be a great option to start building your data science portfolio—right from the browser—all with a free DataCamp account.
Get certified in data literacy and land your dream role
Our certification programs help you stand out and prove your skills are job-ready to potential employers.
