track
Associate AI Engineer för data scientists
40 timmar
MiniMax M2.7 stands out from many open-weight models because it is designed for complex agentic workflows, including tool use, multi-step coding tasks, and productivity-oriented reasoning.
Although it sits in the mid-sized range rather than the very largest model tier, MiniMax M2.7 is positioned to deliver strong coding and reasoning performance with a much more practical deployment footprint.
In this guide, I will use Hyperbolic because it offers the cheapest on-demand H200 access, quick provisioning, and a simple way to spin up Linux GPU machines for local-style model serving.
You will learn how to:
Launch a Hyperbolic H200 Linux machine
Install llama.cpp for local inference
Download Unsloth’s UD-IQ4_XS GGUF version of MiniMax M2.7
Run llama-server as an OpenAI-compatible local API
Connect the local model to OpenCode for agentic coding workflows
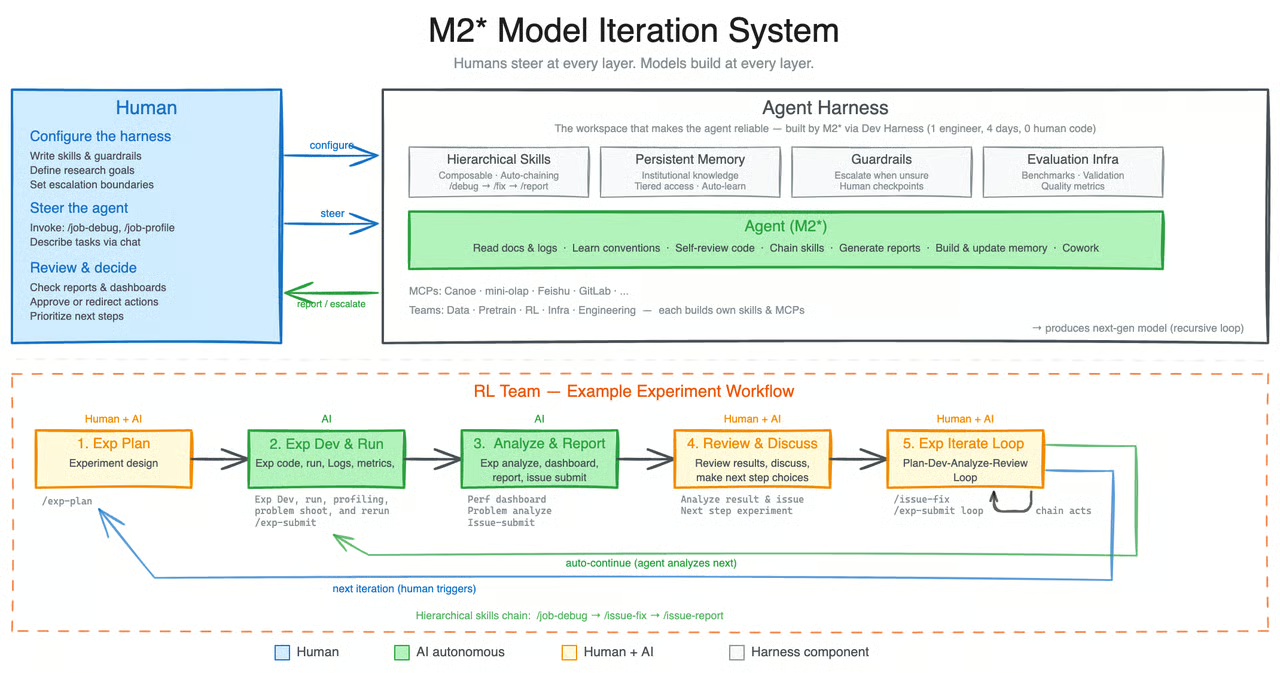
MiniMax M2.7 introduces a more agent-focused direction than earlier open models, such as MiniMax M2.5. What makes it stand out is not just its coding or reasoning ability, but the fact that it is designed to take part in its own improvement process.
According to MiniMax, M2.7 is their first model to deeply contribute to its own evolution by helping build complex agent harnesses, handling elaborate productivity tasks, and working with agent teams, advanced skills, and dynamic tool search.
A major shift with M2.7 is its self-evolution workflow. During development, the model was used to update its own memory, create complex skills for reinforcement learning experiments, and refine its own learning process based on the outcomes of those experiments.
All this makes M2.7 feel less like a standard static model and more like a system built for iterative improvement.
Source: MiniMaxAI/MiniMax-M2.7 · Hugging Face
What I find most interesting is that MiniMax is positioning M2.7 as more than just another open model. To me, it points toward a more sustainable way of improving and training models, where advanced systems can play a more active role in their own development.
Rather than relying only on massive fresh datasets, it shows how newer training methods and self-improvement loops can help push model performance further.
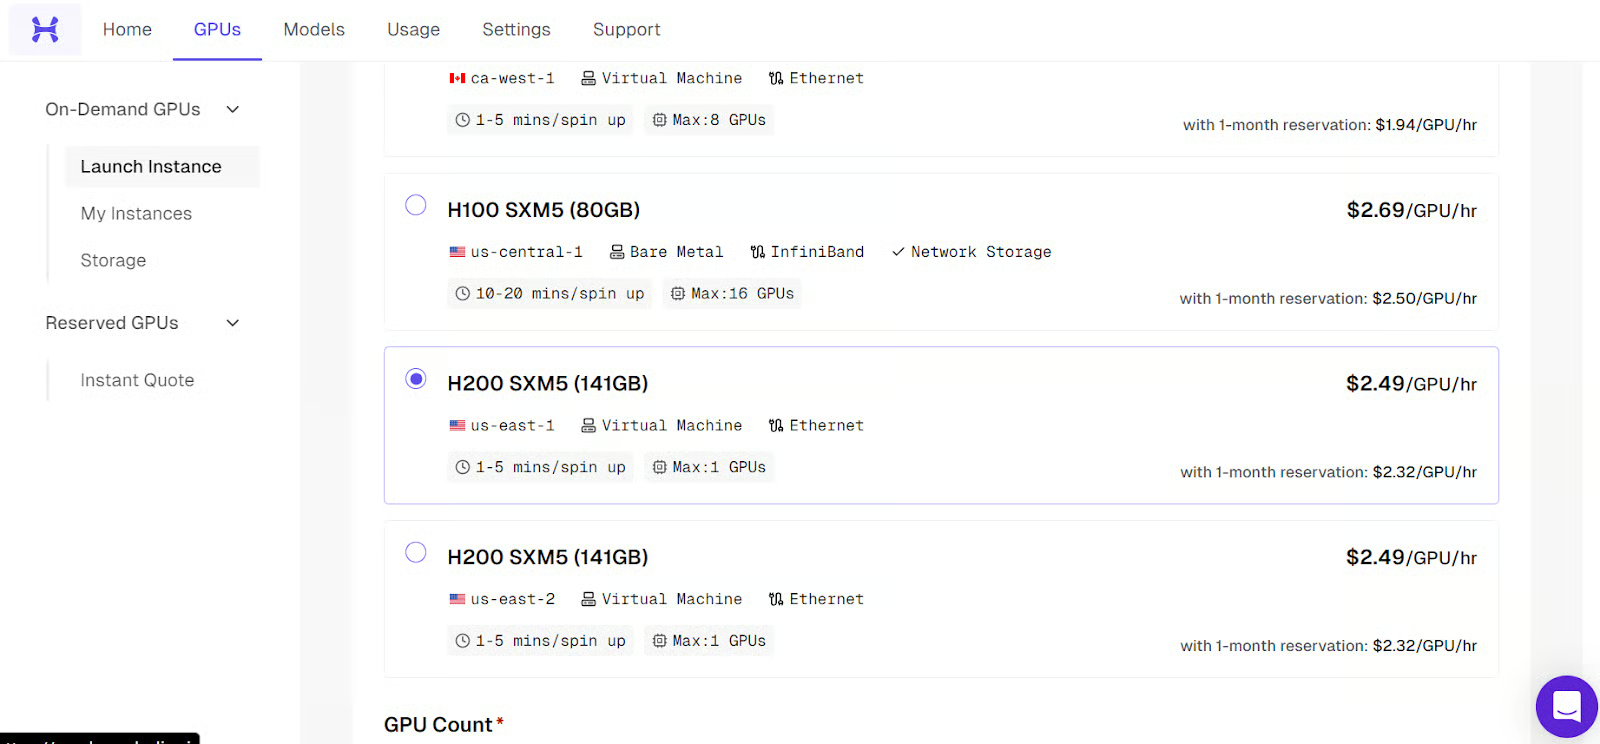
Go to Hyperbolic, sign up, and add at least $5 in credit using your card. Then go to the GPUs tab, click Launch Instance, and select the H200 SXM5 machine.
This guide uses a remote GPU server, so before launching the machine, you need to make sure your SSH access is ready. SSH is what lets you securely connect from your own terminal to the Linux machine running on Hyperbolic.
If you already use SSH and have a key pair set up, you can move on to the next part. If not, you will need to create one first.
On your local machine, open a terminal and generate an SSH key if you do not already have one:
ssh-keygenWhen prompted, press Enter to save it in the default location. You can also add a passphrase if you want extra security, but it is optional.
Once the key has been created, print your public key so you can copy it:
cat ~/.ssh/id_rsa.pubIf your system uses the Ed25519 format instead, run:
cat ~/.ssh/id_ed25519.pubCopy the full output and add it to your Hyperbolic account. Make sure you only upload the public key. The private key stays on your own computer and should never be shared.
Once your SSH key has been added, go to the Hyperbolic dashboard, open the GPUs tab, and click Launch Instance. From the list of available machines, choose the H200 SXM5 instance for this setup.
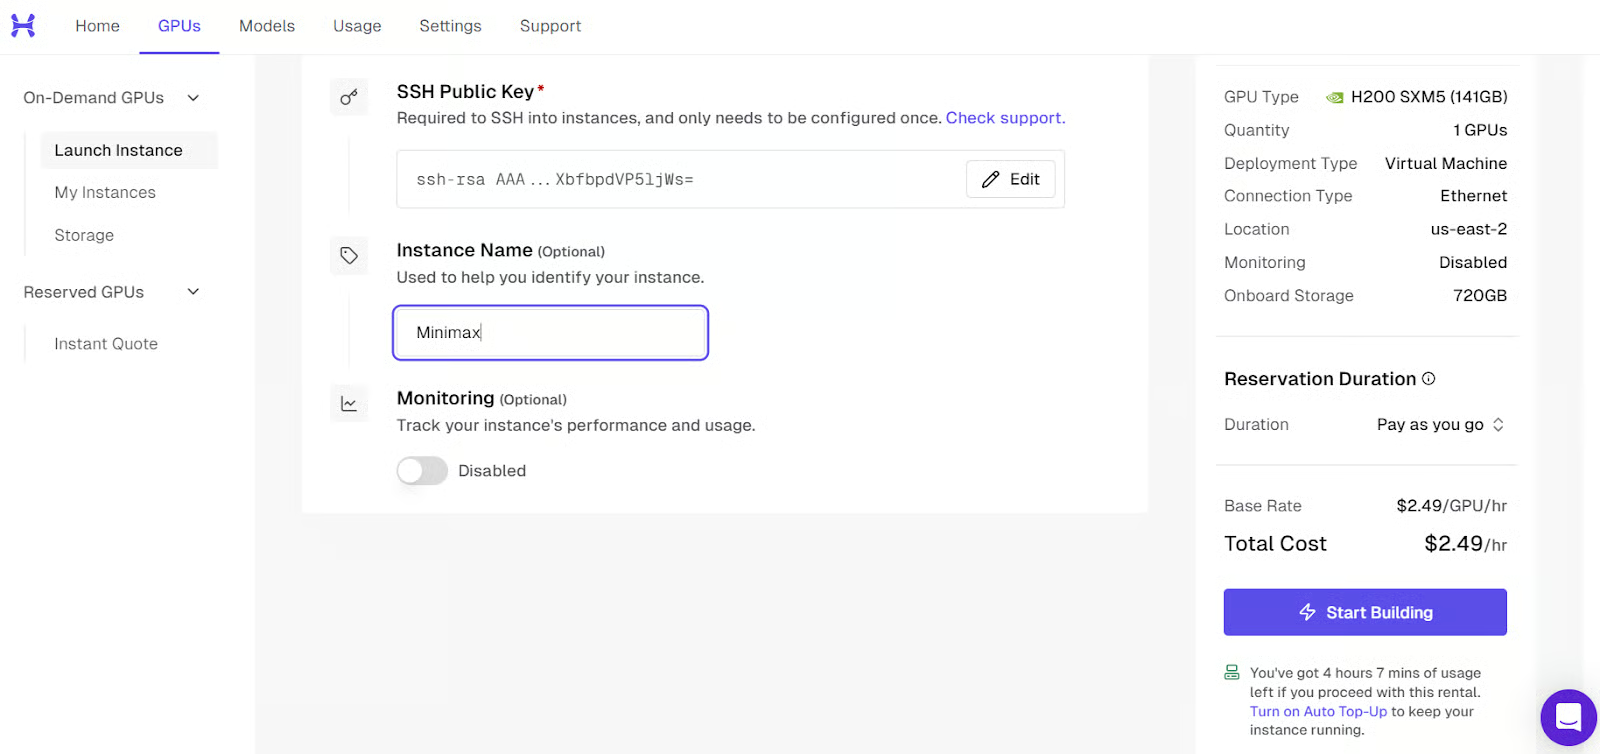
Before starting the machine, give the instance a clear and recognizable name. This makes it much easier to identify later, especially if you launch more than one machine or come back to it after some time.
After that, review the instance settings, confirm that your SSH key is attached, and start the machine. The platform will then begin provisioning the GPU server for you.
Once the machine is fully ready, it will appear as active in the dashboard. At that point, you will also see the SSH command you need to connect to it from your local terminal. You will use that command in the next step.
Now open your local terminal and run the SSH command with port forwarding enabled from the start:
ssh -L 8001:127.0.0.1:8001 root@<H200-Instance-IP>This connects your local machine to the remote Linux server and also forwards port 8001, so later you can access the llama.cpp server in your browser through http://127.0.0.1:8001.
If this is your first time connecting to the server, SSH will ask you to confirm the fingerprint. Type yes and press Enter.
If you set a passphrase when creating your SSH key, SSH will ask for it before the connection is completed. Just type your passphrase and press Enter. Using a passphrase is recommended because it adds an extra layer of protection to your private key.
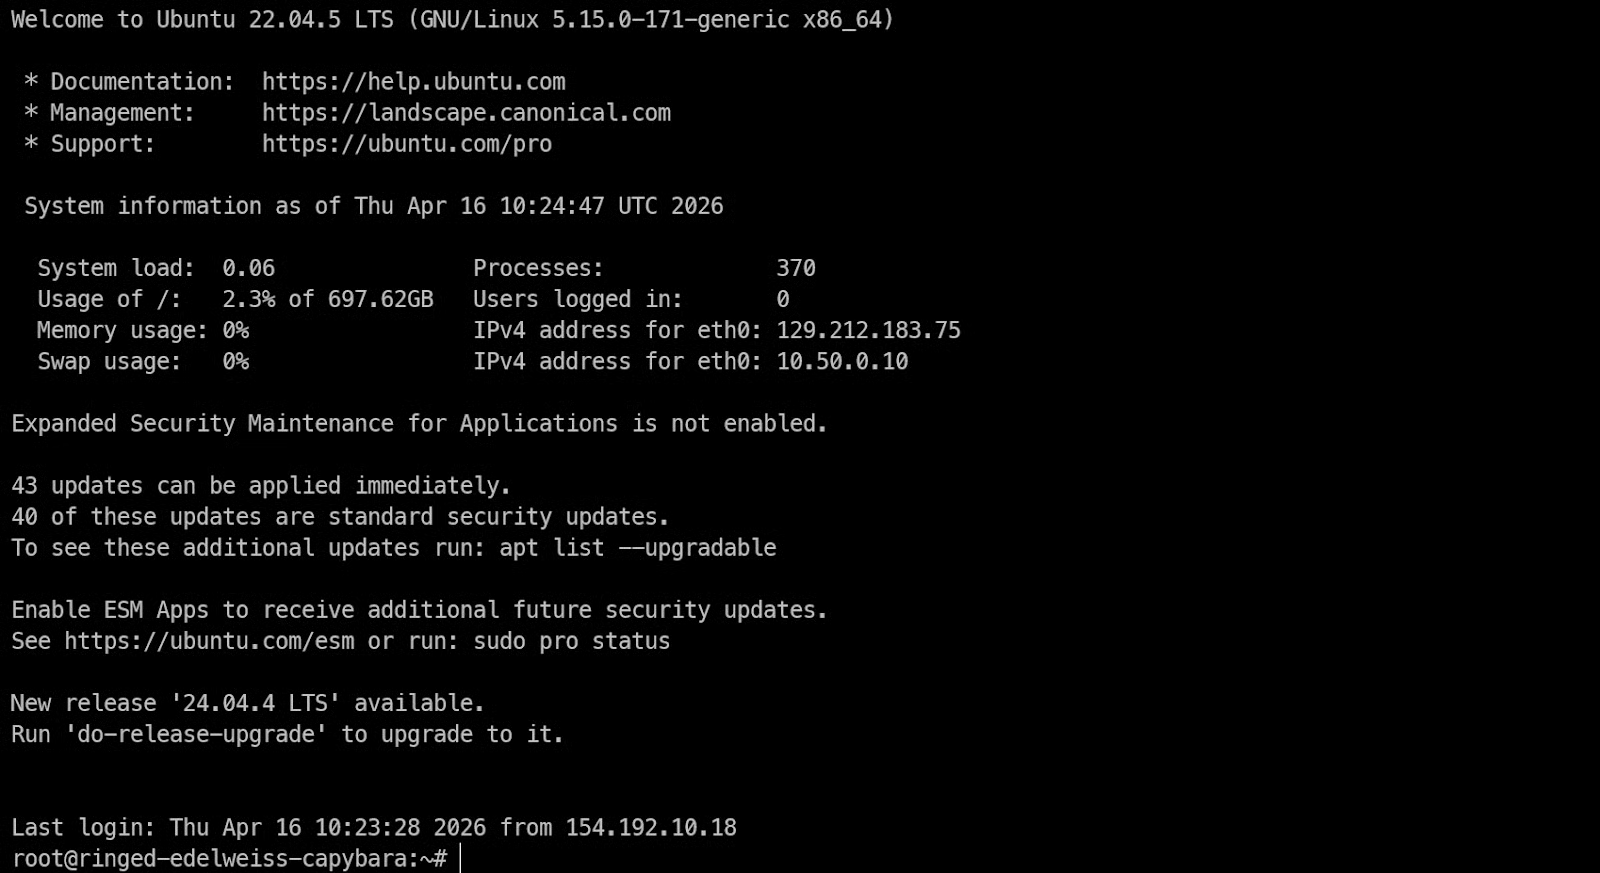
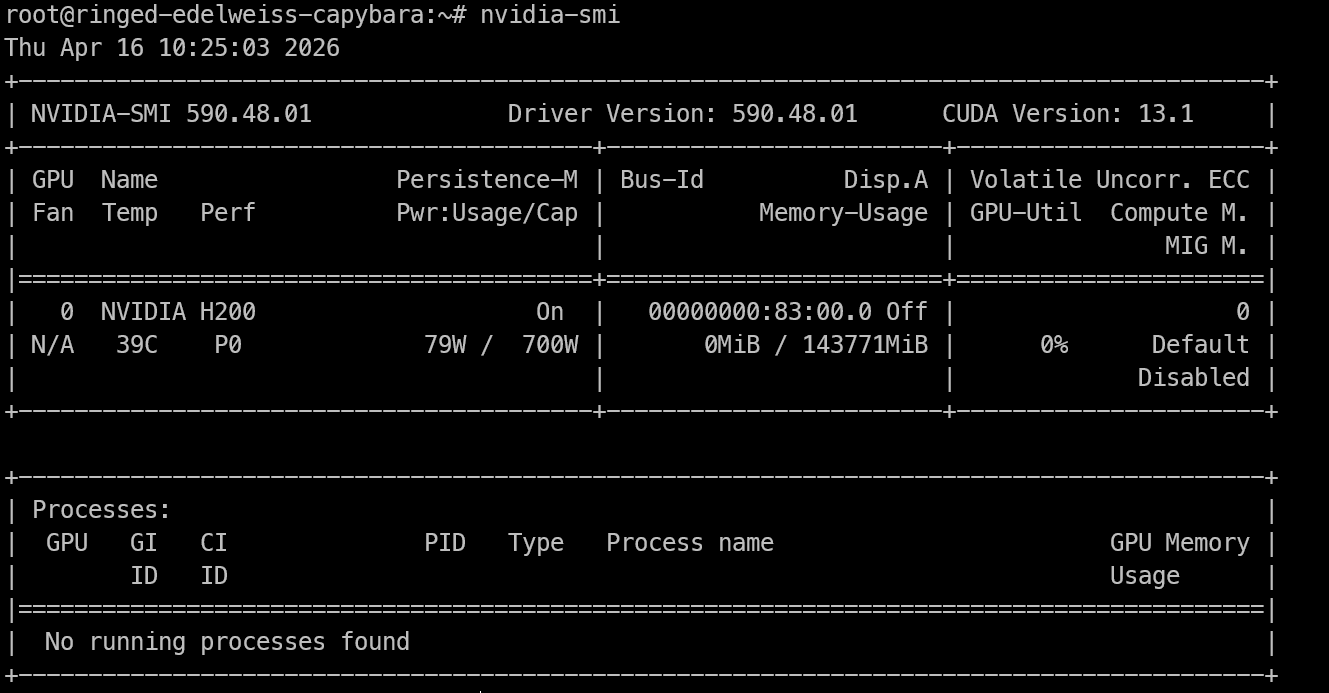
Once you have remote access to the H200 machine, the first thing to check is whether the GPU is visible and the NVIDIA drivers are working correctly.
Run:
nvidia-smiThis command should show the installed NVIDIA GPU, the driver version, CUDA version, and the available memory. If you can see the H200 listed here, the machine is ready for inference work.
Now install the system packages needed to build llama.cpp and run the model locally.
Run:
apt-get update
apt-get install -y pciutils build-essential cmake git curl wget libcurl4-openssl-dev tmux python3 python3-pip
These packages give you the tools needed for the rest of the setup.:
build-essential and cmake are required to compile llama.cpp
git lets you clone the repository
curl and wget help download files
tmux is useful if you want to keep long-running processes active even after closing the terminal.
Now that the machine is ready, the next step is to install llama.cpp, which we will use to run MiniMax M2.7 locally. This gives us both the command-line tools for testing the model and the server we will later expose as an OpenAI-compatible API.
Start by cloning the official llama.cpp repository onto the remote machine:
git clone https://github.com/ggml-org/llama.cppThis will create a new llama.cpp folder in your current directory with all the source files needed to build the project.
Next, run CMake to configure the build. In this setup, we are enabling CUDA so llama.cpp can use the H200 GPU for inference.
cmake llama.cpp -B llama.cpp/build -DBUILD_SHARED_LIBS=OFF -DGGML_CUDA=ONThis command prepares the build files inside the llama.cpp/build directory.
Now compile the tools we need:
cmake --build llama.cpp/build --config Release -j --clean-first --target llama-cli llama-server llama-gguf-splitThis builds three main binaries:
llama-cli for testing and running the model from the terminal
llama-server for serving the model through a local API and browser interface
llama-gguf-split for working with split GGUF model files
Copy the binaries into the main folder
Once the build is finished, copy the compiled binaries into the main llama.cpp folder:
cp llama.cpp/build/bin/llama-* llama.cppThis makes the tools easier to run without needing to type the full build path each time.
Finally, run the help commands below to make sure everything is installed correctly:
./llama.cpp/llama-cli --help
./llama.cpp/llama-server --help
If both commands return usage information instead of an error, llama.cpp has been installed successfully, and you are ready to download the MiniMax M2.7 model.
Before downloading the model, install the Hugging Face download tools on the remote machine:
pip -q install -U "huggingface_hub[hf_xet]" hf-xet hf_transferThis installs the hf CLI along with hf-xet, which helps handle large file downloads more efficiently.
Next, create a folder for the model files and download the UD-IQ4_XS GGUF version of MiniMax M2.7.
Run:
mkdir -p /models/minimax-m27
hf download unsloth/MiniMax-M2.7-GGUF \
--local-dir /models/minimax-m27 \
--include "*UD-IQ4_XS*"
This creates a dedicated model directory and downloads only the UD-IQ4_XS files, which are the 4-bit quantized version used in this guide.
The download is large, around 108 GB, so it may still take some time depending on the network speed of your instance.
Once the download finishes, check that all the GGUF shards are present by running:
find /models/minimax-m27 -name "*.gguf"You should see four GGUF files listed, similar to this:
/models/minimax-m27/UD-IQ4_XS/MiniMax-M2.7-UD-IQ4_XS-00003-of-00004.gguf
/models/minimax-m27/UD-IQ4_XS/MiniMax-M2.7-UD-IQ4_XS-00002-of-00004.gguf
/models/minimax-m27/UD-IQ4_XS/MiniMax-M2.7-UD-IQ4_XS-00001-of-00004.gguf
/models/minimax-m27/UD-IQ4_XS/MiniMax-M2.7-UD-IQ4_XS-00004-of-00004.gguf
If all four files are there, the model has been downloaded correctly, and you are ready to start the server in the next step.
Now it is time to start the model with llama-server. This will load the MiniMax M2.7 GGUF model, run it on the GPU, and expose it through a local server on port 8001.
Before launching the model server, start a tmux session so the process keeps running even if your SSH connection drops or you close the terminal window.
Run:
tmux new -s minimaxThis creates a new tmux session called minimax, which we will use to run the server.
Now move into the llama.cpp directory and run the server with the model path and inference settings:
cd llama.cpp
./llama-server \
--model /models/minimax-m27/UD-IQ4_XS/MiniMax-M2.7-UD-IQ4_XS-00001-of-00004.gguf \
--alias "MiniMax-M2.7" \
--host 0.0.0.0 \
--port 8001 \
--ctx-size 32768 \
--batch-size 2048 \
--ubatch-size 512 \
--threads 16 \
--parallel 1 \
--flash-attn on \
--n-gpu-layers 999 \
--temp 1.0 \
--top-p 0.95 \
--top-k 40
This starts the server on port 8001 and loads the model. As the model loads, watch the logs in the terminal.

If the model loads successfully into GPU memory, you will see a message showing that the server is listening on the configured address and port.

Once the model is fully loaded, you can leave it running inside tmux and detach from the session without stopping it.
Press Ctrl+B, then D. This will return you to your normal terminal while keeping the model server active in the background.
If you ever want to check the logs again later, reattach to the session with:
tmux attach -t minimaxAfter the server starts, open another terminal session and run:
curl http://127.0.0.1:8001/v1/modelsYou should see output like this:
{"models":[{"name":"MiniMax-M2.7","model":"MiniMax-M2.7","modified_at":"","size":"","digest":"","type":"model","description":"","tags":[""],"capabilities":["completion"],"parameters":"","details":{"parent_model":"","format":"gguf","family":"","families":[""],"parameter_size":"","quantization_level":""}}],"object":"list","data":[{"id":"MiniMax-M2.7","aliases":["MiniMax-M2.7"],"tags":[],"object":"model","created":1776336809,"owned_by":"llamacpp","meta":{"vocab_type":2,"n_vocab":200064,"n_ctx_train":196608,"n_embd":3072,"n_params":228689764864,"size":108405492736}}]}If you see the MiniMax-M2.7 model listed, the server is running properly.
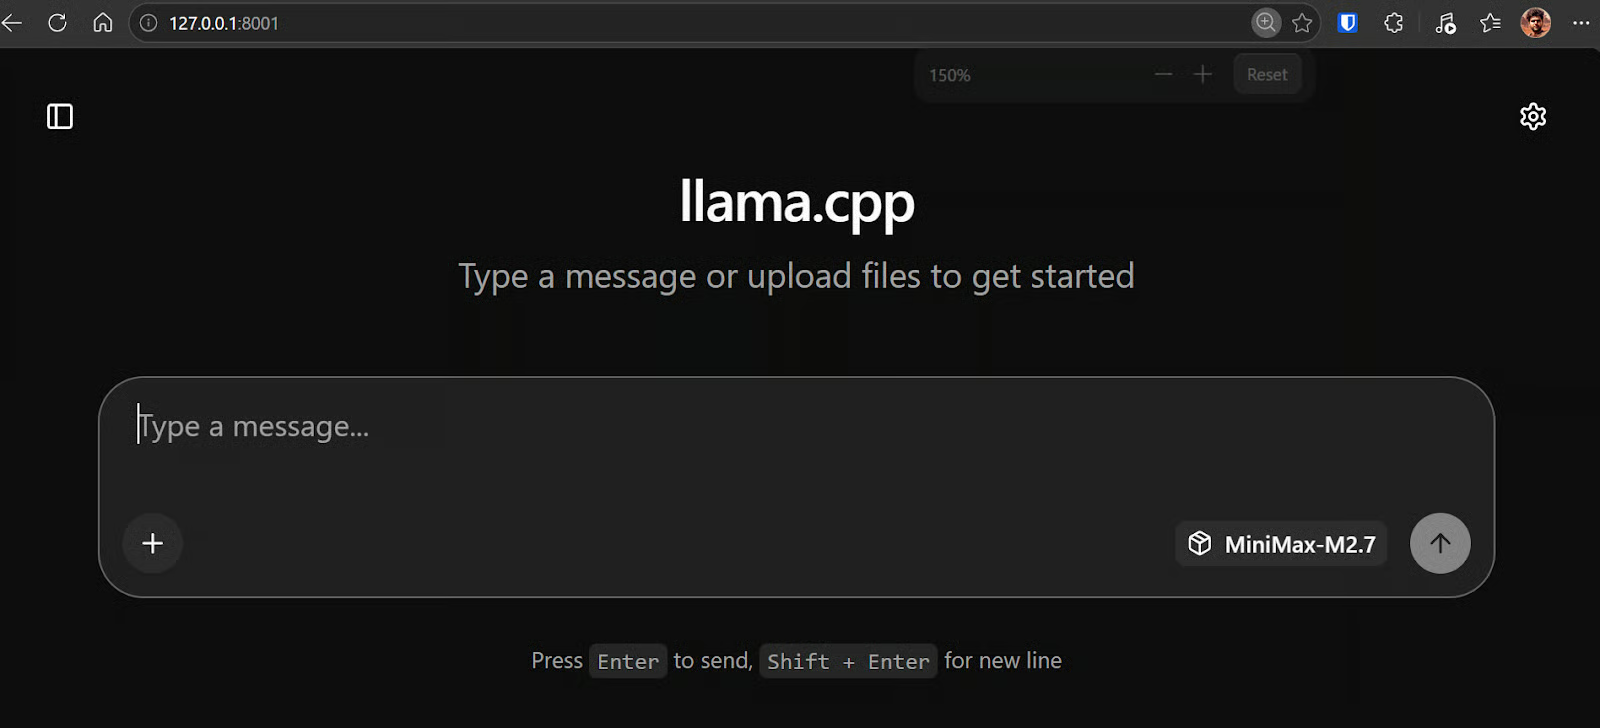
Because you already started SSH with port forwarding on 8001, you can now open the llama.cpp WebUI directly in your browser by going to http://127.0.0.1:8001.
This gives you direct access to the model interface from your local browser.
At this point, the model should be ready to use. You can test it in the WebUI or through API requests from the terminal to make sure everything is working correctly.
In my setup, MiniMax M2.7 was responding extremely fast, reaching around 120 tokens per second. It honestly felt like the fastest local model I have run so far at this size, especially considering how responsive it was even with longer and more technical prompts.
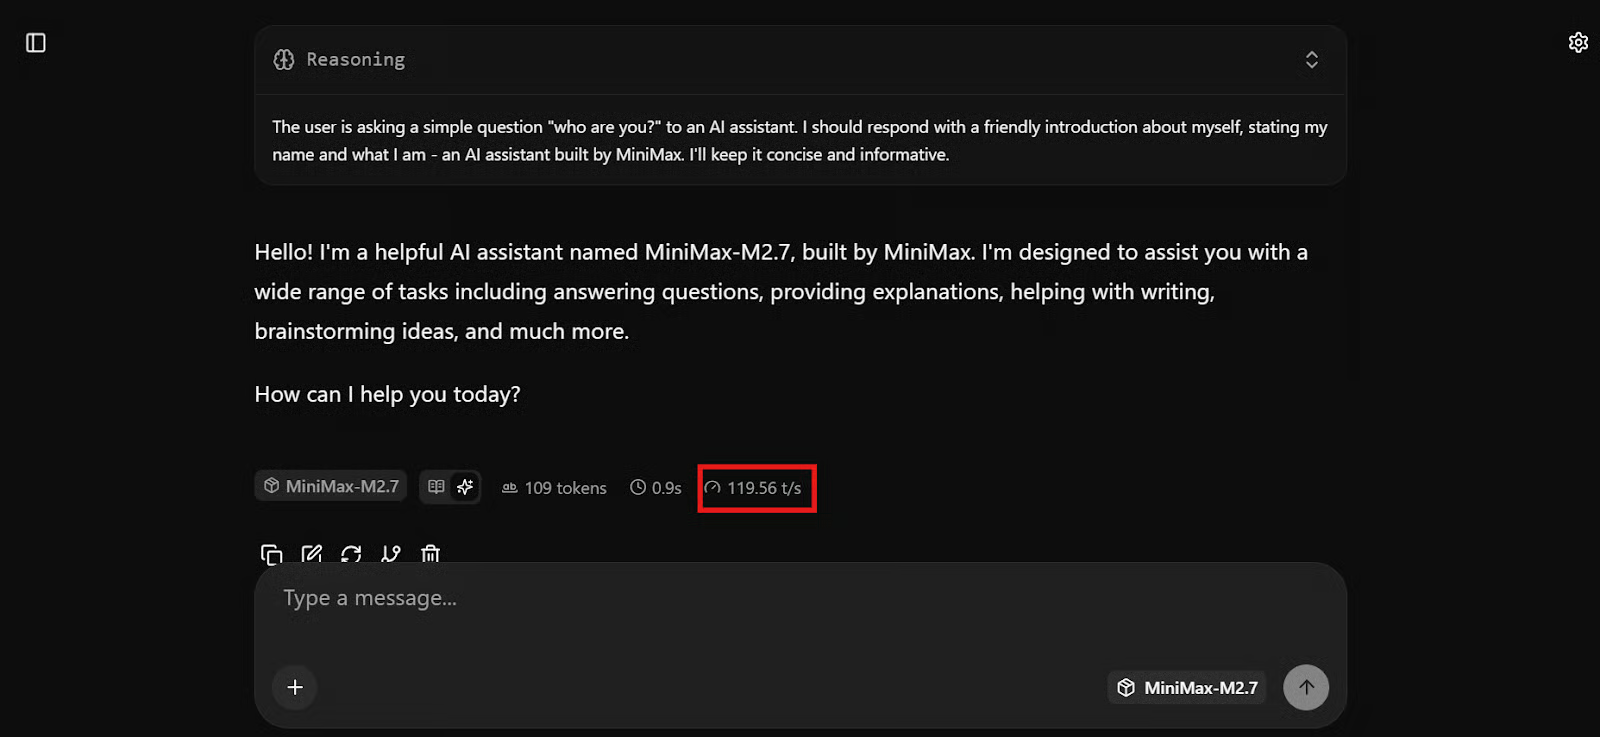
Once it responds correctly, MiniMax M2.7 is fully running locally and ready to be connected to your coding workflow.
Now that the local llama.cpp server is running, the next step is to connect it to OpenCode. OpenCode is a terminal-based coding agent that supports custom providers via its config file. If you’re interested in knowing more about it, check out our comparison of OpenCode vs Claude Code.
For local models like llama.cpp, the cleanest setup is to point OpenCode at the local OpenAI-compatible endpoint running on http://127.0.0.1:8001/v1.
Install OpenCode on the remote machine with:
curl -fsSL https://opencode.ai/install | bash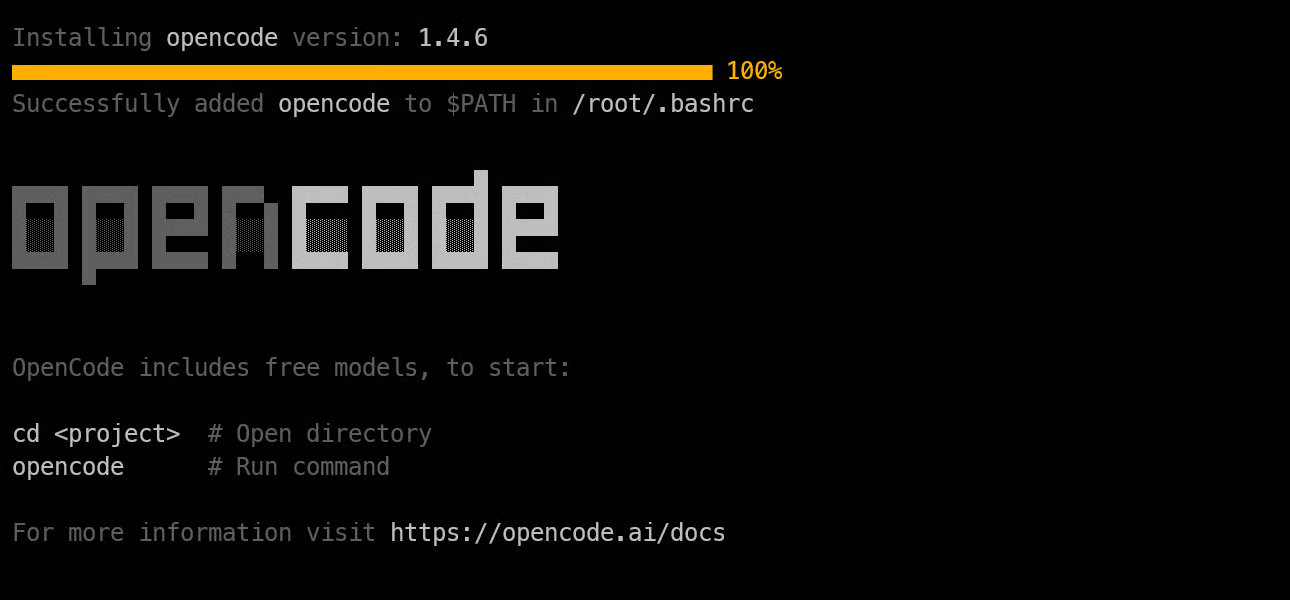
Then reload your shell, and check the version to confirm it installed correctly:
source ~/.bashrc
opencode --version1.4.6Next, create an opencode.json file that tells OpenCode to use your local llama.cpp server as an OpenAI-compatible provider.
cat > opencode.json <<'EOF'
{
  "$schema": "https://opencode.ai/config.json",
  "provider": {
    "llama.cpp": {
      "npm": "@ai-sdk/openai-compatible",
      "name": "llama-server (local)",
      "options": {
        "baseURL": "http://127.0.0.1:8001/v1",
        "timeout": 600000,
        "chunkTimeout": 120000
      },
      "models": {
        "MiniMax-M2.7": {}
      }
    }
  },
  "model": "MiniMax-M2.7"
}
EOF
This config points OpenCode to the local server, sets the default model to MiniMax-M2.7, and uses the same OpenAI-compatible provider approach OpenCode documents for custom providers. OpenCode also supports selecting models inside the app with the /models command.
Now, create a simple project folder and launch OpenCode inside it:
mkdir ml-app
cd ml-app/
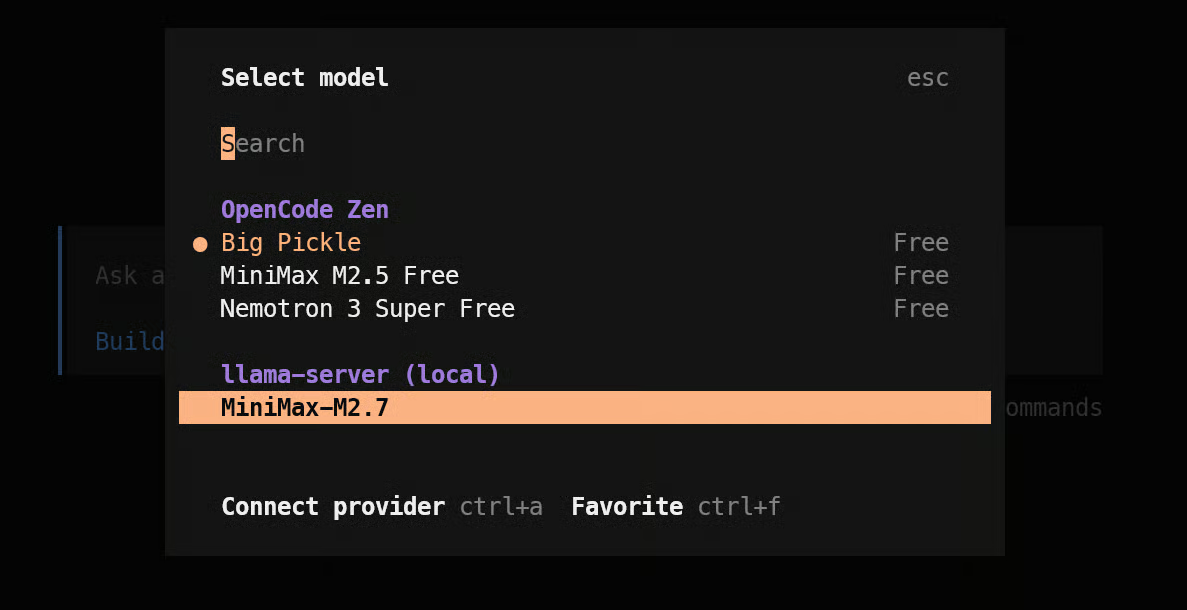
OpencodeOnce OpenCode opens, type /models and select MiniMax-M2.7 under your local provider.
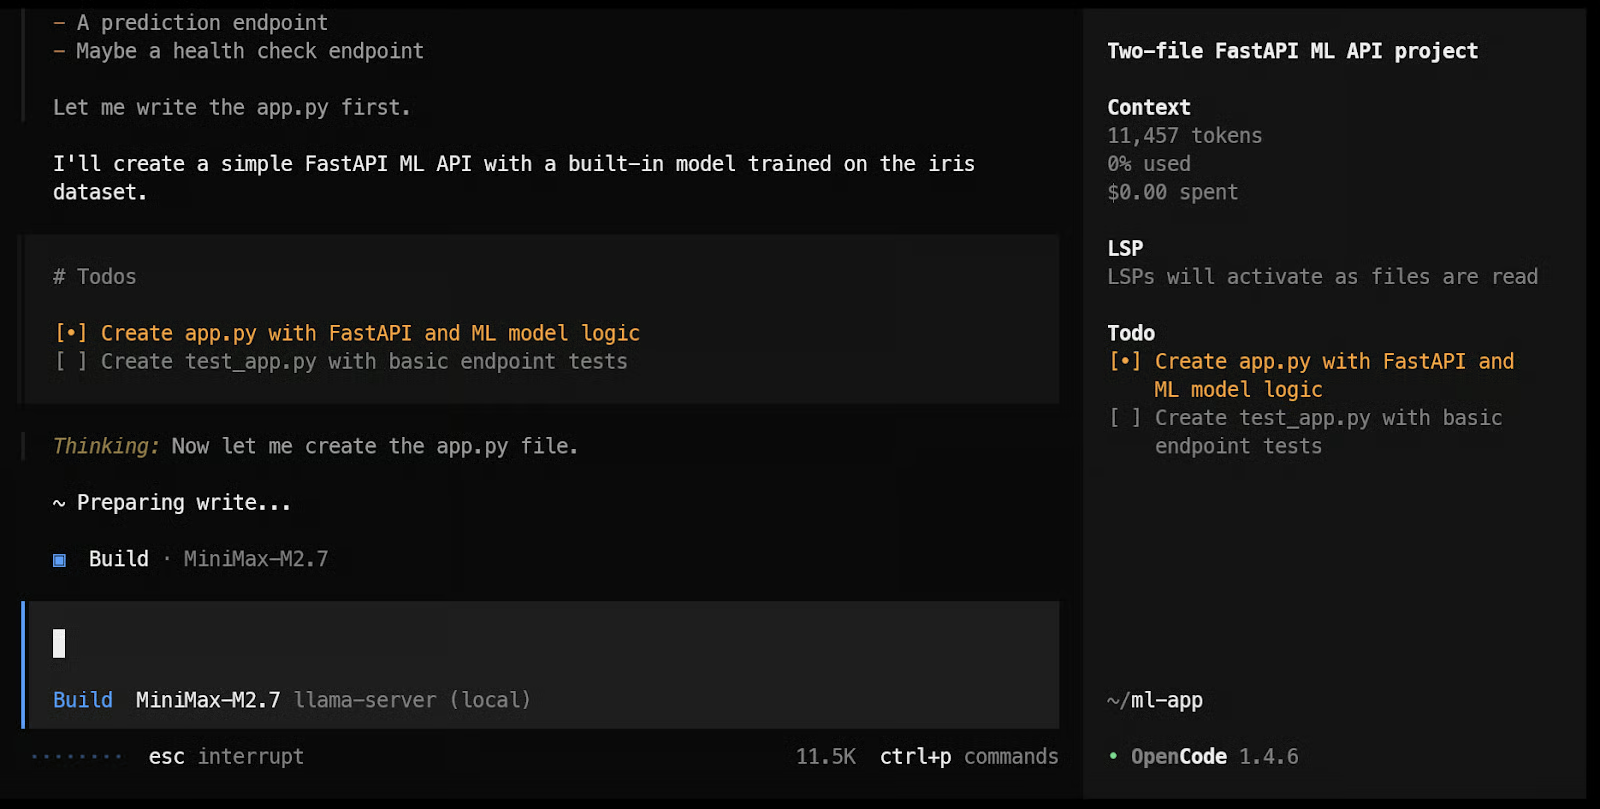
Once the model is selected, give it a real coding prompt. For example:
Build a simple machine learning API app with FastAPI using just two files: one app.py file for the API and model loading/prediction logic, and one test_app.py file for basic endpoint tests.In practice, this is where the setup starts to feel impressive. The model begins working almost immediately, creates a task plan, and starts building out the files. In my testing, it felt very responsive, which lines up with how fast the model was already running through llama.cpp.
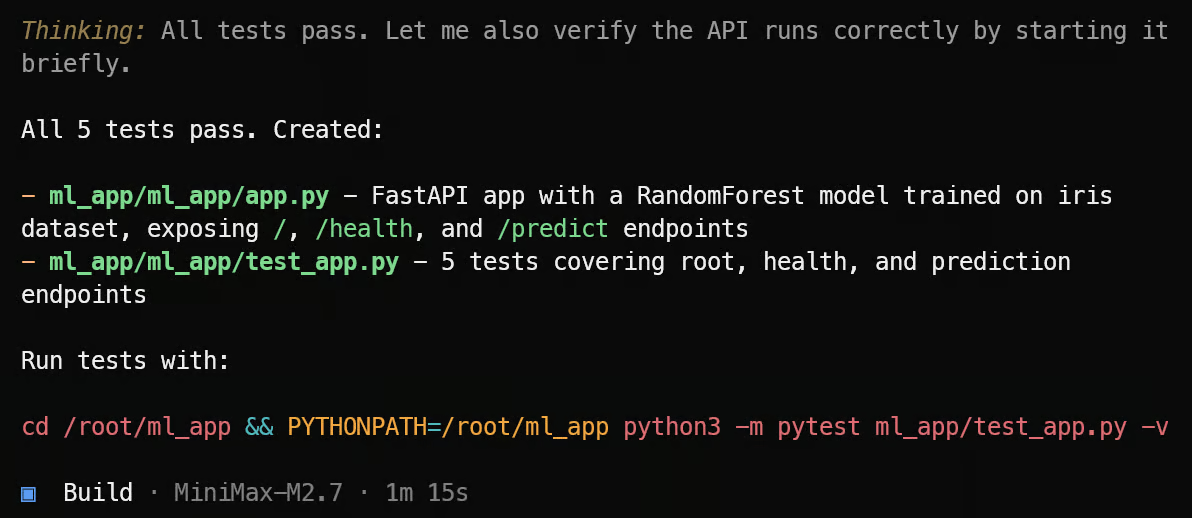
By the end, it was able to create the files, run the tests, and show the results.
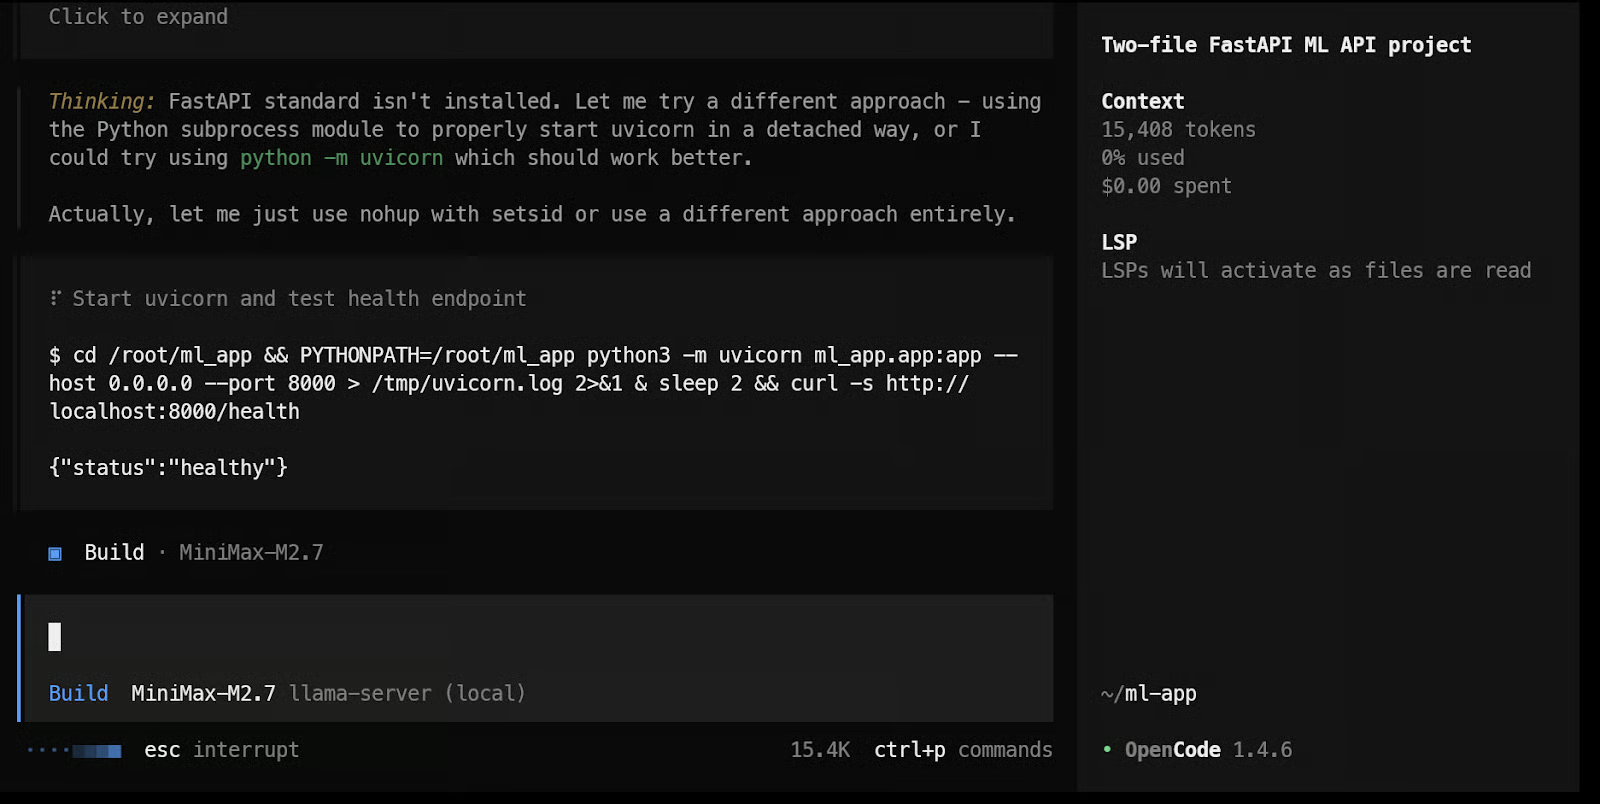
After that, you can keep pushing it further by asking it to test the ML API endpoints, improve the app structure, or add new features. Since OpenCode is built for terminal-based coding workflows, this is the point where the local MiniMax setup starts to feel like a practical coding agent instead of just a model running on a server.
In my case, the local ML API app was working correctly by the end of the run. We ran unit tests, did smoke testing, and made sure there were no errors while running and testing the code. Overall, it took around 2 minutes to complete everything, which shows just how fast this model feels in a local coding workflow.
I originally started with vLLM, but I ran into quite a few issues, especially when trying to run a 4-bit AWQ model. For this kind of setup, I found llama.cpp much easier to work with. The installation felt simpler, the workflow was more straightforward, and it was much faster to get everything running properly.
What I also liked about llama.cpp is that it comes with a built-in WebUI, so you can test the model straight away in a ChatGPT-like interface from your browser. That makes it much easier to quickly check prompts, test responses, and make sure the model is working before connecting it to something like OpenCode.
For local use, I think MiniMax M2.7 is one of the best models I have run so far. It is smaller than GLM 5.1, feels faster, understands code well, and performs strongly in agentic coding tasks. Even the 4-bit version did a very good job on more complex tasks, which made it feel practical for real use and not just something to experiment with.
The speed is a big part of why this setup stands out. In my case, MiniMax M2.7 was running at around 120 tokens per second with very smooth generation, and through SSH port forwarding, I could use it from my local browser or API as if it were running on my own machine. That made the whole workflow feel fast, simple, and very practical.
AI Engineering Courses
track
track
course
tutorial
Abid Ali Awan
tutorial
Abid Ali Awan
tutorial
Abid Ali Awan
tutorial
Abid Ali Awan
tutorial
Abid Ali Awan
tutorial
Abid Ali Awan