
Course
Introduction to GitHub Concepts
2 hr
43.3K
Tired of typing your password every time you connect to a remote server or GitHub repository?
SSH keys are what you're looking for. They offer a secure and convenient alternative to password-based authentication when you want to access remote systems. SSH keys also provide stronger security than passwords since they're practically impossible to crack through brute force attacks.
Over the years, they have become the standard for secure remote connections in professional environments. They're essential for anyone who works with remote servers, cloud services, or version control systems like Git.
In this article, you'll learn how to generate SSH keys, add them to remote systems, and implement best practices for securely managing them.
SSH keys are cryptographic credentials that allow you to access remote systems securely without typing passwords. So, instead of memorizing complex passwords with numbers, capital letters, and special characters, you create a pair of keys – one public and one private.
Think of your public key as a padlock you can freely distribute to any server you want to access. Your private key works like the unique key that opens those padlocks. When you connect to a remote system, it checks if your private key matches its stored public key. If they match, you get instant access without entering a password.
The public key can't be used to determine your private key, which makes this system extremely secure. Your private key should remain secret and stay on your computer, so please never share it with anyone.
> To further understand how secure connections fit into the broader landscape of cybersecurity, explore the Introduction to Data Security course.
When it comes to benefits compared to traditional password authentication, these are the ones you should know:
SSH keys work with virtually any system that supports SSH, including Linux servers, cloud platforms, and code repositories like GitHub and GitLab. They've become the standard for secure remote access in professional environments.
> For cloud professionals, mastering both security and cost efficiency is key—learn more in the AWS Security and Cost Management course.
Now you know what SSH keys are, so next, you'll learn how to generate them.
Creating SSH keys takes just a few minutes, regardless of your operating system.
The process generates two files: your private key (which must stay secure on your computer) and your public key (which you'll add to remote servers).
To create SSH keys on Linux or MacOS, you'll use the built-in ssh-keygen command. To start, open your terminal and type:
ssh-keygen -t rsa -b 4096 -C "[email protected]"This command tells your system to create a new RSA key with 4096-bit encryption (very secure) and add your email as a comment for identification.
Your system will ask where to save the key and whether to add a passphrase. The default location works well for most users, but the passphrase is worth considering.
A good passphrase adds an extra layer of security - even if someone gets your private key file, they can't use it without knowing this phrase.
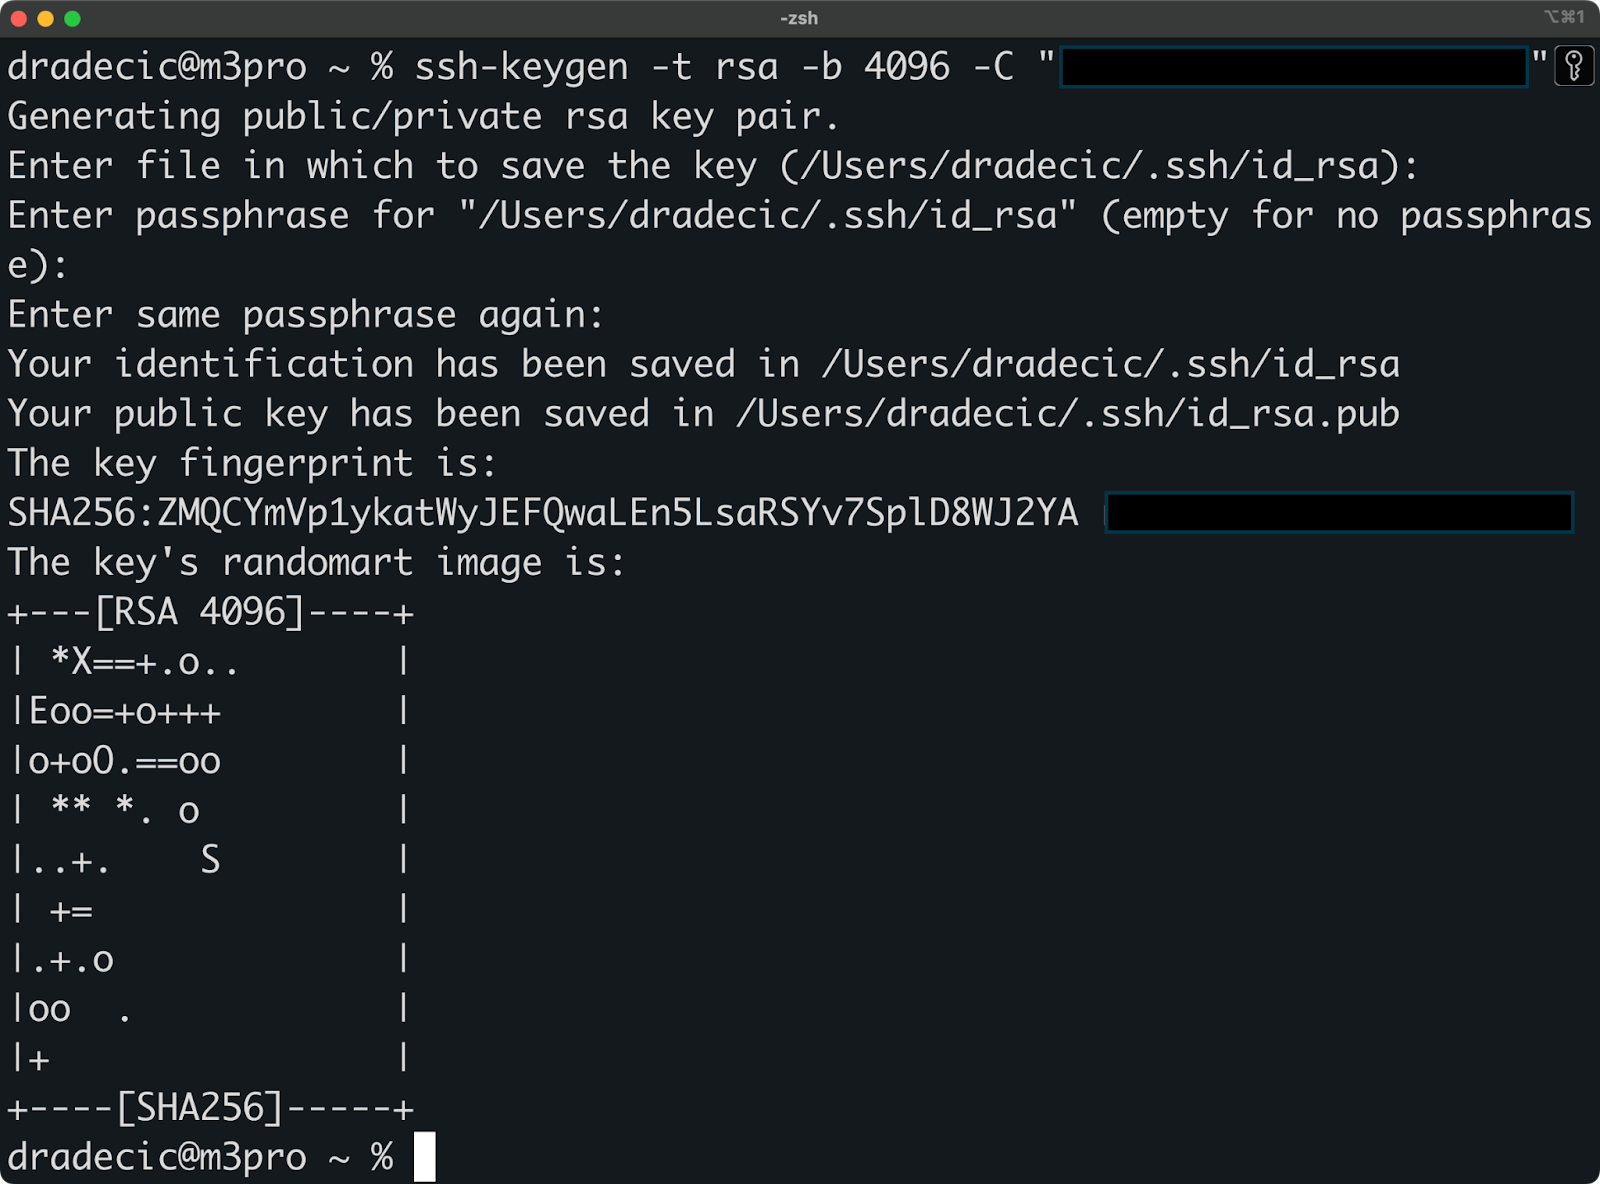
Image 1 - Creating SSH key pair on Linux/macOS
After confirming your choices, your system creates both keys in the .ssh directory of your home folder:
id_rsa)..pub extension (like id_rsa.pub).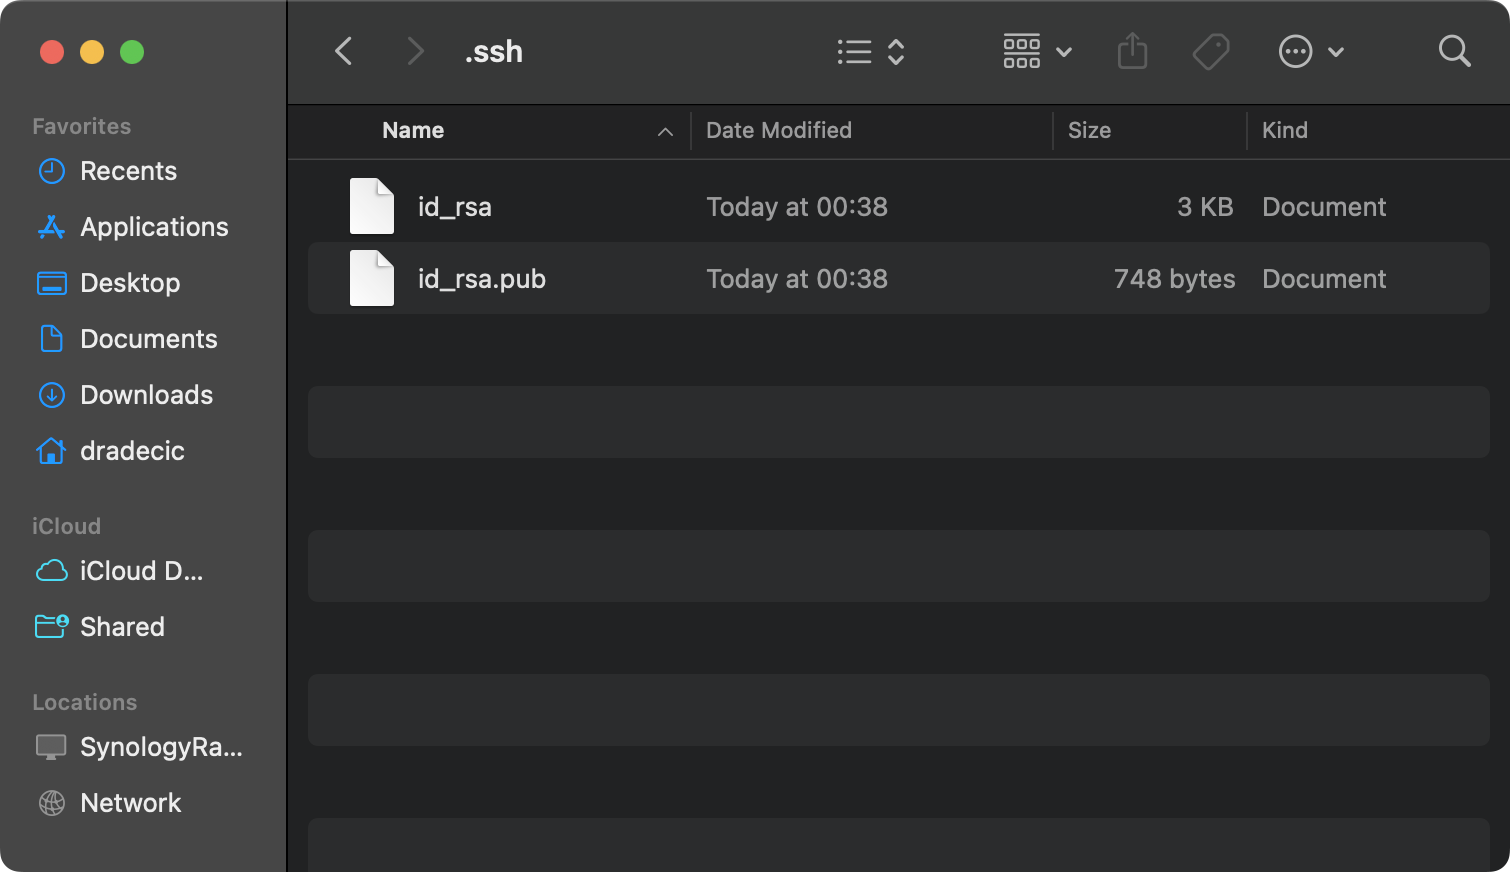
Image 2 - Created key files
Windows users have a couple of good options for creating SSH keys - Git Bash and WSL.
Git Bash provides a command-line experience similar to Linux/MacOS. If you've installed Git for Windows, you already have this tool. Open Git Bash and use the same ssh-keygen command shown above.
Windows Subsystem for Linux (WSL) is another good option if you prefer working in a Linux environment on your Windows machine. The commands work exactly the same as on a native Linux system.
For those who prefer a graphical interface, PuTTYgen offers a more visual approach.

Image 3 - PuTTYgen key generation on Windows
Here are the steps you should take to create your key pair:
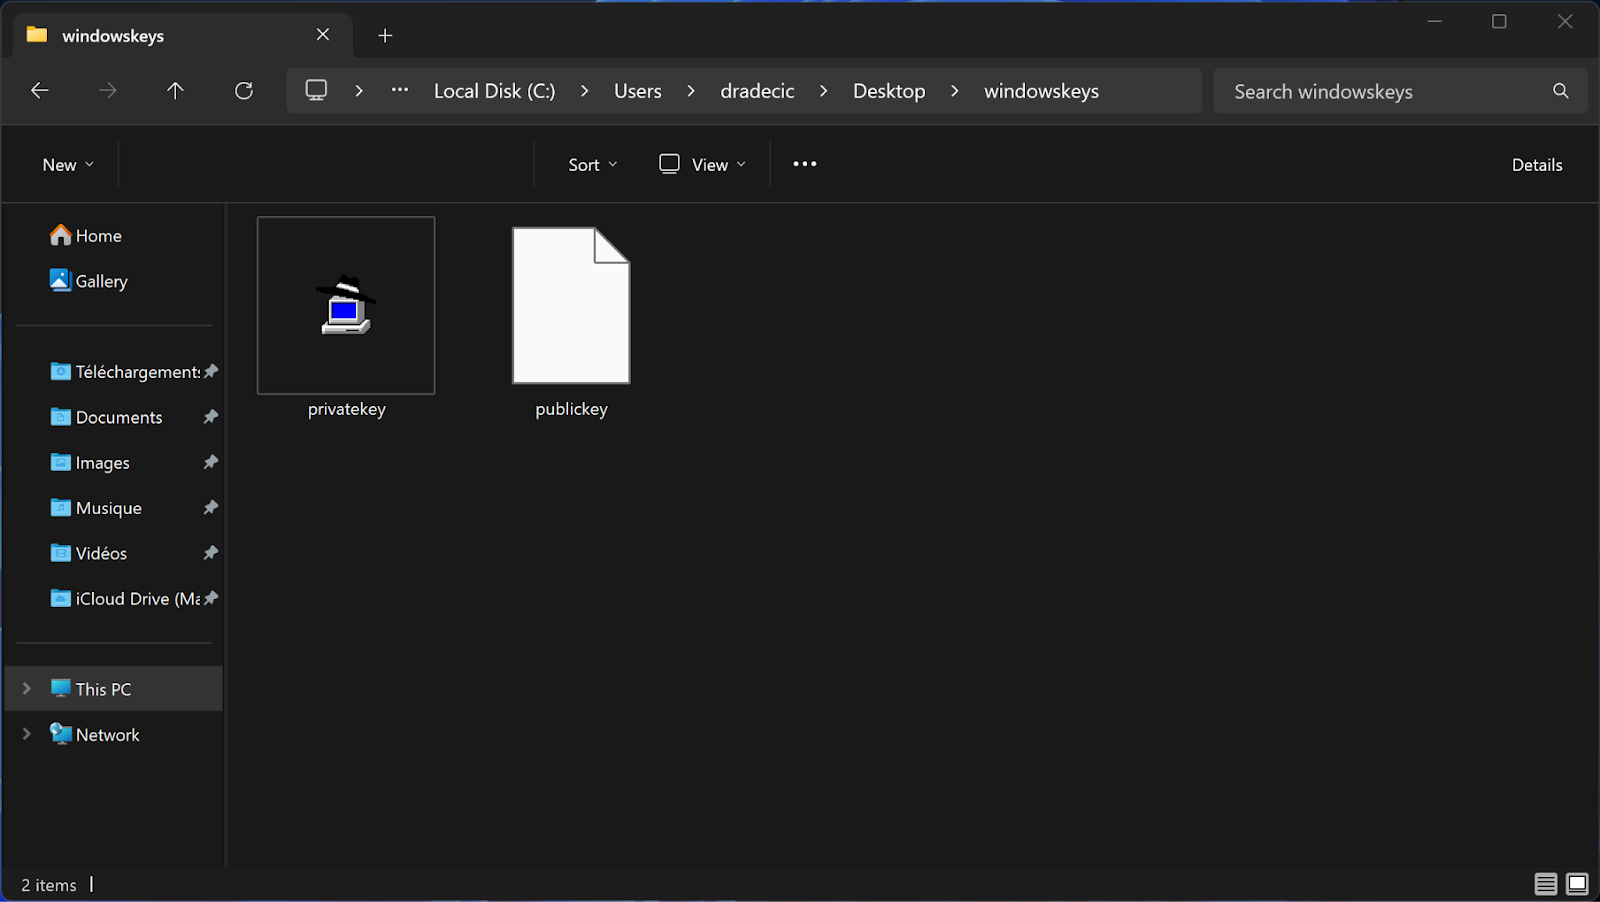
Image 4 - Created key files (2)
The SSH key generation process creates two files that work as a pair.
Your private key must remain secret and secure on your computer. Think of it as a master key that proves your identity. Private keys are typically named similarly to this:
id_ed25519 (for Ed25519 keys).id_rsa (for RSA keys).Your public key can be shared freely with any system you want to access. It works like a lock that only your private key can open. Public keys always have the same name as their corresponding private key, plus a .pub extension.
The security of this system relies entirely on keeping your private key protected.
Never share it, email it, or store it on untrusted devices. If you believe your private key has been compromised, generate a new pair immediately and update all servers that had your old public key.
You can view your public key content with:
cat ~/.ssh/id_rsa.pub
Image 5 - Public key contents
The output shows the complete string you'll need when configuring remote servers, which we will review in the next section.
Now that you've created your SSH key pair, you need to add your public key to each remote system you want to access. In plain English, this process tells the remote server to recognize your private key as a valid form of authentication.
There isn't much to this process; you just have to add your public key to a special file on the remote server. This file, called authorized_keys, contains a list of public keys that are allowed to connect.
The simplest way to add your key is with the ssh-copy-id command:
ssh-copy-id username@remote_hostThis command connects to the remote server, creates the necessary directories if they don't exist, and adds your public key to the authorized_keys file. You'll need to enter your password one last time during this process.
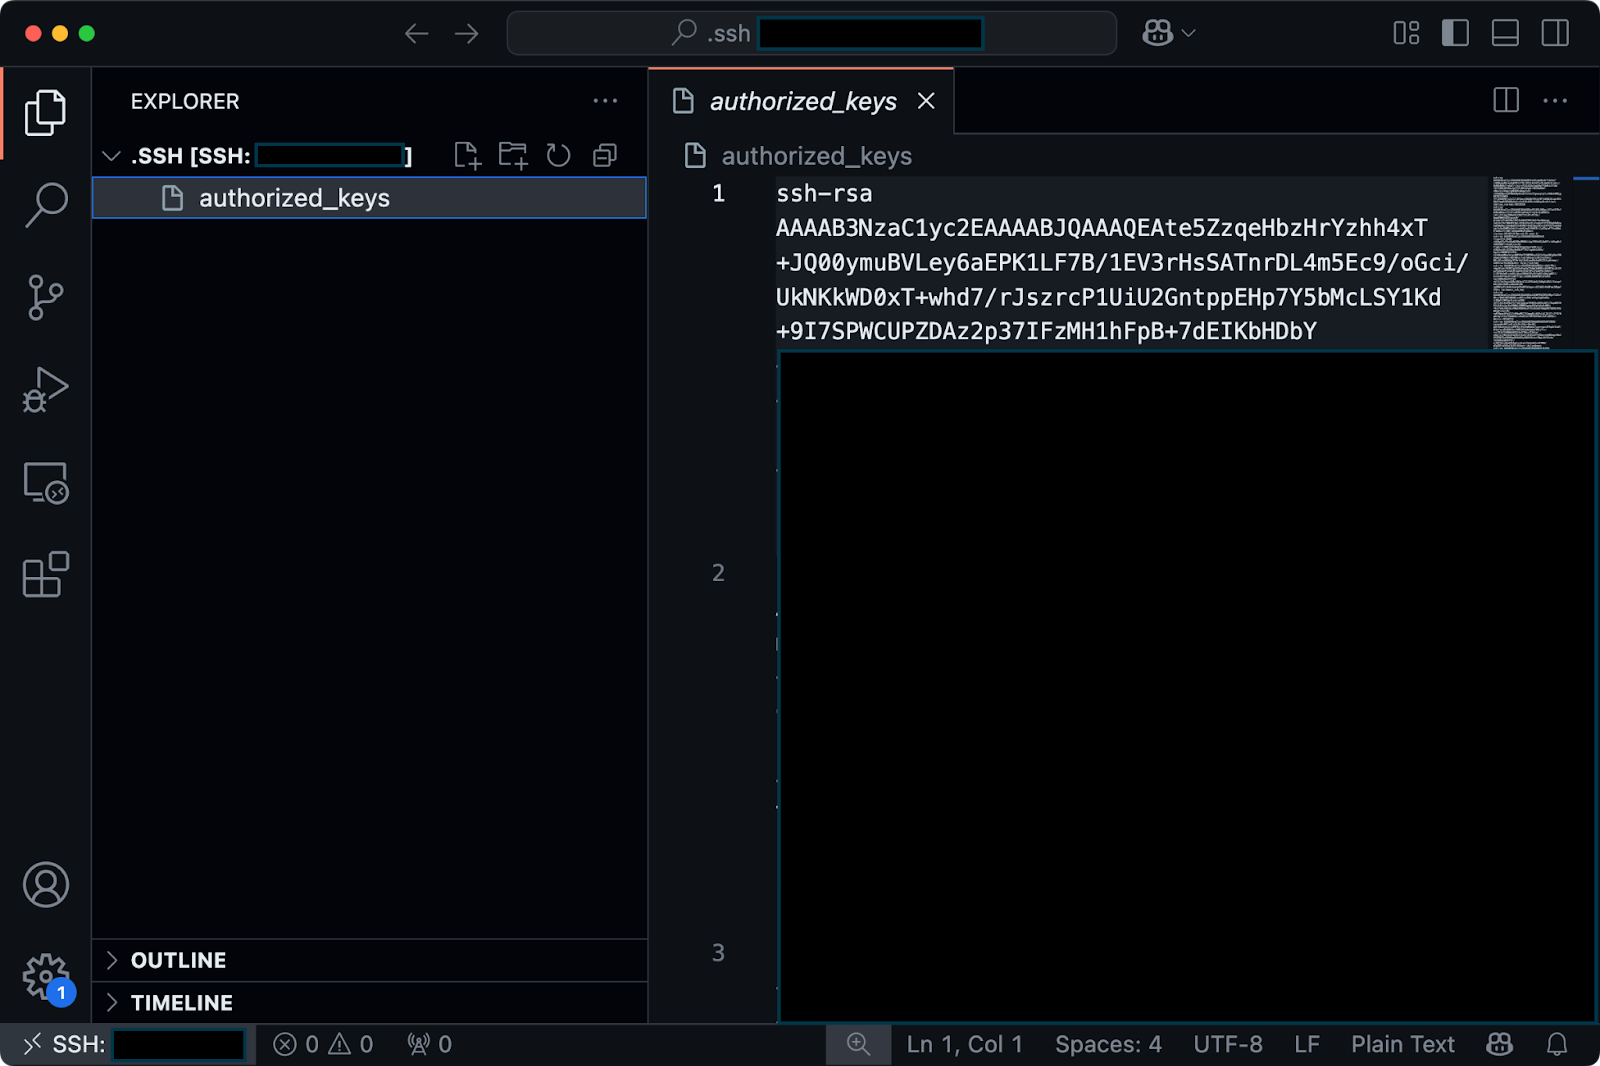
Image 6 - Contents of the authorized_keys file
If your system doesn't have the ssh-copy-id command, you can do the same task manually, but it involves a couple of steps.
Follow these instructions, and run the commands one by one:
# Display your public key and copy it
cat ~/.ssh/id_rsa.pub

# Connect to your remote server with password authentication
ssh username@remote_host

# Create the .ssh directory if it doesn't exist
mkdir -p ~/.ssh

# Open or create the authorized_keys file and paste your public key
echo "your_copied_public_key" >> ~/.ssh/authorized_keys
And that's it!
For servers where you need to provide your key to a system administrator, simply send them the contents of your public key file. They'll add it to the server for you.
After adding your public key, you may want to configure the SSH server to further enhance security. These steps require administrative (sudo) privileges.
To edit the SSH server configuration, open the main config file:
sudo nano /etc/ssh/sshd_config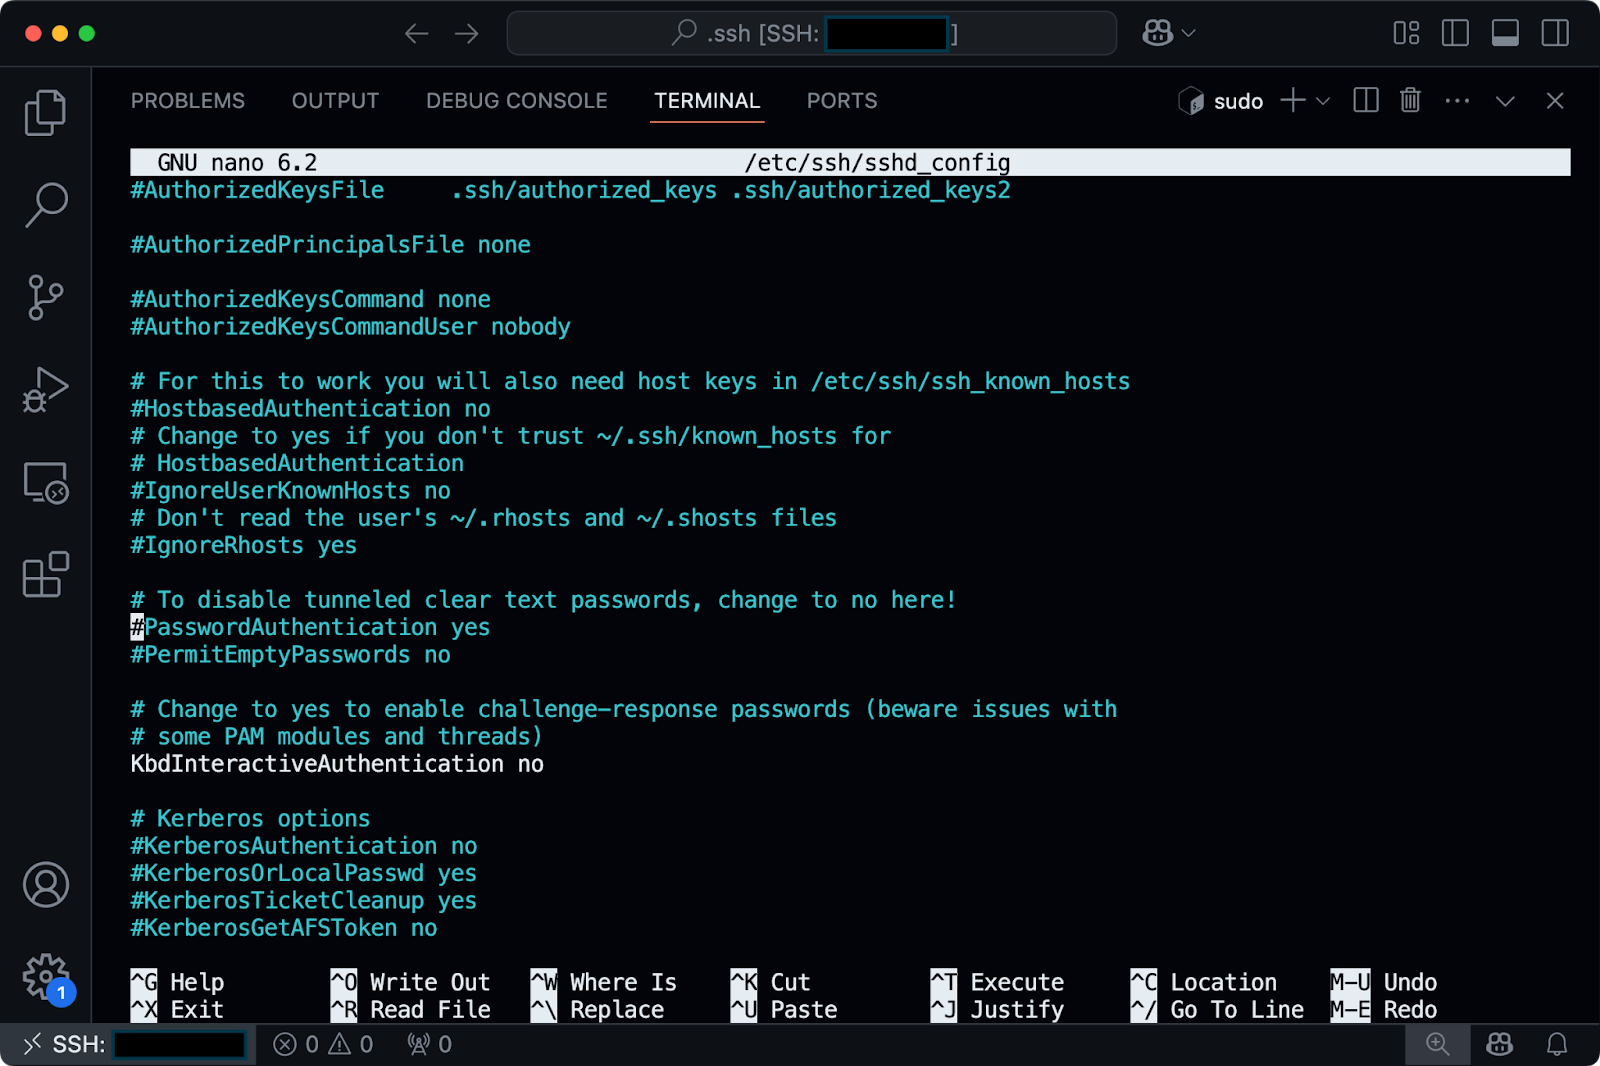
Image 7 - Contents of the sshd_config file
In this file, you can make a couple of security enhancements:
PasswordAuthentication no to disable password logins entirely.PubkeyAuthentication yes is set (it's usually enabled by default).PermitRootLogin prohibit-password to prevent root login with passwords.After making changes, just remember to restart the SSH service to apply them:
sudo systemctl restart sshdIt's also worth noting that the correct file permissions are crucial for SSH key authentication to work. The SSH server is very particular about security and will reject connections if permissions are too open. Make sure your files have these permissions:
chmod 755 ~..ssh directory: chmod 700 ~/.ssh.authorized_keys file: chmod 600 ~/.ssh/authorized_keys.With your public key in place and the server properly configured, you can now connect to remote servers without entering your password.
In the next section, I'll show you how to use your SSH keys for authentication.
You're now ready to enjoy the convenience and security of passwordless authentication. Let's examine how to connect to servers and code repositories using your SSH keys.
Connecting to a server with SSH keys works just like regular SSH access, but without the password prompt. Open your terminal and use the standard SSH command:
ssh username@hostnameIf you stored your key in the default location (~/.ssh/id_rsa), SSH automatically finds and uses it. If you set a passphrase when creating your key, you'll need to enter it, but only once per session.
For keys stored in non-standard locations, specify the path with the -i flag:
ssh -i ~/path/to/your/private_key username@hostname
Image 8 - Connecting to a remote server via SSH
Typing your passphrase each time you connect can become tedious. This is where the SSH agent comes in handy. They run in the background and securely hold your decrypted private keys in memory, so you only need to enter your passphrase once.
To start the SSH agent and add your key:
eval "$(ssh-agent -s)"
ssh-add ~/.ssh/id_rsa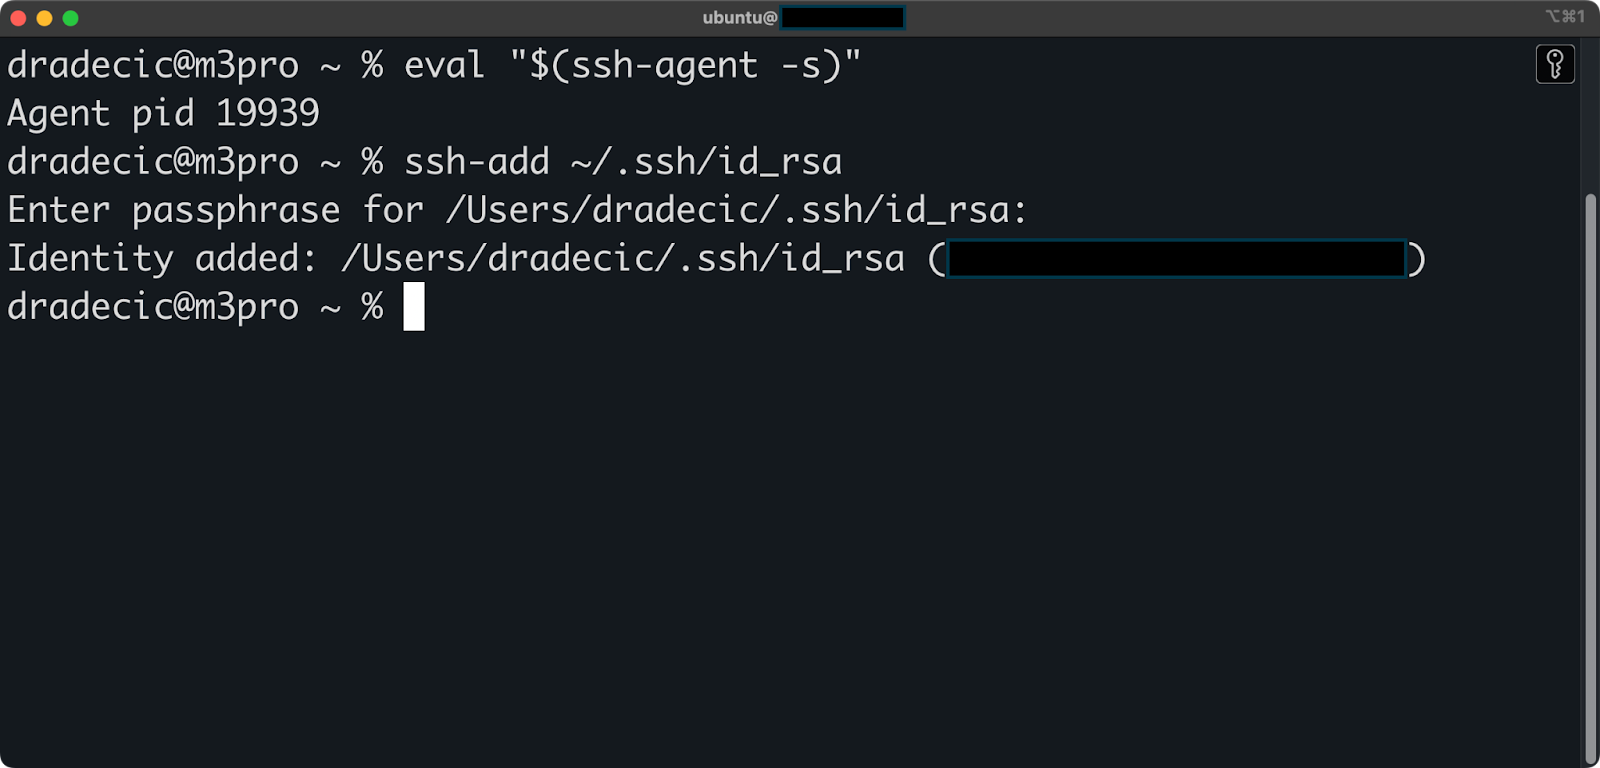
Image 9 - SSH agent
You'll enter your passphrase once, and the agent will handle authentication for all further connections during your session. This is useful when you need to connect to servers multiple times or when using applications that establish multiple SSH connections.
On macOS, the SSH agent starts automatically, and you can enable "remember passphrase in keychain" during the first connection to avoid re-entering it in future sessions. Unfortunately, this feature is only macOS-specific.
Services like GitHub and GitLab also support SSH key authentication, and they recommend it over password-based authentication.
To add your SSH key to GitHub, start by opening GitHub and signing in to your account. Then, click your profile picture in the top right corner and select "Settings". In the sidebar, click "SSH and GPG keys":
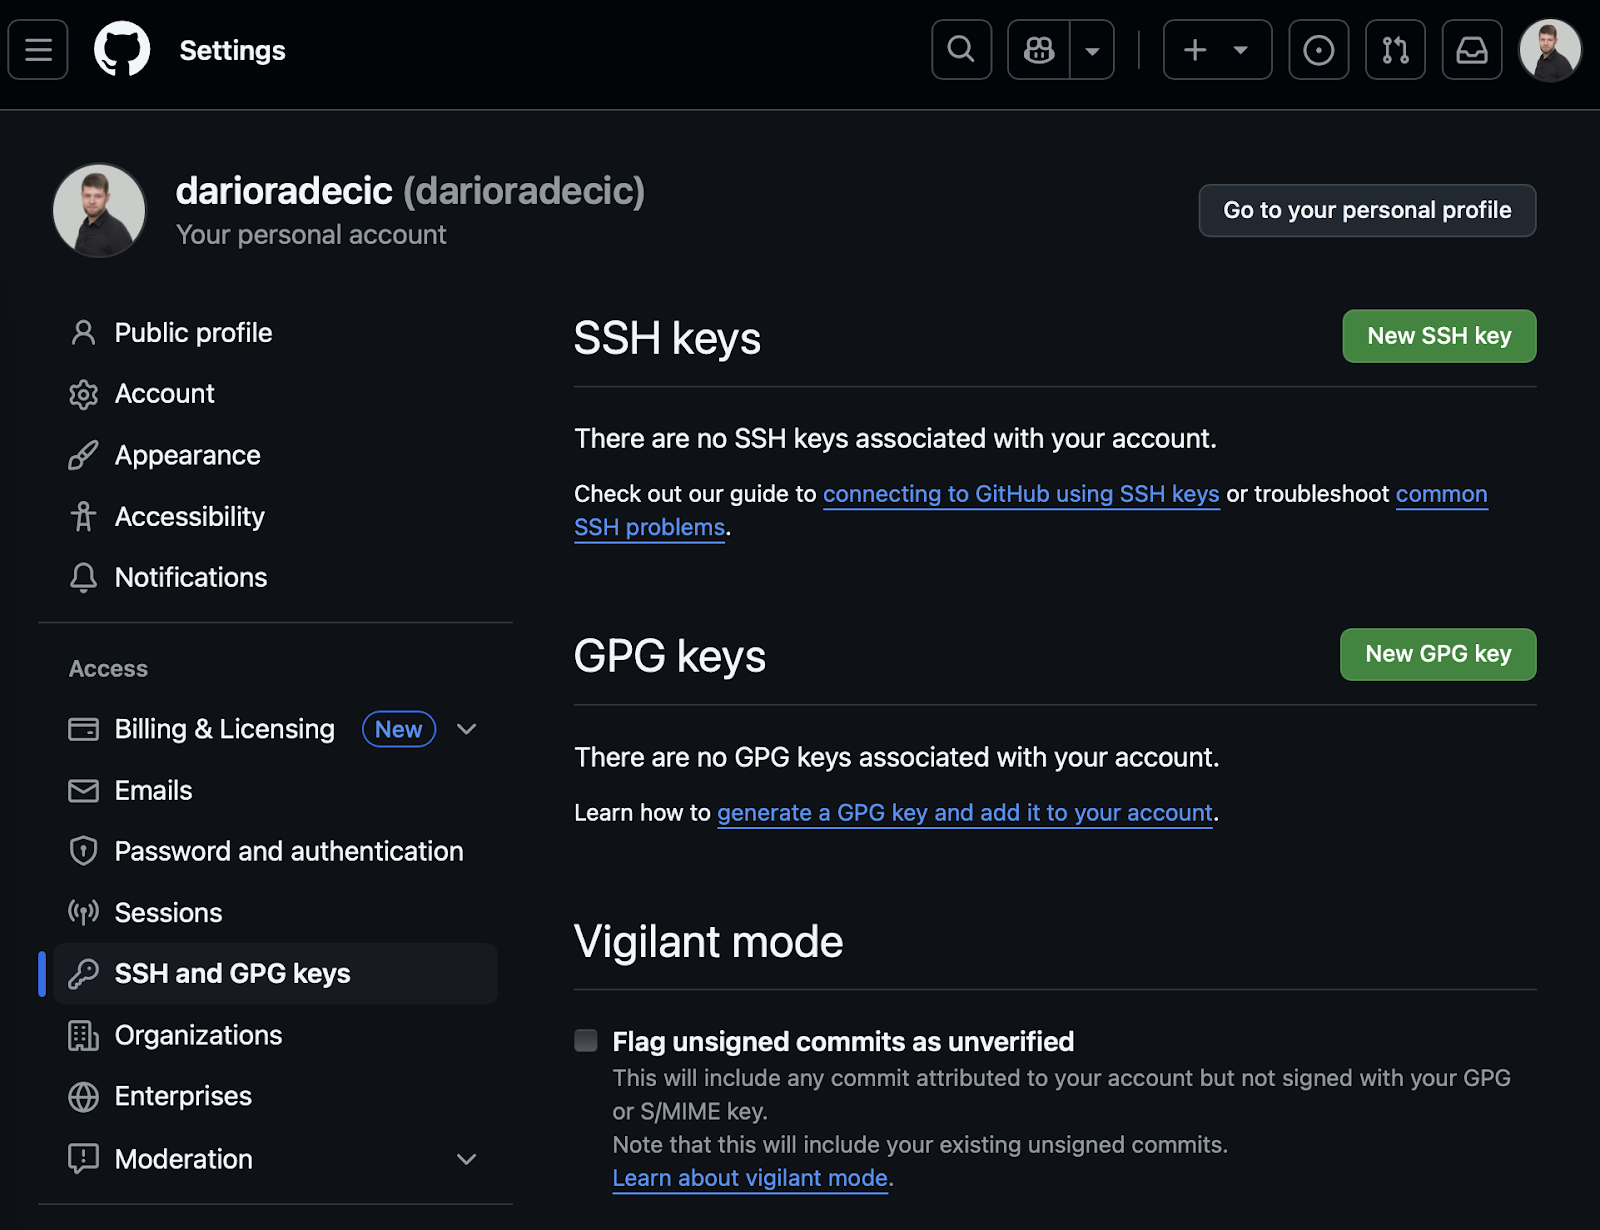
Image 10 - GitHub authentication setup (1)
Click "New SSH key", give your key a descriptive title, paste your public key into the "Key" field, and finally, click "Add SSH key":
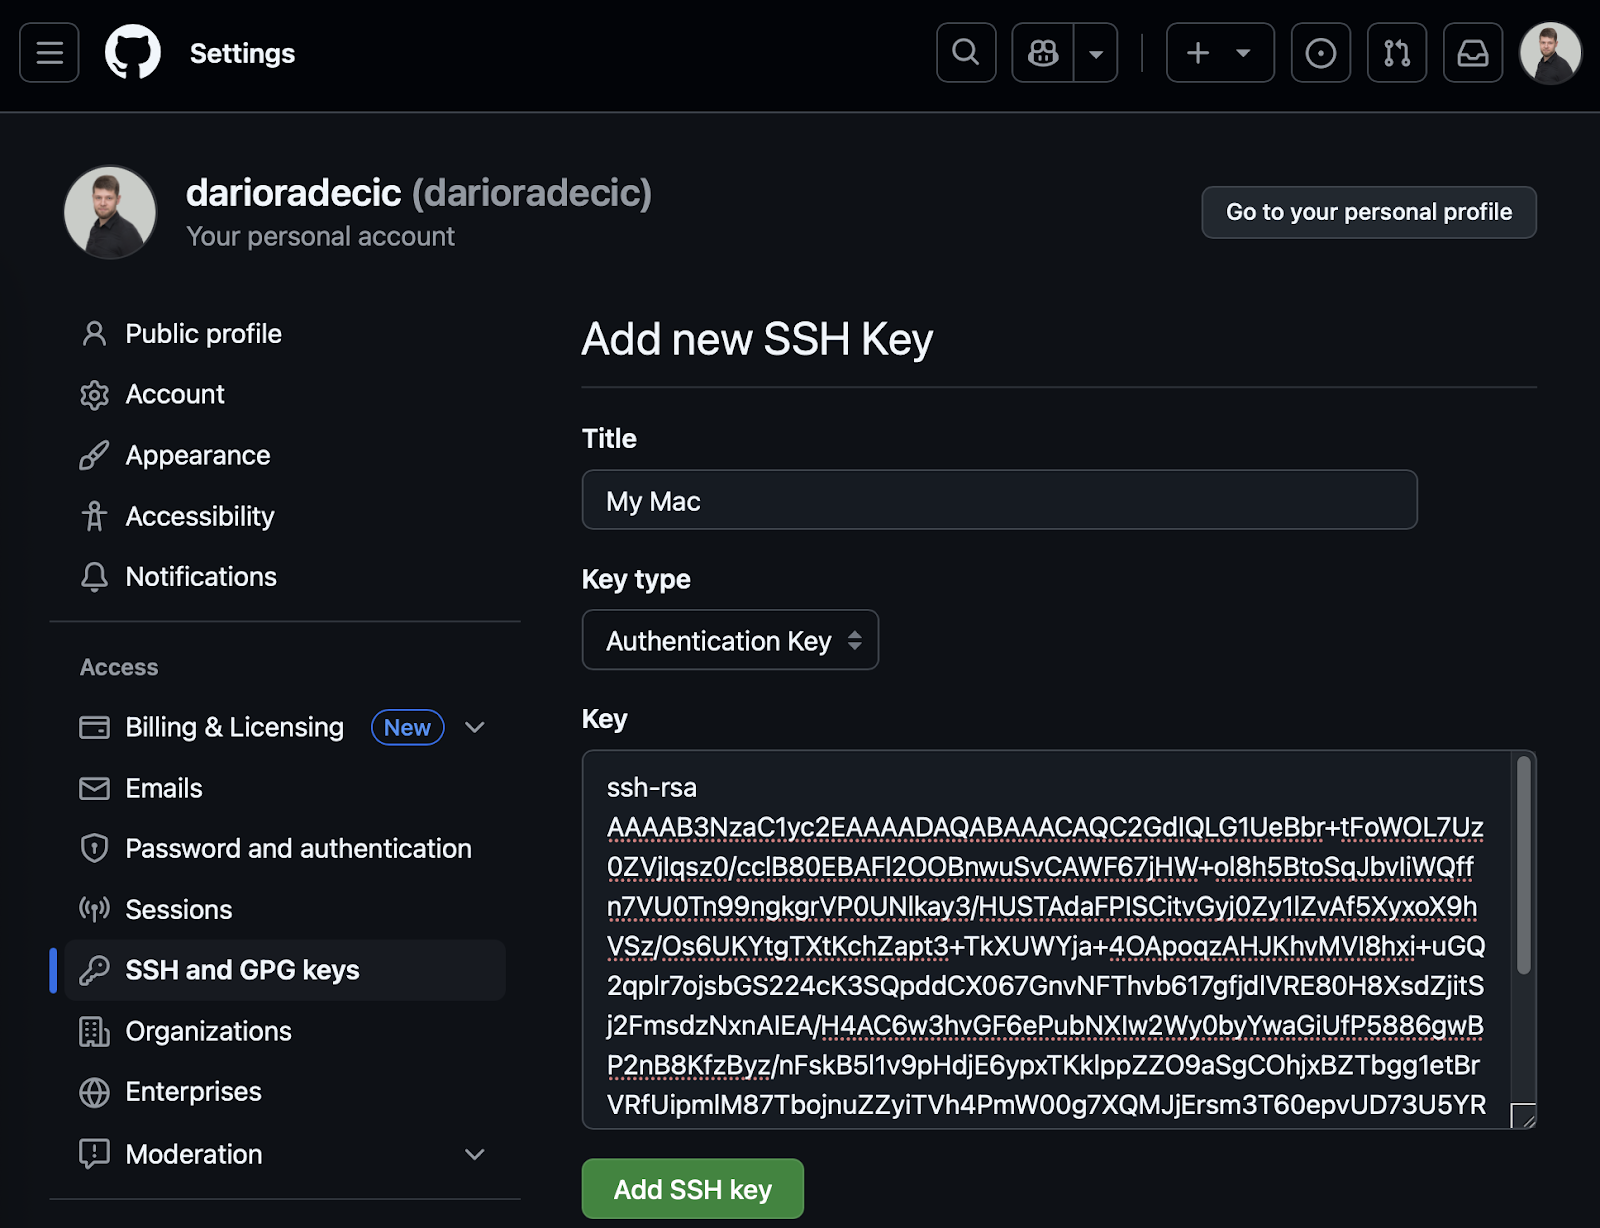
Image 11 - GitHub authentication setup (2)
When everything is done, you'll see a success message informing you that the key was added to your account:
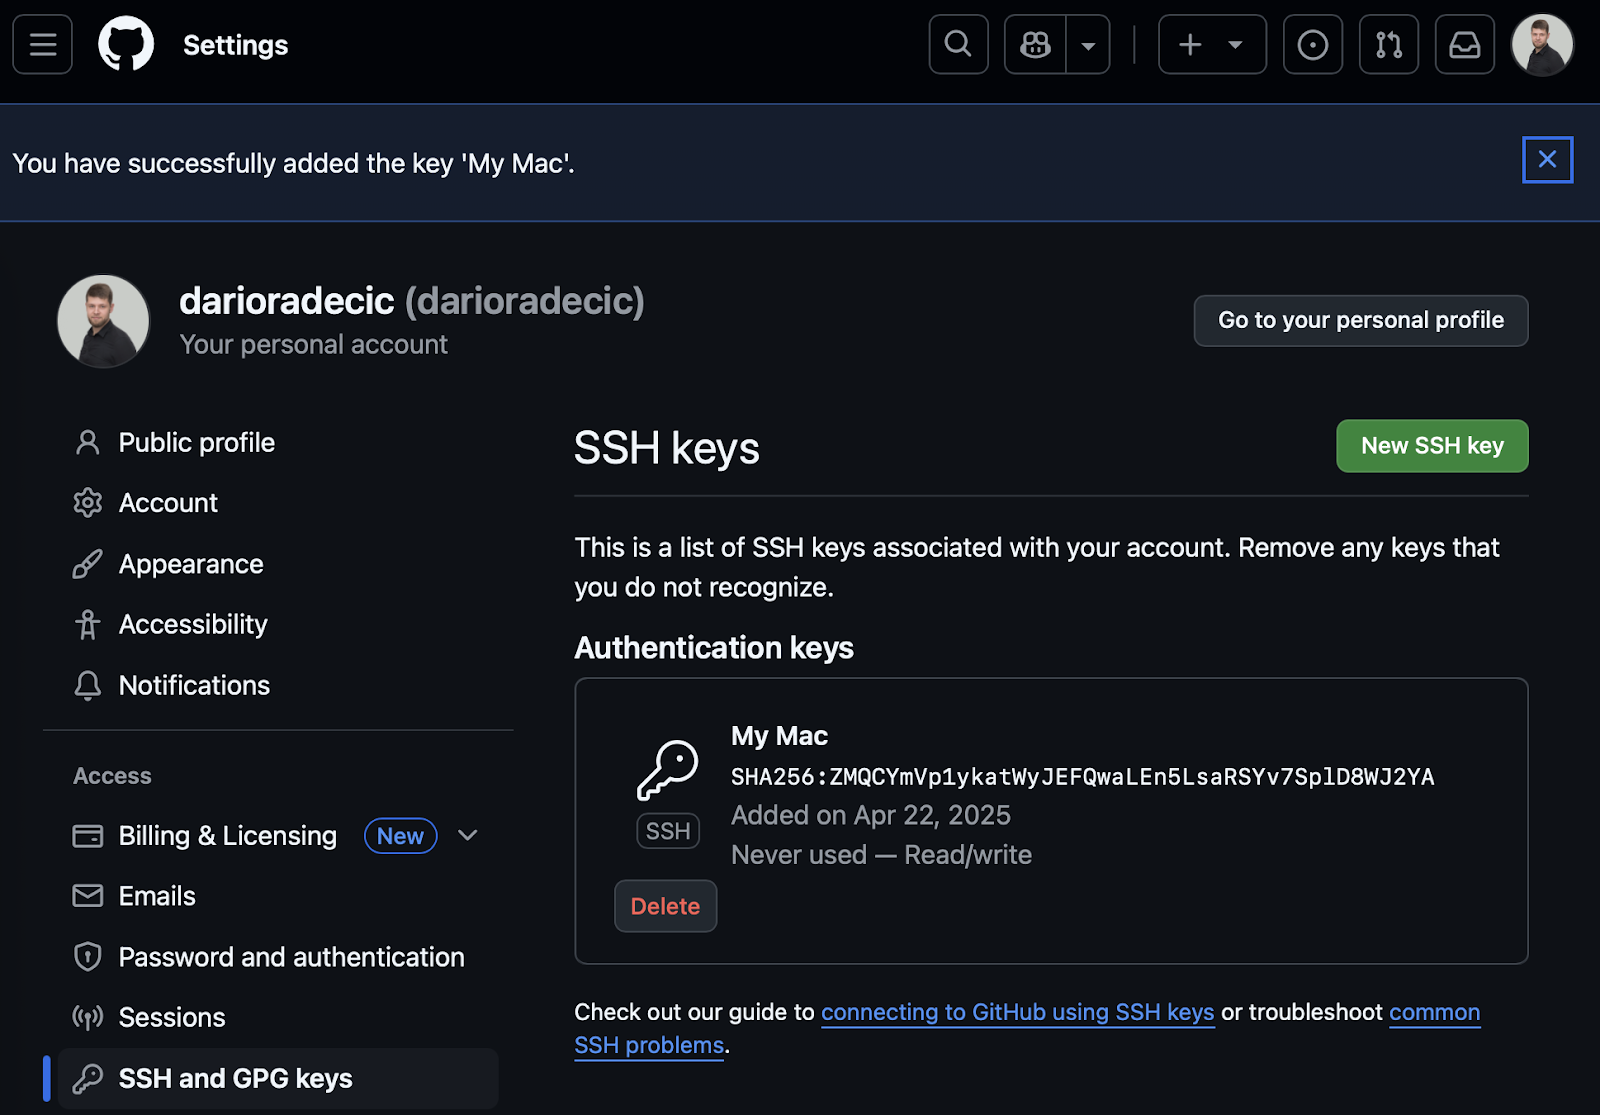
Image 12 - GitHub authentication setup (3)
After adding your key, you can clone, pull, and push to repositories using SSH URLs instead of HTTPS URLs. This is the command you'll use:
git clone [email protected]:username/repository.git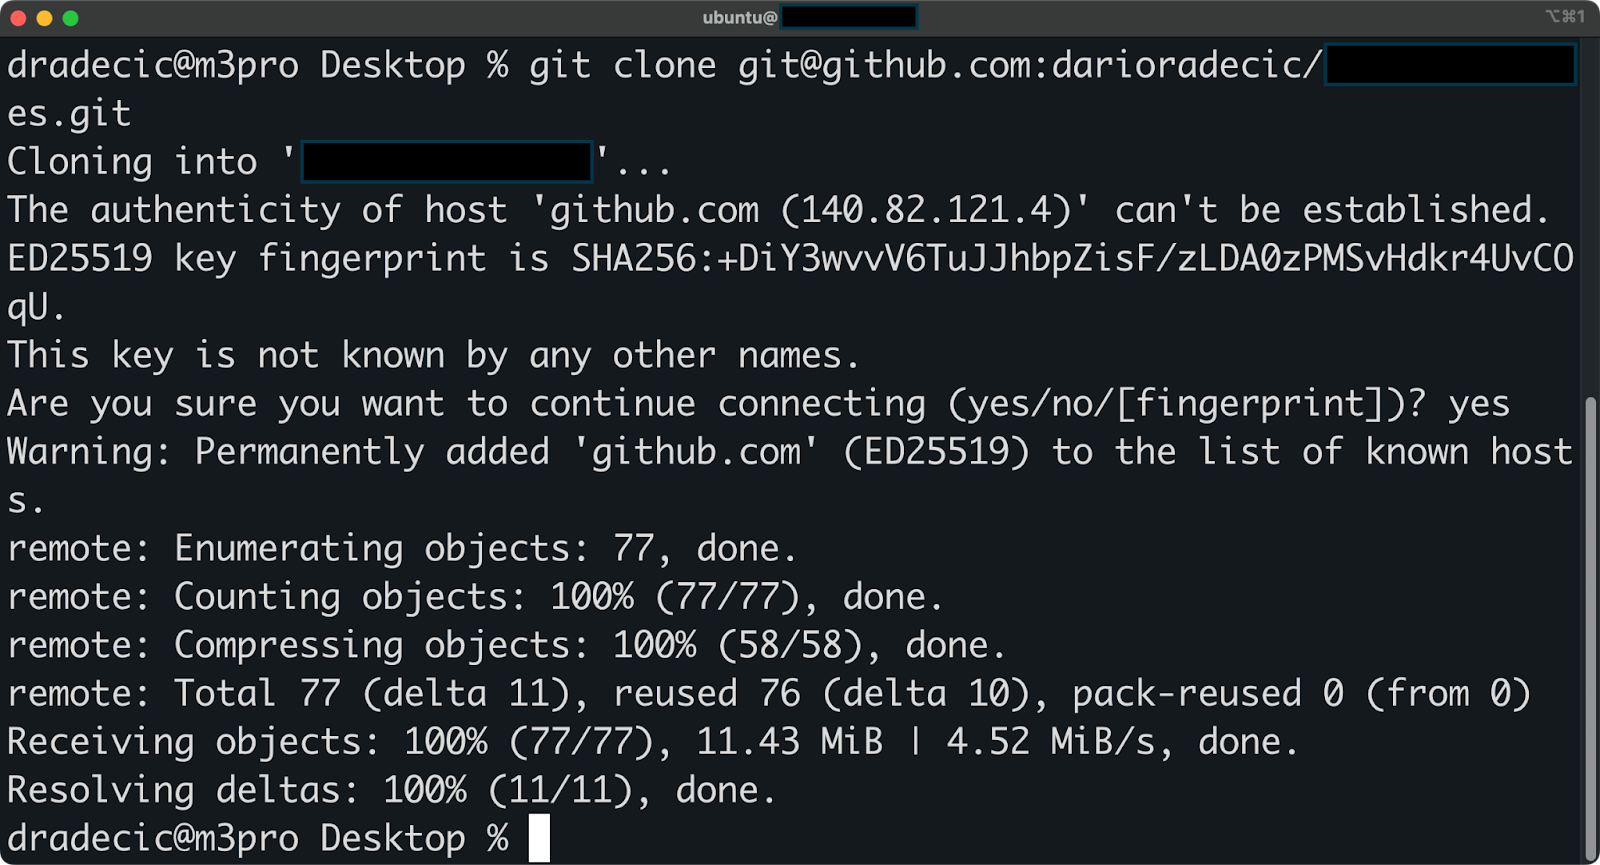
Image 13 - Cloning a repo over SSH
That's all there is to it. The process for GitLab is very similar—just look for SSH Keys in your account settings.
To recap, using SSH for Git operations means you won't need to enter your username and password each time you interact with the remote repository. Your SSH key provides secure authentication automatically.
If you work with multiple services (like both GitHub and GitLab), you might consider creating separate keys for each service. This approach improves security by limiting exposure if one key is compromised.
> To dive deeper into managing repositories, check out Intermediate GitHub Concepts.
As you use SSH keys across multiple systems and services, sooner or later you'll need a way to manage them.
In this section, I'll show you what goes into keeping track of existing keys, removing old or compromised keys, and troubleshooting any potential issues.
You can view all your SSH keys by checking the .ssh directory in your home folder. This directory contains both your private keys and their corresponding public keys.
Run the following command to list all files in your SSH directory:
ls -la ~/.ssh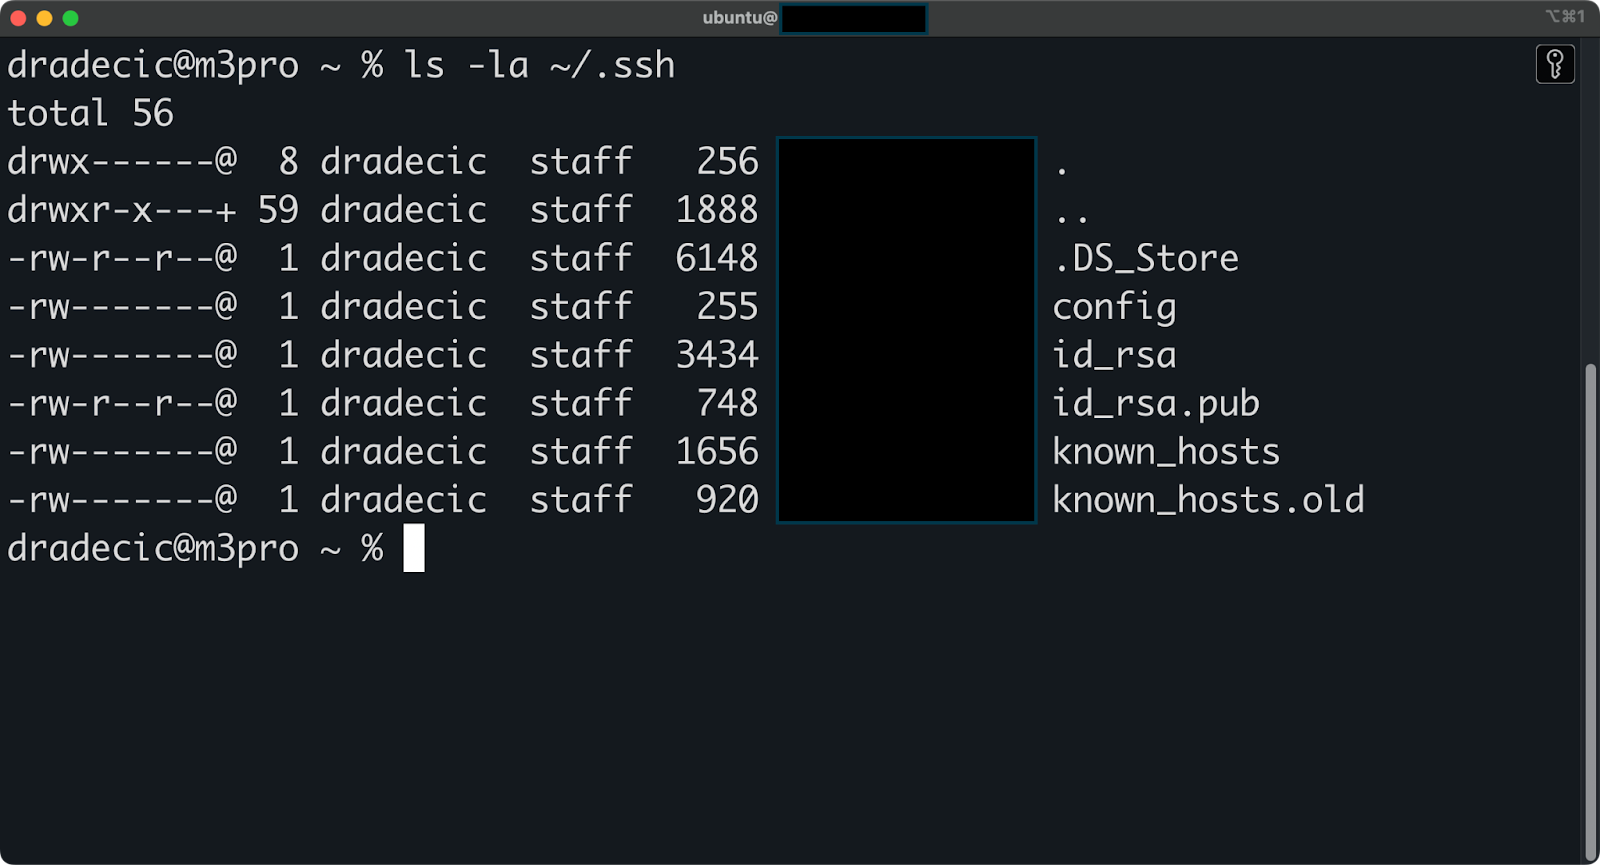
Image 14 - All files in the .ssh directory
This command shows all files in the directory, including hidden ones. You'll typically see files like:
id_rsa - Your private RSA key.id_rsa.pub - Your public RSA key.known_hosts - A list of servers you've connected to.authorized_keys - Public keys that can access this machine (if it's set up as a server).config - Your SSH client configuration (if you've created one).If you've created multiple keys for different services, you'll see additional key pairs with names you specified during creation.
To check what a specific public key contains, run the following command:
cat ~/.ssh/id_rsa.pub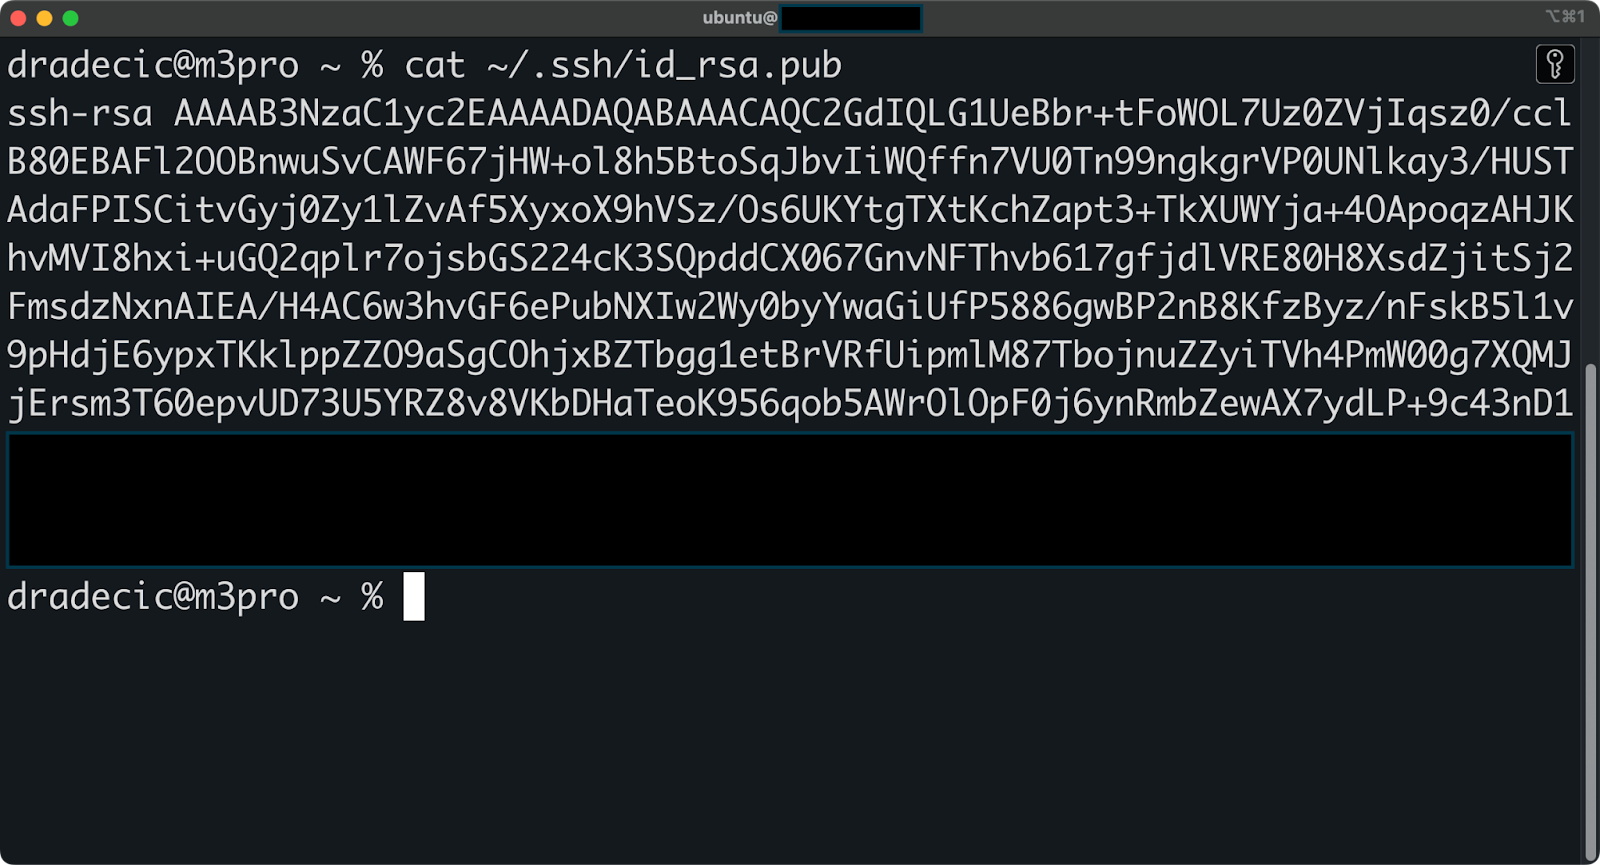
Image 15 - Public key contents
This displays the full public key, which starts with ssh-rsa and ends with your comment (usually your email address).
Over time, you may need to remove SSH keys for different reasons - maybe you're updating to a stronger key type, a device was lost, or you no longer need access to certain systems.
To remove keys from a remote server, you'll need to edit the authorized_keys file:
# Connect to the remote server
ssh username@remote_host

#  Open the authorized_keys file:
nano ~/.ssh/authorized_keys
For GitHub and GitLab, removing keys is even simpler:
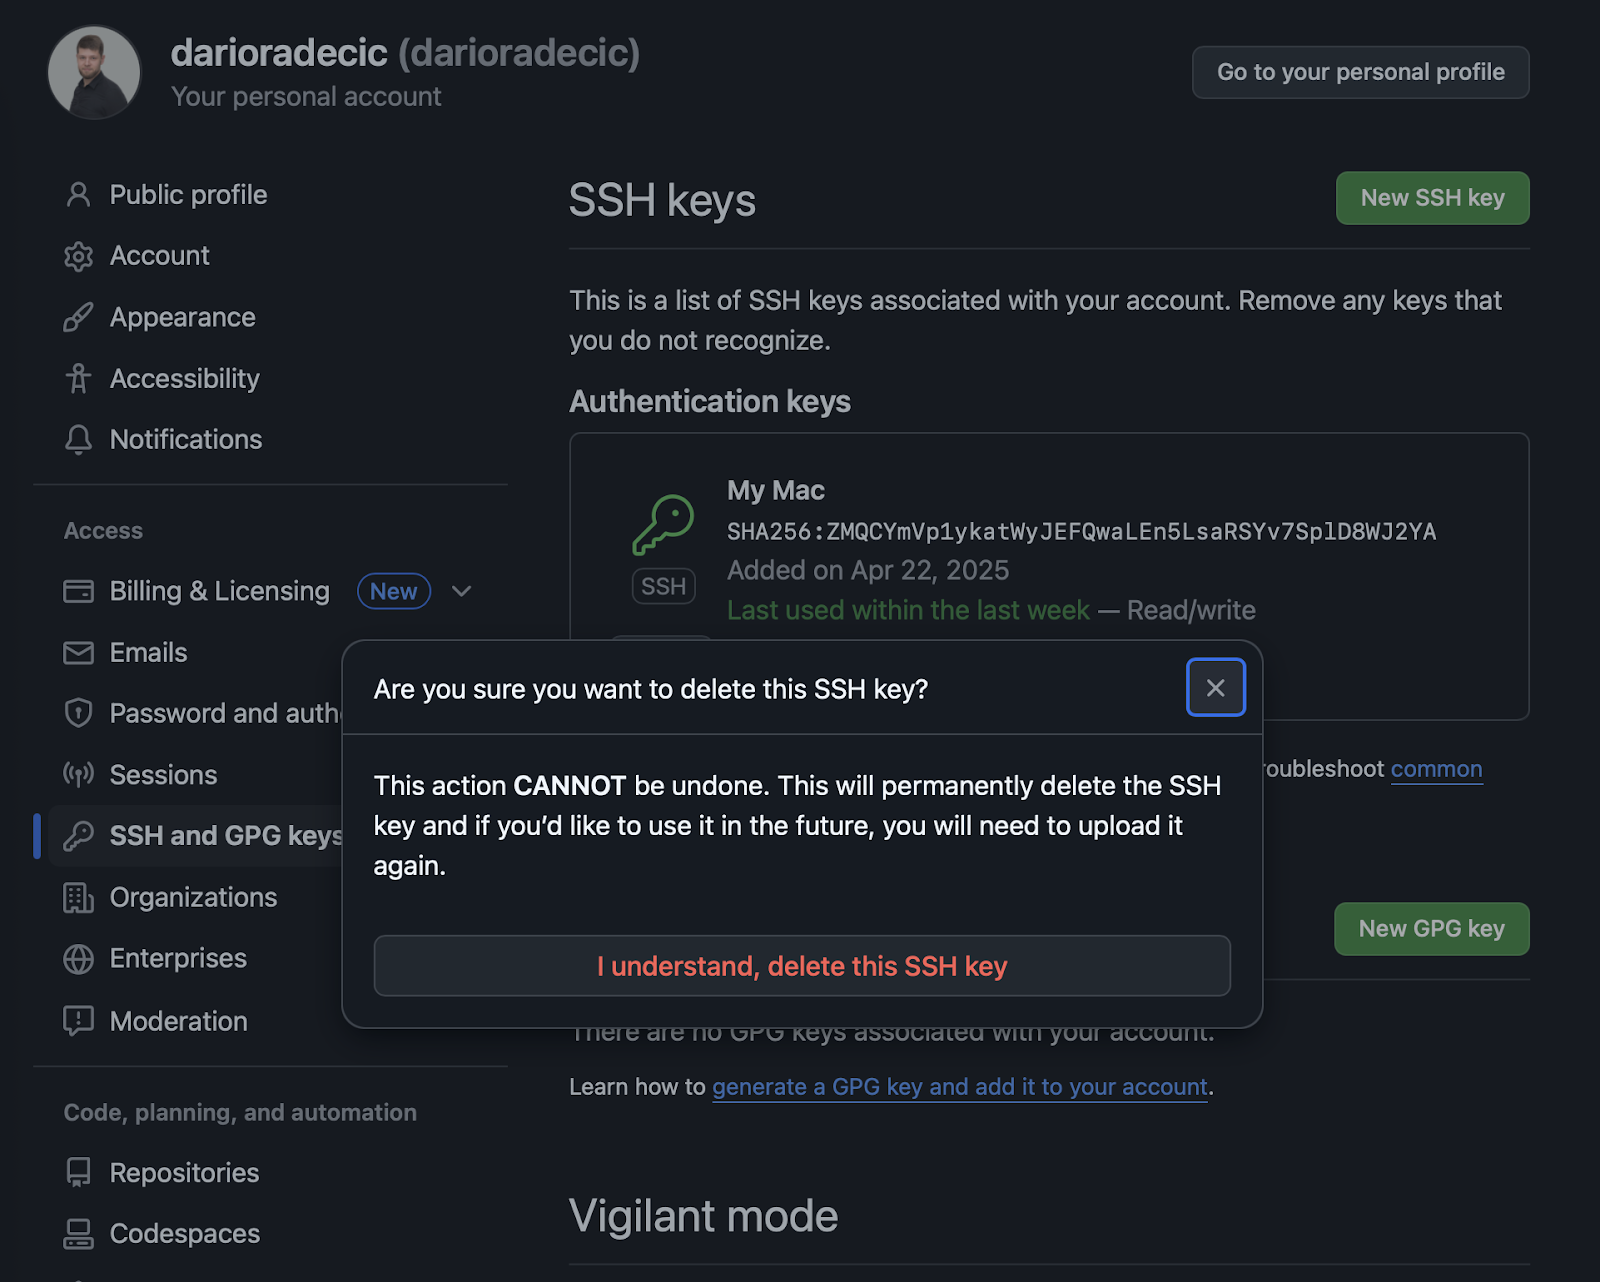
Image 16 - Confirming key deletion on GitHub
And finally, to remove keys from your local machine, simply delete the files:
rm ~/.ssh/id_rsa ~/.ssh/id_rsa.pubReplace id_rsa with the name of the key you want to remove.
If you need to remove a remote host from your known_hosts file (usually after a server has been reconfigured), run this command:
ssh-keygen -R hostnameThis removes the specified host's entry from your known_hosts file, which comes in handy when you get the "host key verification failed" error.
SSH key authentication can sometimes fail for all kinds of reasons. In this section, I'll show you solutions to common problems.
chmod 700 ~/.ssh
chmod 600 ~/.ssh/id_rsa
chmod 644 ~/.ssh/id_rsa.pub
chmod 600 ~/.ssh/authorized_keysauthorized_keys file.ssh-add -l.eval "$(ssh-agent -s)".ssh-add ~/.ssh/id_rsa.Up next, let's explore some best practices for SSH key management.
SSH authentication is great for keeping your systems safe from unwanted access, but let's be honest - it can be a bit of a hassle sometimes. The tips I'm about to cover are all about finding that sweet spot between strong security and everyday convenience.
Your private key's passphrase acts as the last line of defense if someone obtains your key file. Always choose a strong and unique passphrase that's difficult to guess but easy for you to remember.
A good passphrase has these characteristics:
For keys that access critical systems or production environments, a strong passphrase is absolutely essential. The minor inconvenience of typing it occasionally far outweighs the security risks.
When you use the SSH agent, you only need to enter your passphrase once per session. This makes strong passphrases practical for daily use. Consider using a password manager to securely store complex passphrases.
You should always create separate key pairs for different services or security levels instead of using a single key everywhere. This compartmentalization limits your exposure if one key becomes compromised.
For example, you might create:
Again, a slight inconvenience, but well worth the extra effort.
When creating multiple keys, use descriptive filenames that identify their purpose:
ssh-keygen -t rsa -b 4096 -f ~/.ssh/github_rsa -C "github access"To use a specific key when connecting, you can conveniently set up a configuration file:
# ~/.ssh/config
Host github.com
    IdentityFile ~/.ssh/github_rsa

Host companyserver
    HostName 255.255.255.255
    User ubuntu
    IdentityFile ~/.ssh/company_server_rsa
This approach guarantees that if one key is compromised, you only need to replace that single key rather than updating all your systems.
Periodically replacing your SSH keys reduces the risk of undetected compromises and follows security best practices.
How often you should do it depends on the sensitivity:
The process of rotating SSH keys involves creating new key pairs, adding the new public keys to your servers, verifying the new keys work, removing the old public keys from servers, and deleting the old private keys from your local machine.
In other words, it takes some time, so plan for it in your schedule.
Also, it's a good practice to maintain a record of which keys have access to which systems. For organizations, consider implementing automated key management tools that systematically handle rotation.
The strongest security measure you can implement is to completely disable password authentication on your servers and require SSH keys for all connections.
Follow these steps to enforce key-based authentication:
# Edit your SSH server configuration
sudo nano /etc/ssh/sshd_config

# Set these critical security options
PasswordAuthentication no
ChallengeResponseAuthentication no
UsePAM no

# Restart the SSH service
sudo systemctl restart sshd
This configuration entirely prevents brute force password attacks.
But before making these changes, make sure your SSH key authentication works properly to avoid locking yourself out. It happens.
To conclude, it's safe to say SSH keys transform the way you connect to remote systems. Switching from passwords to key-based authentication improves your daily workflow with both security and convenience.
Another benefit is that there isn't much to the process. You need to generate the keys, add them to the servers you access, and connect without typing passwords. That's it! When compared to traditional password-based authentication, SSH keys make your connections faster and more reliable, and also block common attack methods like password guessing.
Remember that your private key requires protection. Use a strong passphrase, keep your key secure, and follow the best practices outlined in this article, especially those regarding compartmentalizing SSH keys.
If you want to learn more about SSH keys and working with the command line in general, these courses from DataCamp are your best next stop:
Learn about data engineering and security with these courses!
Course
Course
Course
Tutorial
Mark Pedigo
Tutorial
Joleen Bothma
Tutorial
Joleen Bothma
Tutorial
Olivia Smith
Tutorial
Vikash Singh
Tutorial
Don Kaluarachchi