
Course
Developing LLM Applications with LangChain
3 hr
46.2K
vLLM (Virtual Large Language Model) is a library designed to host large language models (LLMs). It offers an optimized environment for handling large-scale language processing tasks.
There are several reasons why we might want to host our own LLM. Hosting a model locally or on a cloud platform gives us control over data privacy, potential customization of the model to better suit our specific needs, and it can be cheaper depending on the application.
Additionally, vLLM is compatible with the OpenAI API. This compatibility means that if we have existing code that interfaces with OpenAI's infrastructure, we can replace it with our own hosted LLM using vLLM without having to modify the existing codebase.
In this article, I’ll guide you through the steps to set up vLLM. We'll begin by demonstrating how to run it on our computer using Docker, a popular tool for containerization that simplifies the process of running applications consistently across environments. Then, we'll learn how to deploy vLLM on Google Cloud, providing a scalable solution for hosting these models and ensuring they are ready to handle larger tasks or higher traffic volumes.
vLLM simplifies running LLMs with an efficient setup optimized for a CUDA platform, which typically means using NVIDIA GPUs for acceleration. However, if we aim to run the model on a CPU instead, we can use the Docker image that vLLM provides specifically for CPU usage. This flexibility allows us to host models even if we don't have access to a CUDA-enabled environment. To host vLLM on a CUDA platform, refer to their quickstart guide.
Since most of us don't have access to high-end GPUs, we will focus on setting up vLLM to run on a CPU. This ensures that we can still experiment with LLMs using the resources we have.
To simplify the process, we will use Docker, which is a popular tool that allows us to package applications and their dependencies into containers. Think of a container as a lightweight, portable unit that includes everything needed to run a specific piece of software. By using Docker, we don't need to worry about manually installing vLLM or dealing with potential compatibility issues on our system.
vLLM offers a ready-to-use Docker image designed specifically for CPU execution. This image contains all the necessary components to run vLLM, allowing us to focus on using the model rather than the complexities of setting it up. This means we can start running our LLMs quickly and efficiently on a CPU.
First, we need to build a Docker image that will allow us to run vLLM on our computer. The vLLM repository provides Dockerfiles with all necessary instructions to build an image that can run vLLM on a CPU.
Dockerfile.cpu for regular CPUs.Dockerfile.arm for ARM CPUs like the ones in modern Macs.Since I have a Mac with an M2 processor, I'll be using the .arm file. To build the image, we first clone or download the repository and then run this command from inside it:
docker build -f Dockerfile.arm -t vllm-cpu --shm-size=4g .Here’s a quick breakdown of what this command does:
docker build: This command creates a Docker image from a Dockerfile.-f Dockerfile.arm: Specifies the Dockerfile to use.-t vllm-cpu: Tags the image as vllm-cpu for easy reference (could've been another name).--shm-size=4g: Allocates 4 gigabytes of shared memory, which helps improve performance.vLLM uses Hugging Face, a platform that facilitates the management of models, to streamline the process of model hosting. Here’s how we can get started:
meta-llama/Llama-3.2-1B-Instruct, as it's a smaller model suitable for initial testing. On the model's page, there may be an option to request access. Follow any instructions provided to gain access.With our Docker image built and Hugging Face token ready, we can now run the vLLM model using the following command:
docker run -it --rm -p 8000:8000 \
--env "HUGGING_FACE_HUB_TOKEN=<replace_with_hf_token>" \
vllm-cpu --model meta-llama/Llama-3.2-1B-Instruct \
--dtype float16
Let's unpack this command:
docker run: This command runs a container based on the specified Docker image.-it: Runs the container interactively with terminal access.--rm: Automatically removes the container when it’s stopped.-p 8000:8000: Maps port 8000 of the container to port 8000 on our machine, making the service available locally.--env "HUGGING_FACE_HUB_TOKEN=<replace_with_hf_token>": Sets the Hugging Face token as an environment variable, allowing vLLM to connect to the Hugging Face API. Replace <replace_with_hf_token> with the actual token we created.vllm-cpu: Specifies the name of the Docker image we built earlier.--model meta-llama/Llama-3.2-1B-Instruct: Indicates which model to run.--dtype float16: Use the float16 data type because the model requires it when running on CPU.When we run this command, the server will take a while to be ready since it needs to download the LLM. It will be ready when we see something like this in the terminal:
INFO:     Started server process [1]
INFO:     Waiting for application startup.
INFO:     Application startup complete.
INFO: Uvicorn running on http://0.0.0.0:8000 (Press CTRL+C to quit)One of the great features of vLLM is its compatibility with the OpenAI API. This means that if we have existing code designed to interact with OpenAI's infrastructure, we can easily use that same code to communicate with a model hosted via vLLM.
This compatibility allows for a smooth transition without modifying our existing codebase. So, when we set up vLLM, it becomes straightforward to continue using our familiar tools and commands to interact with the LLM, making the integration process efficient and user-friendly.
Here's an example of how to send a message to our local server running on Docker:
from openai import OpenAI
openai_api_key = "EMPTY"
openai_api_base = "http://localhost:8000/v1"
client = OpenAI(
    api_key=openai_api_key,
    base_url=openai_api_base,
)
models = client.models.list()
model = models.data[0].id
completion = client.chat.completions.create(
    model=model,
    messages=[
        {"role": "system", "content": "You are a helpful assistant."},
        {"role": "user", "content": "Hello"},
    ]
)
print(completion.choices[0].message.content)
Note that we used the "EMPTY" API key above. This is the default key. We could require a key to access the model by specifying it with the --api-key parameter. For example:
docker run -it --rm -p 8000:8000 \
--env "HUGGING_FACE_HUB_TOKEN=<replace_with_hf_token>" \
vllm-cpu --model meta-llama/Llama-3.2-1B-Instruct \
--dtype float16 --api-key supersecretkey
Then, in this case, we need to replace the key at the top of the code:
openai_api_key = "supersecretkey"Hosting an LLM on Google Cloud using vLLM can provide a solution for deploying LLMs. Let's break down the steps mentioned and expand on them for better clarity.
First, we need to access the Google Cloud Console. We can do this by navigating to Google Cloud Console in our web browser. If we don't already have a Google account, we need to create one to use Google Cloud services.
In the Google Cloud Console, locate the project dropdown menu at the top of the screen and select "New Project."

Enter vllm-demo as the project name, making it easier to identify later.
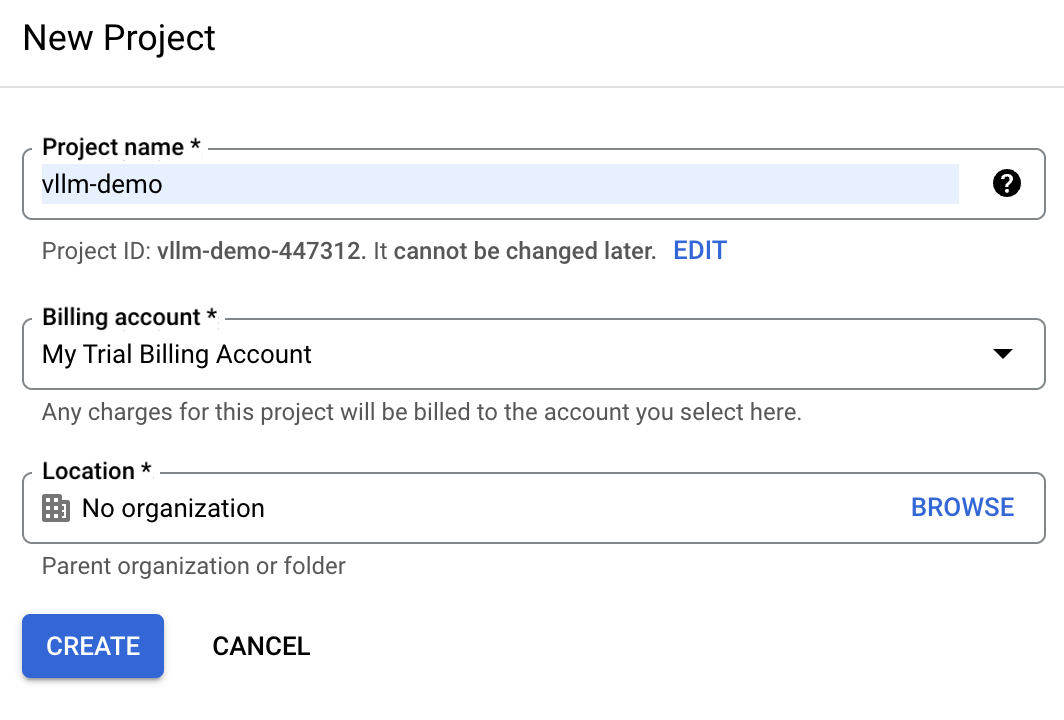
If we already have a Google cloud account, the trial billing account might be unavailable. In this case, we need to create a new billing account. To do so, navigate to the "Billing" section and follow the steps to either select an existing billing account or create a new one.
The Artifact Registry is a service that allows us to store and manage container images. We use it to store the Docker image that we’ll use to run vLLM.
In the Cloud Console, search for "artifact" to open the Artefact Registry.
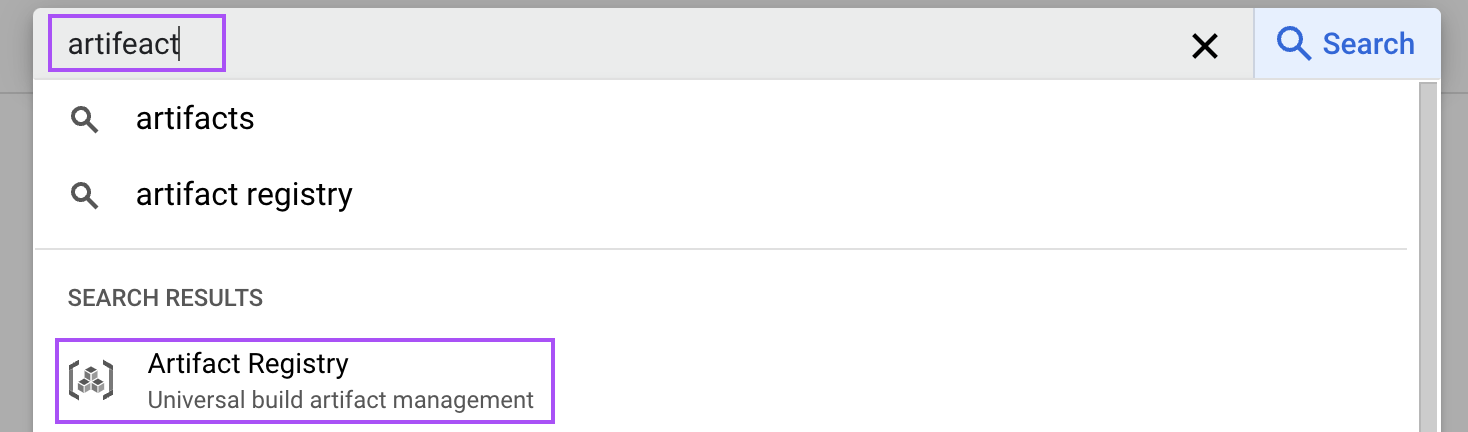
Then, enable it for our project. This step is necessary to store the Docker image of our vLLM setup.
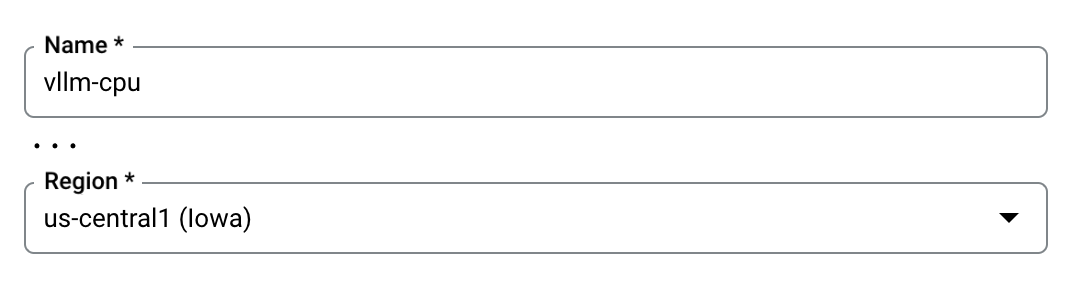
Now, we need to create an artifact repository to store our container images. Navigate to the Artifact Registry and click on "Create Repository."

Name the repository vllm-cpu and choose "Docker" as the format. Specify the location as us-central1 to optimize performance based on our deployment requirements. The rest of the configuration can be left with the default values.
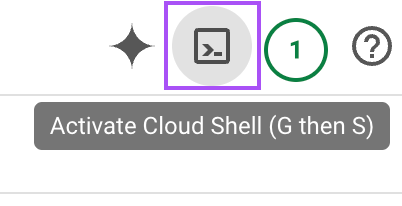
Just like we did for our local machine, we need to build the Docker image and then upload it (push) to our vllm-cpu Google Cloud repository. We will do this using the cloud shell located in the top right corner.
 .
.
In that terminal, clone the vLLM GitHub repository with the following command to fetch the necessary files:
git clone https://github.com/vllm-project/vllm.gitNavigate to the cloned vLLM directory using the terminal.
cd vllmBuild the Docker image with the specified command, which uses the provided Dockerfile configured for CPU usage:
docker build \
-t us-central1-docker.pkg.dev/vllm-demo/vllm-cpu/vllm-openai:latest \
-f Dockerfile.cpu .
Once the Docker image is built, push it to our Artifact Repository. This action involves uploading the image so it can be used later by Google Cloud services:
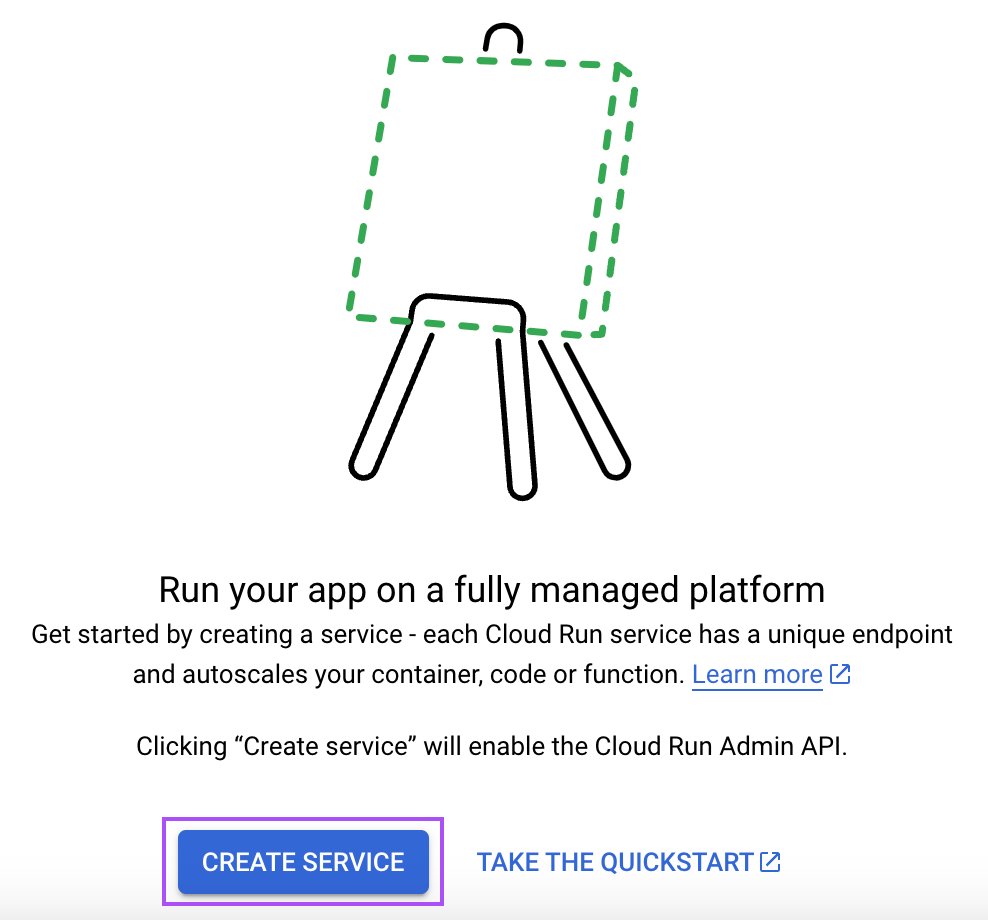
docker push us-central1-docker.pkg.dev/vllm-demo/vllm-cpu/vllm-openai:latestGoogle Cloud Run allows the deployment of containerized applications. We use this service to deploy the image we just built.
Type "cloud run" in the search bar and open the “Cloud Run” service.

From there, click the "Create Service" button:
Then follow these steps:
8000, which is used by vLLM.HUGGING_FACE_HUB_TOKEN and paste our token here. This token allows vLLM to access models from Hugging Face.--model=meta-llama/Llama-3.2-1B to specify the desired model.With all the configuration set (the other options can be left with default values), click the “Create” button at the bottom of the page. Wait for the service to be ready and navigate to that service page. There, we have the service URL that we can use to communicate with the LLM.
It should look something like this:
https://vllm-llama-577126904161.us-central1.run.appWe can interact with the LLM using Python like we did when running the model locally. We only need to change the URL on the script:
# Replace with your service URL
openai_api_base = "https://vllm-llama-577126904161.us-central1.run.app/v1"Warning: If you’re following along with these steps, keep in mind that keeping the artifact registry live will cost you money. So please remember to unlink the billing account after following this guide, or you’ll be billed even if no one uses it.
At the time of writing this tutorial, GPU support for Google Cloud Run is available on request. This means we need to specifically request access to this feature. Once granted, running the vLLM using a GPU will significantly increase its performance compared to CPU usage. This is particularly beneficial for handling large language models, as GPUs are designed to process parallel tasks more efficiently.
If we obtain access to GPU support, we have the option to streamline our workflow. In this scenario, we don't need to go through the process of building our own Docker image. Instead, we can directly create a service utilizing the pre-existing image vllm/vllm-openai:latest. This image is optimized to work with GPU, allowing us to deploy our models quickly and effectively without the additional setup steps required for CPU configurations.
Once GPU access is approved and we set up the service using the provided image, our vLLM deployment can take full advantage of the power and speed that GPUs offer, making it well-suited for real-time applications and high-demand language processing tasks.
For those looking for alternative hosting options, platforms like RunPod offer streamlined services for hosting large language models. RunPod, for instance, provides a serverless setup that simplifies the deployment process.
While this option is user-friendly and quick to set up, it's important to keep in mind that convenience often comes with a higher price tag. If budget constraints are a factor, we might want to weigh the ease of use against the costs associated with such services.
In this tutorial, we explored the process of setting up and hosting vLLM both locally and on Google Cloud.
We learned how to build and run Docker images specifically tailored for CPUs, ensuring accessibility even without high-end GPU resources. Additionally, we looked into deploying vLLM on Google Cloud, which provides a scalable solution for handling larger tasks.
Learn AI with these courses!
Course
Course
blog
Javier Canales Luna
12 min
blog
Abid Ali Awan
8 min
Tutorial
Abid Ali Awan
Tutorial
Abid Ali Awan
Tutorial
Abid Ali Awan
Tutorial
Abid Ali Awan