programa
Data is the foundation of modern organizations, but the large volume of information being collected and stored can be challenging to manage. The key to success lies in effectively organizing and analyzing this data to discover valuable insights that drive informed decision-making.
This is where data warehousing comes in. It is a powerful solution that enables businesses to consolidate and optimize their data for efficient analysis. And when it comes to data warehousing, AWS Redshift stands out as a top choice.
In this article, we will explore the details of AWS Redshift, along with its key features, benefits, and best practices for setting up, loading data, querying, performance tuning, security, and integrations.
Whether you're a data professional or a business leader looking to make the most of your data, this article will provide the knowledge and tools you need to succeed with AWS Redshift.
What is Data Warehousing?
Data warehousing is a process of collecting, storing, and managing large amounts of structured data from various sources within an organization.
The primary goal of a data warehouse is to provide a centralized repository of information that can be easily accessed, analyzed, and used for reporting and decision-making purposes.
Data warehouses are designed to support complex queries and data analysis, enabling businesses to gain valuable insights from their data.
The importance of data warehousing
Adopting a data warehouse can provide organizations with a significant number of benefits:
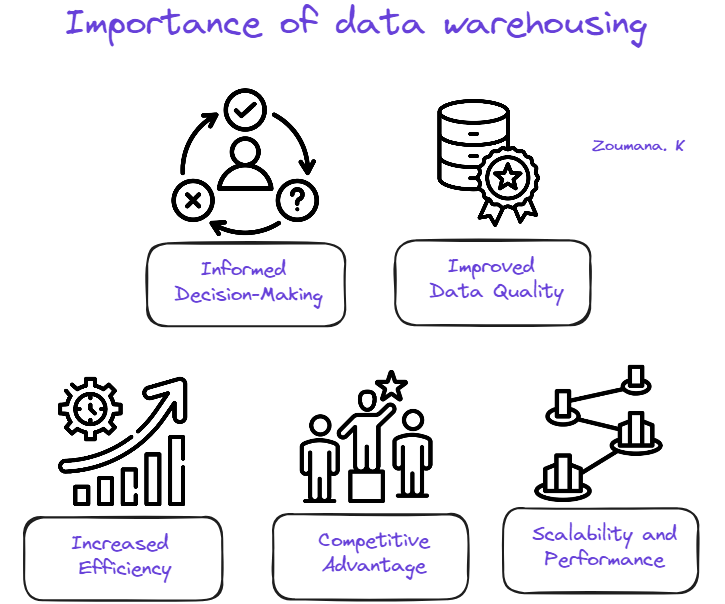
Importance of Data Warehousing
- Informed Decision-Making: Data warehousing enables organizations to make data-driven decisions by providing easy access to historical data and trends.
- Improved Data Quality: Data warehouses integrate and cleanse data from multiple sources, ensuring consistency and accuracy for reliable insights.
- Increased Efficiency: Users can quickly access and query large amounts of data without impacting operational systems, enabling timely decision-making.
- Competitive Advantage: Insights gained from data warehousing help organizations identify new opportunities, optimize processes, and gain a competitive advantage.
- Scalability and Performance: Data warehouses are designed to handle large data volumes and support complex queries, ensuring consistent performance as data needs grow.
Overview of AWS Redshift
What is AWS Redshift?
AWS Redshift is a fully managed, cloud-based data warehousing service that allows for the storage and analysis of petabyte-scale datasets. With AWS Redshift Serverless, users can access and analyze data without the need for manual configuration of a provisioned data warehouse.
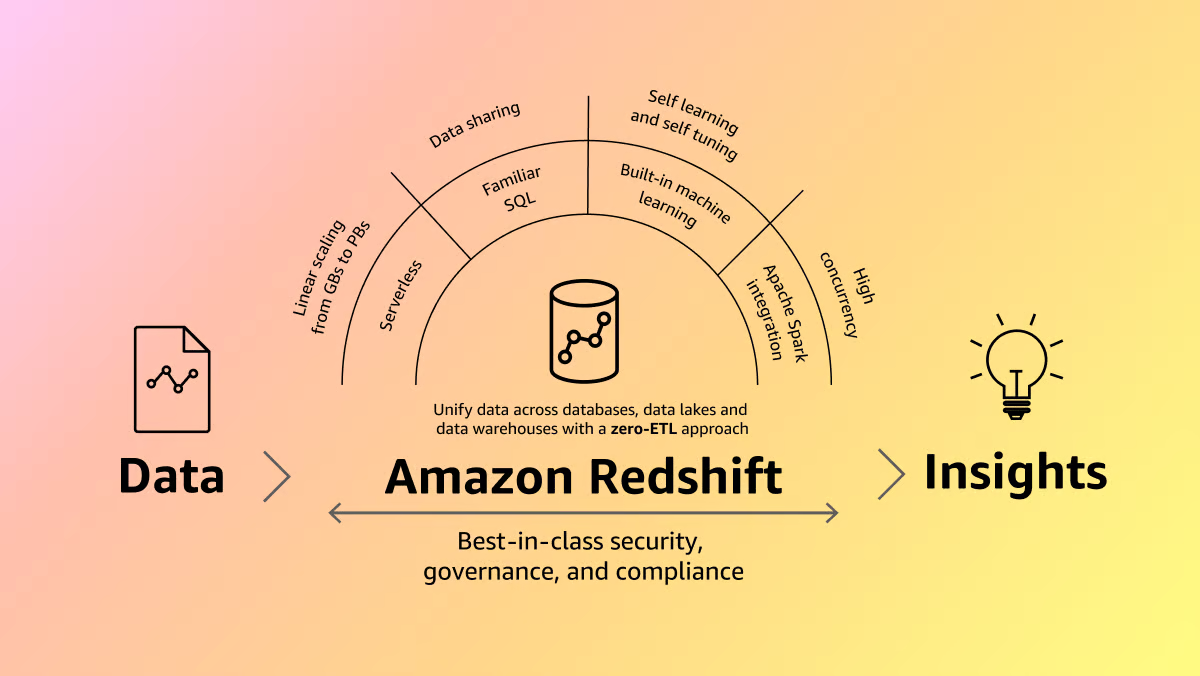
Amazon Redshift (Source)
The service automatically provisions resources and intelligently scales data warehouse capacity to ensure fast performance, even for the most demanding and unpredictable workloads. Users only pay for the resources they use, as there are no charges incurred when the data warehouse is idle.
AWS Redshift enables users to load data and start querying immediately using the Amazon Redshift query editor v2 or their preferred business intelligence (BI) tool. The service offers the best price-performance ratio and familiar SQL features in an easy-to-use, zero-administration environment.
Regardless of the size of the dataset, AWS Redshift delivers fast query performance using the same SQL-based tools and business intelligence applications that are commonly used today.
AWS Redshift key features and benefits
AWS Redshift provides multiple features and benefits to help organizations efficiently store, manage, and analyze large volumes of data. Some of the key features and benefits are illustrated below:
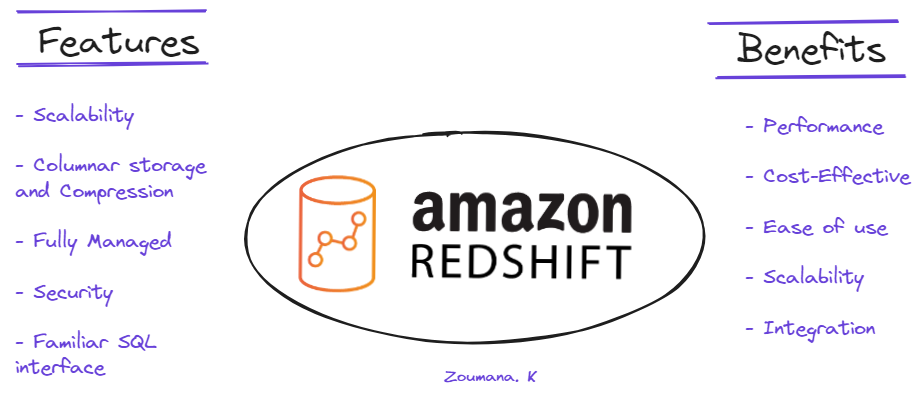
AWS Redshift Features and Benefits
Key features
- Scalability: Redshift can scale from a few hundred gigabytes to a petabyte or more.
- Columnar Storage and Compression: Utilizes columnar storage and data compression to optimize query performance.
- Fully Managed: Eliminates the need for manual setup, configuration, and maintenance.
- Security: Provides robust security features, including encryption at rest and in transit, VPC integration, and IAM roles.
- Familiar SQL Interface: Offers a familiar SQL interface and compatibility with popular BI tools.
Key benefits
- Performance: Enables fast data analysis through optimized query performance.
- Cost-Effectiveness: Users only pay for the storage and compute resources they consume.
- Ease of Use: Enables users to quickly start querying and visualizing data.
- Scalability: Accommodates growing data needs without the need for manual intervention.
- Integration: Facilitates end-to-end data solutions by integrating with various tools and services.
Setting Up AWS Redshift
The previous sections mainly focused on an overall understanding of Redshift. Now, we will explore the technical aspects.
This section first illustrates the main prerequisites to successfully set up AWS Redshift, then it walks through a step-by-step process of creating a Redshift cluster before. The last part focuses more on the detailed explanation of key cluster settings, such as node types, number of nodes, and security configuration.
Prerequisites
Before diving into the details of the use case, let’s first go over the prerequisites required for a successful implementation:
- AWS Account: needed to access AWS services, and one can be created from the AWS website.
- SQL Skills: required to extract and organize data, and our Introduction to SQL is a great place to start.
- AWS IAM: An understanding of AWS Identity and Access Management (IAM) is necessary to set up the correct permissions for the Lambda functions being used.
- Basic Knowledge of AWS Services: Familiarity with AWS EC2, and S3 is necessary for the scope of this article.
- Coding Skills: Basic coding skills in Python are necessary to use libraries and tools to interact with Redshift.
Creating and configuring a Redshift cluster
This section provides all the steps to create a Redshift cluster through the AWS Management Console in 11 simple steps, as illustrated below:
1. Search Redshift from the console, and select “Amazon Redshift”:
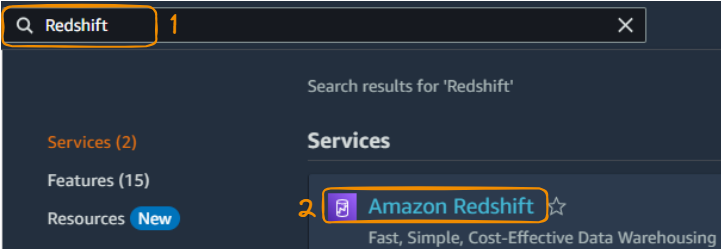
Search and select Redshift from Management Console
2. Select the “Create Cluster” button to start creating a cluster.
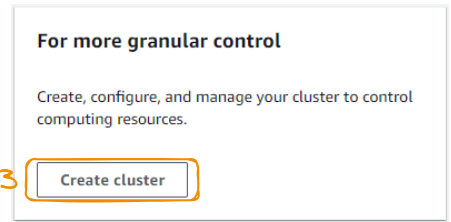
Create cluster button
3. From the above action, we can configure the cluster by providing information such as cluster identifier, the size of the cluster, the node type, availability zone choice, number of nodes.
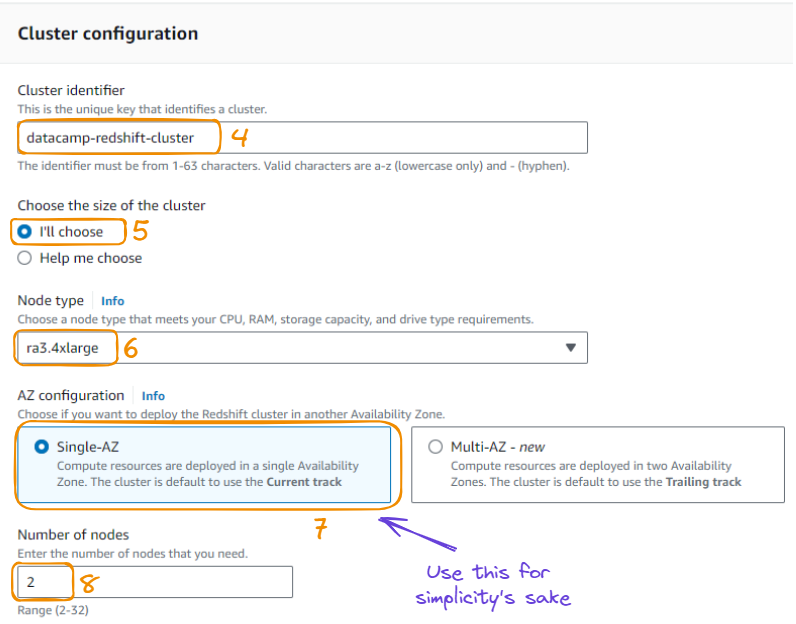
Cluster configuration in 8 steps
4. Instead of using sample data as suggested from the same page as above, we are using data from an S3 bucket instead to load data into Redshift.
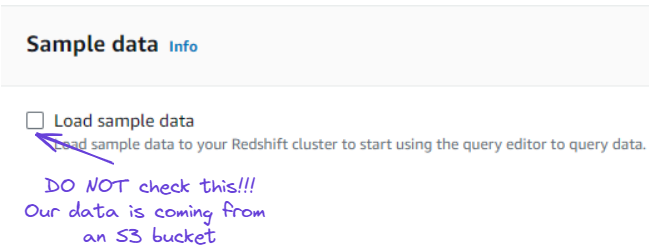
Ignore loading sample data option
5. We have the option to define the clusters’ permission by providing IAM roles. This section can be ignored and tackled moving forward.
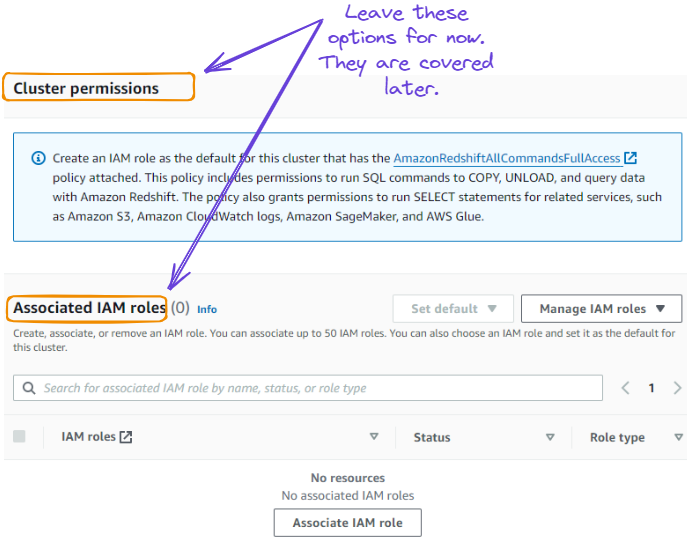
Ignore cluster permissions and IAM roles
6. Leave the default configurations for network, security, backup, maintenance, and select the “Create cluster” button to create the cluster.
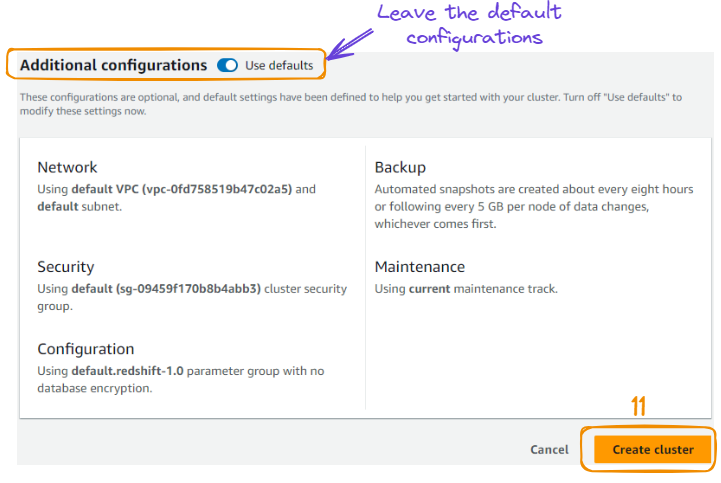
Creation of the cluster
7. After the above action, we are redirected to a new page showing the newly created cluster. This might take a few minutes to successfully create the cluster, and can be seen in the “Status” section, which is first “Creating” before becoming “Available”.
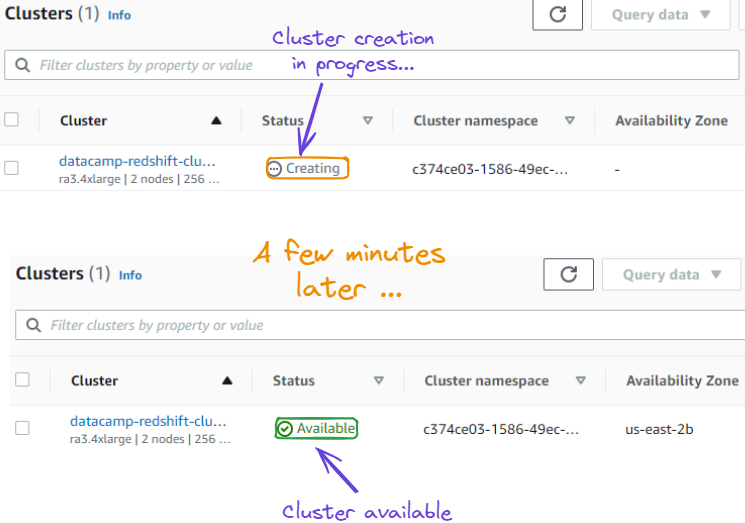
Cluster state from “Creating” to “Available”
Loading Data into Redshift
We’ve now successfully created our Redshift clusters. This section guides you through all the steps, from choosing the Country, Regional, and World GDP (Gross Domestic Product) dataset available on our DataLab to uploading it into an S3 bucket.
About the data
Our data is originally sourced from the World Bank dataset. It is about GDP from countries, regions and world measured in current US Dollars ($). Regions refer to collections of countries, such as Europe, and Central Asia.
The first ten observations of the data look like this:

First ten observations of the GDP data
Using AWS S3 to load data
For a successful interaction between S3 and Redshift we need to first create an IAM role before creating an S3 bucket to store data.
Create an IAM role
The benefit of creating an IAM role is that it creates a connection between our Redshift cluster and the S3 bucket where the data lives.
Creating the IAM role is performed as follows:
From the Management Console, search for “IAM” and select the “IAM” logo from the search result.
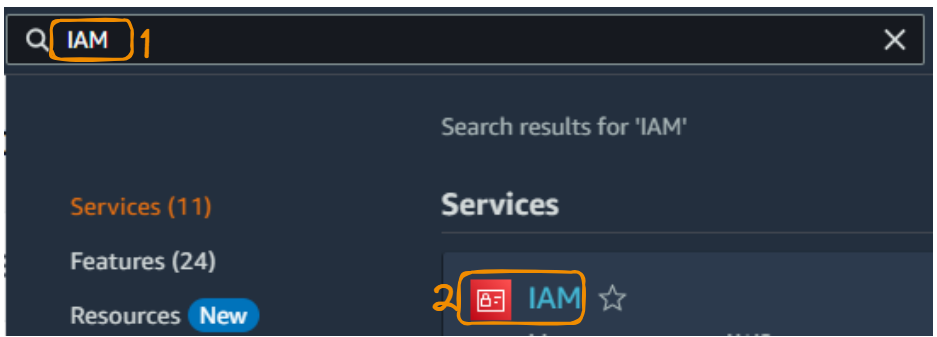
IAM service from Management Console
Select “Roles” to display all the possible roles, and choose “Create role” to create a new role.
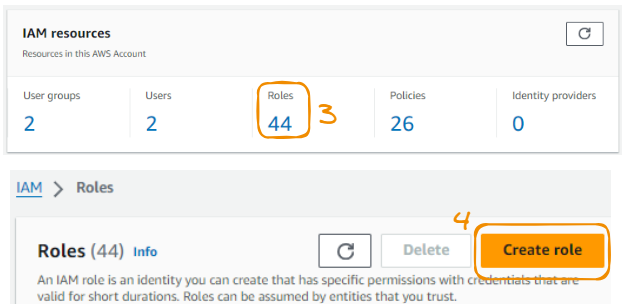
Start creating a new role
Choose “AWS service” from the “Trusted entity type,” then “Redshift” as “Use case,” and “Next” to continue.
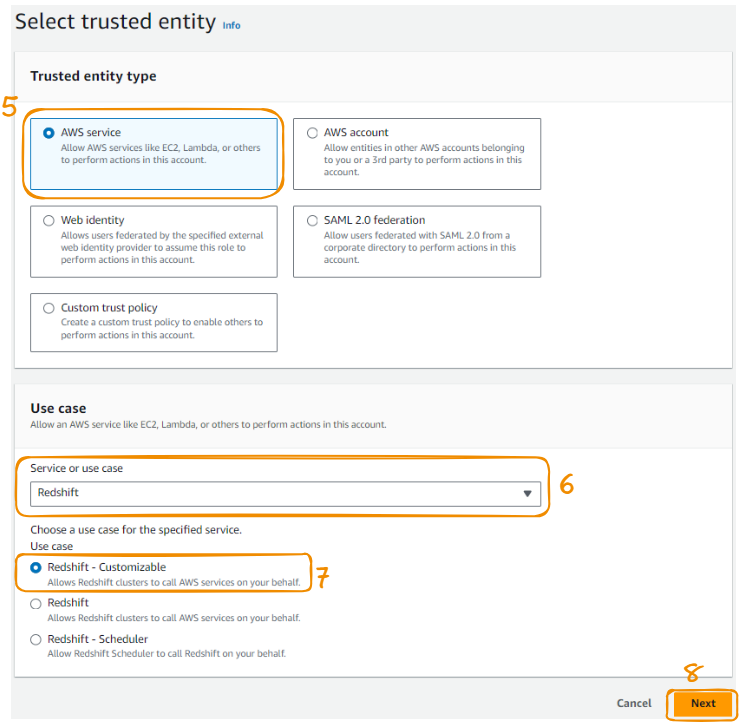
Steps 5 to 8 of the AMI role creation
Find “S3FullAccess” from the search tab, then check the option and select “Next.”
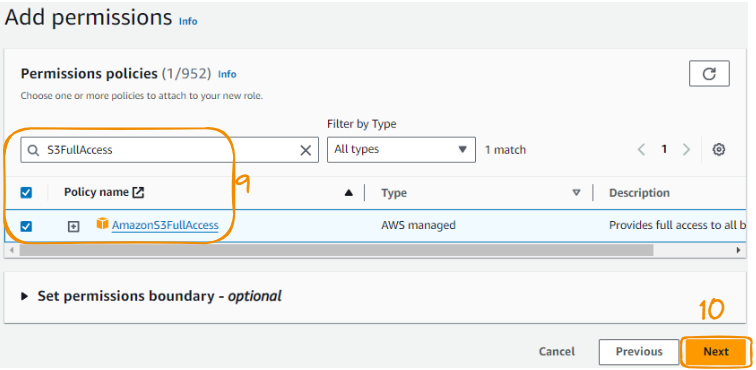
Steps 9 to 10 of the AMI role creation
Lastly, name the role, review it, and choose the “Create role” button to finalize the creation of the role.
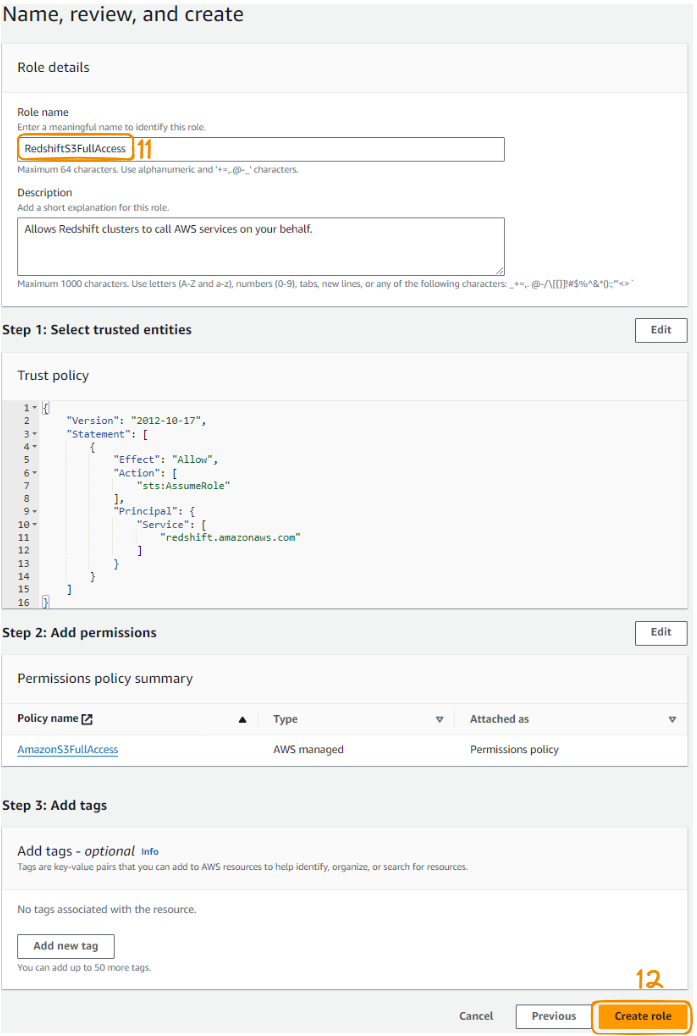
Steps 11 to 12 of the AMI role creation
Once everything is successful, the following green message confirming the role creation is displayed in the top corner.

Role creation confirmation message
Link IAM role to Redshift
Now that we have the IAM role, it can be used to link to the Redshift cluster initially created, and that can be achieved as follows:
From the clusters section, select the datacamp cluster created, and under the “Actions” section, choose “Manage IAM roles.”
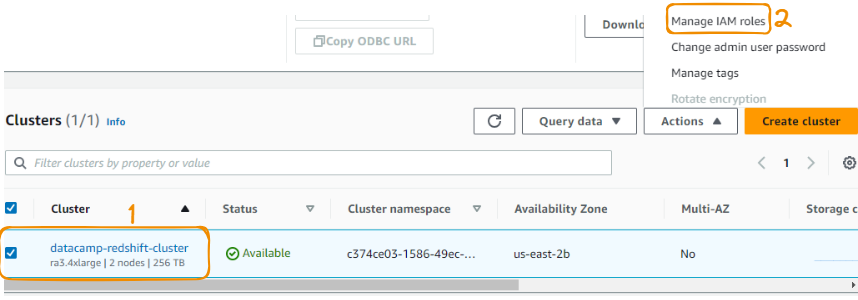
Link IAM role to Redshift steps 1 to 2
Under this section, choose the previously created IAM role and save the changes.
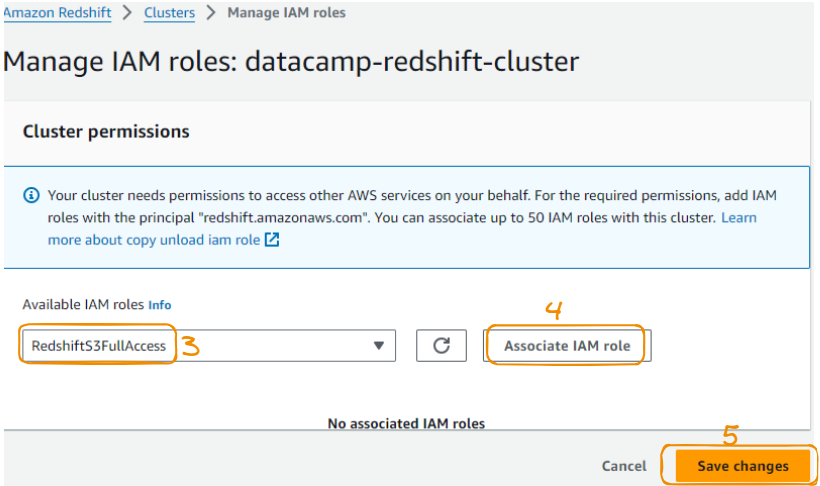
Link IAM role to Redshift steps 3 to 4
Connect with Redshift Query Editor
Multiple tools can be used to query data from Redshift. Some of those tools can be either part already part of AWS services or external. In the scope of this tutorial we are using the query editor from Redshift Dashboard.
To be able to use it, we first need to create a connection to the Query editor as follows, starting from the “Query in query editor” option from the “Query data” tab:
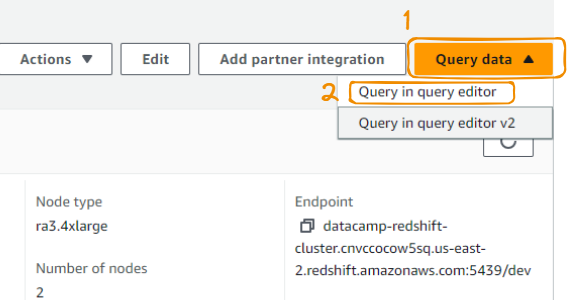
Query editor from query data
The above action leads to the following page, where we can connect to the database after giving it a name, along with a username as follows:
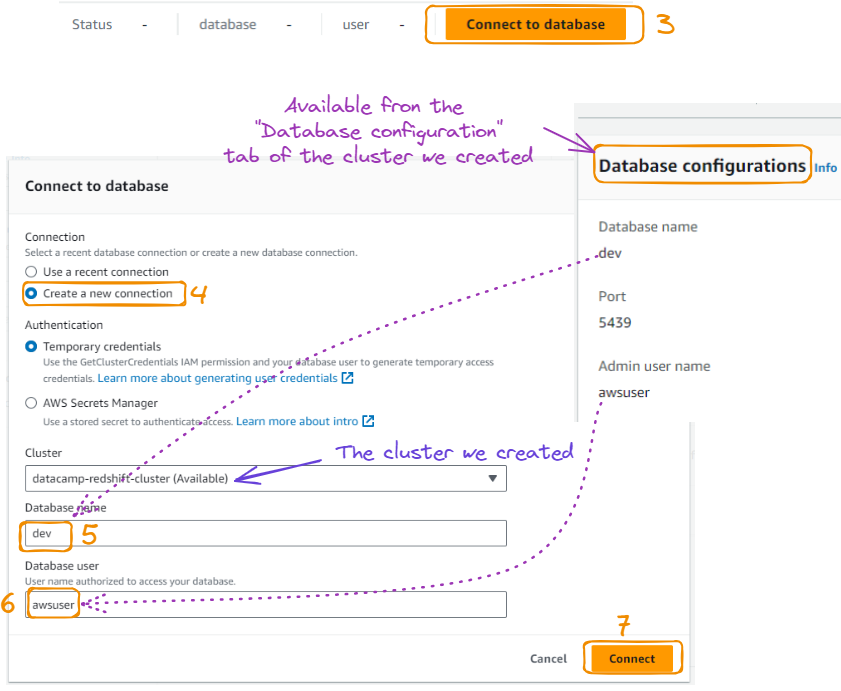
Database connection from query editor
Create a table for the data
After hitting the “Connect” button, we can see the green “Connected” tab at the top and the database information on the left.
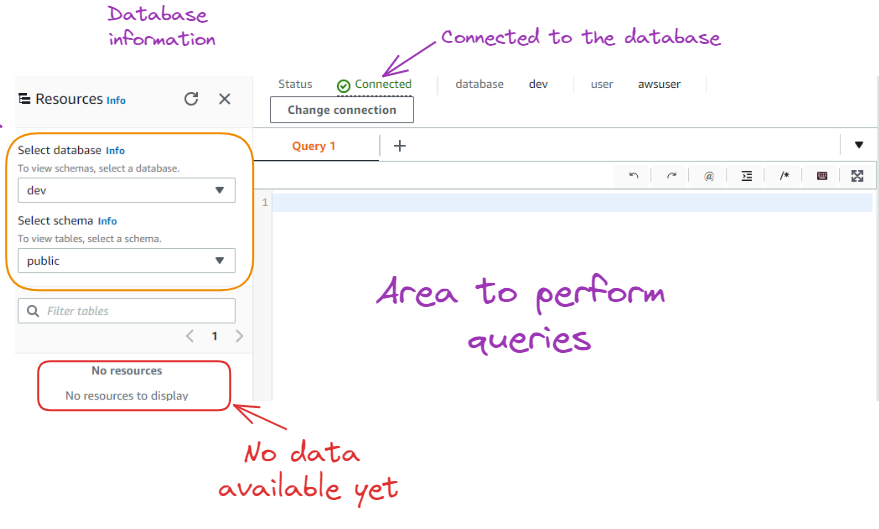
Result after connecting to the database
As we can see above, there is no resources/data available yet in the database. Before importing data, we first need to create a table with the same characteristics as the data being imported.
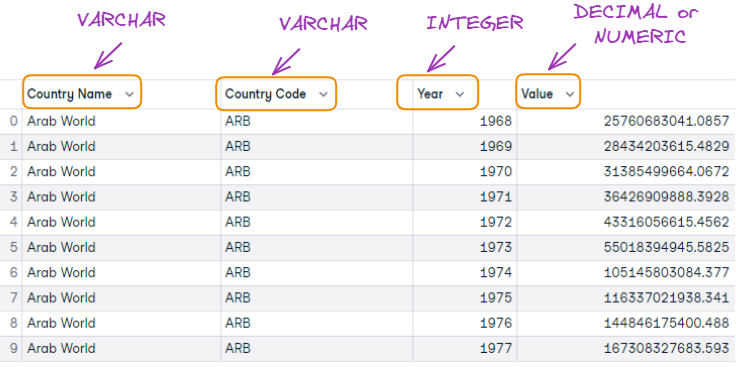
First 10 observations and table columns format matching
The table is created using the following SQL query:
CREATE TABLE gdp_data (
id INTEGER PRIMARY KEY,
country_name VARCHAR(255),
country_code VARCHAR(10),
year INTEGER,
value DECIMAL(20,2)
);
Here's an explanation of the SQL query in one bullet point for each column:
id INTEGER PRIMARY KEY: Creates a column named "id" with the INTEGER data type and sets it as the primary key of the table, ensuring unique values for each row.country_name VARCHAR(255): Creates a column named "country_name" with the VARCHAR data type, allowing storage of strings up to 255 characters in length.country_code VARCHAR(10): Creates a column named "country_code" with the VARCHAR data type, allowing storage of strings up to 10 characters in length.year INTEGER: Creates a column named "year" with the INTEGER data type, suitable for storing whole numbers (in this case, years).value DECIMAL(20,2): Creates a column named "value" with the DECIMAL data type, allowing storage of decimal numbers with a precision of 20 digits and 2 decimal places.
Now, we run the query to create the table:
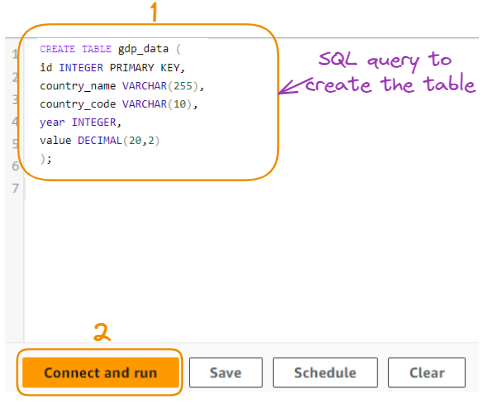
Query to create the table
This query creates a table named "gdp_data" with the specified columns to store GDP data as shown below:
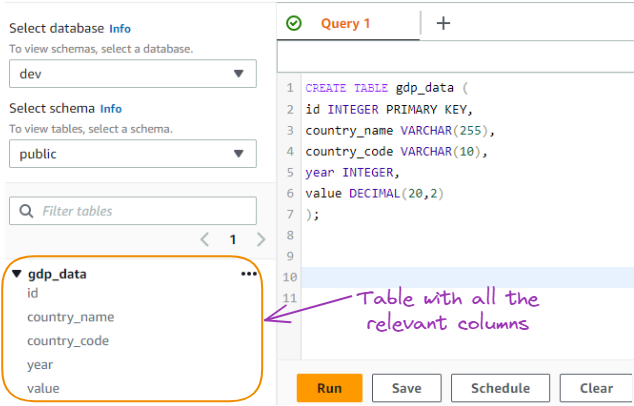
GDP data table created from SQL query
Create a table for the data
The data will be imported into the table from an S3 bucket. In this section we cover all the steps of creating the bucket and uploading the data.
Find the S3 service from the Management Console, select the corresponding logo, and give it a name while leaving everything else by default:
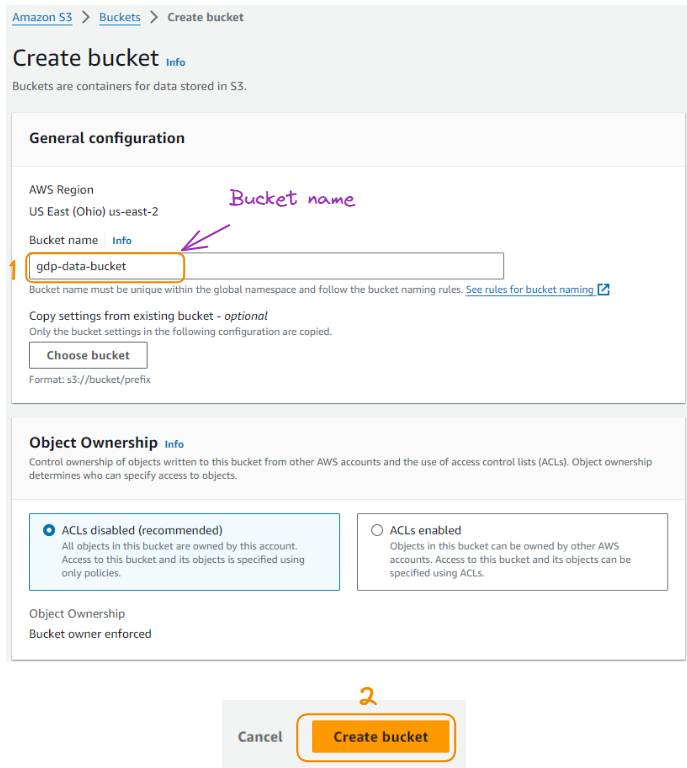
S3 bucket creation
Once the bucket is created it becomes available in the list of all the buckets created in the past.
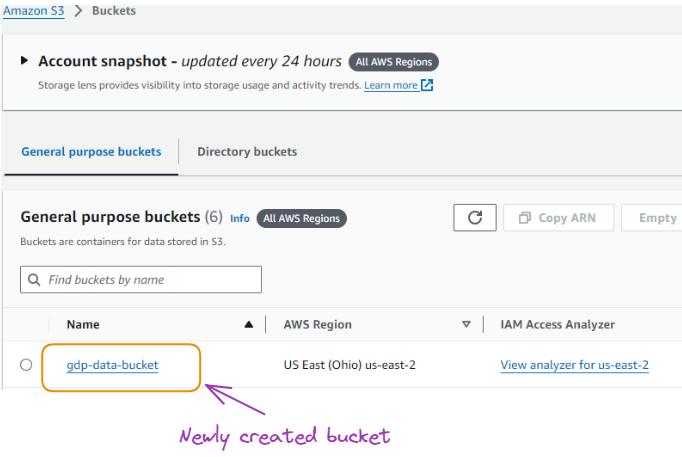
The newly created bucket
From there we can select the bucket name, and upload the GDP data downloaded locally in a CSV format.
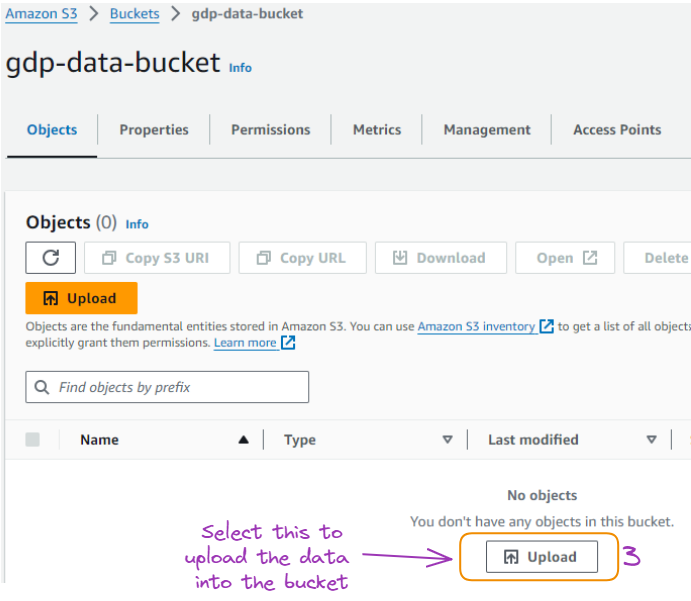
Page to upload data into the bucket
After successfully importing the data, it becomes available as shown below:
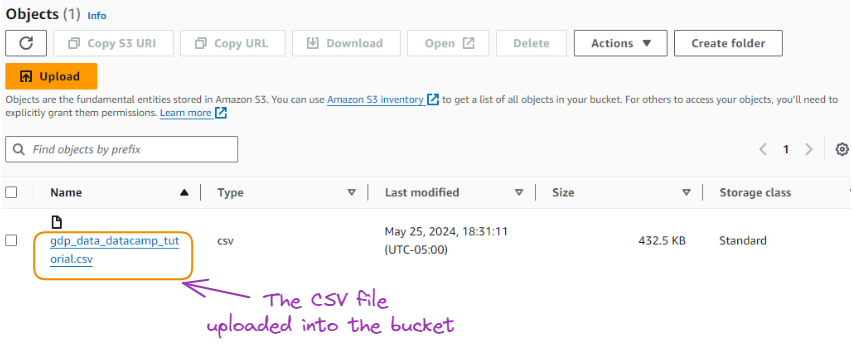
The CSV uploaded into the bucket
Copy Command: Syntax and examples
Congratulations on making it this far!
This section illustrates how to copy the data from S3 into Redshift as follows.
COPY gdp_data (id, country_name, country_code, year, value)
FROM 's3://gdp-data-bucket/gdp/gdp_data.csv'
IAM_ROLE 'arn:aws:iam::654654631565:role/RedshiftS3FullAccess'
CSV
IGNOREHEADER 1;
Let’s understand what is happening here:
- COPY gdp_data (id, country_name, country_code, year, value): Specifies the table and columns to copy data into.
- FROM 's3://gdp-data-bucket/gdp/gdp_data.csv': Indicates the source file in the S3 bucket.
- IAM_ROLE 'arn:aws:iam::654654631565:role/RedshiftS3FullAccess': Uses the specified IAM role to access the S3 bucket.
- CSV: Indicates that the file format is CSV (Comma-Separated Values).
- IGNOREHEADER 1: Instructs Redshift to ignore the first row, which is typically the header row.
The same code from the editor is given below, and the copy operation was successfully performed after a few seconds:
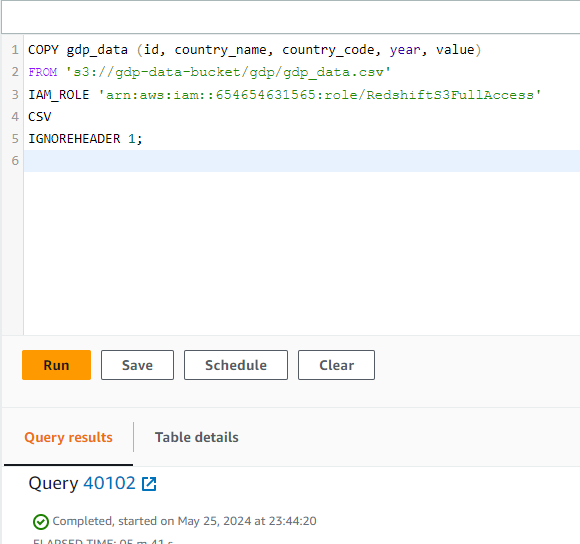
COPY task completed
Instead of uploading all the data from the original CSV, only a random sample of a hundred observations was uploaded for simplicity’s sake. We can have a preview of the data by selecting the “Preview data” option as follows:
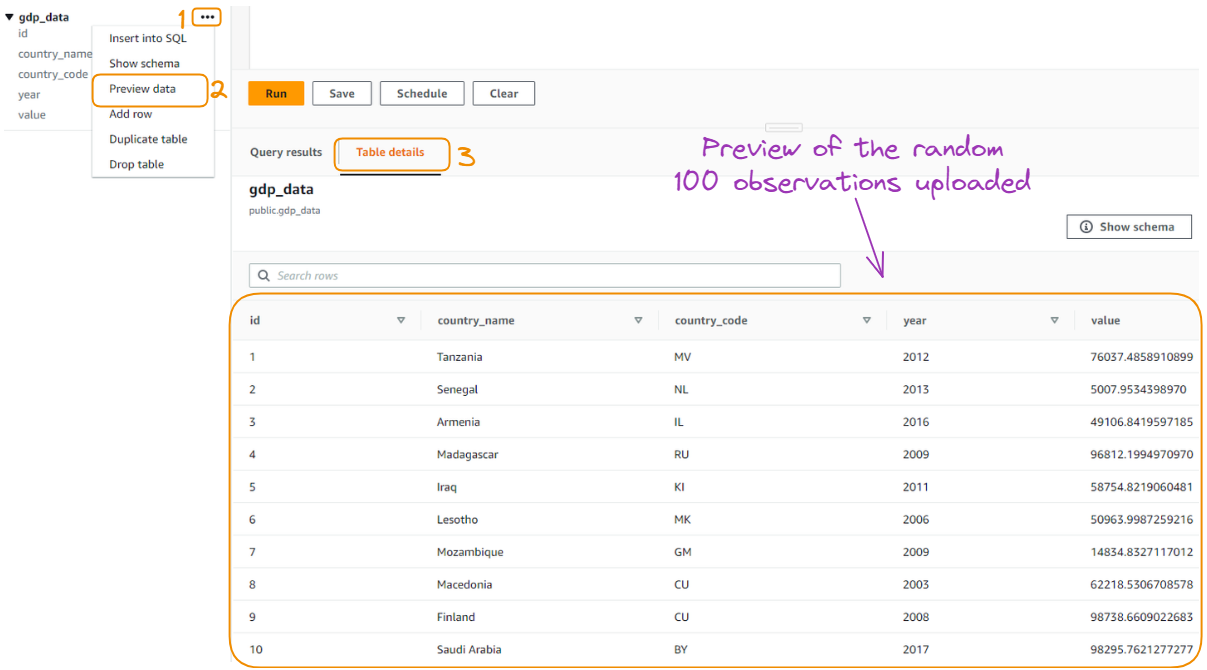
Preview of the randomly uploaded 100 observations
Querying Data in Redshift
Getting the preview of the data only displays the first ten observations of the data. However, we might want to interact more with our data to get more insight, this is where it can be beneficial to have SQL skills.
In this section, we explore the data through some SQL queries to explore the data.
Basic SQL queries
We are using five SQL queries to interact with data stored in our database, starting with the most commonly used query: selecting the data.
Select all data
SELECT *
FROM gdp_data;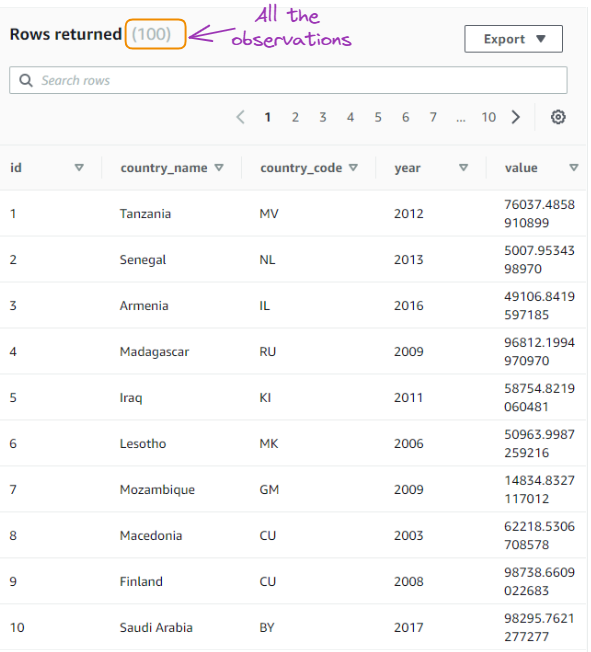
Result of the first query
Select data for a specific country:
SELECT * FROM gdp_data
WHERE country_name = 'Senegal';
Result of the second query
Calculate the average GDP value for a specific year:
SELECT year, AVG(value) as average_gdp
FROM gdp_data
WHERE year = 2020
GROUP BY year;
Result of the third query
Find the top 5 countries with the highest GDP in a specific year:
SELECT country_name, value
FROM gdp_data
WHERE year = 2020
ORDER BY value DESC
LIMIT 5;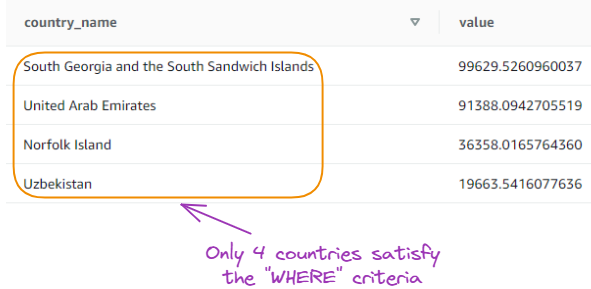
Result of the fourth query
Count the number of records per year:
SELECT year, COUNT(*) as record_count
FROM gdp_data
GROUP BY year
ORDER BY year;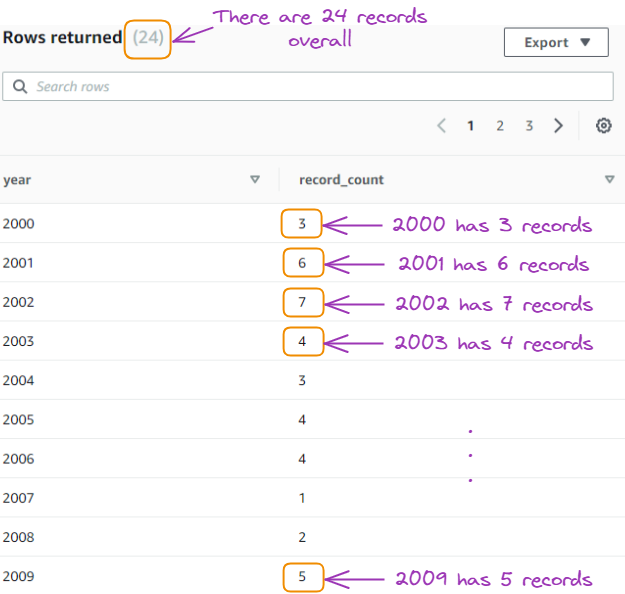
Result of the fifth query
Advanced query techniques
The above queries provided a basic understanding of the data, and this section focuses on covering three advanced query techniques.
Windowing functions
Calculating running total: This query calculates the running total of GDP values for each country, ordered by year.
SELECT
    country_name,
    year,
    value,
    SUM(value) OVER (PARTITION BY country_name ORDER BY year) as running_total
FROM gdp_data;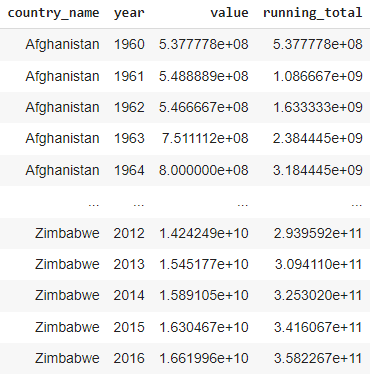
Result of the running total
Using common table expressions (CTEs)
CTFs for filtering and aggregating: this query uses a CTE to filter the data to include only records from the year 2020 onwards and then calculates the average GDP value for each country.
WITH recent_data AS (
    SELECT
        country_name,
        year,
        value
    FROM gdp_data
    WHERE year >= 2020
)
SELECT
    country_name,
    AVG(value) as average_gdp
FROM gdp_data
GROUP BY country_name;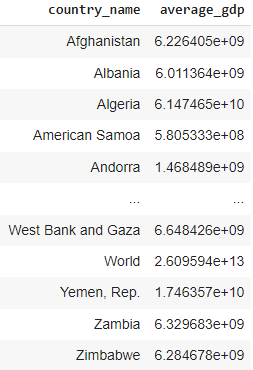
Result from the CTEs
Using self joins
Calculate year-over-year GDP growth: with this query, we calculate the year-over-year GDP growth for each country.
SELECT
    a.country_name,
    a.year,
    a.value as current_year_value,
    b.value as previous_year_value,
    (a.value - b.value) / b.value * 100 as growth_percentage
FROM gdp_data a
JOIN gdp_data b
    ON a.country_name = b.country_name
    AND a.year = b.year + 1;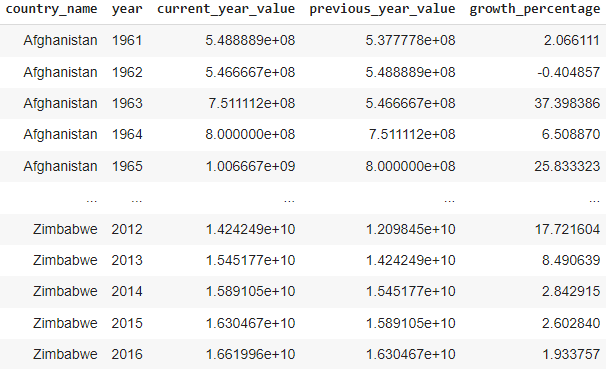
Result of the self-join query
Performance Tuning
To ensure optimal performance and cost-effectiveness, it is essential to understand the factors influencing Redshift's performance and implement best practices for tuning our cluster.
In this section, we will explore the key aspects of our Redshift performance tuning and provide insights based on the provided cluster information.
Understanding Redshift performance
Performance in Amazon Redshift is influenced by multiple factors, ranging from hardware configurations to query optimization techniques, so understanding these factors is crucial for identifying bottlenecks and making better decisions to improve our cluster's performance.
We have configured a Redshift cluster consisting of two ra3.4xlarge nodes, and the data being used is only 391 KB.
Also, the following image reveals that our cluster's CPU utilization remains close to 0% throughout the entire time period, indicating that the cluster is not being heavily utilized and may be over-provisioned for our current workload.

CPU Utilization of our cluster
Several key factors that impact Redshift’s performance include:
- Cluster configuration: The node type and number of nodes in your cluster play a significant role in performance. Choosing the appropriate configuration based on the workload requirements is essential.
- Data distribution and skew: Evenly distributing data across nodes and minimizing skew can help optimize query performance by reducing data movement during query execution.
- Query complexity and optimization: Writing efficient queries and leveraging Redshift's query optimization features can significantly improve performance.
- Workload management: Effectively managing and prioritizing workloads ensures that critical queries receive the necessary resources and maintain optimal performance.
Best practices for performance optimization
To optimize the performance of our cluster, it is important to follow best practices in table design and data management. Even with a small dataset, implementing these practices can lay a solid foundation for future growth and performance efficiency.
- Distribution styles and keys: Choosing the right distribution style and key is crucial for evenly distributing data across nodes and minimizing data movement during query execution. With a small dataset and two nodes like in our scenario, the impact of distribution may be less critical, but it remains a best practice to ensure scalability.
- Sort keys: Selecting appropriate sort keys based on columns frequently used in sorting, filtering, and joining can significantly improve query performance. By sorting data during ingestion, Redshift can organize data in a way that optimizes query execution.
- Compression encoding: Applying compression encoding to columns based on their data type and cardinality can reduce storage footprint and improve query performance. Redshift offers automatic compression encoding when using the COPY command or CREATE TABLE AS SELECT statement, sampling data to choose the optimal encoding.
Monitoring and maintenance
Regular monitoring and maintenance of the cluster are essential for ensuring optimal performance and cost-efficiency. The following image provides a breakdown of our monthly Redshift costs, revealing opportunities for cost optimization.
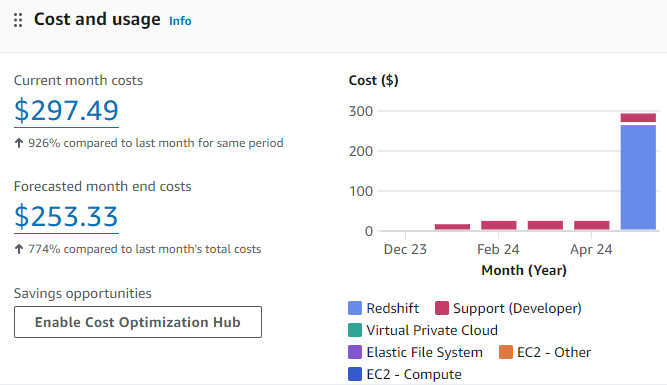
Cost and usage graphic for the current Redshift use case
Based on the above image, our Redshift cluster appears to be over-provisioned for our current small dataset, resulting in low utilization and cost inefficiencies.
Using AWS tools such as Amazon CloudWatch and the AWS Management Console, we can monitor key performance metrics, including CPU utilization and query performance. These insights can help us identify potential issues and make data-driven decisions for cluster optimization.
Given our cluster's low utilization, we can consider the following cost optimization strategies:
- Pausing the cluster when not in use using the Cost Optimization Hub
- Resizing to a smaller instance type that aligns with our workload requirements
- Exploring Amazon Redshift Serverless if our workload is intermittent or unpredictable
As the data volume grows and workload evolves, continuously monitor our cluster's performance and re-evaluate our instance sizing and optimization strategies accordingly.
Security and Compliance
When working with sensitive data in Amazon Redshift, ensuring the highest standards of security and compliance is important. As organizations face increasing regulatory requirements and the need to protect sensitive information, implementing robust security measures and adhering to compliance guidelines become critical aspects of managing our Redshift cluster.
Compliance and best practices for data security
Compliance with industry-specific regulations and data protection laws is a top priority for organizations dealing with sensitive data. Amazon Redshift provides features and capabilities to help us meet these compliance requirements effectively.
In addition to compliance considerations, implementing best practices for data security in Amazon Redshift is crucial to safeguarding your sensitive information from unauthorized access and potential breaches.

Best practices for data security
Regular audits
Conducting regular security audits is essential to identify vulnerabilities, assess the effectiveness of existing security measures, and ensure ongoing compliance. Consider the following audit practices:
- Regularly review user access privileges and remove unnecessary permissions
- Monitor and analyze logs for suspicious activities or unauthorized access attempts
- Perform vulnerability scans and penetration testing to identify potential weaknesses
- Validate compliance with internal security policies and external regulations
Data masking
Data masking is a technique that involves masking sensitive data elements while preserving the structure and format of the data. By masking sensitive information, we can protect it from unauthorized access and maintain data privacy. Below are some approaches for masking data in Amazon Redshift:
- Dynamic data masking: Mask sensitive data in real time based on user roles and permissions
- Static data masking: Create masked copies of data for use in non-production environments
- Tokenization: Replace sensitive data with irreversible tokens to protect its confidentiality
Access control
Implementing strong access control mechanisms is critical to ensure that only authorized individuals can access sensitive data in our Amazon Redshift cluster. Such mechanisms can be applied as follows:
- Use AWS Identity and Access Management (IAM) to manage user authentication and authorization.
- Implement role-based access control (RBAC) to grant permissions based on user roles and responsibilities.
- Enable multi-factor authentication (MFA) for an additional layer of security
- Regularly review and update access policies to ensure the principle of least privilege.


Conclusion
In this article, we have explored the fundamentals and advanced aspects of using Amazon Redshift for data warehousing. We started by understanding the importance of data warehousing and how Amazon Redshift provides a powerful, scalable, and cost-effective solution for analyzing large datasets using SQL.
Then, we walked through the process of setting up an Amazon Redshift cluster, including the prerequisites, cluster creation, and configuration settings. We also delved into the details of loading data into Redshift using AWS S3 and the COPY command, providing syntax examples and explanations.
Furthermore, we covered the essentials of querying data in Redshift, from basic SQL queries to advanced techniques like window functions and complex joins. We also discussed performance tuning in Redshift, highlighting best practices for optimizing query performance, such as distribution styles, sort keys, and compression encoding.
Lastly, we emphasized the importance of security and compliance in Amazon Redshift, covering security features like encryption and access control, as well as compliance considerations.
Next Steps
For anyone interested in expanding their knowledge and skills in working with Amazon Redshift and AWS, it would be worth exploring the following DataCamp resources:
- Analyzing Ticket Sales Data with Amazon Redshift: This hands-on code-along guides you through analyzing ticket sales data using Amazon Redshift, providing practical experience in querying and visualizing data.
- Introduction to AWS: This course offers a comprehensive introduction to AWS services and concepts, helping build a solid foundation for working with AWS and Redshift.
- Introduction to Redshift: Dive deeper into Amazon Redshift with this dedicated course, covering advanced topics like data loading, query optimization, and troubleshooting.
By mastering Amazon Redshift and leveraging its capabilities, users can unlock valuable insights from their data and make data-driven decisions.

A multi-talented data scientist who enjoys sharing his knowledge and giving back to others, Zoumana is a YouTube content creator and a top tech writer on Medium. He finds joy in speaking, coding, and teaching . Zoumana holds two master’s degrees. The first one in computer science with a focus in Machine Learning from Paris, France, and the second one in Data Science from Texas Tech University in the US. His career path started as a Software Developer at Groupe OPEN in France, before moving on to IBM as a Machine Learning Consultant, where he developed end-to-end AI solutions for insurance companies. Zoumana joined Axionable, the first Sustainable AI startup based in Paris and Montreal. There, he served as a Data Scientist and implemented AI products, mostly NLP use cases, for clients from France, Montreal, Singapore, and Switzerland. Additionally, 5% of his time was dedicated to Research and Development. As of now, he is working as a Senior Data Scientist at IFC-the world Bank Group.


