

虚拟环境与依赖
在使用 OpenAI 的 gpt-4o-audio-preview 模型之前,我们先为项目设置一个虚拟环境。这有助于保持有序并避免依赖冲突,特别适合同时处理多个项目时使用。
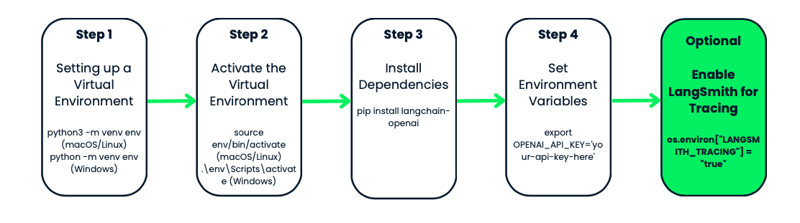
什么是虚拟环境?
想象您有两个不同的项目。其中一个需要某个包的 1.0 版本,另一个需要 2.0 版本。如果把一切都全局安装,您很可能会遇到冲突。
虚拟环境会创建一个隔离的工作区,就像一个“气泡”,您可以在其中为特定项目安装所需的一切。为项目创建环境后,就无需再担心破坏系统的 Python 设置或包冲突。
创建并激活虚拟环境
让我们开始为项目创建一个虚拟环境。我们将使用 Python 内置的 venv 模块。我们需要:
- 进入项目文件夹——也就是您希望环境所在的位置。如果还没有项目文件夹,请先创建一个。
- 进入该文件夹后,创建虚拟环境。在 macOS 或 Linux 上运行
python3 -m venv env。在 Windows 上运行python -m venv env。 - 注意,
venv是 Python 用于创建虚拟环境的工具,env是环境文件夹的名称。您可以随意命名:env、venv、my_project_env 等。建议保持简短易懂。 - 创建好虚拟环境后,需要将其激活。这一步很关键,它能确保您安装的任何包只会影响该项目。
- 在 macOS 或 Linux 上,用
source env/bin/activate激活;在 Windows 上使用:.\env\Scripts\activate
您会注意到终端提示符变成类似 env 的形式——这表示您正在虚拟环境中工作。从现在起,您安装的包或运行的命令都会与该项目隔离。
安装 langchain-openai
激活环境后,就可以安装所需工具了。因为我们要使用 OpenAI 和 LangChain,所以先安装 langchain-openai 包。该包可用于与 OpenAI 的模型交互。
在终端中运行:pip install langchain-openai。
设置环境变量
下一步是确保敏感信息(如 API 密钥)不会被硬编码在脚本中。我们将通过设置环境变量来实现。
首先,您需要访问 OpenAI 的模型。如果还没有账号,请前往 OpenAI 平台创建账号。注册完成后,需要生成一个 API 密钥。这个密钥可用于访问 OpenAI 的模型,包括 gpt-4o-audio-preview。
在我们的例子中,我们需要设置 OPENAI_API_KEY。您可以在每次开始项目时手动设置,也可以使用 .env 文件进行保存以便于访问。我们看看两种方法。
方法一:手动设置环境变量
如果只是临时使用并想快速上手,可以直接在终端中设置环境变量。
- 在 macOS/Linux 上运行:
export OPENAI_API_KEY='your-api-key-here' - 在 Windows 上使用:
set OPENAI_API_KEY='your-api-key-here'
现在,您的 API 密钥已经可用于脚本中,您可以在 Python 中通过 os 模块来访问它。
方法二:使用 .env 文件
如果您更偏好持久化方案,可以使用 .env 文件来保存环境变量。该文件放置在项目文件夹中,有助于保护密钥安全。
首先,在项目目录中创建 .env 文件,然后按如下方式添加 API 密钥:
OPENAI_API_KEY=your-api-key-here接着安装 python-dotenv 包:
pip install python-dotenv然后在 Python 脚本中,从 .env 文件加载环境变量:
from dotenv import load_dotenv
import os
load_dotenv() # Load variables from .env file
api_key = os.getenv('OPENAI_API_KEY')如果需要管理多个环境变量,该方法尤其有用,同时能保持代码整洁与安全。
可选:使用 LangSmith 进行追踪
如果您想为了调试或性能监控而追踪 API 调用,OpenAI 提供了一个很实用的功能 LangSmith。它会为模型的每一次 API 调用提供详细日志,如果您想优化或排查工作流,将非常有帮助。
您可以这样启用 LangSmith 追踪:
os.environ["LANGSMITH_API_KEY"] = getpass.getpass("Enter your LangSmith API key: ")
os.environ["LANGSMITH_TRACING"] = "true"这完全是可选的,但如果您在构建复杂应用并希望监控模型行为,它会很顺手。
实例化 OpenAI 的 gpt-4o-audio-preview 模型
现在环境已准备就绪,接下来进入有趣的部分——实例化 OpenAI 的 gpt-4o-audio-preview 模型。在这里我们将开始与模型交互、发送请求,并处理输入与输出。
本节将讲解如何通过 LangChain 框架实例化模型、定制基础参数,并完成开始生成回复所需的设置。
实例化模型意味着什么?
在上代码前,先解释一下“实例化”模型是什么意思。所谓实例化,是指在 Python 中创建一个对象,用于与 gpt-4o-audio-preview 模型交互。这个对象就像一个控制面板——它包含我们发送数据并获取结果所需的所有设置、配置和方法。
使用 LangChain 的基础模型设置
让我们来创建这个模型对象。由于我们使用 LangChain 框架,将使用 langchain_openai 包中的 ChatOpenAI 类。该类使我们可以方便地访问 OpenAI 模型及其功能。
from langchain_openai import ChatOpenAI
# Create the model object
llm = ChatOpenAI(
model="gpt-4o-audio-preview", # Specifying the model
temperature=0, # Controls randomness in the output
max_tokens=None, # Unlimited tokens in output (or specify a max if needed)
timeout=None, # Optional: Set a timeout for requests
max_retries=2 # Number of retries for failed requests
)该模型的一个优点是高度可定制。您可以根据需求微调参数。例如,若您在构建需要音频转录的应用,可以调整参数以处理更大的输入或限制输出长度。
比如,如果您处理对时延敏感的请求并希望模型不要耗时过长,也可以设置超时:
llm = ChatOpenAI(
model="gpt-4o-audio-preview",
timeout=30 # Set timeout to 30 seconds
)gpt-4o-audio-preview 的音频输入与输出
模型已启动并运行,现在来看看它处理音频输入与输出的能力。
上传与编码音频文件
在开始处理音频之前,第一步是将音频文件加载并编码成模型可理解的格式。OpenAI 要求以 base64 编码格式发送音频数据,因此我们先上传并进行编码。
假设您有一个 .wav 文件需要处理——我将其命名为 gpt.wav。您可以用下面的代码替换为自己的文件。具体加载与准备方式如下:
import base64
# Open the audio file and convert to base64
with open("gpt.wav", "rb") as f:
audio_data = f.read()
# Convert binary audio data to base64
audio_b64 = base64.b64encode(audio_data).decode()这里做了什么?我们以二进制方式读取音频文件("rb" 模式),然后使用 base64 库将其编码为 base64 字符串。这是 OpenAI 处理音频输入所要求的格式。
将音频发送至模型进行转录
音频编码完成后,就可以传给模型了。gpt-4o-audio-preview 模型可以从音频文件中转录语音——如果您需要将播客、语音备忘或会议录音转为文本,这正是您想要的!我们来看看怎么做。
# Define the input message with audio
messages = [
(
"human",
[
{"type": "text", "text": "Transcribe the following:"},
{"type": "input_audio", "input_audio": {"data": audio_b64, "format": "wav"}},
],
)
]
# Send the request to the model and get the transcription
output_message = llm.invoke(messages)
print(output_message.content)在这个示例中,我们向模型发送了两部分数据:
- 一条文本消息,指示其“Transcribe the following.”(转录如下内容)。
- 指定格式为 .wav 的 base64 编码音频数据。
模型会处理这些输入并返回音频的文本转录。例如,如果音频中说的是 “I’m learning how to use AI.”,模型将返回类似 “I'm learning how to use AI.” 的文本输出。
使用 gpt-4o-audio-preview 生成音频输出
gpt-4o-audio-preview 不仅能理解音频——它还可以生成音频。 以下是配置模型以生成音频输出的方法:
llm = ChatOpenAI(
model="gpt-4o-audio-preview",
temperature=0,
model_kwargs={
"modalities": ["text", "audio"], # We’re telling the model to handle both text and audio
"audio": {"voice": "alloy", "format": "wav"}, # Configure voice and output format
}
)
# Send a request and ask the model to respond with audio
messages = [("human", "Are you human? Reply either yes or no.")]
output_message = llm.invoke(messages)
# Access the generated audio data
audio_response = output_message.additional_kwargs['audio']['data']我们来解读一下:
- modalities=["text", "audio"]: 告诉模型我们希望同时处理文本与音频,从而生成口语化回复。
- audio={"voice": "alloy", "format": "wav"}: 指定语音(此处为 "alloy")以及输出格式(.wav)。OpenAI 提供多种声音,您可根据应用需求定制体验。
base64 编码的音频回复保存在 output_message.additional_kwargs['audio']['data'] 中,您可以轻松解码并保存以供播放。
保存并回放音频文件
既然已经生成了音频,您大概会想把它保存并播放,对吗?下面展示如何将 base64 编码的音频数据解码,并保存为 .wav 文件:
# Decode the base64 audio data
audio_bytes = base64.b64decode(output_message.additional_kwargs['audio']['data'])
# Save the audio file
with open("output.wav", "wb") as f:
f.write(audio_bytes)
print("Audio saved as output.wav")现在,您可以使用任意媒体播放器在本地播放该 .wav 文件。因此,当您调用模型时,它不仅生成文本回复,还会生成一段朗读该回复的音频文件。
gpt-4o-audio-preview 的高级用法
本节将介绍如何为 gpt-4o-audio-preview 绑定工具、处理更复杂的工作流,甚至将多个步骤串联起来,创建全自动化解决方案。如果您想构建一个不仅能转录音频、还可从外部来源获取信息的语音助手,这部分内容会很有帮助。
工具调用
先从工具调用开始。这是教会 AI 模型如何使用外部工具或函数以提升能力。除了处理文本或音频,模型还能执行其他任务,如从 API 获取数据、进行计算,或查询天气信息。
OpenAI 的 gpt-4o-audio-preview 模型可通过 LangChain 的 bind_tools 方法与其他工具和函数结合。借助该方法,您可以创建一个流畅的工作流,让模型自行决定何时以及如何使用您提供的工具。
下面我将演示一个将工具绑定到模型的实用示例。在这个案例中,我们将绑定一个获取天气的工具。
首先,我们定义一个表示所需工具的 Pydantic 模型。然后将该工具绑定到 gpt-4o-audio-preview,使其在必要时被调用。为此,您需要从 OpenWeatherMap 获取一个 API 密钥。
import requests
from pydantic import BaseModel, Field
# Define a tool schema using Pydantic
class GetWeather(BaseModel):
"""Get the current weather in a given location."""
location: str = Field(..., description="The city and state, e.g. Edinburgh, UK")
def fetch_weather(self):
# Using OpenWeatherMap API to fetch real-time weather
API_KEY = "YOUR_API_KEY_HERE" # Replace with your actual API key
base_url = f"http://api.openweathermap.org/data/2.5/weather?q={self.location}&APPID={API_KEY}&units=metric"
response = requests.get(base_url)
if response.status_code == 200:
data = response.json()
weather_description = data['weather'][0]['description']
temperature = data['main']['temp']
return f"The weather in {self.location} is {weather_description} with a temperature of {temperature}°C."
else:
# Print the status code and response for debugging
print(f"Error: {response.status_code}, {response.text}")
return f"Could not fetch the weather for {self.location}."
# Example usage
weather_tool = GetWeather(location="Edinburgh, GB") # Using city name and country code
ai_msg = weather_tool.fetch_weather()
print(ai_msg)让我们看看发生了什么:
- 定义工具: 我们定义了一个名为 GetWeather 的工具,它接收位置作为输入,并使用 OpenWeatherMap API 返回该位置的当前天气。
- 查询爱丁堡天气: 本例中,我们查询的是英国爱丁堡的天气。
- 实时天气数据: 该工具通过外部 API 获取实时天气数据并返回。
在这个例子中,我想知道爱丁堡的天气。运行后得到的输出为:The weather in Edinburgh, GB is broken clouds with a temperature of 13.48°C.
串联任务:构建多步骤工作流
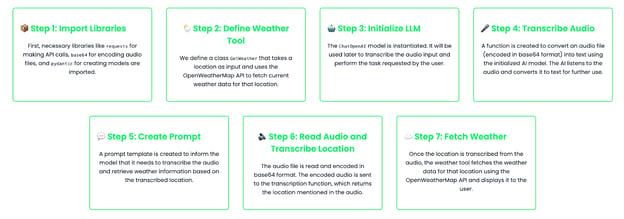
通过串联任务,您可以创建多步骤工作流,将多个工具与模型调用组合起来处理复杂请求。设想这样一个场景:您希望助手先转录音频,然后根据音频中提到的位置执行操作。在本例中,我们将把音频转录与基于转录位置的天气查询串联起来。
import base64
import requests
from pydantic import BaseModel, Field
from langchain_core.prompts import ChatPromptTemplate
from langchain_openai import ChatOpenAI
# Define the tool schema for fetching weather
class GetWeather(BaseModel):
"""Get the current weather in a given location."""
location: str = Field(..., description="The city and state, e.g. Edinburgh, UK")
def fetch_weather(self):
# Using OpenWeatherMap API to fetch real-time weather
API_KEY = "YOUR_API_KEY_HERE" # Replace with your actual API key
base_url = f"http://api.openweathermap.org/data/2.5/weather?q={self.location}&appid={API_KEY}&units=metric"
response = requests.get(base_url)
if response.status_code == 200:
data = response.json()
weather_description = data['weather'][0]['description']
temperature = data['main']['temp']
return f"The weather in {self.location} is {weather_description} with a temperature of {temperature}°C."
else:
return f"Could not fetch the weather for {self.location}."
# Instantiate the LLM model
llm = ChatOpenAI(
model="gpt-4o-audio-preview"
)
# Function to handle audio transcription using the LLM
def audio_to_text(audio_b64: str) -> str:
# Define the message to send for transcription
messages = [
(
"human",
[
{"type": "text", "text": "Transcribe the following:"},
{"type": "input_audio", "input_audio": {"data": audio_b64, "format": "wav"}},
],
)
]
# Invoke the model and get the transcription
output_message = llm.invoke(messages)
# Return the transcription from the model's output
return output_message.content
# Create a prompt template for transcription and weather lookup
prompt = ChatPromptTemplate.from_messages(
[
("system", "You are an assistant that transcribes audio and fetches weather information."),
("human", "Transcribe the following and tell me the weather in the location mentioned in the audio."),
]
)
# Bind the tool to the model
llm_with_tools = llm.bind_tools([GetWeather])
# Chain the transcription and weather tool
chain = prompt | llm_with_tools
# Read and encode the audio file in base64
audio_file = "weather_input.wav" #Replace with your audio file
with open(audio_file, "rb") as audio_file:
audio_b64 = base64.b64encode(audio_file.read()).decode('utf-8')
# Transcribe the audio to get the location
transcribed_location = audio_to_text(audio_b64)
# Print the transcription result for debugging
print(f"Transcribed location: {transcribed_location}")
# Check if transcription returned a valid result
if transcribed_location:
# Fetch weather for the transcribed location
weather_tool = GetWeather(location=transcribed_location)
weather_result = weather_tool.fetch_weather()
print(f"Weather result: {weather_result}")
else:
print("No valid location was transcribed from the audio.")代码要点如下:
- 音频转录: 用户提供 base64 编码的音频输入。该音频被发送至模型进行转录。例如,转录结果可能为 “Edinburgh”。
- 天气查询: 完成转录并确定位置后,模型调用 GetWeather 工具以获取该位置的天气。
- 全自动工作流: 该设置创建了一个自动化的多步骤工作流:模型先理解音频内容(转录),再据此获取相关的天气数据。
在这个例子中,我给模型一段我说出 “Edinburgh” 的音频。得到的输出是:Transcribed location: Edinburgh
Weather result: The weather in Edinburgh is broken clouds with a temperature of 13.47°C.
微调 gpt-4o-audio-preview
在某些情况下,您可能希望对模型进行微调,以更有效地处理特定任务。比如,如果您在构建用于转录医学音频的应用,可能希望模型对医学术语和行话有更深入的理解。OpenAI 允许您通过自定义数据集来微调模型。
我们来看一下如何进行:
import base64
from langchain_openai import ChatOpenAI
# Step 1: Instantiate the fine-tuned audio-capable model
fine_tuned_model = ChatOpenAI(
temperature=0,
model="ft:gpt-4o-audio-preview:your-organization::model-id"
)
# Step 2: Capture and encode the input audio file (medical report)
audio_file = "medical_report.wav"
with open(audio_file, "rb") as audio_file:
audio_b64 = base64.b64encode(audio_file.read()).decode('utf-8')
# Step 3: Create the message structure for transcription request
messages = [
(
"human",
[
{"type": "text", "text": "Please transcribe this medical report audio."},
{"type": "input_audio", "input_audio": {"data": audio_b64, "format": "wav"}},
],
)
]
# Step 4: Invoke the fine-tuned model to transcribe the audio
result = fine_tuned_model.invoke(messages)
# Step 5: Extract and print the transcribed text from the response
transcription = result.content # This contains the transcription
print(f"Transcription: {transcription}")
# Debugging: Print the full structure of the additional_kwargs for inspection
print(result.additional_kwargs)这里使用的是一个专门针对医学音频训练过的微调模型,但您也可以针对其他用例进行微调,例如法律转录、客服录音或播客编辑等。
实践示例:构建语音助手
最后,让我们看一个实践示例:构建一个语音助手,它通过音频接收用户提问,生成答案,并用音频进行回复。
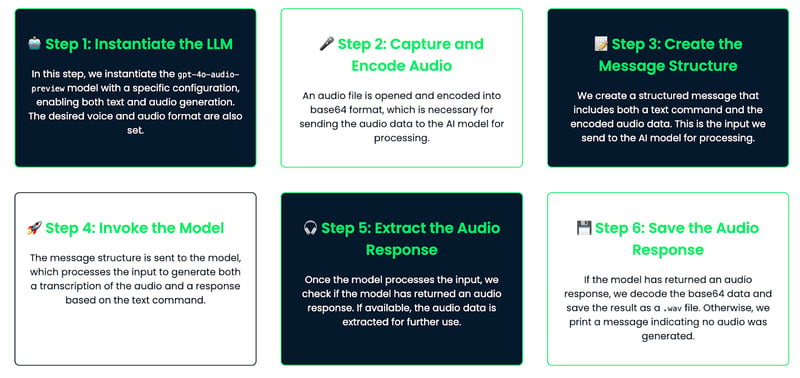
工作流拆解
我们的工作流如下:
- 用户对着麦克风说话,音频被捕获。
- 模型对音频进行转录。
- 基于转录内容生成答案。
- 模型生成可回放给用户的音频回复。
实现
我们来看看如何编写代码:
import base64
from langchain_openai import ChatOpenAI
# Step 1: Instantiate the audio-capable model with configuration for generating audio
llm = ChatOpenAI(
model="gpt-4o-audio-preview",
temperature=0,
model_kwargs={
"modalities": ["text", "audio"], # Enable both text and audio modalities
"audio": {"voice": "alloy", "format": "wav"}, # Set the desired voice and output format
}
)
# Step 2: Capture and encode the audio
audio_file = "math_joke_audio.wav" #You can replace your audio file here
with open(audio_file, "rb") as audio_file:
audio_b64 = base64.b64encode(audio_file.read()).decode('utf-8')
# Step 3: Create the message structure for transcription and audio response
messages = [
(
"human",
[
{"type": "text", "text": "Answer the question."},
{"type": "input_audio", "input_audio": {"data": audio_b64, "format": "wav"}},
],
)
]
# Step 4: Invoke the model to transcribe the audio and generate a response
result = llm.invoke(messages)
# Step 5: Extract the audio response
audio_response = result.additional_kwargs.get('audio', {}).get('data') # Safely check if audio exists
# Step 6: Save the audio response to a file if it exists
if audio_response:
# Decode the base64 audio data and save it as a .wav file
audio_bytes = base64.b64decode(audio_response)
with open("response.wav", "wb") as f:
f.write(audio_bytes)
print("Audio response saved as 'response.wav'")
else:
print("No audio response available")工作原理
我们来拆解一下其原理:
- 音频输入: 用户提供音频输入,例如提出问题(如 “Tell me a math joke”)。音频将被编码为 base64 并传给助手。
- 转录: 模型将音频转为文本。如果您想记录或展示该内容,也可以使用。
- 生成回复: 基于转录内容,模型使用其内部知识生成答案(例如,“法国的首都是巴黎”)。
- 音频输出:将回复转换为音频格式。音频被保存为文件(如 “response.wav”),可用任意音频播放器回放给用户。
该助手专为语音交互而设计。它聆听用户的声音,理解问题,然后用自己的声音作答。此设置非常适合构建简易语音助手,后续也可按需扩展升级!
结语
在本教程中,我们探索了 OpenAI 的 gpt-4o-audio-preview 模型,涵盖了环境搭建、音频输入/输出、高级用法,甚至构建了一个基础语音助手。这个强大的模型为创建真实世界的音频应用提供了坚实基础。
如果您想进一步提升 LangChain 的实战能力,推荐阅读以下博文:

Ana Rojo Echeburúa 是一位人工智能与数据专家,拥有应用数学博士学位。她热衷于将数据转化为可执行的洞见,并在带领技术团队方面拥有丰富经验。Ana 喜欢与客户密切合作,解决其业务难题并打造创新的 AI 解决方案。她以出色的问题解决能力和清晰的沟通著称,对人工智能,尤其是生成式 AI 充满热情。Ana 致力于持续学习与负责任的 AI 开发,同时专注于简化复杂问题,并以通俗易懂的方式解释技术。
想象一下构建一个语音应用,比如客服机器人或播客转录器。通常,您需要为转录和音频生成等任务准备多个工具。OpenAI 的 gpt-4o-audio-preview 模型通过同时理解和生成文本与音频,简化了这一过程。
在本教程中,我们将探索这一强大模型,并讲解如何将其与 LangChain 结合以实现流畅的音频处理。我将解释如何设置该模型、处理音频输入、生成文本与音频回复,并将其整合到实际应用中。