You are a GitHub Issue Triage agent.
Input: a public GitHub repository URL (e.g., https://github.com/OWNER/REPO).
Task:
1) Find the repository and the 10–20 most recent *open* issues.
2) For each issue, produce:
-`label`: one of ["bug","feature","question","chore","docs"]. Be strict.
-`summary`: 1–2 sentences in plain English that restates the problem or request.
-`duplicate_query`: a GitHub search string likely to find duplicates. Use:
repo:OWNER/REPO is:issue (STATE OR KEYWORDS …)
Prefer 2–4 high-signal tokens from the issue title/body; include synonyms.
-`assignee_hints`: array of up to 3 GitHub usernames to consider assigning.
Heuristics: past commit/file authors, most recent commenters with code
context, codeowners, or frequent resolvers of similar issues.
-`evidence`: an array of `{url, title}` for 1–3 canonical links
(the issue URL itself is allowed; add one extra context link if useful).
-`confidence`: 0–1 float confidence for your label.
3) If fewer than 3 issues are open, expand to the last 30 days including closed.
Constraints & quality bar:
- Do not invent usernames. Only output handles you can infer from the repo or issues.
- Prefer precise duplicate queries over long ones.
- Keep `summary` ≤ 280 chars.
- Include citations for any non-issue links you add.
技术支持
4. 在 Tools 选项卡下,点击 +,为该代理启用 Web Search 工具。
5. 最后,点击切换按钮,在 output format 选项卡中选择JSON 作为结构化输出。将弹出类似 Excel 的窗口,按如下所示填写参数:
You are a Release Manager assistant.
You will receive the JSON produced by the previous GitHub Agent. Create a concise triage report that a maintainer can act on immediately.
Report format:
- Repo header with link.
- Triage table (or bullet list) grouped by label in the order: bug, feature, question, chore, docs.
  For each issue: #number, title (link), 1-line summary, confidence (0–1), and a clickable “Duplicates” GitHub search using duplicate_query.
- “Suggested assignees” section: aggregate the top usernames across all issues and list why they were suggested (e.g., “owns file X”, “fixed similar Y”).
- “Notable risks” section: 2–4 bullets calling out breaking risks or customer impact.
- Keep the whole report under 400 words.
Rules:
- Do not invent data not present in the JSON input.
- If error is set or the issues array is empty, output a short diagnostic instead.技术支持
4. 将输出格式选择为 Text。
现在,您的 Summary 代理会生成面向开发者的摘要报告,最终工作流如下所示:
步骤 5:预览与发布
要运行该工作流,点击 Preview,交互式测试您的工作流。
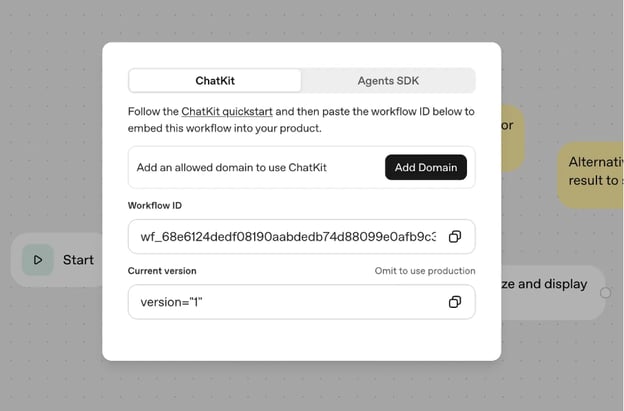
当您对工作流满意后,点击 Publish 发布工作流,以便通过 API 调用。部署完成后,将该 ID 传入您的 ChatKit 集成,或下载 Agents SDK 代码自行部署工作流。



全新推出的 OpenAI AgentKit 是一套新工具包,允许开发者通过可视化工作流界面来设计、连接并部署 AI 代理。它集成了 Agent Builder、ChatKit,以及内置工具集成(如网页搜索、GitHub 和 MCP 服务器),助您从想法快速高效地走到可用代理。
在本指南中,我将带您动手搭建一个演示:它会自动扫描仓库、对未关闭的 Issue 进行分类、检测重复项,并将一切汇总成简明报告。您将按部就班地学到如何:
完成后,您的 AgentKit 工作流将如下所示:
如果您还在熟悉 OpenAI,建议先查看我们的OpenAI 基础技能路径。
什么是 AgentKit?
AgentKit 是 OpenAI 最新的用于构建、部署和优化 AI 代理的框架。它旨在让您无需复杂的后端搭建,就能从原型走向生产。
AgentKit 的核心由两个关键组件构成:Agent Builder 和 ChatKit。
Agent Builder 是一个拖拽式可视化界面,让您无需写代码即可设计完整的 AI 工作流。您可以组合多个 Agent 节点(由 GPT 模型驱动),并按逻辑顺序连接起来。
每个代理都可拥有自己的指令、工具(如网页搜索、代码解释器或 API 调用)以及结构化输出模式,您可以将它们串联,构建多步骤自动化。Agent Builder 会自动处理节点间的上下文传递、模型调用和数据格式化,使复杂流程的原型搭建也变得轻松。
来源:ChatKit Playground
当您的工作流准备就绪,ChatKit 让它可以随处部署。它充当集成层,使您可以将工作流嵌入聊天界面、通过 API 暴露,或通过基于模式的配置来管理用户会话。
您甚至可以下载 SDK 自行托管,以便灵活掌控代理的运行方式。
AgentKit 还与Connector Registry 无缝集成,这是一个中心化枢纽,使管理员可以统一管理数据源与工具在 OpenAI 各产品间的连接方式。
借助该集成,您的代理可以安全访问企业资源,如 GitHub、Notion 或内部 API,而无需在代码中硬编码凭证或单独维护集成。
OpenAI AgentKit 演示:搭建一个 GitHub Issue 审查工作流
本节将演示如何使用 AgentKit 的 Agent Builder 构建一个自动化的 GitHub Issue 审查工作流。该工作流由两个互联代理组成:一个从 GitHub 仓库分析 Issue,另一个将结果汇总为简明报告。
其工作方式如下:
https://github.com/OWNER/REPO)。最终,您将拥有一个功能完整的多代理工作流,将原始的 GitHub Issue 转化为可执行洞见。
步骤 1:设置 Agent Builder
前往AgentKit Playground,使用您的 OpenAI 账号登录或注册。登录后,您将进入可视化工作流编辑器,在这里可以轻松设计、连接并配置代理。
现在,让我们创建一个工作流开始动手。
步骤 2:创建工作流
在构建代理之前,我们需要先创建一个工作流,用于定义代理如何连接与交互。工作流充当不同节点(如输入、处理、输出)之间的控制流。
首先点击 + Create 创建一个新工作流,并将其命名为 GitHub Issue Assistant 之类的名称。创建后,您会看到一个带有 Start 节点的空白画布,它充当工作流中所有操作的入口。
画布准备就绪,现在我们可以开始添加并连接多个节点,构建工作流逻辑。
步骤 3:创建 GitHub 代理
此步骤中,我们将在 Start 节点旁添加一个 GitHub 代理节点,以处理用户输入的仓库链接。操作分 6 步:
1. 在侧边栏点击 Agent,在 Start 节点旁添加一个代理节点。
2. 双击该代理节点进入参数设置,将代理名称修改为“GitHub Agent”。
3. 将以下指令添加到指令框:
4. 在 Tools 选项卡下,点击
+,为该代理启用 Web Search 工具。5. 最后,点击切换 按钮,在 output format 选项卡中选择 JSON 作为结构化输出。将弹出类似 Excel 的窗口,按如下所示填写参数:
您可以点击 Generate,让 GPT 自动为您填充该模式。
6. 点击 Update 保存设置。
至此,我们的 GitHub 代理已准备好分析仓库并对其 Issue 进行分类。
步骤 4:创建摘要代理
接下来,让我们把 GitHub 代理生成的内容汇总成一份报告。为此,我们设置一个摘要代理,接收上一个节点的 JSON 输出,并返回文本摘要作为输出。
4. 将输出格式选择为 Text。
现在,您的 Summary 代理会生成面向开发者的摘要报告,最终工作流如下所示:
步骤 5:预览与发布
要运行该工作流,点击 Preview,交互式测试您的工作流。