Cours
Introduction à Git
2 h
79.3K
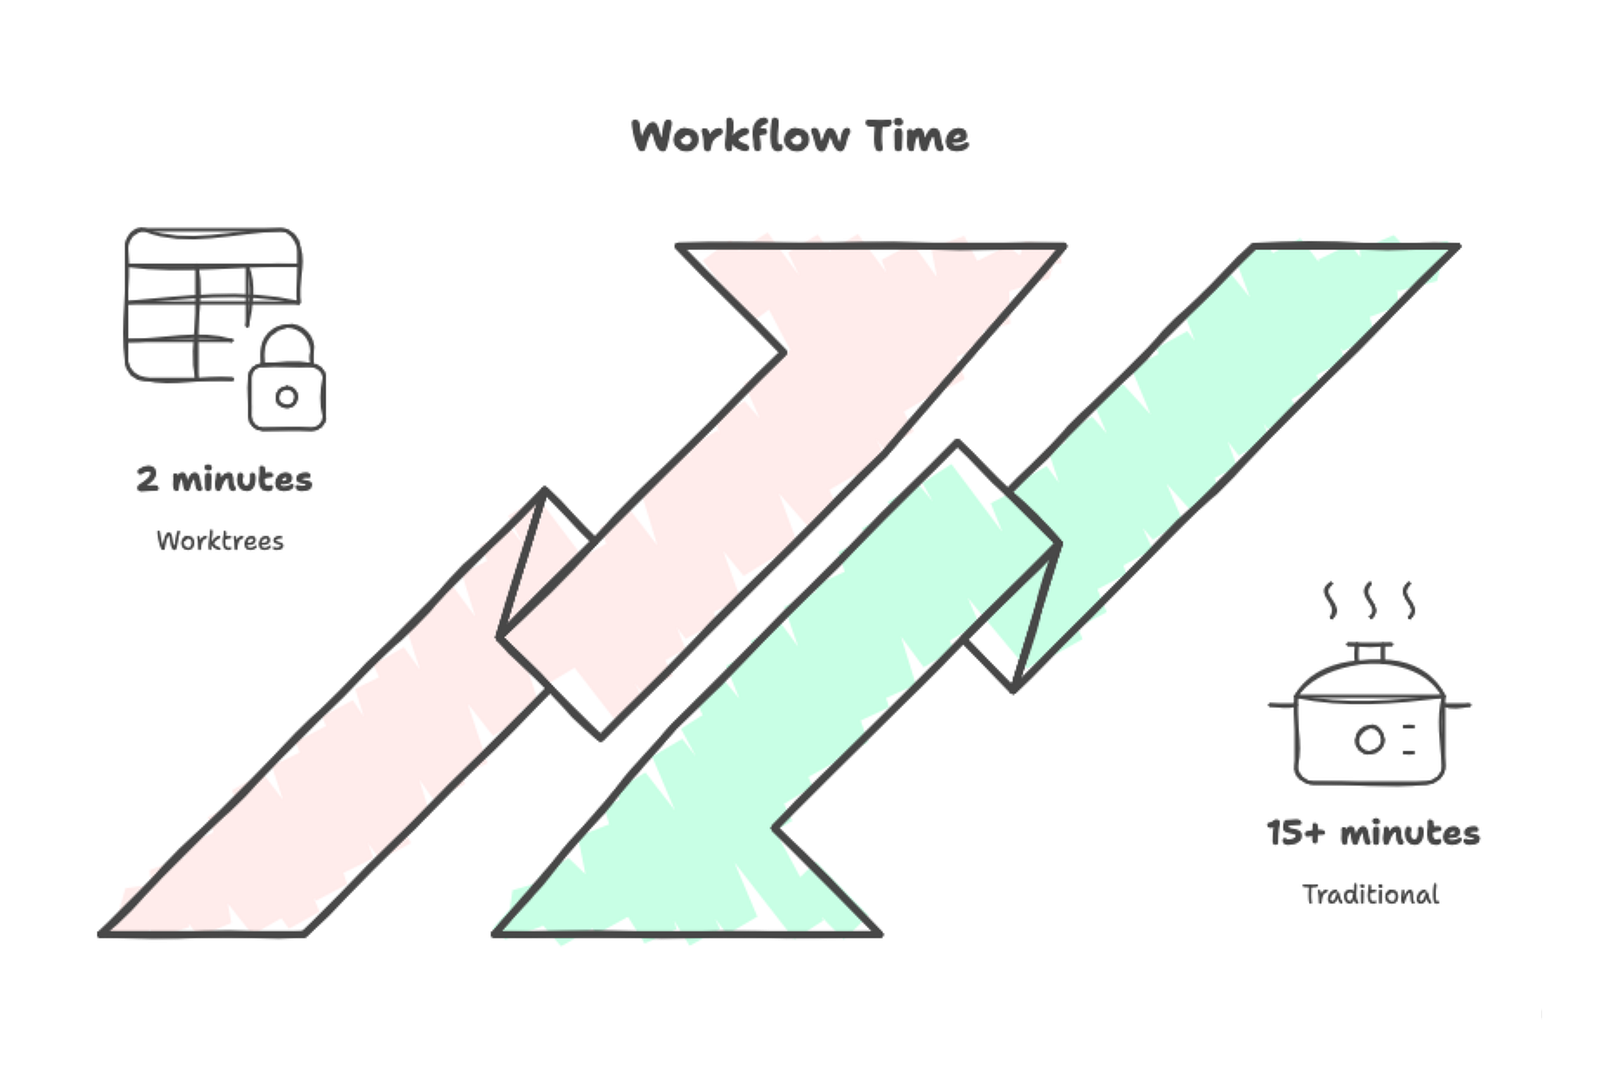
Vous travaillez sur une branche de fonctionnalité quand un collègue vous demande de relire sa pull request. Vous pourriez faire un stash, changer de branche et espérer vous souvenir où vous en étiez. Ou bien committer un travail à moitié fait pour ne rien perdre. Et puis survient l'urgence : un hotfix, la production est à l'arrêt et vous êtes en plein refactoring qui touche la moitié de la base de code. Chaque changement de contexte comme celui‑ci coûte 10 à 15 minutes de remise en place et brise votre concentration.
Git worktree résout ce problème en vous permettant de consulter plusieurs branches en parallèle dans des répertoires distincts. Au lieu de stasher ou de committer un travail incomplet, il vous suffit de faire cd vers un autre répertoire où une autre branche est déjà checkoutée. Travaillez sur le hotfix, déployez‑le, puis revenez avec cd à votre fonctionnalité exactement dans l'état où vous l'aviez laissée.
Dans ce tutoriel, je vous montre comment créer et gérer des worktrees, éviter les pièges courants et les intégrer à votre flux de travail quotidien. Vous devez déjà comprendre les branches Git, les commits et les opérations de base en ligne de commande. Si vous avez besoin de réviser les fondamentaux de Git, je vous recommande l'introduction à Git de DataCamp pour couvrir l'essentiel.
Git worktree est une fonctionnalité native qui crée des répertoires de travail supplémentaires liés au même dépôt. Votre répertoire de travail principal est le worktree primaire, et chaque worktree additionnel dispose de son propre répertoire avec sa propre branche checkoutée. Tous ces worktrees pointent vers le même dépôt .git.
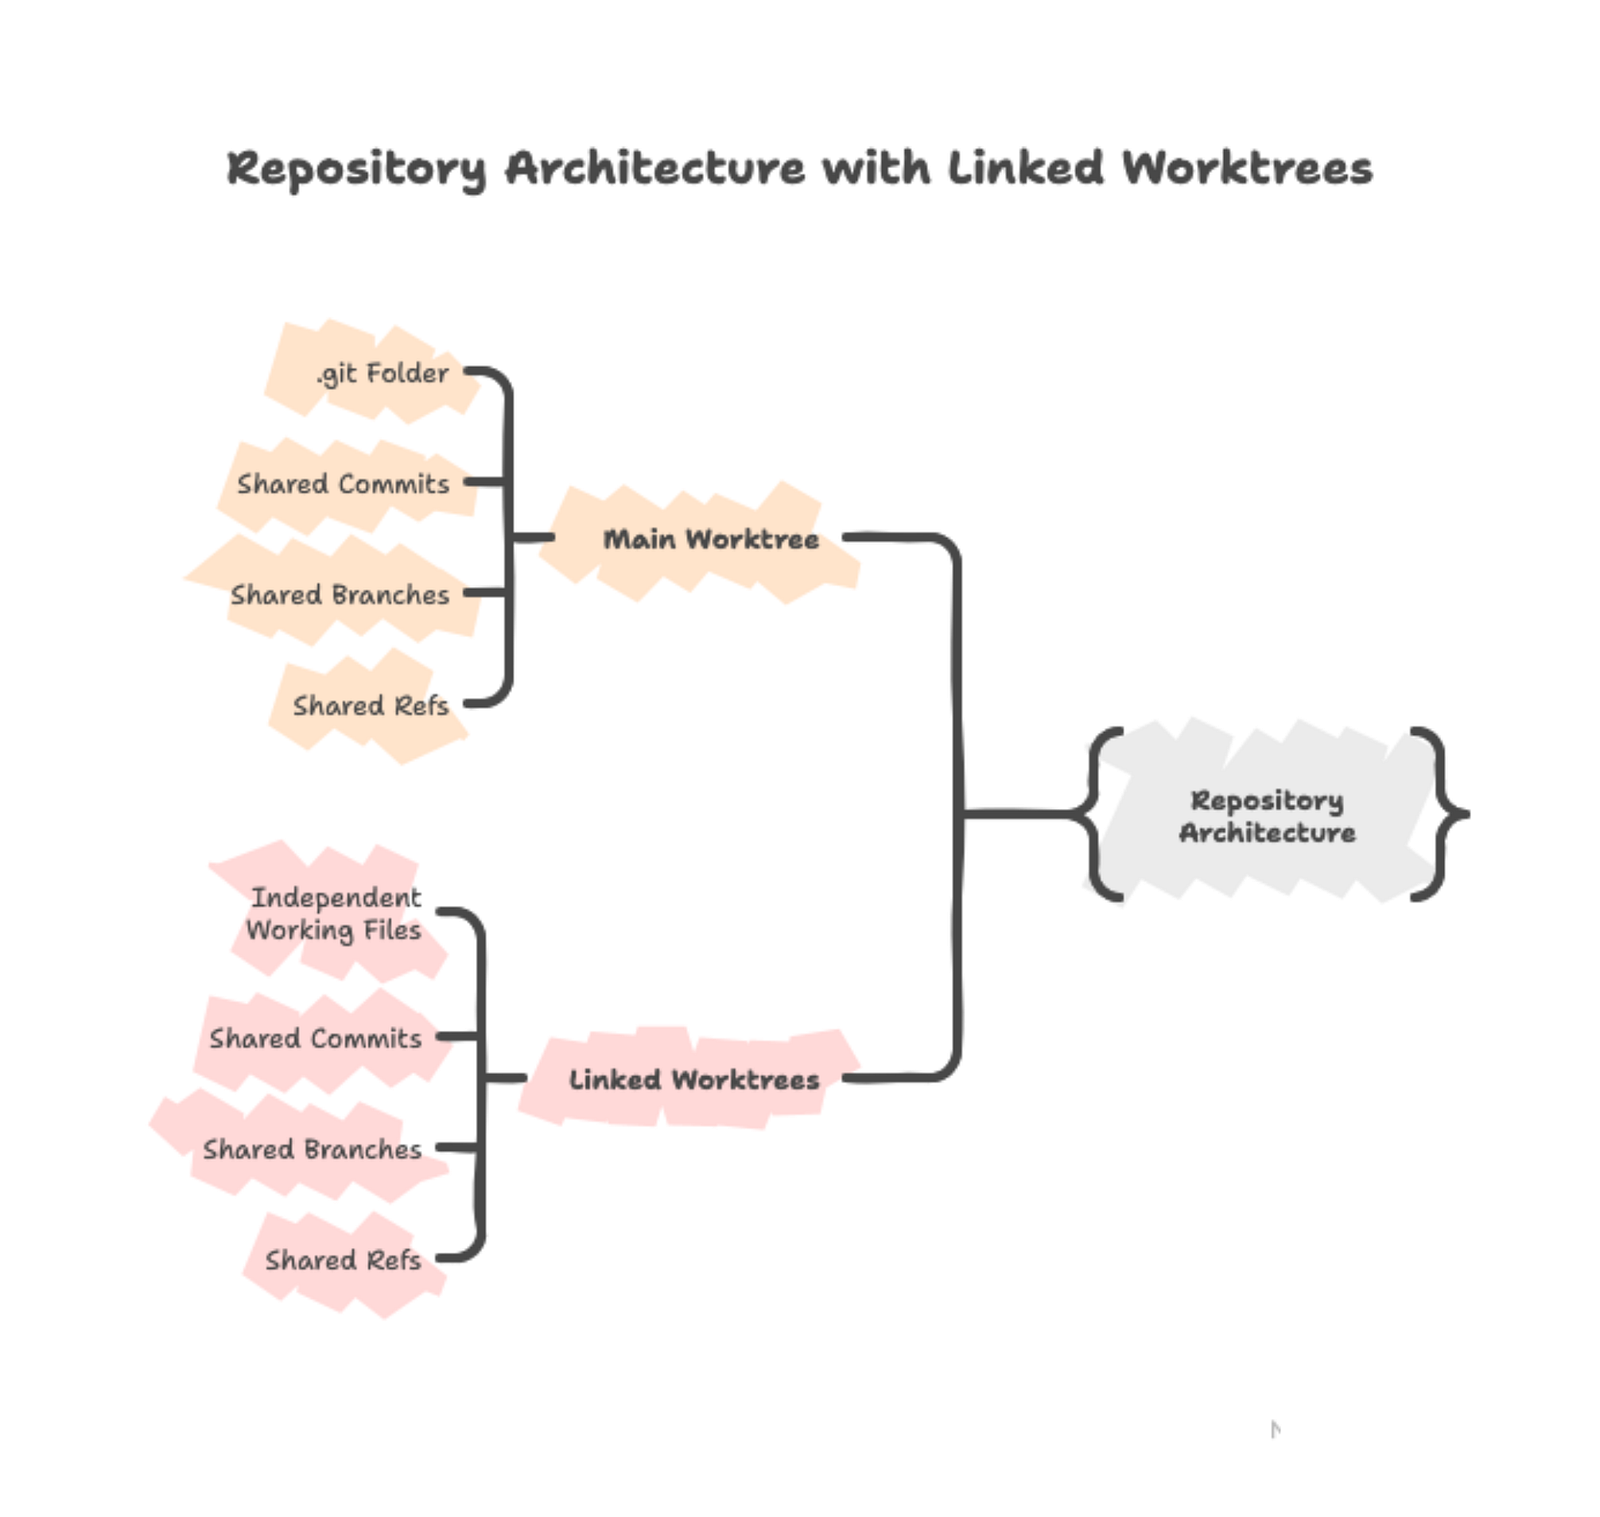
Cette architecture partagée signifie que les commits effectués dans n'importe quel worktree apparaissent immédiatement dans la base de données Git commune, accessible depuis tous les autres worktrees. Les fichiers eux‑mêmes restent indépendants — modifier train.py dans un worktree n'affecte que ce répertoire tant que vous n'avez pas committé les changements.
Vous ne pouvez pas ouvrir plusieurs terminaux dans le même répertoire et travailler sur des branches différentes en parallèle. Git n'autorise qu'une seule branche checkoutée par répertoire. Lorsque vous exécutez git checkout feature-b dans un terminal, cela change les fichiers pour tous les terminaux pointant vers ce répertoire.
Git worktree résout cela en donnant à chaque branche son propre répertoire. Chaque répertoire est totalement indépendant, avec ses propres fichiers, processus en cours et artefacts de build. Passer d'une branche à l'autre devient un cd ../repertoire-different au lieu d'un git checkout branche-differente.
Avant d'utiliser git worktree, vérifiez votre configuration :
git --version pour vérifier. Git worktree est sorti en 2015, la plupart des installations l'incluentVérifiez que worktree est disponible :
git worktree --helpSi la page d'aide s'affiche, vous êtes prêt.
Git worktree est idéal quand changer de branche perturberait votre travail en cours :
Évitez‑le pour des tâches rapides (moins de 10 minutes) où git checkout suffit, ou lorsque vous êtes concentré sur un seul sujet sans interruption prévue.
La meilleure façon de comprendre git worktree est d'en créer un et de le voir à l'œuvre. Nous allons parcourir les commandes de base, explorer la structure créée par Git et observer comment les changements circulent entre les worktrees.
Avant de plonger dans les worktrees, il vous faut un dépôt Git. Si vous avez déjà un projet Python avec plusieurs branches, passez à la section suivante. Sinon, configurons rapidement un pipeline de ML simple :
mkdir ml-pipeline
cd ml-pipeline
git init
Créez un README et un script Python :
echo "# ML Pipeline" > README.md
echo "def load_data():" > train.py
echo "    print('Loading training data...')" >> train.py
Vérifiez que les fichiers ont été créés :
ls
# You should see: README.md  train.py
Committez ces fichiers et créez une branche de fonctionnalité :
git add .
git commit -m "Initial commit"
git branch feature-preprocessing
Vous avez maintenant un dépôt avec deux branches : main (votre branche actuelle) et feature-preprocessing.
Créer un worktree pour une branche existante ne nécessite qu'une seule commande. Checkoutons feature-preprocessing dans un répertoire séparé :
git worktree add ../ml-pipeline-preprocessing feature-preprocessingCela crée un nouveau répertoire nommé ml-pipeline-preprocessing un niveau au‑dessus de votre emplacement actuel, y checkoute la branche feature-preprocessing et le lie à votre dépôt existant.
Git confirme la création :
Preparing worktree (checking out 'feature-preprocessing')
HEAD is now at 0a7f986 Initial commit
Pour un nouveau travail, créez à la fois la branche et le worktree d'un coup :
git worktree add -b feature-visualization ../ml-pipeline-vizL'option -b crée une nouvelle branche appelée feature-visualization et la checkoute dans le nouveau worktree.
Une fois votre worktree créé, vous avez plusieurs répertoires sur votre système de fichiers. Pour tous les lister :
git worktree list/Users/you/projects/ml-pipeline 0a7f986 [main]
/Users/you/projects/ml-pipeline-preprocessing 0a7f986 [feature-preprocessing]La première ligne montre votre worktree principal — le répertoire d'origine contenant le dossier .git. La seconde ligne montre votre worktree lié. Les deux affichent le hash du commit courant et la branche checkoutée.

Chaque répertoire de worktree fonctionne comme un dépôt Git complet. Vous pouvez y naviguer, éditer des fichiers, exécuter git status et faire des commits. Les worktrees liés ne contiennent pas un dossier .git complet — ils ont à la place un fichier .git qui pointe vers le dépôt principal. Dans le .git principal, un dossier worktrees stocke les métadonnées de chaque worktree lié.
Allez dans le worktree feature-preprocessing et faites un commit :
cd ../ml-pipeline-preprocessing
cat >> train.py << 'EOF'

def preprocess_features(df):
   """Normalize numeric features."""
   return (df - df.mean()) / df.std()
EOF
git add train.py
git commit -m "Add feature preprocessing function"
Le commit se déroule normalement :
[feature-preprocessing 7c8d4e2] Add feature preprocessing function
1 file changed, 3 insertions(+)
Revenez dans votre worktree principal et vérifiez l'historique des commits :
cd ../ml-pipeline
git log --oneline --all
Votre nouveau commit apparaît :
7c8d4e2 Add feature preprocessing function
0a7f986 Initial commit
Remarquez comme le commit apparaît immédiatement aux deux endroits sans commande supplémentaire.
Maintenant que vous savez créer et utiliser des worktrees, voyons des scénarios concrets où ils résolvent de vrais problèmes de développement.
Votre collègue a besoin d'un retour sur sa PR. Au lieu de stasher vos changements et de changer de branche, créez un répertoire séparé pour la revue :
git worktree add ../ml-pipeline-review pr/update-training
cd ../ml-pipeline-review
pip install -r requirements.txt
python train_model.py --config experiments/baseline.yaml
Testez les changements et laissez votre feedback. Une fois terminé :
cd ../ml-pipeline
git worktree remove ../ml-pipeline-review
Votre travail initial est resté intact. Pas de stash ni de changement de contexte. Pour plus de stratégies sur des revues de code efficaces, consultez le guide DataCamp des bonnes pratiques de revue de code.
Sans worktrees :
Avec les worktrees :
git worktree add ../ml-pipeline-hotfix main
cd ../ml-pipeline-hotfix
Corrigez et déployez :
git add src/data/validation.py
git commit -m "Fix schema validation for nullable timestamp fields"
git push origin main
cd ../ml-pipeline
git worktree remove ../ml-pipeline-hotfix
Vous reprenez votre refactoring en quelques secondes, avec tous les fichiers exactement comme vous les aviez laissés.
Vous implémentez des métriques personnalisées et un nouveau loader de données — deux fonctionnalités indépendantes. Créez un worktree pour chacune :
git worktree add -b feature-custom-metrics ../ml-pipeline-metrics
git worktree add -b feature-streaming-loader ../ml-pipeline-loader
Votre système de fichiers ressemble maintenant à ceci :
~/projects/
 ml-pipeline/           [main] - votre travail habituel
 ml-pipeline-metrics/   [feature-custom-metrics]
 ml-pipeline-loader/    [feature-streaming-loader]
Exécutez les deux fonctionnalités en parallèle — chacune dans son propre terminal :
# Terminal 1
cd ~/projects/ml-pipeline-metrics
python experiments/evaluate_custom_metrics.py

# Terminal 2
cd ~/projects/ml-pipeline-loader
pytest tests/test_data_loader.py -v
Les deux processus tournent simultanément sans conflit. Lorsqu'une fonctionnalité est terminée, fusionnez‑la et supprimez le worktree :
cd ~/projects/ml-pipeline
git merge feature-custom-metrics
git worktree remove ../ml-pipeline-metrics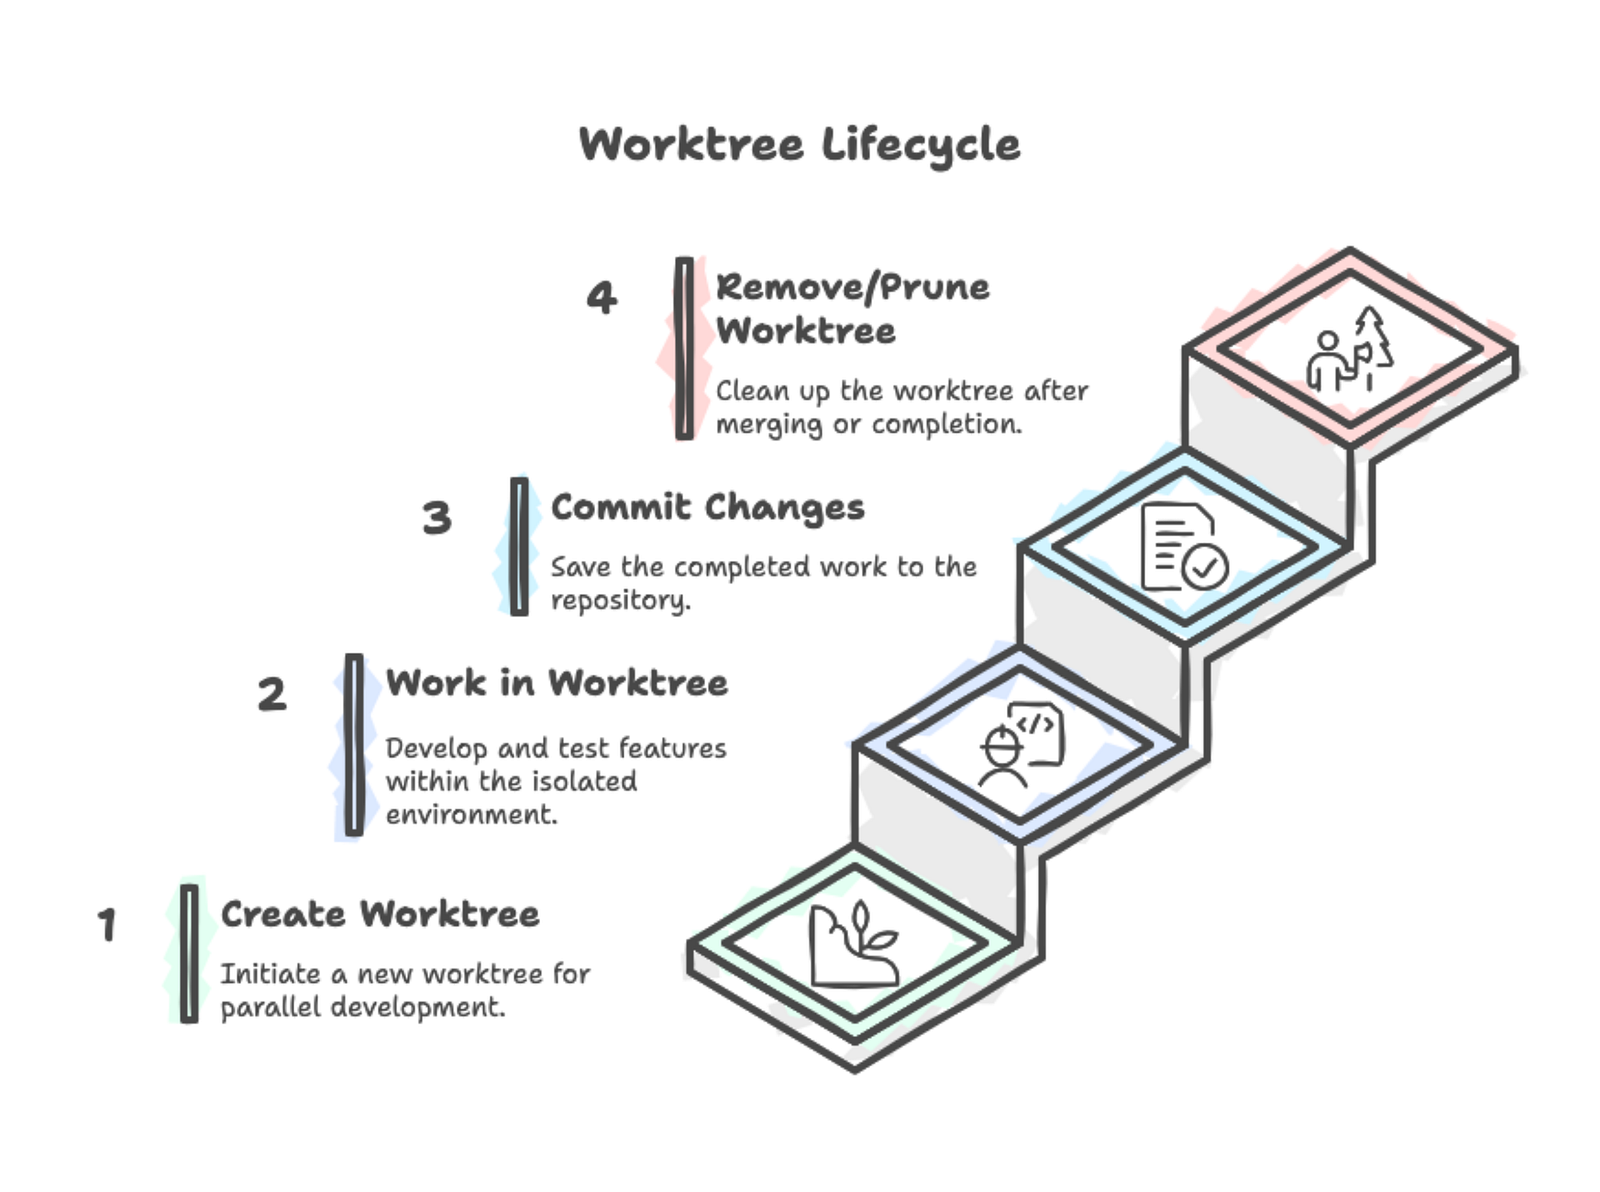
Pour voir tous les worktrees d'un dépôt :
git worktree list/Users/you/projects/ml-pipeline a3f9c81 [main]
/Users/you/projects/ml-pipeline-review b7d4e92 [pr/data-validation]
/Users/you/projects/ml-pipeline-hotfix a3f9c81 [hotfix/schema-bug]Chaque ligne affiche le chemin du répertoire, le hash du commit courant et la branche checkoutée. La première entrée est toujours votre worktree principal (contenant le dossier .git) et les suivantes sont les worktrees liés.
Pour des scripts ou une navigation rapide, extrayez uniquement les chemins :
git worktree list | awk '{print $1}'Quand vous avez fini dans un worktree, supprimez‑le correctement :
cd ~/projects/ml-pipeline
git worktree remove ../ml-pipeline-review
Git protège contre la perte de données. Si vous avez des changements non commités :
git worktree remove ../ml-pipeline-reviewfatal: '../ml-pipeline-review' contains modified or untracked files, use --force to delete itForcez la suppression si vous êtes certain :
git worktree remove --force ../ml-pipeline-reviewSi un worktree est verrouillé, utilisez --force deux fois :
git worktree remove --force --force ../ml-pipeline-lockedSi vous avez supprimé manuellement un répertoire de worktree (rm -rf ou via un gestionnaire de fichiers), Git continue de le suivre en interne. Nettoyez les références orphelines :
git worktree prunePrévisualisez ce qui serait élagué :
git worktree prune --dry-runVoici comment tirer le meilleur parti des worktrees et éviter les erreurs fréquentes.
L'emplacement de vos worktrees compte. La plupart des développeurs les placent comme répertoires frères du dépôt principal :
~/projects/
 ml-pipeline/                    # worktree principal
 ml-pipeline-feature-auth/       # worktree lié
 ml-pipeline-hotfix-login/       # worktree lié
Cette structure garde tout au même endroit et rend les chemins prévisibles. Le motif nomprojet-nombranche indique clairement le contenu de chaque répertoire.
Certains préfèrent un dossier dédié :
~/projects/
 ml-pipeline/                    # worktree principal
 ml-pipeline-worktrees/
   feature-auth/
   hotfix-login/
Choisissez une approche et appliquez‑la systématiquement. Des noms descriptifs comme ml-pipeline-user-authentication rendent les répertoires explicites, tandis que des noms génériques comme ml-pipeline-temp ou ml-pipeline-2 vous obligent à vérifier leur contenu. Considérez les worktrees comme temporaires — créez‑les pour une tâche précise, puis supprimez‑les une fois terminé.
Git empêche de checkout la même branche dans deux worktrees :
git worktree add ../ml-pipeline-duplicate mainfatal: 'main' is already used by worktree at '/Users/you/projects/ml-pipeline'Cette protection existe car vous pourriez produire des commits conflictuels. Si vous avez besoin du même code à deux endroits, créez une nouvelle branche.
Chaque worktree reste sur votre disque tant que vous ne le supprimez pas explicitement. Les anciens worktrees s'accumulent ; des projets peuvent en compter plus de 15 oubliés, consommant des gigaoctets.
Chaque worktree contient une copie complète des fichiers de votre dépôt. Un dépôt de 500 Mo avec 5 worktrees consomme 2,5 Go. Supprimez les worktrees une fois terminés :
git worktree list
git worktree remove ../ml-pipeline-old-featureN'installez pas un worktree à l'intérieur du répertoire d'un autre worktree. Git l'autorise, mais cela crée des structures déroutantes et rend le nettoyage risqué.
Des alias shell font gagner du temps si vous créez souvent des worktrees :
alias gwl='git worktree list'
alias gwa='git worktree add'
alias gwr='git worktree remove'
Pour une configuration plus complète, écrivez une fonction qui crée un worktree et prépare votre environnement de développement en une étape :
wt() {
 git worktree add "../${PWD##*/}-$1" -b "$1"
 cd "../${PWD##*/}-$1"
 python -m venv .venv && source .venv/bin/activate && pip install -r requirements.txt
}
La variable ${PWD##*/} récupère le nom de votre répertoire courant. Exécuter wt feature-logging depuis ml-pipeline crée ml-pipeline-feature-logging, y navigue et configure un environnement virtuel Python avec les dépendances.
Créer un worktree devient une seule commande :
wt feature-custom-metricsAdaptez‑le à votre langage : remplacez la configuration Python par bundle install pour Ruby, cargo build pour Rust, ou npm install pour Node.js.
Votre éditeur ou IDE fonctionne avec les worktrees sans configuration particulière. Chaque worktree est juste un répertoire : ouvrez‑le comme n'importe quel projet. La plupart des éditeurs modernes permettent d'ouvrir plusieurs racines de projet simultanément — vous pouvez avoir trois worktrees ouverts dans une fenêtre et basculer entre eux depuis la barre latérale.
Si vous utilisez des assistants de code IA, les worktrees déverrouillent un flux de travail parallèle très efficace. Cette approche s'est largement répandue chez les développeurs et les équipes en 2024–2025.
Créez des worktrees séparés pour différentes tâches :
git worktree add -b feature-add-logging ../ml-pipeline-logging
git worktree add -b feature-optimize-preprocessing ../ml-pipeline-optim
git worktree add -b bugfix-memory-leak ../ml-pipeline-bugfix
Ouvrez un volet de terminal pour chaque worktree et lancez votre assistant IA :
# Pane 1
cd ~/projects/ml-pipeline-logging
claude

# Pane 2
cd ~/projects/ml-pipeline-optim
claude

# Pane 3
cd ~/projects/ml-pipeline-bugfix
claude
Chaque instance d'IA travaille sur une fonctionnalité différente sans interférence. Des équipes rapportent terminer en quelques heures des travaux qui prenaient auparavant des jours. Par exemple, incident.io exécute 4 à 5 agents Claude Code en parallèle avec ce modèle. Dans un cas, Claude a estimé une amélioration d'UI à 2 heures mais l'a terminée en 10 minutes.
Compromis à prendre en compte :
Cette approche fonctionne bien pour de grandes fonctionnalités indépendantes (30+ minutes chacune) qui ne touchent pas les mêmes fichiers, et si vous disposez d'un quota API suffisant. Évitez‑la pour des correctifs rapides, des fonctionnalités fortement couplées ou à l'approche des limites de débit API.
Souvenez‑vous du scénario du début — un collègue a besoin d'une revue de PR alors que vous êtes en plein développement. Vous connaissez désormais la solution : git worktree add ../ml-pipeline-review pr/branch-name, puis cd pour commencer la revue. Votre travail de fonctionnalité reste intact. Pas de stash, pas de commit à moitié terminé, pas de charge mentale pour reconstruire le contexte au retour. Deux répertoires, deux branches, zéro friction.
Git worktree n'ajoute pas de complexité à votre flux de travail — il en retire. Chaque worktree n'est qu'un répertoire avec une branche checkoutée. Mais cette simplicité déverrouille quelque chose de puissant : la capacité de changer instantanément de contexte sans la charge cognitive du stash, du checkout et de la reconstruction de votre modèle mental.
Lorsque vous devez intégrer les worktrees à des workflows d'équipe comme les pull requests et les revues de code, le parcours de compétences GitHub Foundations de DataCamp couvre les pratiques essentielles pour collaborer efficacement en mode distribué.
Les meilleurs cours Git
Cours
Cours
Cours
blog
Kurtis Pykes
15 min
Tutoriel
Satyabrata Pal
Tutoriel
Tutoriel
Sejal Jaiswal
Tutoriel
Aditya Sharma
Tutoriel
DataCamp Team