
Course
Introduction to Git
2 hr
79K
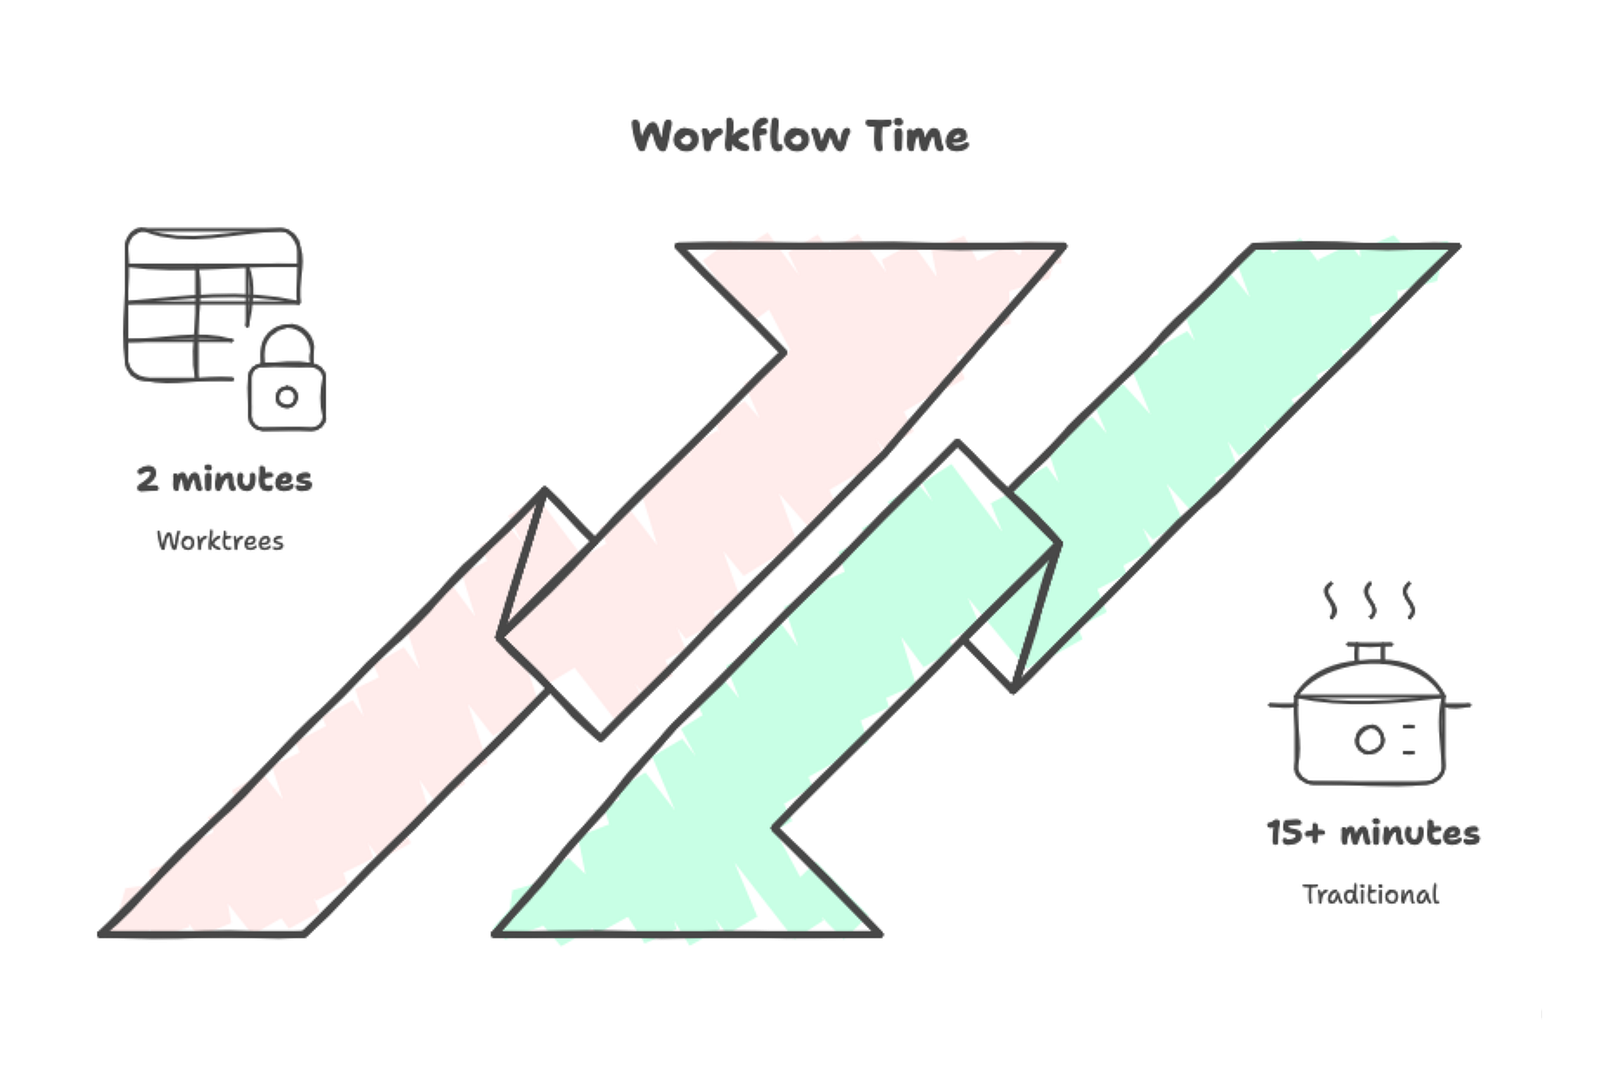
You’re working on a feature branch when a teammate asks you to review their pull request. You could stash your changes, switch branches, and hope you remember where you left off. Or you could commit half-finished work just to avoid losing it. Then there’s the emergency hotfix: production is down, and you’re deep in a refactoring that touches half the codebase. Each context switch like this costs 10–15 minutes of setup time and breaks your focus.
Git worktree solves this by letting you check out multiple branches at the same time in separate directories. Instead of stashing or committing incomplete work, you simply cd to a different directory where another branch is already checked out. Work on the hotfix, deploy it, then cd back to your feature work exactly as you left it.
In this tutorial, I’ll show you how to create and manage worktrees, avoid common pitfalls, and integrate them into your daily workflow. You should already understand Git branches, commits, and basic command-line operations. If you need to brush up on Git fundamentals first, I recommend DataCamp’s Introduction to Git tutorial to cover the essentials.
Git worktree is a built-in feature that creates additional working directories linked to the same repository. Your main working directory is the primary worktree, and each additional worktree you create gets its own directory with its own branch checked out. All these worktrees connect to the same .git repository.
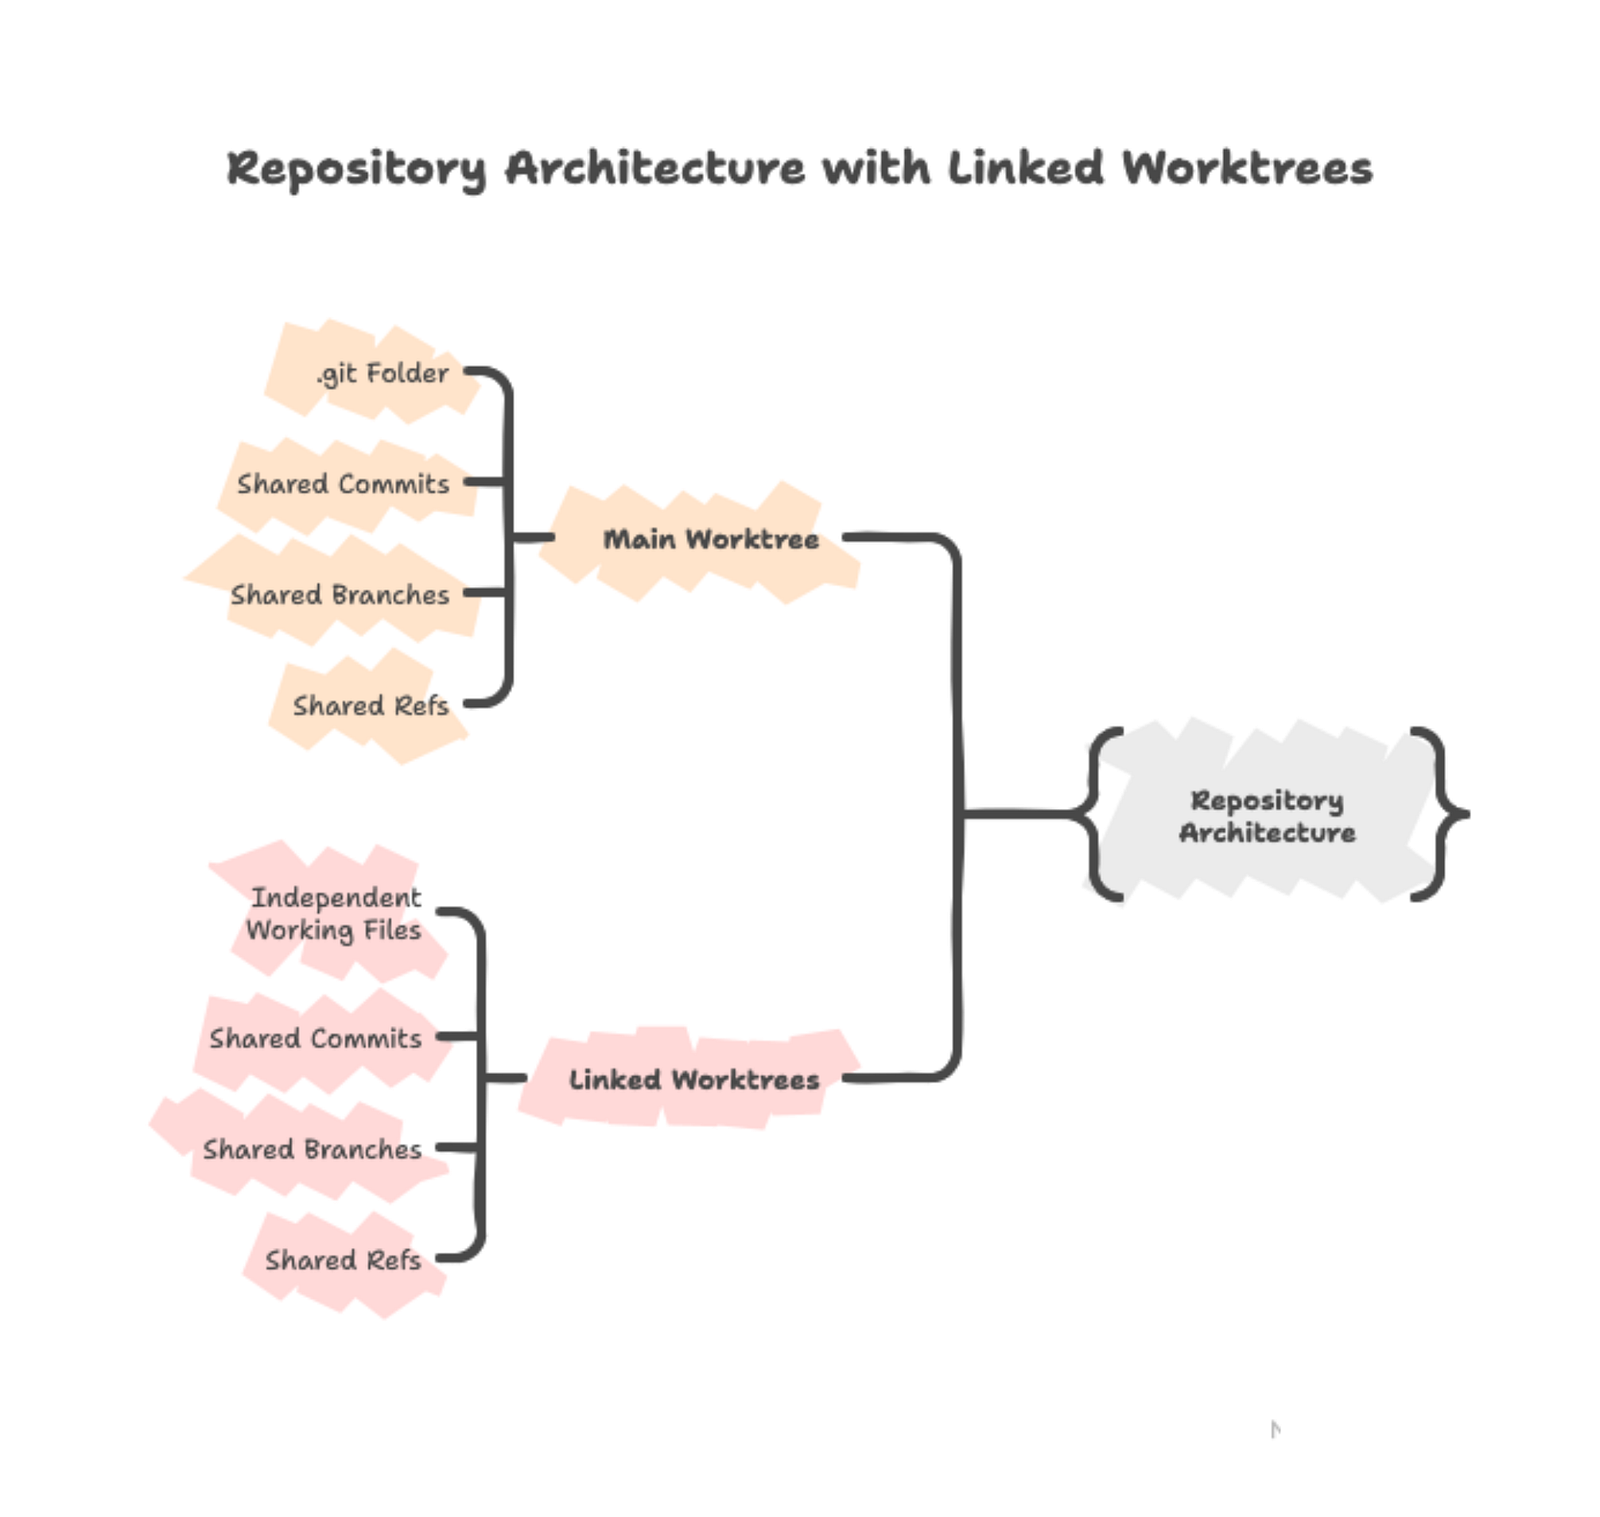
This shared repository architecture means commits you make in any worktree immediately appear in the shared Git database, accessible from all other worktrees. The files themselves stay independent — editing train.py in one worktree only affects that directory until you commit the changes.
You can’t open multiple terminals in the same directory and work on different branches simultaneously. Git only allows one branch checked out at a time per directory. When you run git checkout feature-b in one terminal, it changes the files for every terminal pointing to that directory.
Git worktree solves this by giving each branch its own directory. Each directory is completely independent with its own files, running processes, and build artifacts. Switching between branches becomes cd ../different-directory instead of git checkout different-branch.
Before using git worktree, verify your setup:
git --version to check. Git worktree shipped in 2015, so most installations have itCheck that worktree is available:
git worktree --helpIf this displays the help page, you’re ready.
Git worktree works well when switching branches would interrupt your current work:
Skip it for quick tasks under 10 minutes where git checkout is simpler, or when you're focused on a single piece of work with no interruptions expected.
The best way to understand git worktree is to create one and see it in action. We’ll walk through the basic commands, explore the structure Git creates, and observe how changes flow between worktrees.
Before diving into worktrees, you’ll need a Git repository to work with. If you already have a Python project with multiple branches, skip to the next section. Otherwise, let’s quickly set up a simple ML pipeline:
mkdir ml-pipeline
cd ml-pipeline
git init
Create a README and a Python script:
echo "# ML Pipeline" > README.md
echo "def load_data():" > train.py
echo "    print('Loading training data...')" >> train.py
Verify the files were created:
ls
# You should see: README.md  train.py
Commit these files and create a feature branch:
git add .
git commit -m "Initial commit"
git branch feature-preprocessing
Now you have a repository with two branches: main (your current branch) and feature-preprocessing.
Creating a worktree for an existing branch requires just one command. Let’s check out feature-preprocessing in a separate directory:
git worktree add ../ml-pipeline-preprocessing feature-preprocessingThis creates a new directory called ml-pipeline-preprocessing one level up from your current location, checks out the feature-preprocessing branch there, and links it to your existing repository.
Git confirms the creation:
Preparing worktree (checking out 'feature-preprocessing')
HEAD is now at 0a7f986 Initial commit
For brand-new work, create both a branch and a worktree at once:
git worktree add -b feature-visualization ../ml-pipeline-vizThe -b flag creates a new branch called feature-visualization and checks it out in the new worktree.
With your worktree created, you now have multiple directories on your filesystem. To see them all:
git worktree list/Users/you/projects/ml-pipeline 0a7f986 [main]
/Users/you/projects/ml-pipeline-preprocessing 0a7f986 [feature-preprocessing]The first line shows your main worktree — the original directory containing the .git folder. The second line shows your linked worktree. Both display the current commit hash and the checked-out branch.

Each worktree directory functions like a complete Git repository. You can navigate into it, edit files, run git status, and make commits. Linked worktrees don't contain a full .git directory—instead, they have a .git file that points back to the main repository. Inside the main .git directory, a worktrees folder stores metadata about each linked worktree.
Navigate to the feature-preprocessing worktree and make a commit:
cd ../ml-pipeline-preprocessing
cat >> train.py << 'EOF'

def preprocess_features(df):
   """Normalize numeric features."""
   return (df - df.mean()) / df.std()
EOF
git add train.py
git commit -m "Add feature preprocessing function"
The commit goes through normally:
[feature-preprocessing 7c8d4e2] Add feature preprocessing function
1 file changed, 3 insertions(+)
Return to your main worktree and check the commit history:
cd ../ml-pipeline
git log --oneline --all
Your new commit appears:
7c8d4e2 Add feature preprocessing function
0a7f986 Initial commit
Notice how the commit appears immediately in both locations without any additional commands.
Now that you know how to create and work in worktrees, let’s look at practical scenarios where they solve real development problems.
Your teammate needs feedback on their PR. Instead of stashing your changes and switching branches, create a separate directory for the review:
git worktree add ../ml-pipeline-review pr/update-training
cd ../ml-pipeline-review
pip install -r requirements.txt
python train_model.py --config experiments/baseline.yaml
Test the changes and leave your feedback. When done:
cd ../ml-pipeline
git worktree remove ../ml-pipeline-review
Your original work stays untouched. No stashing or context switching required. For more strategies on effective code reviews, check out DataCamp’s code review best practices guide.
Without worktrees:
With worktrees:
git worktree add ../ml-pipeline-hotfix main
cd ../ml-pipeline-hotfix
Fix and deploy:
git add src/data/validation.py
git commit -m "Fix schema validation for nullable timestamp fields"
git push origin main
cd ../ml-pipeline
git worktree remove ../ml-pipeline-hotfix
You’re back in your refactoring work in seconds, with all files exactly as you left them.
You’re implementing custom metrics and a new data loader — two independent features. Set up a worktree for each:
git worktree add -b feature-custom-metrics ../ml-pipeline-metrics
git worktree add -b feature-streaming-loader ../ml-pipeline-loader
Your filesystem now looks like this:
~/projects/
 ml-pipeline/           [main] - your usual work
 ml-pipeline-metrics/   [feature-custom-metrics]
 ml-pipeline-loader/    [feature-streaming-loader]
Run both features in parallel — each in its own terminal:
# Terminal 1
cd ~/projects/ml-pipeline-metrics
python experiments/evaluate_custom_metrics.py

# Terminal 2
cd ~/projects/ml-pipeline-loader
pytest tests/test_data_loader.py -v
Both processes run simultaneously without conflicts. When a feature is complete, merge it and remove the worktree:
cd ~/projects/ml-pipeline
git merge feature-custom-metrics
git worktree remove ../ml-pipeline-metrics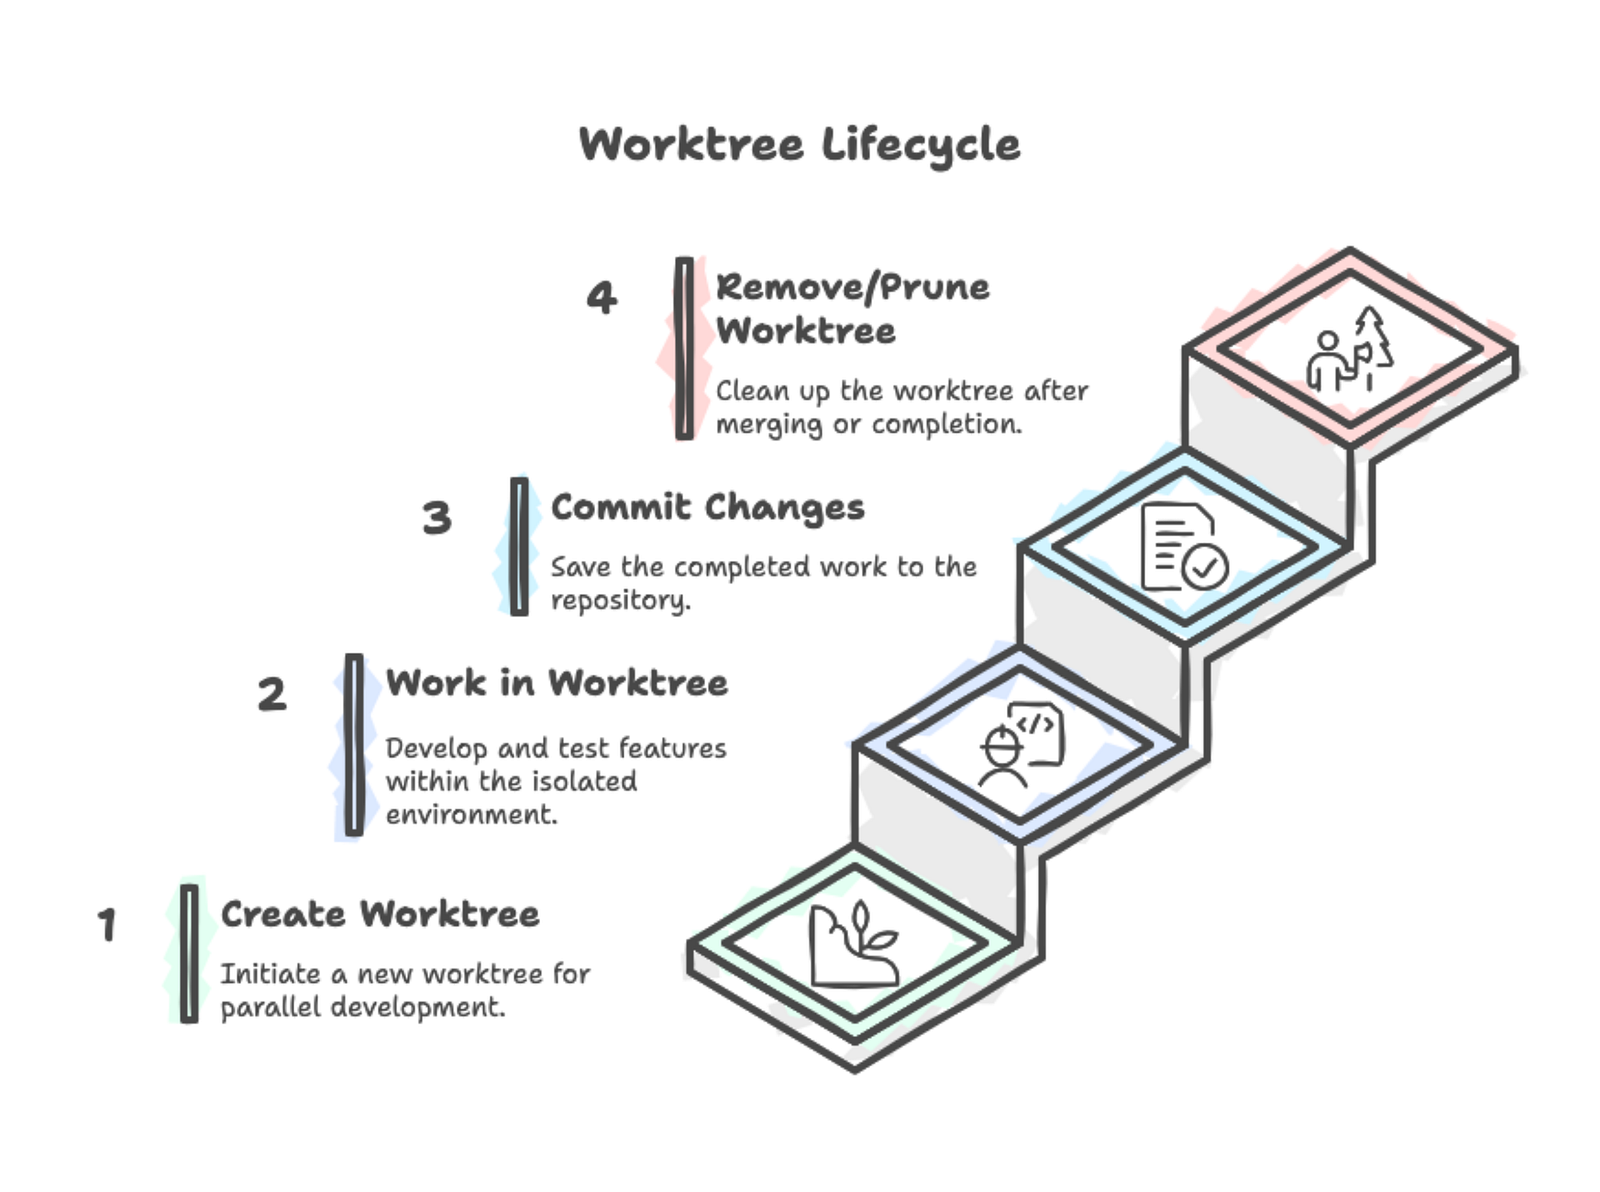
To see all worktrees in a repository:
git worktree list/Users/you/projects/ml-pipeline a3f9c81 [main]
/Users/you/projects/ml-pipeline-review b7d4e92 [pr/data-validation]
/Users/you/projects/ml-pipeline-hotfix a3f9c81 [hotfix/schema-bug]Each line shows the directory path, current commit hash, and checked-out branch. The first entry is always your main worktree (containing the .git folder), and the rest are linked worktrees.
For scripting or quick navigation, extract just the paths:
git worktree list | awk '{print $1}'When you finish work in a worktree, remove it properly:
cd ~/projects/ml-pipeline
git worktree remove ../ml-pipeline-review
Git protects against data loss. If you have uncommitted changes:
git worktree remove ../ml-pipeline-reviewfatal: '../ml-pipeline-review' contains modified or untracked files, use --force to delete itForce removal if you’re certain:
git worktree remove --force ../ml-pipeline-reviewIf a worktree is locked, use --force twice:
git worktree remove --force --force ../ml-pipeline-lockedIf you manually deleted a worktree directory (rm -rf or file manager), Git still tracks it internally. Clean up stale references:
git worktree prunePreview what would be pruned:
git worktree prune --dry-runLet’s take a look at some ways you can get the most out of using worktrees and how to avoid some common mistakes.
Where you put worktrees matters. Most developers place them as sibling directories to the main repository:
~/projects/
 ml-pipeline/                    # main worktree
 ml-pipeline-feature-auth/       # linked worktree
 ml-pipeline-hotfix-login/       # linked worktree
This structure keeps everything in one place and makes paths predictable. The pattern projectname-branchname tells you exactly what each directory contains.
Some developers prefer a dedicated folder:
~/projects/
 ml-pipeline/                    # main worktree
 ml-pipeline-worktrees/
   feature-auth/
   hotfix-login/
Choose an approach and use it consistently. Descriptive names like ml-pipeline-user-authentication make directories self-documenting, while generic names like ml-pipeline-temp or ml-pipeline-2 force you to check what's inside. Treat worktrees as temporary—create them for a specific task, then remove them when done.
Git prevents checking out the same branch in two worktrees:
git worktree add ../ml-pipeline-duplicate mainfatal: 'main' is already used by worktree at '/Users/you/projects/ml-pipeline'This protection exists because you could make conflicting commits. If you need the same code in two places, create a new branch.
Every worktree stays on your filesystem until you explicitly remove it. Old worktrees pile up; projects can accumulate 15+ forgotten worktrees, consuming gigabytes.
Each worktree contains a full copy of your repository’s files. A 500MB repository with 5 worktrees consumes 2.5GB. Remove worktrees when done:
git worktree list
git worktree remove ../ml-pipeline-old-featureDon’t create a worktree inside another worktree’s directory. Git allows this, but it creates confusing directory structures and makes cleanup error-prone.
Shell aliases save time if you create worktrees frequently:
alias gwl='git worktree list'
alias gwa='git worktree add'
alias gwr='git worktree remove'
For more complex setup, write a function that creates a worktree and configures your development environment in one step:
wt() {
 git worktree add "../${PWD##*/}-$1" -b "$1"
 cd "../${PWD##*/}-$1"
 python -m venv .venv && source .venv/bin/activate && pip install -r requirements.txt
}
The ${PWD##*/} extracts your current directory name. Running wt feature-logging from ml-pipeline creates ml-pipeline-feature-logging, navigates into it, and sets up a Python virtual environment with dependencies.
Creating a worktree becomes a single command:
wt feature-custom-metricsAdapt this for your language: replace the Python setup with bundle install for Ruby, cargo build for Rust, or npm install for Node.js.
Your editor or IDE works with worktrees without special configuration. Each worktree is just a directory, so open it like any other project folder. Most modern editors support opening multiple project roots simultaneously — you can have three worktrees open in one window and switch between them in the sidebar.
If you use AI coding assistants, worktrees unlock a powerful parallel workflow. This approach has gained traction among developers and teams in 2024–2025.
Create separate worktrees for different tasks:
git worktree add -b feature-add-logging ../ml-pipeline-logging
git worktree add -b feature-optimize-preprocessing ../ml-pipeline-optim
git worktree add -b bugfix-memory-leak ../ml-pipeline-bugfix
Open a terminal pane for each worktree and start your AI assistant:
# Pane 1
cd ~/projects/ml-pipeline-logging
claude

# Pane 2
cd ~/projects/ml-pipeline-optim
claude

# Pane 3
cd ~/projects/ml-pipeline-bugfix
claude
Each AI instance works on a different feature without interference. Teams report completing work in hours that previously took days. For example, incident.io runs 4–5 Claude Code agents in parallel using this pattern. In one case, Claude estimated a UI improvement would take 2 hours but finished in 10 minutes.
Tradeoffs to consider:
This works well for large independent features (30+ minutes each) where work doesn’t touch the same files, and you have sufficient API quota. Skip it for quick bug fixes, tightly coupled features, or when near API rate limits.
Remember that scenario from the beginning — a teammate needs a PR review while you’re mid-feature. You now know the solution: git worktree add ../ml-pipeline-review pr/branch-name, then cd to start reviewing. Your feature work stays untouched. No stashing, no committing half-finished code, no mental overhead reconstructing context when you return. Two directories, two branches, zero friction.
Git worktree doesn’t add complexity to your workflow — it removes it. Each worktree is just a directory with a branch checked out. But that simplicity unlocks something powerful: the ability to context-switch instantly between tasks without the cognitive load of stashing, checking out, and rebuilding your mental model.
When you need to integrate worktrees with team collaboration workflows like pull requests and code reviews, DataCamp’s GitHub Foundations skill track covers the essential practices for working effectively with distributed teams.
Top Git Courses
Course
Course
Course
Tutorial
François Aubry
Tutorial
Dario Radečić
Tutorial
Patrick Brus
Tutorial
Srujana Maddula
Tutorial
Oluseye Jeremiah
Tutorial
Mark Pedigo