Cours
Comprendre l'intelligence artificielle
2 h
401.5K
When Google's development team internally codenamed their image generation model "Nano Banana," the name stuck. The pro version launched on November 20, 2025, and it fixes problems that frustrated people working with earlier AI image generators.
This tutorial shows you how Nano Banana Pro works, walks through using the API, and helps you decide when to use it instead of the non-pro version.
Nano Banana Pro (gemini-3-pro-image-preview) builds on Gemini 2.5 Flash Image (the original Nano Banana from my previous tutorial) with significant improvements.
The model does four things exceptionally well that earlier versions struggled with:
The model supports 1K, 2K, and 4K resolutions with aspect ratios including 1:1, 16:9, 9:16, and 21:9. Every image includes invisible SynthID watermarking. While you can try it for free through the Gemini app, API access requires billing setup.
Before you can try any of this, you need to get access to the model. Let's look at your options.
You can try Nano Banana Pro for free through the Gemini app at gemini.google.com. Just sign in with your Google account and start generating images. The free access comes with usage limits (Google hasn't published exact numbers), so if you plan to generate many images or build applications, you'll need API access through Google AI Studio or Vertex AI. This requires billing setup, but gives you predictable costs and higher limits.
Head to Google AI Studio and sign in. You'll need to create or link a Google Cloud project, then enable billing (credit card required). Once that's done, generate an API key from the API keys section.
Store your API key securely. Create a .env file in your project directory and add:
GEMINI_API_KEY=your_key_hereNever commit this file to version control. Add .env to your .gitignore file.
The model charges per image generated:
For reference, $10 gets you roughly 75 standard-quality 1K images or 42 4K images. Generation and editing cost the same.
Rate limits vary by your account tier and region (check the official pricing docs for current limits). Enterprise users can access the model through Vertex AI with additional security and compliance features.
With access set up, let's generate your first image and see conversational editing in action.
Time to generate images and see what makes Nano Banana Pro special. We'll generate a striking cosmic scene, transform it conversationally, then blend it with multiple reference images to create a final composition.
First, install the required packages:
pip install google-genai python-dotenv pillowYou'll need google-genai for working with Gemini models, python-dotenv for loading your API key from the .env file, and pillow for handling images.
Good prompts for Nano Banana Pro combine specific details with photography or design terms. Instead of vague descriptions, include concrete visual elements and style references.
Strong prompts typically include:
Here's the complete code to generate an image:
import os
from google import genai
from google.genai import types
from dotenv import load_dotenv
# Load API key
load_dotenv()
client = genai.Client(api_key=os.getenv("GOOGLE_API_KEY"))
# Generate image
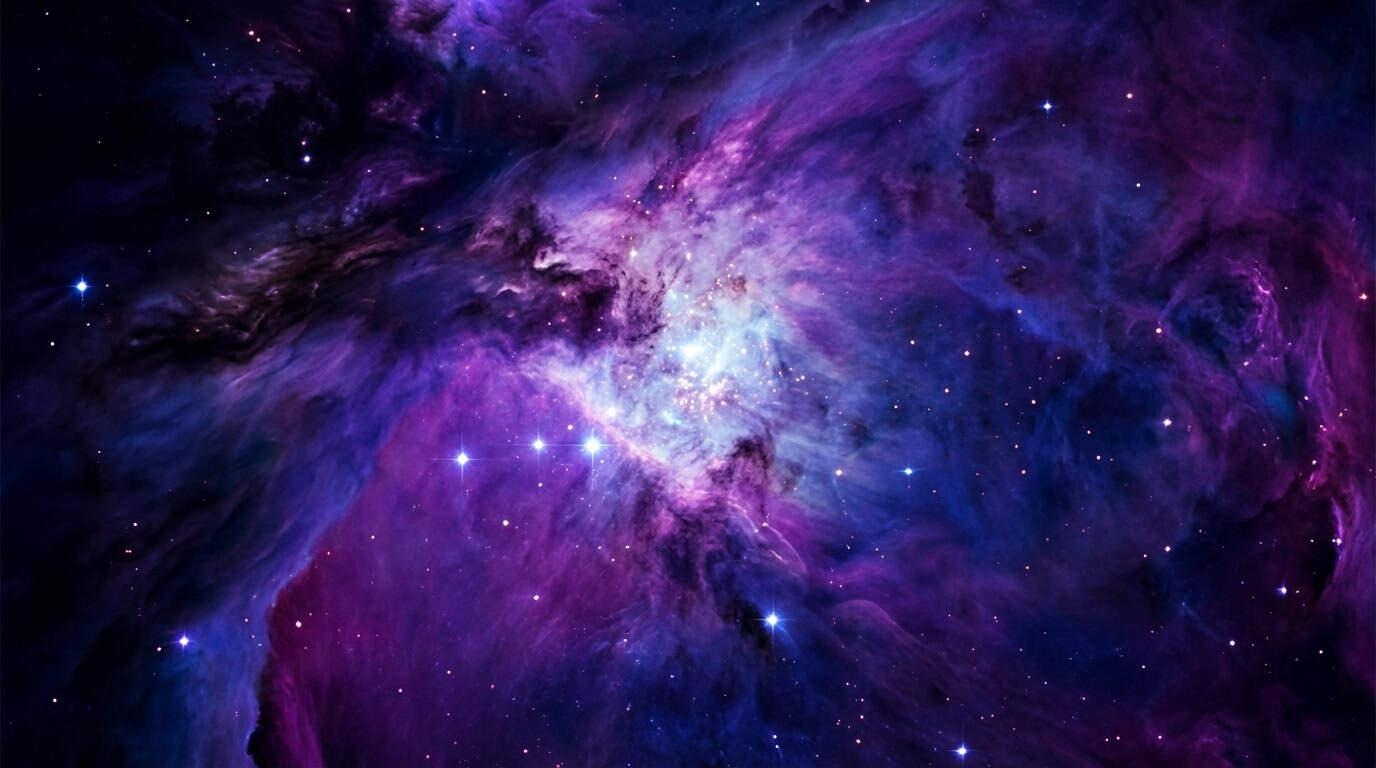
response = client.models.generate_content(
model="gemini-3-pro-image-preview",
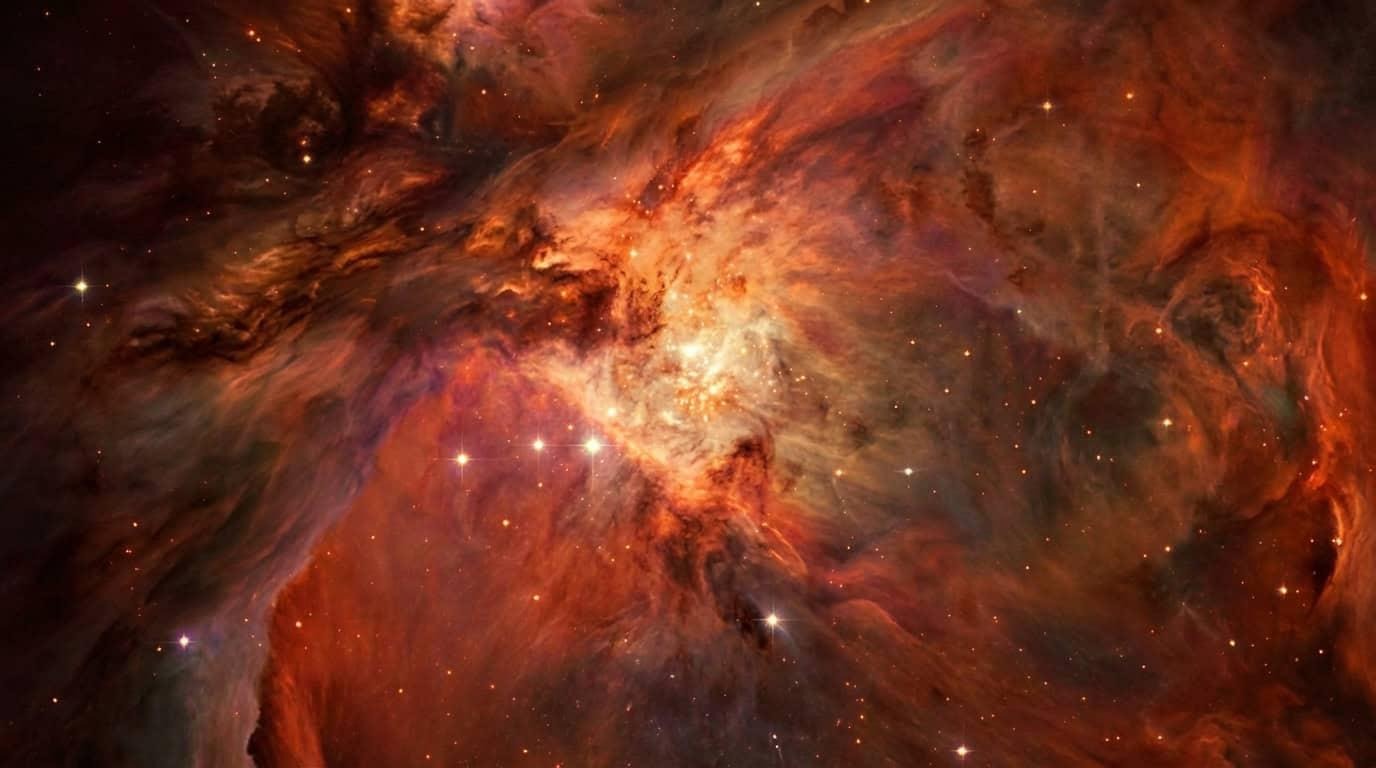
contents="Vast cosmic nebula in deep space. Swirling purple and blue gas clouds with bright star clusters. Ethereal glow. Epic space photography. 16:9 cinematic composition. No planets visible.",
config=types.GenerateContentConfig(
response_modalities=["TEXT", "IMAGE"],
image_config=types.ImageConfig(
aspect_ratio="16:9",
image_size="1K"
),
)
)
# Save the image
for part in response.parts:
if image := part.as_image():
image.save("cosmic_base.png")
print("Image saved!")This code follows the core Nano Banana Pro workflow. The generate_content() method handles image generation. The response_modalities parameter tells the model to return both text and images. Inside image_config, you control the output: aspect_ratio sets the image dimensions (16:9 for widescreen), while image_size determines resolution (1K, 2K, or 4K). The response comes back as parts, which you iterate through to extract and save the generated image.
This generates a striking cosmic nebula:
Now let's see conversational editing transform this scene.
Instead of regenerating from scratch, you can edit images through conversation. Let's transform the nebula's color palette while preserving its structure:
# Load the base image
from PIL import Image
base_image = Image.open("cosmic_base.png")

# Create a chat session for editing
chat = client.chats.create(
    model="gemini-3-pro-image-preview",
    config=types.GenerateContentConfig(
        response_modalities=["TEXT", "IMAGE"],
        image_config=types.ImageConfig(
            aspect_ratio="16:9",
            image_size="1K"
        ),
    )
)

# Edit: Transform colors
response = chat.send_message([
    base_image,
    "Transform this nebula to warm orange and red tones, like a different type of stellar nursery. Keep the same swirling structure and composition."
])

# Save edited image
for part in response.parts:
    if image := part.as_image():
        image.save("cosmic_orange.png")
Same nebula structure, completely different mood:
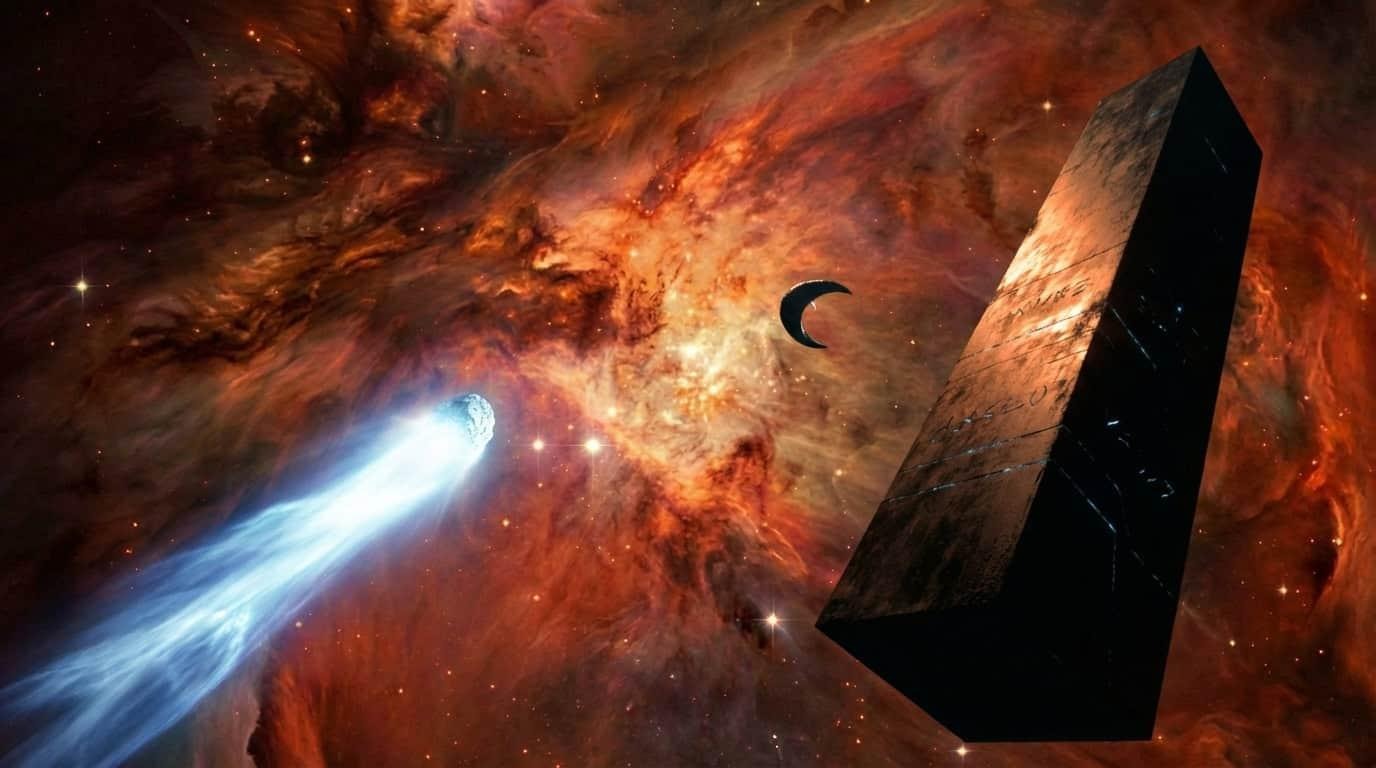
Nano Banana Pro can blend up to 14 reference images while maintaining consistency. Let's combine our orange nebula with two additional elements: a dramatic comet and an ancient alien monolith.
First, generate the two reference images:
# Generate comet reference
comet_response = client.models.generate_content(
    model="gemini-3-pro-image-preview",
    contents="Massive comet with bright glowing nucleus and long ion tail streaming behind. Detailed surface texture on comet head. Ethereal blue-white tail against black space. Dramatic cosmic photography.",
    config=types.GenerateContentConfig(
        response_modalities=["TEXT", "IMAGE"],
        image_config=types.ImageConfig(aspect_ratio="16:9", image_size="1K"),
    )
)

# Save comet
for part in comet_response.parts:
    if image := part.as_image():
        image.save("comet.png")
Here's the comet element:

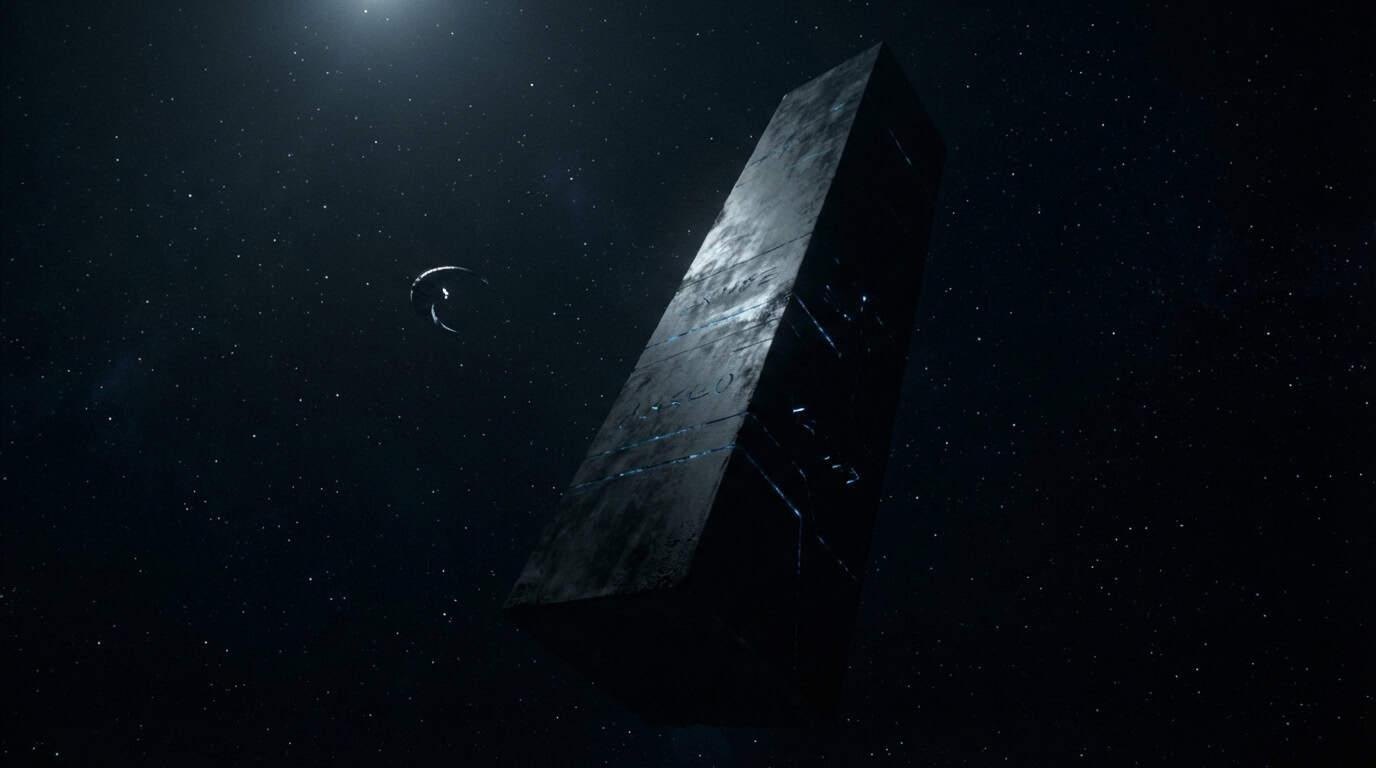
# Generate ancient alien monolith
monolith_response = client.models.generate_content(
    model="gemini-3-pro-image-preview",
    contents="Massive ancient alien monolith floating in space. Towering black rectangular obelisk with subtle geometric patterns. Mysterious glowing symbols etched on surface. 2001 Space Odyssey style. Epic scale.",
    config=types.GenerateContentConfig(
        response_modalities=["TEXT", "IMAGE"],
        image_config=types.ImageConfig(aspect_ratio="16:9", image_size="1K"),
    )
)

# Save monolith
for part in monolith_response.parts:
    if image := part.as_image():
        image.save("monolith.png")
And the ancient alien monolith:
Now blend all three elements into one composition. The contents parameter takes a list: your text prompt first, followed by all the images you want to blend.
# Load all three images
nebula = Image.open("cosmic_orange.png")
comet = Image.open("comet.png")
monolith = Image.open("monolith.png")

# Blend them into one composition
blend_response = client.models.generate_content(
    model="gemini-3-pro-image-preview",
    contents=[
        "Combine these images into one epic space scene. Place the ancient alien monolith in the right side, towering and mysterious. Show the bright comet with its glowing tail streaking diagonally across the left side. Keep the orange nebula as the dramatic backdrop. Cinematic space composition.",
        nebula,
        comet,
        monolith
    ],
    config=types.GenerateContentConfig(
        response_modalities=["TEXT", "IMAGE"],
        image_config=types.ImageConfig(aspect_ratio="16:9", image_size="1K"),
    )
)

# Save final composition
for part in blend_response.parts:
    if image := part.as_image():
        image.save("cosmic_final.png")
The final composition combines all three elements seamlessly:
Now that you've learned how to generate images with the new model and take advantage of some of its features, let's cover its four distinctions with other models.
You've seen basic image generation and conversational editing. Now let's examine each capability in detail and see how they work in practice.
We'll use a helper function to keep the code examples clean:
def generate_image(prompt, filename, aspect_ratio="16:9", size="1K", use_google_search=False):

    config = types.GenerateContentConfig(
        response_modalities=["TEXT", "IMAGE"],
        image_config=types.ImageConfig(
            aspect_ratio=aspect_ratio,
            image_size=size
        ),
    )

    # Add Google Search grounding if requested
    if use_google_search:
        config.tools = [{"google_search": {}}]

    response = client.models.generate_content(
        model="gemini-3-pro-image-preview",
        contents=prompt,
        config=config
    )

    for part in response.parts:
        if image := part.as_image():
            image.save(f"{filename}.png")
            return image
This reduces repetition in the examples below and shows a reusable pattern you can adapt for your projects.
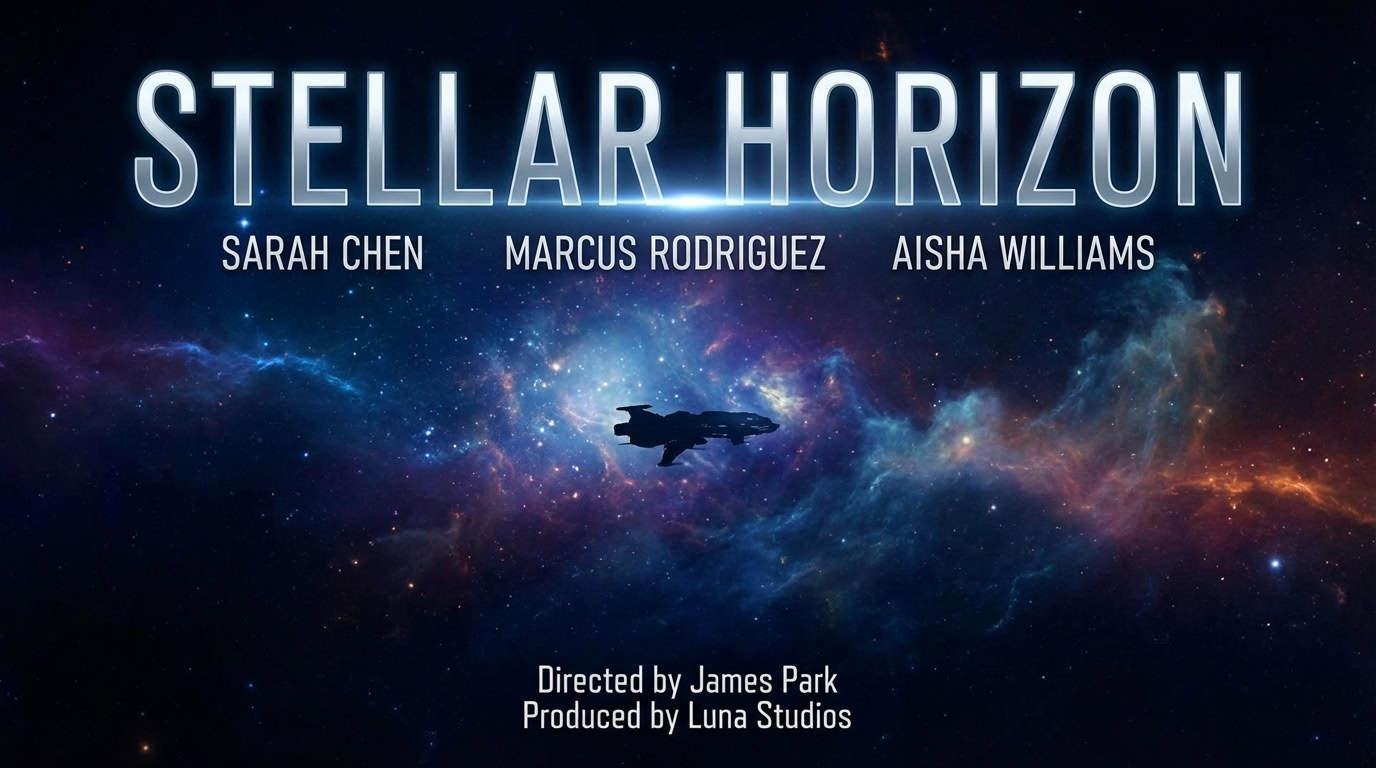
AI image generators historically butchered text, making them useless for anything involving typography, branding, or interface design. Nano Banana Pro fixes this.
Here's a movie poster with multiple text elements:
# Generate movie poster with cast and credits
image = generate_image(
    prompt="""Sci-fi movie poster. Large title "STELLAR HORIZON" at top. Actor names "SARAH CHEN" "MARCUS RODRIGUEZ" "AISHA WILLIAMS". Production credits "Directed by James Park" "Produced by Luna Studios" at bottom. Deep space background with nebula. Professional film poster typography. Crisp readable text.""",
    filename="movie_poster"
)
The same capability works for web interfaces with multiple text elements:
# SaaS website hero section
image = generate_image(
    prompt="""Modern SaaS website hero section. Large headline "Automate Your Workflow in Minutes" with subheadline "Connect your tools and boost productivity by 10x". Two buttons "Start Free Trial" and "Watch Demo". Trust badges showing "500K+ Users" "99.9% Uptime" "SOC 2 Certified". Clean typography. Gradient purple to blue background. Professional web design layout.""",
    filename="saas_hero"
)
It even handles multilingual text on the same image:
# Conference poster with English and Japanese
image = generate_image(
    prompt="""Tech conference poster. Top section English text: "GLOBAL AI SUMMIT 2025" "March 15-17, Tokyo". Bottom section Japanese text: "グローバルAIサミット2025" "3月15日-17日、東京". Modern geometric design. Vibrant gradient background blue to purple. Professional bilingual typography.""",
    filename="multilingual_poster"
)
Marketing teams can create campaign visuals with clear messaging, designers can explore typography without manual layout work, brands can generate consistent wordmarks across materials, and UI/UX designers can mock up interfaces with readable text.
Text clarity is just one piece. Let's look at how you control lighting and camera angles.
Nano Banana Pro lets you adjust lighting, camera angles, depth of field, and color grading conversationally while preserving your composition.
Start with a product shot from the front:
# Generate base product image
base_image = generate_image(
    prompt="""Premium wireless earbuds with charging case. Front-facing straight-on view. Sleek matte black finish. Modern minimalist design. Clean white studio background. Professional product photography. Sharp focus throughout. Contemporary tech aesthetic.""",
    filename="earbuds_front"
)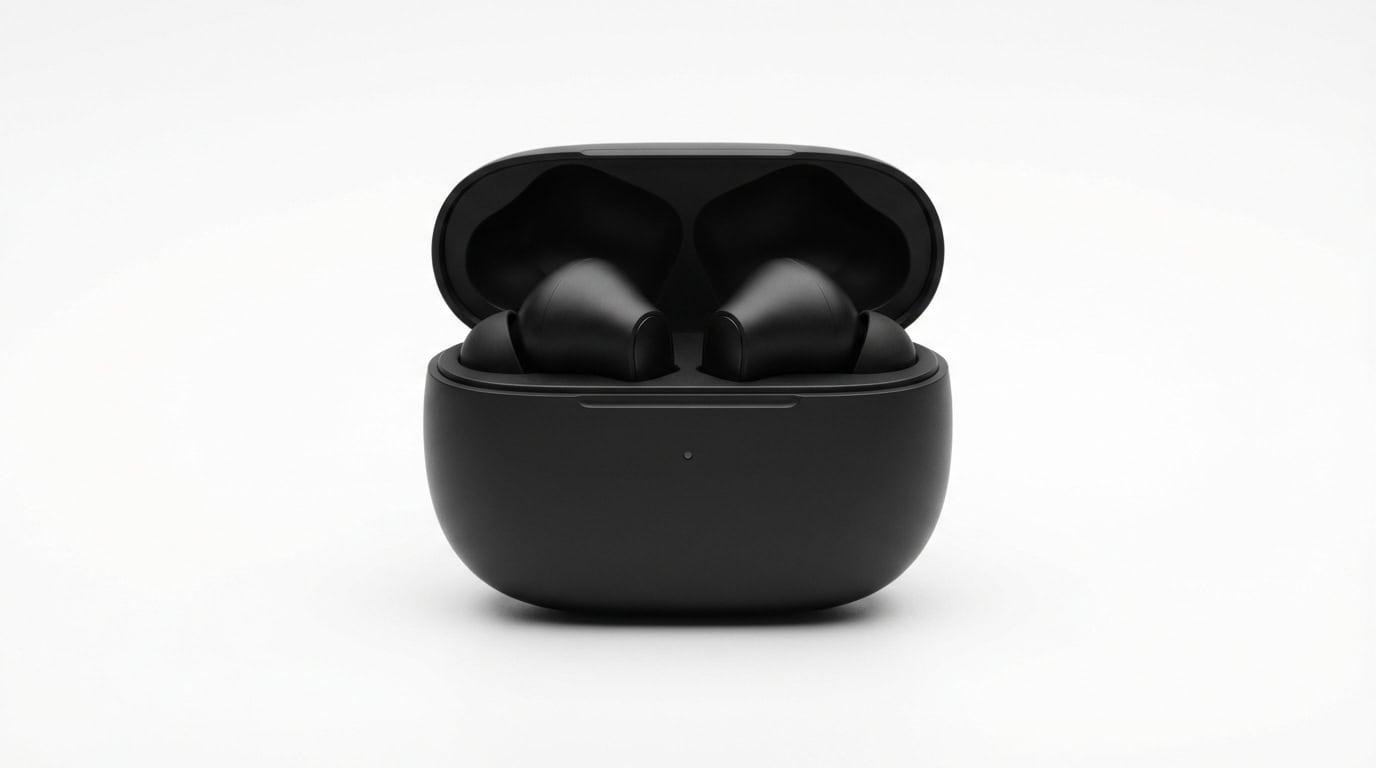
Now change the camera angle to bird's eye view without regenerating:
# Create chat for editing
chat = client.chats.create(
    model="gemini-3-pro-image-preview",
    config=types.GenerateContentConfig(
        response_modalities=["TEXT", "IMAGE"],
        image_config=types.ImageConfig(aspect_ratio="16:9", image_size="1K"),
    )
)

# Edit camera angle conversationally
edit_response = chat.send_message([
    base_image,
    """Show these exact same wireless earbuds from bird's eye view, looking straight down from above. Keep the same earbuds and charging case. Overhead flat lay composition. Professional product photography."""
])

# Save edited image
for part in edit_response.parts:
    if image := part.as_image():
        image.save("earbuds_overhead.png")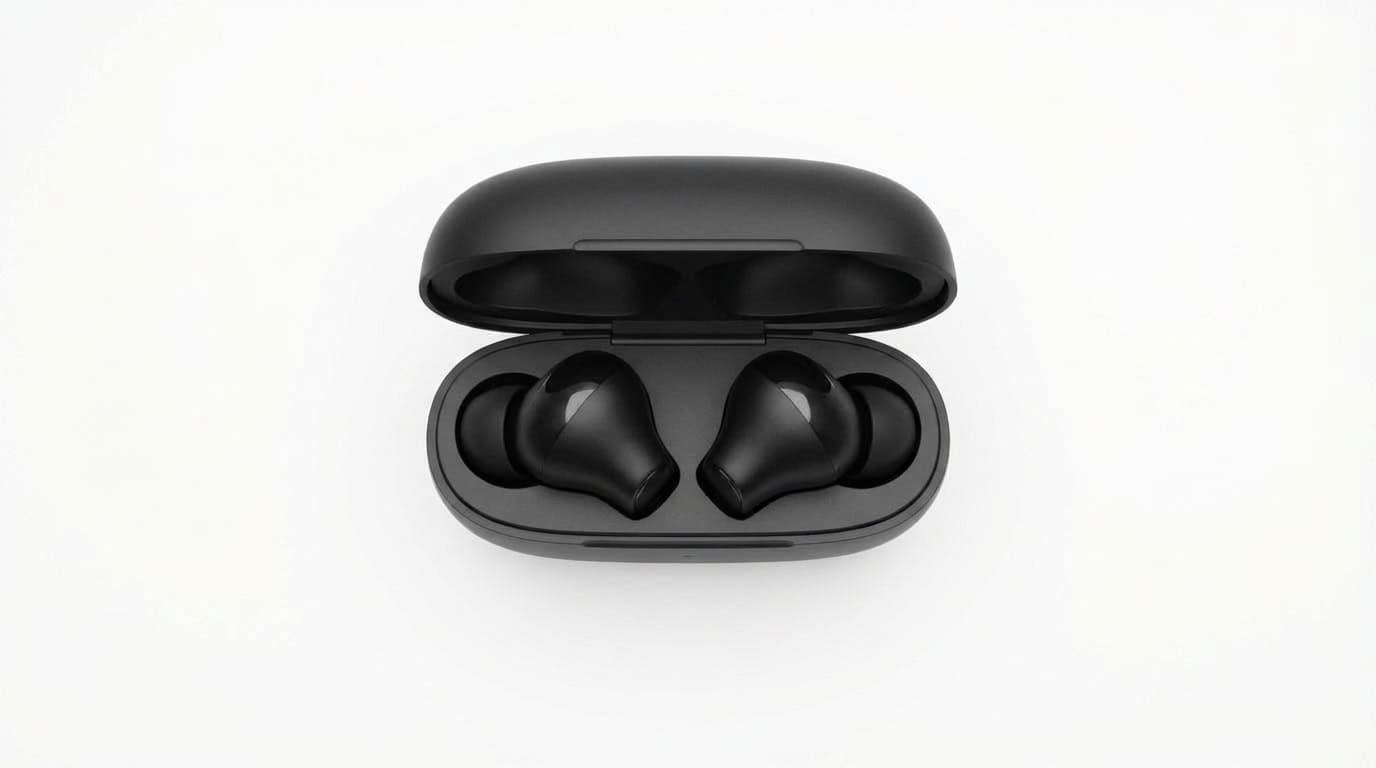
Product photographers can test camera angles without reshoots, architects can show buildings from different perspectives, interior designers can visualize spaces with various viewpoints, and marketing teams can create composition variations for A/B testing.
Brand mascots need to look identical across every touchpoint. Marketing campaigns require the same character in different scenarios. Earlier models struggled with this (but already, the base Nano Banana was very good). Nano Banana Pro further improves visual identity across scenes.
Generate a brand logo element:
# Create brand logo
brand_logo = generate_image(
    prompt="""Abstract geometric ribbon logo. Flowing infinity loop shape with metallic gradient silver to deep purple. Smooth curved surfaces. Elegant minimalist design. Clean white background. Premium brand identity element. Modern corporate aesthetic. No face. No eyes.""",
    filename="ribbon_logo"
)
Use the same ribbon in a mobile app interface:
# Create chat for editing
chat = client.chats.create(
    model="gemini-3-pro-image-preview",
    config=types.GenerateContentConfig(
        response_modalities=["TEXT", "IMAGE"],
        image_config=types.ImageConfig(aspect_ratio="16:9", image_size="1K"),
    )
)

# Show logo in app interface
app_response = chat.send_message([
    brand_logo,
    """Show this exact ribbon logo in a complete mobile app home screen. Top status bar with time and battery. Logo in header next to app name. Content cards below showing features. Bottom tab navigation with icons and labels. Modern mobile app UI. Gradient purple background. Professional startup app design. Full mobile interface layout."""
])

# Save
for part in app_response.parts:
    if image := part.as_image():
        image.save("ribbon_app.png")
Now show the same ribbon on physical merchandise:
# Show logo on merchandise
merch_response = chat.send_message([
    brand_logo,
    """Show this exact ribbon logo on brand merchandise collection. Flat lay showing: white tote bag with logo, coffee mug with logo, t-shirt with logo printed on chest, product packaging box with logo. All items arranged together. Premium brand identity mockup. Minimalist aesthetic. Professional product photography. Same ribbon on each item."""
])

# Save
for part in merch_response.parts:
    if image := part.as_image():
        image.save("ribbon_merchandise.png")
Now, we are onto the game-changing feature of Nano Banana Pro - factual grounding through Google Search.
When you enable Search grounding, the model accesses current information for factual accuracy in educational materials, technical documentation, and data-driven content where correctness is critical.
Enable Google Search grounding for educational content:
# Generate solar energy infographic with Search grounding
image = generate_image(
    prompt="""Educational infographic explaining solar panel energy conversion. Show photovoltaic cells converting to DC power, then inverter converting to AC power for the grid. Clear labels and arrows.""",
    filename="solar_infographic",
    use_google_search=True  # Enable Search for factual accuracy
)
The same grounding works for technical diagrams:
# Generate neural network diagram with Search grounding
image = generate_image(
    prompt="""Neural network architecture diagram. Left: 4 input nodes labeled "Input 1" "Input 2" "Input 3" "Input 4". Middle: two hidden layers each with 5 nodes labeled "Hidden Layer 1" and "Hidden Layer 2". Right: 3 output nodes labeled "Output 1" "Output 2" "Output 3". Connection lines between all layers. Clean technical illustration. Educational ML diagram. Professional data science aesthetic.""",
    filename="ml_architecture",
    use_google_search=True  # Enable Search for accuracy
)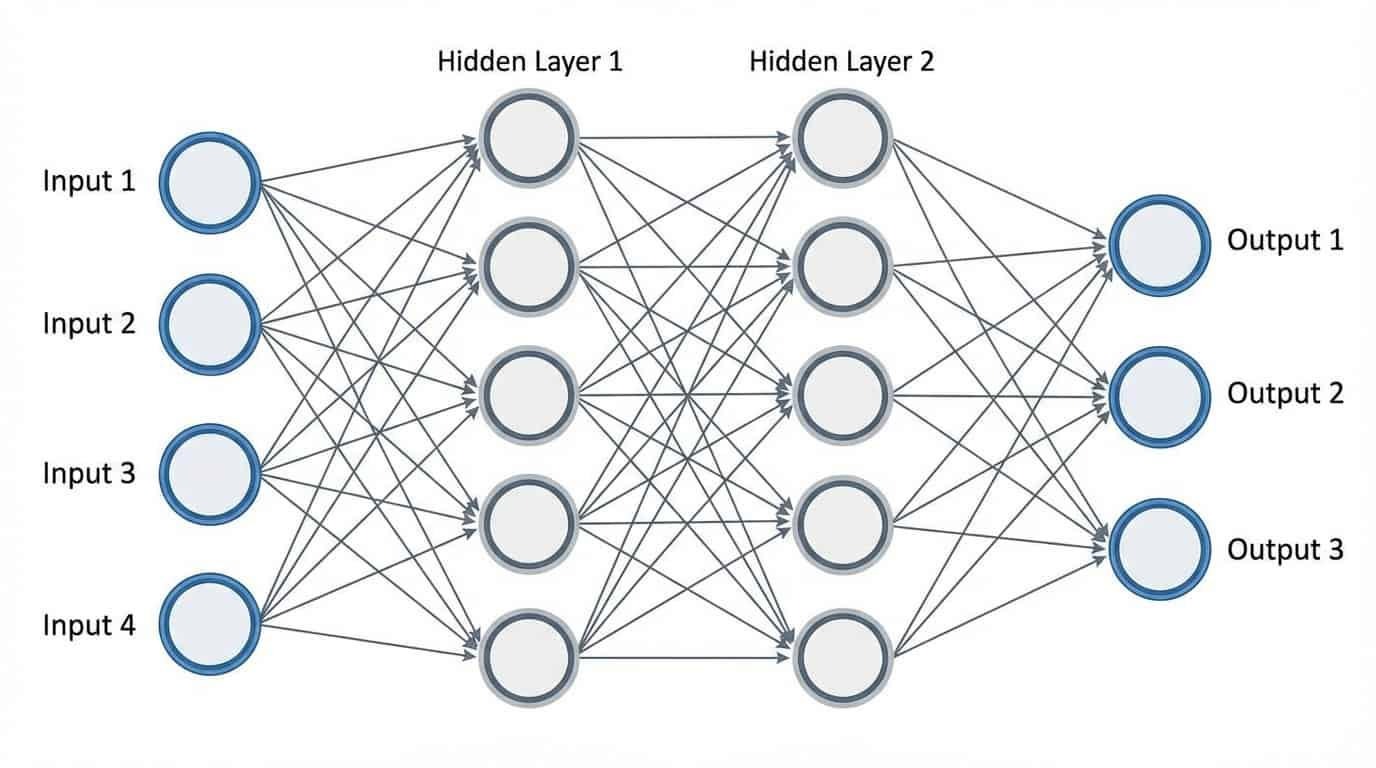
Educational content creators can produce accurate learning materials, technical writers can visualize complex systems correctly, data teams can represent real statistics, and science communicators can create accurate diagrams without extensive fact-checking.
These four features combine to make Nano Banana Pro versatile for professional workflows. Next, let's compare it directly with the original Nano Banana to see the improvements.
In this section, we will compare the base Gemini 2.5 Flash image model to Gemini 3 Pro image, aka base Nano Banana versus the pro version.
While the previous examples mostly focused on generating images for professional or educational use-cases, the images here will be based on "Let's go crazy!" type of prompts. After all, most images generated by image models are usually to satisfy the unlimited creativity of the human mind. Such prompts test models' ability to capture wild thoughts into art.
Let's start with this one:
Geometric shapes staging a protest. Cubes holding signs reading "FREE THE SPHERES!" Triangles with banners "DOWN WITH FLATLAND!" A giant dodecahedron wearing a top hat giving a speech. Protest happening inside an M.C. Escher staircase. Floating equations as graffiti: "π > 3.14159". Pure mathematical chaos.
This prompt tests two things: abstract conceptual understanding and text rendering. The base model interprets the whimsy but struggles with making the geometric shapes anthropomorphic (drawing faces on them). The pro version renders sharp text on the signs while maintaining the surreal mathematical chaos. It also draws the M.C. Escher staircase more accurately.
Prompt 2
Bold emblem/logo direction: a graphical, simplified, highly geometric icon of an ice hockey player in a powerful action pose with the hockey stick touching the ice, constructed entirely from sharp, angular, polygonal shards. Strict four-color palette (red, blue, yellow, white) on black, flat colors only (no gradients) for perfect reproduction as a logo or patch.
Nano Banana Pro is the clear winner. The logo is sharp, professional (no unnecessary text), and actually made up of geometric shapes as requested. The base version lacks the clean geometric construction and adds unwanted elements.
Prompt 3:
Mandelbrot's set drawn with extreme mathematical accuracy for a 1:1 wallpaper, fractal art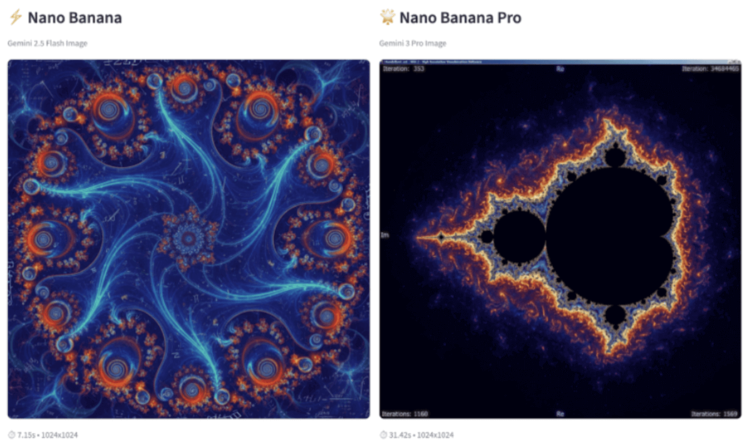
The pro model renders the fractal with impressive accuracy. It's still not perfect—mathematical accuracy was sacrificed around the edges for artistic quality—but the pro model did a much better job than the base model, which drew something completely different. However, the pro model added unrequested elements: iteration counts, imaginary and real axes, and, for some reason, a Windows XP-style window frame.
Pro generally outperforms base, but the gap varies by prompt type. Text rendering and geometric precision show the biggest improvements (see the hockey logo and geometric staircase examples). Technical content like the Mandelbrot set also benefits from Pro's accuracy.
Pro costs $0.134 per 1K/2K image versus roughly half that for base. For hundreds of iterations on personal projects, base works fine. For professional deliverables or anything needing accurate text, Pro justifies the cost. The conversational editing feature makes Pro more cost-effective when you need precise results, since you refine instead of regenerating.
Pro also supports Google Search for factual grounding, making it better for any image involving real-world knowledge.
You've learned how to generate and edit images with Nano Banana Pro, explored its four standout features, and seen how it compares to the base model. The API gives you conversational editing, multi-image blending, accurate text rendering, and Google Search grounding for factual content.
Start with the free tier through the Gemini app to test prompts and see what works for your projects. Conversational editing often saves money since you refine existing images instead of regenerating from scratch.
For deeper technical details and the latest updates, check the official documentation as Google continues expanding the model's capabilities.
Learn with DataCamp
Cours
Cours
Cours
blog
Alex Olteanu
8 min
blog
Matt Crabtree
13 min
Tutoriel
Bex Tuychiev
Tutoriel
François Aubry
Tutoriel
Aashi Dutt
Tutoriel
Abid Ali Awan