Mistral AI has recently launched a new family of reasoning models called Magistral. These models are designed to excel in specific domains, provide transparent reasoning, and support multiple languages.
In this tutorial, we will focus on fine-tuning Magistral Small on the Medical MCQs reasoning dataset. The Magistral Small is an open-source variant of the Magistral family with 24 billion parameters. It is based on the 3.1 version (2503) and has enhanced reasoning capabilities.
Here are the steps that we are going to follow in this tutorial:
- Set up the environment and install all necessary dependencies.
- Load the pre-trained Magistral Small model and tokenizer to prepare for customization.
- Load the medical MCQs dataset and process it to ensure it is ready for training.
- Perform model inference before fine-tuning to establish a baseline for comparison.
- Configure the model and training parameters, then start the fine-tuning process.
- Compare the results before and after fine-tuning to evaluate improvements.
- Save the fine-tuned model and tokenizer, and upload them to a Hugging Face repository for sharing and deployment.
1. Setting Up
I initially tried running the fine-tuning script on Kaggle, but even with 4-bit quantization, the free GPUs were insufficient for this task. Due to these limitations, I switched to RunPod and selected an A100 SXM GPU instance, which offers faster performance and larger VRAM.
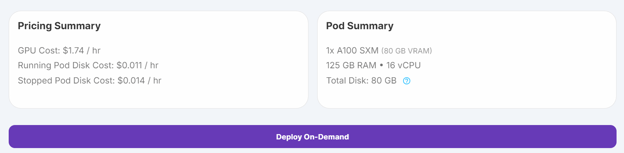
1. Go to “Pods” on RunPod, choose the latest PyTorch image, select the A100 SXM machine, and deploy your pod.
Source: My Pods
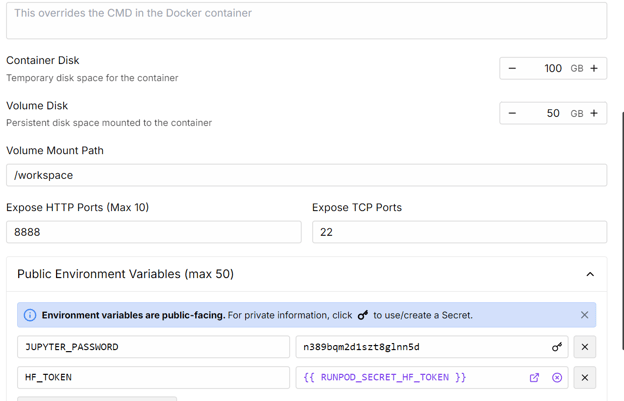
2. Edit the Pod settings to increase the container disk size, and add your Hugging Face access token for authentication.
Source: My Pods
3. Once the pod is running, click the Connect button and launch a JupyterLab instance for interactive development.
4. Install all the necessary Python packages
%%capture
%pip install -U transformers==4.52.1
%pip install -U datasets
%pip install -U accelerate
%pip install -U peft
%pip install -U trl
%pip install -U bitsandbytes
5. Log in to Hugging Face using your access token (which you saved earlier). This allows you to load gated models and later upload your fine-tuned model and tokenizer:
from huggingface_hub import login
import os

hf_token = os.environ.get("HF_TOKEN")
login(hf_token)
2. Loading the Model and Tokenizer
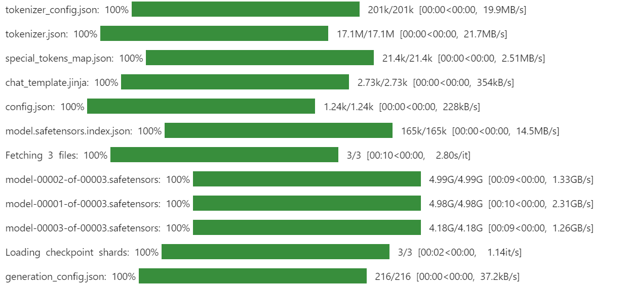
We will use the Unsloth 4-bit quantized version of Magistral-Small to save both storage space and VRAM. This approach is much faster and more efficient than downloading the full-precision model and quantizing it manually.
from transformers import AutoModelForCausalLM, AutoTokenizer
import torch
model_dir = "unsloth/Magistral-Small-2506-bnb-4bit"
tokenizer = AutoTokenizer.from_pretrained(model_dir, use_fast=True)
model = AutoModelForCausalLM.from_pretrained(
model_dir,
device_map="auto",
torch_dtype=torch.bfloat16,
)
model.config.use_cache = False
model.config.pretraining_tp = 1
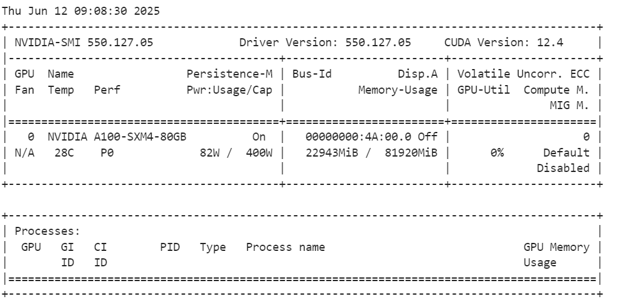
After loading the model, check your GPU memory usage.
As we can see, it uses only 23GB VRam.
3. Loading and Processing the Dataset
Define a prompt template that instructs the model to answer with one of the provided options, include reasoning within <analysis></analysis> tags, and the final answer within <answer></answer> tags.
train_prompt_style = """
Please answer with one of the options in the bracket. Write reasoning in between <analysis></analysis>. Write the answer in between <answer></answer>.
### Question:
{}

### Response:
{}"""
Create a Python function to format each example according to the prompt style and append the EOS token if missing.
EOS_TOKEN = tokenizer.eos_token
def formatting_prompts_func(examples):
inputs = examples["input"]
outputs = examples["output"]
texts = []
for question, response in zip(inputs, outputs):
question = question.replace("Q:", "")
if not response.endswith(tokenizer.eos_token):
response += tokenizer.eos_token
text = train_prompt_style.format(question, response)
texts.append(text)
return {"text": texts}
Then, download and load the mamachang/medical-reasoning dataset from Hugging Face. Apply the formatting function to create a new "text" column with the structured prompt.
from datasets import load_dataset

dataset = load_dataset(
    "mamachang/medical-reasoning",
    split="train",
    trust_remote_code=True,
)
dataset = dataset.map(
    formatting_prompts_func,
    batched=True,
)
print(dataset["text"][10])
The "text" column contains the system prompt, question, analysis, and answer, all in the required format.
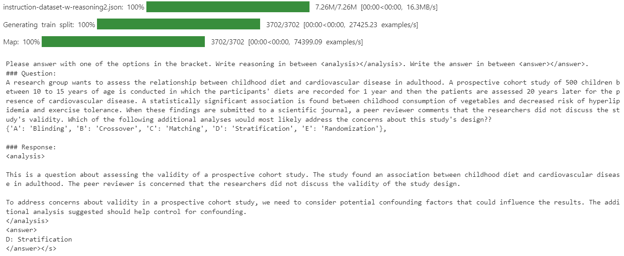
Since the new SFTTrainer does not accept a tokenizer directly, convert the tokenizer into a data collator for language modeling.
from transformers import DataCollatorForLanguageModeling

data_collator = DataCollatorForLanguageModeling(
    tokenizer=tokenizer,
    mlm=False
)
4. Model Inference Before Fine-Tuning
Before fine-tuning, it is important to evaluate the base model’s performance on your dataset. This baseline will help you objectively compare results after fine-tuning and measure improvements.
Define a prompt template for inference that includes a system prompt, a question section (with a placeholder), and a response section.
inference_prompt_style = """
Please answer with one of the options in the bracket. Write reasoning in between <analysis></analysis>. Write the answer in between <answer></answer>.

### Question:
{}

### Response:
<analysis>
"""
Select the 11th question from your dataset, remove any unnecessary prefixes, and tokenize it for model input
question = dataset[10]['input']
question = question.replace("Q:", "")

inputs = tokenizer(
    [inference_prompt_style.format(question) + tokenizer.eos_token],
    return_tensors="pt"
).to("cuda")

outputs = model.generate(
    input_ids=inputs.input_ids,
    attention_mask=inputs.attention_mask,
    max_new_tokens=512,
    eos_token_id=tokenizer.eos_token_id,
    use_cache=True,
)
response = tokenizer.batch_decode(outputs, skip_special_tokens=True)
print(response[0].split("### Response:")[1])
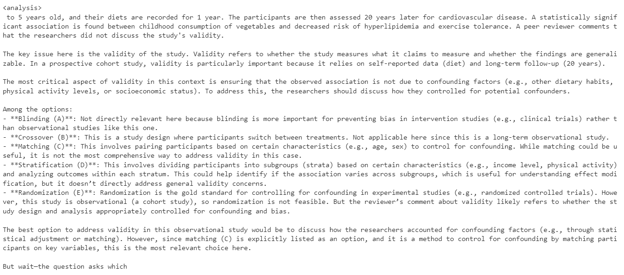
In this baseline test, the model’s generated analysis was excessively long and often failed to produce a correct or concise answer.
5. Setting Up the Model
In this part, we will set up the model for fine-tuning.
We will use LoRA (Low-Rank Adaptation) to fine-tune the model, which will significantly reduce our memory footprint and speed up the training process as we are only fine-tuning a small subset of the model's parameters.
from peft import LoraConfig, get_peft_model
peft_config = LoraConfig(
lora_alpha=16,
lora_dropout=0.05,
r=64,
bias="none",
task_type="CAUSAL_LM",
target_modules=[
"q_proj",
"k_proj",
"v_proj",
"o_proj",
"gate_proj",
"up_proj",
"down_proj",
],
)
model = get_peft_model(model, peft_config)
The TrainingArguments class lets you configure batch size, optimizer, learning rate, and other training hyperparameters. The SFTTrainer from the TRL library streamlines supervised fine-tuning by integrating the model, dataset, data collator, training arguments, and LoRA configuration into a single workflow.
from trl import SFTTrainer
from transformers import TrainingArguments
training_arguments = TrainingArguments(
output_dir="Magistral-Medical-Reasoning",
per_device_train_batch_size=1,
per_device_eval_batch_size=1,
gradient_accumulation_steps=2,
optim="paged_adamw_32bit",
num_train_epochs=1,
logging_steps=0.2,
warmup_steps=10,
logging_strategy="steps",
learning_rate=2e-4,
fp16=False,
bf16=False,
group_by_length=True,
report_to="none"
)
trainer = SFTTrainer(
model=model,
args=training_arguments,
train_dataset=dataset,
peft_config=peft_config,
data_collator=data_collator,
)

6. Model Training
To avoid Out of Memory (OOM) errors, it’s important to clear the Python garbage collector and empty the CUDA cache before starting training. This ensures that any unused memory from previous operations is released.
Then, start the training process using the SFTTrainer.
import gc, torch
gc.collect()
torch.cuda.empty_cache()
model.config.use_cache = False
trainer.train()
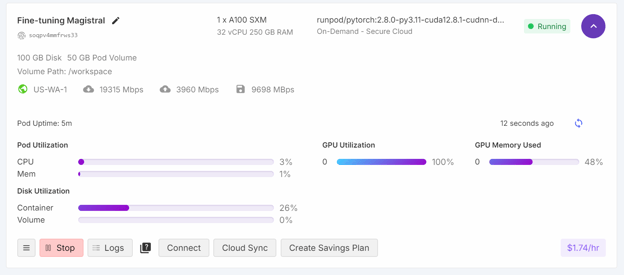
During training, GPU utilization reached 100%, and there was sufficient VRAM available to potentially load another model in parallel.
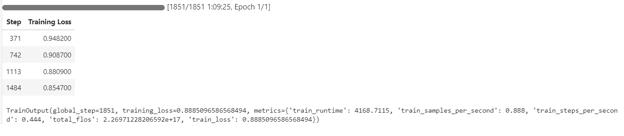
The training process took approximately 1 hour and 10 minutes, with the training loss decreasing steadily at each step, indicating effective learning.
7. Model Inference After Fine-Tuning
We will evaluate the performance of the fine-tuned model by using the same 11th sample question from the dataset. This approach allows us to compare the results with the base model and assess the improvements achieved through fine-tuning.
question = dataset[10]['input']
question = question.replace("Q:", "")

inputs = tokenizer(
    [inference_prompt_style.format(question,) + tokenizer.eos_token],
    return_tensors="pt"
).to("cuda")

outputs = model.generate(
    input_ids=inputs.input_ids,
    attention_mask=inputs.attention_mask,
    max_new_tokens=512,
    eos_token_id=tokenizer.eos_token_id,
    use_cache=True,
)
response = tokenizer.batch_decode(outputs, skip_special_tokens=True)
print(response[0].split("### Response:")[1])
The model now generates a concise and accurate analysis, and the answer is correct.
<analysis>
Analysis:

This is a prospective cohort study looking at the relationship between childhood diet and cardiovascular disease in adulthood. The key issue with the validity of this study is confounding. The researchers did not account for other factors that could influence cardiovascular disease risk in adulthood besides childhood diet.

To address confounding, the researchers should have stratified the analysis by potential confounders like family history, physical activity levels, and smoking status. This would allow them to see if the relationship between diet and disease persists even when accounting for these other variables.

Blinding, crossover, matching, and randomization do not address the main validity concern in this study design.
</analysis>
<answer>
D: Stratification
</answer>
To further validate performance, try inference on another sample.
question = dataset[100]['input']
question = question.replace("Q:", "")

inputs = tokenizer(
    [inference_prompt_style.format(question) + tokenizer.eos_token],
    return_tensors="pt"
).to("cuda")

outputs = model.generate(
    input_ids=inputs.input_ids,
    attention_mask=inputs.attention_mask,
    max_new_tokens=512,
    eos_token_id=tokenizer.eos_token_id,
    use_cache=True,
)
response = tokenizer.batch_decode(outputs, skip_special_tokens=True)
print(response[0].split("### Response:")[1])
The model continues to provide accurate answers and well-structured analysis, demonstrating consistent improvements even after just one epoch of fine-tuning.
<analysis>

This is a clinical vignette describing a 55-year-old man with burning and shooting pain in his feet and lower legs that worsens at night. He has a history of type 2 diabetes mellitus and hypertension.

The key findings are:
- Burning and shooting pain in feet and lower legs
- Pain worsens at night
- History of type 2 diabetes mellitus

This presentation is most consistent with diabetic peripheral neuropathy. The pain distribution, timing, and history of diabetes point towards a distal symmetric sensorimotor polyneuropathy as the etiology. The other options can be ruled out based on the clinical presentation.
</analysis>
<answer>
D: Distal symmetric sensorimotor polyneuropathy
</answer>
8. Saving the Model
After fine-tuning, you can easily share your model by pushing it to the Hugging Face Hub. This makes it accessible for others to use or further fine-tune.
new_model_name = "kingabzpro/Magistral-Small-Medical-QA"

trainer.model.push_to_hub(new_model_name)
trainer.processing_class.push_to_hub(new_model_name)

The fine-tuned model is now available at: kingabzpro/Magistral-Small-Medical-QA
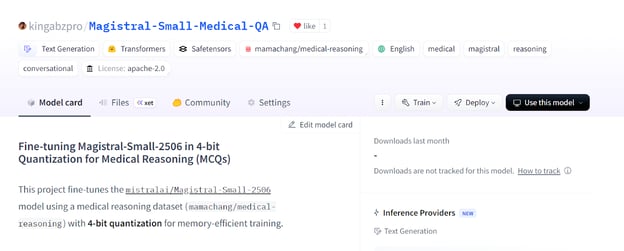
Source: kingabzpro/Magistral-Small-Medical-QA
9. Loading the Fine-Tuned Model from Hugging Face
After fine-tuning and saving your LoRA to the Hugging Face Hub, you can easily reload it for further analysis, inference, or deployment as an inference server. This process involves clearing your current session, loading the base model and LoRA adapter, and running inference on new data. You can learn more about Working with the Hugging Face Hub in our course.
1. Before loading a new model, it’s good practice to delete any existing model and trainer objects and clear the GPU cache to avoid memory issues.
2. Download the base model and your fine-tuned LoRA adapter from the Hugging Face Hub, then merge them. Also, load the tokenizer.
del model
del trainer
torch.cuda.empty_cache()
from transformers import AutoTokenizer, AutoModelForCausalLM, BitsAndBytesConfig
from peft import PeftModel
import torch
base_model_id = "unsloth/Magistral-Small-2506-bnb-4bit"
lora_adapter_id = "kingabzpro/Magistral-Small-Medical-QA"
base_model = AutoModelForCausalLM.from_pretrained(
base_model_id,
device_map="auto",
torch_dtype=torch.bfloat16,
trust_remote_code=True,
)
model = PeftModel.from_pretrained(
base_model,
lora_adapter_id,
device_map="auto",
trust_remote_code=True,
)
tokenizer = AutoTokenizer.from_pretrained(base_model_id, trust_remote_code=True)
3. Prepare a sample prompt, tokenize it, generate a response, and decode the output.
prompt = """
Please answer with one of the options in the bracket. Write reasoning in between <analysis></analysis>. Write the answer in between <answer></answer>.
### Question:
A research group wants to assess the relationship between childhood diet and cardiovascular disease in adulthood.
A prospective cohort study of 500 children between 10 to 15 years of age is conducted in which the participants' diets are recorded for 1 year and then the patients are assessed 20 years later for the presence of cardiovascular disease.
A statistically significant association is found between childhood consumption of vegetables and decreased risk of hyperlipidemia and exercise tolerance.
When these findings are submitted to a scientific journal, a peer reviewer comments that the researchers did not discuss the study's validity.
Which of the following additional analyses would most likely address the concerns about this study's design?
{'A': 'Blinding', 'B': 'Crossover', 'C': 'Matching', 'D': 'Stratification', 'E': 'Randomization'},
### Response:
<analysis>
"""
inputs = tokenizer(
[prompt + tokenizer.eos_token],
return_tensors="pt"
).to("cuda")
outputs = model.generate(
input_ids=inputs.input_ids,
attention_mask=inputs.attention_mask,
max_new_tokens=1200,
eos_token_id=tokenizer.eos_token_id,
use_cache=True,
)
response = tokenizer.batch_decode(outputs, skip_special_tokens=True)
print(response[0].split("### Response:")[1])
4. The generated response is accurate and closely matches the style and structure of your dataset, demonstrating that the fine-tuned model is ready for real-world inference and deployment.
<analysis>

Analysis:
This is a prospective cohort study looking at the relationship between childhood diet and cardiovascular disease in adulthood. The key concern from the peer reviewer is about the study's validity.

To address concerns about validity, the researchers could perform additional analyses to control for confounding. Matching and stratification would help control for known confounders like socioeconomic status or family history. Crossover and blinding are not applicable to this observational study design. Randomization would not be possible since the study is observational.
</analysis>
<answer>
D: Stratification
</answer>
If you encounter issues while running the above code, please refer to the fine-tuning-magistral.ipynb Jupyter notebook on the Hugging Face.
Conclusion
In a separate fine-tuning guide, we looked at how DeepSeek-R1-0528 distilled mode performs. While DeepSeek-R1-0528 struggled to adapt to the specific style of the dataset and accuracy, Magistral demonstrated seamless adaptation and delivered strong results with minimal effort.
This experience reinforces my belief that Mistral AI is rapidly emerging as a leading player in the AI space, not only in language models but also across a broad spectrum of solutions, including computer vision.
In this guide, we successfully fine-tuned Mistral AI’s latest reasoning model, Magistral, on a medical MCQs dataset.
However, it is important to note that fine-tuning large models like Magistral requires substantial hardware, typically GPUs with at least 40GB of VRAM, as even the RTX 4090 may not suffice for some configurations. I also experimented with the Unsloth framework and its 4-bit model version, but still encountered GPU memory issues.
If you’re looking for a hands-on course to get familiar with fine-tuning, be sure to check out Fine-Tuning With Llama 3.


 Abid Ali Awan






Mistral AI has recently launched a new family of reasoning models called Magistral. These models are designed to excel in specific domains, provide transparent reasoning, and support multiple languages.
In this tutorial, we will focus on fine-tuning Magistral Small on the Medical MCQs reasoning dataset. The Magistral Small is an open-source variant of the Magistral family with 24 billion parameters. It is based on the 3.1 version (2503) and has enhanced reasoning capabilities.
Here are the steps that we are going to follow in this tutorial:
1. Setting Up
I initially tried running the fine-tuning script on Kaggle, but even with 4-bit quantization, the free GPUs were insufficient for this task. Due to these limitations, I switched to RunPod and selected an A100 SXM GPU instance, which offers faster performance and larger VRAM.
1. Go to “Pods” on RunPod, choose the latest PyTorch image, select the A100 SXM machine, and deploy your pod.
Source: My Pods
2. Edit the Pod settings to increase the container disk size, and add your Hugging Face access token for authentication.
Source: My Pods
3. Once the pod is running, click the Connect button and launch a JupyterLab instance for interactive development.
4. Install all the necessary Python packages
5. Log in to Hugging Face using your access token (which you saved earlier). This allows you to load gated models and later upload your fine-tuned model and tokenizer:
2. Loading the Model and Tokenizer
We will use the Unsloth 4-bit quantized version of Magistral-Small to save both storage space and VRAM. This approach is much faster and more efficient than downloading the full-precision model and quantizing it manually.
After loading the model, check your GPU memory usage.
As we can see, it uses only 23GB VRam.
3. Loading and Processing the Dataset
Define a prompt template that instructs the model to answer with one of the provided options, include reasoning within <analysis></analysis> tags, and the final answer within <answer></answer> tags.
Create a Python function to format each example according to the prompt style and append the EOS token if missing.
Then, download and load the mamachang/medical-reasoning dataset from Hugging Face. Apply the formatting function to create a new "text" column with the structured prompt.
The "text" column contains the system prompt, question, analysis, and answer, all in the required format.
Since the new SFTTrainer does not accept a tokenizer directly, convert the tokenizer into a data collator for language modeling.
4. Model Inference Before Fine-Tuning
Before fine-tuning, it is important to evaluate the base model’s performance on your dataset. This baseline will help you objectively compare results after fine-tuning and measure improvements.
Define a prompt template for inference that includes a system prompt, a question section (with a placeholder), and a response section.
Select the 11th question from your dataset, remove any unnecessary prefixes, and tokenize it for model input
In this baseline test, the model’s generated analysis was excessively long and often failed to produce a correct or concise answer.
5. Setting Up the Model
In this part, we will set up the model for fine-tuning.
We will use LoRA (Low-Rank Adaptation) to fine-tune the model, which will significantly reduce our memory footprint and speed up the training process as we are only fine-tuning a small subset of the model's parameters.
The
TrainingArgumentsclass lets you configure batch size, optimizer, learning rate, and other training hyperparameters. TheSFTTrainerfrom the TRL library streamlines supervised fine-tuning by integrating the model, dataset, data collator, training arguments, and LoRA configuration into a single workflow.6. Model Training
To avoid Out of Memory (OOM) errors, it’s important to clear the Python garbage collector and empty the CUDA cache before starting training. This ensures that any unused memory from previous operations is released.
Then, start the training process using the
SFTTrainer.During training, GPU utilization reached 100%, and there was sufficient VRAM available to potentially load another model in parallel.
The training process took approximately 1 hour and 10 minutes, with the training loss decreasing steadily at each step, indicating effective learning.
7. Model Inference After Fine-Tuning
We will evaluate the performance of the fine-tuned model by using the same 11th sample question from the dataset. This approach allows us to compare the results with the base model and assess the improvements achieved through fine-tuning.
The model now generates a concise and accurate analysis, and the answer is correct.
To further validate performance, try inference on another sample.
The model continues to provide accurate answers and well-structured analysis, demonstrating consistent improvements even after just one epoch of fine-tuning.
8. Saving the Model
After fine-tuning, you can easily share your model by pushing it to the Hugging Face Hub. This makes it accessible for others to use or further fine-tune.
The fine-tuned model is now available at: kingabzpro/Magistral-Small-Medical-QA
Source: kingabzpro/Magistral-Small-Medical-QA
9. Loading the Fine-Tuned Model from Hugging Face
After fine-tuning and saving your LoRA to the Hugging Face Hub, you can easily reload it for further analysis, inference, or deployment as an inference server. This process involves clearing your current session, loading the base model and LoRA adapter, and running inference on new data. You can learn more about Working with the Hugging Face Hub in our course.
1. Before loading a new model, it’s good practice to delete any existing model and trainer objects and clear the GPU cache to avoid memory issues.
2. Download the base model and your fine-tuned LoRA adapter from the Hugging Face Hub, then merge them. Also, load the tokenizer.
3. Prepare a sample prompt, tokenize it, generate a response, and decode the output.
4. The generated response is accurate and closely matches the style and structure of your dataset, demonstrating that the fine-tuned model is ready for real-world inference and deployment.
If you encounter issues while running the above code, please refer to the fine-tuning-magistral.ipynb Jupyter notebook on the Hugging Face.
Conclusion
In a separate fine-tuning guide, we looked at how DeepSeek-R1-0528 distilled mode performs. While DeepSeek-R1-0528 struggled to adapt to the specific style of the dataset and accuracy, Magistral demonstrated seamless adaptation and delivered strong results with minimal effort.
This experience reinforces my belief that Mistral AI is rapidly emerging as a leading player in the AI space, not only in language models but also across a broad spectrum of solutions, including computer vision.
In this guide, we successfully fine-tuned Mistral AI’s latest reasoning model, Magistral, on a medical MCQs dataset.
However, it is important to note that fine-tuning large models like Magistral requires substantial hardware, typically GPUs with at least 40GB of VRAM, as even the RTX 4090 may not suffice for some configurations. I also experimented with the Unsloth framework and its 4-bit model version, but still encountered GPU memory issues.
If you’re looking for a hands-on course to get familiar with fine-tuning, be sure to check out Fine-Tuning With Llama 3.