

步骤 1:环境配置
首先,从 GitHub 安装最新的 diffusers 库以及其他依赖。
!pip install -q "git+https://github.com/huggingface/diffusers.git@main" \
"transformers>=4.44.0" accelerate safetensors bitsandbytes gradio pillow然后登录 Hugging Face,以便拉取 4 位的 FLUX.2-dev 权重:
from huggingface_hub import login
login() 在提示时传入 HF Token 并登录 HF 以拉取模型。接着做一个快速健全性检查,确认 CUDA 是否可用以及正在使用哪块 GPU:
import torch, diffusers, bitsandbytes as bnb
print("diffusers:", diffusers.__version__)
print("CUDA available:", torch.cuda.is_available())
!nvidia-smi如果您在 nvidia-smi 输出中看到您的 GPU,且显示 CUDA available: True,就可以继续了。
步骤 2:FLUX.2-dev(4 位)模型
现在我们从 diffusers/FLUX.2-dev-bnb-4bit 仓库加载 4 位的 FLUX.2-dev 组件。
from diffusers import Flux2Pipeline, Flux2Transformer2DModel
from transformers import Mistral3ForConditionalGeneration
import torch
bnb_repo = "diffusers/FLUX.2-dev-bnb-4bit"
torch_dtype = torch.bfloat16
device = "cuda"
print("Loading 4-bit transformer...")
transformer = Flux2Transformer2DModel.from_pretrained(
bnb_repo,
subfolder="transformer",
torch_dtype=torch_dtype,
device_map="auto",
)
print("Loading 4-bit text encoder...")
text_encoder = Mistral3ForConditionalGeneration.from_pretrained(
bnb_repo,
subfolder="text_encoder",
torch_dtype=torch_dtype,
device_map="auto",
)
print("Building Flux2 pipeline...")
pipe = Flux2Pipeline.from_pretrained(
bnb_repo,
transformer=transformer,
text_encoder=text_encoder,
torch_dtype=torch_dtype,
).to(device)
pipe.set_progress_bar_config(disable=False)
print("Loaded. Example param device:", next(pipe.transformer.parameters()).device)依赖安装完成后,我们即可使用 diffusers 库加载 FLUX.2,并与 transformers 中的 Mistral 3 文本编码器配对。代码如下:
Flux2Transformer2DModel:这是负责去噪过程的核心类 U-Net Transformer,并以 4 位量化形式加载。Mistral3ForConditionalGeneration:作为文本编码器使用,将您的文本提示转为扩散过程中的条件信号。Flux2Pipeline:将 Transformer、文本编码器与配套组件组合为一个可调用的图像生成接口。
使用 device_map="auto" 与 torch_dtype=torch.bfloat16 能在不同 GPU 设置间保持灵活,同时兼顾内存效率。
步骤 3:预处理图像
应用允许用户上传多张衣橱图片。我们需要一些工具来处理:
- 将 Gradio 文件对象转换为 PIL 图像
- 将其缩放到适合条件控制的大小
import gradio as gr
import random, json
from typing import List, Union
from PIL import Image
MAX_REFS = 10
def files_to_pil(files: List[Union[str, dict]]) -> List[Image.Image]:
images = []
for f in files:
path = f.get("name") if isinstance(f, dict) else f
if not path:
continue
img = Image.open(path).convert("RGB")
images.append(img)
return images
def preprocess_refs(refs: List[Image.Image], max_size: int = 512) -> List[Image.Image]:
processed = []
for img in refs:
img = img.convert("RGB")
img.thumbnail((max_size, max_size), Image.LANCZOS)
processed.append(img)
return processed上述代码定义了两个关键辅助函数。
files_to_pil()函数接收 Gradio 返回的文件对象,提取路径,并将每个文件以 RGBPIL.Image打开。preprocess_refs()函数将这些图像等比例缩放到最大 512 × 512,这对速度与内存使用都很重要。
另外,我们用 MAX_REFS = 10 限制参考图像数量,避免条件集过载。
步骤 4:穿搭提示
与其发送单一的纯文本提示,我构建了一个结构化的类 JSON 提示,描述以下内容:
- 棚拍环境
- 主体与姿态
- 穿搭单品(关联参考图像)
- 光效、氛围与相机信息
def build_outfit_prompt(outfit_indices: List[int], labels: List[str]) -> str:
item_phrases = [
f"{labels[idx]} from reference image {idx+1}" for idx in outfit_indices
]
outfit_items_str = ", ".join(item_phrases)
mistral_prompt = """A professional full-body studio photograph of a high-end fashion editorial shoot, set against a flawless seamless neutral gray backdrop (#f5f5f5) in a controlled studio environment. The scene is bathed in soft, diffused three-point lighting (key, fill, and subtle rim) that eliminates harsh shadows, ensuring even illumination across the subject while preserving dimensionality and texture.
At the center of the frame stands a full-body adult model, exuding quiet confidence in a relaxed yet poised stance—one foot slightly forward, weight balanced, body angled subtly to the right. The model’s expression is natural, with a neutral gaze directed just off-camera, evoking a modern, minimalist lookbook aesthetic.
The outfit—meticulously styled and tailored—is the focal point, captured with ultra-realistic 8K resolution and razor-sharp detail. Fabrics display tactile depth: the weave of knits, the drape of silks, the sheen of leathers, and the crispness of cotton are all rendered with commercial-grade precision. The shallow depth of field (50mm prime lens, f/2.8) keeps the subject in crystalline focus while softly blurring the backdrop, emphasizing the outfit’s textures and proportions.
The composition adheres to classic fashion photography rules: vertical framing, ample headroom, and a slightly dynamic angle (eye-level) that flatters the model’s posture. The color palette is controlled and sophisticated, dominated by the outfit’s hues against the neutral gray, with subtle tonal contrasts to highlight layers and accessories.
Every element—from the studio-quality lighting to the catalog-ready styling—conveys luxury, clarity, and commercial appeal, designed to showcase the outfit as a covetable, high-end ensemble."""
prompt_dict = {
"scene": mistral_prompt,
"subjects": [
{
"description": (
"The model is styled in an outfit composed of: "
+ outfit_items_str
+ ". Each garment should closely match the color, fabric, and key design details of its reference image."
)
}
]
}
return json.dumps(prompt_dict)build_outfit_prompt() 函数完成三件重要的事:
- 首先,它使用
outfit_indices与labels生成诸如“参考图像 1 的衣橱单品 1”之类的短语,并将其连接为描述本套穿搭所选单品的字符串。 - 其次,它将这些单品嵌入自然语言的 mistral_prompt 中,定义棚拍环境、灯光设置、镜头参数、景深等。
- 最后,我们将一切封装进包含 scene 与 subjects 字段的
prompt_dict,再序列化为 JSON,以便作为单一的提示字符串传给流水线。
从概念上讲,我们将每张上传的衣橱图片视作“衣橱单品 i”,并让模型“用衣橱单品 1、单品 3、单品 4 来组合一套穿搭”,同时保留每件单品的颜色、面料与关键设计细节。
注意:由于本流水线使用 Mistral 模型作为文本编码器,我也通过 Meta prompting 使用 Mistral 来起草长篇的棚拍描述提示(mistral_prompt)。这样能让风格与编码器的“预期”保持一致,并便于直接在代码中微调措辞。
步骤 5:生成穿搭网格
演示的核心是 capsule_fn,它:
- 接收上传的图像与 UI 参数
- 为每个小格随机选择衣橱单品子集
- 然后调用 FLUX.2-dev 流水线生成多张图像
- 最后将它们拼成单一网格
def make_grid(images: List[Image.Image], rows: int, cols: int) -> Image.Image:
w, h = images[0].size
grid = Image.new("RGB", (cols * w, rows * h), (255, 255, 255))
for idx, img in enumerate(images):
r, c = divmod(idx, cols)
grid.paste(img, (c * w, r * h))
return grid
def capsule_fn(files, rows, cols, height, width, steps, guidance, seed):
if not files or len(files) < 2:
return None
images = files_to_pil(files)
images = images[:MAX_REFS]
refs = preprocess_refs(images, max_size=512)
labels = [f"wardrobe piece {i+1}" for i in range(len(refs))]
random.seed(int(seed))
tiles = []
num_tiles = rows * cols
for i in range(num_tiles):
k = min(len(refs), random.randint(2, 3))
outfit_idxs = random.sample(range(len(refs)), k=k)
prompt = build_outfit_prompt(outfit_idxs, labels)
generator = torch.Generator(device=device).manual_seed(int(seed) + i)
out = pipe(
prompt=prompt,
image=refs,
height=height,
width=width,
num_inference_steps=steps,
guidance_scale=guidance,
generator=generator,
)
tiles.append(out.images[0])
grid = make_grid(tiles, rows, cols)
return grid上述两个函数构成了胶囊衣橱演示的核心引擎。
make_grid()函数创建足够容纳 行×列 布局的空白画布,然后将每张生成的穿搭图像粘贴到正确位置,得到一张单一的网格图。capsule_fn()函数将用户的衣橱图像作为参考进行准备,每个小格随机选择 2–3 件单品,构建结构化穿搭提示,并用选定的分辨率、步数、引导与种子调用 FLUX.2 流水线。它汇集所有生成的小格并传给make_grid(),从而让用户看到最终的混搭穿搭网格。
步骤 6:Gradio 界面
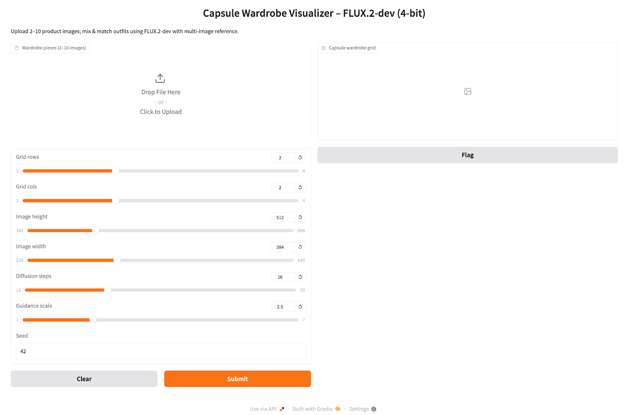
此步骤将胶囊衣橱引擎接入 Gradio 应用。用户上传衣橱图片,选择网格与生成设置,并获得合成的穿搭网格。
inputs = [
gr.File(file_types=["image"], file_count="multiple", label="Wardrobe pieces (2–10 images)"),
gr.Slider(1, 4, value=2, step=1, label="Grid rows"),
gr.Slider(1, 4, value=2, step=1, label="Grid cols"),
gr.Slider(384, 896, value=512, step=64, label="Image height"),
gr.Slider(256, 640, value=384, step=64, label="Image width"),
gr.Slider(10, 30, value=16, step=2, label="Diffusion steps"),
gr.Slider(1.0, 7.0, value=2.5, step=0.5, label="Guidance scale"),
gr.Number(value=42, precision=0, label="Seed")
]
iface = gr.Interface(
fn=capsule_fn,
inputs=inputs,
outputs=gr.Image(type="pil", label="Capsule wardrobe grid"),
title="Capsule Wardrobe Visualizer – FLUX.2-dev (4-bit)",
description="Upload 2–10 product images; mix & match outfits using FLUX.2-dev with multi-image reference.",
)
iface.launch(share=True, debug = True)我们这样构建 Gradio 应用:
- inputs 列表定义了应用的所有交互控件。衣橱单品输入是一个 2–10 张服饰或产品照的多文件上传;行与列滑块决定网格形状,即每批生成多少套穿搭。
- 图像高度与宽度滑块控制每个小格的分辨率,值越高占用的显存与时间越多。
- 扩散步数滑块决定模型进行多少次去噪(16–24 是不错的默认),引导系数控制模型遵循文本提示与参考图像的强度对比。
gr.Interface调用将这些输入连接到capsule_fn函数,并声明单一的gr.Image输出。launch(share=True, debug=True)启动 Gradio 服务器,暴露可分享的公网链接用于演示,并在控制台启用调试日志以便诊断问题。
当界面运行后:
- 上传少量服饰单品(如 2 件上衣、2 条裤装、1 件外套、1 双鞋)。
- 选择 3x3 或 2x2 网格,512x384 分辨率,约 20 步,引导系数 2.5。
- 点击提交,观看网格被杂志风格的图片填满。
Flux 2 示例与观察
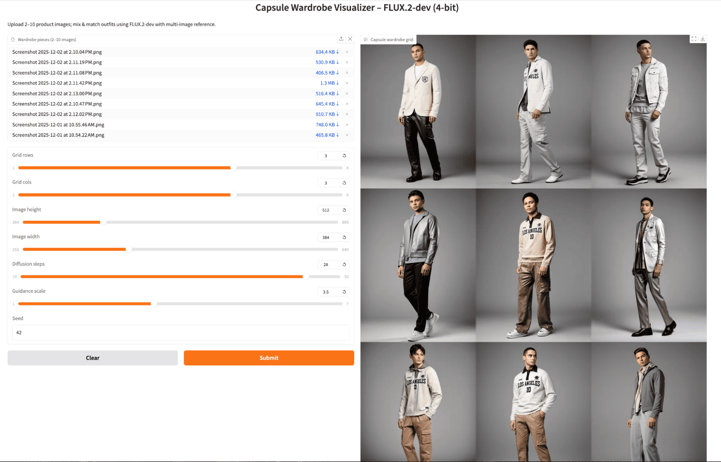
为了解 FLUX.2-dev 的实际表现,我用最终应用做了几个小实验。我调整了扩散步数与引导系数,并分别尝试了同一件服饰的多张图像与每件服饰一张图,观察模型能产生多少变化。
- 扩散步数与引导主要影响速度与锐度,而非内存。将扩散步数从 28 增到 30、引导从 2.5 提高到 5.0,显存占用大致不变,但每批次会稍慢,同时呈现更清晰的穿搭。不过,理论上更高的步数(如 50)会明显改变网格观感,并在提高质量的同时增加时延。
- 在 A100 上,4 位是相当舒适的默认配置。使用 4 位的 FLUX.2-dev 检查点,在 512x384、约 20–28 步的 3x3 网格上,单卡演示感觉既快又稳。如果可以在 H100 上加载原始(非量化)检查点,通常能在类似时延下获得更高的图像质量。当然,具体表现仍取决于显存与批量大小,结果可能有所差异。
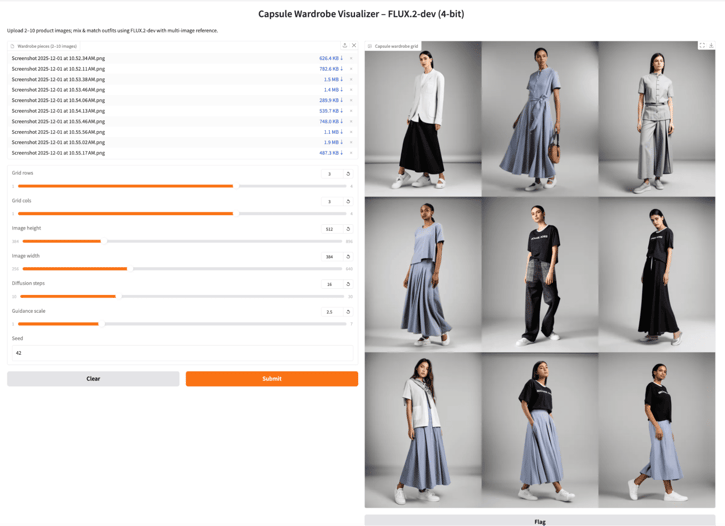
示例 1:默认设置 + 同一服饰的多视角
我先上传了同一套穿搭从不同角度拍摄的多张图片,保持默认扩散步数与中等引导。模型呈现出一致的棚拍光照与面料细节,穿搭在网格中像是同一套胶囊组合的多种变化。
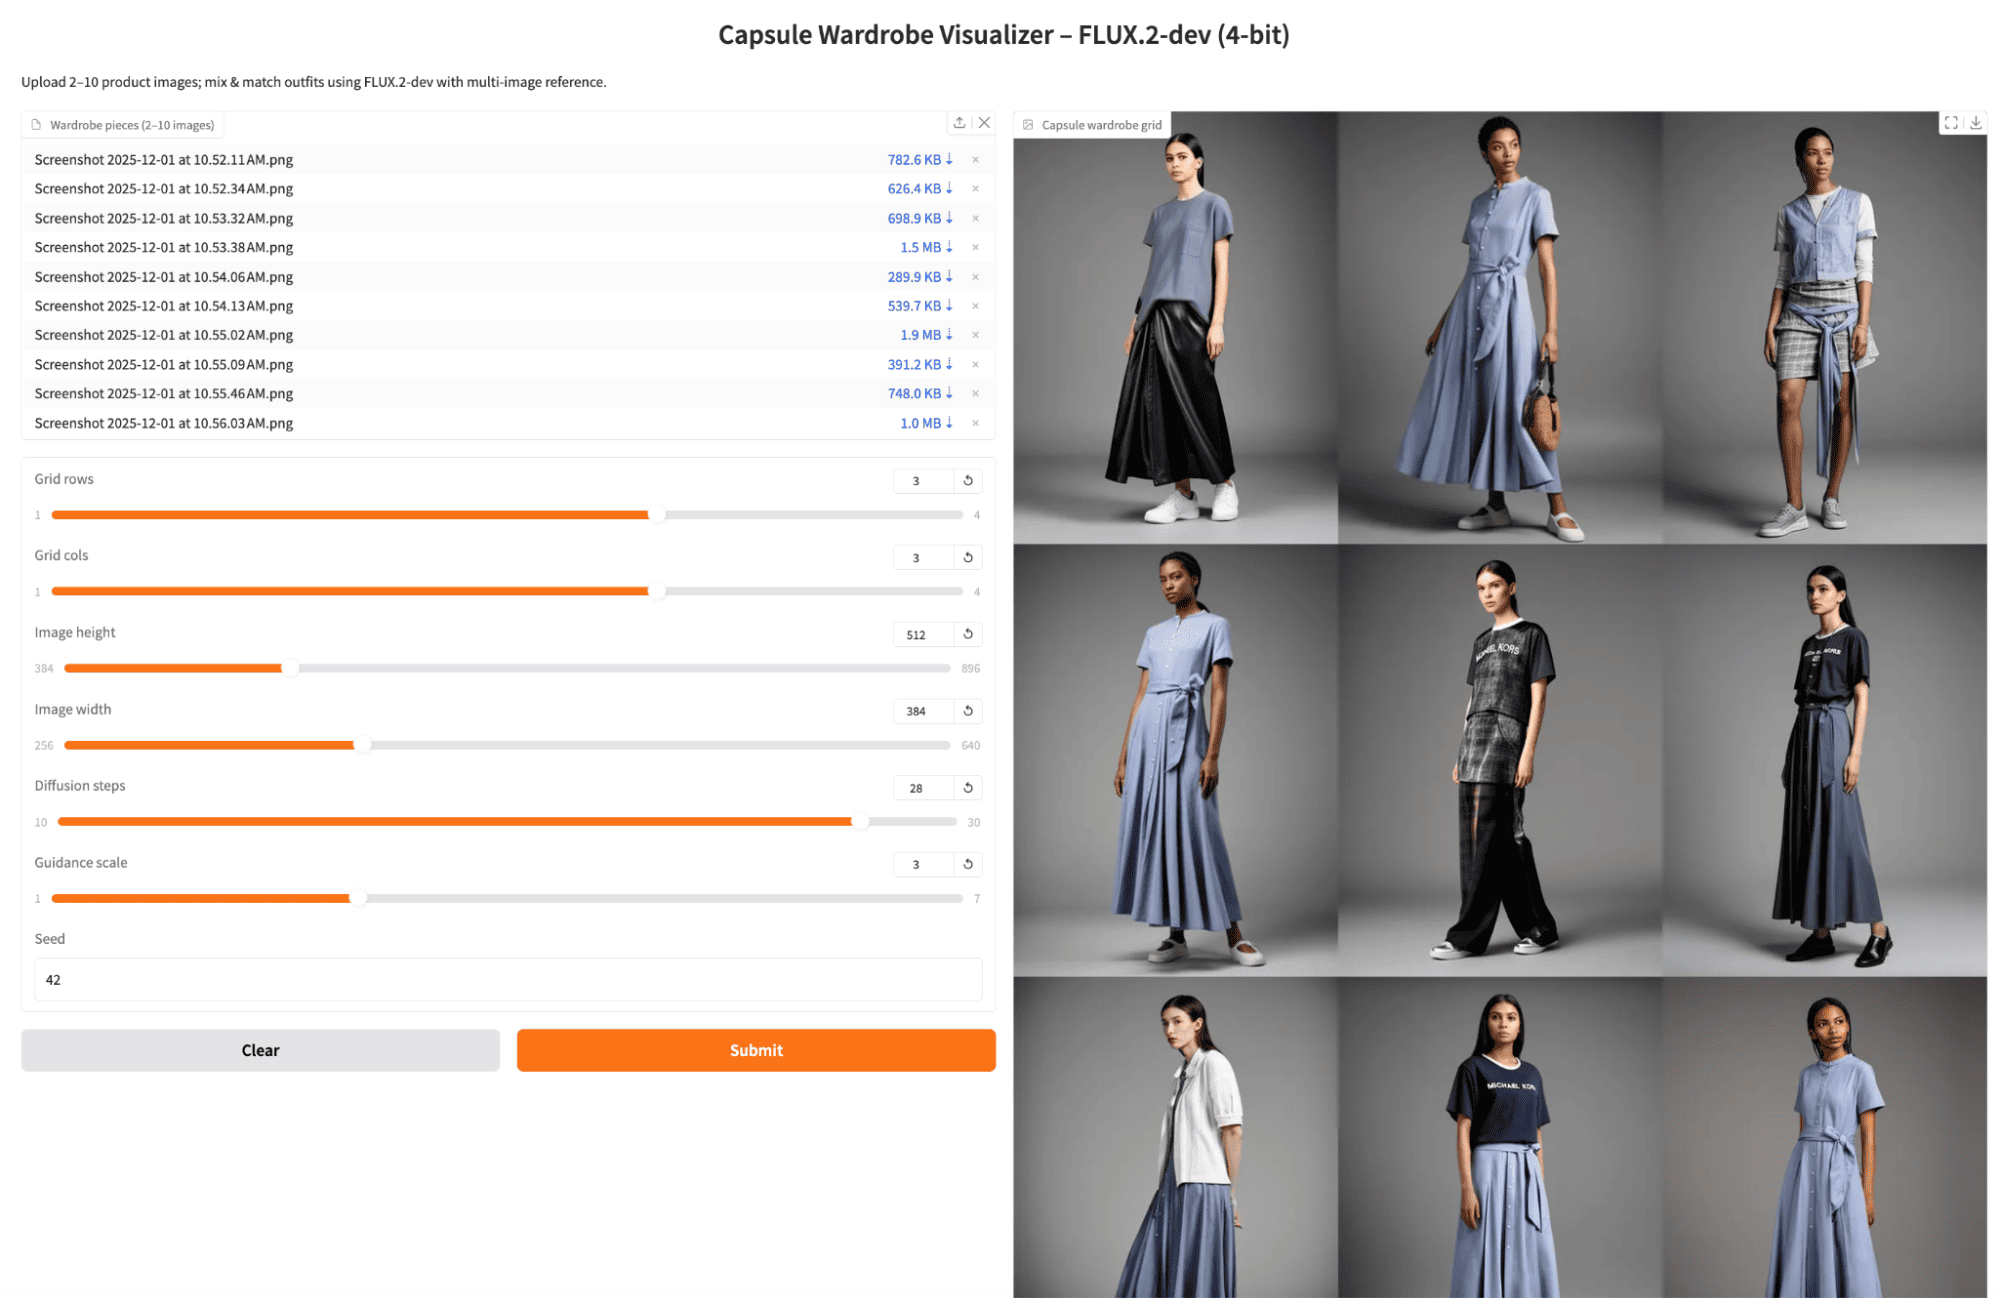
示例 2:更高扩散步数 + 同一服饰的多视角
接着我保留相同的参考图像,将扩散步数提高到 28(并略微调整引导)。网格变得更锐利、更精致,但仍聚焦于重组相同的核心单品。代价是每批次生成时间有小幅但可感的增加。
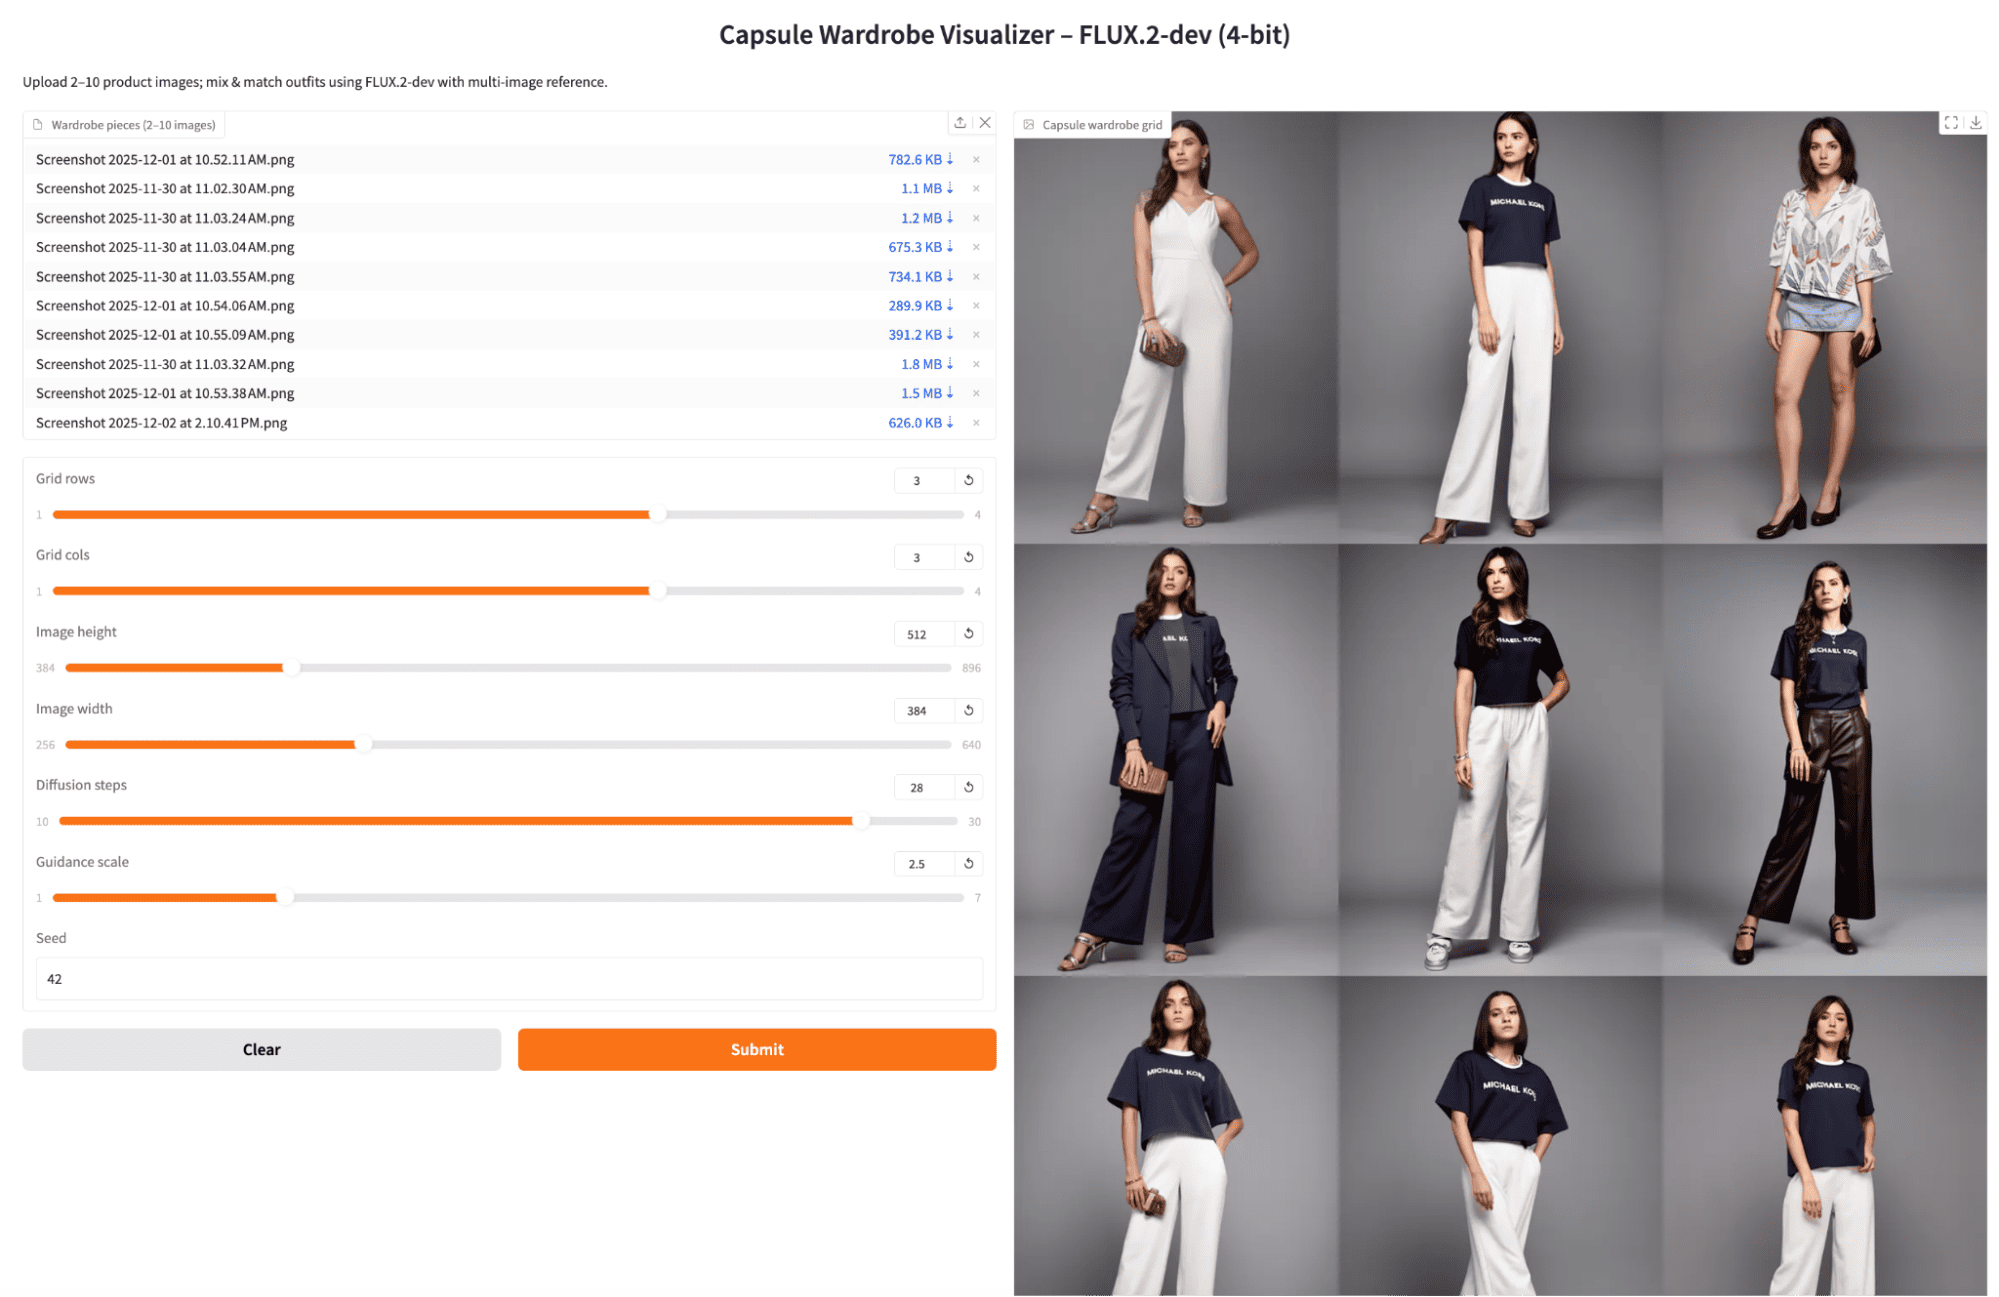
实验 3:每件服饰一张图
最后,我为每件不同的服饰各上传一张产品照,并再次生成 3x3 网格。得到的穿搭在各小格之间差异更大,以有趣的方式混搭不同的上衣与下装。虽然仍会出现一定重复,但整体上更接近真正的胶囊衣橱,在相同种子与设置下能给出更多元的组合。
结语
4 位形式的 FLUX.2-dev 是一款很适合图像应用的模型。在本教程中,我们用 diffusers 搭建了 4 位的 FLUX.2-dev 流水线,构建了一个将衣橱单品作为条件提示的多图像参考工作流,并用 Gradio 将其封装成应用。
最终成果是一款强大的胶囊衣橱可视化工具,既可作为时尚电商工具的原型,也能作为重新混搭您自家衣橱的有趣方式。接下来,您可以将同一流水线接入更广泛的智能体系统,例如根据着装要求或天气建议穿搭的 LLM,或将其连接到真实的商品目录后端。
FLUX.2 常见问题
我能在不本地依赖 Mistral 文本编码器的情况下使用 FLUX.2-Dev(4 位)流水线吗?
可以。FLUX.2 支持通过 Hugging Face 的文本编码器服务进行远程文本编码,这能显著降低显存占用。您可以不在本地加载 Mistral3ForConditionalGeneration,而是传入从远程编码器获得的 prompt_embeds。这对显存较低的 GPU(如 RTX 4090 或移动端 GPU)很有用。
如何格式化或准备衣橱参考照片以获得最佳效果?
虽然模型可接收任意图像,但在以下情况下效果更佳:
- 服饰照片背景干净
- 图像光照良好且大致正面
- 服饰没有被严重遮挡
- 所有单品取景类似(如置中产品照)
FLUX.2 能确保穿搭总是包含一件上装、一件下装和一双鞋吗?
默认不行。除非您在应用中显式编码并强制执行选择逻辑,否则模型并不“理解”服饰类别。
您可以通过以下方式强制结构化:
- 使用类似“参考图像 1 的上装”、“参考图像 2 的下装”的标签
- 或在 capsule_fn 中添加基于规则的选择
如何防止生成图像中的服饰互相融合或变形?
多图像参考模式可能导致单品融合,如果:
- 服饰彼此相似,
- 您传入了很多参考图(8–10 张),
- 或您的提示过于含糊。 为降低融合:
- 每个小格使用较少参考图像(最多 2–3 张)。
- 加强提示描述,如“层次分明”、“不要融合”、“保留廓形”。
- 确保参考照片在形状/颜色上有明显差异。
FLUX.2 在质量下降前实际上能处理多少张参考图?
FLUX.2 最多支持 10 张参考图,但质量并不会线性提升。 实际上:
- 1–4 张参考 → 对各单品的忠实度很强
- 5–7 张参考 → 细节匹配有所减弱
- 8–10 张参考 → 融合或边界模糊的风险更高
这是因为 FLUX 的多图像条件控制模块会将视觉嵌入融合进去噪 Transformer。传入的嵌入越多,Transformer 需要调和的空间与风格线索就越多。

我是一名 Google Developers 机器学习(生成式 AI)领域的专家、Kaggle 三项专家,以及 Women Techmakers 大使,拥有 3 年以上的技术从业经验。2020 年我共同创办了一家健康科技初创公司,目前在佐治亚理工学院攻读计算机科学硕士,专攻机器学习。
FLUX.2 是一款面向高质量、可控生成而构建的现代文生图模型。在本教程中,我将向您展示如何使用 FLUX.2-dev 变体来构建一个胶囊衣橱可视化工具:我们上传 2–10 张服饰图片(上衣、裤装、外套、鞋子等),模型在这些单品中采样组合,应用会以网格形式返回不同混搭的穿搭。
最终得到的是一款交互式工具,助您直观探索穿搭组合,底层由针对 GPU 显存优化的扩散模型提供支持。
如果您想进一步了解本教程背后的原理,建议查看《使用 PyTorch 进行图像深度学习》课程。
什么是 FLUX 2?
FLUX.2 是一个文生图模型家族,针对质量、速度与灵活性之间的不同权衡进行了优化,而非单一的大一统检查点。它带来了若干重要能力:
在实践中,您通常会看到三个核心变体:
与 Pro 与 Flex 相比,Dev 变体专为想要尝试的人而设计,正好满足我们构建交互式胶囊衣橱网格的需求。
为何选择 FLUX.2-Dev(4 位)?
原始的 FLUX.2 系列已足够强大,但将 FLUX.2-Dev 与 4 位量化结合,使本演示更易运行、迭代与扩展。原因如下:
简言之,FLUX.2-Dev(4 位)为交互式胶囊衣橱工具在显存、速度与质量间提供了最佳平衡。
Flux 2 演示概览:胶囊衣橱可视化工具
本节我们将用包裹在 Gradio 应用中的 FLUX 2 模型实现一个胶囊衣橱可视化工具。总体来看,应用完成三件事:
在下方视频中,您可以看到流程的简化版本。为演示之便,视频已加速(实际生成过程可能需要几分钟):