
Kurs
Einführung in Claude-Modelle
3 Std.
10.7K
Modern GitHub repositories often lack clear, structured documentation, especially wikis.
Creating these pages manually can take hours of reading code, understanding architecture, and organizing content.
A GitHub Wiki AI Agent can solve this problem.
In this tutorial, I will walk you through how to build a fully automated GitHub Wiki AI Agent, a command-line tool that uses Claude Opus 4.5 and the Claude Agent SDK to generate complete GitHub repository wikis with a single instruction.
Instead of manually writing documentation, this tool analyzes your codebase, understands its structure, and produces clean, multi-page wiki content that is automatically committed and published to your repository.
Everything runs through an interactive CLI app designed to feel fast, intelligent, and developer-friendly.
In this guide, we will follow a simple three-step process to set up the environment, build the GitHub Wiki AI Agent, and test it on real repositories:
If you’re new to AI agents and want to learn more, I recommend checking out the AI Agent Fundamentals skill track. You should also read our tutorial on Claude Cowork and our guide to the new Claude Opus 4.6.
Before building the GitHub Wiki Agent with Opus 4.5, make sure your environment is configured properly. This section walks you through all prerequisites and setup steps.
Open your terminal (Command Prompt, PowerShell, or macOS Terminal) and run following command to install Claude Code CLI:
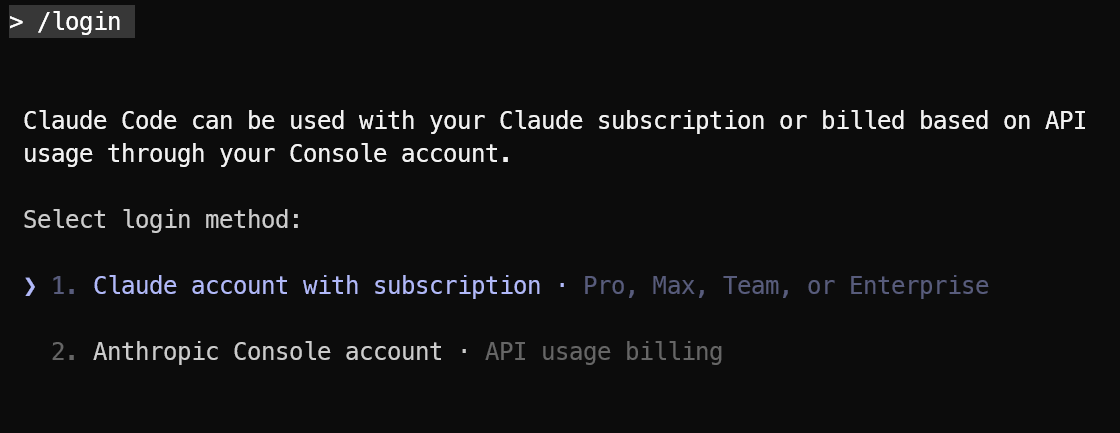
npm install -g @anthropic-ai/claude-codeType claude in your terminal to start Claude Code. Then, inside the Claude chat, type /login to authenticate and gain access to the Opus 4.5 model and tools, as shown below.
You can learn more about Claude Code in our hands-on tutorial.
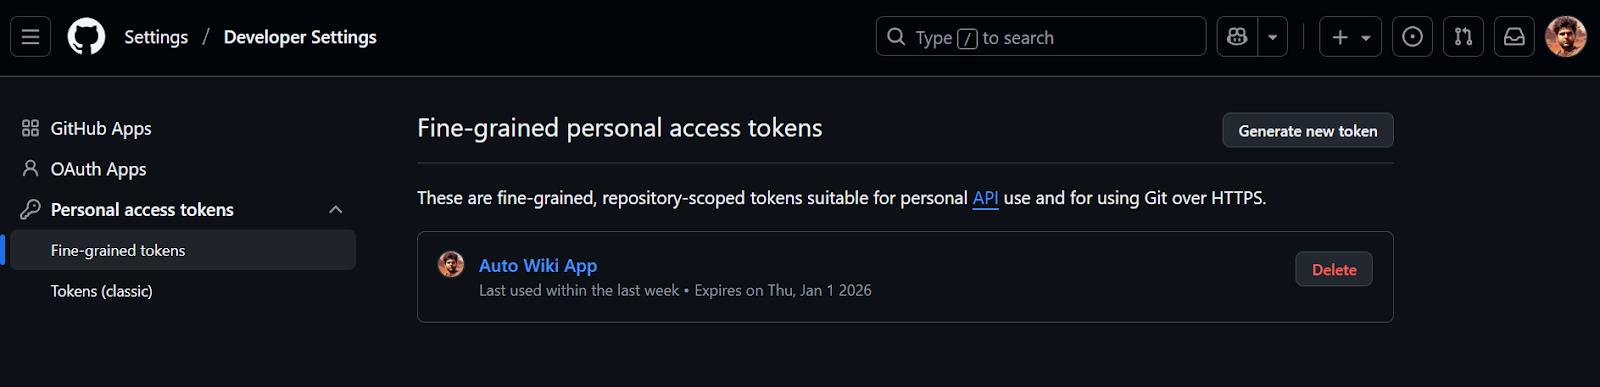
To generate a fine-grained GitHub Personal Access Token, go to GitHub and navigate to:
Settings → Developer Settings → Personal Access Tokens → Fine-grained tokens.
Create a new token and select the repository you will use under the Repository section. Then configure the Permissions. For security, it is recommended to set a short expiry for the token.
Then, set Personal Access Token as the environment variable:
export GITHUB_PAT="your-github-personal-access-token"GitHub currently does not support creating a Wiki locally first.
So you must manually initialize the wiki by:
We will install the Claude Agentic framework that handles everything from using MCP to invoking tools, creating files, and pushing changes to the remote.
pip install claude-agent-sdkWe will now create a Python CLI application named gh_wiki_cli.py. This file will include configurations, agents, tools, an MCP client, system prompts, the CLI application itself, and helper functions.
These components will ensure that the user can provide the link to the repository and the agent knows how to handle it correctly to publish GitHub wiki.
This part pulls in Python stdlib modules, typing helpers, and the Claude Agent SDK.
asyncio for async I/O (chat + streaming).os, sys for environment variables and exiting.dataclass to track stats.import asyncio
import os
import sys
from dataclasses import dataclass
from typing import Dict
# --- SDK Imports ---
from claude_agent_sdk import (
AssistantMessage,
ClaudeAgentOptions,
ClaudeSDKClient,
McpSdkServerConfig,
ResultMessage,
TextBlock,
ToolResultBlock,
ToolUseBlock,
)This is the “brain” of the agent. We will instruct the Opus 4.5 model on how it should behave and how to use the tools.
SYSTEM_PROMPT = """
        You are an expert Technical Writer and GitHub Wiki specialist.

        TOOLS
        - Read, Write, Glob, Grep:
        - Use these to inspect files and folders in the project directory (e.g. /tmp/Issue-Analyzer) and in wiki_clone/.
        - Use them to list files, read contents, and search for patterns.
        - Write:
        - Use this ONLY to write or update three wiki pages inside wiki_clone/:
            - wiki_clone/Home.md
            - wiki_clone/Getting-Started.md
            - wiki_clone/Architecture-and-Tools.md
        - Bash:
        - Bash is ONLY allowed for git commands, never for inspection or editing.
        - Allowed commands (with cd wiki_clone/ when needed):
            - git clone <repo>.wiki.git wiki_clone  (if wiki_clone does not already exist)
            - git status
            - git add .
            - git commit -m "Update wiki"
            - git push
        - Do NOT use Bash for ls, cat, grep, find, python, or any other way of reading/writing files.

        WORKFLOW
        1. When the user gives a GitHub repo URL:
        - Use Bash to clone the wiki if wiki_clone/ does not already exist:
            git clone <repo>.wiki.git wiki_clone
        2. Use Read/Glob/Grep (and any GitHub MCP tools) to explore the project:
        - Read important files in the project folder (e.g. README, docs/, src/).
        - Use that information to generate documentation.
        3. Use Write to create or update ONLY:
        - wiki_clone/Home.md
        - wiki_clone/Getting-Started.md
        - wiki_clone/Architecture-and-Tools.md
        4. When the wiki pages are ready:
        - Use Bash from wiki_clone/ to:
            git add .
            git commit -m "Update wiki"
            git push

        RULES
        - You may READ from the whole project directory and wiki_clone/.
        - You may WRITE only to the three wiki pages inside wiki_clone/.
        - Never use Bash to inspect or edit files; only use it for git commands.
        - Keep documentation clear, concise, and in GitHub Wiki style.
"""This makes the CLI output nicer, but it still works if colorama isn’t installed.
try:
    from colorama import Fore, Style, init

    init()
except ImportError:

    class MockColors:
        def __getattr__(self, name):
            return ""

Fore = Style = MockColors()A tiny dataclass to keep track of cost, turns, and duration.
total_cost: sum of $ cost from the Claude SDK.total_turns: how many user queries you sent.duration_ms: accumulated duration in milliseconds.@dataclass
class SessionStats:
total_cost: float = 0.0
total_turns: int = 0
duration_ms: int = 0Next, we will create the ClaudeAgentOptions object and connect to our MCP servers. The function below validates the required environment variables, configures the GitHub MCP server if it's available, and restricts the tools that the agent can use.
We deliberately restrict the allowed_tools so that Opus 4.5 can: use Bash for Git operations, call the GitHub MCP server to inspect repository contents, and use Read/Write (along with Glob and Grep) to work with and validate local Markdown files.
def create_agent_options() -> ClaudeAgentOptions:
    """Validates env vars and configures the agent options."""
    anthropic_key = os.getenv("ANTHROPIC_API_KEY")
    github_pat = os.getenv("GITHUB_PAT")

    if not anthropic_key:
        print(
            f"{Fore.RED}Error: ANTHROPIC_API_KEY environment variable is required.{Style.RESET_ALL}"
        )
        sys.exit(1)

    # Configure MCP servers
    mcp_servers: Dict[str, McpSdkServerConfig] = {}
    if github_pat:
        mcp_servers["github"] = {
            "type": "http",
            "url": "https://api.githubcopilot.com/mcp/",
            "headers": {"Authorization": f"Bearer {github_pat}"},
        }

    return ClaudeAgentOptions(
        model="claude-opus-4-5",
        system_prompt=SYSTEM_PROMPT,
        mcp_servers=mcp_servers,
        permission_mode="bypassPermissions",
        allowed_tools=[
            "Read",
            "Write",
            "Glob",
            "Grep",
            "Bash",
            "mcp__github__*",
        ],
)This function listens to the stream and prints text, tool usage, and tool outputs.
client.receive_response() as an async stream.[Tool Use: ...].ResultMessage arrives → update SessionStats with cost + duration.async def process_response_stream(client: ClaudeSDKClient, stats: SessionStats):
"""Handles the stream of messages from the agent."""
async for message in client.receive_response():
# 1. Handle Assistant Content (Text & Tool Requests)
if isinstance(message, AssistantMessage):
for block in message.content:
if isinstance(block, TextBlock):
print(block.text, end="", flush=True)
elif isinstance(block, ToolUseBlock):
print(f"\n{Fore.CYAN}[Tool Use: {block.name}]{Style.RESET_ALL}")
# 2. Handle Tool Results (Outputs)
if hasattr(message, "content") and isinstance(message.content, list):
for block in message.content:
if isinstance(block, ToolResultBlock):
# Truncate output for cleaner CLI
raw_output = str(block.content)
clean_output = raw_output.replace("\n", " ")
short_output = (
clean_output[:200] + "..."
if len(clean_output) > 200
else clean_output
)
print(
f"{Fore.YELLOW} -> [Output]: {short_output}{Style.RESET_ALL}"
)
# 3. Handle Result Metrics (Cost & Usage)
if isinstance(message, ResultMessage):
if message.total_cost_usd:
stats.total_cost += message.total_cost_usd
if message.duration_ms:
stats.duration_ms += message.duration_msNice end-of-session stats for the CLI app that display the turns, durations, and cost in dollars.
duration_ms to seconds.def print_summary(stats: SessionStats):
"""Prints the final session statistics."""
print(f"\n\n{Fore.GREEN}=== Session Summary ==={Style.RESET_ALL}")
print(f"Total Turns: {stats.total_turns}")
print(f"Duration: {stats.duration_ms / 1000:.2f}s")
print(f"Total Cost: ${stats.total_cost:.4f}")
print(f"{Fore.GREEN}======================={Style.RESET_ALL}")This is the core control flow of the app: it handles setup, connects to services, reads user input, and sends queries. The function calls create_agent_options() and initializes statistics. It prints an introductory banner and specifies which MCP servers are enabled. It also creates a ClaudeSDKClient using an asynchronous context.
The application runs a simple REPL (Read-Eval-Print Loop):
stats.total_turns by 1.await client.query(user_input) sends the user's message.await process_response_stream(...) prints the streamed result.print_summary(stats).async def main():
options = create_agent_options()
stats = SessionStats()
# Welcome message
print(f"{Fore.GREEN}=== GitHub Wiki AI Agent (Auto-Mode) ==={Style.RESET_ALL}")
print(
f"MCP Servers: {', '.join(options.mcp_servers.keys()) if options.mcp_servers else 'None'}"
)
print("Ask me to help with a GitHub wiki by mentioning the repository URL!")
print("Type 'exit' to quit.\n")
async with ClaudeSDKClient(options=options) as client:
try:
await client.connect()
while True:
try:
user_input = input(f"\n{Fore.BLUE}>> {Style.RESET_ALL}").strip()
except EOFError:
break
if not user_input:
continue
if user_input.lower() in ["exit", "quit"]:
break
stats.total_turns += 1
# Send query
await client.query(user_input)
print() # Spacer
# Process response stream using helper function
await process_response_stream(client, stats)
except Exception as e:
print(f"\n{Fore.RED}Session Error: {e}{Style.RESET_ALL}")
finally:
print_summary(stats)Finally, we define the script’s entry point so the CLI runs when the file is executed directly. The block below starts the main async loop and handles clean shutdowns:
if __name__ == "__main__":
    try:
        asyncio.run(main())
    except KeyboardInterrupt:
        print("\nSession interrupted.")
sys.exit(0)Once everything is installed, start the CLI chat app, and make sure your Claude Code CLI app works:
python gh_wiki_cli.pyYou can now interact with the agent just like a chat interface. Ask general questions or directly tell it to build the wiki for your repository:
create the github wiki for https://github.com/kingabzpro/ECom-Intel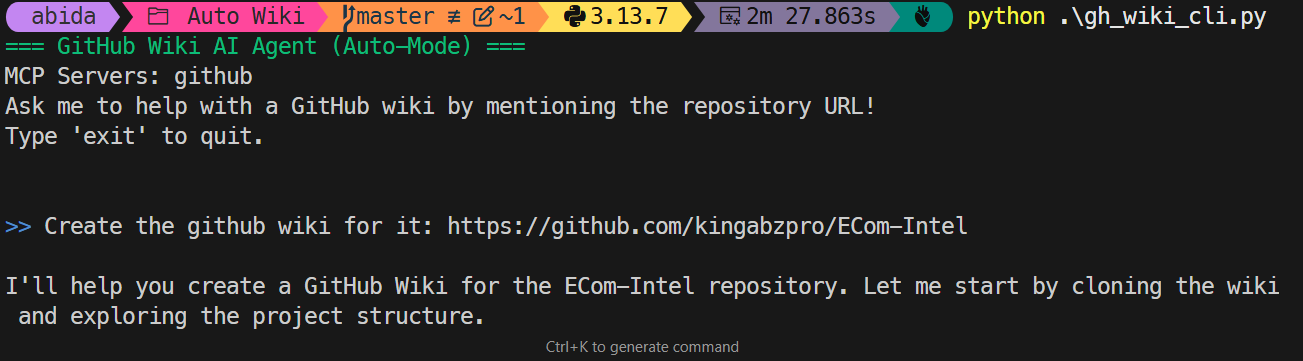
If the user asks to create a wiki, the agent automatically performs:
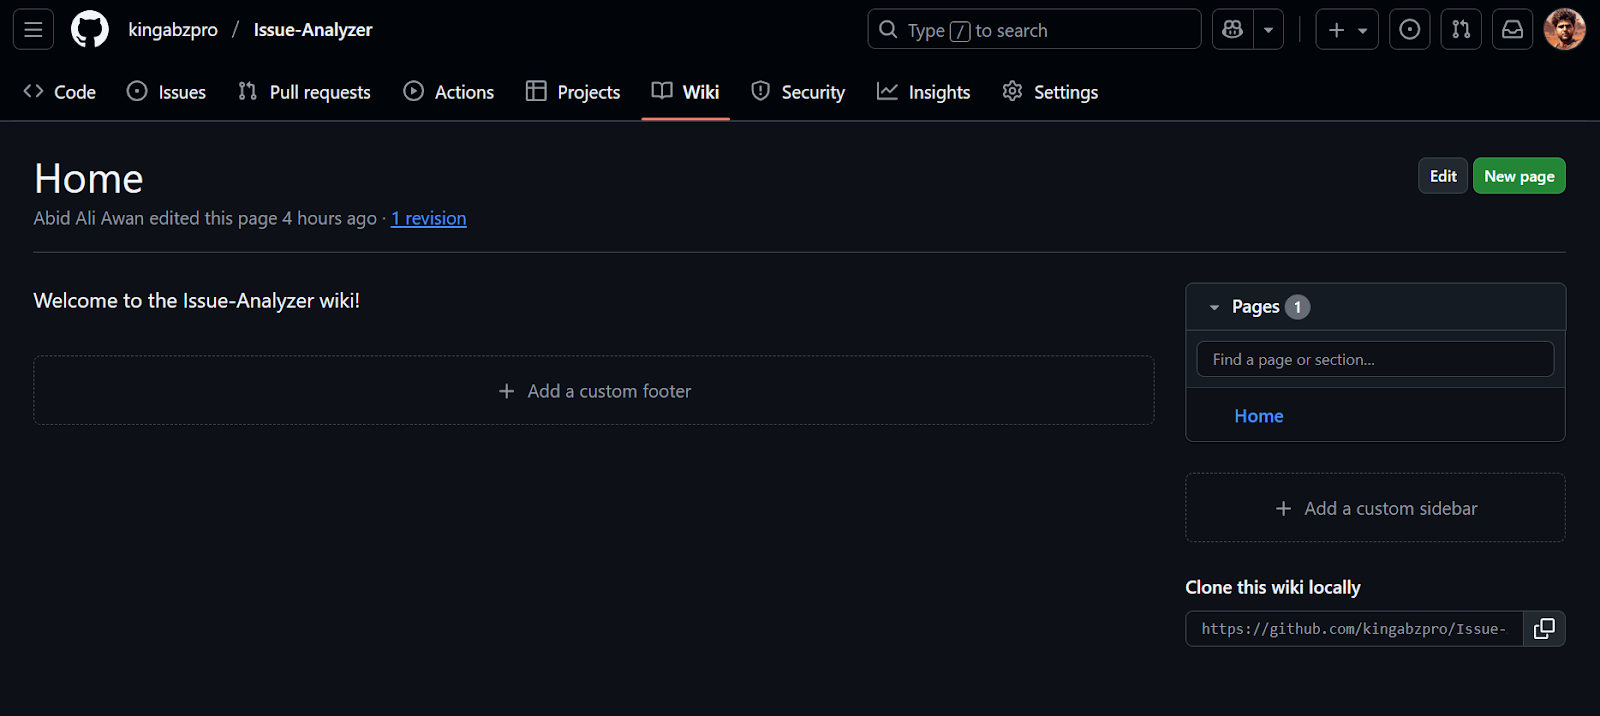
wiki_clone/ folder and pulls the latest wiki content.<your-repo>.wiki.gitI was genuinely impressed by how well the agent was able to gather demo images, charts, and other key information, then assemble a coherent home page for the wiki.
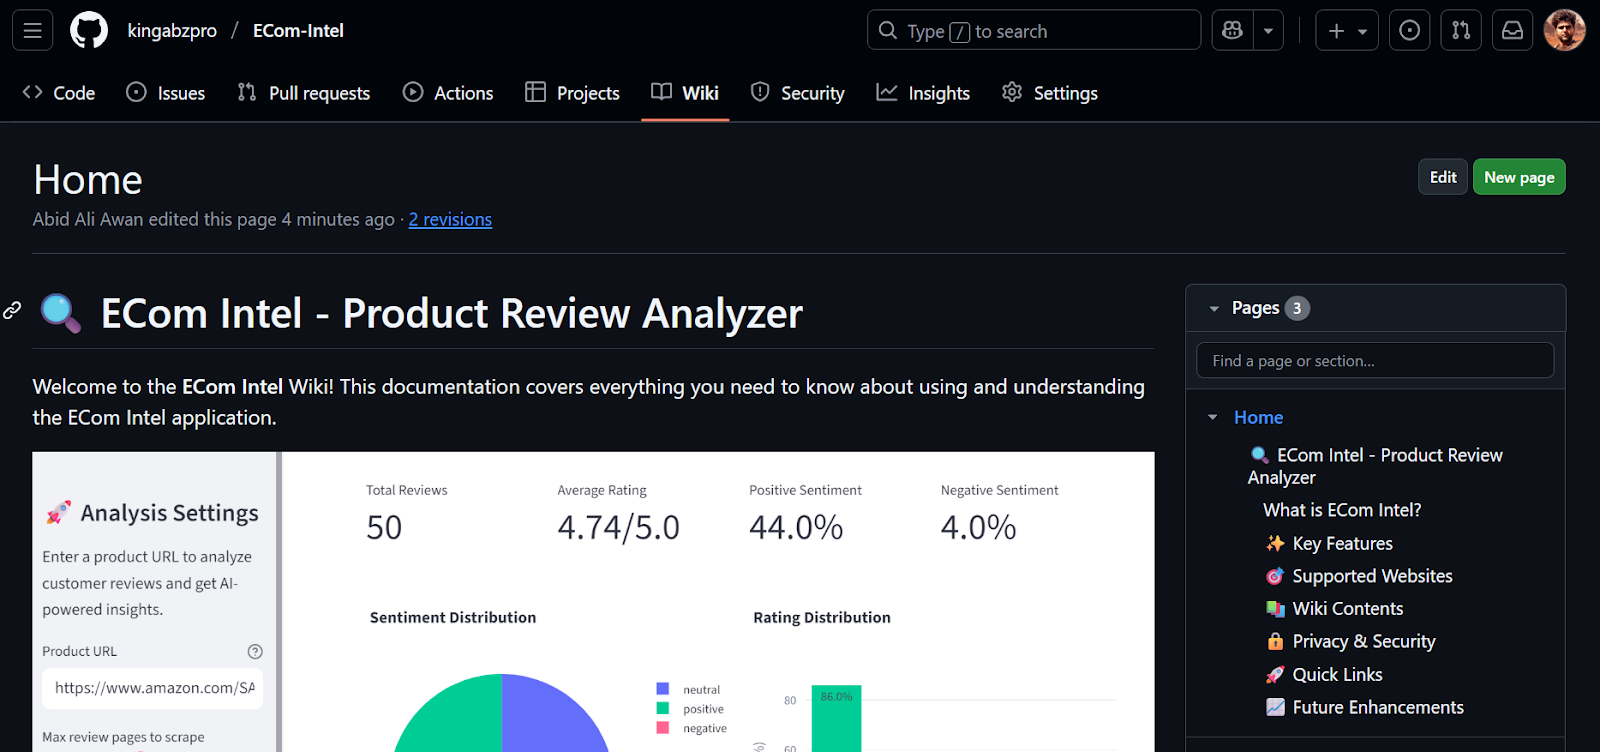
The wiki now includes a proper table of contents, explanations of the assistant and tools, and clear “getting started” instructions.
At the end of the run, the session summary showed that this single session cost almost 1 USD, which is quite expensive for generating a three-page wiki. If the repository were larger and we needed, for example, a 12-page wiki, the cost would scale up significantly.
=== Session Summary ===
Total Turns:   1
Duration:      282.99s
Total Cost:    $0.9047
=======================
In the second test, I asked the agent to create a wiki for another repository:
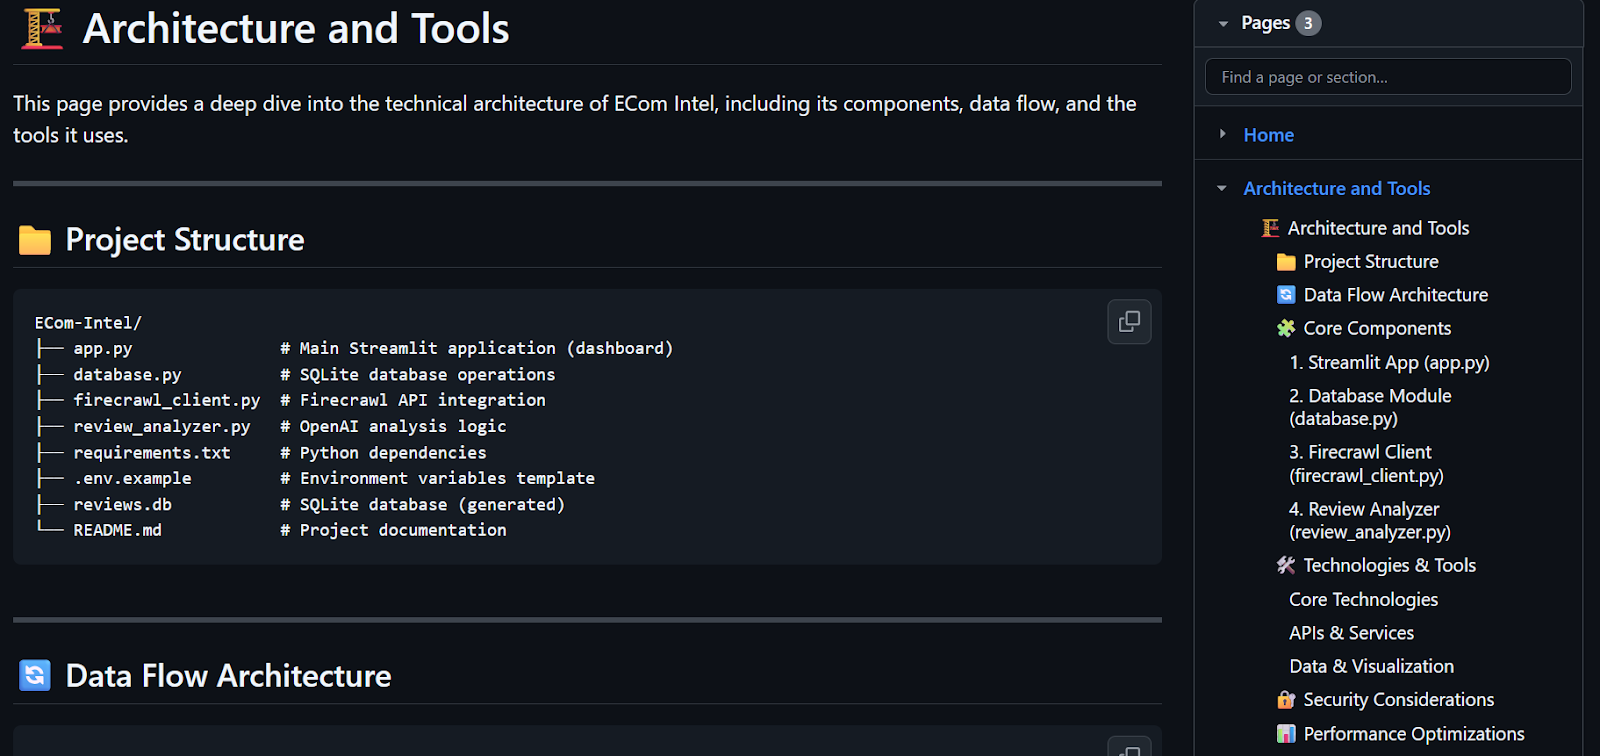
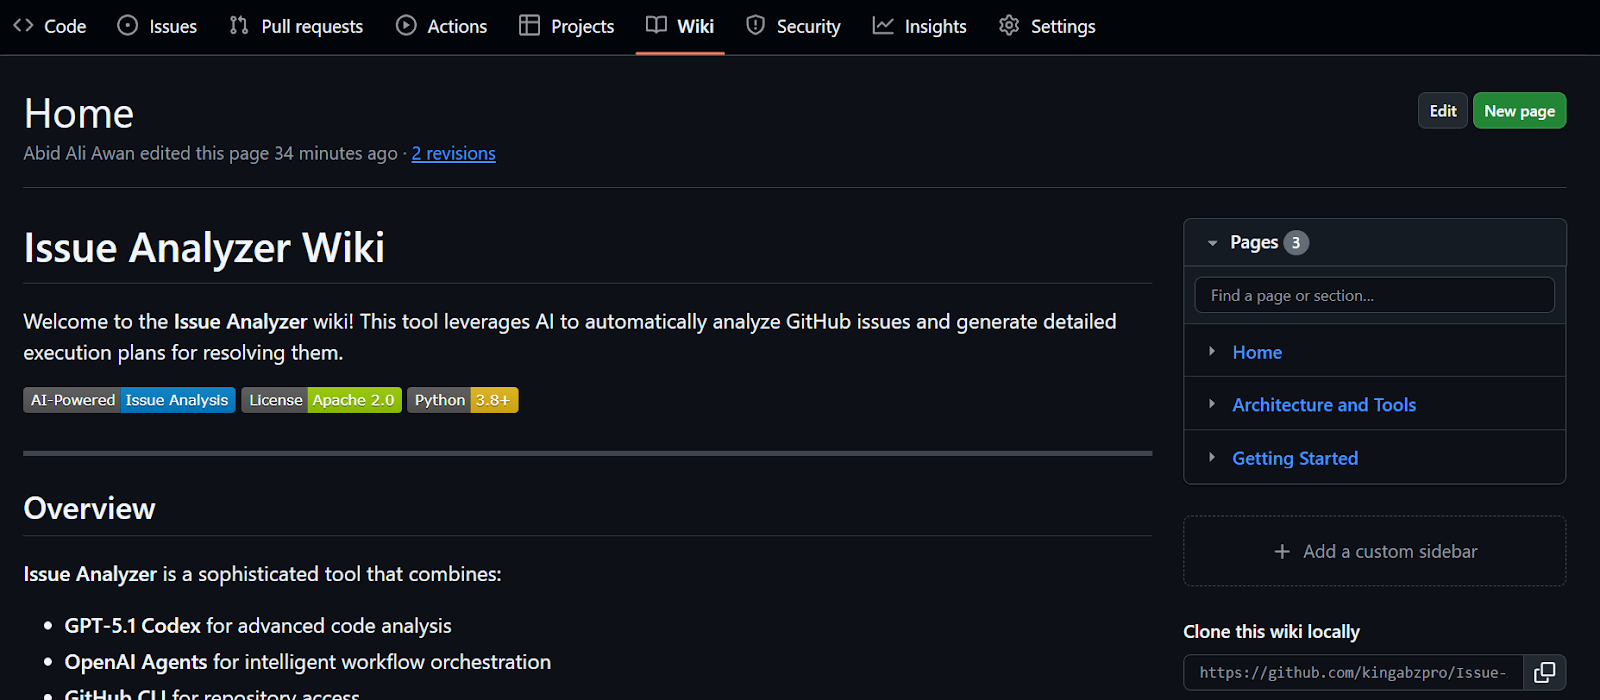
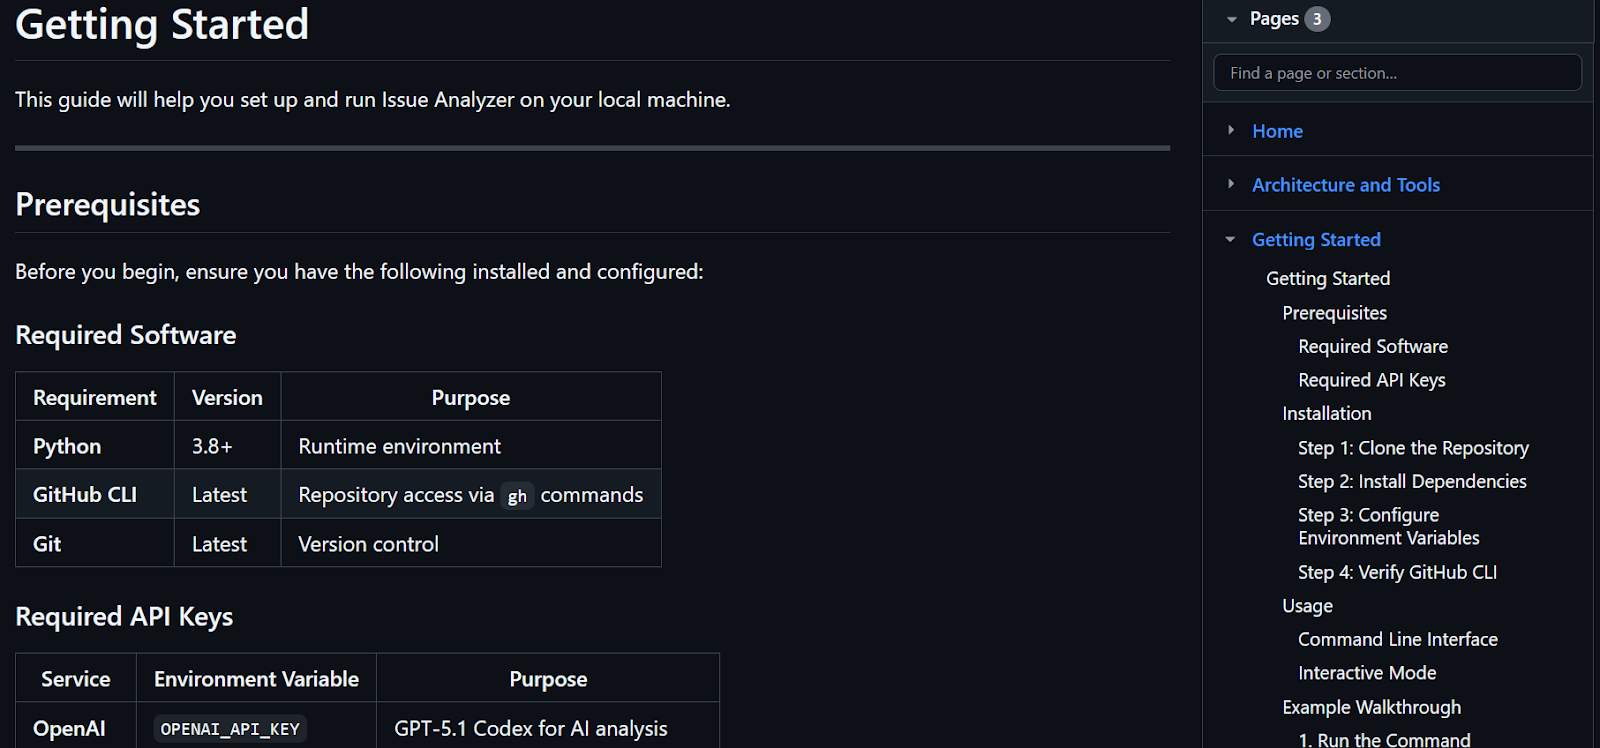
create the github wiki for https://github.com/kingabzpro/Issue-AnalyzerThe result was even better. The generated wiki, available at https://github.com/kingabzpro/Issue-Analyzer/wiki, now contains proper documentation explaining what the project does and how to get started.
It includes well-structured tables, an architecture diagram, and other core sections that let you understand the entire project in about five minutes, instead of spending days reading through the code.
When I first heard about Opus 4.5 being heralded as the best coding and agentic model in the world, I was genuinely excited, especially since it’s priced similarly to the Sonnet models.
However, my enthusiasm waned when I realized that experimenting and building a small application ended up costing around $15 in API usage.
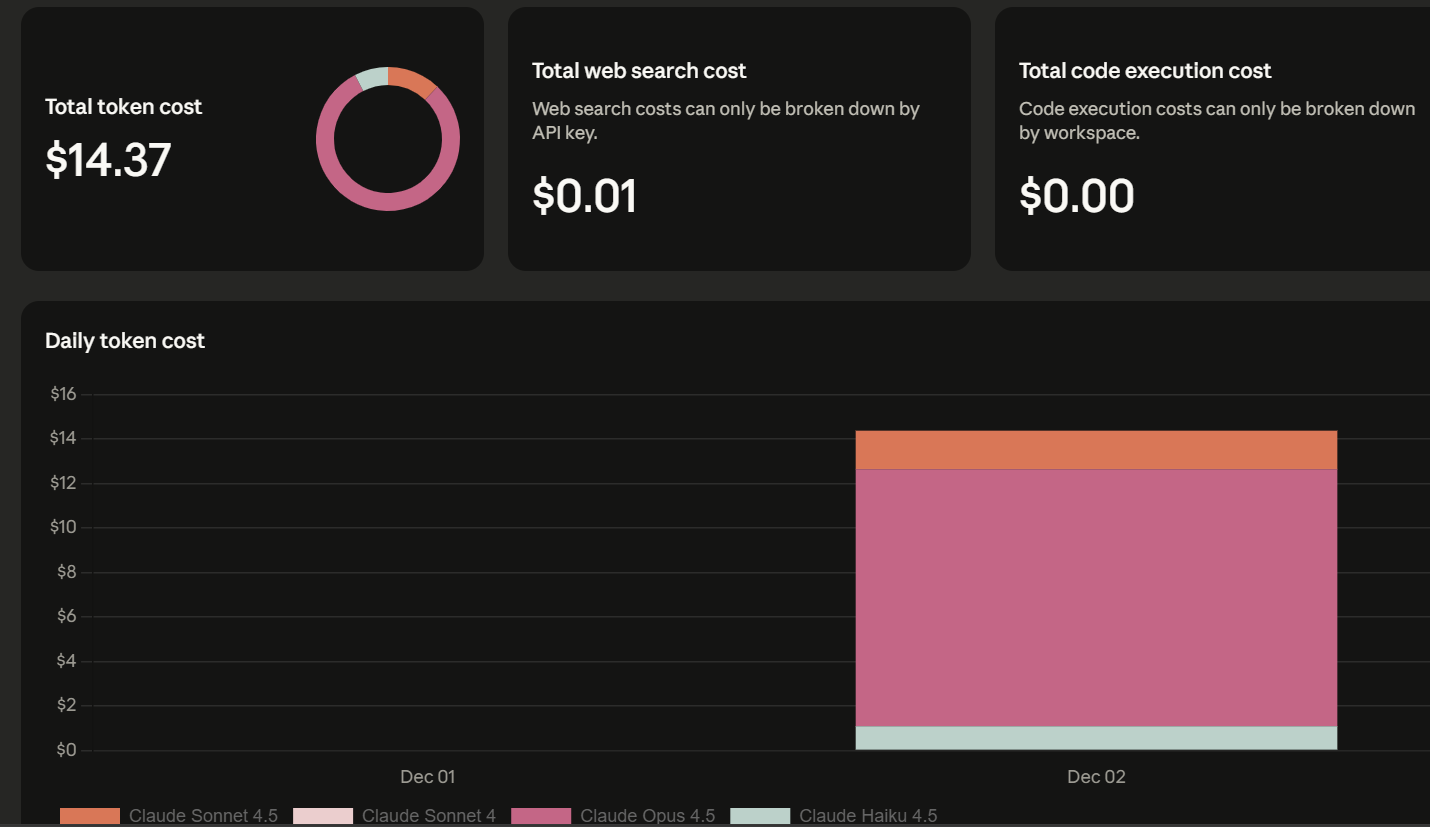
Opus 4.5 is powerful but expensive. I also attempted to replicate the same workflow using Haiku and Sonnet, but the experience was noticeably inferior for this type of agentic, documentation-heavy task.
Both frequently reverted to using Bash tools, even when I explicitly requested that they use MCP tools for reading GitHub files. Additionally, they often took longer, less direct routes to solve problems.
If you prioritize accuracy, reliability, and high-quality code and documentation generation, Opus 4.5 is definitely worth considering.
However, if your use case is less critical or you are very cost-sensitive, you might want to stick with Sonnet or even cheaper open source models. The costs associated with Opus 4.5 can escalate quickly, particularly for multi-step, agentic workflows across large repositories.
If you are interested in the project, you can find the full source code here, which you can clone and run locally: kingabzpro/GitHub-Wiki-Agent.
If you’re eager to keep building AI agents, I recommend checking out the Multi-Agent Systems with LangGraph course.
Top DataCamp Courses
Kurs
Kurs
Kurs
Blog
Josef Waples
10 Min.
Tutorial
Abid Ali Awan
Tutorial
Abid Ali Awan
Tutorial
Aashi Dutt
Tutorial
Abid Ali Awan
Tutorial
Aashi Dutt