
Cours
Ajustement fin avec Llama 3
2 h
3.7K
T5Gemma 2 est une famille de modèles d'encodeurs-décodeurs légers et ouverts de Google, construits sur Gemma 3, qui prennent en charge les entrées multilingues et multimodales.
Avec une fenêtre contextuelle pouvant atteindre 128 Ko dans plus de 140 langues et des choix de conception efficaces en termes de paramètres, tels que les intégrations liées et l'attention fusionnée, ces modèles sont parfaitement adaptés aux tâches de génération de texte et de compréhension d'images, tout en restant suffisamment compacts pour fonctionner sur un ordinateur portable.
Dans ce tutoriel, nous allons apprendre à affiner un modèle encodeur-décodeur sur un ensemble de données OCR LaTeX. L'objectif est d'obtenir des performances élevées en utilisant un nombre minimal d'échantillons d'entraînement.
Bien qu'il soit possible d'ajuster ce modèle sur Kaggle ou Google Colab, cela entraîne souvent des sessions instables, des déconnexions de ressources et un ralentissement significatif de la formation. Afin d'éviter ces points de friction et de garantir une configuration simple et fiable, nous utiliserons un GPU NVIDIA A100.
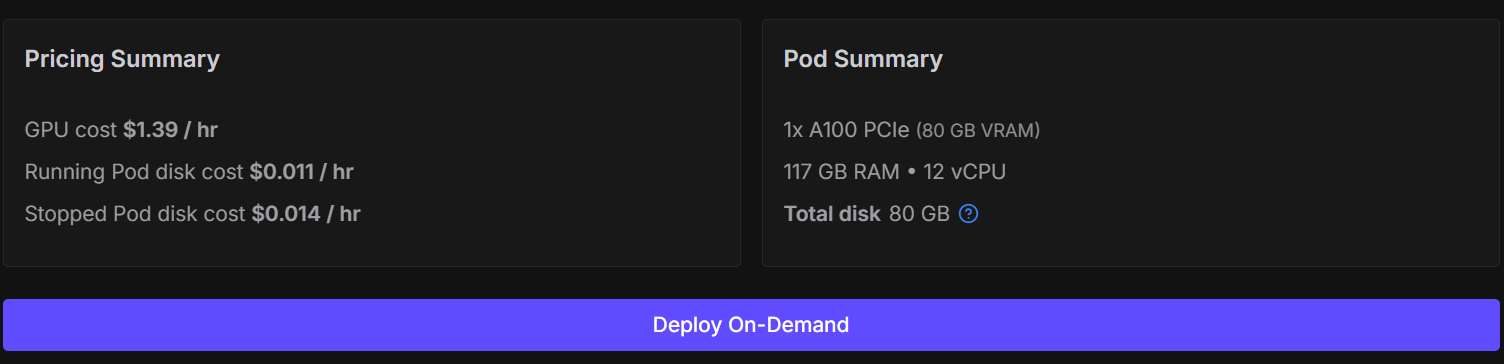
Vous pouvez louer un A100 sur RunPod pour environ 1,39 $ de l'heure, et le processus de formation complet présenté dans ce tutoriel devrait prendre moins de 30 minutes. Cette configuration vous garantit des performances constantes sans contraintes de mémoire.
Commencez par vous rendre sur RunPod et créez un nouveau pod en utilisant la dernière image PyTorch disponible à l'adresse suivante :. Veuillez sélectionner une machine1× A100 d' .
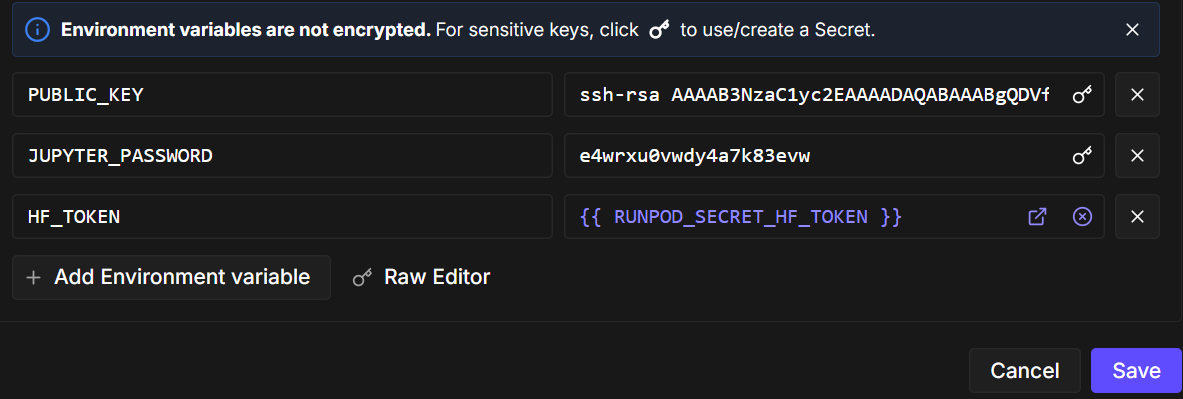
Ensuite, modifiez la configuration du pod et ajoutez une variable d'environnement nommée ` HF_TOKEN`. Ce jeton est nécessaire pour :
Une fois le pod prêt, veuillez démarrer le notebook et installer les paquets Python requis. Veuillez vous assurer que vous utilisez la dernière version d'transformers.
!pip -q install -U accelerate datasets pillow sentencepiece safetensors
!pip install --quiet "transformers==5.0.0rc1"
!pip install --quiet --no-deps trl
Veuillez maintenant importer les bibliothèques et les utilitaires que nous utiliserons tout au long du notebook.
import torch
from datasets import load_dataset
from transformers import AutoProcessor, AutoModelForSeq2SeqLM
from transformers import Seq2SeqTrainingArguments, Seq2SeqTrainer, set_seed
Avant la formation, nous appliquons quelques configurations optimisées pour les GPU A100. La définition d'une graine garantit la reproductibilité, et l'activation de TF32 améliore les performances sans affecter la stabilité de l'entraînement bf16.
set_seed(42)

torch.backends.cuda.matmul.allow_tf32 = True
torch.backends.cudnn.allow_tf32 = True

print("CUDA:", torch.cuda.is_available(), torch.cuda.get_device_name(0) if torch.cuda.is_available() else None)
print("bf16 supported:", torch.cuda.is_available() and torch.cuda.is_bf16_supported())
CUDA: True NVIDIA A100 80GB PCIe
bf16 supported: TrueDans ce tutoriel, nous utilisons le ensemble de données LaTeX OCR disponible sur Hugging Face. Chaque exemple du jeu de données comprend :
L'ensemble de données propose plusieurs configurations. Afin de garantir l'efficacité de la formation et de rester fidèles à notre objectif d'apprentissage à partir de données limitées, nous contrôlerons explicitement la taille de l'ensemble de données.
Tout d'abord, veuillez charger les divisions d'entraînement et de validation. Afin de simuler un scénario de réglage fin avec peu de données, nous mélangeons aléatoirement l'ensemble de données et sélectionnons un petit sous-ensemble :
Cela permet de maintenir un apprentissage rapide tout en permettant au modèle de généraliser.
DATASET_NAME = "full"
raw_train = load_dataset("linxy/LaTeX_OCR", name=DATASET_NAME, split="train")
raw_val   = load_dataset("linxy/LaTeX_OCR", name=DATASET_NAME, split="validation")

train_ds = raw_train.shuffle(seed=42).select(range(1000))
val_ds   = raw_val.shuffle(seed=42).select(range(200))

print(train_ds, val_ds)
print("Columns:", train_ds.column_names)
Résultat :
Dataset({
    features: ['image', 'text'],
    num_rows: 1000
}) Dataset({
    features: ['image', 'text'],
    num_rows: 200
})
Columns: ['image', 'text']
Afin de mieux appréhender les données, examinons un exemple de formation. Veuillez d'abord examiner l'image.
train_ds[10]["image"]
Ensuite, veuillez examiner la chaîne LaTeX brute associée à cette image.
train_ds[10]["text"]'G ( \\beta , \\tilde { \\mu } ) = \\left( \\frac { \\pi \\mu \\Gamma ( \\frac { \\lambda } { \\lambda + 1 } ) } { 2 \\Gamma ( \\frac { 1 } { \\lambda + 1 } ) } \\right) ^ { \\frac { 1 } { 2 \\lambda } } g _ { 0 } ( \\beta ) g _ { S } ( \\beta , Z ) ,'Enfin, nous pouvons afficher cette expression LaTeX directement dans le notebook afin de vérifier que le texte correspond au contenu de l'image.
from IPython.display import display, Math, Latex

latex = train_ds[10]["text"]
display(Math(latex))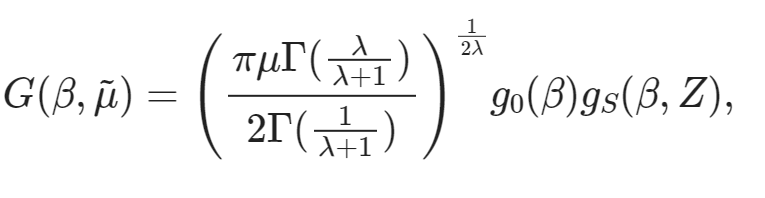
Maintenant que l'ensemble de données est prêt, l'étape suivante consiste à charger le modèleT5Gemma-2 et son processeur correspondant. Nous utiliserons le variante 270M-270M, qui offre un excellent équilibre entre performances et efficacité et s'adapte parfaitement à un GPU grand public.
MODEL_ID = "google/t5gemma-2-270m-270m"

processor = AutoProcessor.from_pretrained(MODEL_ID, use_fast=True)
model = AutoModelForSeq2SeqLM.from_pretrained(
    MODEL_ID,
    dtype=torch.bfloat16,   # A100 -> bf16
    device_map="auto",
)
Le tokenizer est accessible via le processeur. Certains modèles d'encodeurs-décodeurs ne définissent pas de jeton de remplissage par défaut. Par conséquent, nous en ajoutons un si nécessaire et redimensionnons les intégrations de jetons du modèle en conséquence.
tokenizer = processor.tokenizer
if tokenizer.pad_token is None:
    tokenizer.add_special_tokens({"pad_token": tokenizer.eos_token})
    model.resize_token_embeddings(len(tokenizer))
Pour LaTeX OCR, nous guidons le modèle à l'aide d'une brève invite textuelle associée à l'image d'entrée. Cette invite précise clairement la tâche à accomplir et impose le format de sortie.
Enfin, nous définissons les longueurs maximales des séquences pour l'entrée de l'encodeur et la cible du décodeur. Ces valeurs sont adéquates pour la plupart des expressions mathématiques tout en permettant de contrôler l'utilisation de la mémoire.
PROMPT = "<start_of_image> Convert this image to LaTeX. Output only LaTeX."
MAX_INPUT_LEN  = 128
MAX_TARGET_LEN = 256Avant de procéder au réglage fin, il est recommandé d'exécuter une inférence de référence à l'aide du modèle T5Gemma-2 pré-entraîné. Cela nous aide à comprendre comment le modèle se comporte dans le cadre de la tâche OCR LaTeX sans aucune formation spécifique à la tâche et nous fournit un point de référence pour les améliorations ultérieures.
Voici un aperçu concis du processus :
image = train_ds[20]["image"]

# prepare inputs
model_inputs = processor(text=PROMPT, images=image, return_tensors="pt")
model_inputs = {k: v.to("cuda") for k, v in model_inputs.items()}

# run inference
model = model.eval()
with torch.inference_mode():
    generation = model.generate(
        **model_inputs,
        max_new_tokens=100,
        do_sample=False,
        num_beams=3,
        repetition_penalty=1.2,
        no_repeat_ngram_size=4,
        early_stopping=True,
    )

# decode
pred = processor.decode(generation[0], skip_special_tokens=True)

print("\n--- Model output ---")
print(pred)
Exemple de résultat obtenu à partir du modèle pré-entraîné :
--- Model output ---
Use this command to change this image's format:\usepackage[T1]{fontenc}\usepackage[utf8]{inputenc}\DeclareUnicodeUTF8{1234567890123}\begin{document}<tex>$\begin{equation}\begin{aligned}P=&\frac{1+(-)\frac{1}{2}\left(F_{1}(-)\frac{F_{2}(-
Maintenant, examinons le code LaTeX correspondant à la même image.
train_ds[20]["text"]Vérité terrain :
'{ \\cal P } = \\frac { 1 + ( - ) ^ { F } { \\cal I } _ { 4 } ( - ) ^ { F _ { L } } } { 2 } .'Comme prévu, le modèle pré-entraîné ne produit pas une transcription LaTeX correcte. Au lieu de cela, il génère des fragments génériques LaTeX et des fragments non liés. Ce comportement est normal, car le modèle de base n'a pas été spécifiquement formé pour la reconnaissance optique de caractères (OCR) LaTeX.
Dans cette section, nous développons un outil personnalisé de compilation de données image-texte afin de regrouper correctement les images, les invites et les cibles LaTeX pour le réglage fin. Étant donné que T5Gemma-2 est un modèle d'encodeur-décodeur multimodal, le collateur joue un rôle essentiel pour garantir que les images et le texte sont correctement alignés et transmis au modèle dans le format attendu.
Plus précisément, le collateur :
Ensemble, ces étapes garantissent un apprentissage stable, un calcul correct des pertes et une convergence fiable lors du réglage fin du modèle sur les données OCR LaTeX.
from typing import Any, Dict, List
import torch
from PIL import Image as PILImage

tokenizer = processor.tokenizer
tokenizer.padding_side = "right"

if tokenizer.pad_token is None:
    tokenizer.add_special_tokens({"pad_token": tokenizer.eos_token})

pad_id = tokenizer.pad_token_id

PROMPT = "<start_of_image> Convert this equation image to LaTeX. Output only LaTeX."
MAX_TARGET_LEN = 256

def collate_fn(examples: List[Dict[str, Any]]) -> Dict[str, torch.Tensor]:
    images, prompts, targets = [], [], []

    for ex in examples:
        im = ex["image"]
        if isinstance(im, PILImage.Image):
            im = im.convert("RGB")
        elif isinstance(im, dict) and "path" in im:
            im = PILImage.open(im["path"]).convert("RGB")
        else:
            raise ValueError(f"Unexpected image type: {type(im)}")

        # IMPORTANT: one image per sample -> nested list
        images.append([im])

        prompts.append(PROMPT)
        targets.append(ex["text"])

    # ✅ NO truncation here (prevents image-token mismatch)
    model_inputs = processor(
        text=prompts,
        images=images,
        padding=True,
        truncation=False,
        return_tensors="pt",
    )

    labels = tokenizer(
        targets,
        padding=True,
        truncation=True,
        max_length=MAX_TARGET_LEN,
        return_tensors="pt",
    )["input_ids"]

    labels[labels == pad_id] = -100
    model_inputs["labels"] = labels
return model_inputsDans cette section, nous définissons la configuration de l'entraînement et les paramètres d'optimisation pour affiner T5Gemma-2 sur la tâche OCR LaTeX. La configuration est volontairement simple et optimisée pour un apprentissage rapide sur un seul GPU A100, à l'aide d'un petit ensemble de données et d'une seule période d'apprentissage.
Afin de réduire les frais généraux et d'accélérer le processus, nous désactivons l'évaluation et la sauvegarde des points de contrôle et nous nous concentrons uniquement sur des passages avant et arrière efficaces.
from transformers import Seq2SeqTrainingArguments

args = Seq2SeqTrainingArguments(
    output_dir="t5gemma2-latex-ocr-1k",

    # --- core training ---
    num_train_epochs=1,
    per_device_train_batch_size=8,
    gradient_accumulation_steps=1,

    learning_rate=1e-4,
    warmup_steps=15,
    lr_scheduler_type="linear",

    # --- precision / speed ---
    bf16=True,
    fp16=False,
    tf32=True,

    # --- memory ---
    gradient_checkpointing=True,

    # --- stop extra work (this is the big speed win) ---
    eval_strategy="no",
    predict_with_generate=False,
    save_strategy="no",
    report_to="none",

    # --- dataloader ---
    dataloader_num_workers=0,
    remove_unused_columns=False,

    # --- logging ---
    logging_steps=10,
)
Enfin, nous initialisons l'Seq2SeqTrainer. Nous transmettons explicitement notre collecteur de données personnalisé afin que le formateur puisse correctement construire des lots multimodaux combinant des images, des invites d'instructions et des séquences cibles LaTeX pendant la formation.
trainer = Seq2SeqTrainer(
    model=model,
    args=args,
    train_dataset=train_ds,
    eval_dataset=val_ds,
    data_collator=collate_fn,
)Une fois tous les éléments configurés, nous pouvons maintenant procéder à l'ajustement du modèle. La formation est lancée par un simple appel au formateur.
trainer.train()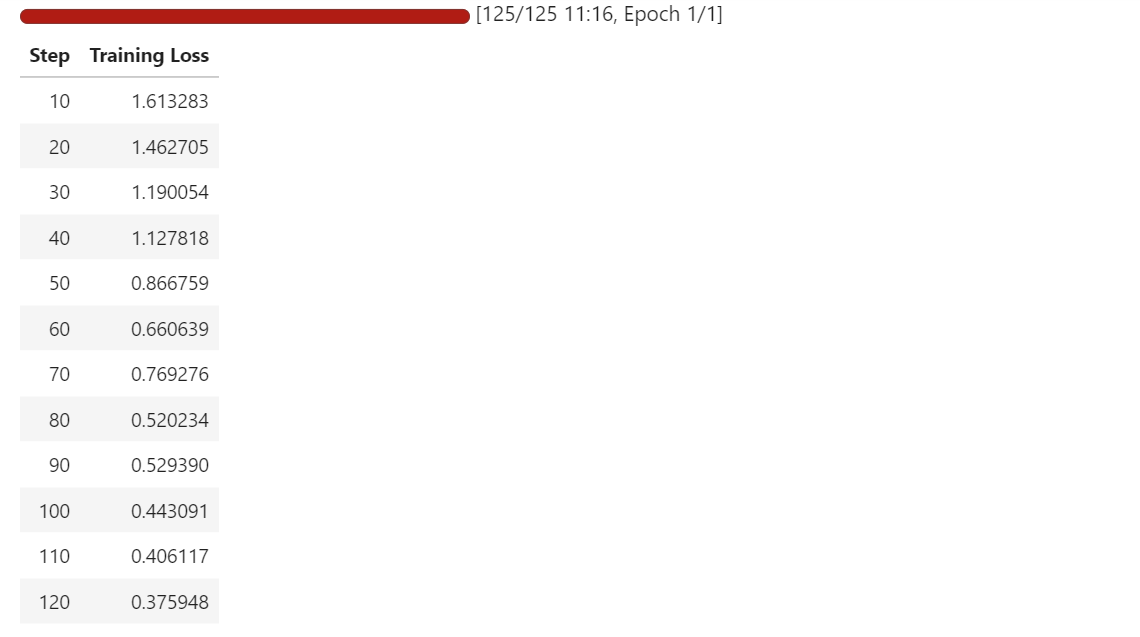
Au cours de l'entraînement, la perte diminue progressivement, ce qui indique que le modèle apprend à mieux mapper les images d'équations à leurs représentations LaTeX correspondantes.
Même avec un petit ensemble de données et une seule époque, le modèle commence à s'adapter rapidement à la tâche d'OCR.
Après avoir procédé à des ajustements, nous avons relancé l'inférence sur un échantillon d'apprentissage et un échantillon de validation afin d'observer comment les résultats du modèle ont évolué.
Par rapport au modèle de base, qui produisait principalement des modèles LaTeX génériques, le modèle optimisé génère désormais du code LaTeX structuré qui correspond étroitement à la forme et aux symboles des équations cibles.
Nous commençons par effectuer des tests sur le même exemple d'entraînement que précédemment. L'image est traitée par le processeur, des jetons sont générés par le modèle, puis décodés à nouveau en LaTeX.
# pick a sample
image = train_ds[10]["image"]

# prepare inputs
model_inputs = processor(text=PROMPT, images=image, return_tensors="pt")
model_inputs = {k: v.to("cuda") for k, v in model_inputs.items()}

# run inference
model = model.eval()
with torch.inference_mode():
    generation = model.generate(
        **model_inputs,
        max_new_tokens=100,
        do_sample=False,
        num_beams=3,
        repetition_penalty=1.2,
        no_repeat_ngram_size=4,
        early_stopping=True,
    )

# decode
pred = processor.decode(generation[0], skip_special_tokens=True)
print(pred)
Comme vous pouvez le constater, nous obtenons désormais une sortie LaTeX correcte, et non plus un texte aléatoire ou sans rapport. Dans l'exemple de formation, la prédiction correspond largement à la vérité terrain, les erreurs restantes concernant principalement des fractions, des indices et quelques tokens mal placés.
G ( \beta , \tilde { \mu } ) = \left( \frac { \pi \mu \Gamma } { 2 \Gamma } \lambda _ { + 1 } ^ { \lambda } \right) \right) ^ { \frac { 1 } { 9 \Gamma } g _ { 0 } ( \beta ) g _ { S } ( \theta , Z ) , \right) , \qquad G ( \bar { \Ensuite, nous testons le modèle sur un échantillon de validation afin de vérifier sa généralisation.
image = val_ds[10]["image"]

# prepare inputs
model_inputs = processor(text=PROMPT, images=image, return_tensors="pt")
model_inputs = {k: v.to("cuda") for k, v in model_inputs.items()}

# run inference
model = model.eval()
with torch.inference_mode():
    generation = model.generate(
        **model_inputs,
        max_new_tokens=100,
        do_sample=False,
        num_beams=3,
        repetition_penalty=1.2,
        no_repeat_ngram_size=4,
        early_stopping=True,
    )

# decode
pred = processor.decode(generation[0], skip_special_tokens=True)
print(pred)
Dans l'exemple de validation, le modèle respecte toujours la structure et les symboles LaTeX corrects, bien qu'il commette parfois des erreurs dans le placement des crochets, les termes entre parenthèses et les expressions plus longues.
f ( p , p ^ { \prime } ) = \ln \left\{ \frac { ( p _ { i } - p _ { j } ) ^ { 2 } } { \left( \frac { \psi ( p _ j ) - g ( p ; p _ { s } ) \psi ( \psi _ { i ] } ) \right\} . . . g ( \psi ; \psi ) - g \left( p ; \psi _En comparaison avec la réalité, la structure globale est clairement alignée et le modèle produit une approximation proche plutôt qu'un résultat sans rapport.
print(val_ds[10]["text"])f ( p , p ^ { \prime } ) = \ln \left\{ \frac { ( p _ { i } - p _ { j } ) ^ { 2 } } { ( p _ { i } + p _ { j } ) ^ { 2 } } \right\} \left[ \psi ( p _ { j } ) - g ( p _ { i } , p _ { j } ) \psi ( p _ { i } ) \right] .Dans l'ensemble, les résultats obtenus après l'ajustement fin présentent une nette amélioration. Le modèle ne devine plus les modèles LaTeX génériques, mais produit plutôt du code LaTeX de type équation qui ressemble étroitement aux cibles de l'ensemble de données, même avec un petit ensemble d'apprentissage et un court cycle de réglage fin.
Une fois la formation terminée, la première étape consiste à enregistrer le modèle optimisé localement afin de pouvoir le réutiliser ultérieurement pour l'inférence.
trainer.save_model()Ensuite, nous transférons le modèle vers le Hugging Face Hub afin que d'autres puissent y accéder, le réutiliser et le développer.
trainer.push_to_hub()Lors de l'inspection des fichiers du référentiel, vous remarquerez peut-être que la configuration du processeur n'est pas toujours incluse lors du transfert du modèle via le programme de formation.
Étant donné que le processeur doit traiter correctement à la fois les images et le texte, nous les transmettons explicitement séparément afin de garantir que le modèle puisse être chargé et utilisé sans configuration supplémentaire.
processor.push_to_hub(repo_id="kingabzpro/t5gemma2-latex-ocr-1k")
À l'issue de cette étape, le référentiel contient tous les éléments nécessaires pour charger le modèle et le processeur en un seul appel. Vous pouvez désormais visiter kingabzpro/t5gemma2-latex-ocr-1k sur Hugging Face pour accéder au modèle optimisé et commencer à l'utiliser pour la reconnaissance optique de caractères LaTeX ou pour d'autres expérimentations.

Maintenant que le modèle optimisé est publié sur Hugging Face Hub, nous pouvons le charger directement pour l'inférence à l'aide de l'API pipeline. Il s'agit de la méthode la plus simple pour tester le modèle sans avoir à manipuler manuellement les processeurs, les tokeniseurs ou la logique de génération.
Nous chargeons le modèle à partir du Hub et créons un pipeline d' image-text-to-text s :
from transformers import pipeline

generator = pipeline(
    "image-text-to-text",
    model="kingabzpro/t5gemma2-latex-ocr-1k",
)
Ensuite, nous effectuons une inférence sur un échantillon de validation en utilisant la même instruction que précédemment.
generator(
    val_ds[10]["image"],
    text="<start_of_image> Convert this image to LaTeX. Output only LaTeX.",
    generate_kwargs={"do_sample": False, "max_new_tokens": 100},
)
Comme vous pouvez le constater, le résultat est déjà très proche du LaTeX correct.
[{'input_text': '<start_of_image> Convert this image to LaTeX. Output only LaTeX.',
  'generated_text': '<start_of_image> Convert this image to LaTeX. Output only LaTeX.f ( p , p ^ { \\prime } ) = \\ln \\left\\{ \\begin{array} { \\begin{array} { \\begin{array} { \\begin{array} { \\begin{array} { \\end{array} \\right\\} \\begin{array} { \\begin{array} { \\begin{array} { \\end{array} \\right\\} \\begin{array} { \\begin{array} { \\begin{array} {'}]
Veuillez essayer un autre échantillon de validation et traiter la sortie afin de ne conserver que la chaîne LaTeX.
preds = generator(
    val_ds[30]["image"],
    text="<start_of_image> Convert this image to LaTeX. Output only LaTeX.",
    generate_kwargs={"do_sample": False, "max_new_tokens": 100},
)

prompt = preds[0]["input_text"]
gen = preds[0]["generated_text"]

# remove the prompt if the model echoed it
if gen.startswith(prompt):
    gen = gen[len(prompt):]

# remove any leftover special tokens / separators
gen = gen.replace("<start_of_image>", "").strip()
if gen.startswith("."):
    gen = gen[1:].strip()

print("\nCLEAN PREDICTED LaTeX:\n", gen)
Cette fois-ci, le résultat est clair et directement utilisable comme LaTeX :
CLEAN PREDICTED LaTeX:
 T _ { M N } = \left\{ g N \nu \partial _ { M P _ { } } \cdot \left\{ g ^ { N } \nu \partial _ { M P _ { } } \cdot \left\{ g ^ { N } \nu \partial _ { M P _ { } } \cdot \left\{ g ^ { N } \nu \partial _ { M P _ { } } \cdot \left\{ g ^ {
À ce stade, le modèle peut être utilisé comme un système OCR LaTeX prêt à l'emploi. Vous pouvez le déployer derrière une API, l'intégrer dans un pipeline de traitement de documents ou continuer à l'affiner avec davantage de données pour une précision encore meilleure.
Si vous rencontrez des difficultés lors de l'exécution du code ci-dessus, veuillez consulter le cahier d'aide. Il contient le code complet ainsi que les résultats à chaque étape pour vous guider tout au long du processus.
Lorsque j'ai commencé à entraîner le modèle, je l'ai traité comme n'importe quel grand modèle linguistique avec un encodeur d'images. Après plusieurs échecs, j'ai compris que cette approche n'était pas efficace pour les modèles de type séquence-à-séquence, encodeur-décodeur.
J'ai dû repenser l'ensemble de la configuration, y compris le collecteur de données, le formateur, les arguments de formation et même la manière dont l'inférence est effectuée.
Dans ce tutoriel, nous avons présenté un processus complet pour optimiser T5Gemma-2 dans le cadre d'une tâche d'OCR LaTeX, depuis la configuration de l'environnement et l'inspection de l'ensemble de données jusqu'au collationnement personnalisé des données, à l'entraînement efficace et à l'évaluation post-entraînement.
À l'aide d'un petit ensemble de données et d'un seul GPU A100, nous avons démontré qu'un modèle multimodal encodeur-décodeur peut rapidement apprendre à générer du code LaTeX structuré et significatif à partir d'images d'équations.
Au final, le modèle optimisé a largement dépassé les résultats génériques standard et a produit un code LaTeX similaire à une équation qui correspond étroitement à la réalité, démontrant ainsi à quel point l'optimisation des modèles ouverts modernes peut être accessible et efficace pour les tâches réelles d'OCR et de compréhension de documents.
Si vous recherchez des exemples plus concrets de réglage fin des LLM, je vous recommande de consulter le cours cours « Fine-Tuning with Llama 3 ».
Meilleurs cours DataCamp
Cours
Cours
Cours