Track
डेवलपर्स के लिए एसोसिएट AI इंजीनियर
26 घंटा
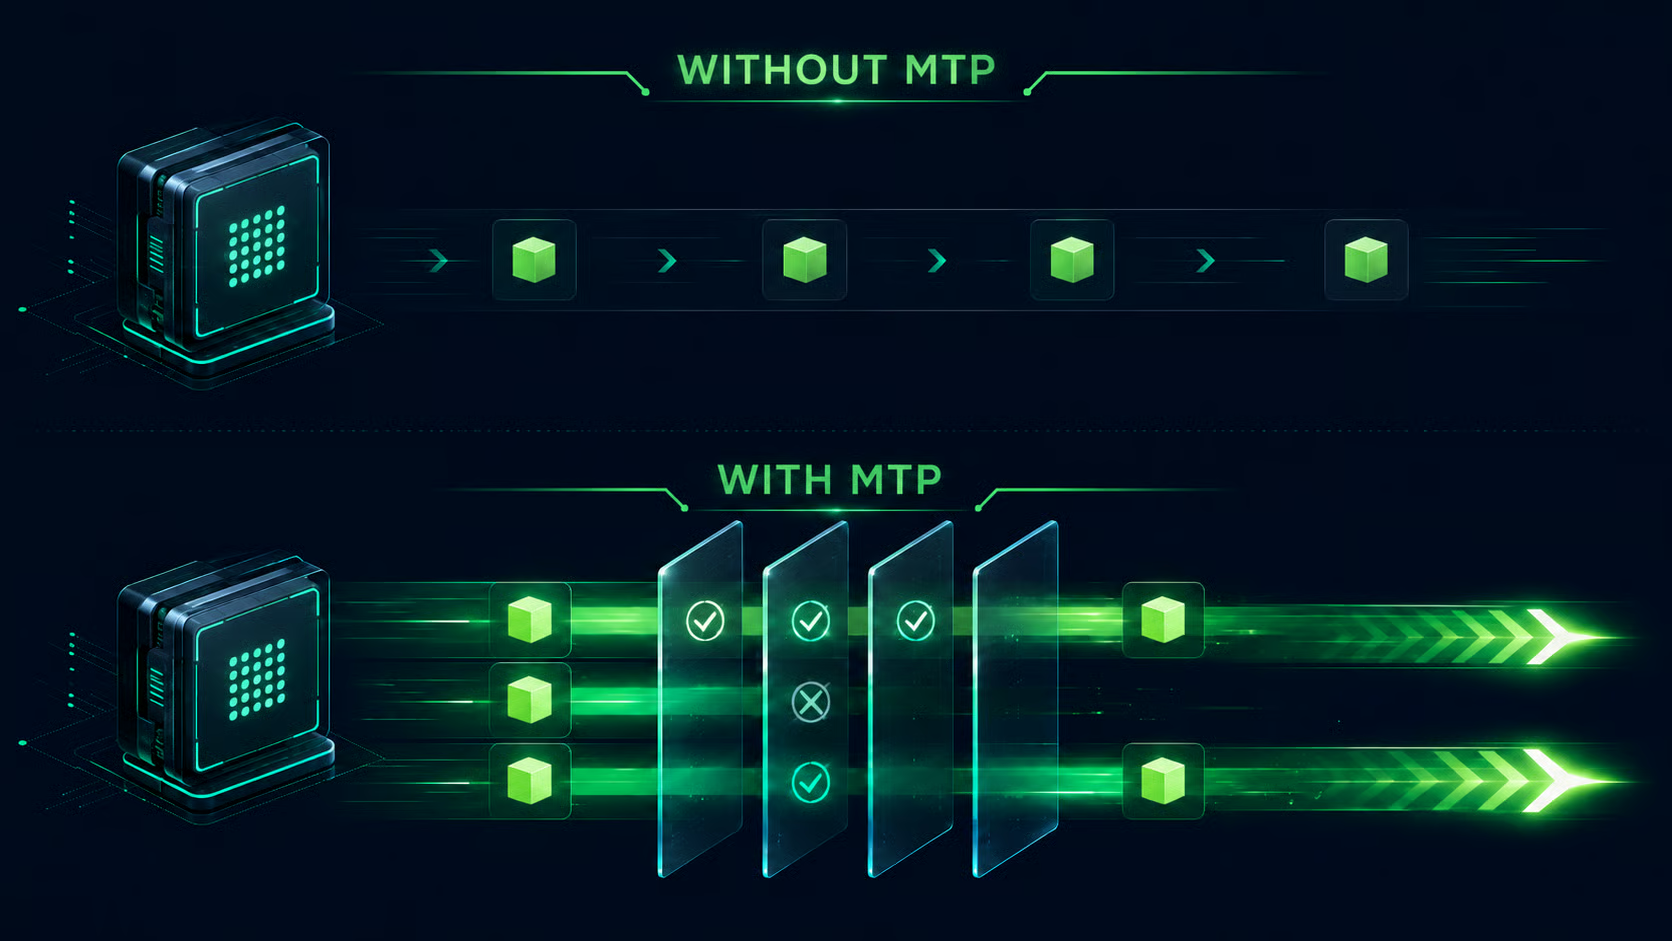
ज़्यादातर LLM एक समय में एक-एक टोकन जनरेट करते हैं। मॉडल अगला टोकन प्रेडिक्ट करता है, उसे कॉन्टेक्स्ट में जोड़ता है, और फिर वही प्रक्रिया दोहराता है। यह विश्वसनीय है, लेकिन धीमा हो सकता है क्योंकि हर नए टोकन के लिए आमतौर पर एक और डिकोडिंग स्टेप चाहिए होता है।
मल्टी-टोकन प्रेडिक्शन इसको बदल देता है: मॉडल को आगे झाँकने और सिर्फ़ एक की बजाय कई भविष्य के टोकन सुझाने की अनुमति मिलती है। फिर मुख्य डिकोडिंग प्रक्रिया इन प्रस्तावित टोकनों की जाँच करती है। यदि प्रेडिक्शन सही हैं, तो मॉडल एक साथ कई टोकन स्वीकार कर सकता है। अगर किसी बिंदु पर कोई टोकन ग़लत हो, तो मॉडल वहीं से सामान्य रास्ते पर लौट आता है।
व्यवहार में, MTP एक बिल्ट-इन ड्राफ्टिंग मैकेनिज़्म जैसा काम करता है। मॉडल कुछ संभावित अगले टोकन ड्राफ्ट करता है, उन्हें वेरिफ़ाई करता है, और वैध टोकन रख लेता है। जितने अधिक ड्राफ्ट टोकन स्वीकार होते हैं, उतने कम फुल डिकोडिंग स्टेप्स की ज़रूरत पड़ती है—जिससे टोकन-पर-सेकंड बढ़ सकते हैं, बिना अंतिम आउटपुट गुणवत्ता बदले।
सरल शब्दों में:
इसीलिए MTP लोकल LLM इन्फरेंस को काफ़ी तेज़ महसूस करा सकता है। मॉडल को एक-एक छोटे स्टेप से आगे बढ़ाने की बजाय, जब उसके ड्राफ्ट प्रेडिक्शन सही हों तो उसे सुरक्षित रूप से आगे छलाँग लगाने दी जाती है।
जैसे टूल्स में llama.cpp और vLLM-स्टाइल इम्प्लीमेंटेशन में, यह speculative decoding से काफ़ी जुड़ा है, जहाँ ड्राफ्ट टोकन तभी स्वीकार होते हैं जब वे वेरिफ़ायर के आउटपुट से मेल खाते हैं।
इस गाइड के लिए, मैंने RTX 3090 वाली RunPod GPU इंस्टेंस का उपयोग किया। आप कोई और CUDA-सक्षम GPU इस्तेमाल कर सकते हैं, लेकिन इस ट्यूटोरियल के बेंचमार्क नतीजे RTX 3090 सेटअप पर आधारित हैं।
सबसे पहले, एक नया RunPod पोड बनाएँ और RTX 3090 GPU चुनें।
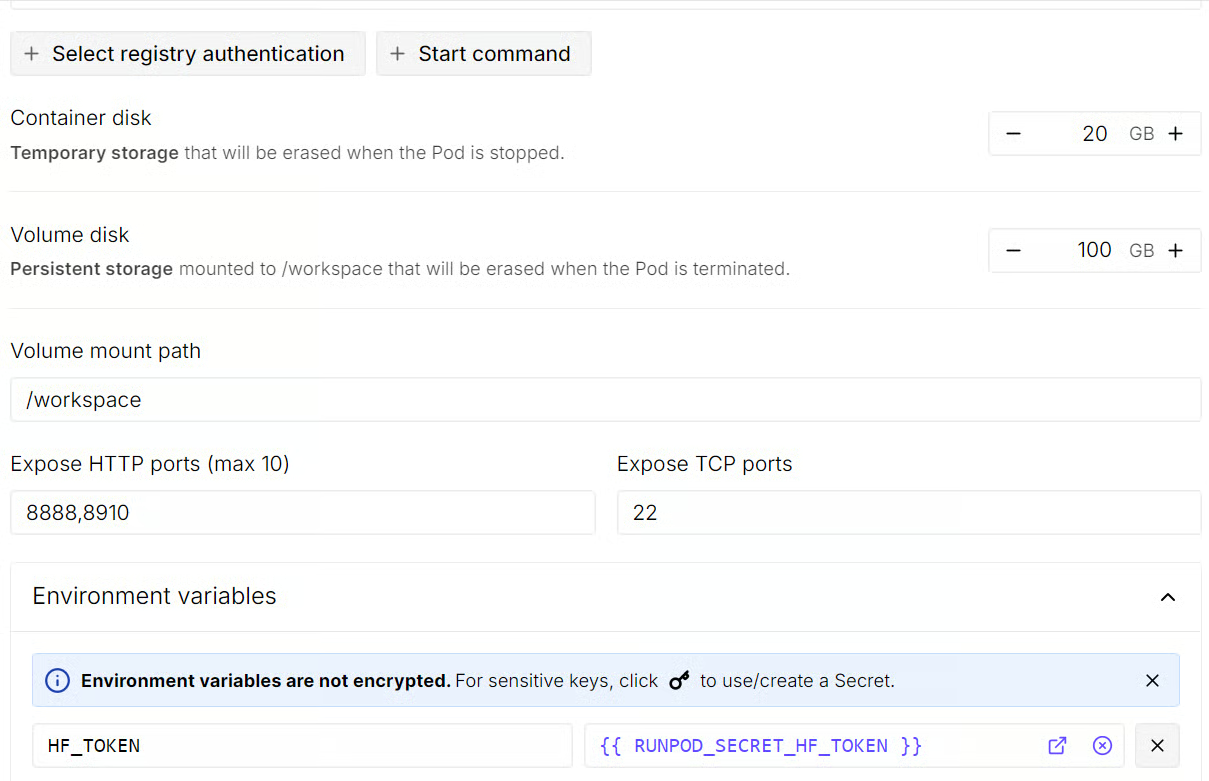
पोड को डिप्लॉय करने से पहले, टेम्पलेट सेटिंग्स एडिट करें:
वॉल्यूम डिस्क साइज को 100 GB तक बढ़ाएँ
एक अतिरिक्त HTTP पोर्ट जोड़ें: 8910
HF_TOKEN नाम का एक पर्यावरण वेरिएबल जोड़ें और इसका मान अपने Hugging Face एक्सेस टोकन पर सेट करें।
यह अतिरिक्त HTTP पोर्ट आपको ब्राउज़र से llama.cpp सर्वर और वेब UI तक पहुँचने देगा। Hugging Face टोकन डाउनलोड रिक्वेस्ट को प्रमाणित करने में मदद करता है और बड़े GGUF फ़ाइलों के लिए मॉडल डाउनलोड स्पीड बेहतर कर सकता है।
टेम्पलेट अपडेट करने के बाद, पोड डिप्लॉय करें। रन होने पर, RunPod से JupyterLab एक्सेस मिलने का इंतज़ार करें। JupyterLab खोलें, फिर एक नया टर्मिनल लॉन्च करें।
टर्मिनल के अंदर, आवश्यक सिस्टम पैकेज इंस्टॉल करें:
apt update
apt install -y git cmake build-essential curl wget python3-pip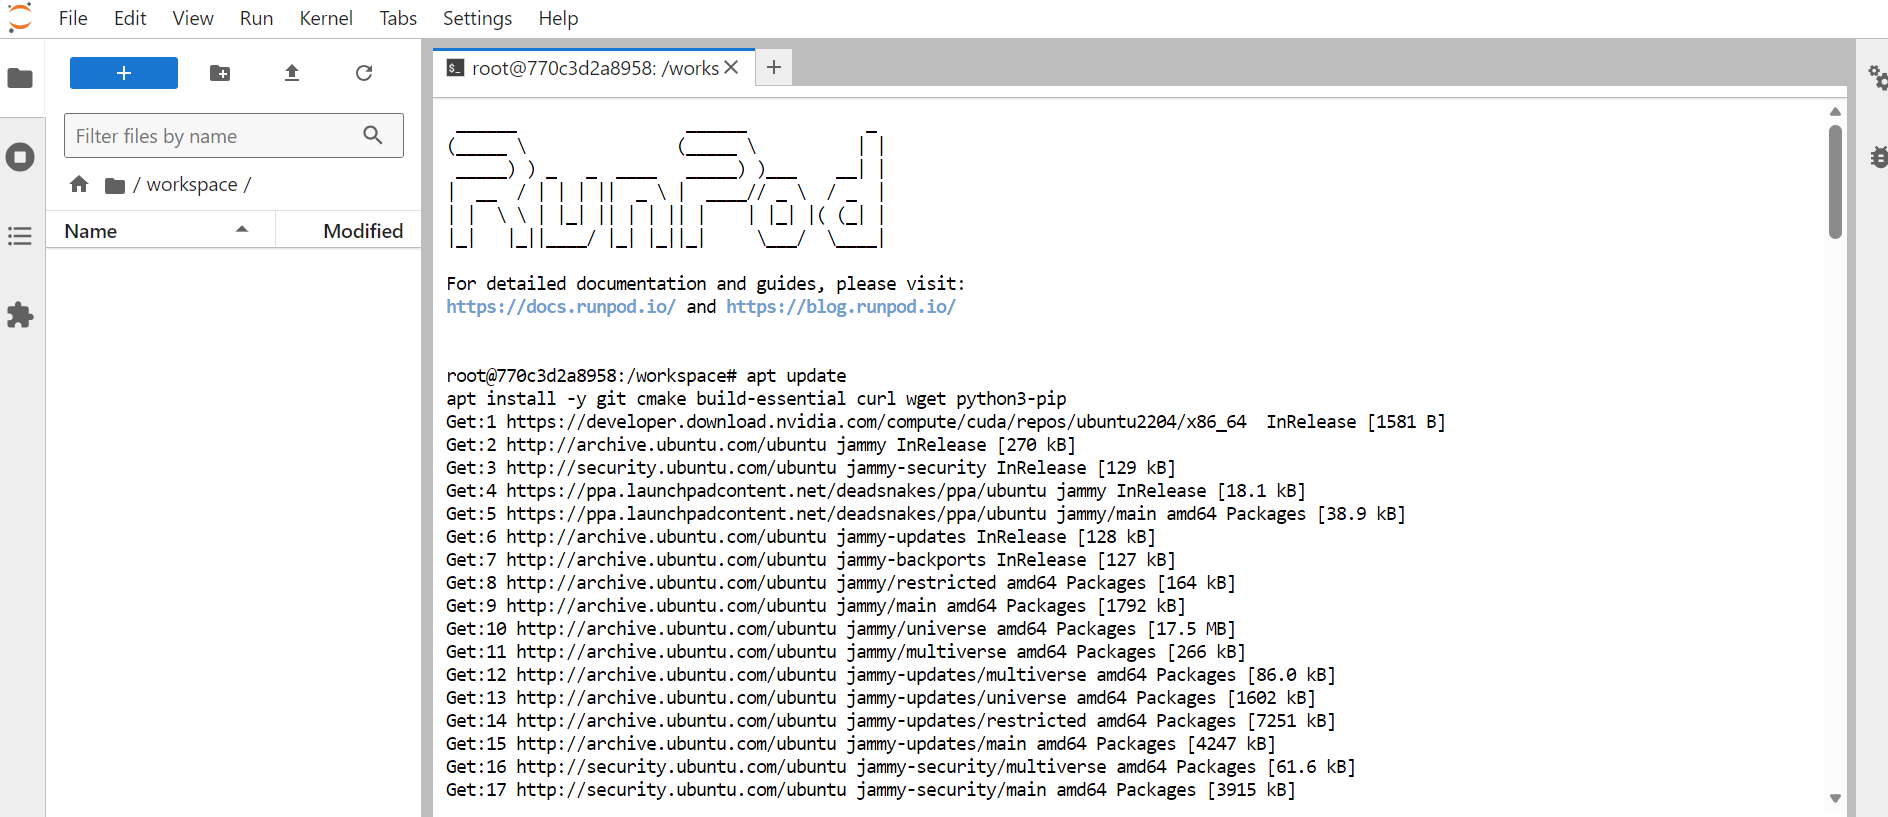
अगला, उस वर्कस्पेस डायरेक्टरी में जाएँ जहाँ हम llama.cpp इंस्टॉल और बिल्ड करेंगे:
cd /workspacellama.cpp रिपॉजिटरी क्लोन करें:
git clone --depth 1 https://github.com/ggml-org/llama.cpp.git
cd llama.cpp
MTP बदलाव अभी एक समर्पित llama.cpp पुल रिक्वेस्ट के माध्यम से टेस्ट हो रहे हैं, इसलिए हम उसे फ़ेच कर उस ब्रांच पर स्विच करेंगे ताकि यह मानक मेन बिल्ड का हिस्सा बनने से पहले नवीनतम MTP इम्प्लीमेंटेशन का उपयोग कर सकें।
MTP ब्रांच लोकली फ़ेच करें:
git fetch origin pull/22673/head:mtp-pr
git checkout mtp-pr
यह आपके लोकल llama.cpp बिल्ड को MTP-सक्षम वर्ज़न पर स्विच करता है, जिसका उपयोग हम आगे के चरणों में करेंगे।

अब जब आप MTP-सक्षम ब्रांच पर हैं, llama.cpp को CUDA सपोर्ट के साथ बिल्ड करें। इससे मॉडल CPU पर इन्फरेंस चलाने की बजाय RTX 3090 GPU का उपयोग कर सकेगा।
CMake बिल्ड कॉन्फ़िगरेशन चलाएँ:
cmake -B build -DGGML_CUDA=ON -DCMAKE_BUILD_TYPE=Releaseफिर इस गाइड के लिए आवश्यक दो टार्गेट्स को कॉम्पाइल करें:
cmake --build build --target llama-cli llama-server -j
यह बिल्ड करता है:
llama-cli ताकि तेज़ी से कमांड-लाइन टेस्ट चलाए जा सकें
llama-server ताकि ब्राउज़र एक्सेस के साथ OpenAI-कम्पैटिबल सर्वर लॉन्च किया जा सके
बिल्ड पूरा होने पर, llama-server बायनेरी को मुख्य llama.cpp डायरेक्टरी में कॉपी करें:
cp ./build/bin/llama-server ./llama-serverइससे अगले चरणों में प्रोजेक्ट रूट से सर्वर चलाना आसान हो जाता है।
अब वह Qwen3.6 27B MTP GGUF मॉडल डाउनलोड करें जिसका हम टेस्ट के लिए उपयोग करेंगे। हम पहले इसे बिना MTP के चलाएँगे, और फिर MTP सक्षम करके स्पीड का अंतर देखेंगे।
पहले, Hugging Face डाउनलोड टूल्स इंस्टॉल करें:
pip install -U "huggingface_hub[hf_xet]" hf-xet hf_transferफिर तेज़ Hugging Face डाउनलोड सक्षम करें:
export HF_HUB_ENABLE_HF_TRANSFER=1यह बड़े मॉडल डाउनलोड, ख़ासकर GGUF फ़ाइलों के साथ काम करते समय, तेज़ करने में मदद करता है।
अब मॉडल के लिए एक समर्पित डायरेक्टरी बनाएँ:
mkdir -p /workspace/models/qwen3.6-mtpQwen3.6 27B MTP GGUF मॉडल डाउनलोड करें:
hf download froggeric/Qwen3.6-27B-MTP-GGUF \
 Qwen3.6-27B-Q4_K_M-mtp.gguf \
 --local-dir /workspace/models/qwen3.6-mtp
यदि आप LLMs को फाइन-ट्यून करने में रुचि रखते हैं, तो मेरे मेडिकल Q&A डेटासेट पर Qwen3.6 को फाइन-ट्यून करने वाले ट्यूटोरियल को देखें।
अब हम गाइड के मुख्य भाग पर हैं: MTP सक्षम करने से पहले और बाद में मॉडल स्पीड टेस्ट करना।
पहले, हम मॉडल को बिना MTP के चलाएँगे। यह हमें एक स्पष्ट बेसलाइन देता है ताकि बाद में स्पीड का अंतर तुलना कर सकें। हम वही मॉडल, वही GPU, वही कॉन्टेक्स्ट साइज और वही सर्वर सेटिंग्स उपयोग कर रहे हैं। अगले चरण में केवल बड़ा बदलाव MTP को सक्षम करना होगा।
वापस llama.cpp डायरेक्टरी में जाएँ:
cd /workspace/llama.cppसर्वर को बिना MTP के शुरू करें:
./llama-server \
-m "/workspace/models/qwen3.6-mtp/Qwen3.6-27B-Q4_K_M-mtp.gguf" \
--alias qwen3.6-27b-no-mtp \
--host 0.0.0.0 \
--port 8910 \
-ngl 99 \
-c 100000 \
--cache-type-k q8_0 \
--cache-type-v q8_0 \
-np 1 \
-b 2048 \
-ub 512 \
-t 8 \
-fa on \
--temp 0.7 \
--top-k 20 \
--top-p 0.95 \
--repeat-penalty 1.1 \
--metrics
यह पोर्ट 8910 पर एक OpenAI-कम्पैटिबल llama.cpp सर्वर शुरू करता है।
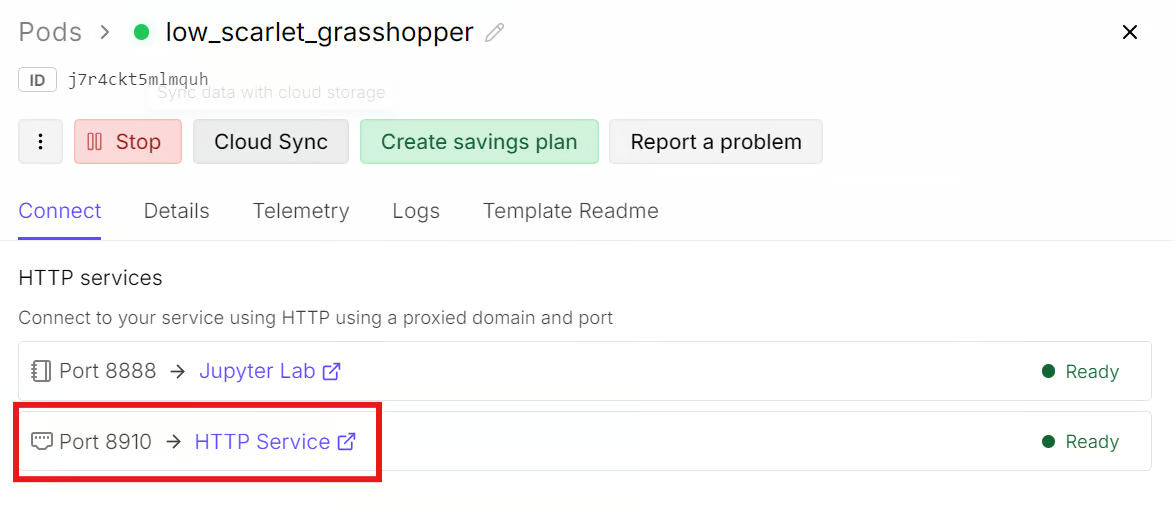
मॉडल को लोड होने में थोड़ा समय लग सकता है क्योंकि सर्वर को मॉडल वेट्स को GPU मेमोरी में लोड करना होता है। सब तैयार होने पर, टर्मिनल दिखाएगा कि सर्वर पोर्ट 8910 पर उपलब्ध है।

क्योंकि हमने RunPod टेम्पलेट सेटअप करते समय यह पोर्ट एक्सपोज़ किया था, आपको और कुछ कॉन्फ़िगर करने की ज़रूरत नहीं है। अपने RunPod डैशबोर्ड पर लौटें और पोर्ट 8910 से जुड़ी लिंक पर क्लिक करें। यह आपके ब्राउज़र में llama.cpp वेब UI खोल देगा, जिसमें लोकल मॉडल पहले से लोड रहेगा।
यहाँ से आप सीधे ब्राउज़र में प्रॉम्प्ट्स टेस्ट करना शुरू कर सकते हैं, ठीक चैट इंटरफ़ेस की तरह।
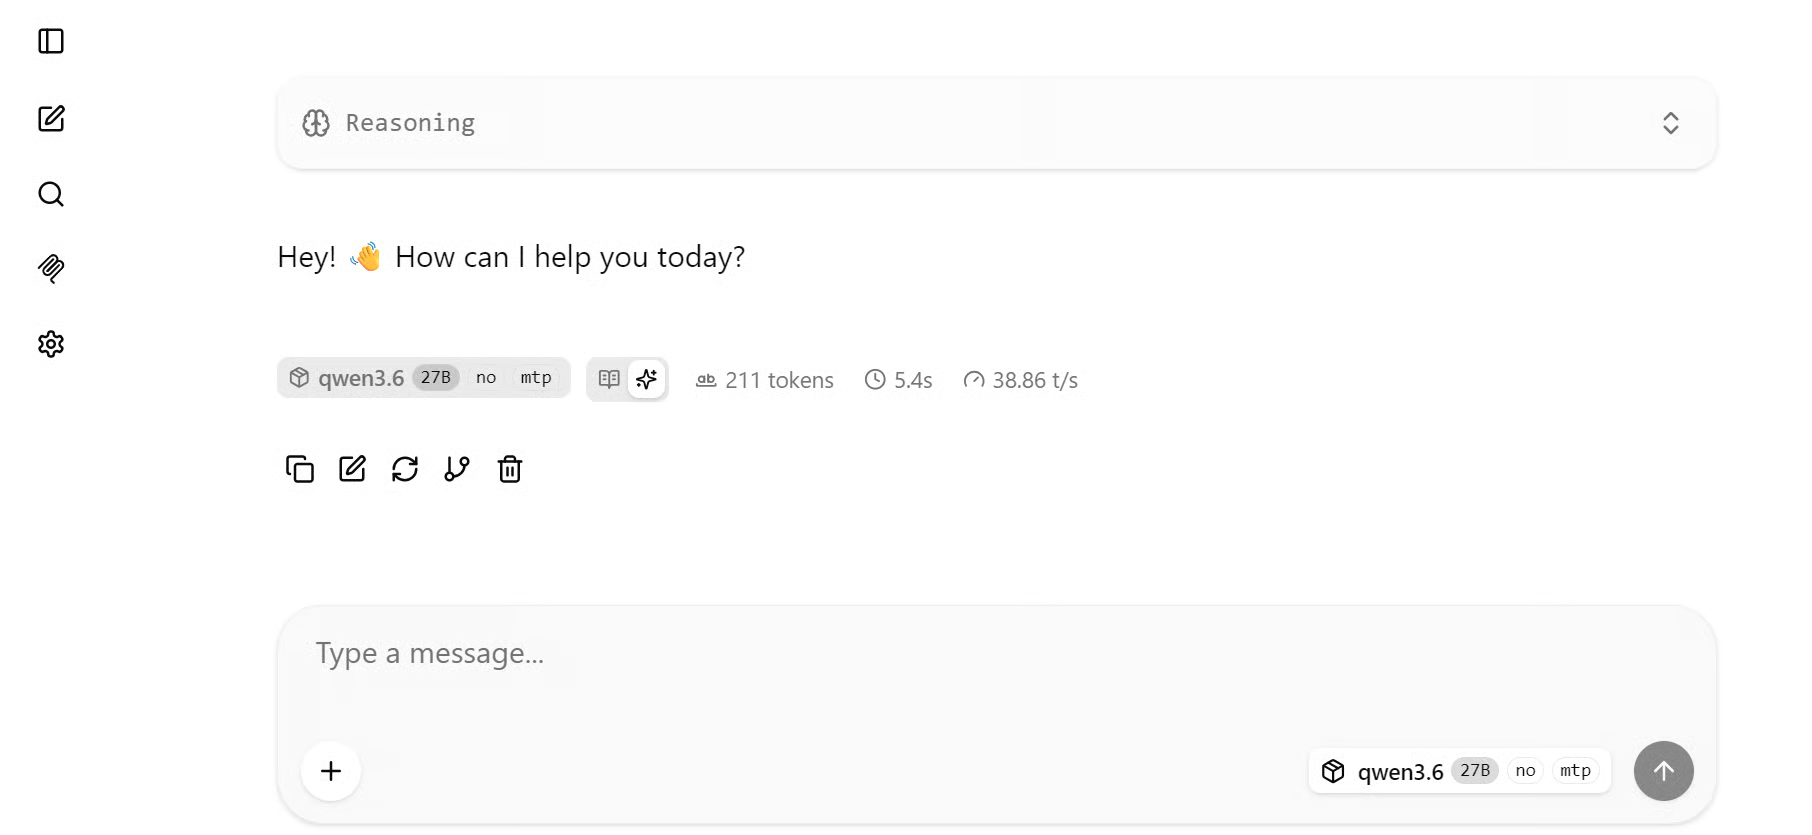
मेरे बेसलाइन टेस्ट में, मॉडल ने बिना MTP के लगभग 38.86 tokens/sec की स्पीड से रिस्पॉन्स जनरेट किए। अधिक जटिल प्रॉम्प्ट पर भी स्पीड लगभग इसी रेंज में रही।
RTX 3090 पर 27B मॉडल के लिए, यह पहले से ही उपयोगी नतीजा है—ख़ासकर यह देखते हुए कि यह GPU नए डेटा सेंटर कार्ड्स की तुलना में धीमा है और इसकी मेमोरी सीमित है।
अब हम वही मॉडल फिर चलाएँगे, लेकिन इस बार MTP सक्षम होगा।
जहाँ सर्वर चल रहा है उस टर्मिनल में वापस जाएँ और इसे इस तरह रोकें:
CTRL + Cयहाँ महत्वपूर्ण बात यह है कि हम मॉडल, GPU, क्वांटाइज़ेशन, या ज़्यादातर रनटाइम सेटिंग्स नहीं बदल रहे। हम सिर्फ़ दो MTP-सम्बंधित फ़्लैग जोड़ रहे हैं:
--spec-type mtp
--spec-draft-n-max 3
पहला फ़्लैग llama.cpp को MTP-स्टाइल speculative decoding उपयोग करने के लिए कहता है। दूसरा फ़्लैग ड्राफ्ट टोकनों की अधिकतम संख्या 3 सेट करता है—यानी वेरिफ़िकेशन से पहले मॉडल अधिकतम तीन भविष्य के टोकन ड्राफ्ट करने का प्रयास कर सकता है।
अब MTP सक्षम करके सर्वर दोबारा शुरू करें:
./llama-server \
-m "/workspace/models/qwen3.6-mtp/Qwen3.6-27B-Q4_K_M-mtp.gguf" \
--alias qwen3.6-27b-mtp \
--host 0.0.0.0 \
--port 8910 \
-ngl 99 \
-c 100000 \
--spec-type mtp \
--spec-draft-n-max 3 \
--cache-type-k q8_0 \
--cache-type-v q8_0 \
-np 1 \
-b 2048 \
-ub 512 \
-t 8 \
-fa on \
--temp 0.7 \
--top-k 20 \
--top-p 0.95 \
--repeat-penalty 1.1 \
--metrics
सर्वर तैयार होने के बाद, ब्राउज़र पेज रिफ़्रेश करें। यदि पेज अपने-आप रीकनेक्ट नहीं होता, तो उसे बंद करें और RunPod डैशबोर्ड से पोर्ट 8910 लिंक फिर खोलें।
अब उसी प्रकार के प्रॉम्प्ट्स के साथ मॉडल को फिर टेस्ट करें।
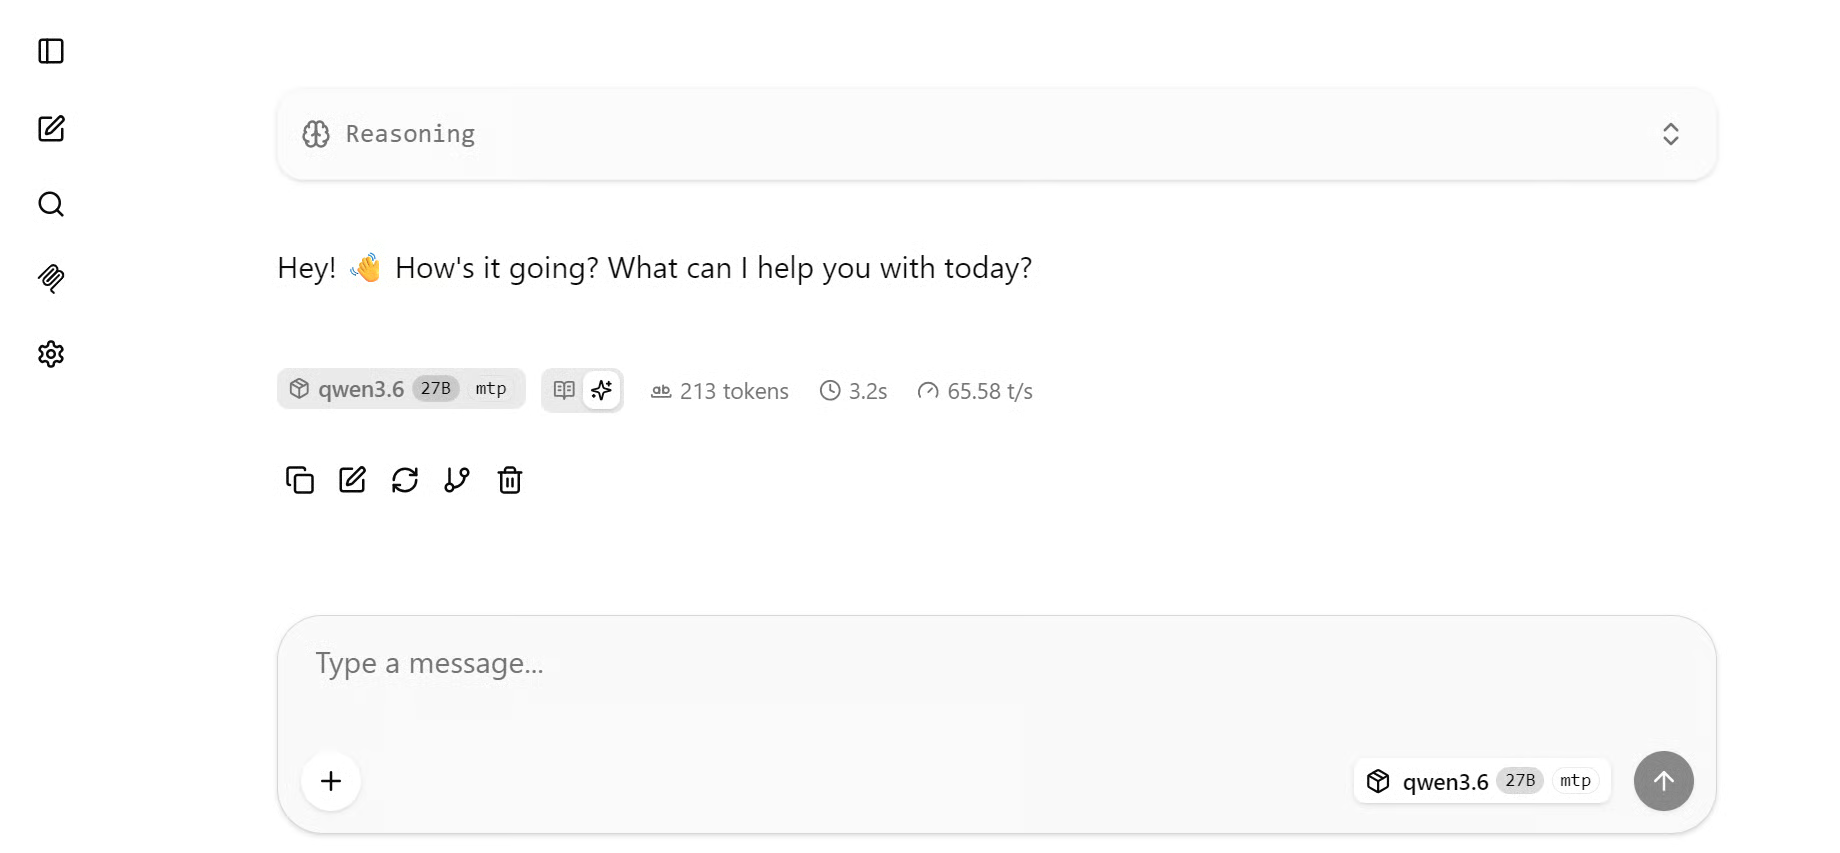
MTP सक्षम होने पर, स्पीड स्पष्ट रूप से बढ़ गई। एक साधारण ग्रीटिंग प्रॉम्प्ट पर, मॉडल लगभग 65–67 tokens/sec तक पहुँचा। बेसलाइन स्पीड 38.86 tokens/sec के मुकाबले, सिर्फ़ दो कमांड-लाइन फ़्लैग जोड़कर यह बड़ा सुधार है।
एक अधिक जटिल प्रॉम्प्ट पर, जैसे मॉडल से Python में एक साधारण गेम बनवाना, स्पीड थोड़ी कम रही लेकिन फिर भी non-MTP बेसलाइन से काफ़ी तेज़ रही। उस टेस्ट में, मॉडल ने लगभग 56–61 tokens/sec की दर से जनरेट किया—RTX 3090 पर 27B मॉडल के लिए यह अब भी मज़बूत नतीजा है।
कुल मिलाकर, MTP सक्षम करने से RunPod RTX 3090 सेटअप पर Qwen3.6 27B लगभग 38 tokens/sec से 65 tokens/sec तक बेहतर हुआ। यह 1.71x स्पीडअप देता है, यानी लगभग 71% अधिक थ्रूपुट—वह भी हार्डवेयर बदले बिना या छोटे मॉडल पर स्विच किए बिना।
इस गाइड का बेंचमार्क मूल llama.cpp MTP सेटअप का उपयोग करता है—TurboQuant, कस्टम पैच, या अन्य रनटाइम-स्तरीय ऑप्टिमाइज़ेशन जोड़े बिना। इससे टेस्ट सरल, दोहराने योग्य और सिर्फ़ MTP सक्षम करने से होने वाले स्पीड गेन पर केंद्रित रहता है।
प्रदर्शन को आगे बढ़ाने के लिए अगला ऑप्टिमाइज़ेशन MTP और TurboQuant का साथ में उपयोग है। MTP कई प्रेडिक्टेड टोकन स्वीकार कर थ्रूपुट बढ़ाता है, जबकि TurboQuant इन्फरेंस के दौरान KV-cache मेमोरी प्रेशर कम करने में मदद करता है।
यह बड़े मॉडलों, लंबी-कॉन्टेक्स्ट प्रॉम्प्ट्स, और RTX 3090 जैसे GPUs पर, जहाँ मेमोरी बैंडविड्थ और VRAM सीमित कारक बन सकते हैं, विशेष रूप से उपयोगी हो सकता है।
इसी वजह से r/LocalLLaMA समुदाय के कुछ नतीजों में इस गाइड से ज़्यादा tokens/sec रिपोर्ट होते हैं। वे सेटअप अक्सर MTP को TurboQuant, पैच्ड बिल्ड्स, अलग KV-cache सेटिंग्स, या तेज़ GPUs के साथ जोड़ते हैं। चूँकि यह ट्यूटोरियल साफ़-सुथरे MTP-ओनली बेंचमार्क पर केंद्रित है, इसलिए TurboQuant को मौजूदा सेटअप का हिस्सा मानने की बजाय सुझाए गए अगले प्रयोग के रूप में लेना चाहिए।
हाल ही में मैं LocalLLaMA Reddit समुदाय की पोस्ट्स देख रहा/रही हूँ, और यह देखकर अच्छा लगता है कि लोकल LLM इन्फरेंस कितनी दूर आ चुका है। लोग अब Qwen3.6 27B जैसे मॉडलों को लोकल कोडिंग एजेंट के रूप में चला रहे हैं—वह भी सीमित VRAM वाले पुराने GPUs पर। कुछ लोग ऐसे सेटअप्स Mac सिस्टम्स पर भी चला रहे हैं, और नतीजे सचमुच प्रभावशाली हैं।
MTP को खुद टेस्ट करने के बाद, समझ आता है कि इतनी उत्सुकता क्यों है। उसी मॉडल और उसी RTX 3090 सेटअप के साथ, Multi-Token Prediction सक्षम करने से जनरेशन स्पीड लगभग 38 tokens/sec से 65 tokens/sec तक बढ़ गई। यह लगभग 2x स्पीडअप है—वह भी GPU अपग्रेड किए बिना या छोटे मॉडल पर स्विच किए बिना।
यह गाइड llama.cpp का उपयोग करते हुए एक सरल और दोहराने योग्य MTP सेटअप पर केंद्रित था, लेकिन यह बस शुरुआत जैसा लगता है। अगला कदम बेहतर GGUF क्वांटाइज़ेशन, MTP, TurboQuant, और अधिक ट्यून किए रनटाइम सेटिंग्स के साथ प्रयोग करना है—ताकि देखा जा सके कि लोकल इन्फरेंस स्पीड को और कितना आगे बढ़ाया जा सकता है।
मेरे लिए सबसे उत्साहजनक बात यह है कि इसका लोकल कोडिंग एजेंट्स के लिए क्या मतलब है। आप अपने हार्डवेयर पर शक्तिशाली मॉडल चला सकते हैं, प्रति क्वेरी लागत कम कर सकते हैं, अपना कोड प्राइवेट रख सकते हैं, और इंटरनेट-आधारित APIs पर पूरी तरह निर्भर हुए बिना AI कोडिंग असिस्टेंट का उपयोग कर सकते हैं। लोकल LLMs पहले की तुलना में तेज़, अधिक व्यावहारिक और कहीं ज़्यादा उपयोगी होते जा रहे हैं।
DataCamp के साथ AI इंजीनियरिंग सीखें!
Track
Track
course