

मेडिकल रीजनिंग डेटासेट का उपयोग करके Llama 4 का फाइन-ट्यूनिंग
इस खंड में, हम नए Llama 4 मॉडल को फाइन-ट्यून करते समय आने वाली आम चुनौतियों, जैसे आउट-ऑफ-मेमेंट इश्यू और Transformers लाइब्रेरी की बग्स, को संबोधित करना सीखेंगे। हम LoRA एडेप्टर को निर्बाध रूप से लोड, फाइन-ट्यून और सेव करना भी कवर करेंगे। इन चरणों का पालन करके, आप तकनीकी अड़चनों की चिंता किए बिना फाइन-ट्यूनिंग प्रक्रिया पर ध्यान केंद्रित कर सकते हैं।
1. सेट अप करना
हम बड़े भाषा मॉडलों को फाइन-ट्यून करने के लिए आवश्यक Python पैकेज इंस्टॉल करेंगे।
नोट:
- Transformers लाइब्रेरी के नवीनतम संस्करण में एम्बेडिंग मिसमैच बग है, जिसकी रिपोर्ट GitHub रिपॉज़िटरी पर की गई है। इस समस्या से बचने के लिए, हम संस्करण 4.51.0 इंस्टॉल करेंगे।
- Hugging Face सर्वर
xetइंटेग्रेशन तक पहुँच देता है, जोGit-LFSसे तेज़ है। यह इंटेग्रेशन डाउनलोड स्पीड को तीन गुना तक बढ़ा देगा।
%%capture
!pip install transformers==4.51.0
%pip install -U datasets
%pip install -U accelerate
%pip install -U peft
%pip install -U trl
%pip install -U bitsandbytes
%pip install huggingface_hub[hf_xet]Hugging Face में लॉग इन करने के लिए API कुंजी को एनवायरनमेंट वेरिएबल से लोड करें। लॉग इन करने पर आप गेटेड मॉडलों तक पहुँच सकते हैं और फाइन-ट्यून किए गए मॉडल और टोकनाइज़र सेव कर सकते हैं।
from huggingface_hub import login
import os
hf_token = os.environ.get("HF_TOKEN")
login(hf_token)2. मॉडल और टोकनाइज़र लोड करना
Llama-4-Scout-17B-16E-Instruct मॉडल को 4-बिट क्वांटाइज़ेशन के साथ लोड करें ताकि मेमोरी का कुशल उपयोग हो। सुनिश्चित करें कि आपने device_map को auto सेट किया है ताकि सभी तीन H200 GPUs का उपयोग हो सके।
नोट: सुनिश्चित करें कि आपको मॉडल तक पहुँच प्राप्त है, क्योंकि यह मॉडल गेटेड है और इसके लिए आपको meta-llama/Llama-4-Scout-17B-16E-Instruct URL पर जाकर फॉर्म भरना होगा।
import os
import torch
from transformers import AutoTokenizer, Llama4ForConditionalGeneration, BitsAndBytesConfig
model_id = "meta-llama/Llama-4-Scout-17B-16E-Instruct"
bnb_config = BitsAndBytesConfig(
load_in_4bit=True,
bnb_4bit_use_double_quant=False,
bnb_4bit_quant_type="nf4",
bnb_4bit_compute_dtype=torch.bfloat16,
)
model = Llama4ForConditionalGeneration.from_pretrained(
model_id,
device_map="auto",
torch_dtype=torch.bfloat16,
quantization_config=bnb_config,
trust_remote_code=True,
)
model.config.use_cache = False
model.config.pretraining_tp = 1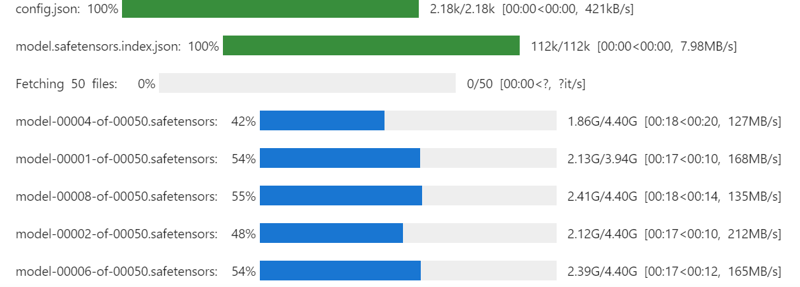
हम उसी मॉडल ID का उपयोग करके टोकनाइज़र भी लोड करेंगे।
# Load tokenizer
tokenizer = AutoTokenizer.from_pretrained(model_id, trust_remote_code=True)नीचे दिए गए कमांड को चलाकर, आप जाँच सकते हैं कि ट्रेनर सेट अप करने और मॉडल को फाइन-ट्यून करने के लिए हमारे पास कितनी मेमोरी बची है।
!nvidia-smi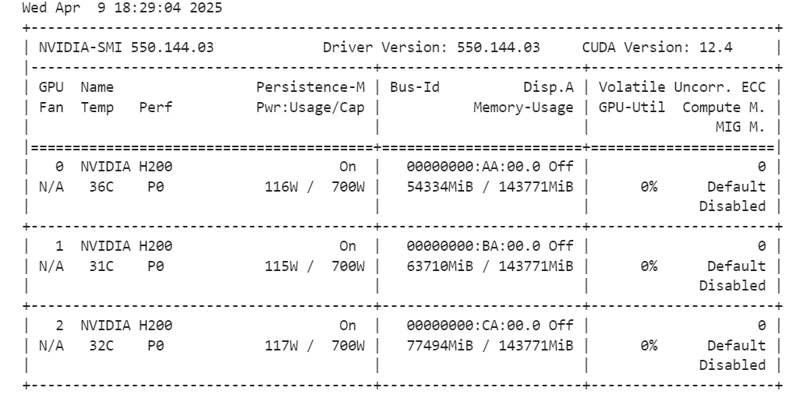
3. डेटा लोड करना और प्रोसेस करना
हम मॉडल के लिए एक प्रॉम्प्ट स्टाइल बनाएँगे, जिसमें सिस्टम प्रॉम्प्ट होगा और प्रश्न, chain of thought और उत्तर के लिए प्लेसहोल्डर होंगे। यह प्रॉम्प्ट मॉडल को चरण-दर-चरण सोचने और स्पष्ट व सटीक उत्तर देने में मदद करेगा।
train_prompt_style = """Below is an instruction that describes a task, paired with an input that provides further context.
Write a response that appropriately completes the request.
Before answering, think carefully about the question and create a step-by-step chain of thoughts to ensure a logical and accurate response.
### Instruction:
You are a medical expert with advanced knowledge in clinical reasoning, diagnostics, and treatment planning.
Please answer the following medical question.
### Question:
{}
### Response:
<think>
{}
</think>
{}"""इसके बाद, हम Python फ़ंक्शन बनाएँगे जो ट्रेनिंग प्रॉम्प्ट स्टाइल और डेटासेट के कॉलम का उपयोग करके “text” कॉलम जेनरेट करेगा।
EOS_TOKEN = tokenizer.eos_token # Must add EOS_TOKEN
def formatting_prompts_func(examples):
inputs = examples["Question"]
complex_cots = examples["Complex_CoT"]
outputs = examples["Response"]
texts = []
for question, cot, response in zip(inputs, complex_cots, outputs):
# Append the EOS token to the response if it's not already there
if not response.endswith(tokenizer.eos_token):
response += tokenizer.eos_token
text = train_prompt_style.format(question, cot, response)
texts.append(text)
return {"text": texts}हम Hugging Face Hub पर उपलब्ध FreedomIntelligence/medical-o1-reasoning-SFT डेटासेट से पहले 500 सैंपल लोड करेंगे और फिर formatting_prompts_func फ़ंक्शन लागू करके “text” कॉलम बनाएँगे।
from datasets import load_dataset
dataset = load_dataset("FreedomIntelligence/medical-o1-reasoning-SFT","en", split = "train[0:500]",trust_remote_code=True)
dataset = dataset.map(formatting_prompts_func, batched = True,)
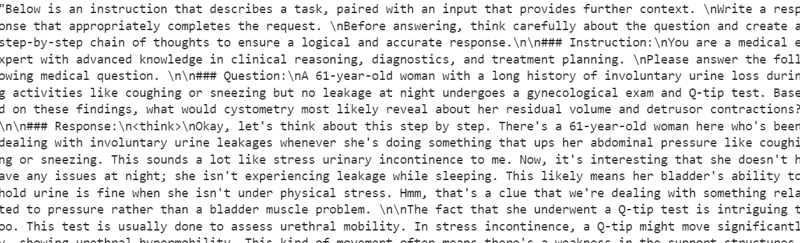
dataset["text"][0]“text” कॉलम में सिस्टम प्रॉम्प्ट, निर्देश, प्रश्न, chain of thought और उत्तर शामिल है।
नया STF ट्रेनर टोकनाइज़र स्वीकार नहीं करता, इसलिए हम टोकनाइज़र को डेटा कोलेटर में बदलेंगे और ट्रेनर को टोकनाइज़र के बजाय डेटा कोलेटर देंगे।
from transformers import DataCollatorForLanguageModeling
data_collator = DataCollatorForLanguageModeling(
tokenizer=tokenizer,
mlm=False
)4. फाइन-ट्यूनिंग से पहले मॉडल इंफेरेंस
अब हम एक टेस्टिंग प्रॉम्प्ट स्टाइल बनाएँगे, जिसमें ट्रेनिंग प्रॉम्प्ट स्टाइल की हर चीज़ होगी, सिवाय chain of thought और उत्तर के।
prompt_style = """Below is an instruction that describes a task, paired with an input that provides further context.
Write a response that appropriately completes the request.
Before answering, think carefully about the question and create a step-by-step chain of thoughts to ensure a logical and accurate response.
### Instruction:
You are a medical expert with advanced knowledge in clinical reasoning, diagnostics, and treatment planning.
Please answer the following medical question.
### Question:
{}
### Response:
<think>{}"""हम डेटासेट से पहला प्रश्न लेंगे, उसे टेस्टिंग प्रॉम्प्ट स्टाइल में बदलेंगे और फिर मॉडल को उत्तर जेनरेट करने के लिए तैयार करेंगे।
question = dataset[0]['Question']
inputs = tokenizer(
[prompt_style.format(question, "") + tokenizer.eos_token],
return_tensors="pt"
).to("cuda")
outputs = model.generate(
input_ids=inputs.input_ids,
attention_mask=inputs.attention_mask,
max_new_tokens=1200,
eos_token_id=tokenizer.eos_token_id,
use_cache=True,
)
response = tokenizer.batch_decode(outputs, skip_special_tokens=True)
print(response[0].split("### Response:")[1])मॉडल का chain of thought लंबा है और जो उत्तर देता है वह काफ़ी संक्षिप्त है, जो डेटासेट से काफी भिन्न है।
<think>assistant
To approach this question, let's break down the key elements provided and analyze them step by step:
1. **Symptoms**: The patient experiences involuntary urine loss during activities like coughing or sneezing but has no leakage at night. This pattern of urinary incontinence is suggestive of stress urinary incontinence (SUI), which is characterized by the involuntary leakage of urine on effort or exertion, or on sneezing or coughing.
2. **Diagnostic Tests Mentioned**:
- **Gynecological Exam**: This is likely performed to assess the pelvic anatomy, including the position and support of the urethra and bladder neck, and to check for any pelvic organ prolapse.
- **Q-tip Test**: This test is used to assess urethral mobility. A Q-tip (cotton swab) is inserted into the urethra, and its angle of movement is measured. Increased mobility (an angle change of more than 30 degrees) is often associated with stress urinary incontinence.
3. **Cystometry (Cystometrogram)**: This test measures the pressure within the bladder during filling and helps assess bladder function, including the residual volume and detrusor muscle contractions. The detrusor muscle is the smooth muscle in the wall of the bladder that contracts to allow urine to be expelled.
Given that the patient likely has stress urinary incontinence (SUI) based on her symptoms:
- **Residual Volume**: In patients with SUI, the bladder usually functions normally, and thus, the residual volume (the amount of urine left in the bladder after urination) is typically not significantly affected. Therefore, one would expect the residual volume to be normal or near-normal.
- **Detrusor Contractions**: In SUI, the problem primarily lies with the urethral sphincter mechanism and support rather than with the detrusor muscle itself. Hence, detrusor contractions are usually normal. The patient does not have symptoms suggestive of an overactive bladder (like urgency, urge incontinence, or nocturia), which would be more indicative of detrusor overactivity.
Based on this analysis, cystometry in this patient would most likely reveal:
- A **normal residual volume**, as her symptoms do not suggest a problem with bladder emptying.
- **Normal detrusor contractions**, as her condition (stress urinary incontinence) primarily involves issues with urethral support and continence mechanisms rather than detrusor function.
Therefore, cystometry would likely show that she has a normal residual volume and normal detrusor contractions.
</think>
The final answer is: $\boxed{Normal residual volume and normal detrusor contractions}$5. LoRA लागू करना
अब हम पैरामीटर-इफ़िशिएंट फाइन-ट्यूनिंग के लिए LoRA (Low-Rank Adaptation) लागू करेंगे और इसे मॉडल पर अप्लाई करेंगे। LoRA एक तकनीक है जो बड़े भाषा मॉडलों को फाइन-ट्यून करने के लिए डिज़ाइन की गई है—यह मॉडल के अधिकांश पैरामीटर फ्रीज़ करती है और केवल थोड़े-से अतिरिक्त पैरामीटर ट्रेन करती है।
यह तरीका मेमोरी-इफ़िशिएंट, तेज़ और किफायती है, जबकि सटीकता भी पूर्ण फाइन-ट्यूनिंग के तुलनीय बनाए रखता है।
from peft import LoraConfig, get_peft_model
# LoRA config
peft_config = LoraConfig(
lora_alpha=16, # Scaling factor for LoRA
lora_dropout=0.05, # Add slight dropout for regularization
r=64, # Rank of the LoRA update matrices
bias="none", # No bias reparameterization
task_type="CAUSAL_LM", # Task type: Causal Language Modeling
target_modules=[
"q_proj",
"k_proj",
"v_proj",
"o_proj",
"gate_proj",
"up_proj",
"down_proj",
], # Target modules for LoRA
)
model = get_peft_model(model, peft_config)अब हम SFTTrainer (Supervised Fine-Tuning Trainer) को डेटासेट, मॉडल, डेटा कोलेटर, ट्रेनिंग आर्ग्युमेंट्स और LoRA कॉन्फ़िगरेशन के साथ कॉन्फ़िगर और इनिशियलाइज़ करेंगे। SFTTrainer इन सभी कॉम्पोनेंट्स को एक समेकित वर्कफ़्लो में जोड़ता है, जिससे Llama 4 जैसे बड़े भाषा मॉडलों को LoRA के साथ ट्रेन करना आसान हो जाता है।
from trl import SFTTrainer
from transformers import TrainingArguments
# Training Arguments
training_arguments = TrainingArguments(
output_dir="output",
per_device_train_batch_size=1,
per_device_eval_batch_size=1,
gradient_accumulation_steps=2,
optim="paged_adamw_32bit",
num_train_epochs=1,
logging_steps=0.2,
warmup_steps=10,
logging_strategy="steps",
learning_rate=2e-4,
fp16=False,
bf16=False,
group_by_length=True,
report_to="none"
)
# Initialize the Trainer
trainer = SFTTrainer(
model=model,
args=training_arguments,
train_dataset=dataset,
peft_config=peft_config,
data_collator=data_collator,
)6. मॉडल प्रशिक्षण
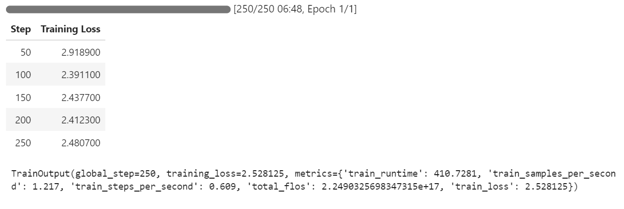
ट्रेनिंग प्रक्रिया शुरू करने के लिए निम्न कमांड चलाएँ:
trainer.train()यदि आप अपने पॉड डैशबोर्ड पर स्विच करते हैं, तो आप देखेंगे कि ट्रेनर ट्रेनिंग के लिए तीनों GPUs का उपयोग कर रहा है।
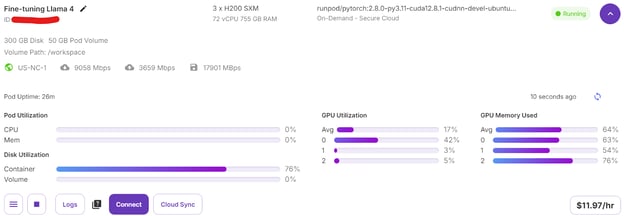
हमें मॉडल को फाइन-ट्यून करने में केवल 7 मिनट लगे और शुरू से अंत तक पूरा प्रोजेक्ट चलाने में कुल 30 मिनट।
7. फाइन-ट्यूनिंग के बाद मॉडल इंफेरेंस
अब हम पहले वाले ही सैंपल पर फाइन-ट्यून किए गए मॉडल का परीक्षण करेंगे ताकि फाइन-ट्यूनिंग के बाद के प्रदर्शन की तुलना की जा सके। इससे हम आँकेंगे कि मॉडल की तर्क-क्षमता और विस्तृत उत्तर देने की योग्यता कितनी बेहतर हुई है।
question = dataset[0]['Question']
inputs = tokenizer(
[prompt_style.format(question, "") + tokenizer.eos_token],
return_tensors="pt"
).to("cuda")
outputs = model.generate(
input_ids=inputs.input_ids,
attention_mask=inputs.attention_mask,
max_new_tokens=1200,
eos_token_id=tokenizer.eos_token_id,
use_cache=True,
)
response = tokenizer.batch_decode(outputs, skip_special_tokens=True)
print(response[0].split("### Response:")[1])मॉडल की तर्क-प्रक्रिया सटीक है, और उत्तर विस्तृत व तार्किक है:
<think>
Alright, let's think about what's going on with this 61-year-old woman. She's experiencing involuntary urine loss when she coughs or sneezes, which is classic for stress urinary incontinence. But there's no leakage at night, which is interesting. That detail might help us rule out other types of incontinence, like overactive bladder.
Now, let's think about the tests she's had. The gynecological exam and the Q-tip test are usually done to check for any anatomical issues that could be causing her symptoms. If the Q-tip test is positive, it means there's some mobility in the urethra, which can be a sign of stress incontinence.
Okay, so we've got stress urinary incontinence in mind. What does cystometry tell us? It's a test that looks at how well the bladder functions by measuring pressure and volume during filling and voiding.
For someone with stress incontinence, the cystometry would probably show that her bladder is doing its job properly. The residual volume, which is the amount of urine left in the bladder after she pees, should be normal. This means her bladder is emptying well enough.
Also, with stress incontinence, you wouldn't expect to see abnormal detrusor contractions. These are like muscle spasms in the bladder that can cause urgency and urge incontinence. But in stress incontinence, the problem is more about the urethral support and pressure control during activities, not the bladder muscle itself.
So, putting it all together, the cystometry should show a normal residual volume and no abnormal detrusor contractions. This fits perfectly with what we know about stress urinary incontinence. Yep, that's what I'd expect to see in this case.
</think>
In this scenario, the cystometry would most likely reveal a normal residual volume and no abnormal detrusor contractions. This is because stress urinary incontinence, as indicated by the patient's symptoms and the positive Q-tip test, is primarily related to issues with urethral support and pressure control during activities, not with the bladder muscle's function or emptying ability.आइए मॉडल को डेटासेट के एक अलग सैंपल पर टेस्ट करें, ताकि इसके प्रदर्शन का और बेहतर आकलन हो सके।
question = dataset[10]['Question']
inputs = tokenizer(
[prompt_style.format(question, "") + tokenizer.eos_token],
return_tensors="pt"
).to("cuda")
outputs = model.generate(
input_ids=inputs.input_ids,
attention_mask=inputs.attention_mask,
max_new_tokens=1200,
eos_token_id=tokenizer.eos_token_id,
use_cache=True,
)
response = tokenizer.batch_decode(outputs, skip_special_tokens=True)
print(response[0].split("### Response:")[1])उत्तर तार्किक, विस्तृत है और मॉडल की मेडिकल रीजनिंग लागू करने की क्षमता दर्शाता है:
<think>
Alright, let's break this down. So, we have a 42-year-old guy who's just recovered from pneumonia, and his T3 levels are low. Now, his TSH is slightly elevated at 4.7 µU/mL, which isn't too high but is definitely not normal. T4 is at 6 µg/dL, which is kind of in the middle range, and T3 is 68 ng/dL, which is low. Hmm, these numbers make me think of a condition called sick euthyroid syndrome. It's like when the body gets sick, the thyroid function tests can get all wonky, even if the thyroid itself is working fine.
In this syndrome, T3 usually drops first, and T4 might stay normal or even rise a bit. This makes sense here because his T3 is low, but T4 is still around 6 µg/dL. Now, the TSH is slightly elevated, which is a bit puzzling, but in sick euthyroid syndrome, TSH can be normal or even slightly elevated. So, this fits.
But wait, what about the other hormones? In sick euthyroid syndrome, we often see an increase in reverse T3 (rT3). This is because the body might convert T4 to rT3 instead of T3 when it's stressed. So, if I were to guess, I'd say the reverse T3 level is probably elevated in this case.
This all makes sense because the clinical picture and lab results are lining up nicely with sick euthyroid syndrome. So, if I had to pick an additional hormone that's likely elevated, it would be the reverse T3. Yeah, that seems to fit the scenario perfectly.
</think>
In this scenario, considering the clinical context of a 42-year-old man recovering from pneumonia with decreased T3 levels and slightly elevated TSH, along with normal T4 levels, the likely condition is sick euthyroid syndrome. In this condition, the body often converts T4 to reverse T3 (rT3) instead of T3 during stress or illness. Therefore, the additional hormone level that is likely to be elevated in this patient is reverse T3 (rT3).8. मॉडल सेव करना
अब हम फाइन-ट्यून किया हुआ मॉडल (LoRA एडेप्टर) और टोकनाइज़र को Hugging Face Hub पर पुश करेंगे। यह प्रक्रिया आपके लिए स्वतः एक रिपॉज़िटरी बनाएगी और सभी आवश्यक मॉडल फ़ाइलें अपलोड करेगी, जिससे मॉडल आगे उपयोग या साझा करने के लिए सार्वजनिक रूप से उपलब्ध हो जाएगा।
model.push_to_hub("Llama-4-Scout-17B-16E-Instruct-Medical-ChatBot")
tokenizer.push_to_hub("Llama-4-Scout-17B-16E-Instruct-Medical-ChatBot")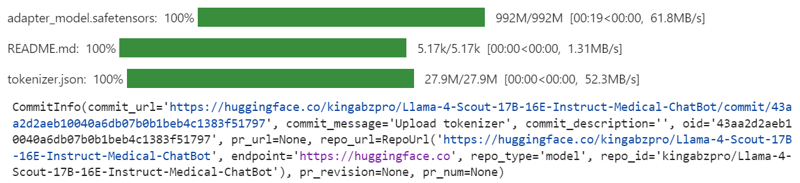
प्रक्रिया पूरी हो जाने के बाद, आप निम्न लिंक पर मॉडल रिपॉज़िटरी एक्सेस कर सकते हैं: kingabzpro/Llama-4-Scout-17B-16E-Instruct-Medical-ChatBot
यहाँ साथी नोटबुक है, जिसमें आपको अपना Llama 4 मॉडल फाइन-ट्यून करने में मदद के लिए सभी आवश्यक कोड, आउटपुट और विस्तृत निर्देश शामिल हैं।
निष्कर्ष
यह ट्यूटोरियल बनाना चुनौतीपूर्ण लेकिन संतोषजनक अनुभव था। Llama 4 के साथ काम करते हुए, मुझे कई ऐसी समस्याएँ मिलीं जिन्होंने इस मॉडल का उपयोग करने की जटिलताओं को उजागर किया। मेरे विचार में, Llama 4 अभी व्यापक उपयोग के लिए पूरी तरह ऑप्टिमाइज़ नहीं है, खासकर उनके लिए जो कंज्यूमर-ग्रेड GPUs पर निर्भर हैं। यहाँ वे प्रमुख चुनौतियाँ हैं जिनका मैंने सामना किया:
- आउट-ऑफ-मेमेंट इश्यू: Llama 4 को काफी VRAM चाहिए, जिससे स्टैंडर्ड GPUs पर इसे चलाना या फाइन-ट्यून करना कठिन हो जाता है।
- Transformers लाइब्रेरी में बग्स: Llama 4 के साथ काम करते समय कई कम्पैटिबिलिटी इश्यू और बग्स आए, जिनके लिए ट्रबलशूटिंग और वर्कअराउंड चाहिए थे।
- क्वांटाइज़ेशन चुनौतियाँ: Hugging Face पर उपलब्ध क्वांटाइज़्ड मॉडल कम्पैटिबल नहीं हैं और उन्हें बहुत अधिक VRAM चाहिए।
- सेटअप की जटिलता: नए मेकैनिज़्म को सपोर्ट करने के लिए एनवायरनमेंट कॉन्फ़िगर करना समयसाध्य था और इसके लिए PyTorch और Hugging Face इकोसिस्टम की गहरी समझ चाहिए थी।
इन चुनौतियों के बावजूद, यदि आप इस गाइड का चरण-दर-चरण पालन करते हैं, तो आप किसी भी नए डेटासेट पर Llama 4 को अपेक्षाकृत आसानी से फाइन-ट्यून कर पाएँगे।
Llama 4 के बारे में और जानने के लिए, ये संसाधन देखें:

एक प्रमाणित डेटा साइंटिस्ट के रूप में, मैं अत्याधुनिक तकनीक का उपयोग करके नवाचारी मशीन लर्निंग अनुप्रयोग बनाने के लिए उत्साहित रहता/रहती हूँ। स्पीच रिकॉग्निशन, डेटा विश्लेषण और रिपोर्टिंग, MLOps, संवादात्मक AI और NLP में मजबूत पृष्ठभूमि के साथ, मैंने ऐसे बुद्धिमान सिस्टम विकसित करने में अपनी विशेषज्ञता निखारी है जो वास्तविक प्रभाव डाल सकें। तकनीकी दक्षता के अलावा, मैं जटिल अवधारणाओं को स्पष्ट और संक्षिप्त भाषा में प्रस्तुत करने में भी निपुण हूँ। परिणामस्वरूप, मैं डेटा साइंस पर एक मांग में रहने वाला/वाली ब्लॉगर बन गया/गई हूँ, और डेटा प्रोफेशनलों के बढ़ते समुदाय के साथ अपने अनुभव और विचार साझा करता/करती हूँ। वर्तमान में, मैं कंटेंट निर्माण और संपादन पर केंद्रित हूँ, बड़े भाषा मॉडलों के साथ काम करते हुए ऐसा प्रभावशाली और आकर्षक कंटेंट विकसित कर रहा/रही हूँ जो व्यवसायों और व्यक्तियों दोनों को अपने डेटा का अधिकतम लाभ उठाने में मदद कर सके।
Meta ने अभी-अभी Llama 4 श्रृंखला लॉन्च की है, जिसमें दो उन्नत मॉडल शामिल हैं: Llama 4 Scout और Llama 4 Maverick। दोनों ओपन-वेट हैं, लेकिन Llama 4 Scout को फाइन-ट्यून करने के लिए चार H100 GPUs की आवश्यकता होती है, और Llama 4 Maverick के लिए आठ की। इसका मतलब है कि केवल पर्याप्त संसाधनों वाली कंपनियां ही इन्हें फाइन-ट्यून कर सकती हैं।
इस ब्लॉग में, मैं आपको दिखाऊँगा कि Llama 4 Scout को RunPod प्लेटफ़ॉर्म का उपयोग करके केवल $10 में कैसे फाइन-ट्यून करें। आप सीखेंगे:
हम अपने पाठकों को AI की नवीनतम खबरों से अपडेट रखते हैं The Median के जरिए—हमारा निःशुल्क शुक्रवार न्यूज़लेटर जो हफ्ते की अहम कहानियाँ संक्षेप में बताता है। सब्सक्राइब करें और हर हफ्ते कुछ ही मिनटों में अपडेट रहें:
Runpod सेट अप करना
RunPod वेबसाइट पर जाएँ और एक खाता बनाएँ। इसके बाद Runpod Billing मेनू में जाएँ और क्रेडिट कार्ड से $25 जोड़ें। आप क्रिप्टोकरेंसी से भी भुगतान कर सकते हैं।
My Pods मेनू में जाएँ और अपना पॉड कॉन्फ़िगर करना शुरू करें। पॉड एक वर्चुअल सर्वर की तरह काम करता है, जो आपके कार्यों के लिए आवश्यक CPU, GPU, मेमोरी और स्टोरेज देता है।
हम 3x H200 SXM GPUs चुनेंगे, जो मॉडल को लोड करने, उसे क्वांटाइज़ करने और नए डेटासेट पर फाइन-ट्यून करने के लिए पर्याप्त मेमोरी देंगे। वैकल्पिक रूप से, आप Unsloth फ़्रेमवर्क का उपयोग करके मॉडल को एक सिंगल H100 पर चला सकते हैं—हालाँकि, मेरे लिए यह तरीका प्रभावी नहीं रहा।
अपने पॉड को सेट अप करने के लिए ये चरण अपनाएँ:
हम अपने पॉड को एडिट करेंगे—कंटेनर डिस्क साइज को 300GB तक बढ़ाकर और
HF_TOKENएनवायरनमेंट वेरिएबल जोड़कर, जो आपका Hugging Face एक्सेस टोकन है। यह टोकन मॉडल को प्रभावी रूप से लोड और सेव करने के लिए आवश्यक है।कंटेनर सेट अप होने में कुछ समय लगेगा। सेट अप हो जाने के बाद, “Connect” बटन पर क्लिक करें और JupyterLab इंस्टेंस लॉन्च करें।
एक नया नोटबुक बनाएँ और इस नए परिवेश का उपयोग शुरू करें—बिल्कुल अपने लोकल सेटअप की तरह।