
Tracks
開発者向けアソシエイトAIエンジニア
26時間
Qwen3.6-35B-A3B is a lightweight mixture-of-experts model built for strong coding, reasoning, and long-context tasks. It uses 35B total parameters with 3B active parameters per token, which makes it more efficient to run while still delivering strong performance. It also supports a 262K token context window, making it useful for larger codebases, long documents, and multi-step workflows.
The model performs especially well on coding and agent-style benchmarks, with strong results on SWE-bench, Terminal-Bench, and Claw-Eval. It also stays competitive on broader reasoning and knowledge benchmarks like GPQA, AIME 2026, MMLU-Pro, and C-Eval, which makes it a strong base model for fine-tuning experiments that need both practical task performance and general reasoning ability.
In this guide, we will set up a RunPod H100 NVL environment, prepare the project, load and clean a medical Q&A dataset, run Qwen3.6 in 4-bit quantization, format prompts, build evaluation helpers, test the base model before fine-tuning, train and save the adapter, and then compare the model again after fine-tuning.
Disclaimer: This tutorial demonstrates a technical fine-tuning process for educational purposes only. The resulting model is not intended for medical or clinical use and should not be relied upon for diagnosis, decision-making, or patient care.
In the first section, we will launch a RunPod H100 NVL instance, install the required libraries, connect to Hugging Face, and define the core project configuration.
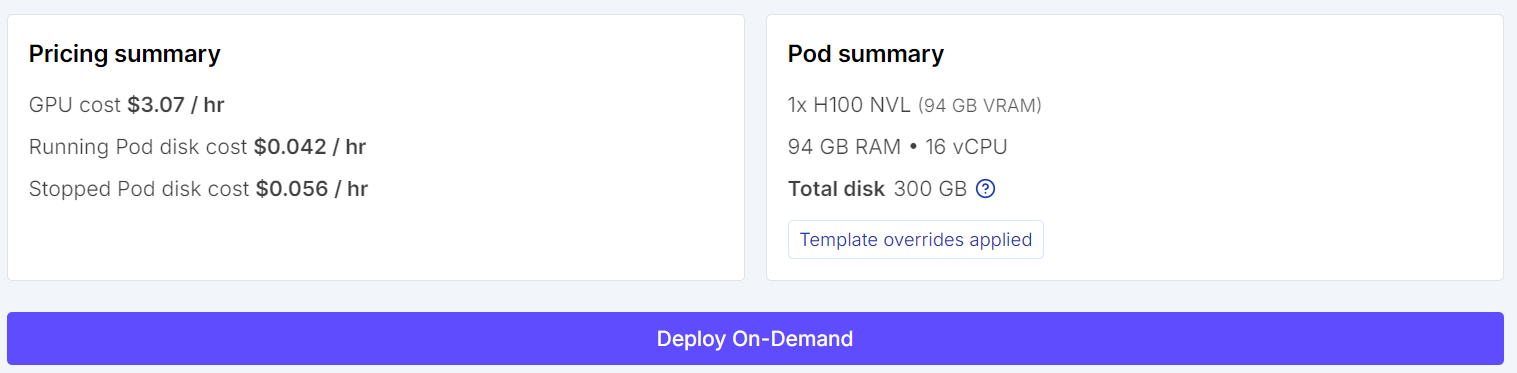
Start by going to RunPod and selecting an H100 NVL GPU machine. This GPU comes with around 94 GB of VRAM and 94 GB of system RAM, which is enough for this Qwen3.6 fine-tuning workflow.
Choose the latest PyTorch template, then edit the pod configuration before deployment. Set the container disk size to 100 GB and the volume disk size to 200 GB. This gives you enough space to download the model, cache dependencies, and save the fine-tuned adapter locally.
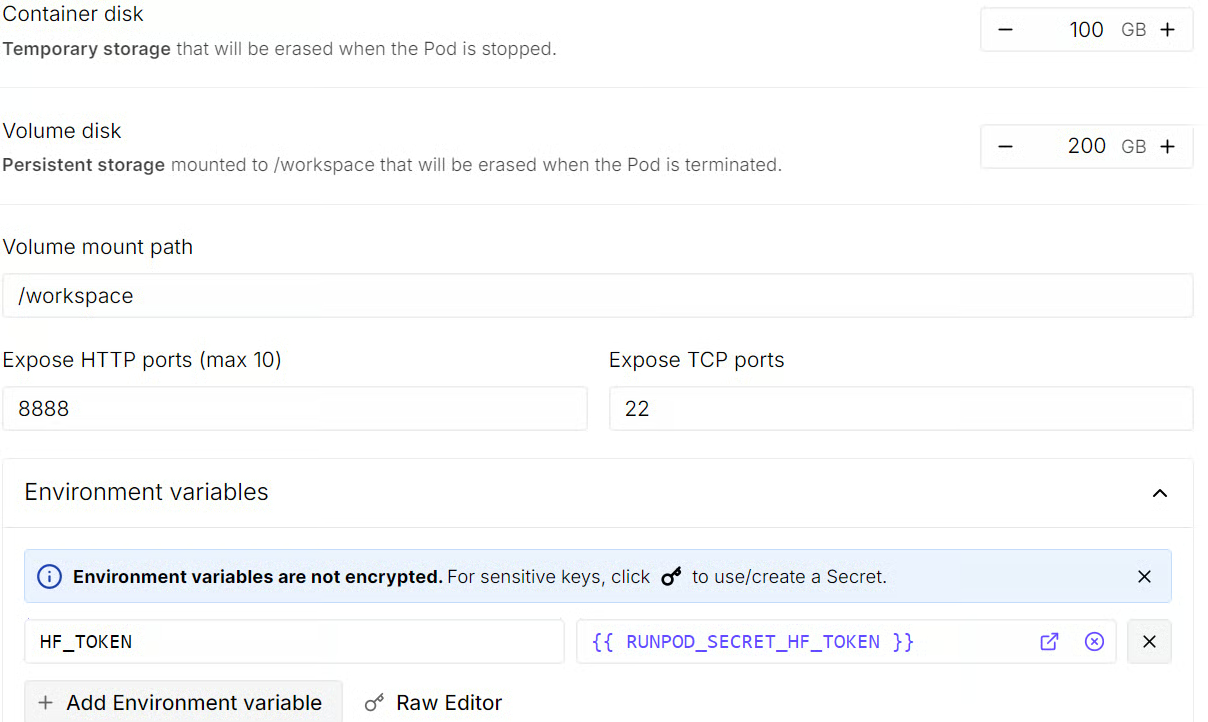
You should also add an HF_TOKEN environment variable at this stage. This will let you log in to Hugging Face later, improve model download access, and make it easier to push the fine-tuned model to the Hub after training.
Before launching the instance, review the pod summary so you can check the estimated cost. Once everything looks correct, deploy the pod.
After the pod is ready, open the Jupyter Notebook link from the RunPod dashboard to launch JupyterLab. Create a new Python notebook, then install the libraries needed for quantized fine-tuning, dataset loading, and supervised fine-tuning with TRL.
pip install -q -U transformers accelerate peft trl bitsandbytes datasets sentencepieceNext, log in to Hugging Face using the HF_TOKEN environment variable you added while creating the pod. This avoids hardcoding your token in the notebook and keeps the workflow cleaner.
import os
from huggingface_hub import login

hf_token = os.getenv("HF_TOKEN")
login(token=hf_token)Now import the required libraries and define the configuration values we will use throughout the tutorial. This includes the model ID, dataset name, sample sizes, output directory, and random seed.
import os
import random
import re

import torch
from datasets import load_dataset
from peft import LoraConfig, prepare_model_for_kbit_training
from transformers import (
    AutoModelForCausalLM,
    AutoTokenizer,
    BitsAndBytesConfig,
    set_seed,
)
from trl import SFTConfig, SFTTrainer

MODEL_ID = "Qwen/Qwen3.6-35B-A3B"
DATASET_ID = "keivalya/MedQuad-MedicalQnADataset"
SAMPLE_SIZE = 240
EVAL_SIZE = 24
COMPARISON_SAMPLE_COUNT = 3
MAX_SEQ_LENGTH = 768
OUTPUT_DIR = "qwen36-medquad-quick"
SEED = 42

set_seed(SEED)
random.seed(SEED)


def supports_bf16() -> bool:
    return torch.cuda.is_available() and torch.cuda.get_device_capability(0)[0] >= 8


print(f"PyTorch: {torch.__version__}")
print(f"CUDA available: {torch.cuda.is_available()}")
if torch.cuda.is_available():
    print(f"GPU: {torch.cuda.get_device_name(0)}")
    print(
        f"GPU memory (GB): {torch.cuda.get_device_properties(0).total_memory / 1024**3:.1f}"
    )
When you run this cell, you should see output confirming that CUDA is available and that the notebook is connected to an NVIDIA H100 NVL GPU.
PyTorch: 2.8.0+cu128
CUDA available: True
GPU: NVIDIA H100 NVL
GPU memory (GB): 93.1In this part, we will load the MedQuad medical Q&A dataset, clean the text fields, filter out lower-quality examples, and create small train and evaluation splits for quick fine-tuning.
We start by loading the training split of the MedQuad dataset from Hugging Face. After loading it, we inspect the dataset structure, column names, and the first example so we can understand what kind of medical question-answer pairs we are working with.
raw_dataset = load_dataset(DATASET_ID, split="train")
print(raw_dataset)
print("First example:", raw_dataset[0])
This shows that the MedQuad dataset contains 16,407 medical question-answer examples across three fields: qtype, Question, and Answer.
Dataset({
features: ['qtype', 'Question', 'Answer'],
num_rows: 16407
})
First example: {'qtype': 'susceptibility', 'Question': 'Who is at risk for Lymphocytic Choriomeningitis (LCM)? ?', 'Answer': 'LCMV infections can occur after exposure to fresh urine, droppings, saliva, or nesting materials from infected rodents. Transmission may also occur when these materials are directly introduced into broken skin, the nose, the eyes, or the mouth, or presumably, via the bite of an infected rodent. Person-to-person transmission has not been reported, with the exception of vertical transmission from infected mother to fetus, and rarely, through organ transplantation.'}Next, we define a small text cleaning function and a filtering rule to remove low-quality samples. The cleaning step normalizes extra whitespace, while the filtering step removes examples with very short questions, very short answers, overly long answers, or generic answer templates that are less useful for training.
def clean_text(text):
    text = re.sub(r"\s+", " ", str(text)).strip()
    return text


BAD_ANSWER_PREFIXES = (
    "These resources address",
    "These resources from MedlinePlus",
    "For more information, go to",
    "For more information go to",
)


def keep_example(example):
    question = clean_text(example["Question"])
    answer = clean_text(example["Answer"])

    if len(question) < 12 or len(answer) < 40:
        return False
    if len(answer) > 900:
        return False
    if any(answer.startswith(prefix) for prefix in BAD_ANSWER_PREFIXES):
        return False
    return True


filtered_dataset = raw_dataset.filter(keep_example)After filtering, we shuffle the dataset, select a smaller subset for this quick tutorial, and split it into training and evaluation sets. This keeps the run lightweight while still letting us compare the model before and after fine-tuning.
subset = filtered_dataset.shuffle(seed=SEED).select(range(SAMPLE_SIZE))
split_dataset = subset.train_test_split(test_size=EVAL_SIZE, seed=SEED)

train_dataset = split_dataset["train"]
eval_dataset = split_dataset["test"]

print(f"Filtered dataset size: {len(filtered_dataset)}")
print(f"Train size: {len(train_dataset)}")
print(f"Eval size: {len(eval_dataset)}")
After filtering, 7,355 higher-quality examples remain, from which we sample 216 training examples and 24 evaluation examples for this quick fine-tuning run.
Filtered dataset size: 7355
Train size: 216
Eval size: 24In this step, we will configure 4-bit quantization with BitsAndBytes, load the Qwen3.6 tokenizer, and then load the base model so it can run more efficiently on the H100 NVL GPU.
Qwen3.6 is still a large model, so loading it in full precision would use much more memory. To make fine-tuning more efficient, we load the model in 4-bit precision with BitsAndBytes. This reduces memory usage while still keeping the model practical for QLoRA-based fine-tuning.
Here, we use nf4 quantization, enable double quantization, and set the compute dtype to bfloat16 when the GPU supports it.
bnb_config = BitsAndBytesConfig(
    load_in_4bit=True,
    bnb_4bit_quant_type="nf4",
    bnb_4bit_use_double_quant=True,
    bnb_4bit_compute_dtype=torch.bfloat16 if supports_bf16() else torch.float16,
)Next, we load the tokenizer for Qwen3.6. We also check whether a padding token is already defined. If it is missing, we reuse the end-of-sequence token as the padding token so batching works correctly later in training and generation.
tokenizer = AutoTokenizer.from_pretrained(
    MODEL_ID,
    trust_remote_code=True,
    use_fast=False,
)

if tokenizer.pad_token is None:
tokenizer.pad_token = tokenizer.eos_tokenNow we load the base Qwen3.6 model with the 4-bit quantization settings we defined earlier. We use device_map="auto" so the model is placed automatically on the available GPU, and we again use bfloat16 when supported for more efficient computation.
After loading the model, we set the padding token ID and disable cache usage. This is important because caching is helpful for inference, but during fine-tuning, it can interfere with training and increase memory use.
model = AutoModelForCausalLM.from_pretrained(
    MODEL_ID,
    quantization_config=bnb_config,
    device_map="auto",
    dtype=torch.bfloat16 if supports_bf16() else torch.float16,
    trust_remote_code=True,
)

model.config.pad_token_id = tokenizer.pad_token_id
model.config.use_cache = FalseIn this step, we will define the prompt structure for Qwen3.6, clean the model outputs, create helper functions for training and inference, and prepare a few preview samples to compare the model before and after fine-tuning.
We start by defining a short system prompt that tells the model how to answer. Since this is a medical Q&A task, we want the responses to be direct, factual, and concise.
SYSTEM_PROMPT = "Answer the medical question directly in 2-4 factual sentences."Qwen3.6 uses a chat-style input format, so we need a helper function that converts our messages into the correct prompt structure. This function applies the tokenizer’s chat template and disables reasoning output so the model stays focused on the final answer.
def apply_chat_template(messages, add_generation_prompt=False):
    kwargs = {
        "tokenize": False,
        "add_generation_prompt": add_generation_prompt,
    }
    try:
        return tokenizer.apply_chat_template(
            messages,
            enable_thinking=False,
            **kwargs,
        )
    except TypeError:
        return tokenizer.apply_chat_template(
            messages,
            chat_template_kwargs={"enable_thinking": False},
            **kwargs,
)Next, we define a small cleanup function to normalize the generated text. This removes extra whitespace and strips any leading answer: prefix if it appears in the output.
def clean_answer_text(answer):
    answer = clean_text(answer)
    answer = re.sub(r"^answer\s*:\s*", "", answer, flags=re.IGNORECASE)
return answerWe also create a helper function for the user prompt. This keeps the question format consistent across training and evaluation and tells the model to return only the answer without repeating the question.
def make_user_prompt(question):
    return (
        f"Question: {clean_text(question)}\n\n"
        "Respond with only the answer. Do not restate the question."
)Now we can format each dataset example into a full chat-style conversation with a system message, a user question, and the expected assistant answer. This is the structure we will use for supervised fine-tuning.
def format_training_example(example):
    messages = [
        {"role": "system", "content": SYSTEM_PROMPT},
        {
            "role": "user",
            "content": make_user_prompt(example["Question"]),
        },
        {
            "role": "assistant",
            "content": clean_answer_text(example["Answer"]),
        },
    ]
return {"text": apply_chat_template(messages, add_generation_prompt=False)}Before we start training, we need a helper function that can generate answers from the base model. We will use this to compare the model’s responses before and after fine-tuning.
The function below builds the prompt, tokenizes it, runs generation, and then removes any <think> traces and extra formatting from the output.
@torch.inference_mode()
def generate_answer(question, max_new_tokens=160):
    messages = [
        {"role": "system", "content": SYSTEM_PROMPT},
        {
            "role": "user",
            "content": make_user_prompt(question),
        },
    ]
    prompt = apply_chat_template(messages, add_generation_prompt=True)
    model_inputs = tokenizer(prompt, return_tensors="pt").to(model.device)

    generated = model.generate(
        **model_inputs,
        max_new_tokens=max_new_tokens,
        do_sample=False,
        pad_token_id=tokenizer.pad_token_id,
        eos_token_id=tokenizer.eos_token_id,
    )

    new_tokens = generated[0][model_inputs["input_ids"].shape[1] :]
    text = tokenizer.decode(new_tokens, skip_special_tokens=True).strip()
    return clean_answer_text(re.sub(r"<think>.*?</think>", " ", text, flags=re.DOTALL))
We also add a small helper function to shorten long outputs when printing preview examples.
def clip_text(text, max_chars=600):
    text = re.sub(r"<think>.*?</think>", " ", text, flags=re.DOTALL)
    text = re.sub(r"\s+", " ", text).strip()
return text if len(text) <= max_chars else text[:max_chars] + "..."Finally, we build a helper function that creates a few side-by-side preview rows. Each row contains the question, the model prediction, and the reference answer. This gives us a simple way to inspect performance before and after fine-tuning.
def generate_preview_rows(dataset, sample_count=COMPARISON_SAMPLE_COUNT):
    sample_count = min(sample_count, len(dataset))
    subset = dataset.select(range(sample_count))
    previews = []

    for row in subset:
        previews.append(
            {
                "question": row["Question"],
                "prediction": generate_answer(row["Question"]),
                "reference": clean_answer_text(row["Answer"]),
            }
        )

    return previews


formatted_train_dataset = train_dataset.map(
    format_training_example,
    remove_columns=train_dataset.column_names,
)

comparison_examples = eval_dataset.shuffle(seed=SEED).select(
    range(COMPARISON_SAMPLE_COUNT)
)

print(formatted_train_dataset[0])
When you print the first formatted training example, you should see a chat-style sample with the system prompt, the user question, and the assistant answer already wrapped in Qwen’s template format.
{'text': '<|im_start|>system\nAnswer the medical question directly in 2-4 factual sentences.<|im_end|>\n<|im_start|>user\nQuestion: What is (are) COPD ?\n\nRespond with only the answer. Do not restate the question.<|im_end|>\n<|im_start|>assistant\n<think>\n\n</think>\n\nMore information on COPD is available at: What is COPD? and at the Learn More, Breathe Better Campaign For information on quitting smoking, visit http://www.surgeongeneral.gov/tobacco/ or Smokefree.gov. For information on the H1N1 flu and COPD, go to The Centers for Disease Control and Prevention.<|im_end|>\n'}We will test the base Qwen3.6 model on a few evaluation examples before training. This gives us a baseline so we can later compare how the model changes after fine-tuning.
We start by generating preview answers for a few sampled examples from the evaluation set.
Each preview includes the question, the model’s answer before fine-tuning, and the reference answer from the dataset.
baseline_previews = generate_preview_rows(comparison_examples)

for idx, sample in enumerate(baseline_previews, start=1):
    print(f"\n--- Preview {idx} ---")
    print("Question:", sample["question"])
    print("Model answer (before fine-tuning):", clip_text(sample["prediction"]))
    print("Reference answer:", clip_text(sample["reference"]))
Here are the side-by-side comparisons between the model’s current response and the reference answer. These examples help us understand the model’s starting point before any task-specific training.
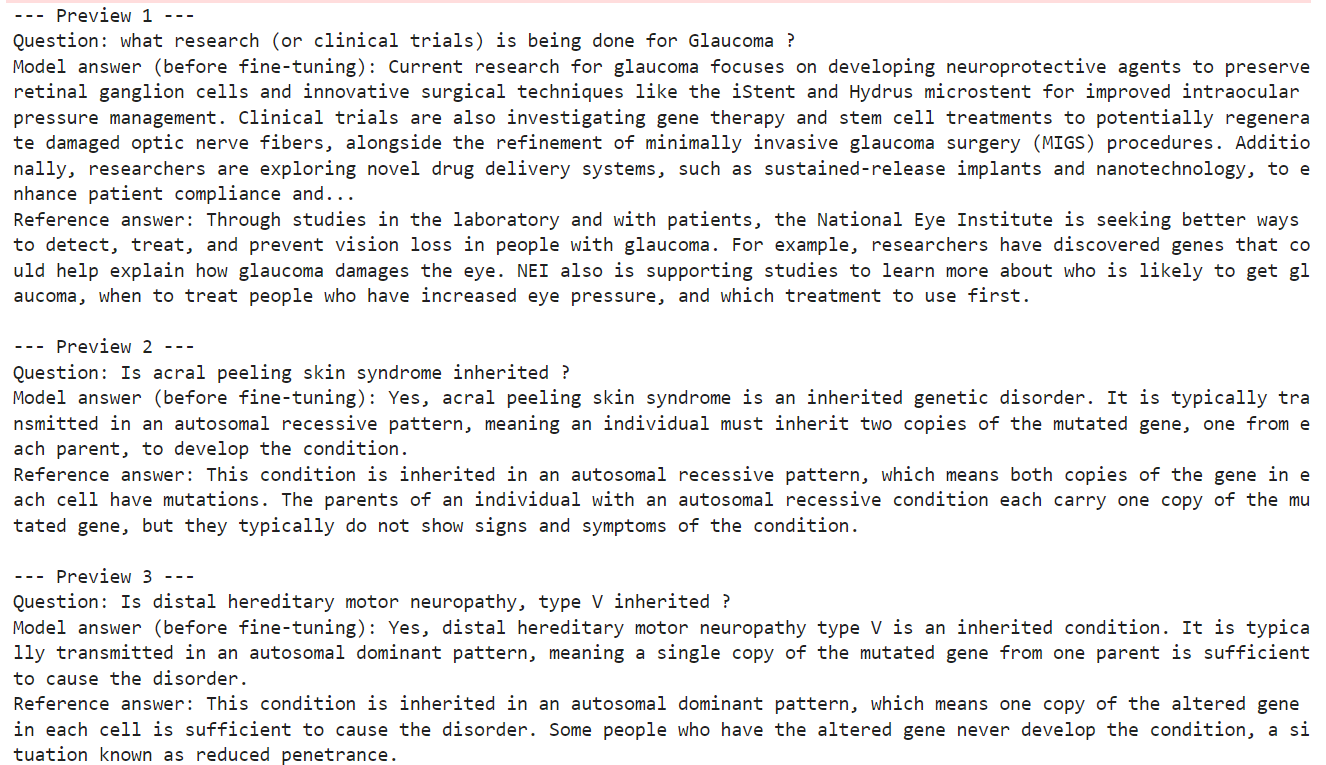
From these examples, we can already see that the base model is capable of producing medically relevant and generally correct answers.
However, its responses do not always match the style, detail level, or wording of the reference answers in the dataset. In some cases, the model gives a broader or more generic explanation, while the reference answer is more specific and better aligned with the target format.
In this part, we will define the LoRA adapter settings, configure the supervised fine-tuning arguments, and initialize the trainer that will handle the QLoRA training process.
Instead of updating all model parameters, QLoRA fine-tunes a much smaller set of trainable adapter weights. This makes training far more memory-efficient while still allowing the model to adapt to the new task.
Here, we define a LoRA configuration with a rank of 8, a scaling factor of 16, and a small dropout value. We also target all linear layers so the adapters are applied broadly across the model.
lora_config = LoraConfig(
    r=8,
    lora_alpha=16,
    lora_dropout=0.05,
    bias="none",
    task_type="CAUSAL_LM",
    target_modules="all-linear",
)Next, we define the training configuration using SFTConfig. These settings control how the supervised fine-tuning run will behave, including batch size, gradient accumulation, learning rate, logging frequency, and precision mode.
This tutorial uses a lightweight setup with one training epoch and a small batch size, so the run stays practical for demonstration purposes. We also enable gradient checkpointing and paged 8-bit AdamW to reduce memory usage during training.
trainer_config = SFTConfig(
    output_dir=OUTPUT_DIR,
    dataset_text_field="text",
    max_length=MAX_SEQ_LENGTH,
    per_device_train_batch_size=2,
    gradient_accumulation_steps=2,
    num_train_epochs=1,
    learning_rate=1e-4,
    warmup_steps=5,
    logging_steps=5,
    save_strategy="epoch",
    report_to="none",
    packing=False,
    gradient_checkpointing=True,
    optim="paged_adamw_8bit",
    bf16=supports_bf16(),
    fp16=not supports_bf16(),
)With the adapter settings and training arguments in place, we can now initialize the SFTTrainer. This trainer brings together the base model, the formatted training dataset, the LoRA configuration, and the tokenizer so the model is ready for supervised fine-tuning.
trainer = SFTTrainer(
    model=model,
    train_dataset=formatted_train_dataset,
    peft_config=lora_config,
    args=trainer_config,
    processing_class=tokenizer,
)
Before starting training, it is useful to confirm how many parameters will actually be updated. One of the main advantages of QLoRA is that only a very small fraction of the model becomes trainable.
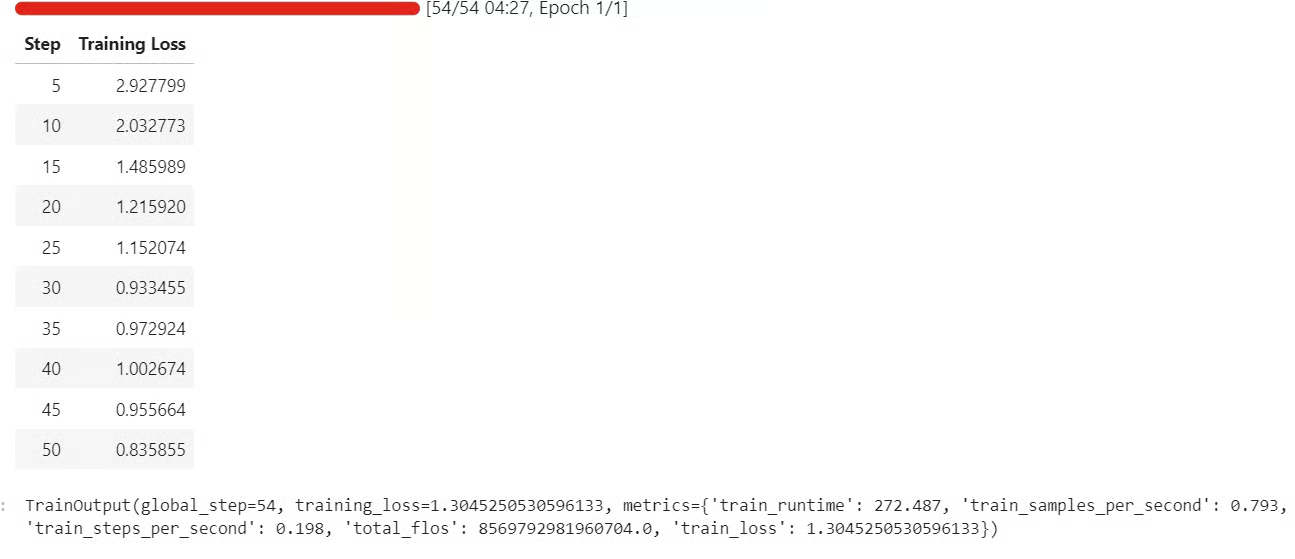
trainer.model.print_trainable_parameters()This shows that only about 0.03% of the full model parameters are being trained. That is what makes QLoRA such a practical approach for fine-tuning large language models on limited hardware.
trainable params: 11,238,720 || all params: 34,671,849,408 || trainable%: 0.0324In this section, we will start the supervised fine-tuning run, save the trained adapter locally, and then push it to Hugging Face, so it can be reused later.
Now that the model, dataset, and trainer are ready, we can begin the fine-tuning process. The trainer will run through the formatted training set and update only the LoRA adapter weights instead of the full model.
train_result = trainer.train()
train_result
As training runs, you should see the loss gradually decrease. This is a good sign that the model is learning the task format and adapting to the medical question-answer data.
After training finishes, save the fine-tuned adapter and tokenizer locally. This gives you a reusable checkpoint that you can load again later without repeating the full training run.
trainer.model.save_pretrained(OUTPUT_DIR)
tokenizer.save_pretrained(OUTPUT_DIR)Once the adapter is saved locally, you can upload it to Hugging Face. This makes it easier to share, version, and reload the fine-tuned model in future notebooks or deployment workflows.
HF_REPO_ID = "kingabzpro/qwen36-medquad-quick"
trainer.model.push_to_hub(HF_REPO_ID)
tokenizer.push_to_hub(HF_REPO_ID)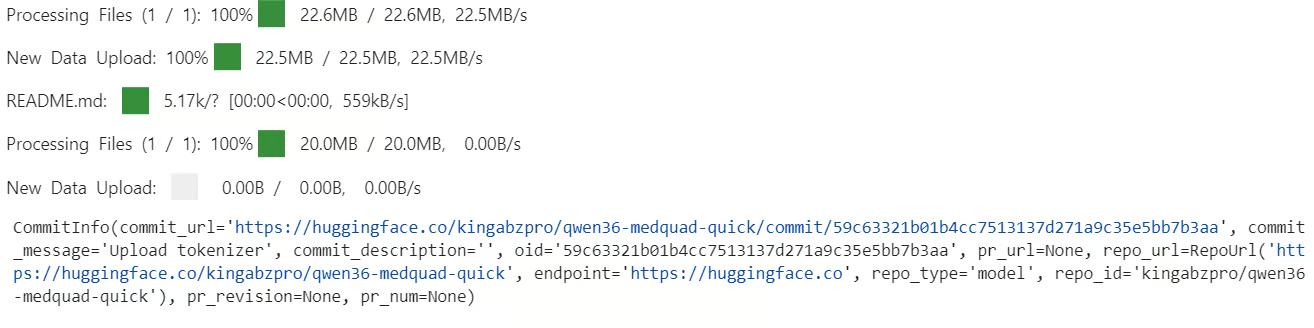 After the upload finishes, the fine-tuned adapter will be available from the repository.
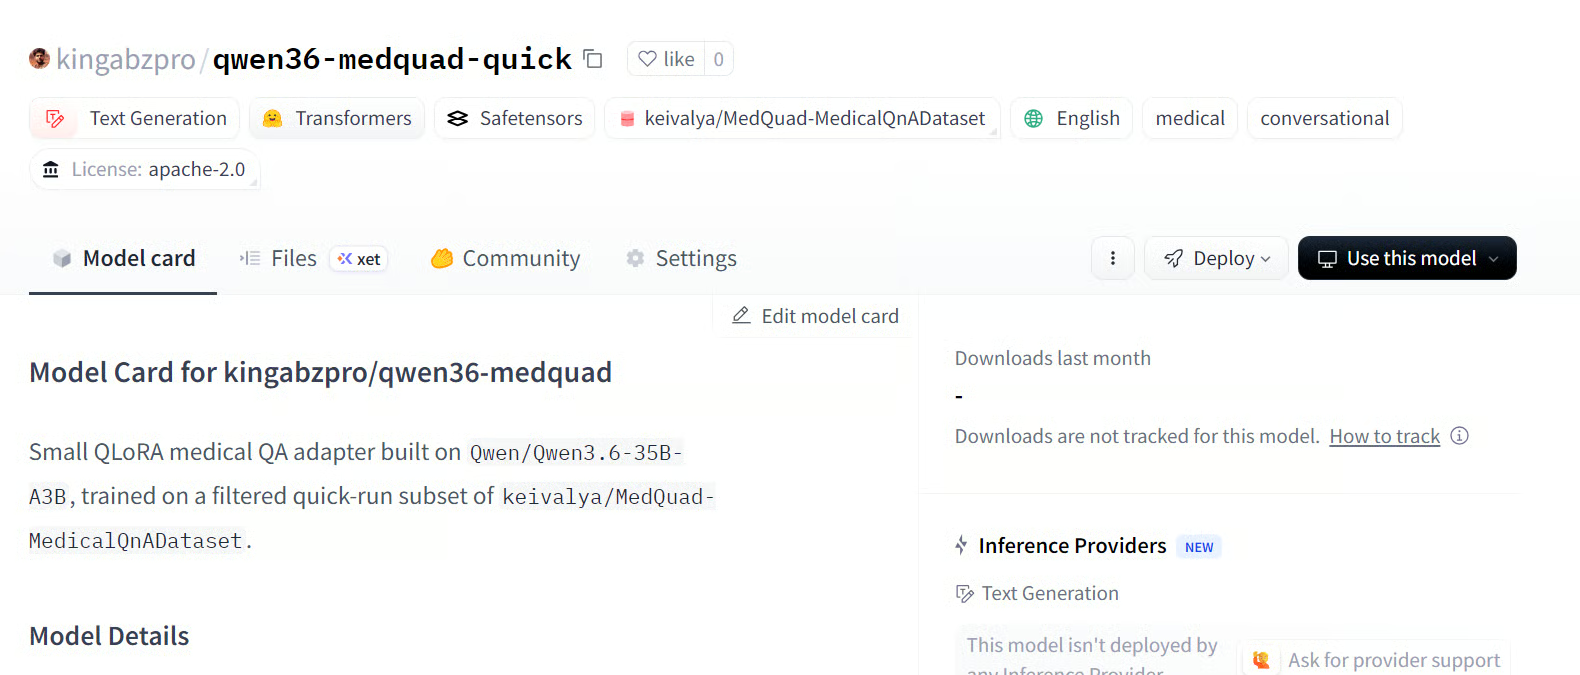
Source: kingabzpro/qwen36-medquad-quick
Now that training is complete, we can evaluate the fine-tuned model on the same comparison examples we used earlier. This helps us make a direct before-and-after comparison on the exact same questions.
model.eval()

fine_tuned_previews = generate_preview_rows(comparison_examples)

for idx, (before, after) in enumerate(
    zip(baseline_previews, fine_tuned_previews), start=1
):
    print(f"\n{'=' * 80}")
    print(f"Sample {idx}")
    print(f"{'=' * 80}")
    print("Question:", before["question"])
    print("\nBefore fine-tuning:")
    print(clip_text(before["prediction"]))
    print("\nAfter fine-tuning:")
    print(clip_text(after["prediction"]))
    print("\nReference answer:")
    print(clip_text(before["reference"]))
You should see the baseline answer, the fine-tuned answer, and the reference answer for each sample. This makes it easier to inspect how the adapter changed the model’s response style and content.
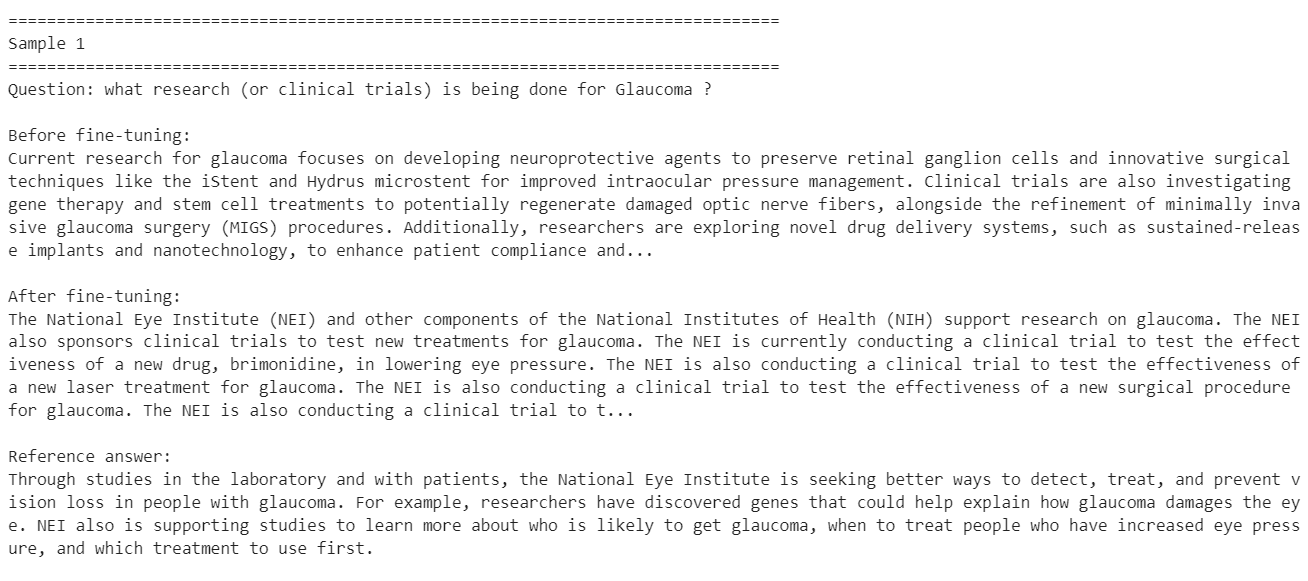
These examples show that fine-tuning helped the model adapt more closely to the style of the target dataset, especially on shorter factual medical questions.
At the same time, the results also show that this was only a small fine-tuning run on a limited subset of the dataset, so improvement on every sample is not guaranteed. Some answers become more aligned with the training distribution, while others may lose useful detail or become too narrow.
To get better results, the next step would be to train on the full dataset instead of a small subset and run the fine-tuning process for at least 3 epochs. You could also increase the LoRA rank to give the adapter more learning capacity, and further refine the system prompt so the model follows the desired medical answer style more consistently.
These changes would likely produce more stable improvements across a wider range of questions.
Fine-tuning a modern language model is not as simple as it may first appear.
Even though Qwen3.6-35B-A3B is an efficient mixture-of-experts model with 35 billion total parameters, it still takes serious computing just to load it in 4-bit mode and prepare it for training. The training itself also remains expensive, especially once you move beyond a small experimental subset and start working with a larger dataset or multiple epochs.
Hardware also matters a lot. In this tutorial, we used an H100 NVL to keep the workflow practical. On an older GPU, training time can increase dramatically. Even on an A100, a similar setup could easily take around an hour, and weaker GPUs would push that much further.
So while QLoRA and 4-bit loading make fine-tuning more accessible, they do not make it lightweight in the everyday sense. It is also worth asking whether fine-tuning is necessary in the first place. For many basic tasks, I would not recommend jumping straight into fine-tuning.
If you spend time improving the prompt, structuring the workflow better, and using tools, MCPs, or retrieval-based methods, you can often get close to the target behavior without training at all. In many cases, that can get you close to 80% of the result you want, while being much faster, cheaper, and easier to iterate on.
Fine-tuning becomes much more valuable when you need the model to consistently learn a very specific response style, domain behavior, or institutional format. That is where it starts to make sense. If you want the model to answer in the exact way a particular hospital, medical system, or specialist workflow responds to questions, then fine-tuning is the better path.
In other words, use prompting and workflow design first, and turn to fine-tuning when you truly need the model to internalize a specialized way of responding.
Top AI Courses
Tracks
Tracks
Courses
tutorials
Abid Ali Awan
tutorials
Abid Ali Awan
tutorials
Abid Ali Awan
tutorials
Abid Ali Awan
tutorials
Abid Ali Awan
tutorials
Abid Ali Awan