Cursus
Introduction to Google Workspace with Gemini
30 min
2.6K
Oefen en volg je voortgang.
Ga Verder Met GoogleAI-agents zijn enorm krachtig, maar ze hebben vaak een fundamenteel probleem: ze staan los van waar ons dagelijkse werk echt gebeurt — onze e-mails, onze agenda’s en onze documenten. Zonder toegang tot je live data is een LLM niet meer dan een welbespraakte brainstormpartner.
In deze tutorial laat ik je zien hoe je de kloof tussen AI-modellen en je enterprisedata overbrugt door de Google Workspace MCP-server te configureren, de nieuwste beveiligingscontroles te begrijpen en een geautomatiseerde assistent te bouwen.
Aan het einde kun je:
De Google Workspace MCP-server is een gestandaardiseerde implementatie van het Model Context Protocol (MCP) waarmee elke compatibele AI-client (zoals Claude Desktop, Gemini CLI of eigen agents) veilig kan communiceren met Google Workspace-apps.
In plaats van dat ontwikkelaars voor elk nieuw AI-project eigen, broze REST-API-wrappers schrijven voor Gmail, Google Docs, Drive en Calendar, stelt de MCP-server deze mogelijkheden beschikbaar als gestandaardiseerde "tools" die de LLM native begrijpt.
Ik raad aan om de cursus Introduction to Model Context Protocol (MCP) te bekijken om er praktijkervaring mee op te doen.
Normaal gesproken betekent het bouwen van een cross-app-workflow het schrijven van kwetsbare integratiecode. Met MCP geef je de tools gewoon aan de LLM. De agent kan een e-mailthread lezen, een planningsconflict opsporen door je agenda te controleren en zelfstandig een samenvatting in Google Docs opstellen.
Als je AI-modellen toegang geeft tot zakelijke e-mails en bestanden, is databeveiliging binnen de onderneming de grootste drempel voor AI-adoptie.
De Workspace MCP-server is vanaf de basis gebouwd om dit probleem aan te pakken.
Authenticatie wordt volledig afgehandeld via OAuth 2.0 en strikte Google Cloud IAM.
Er zijn geen generieke "master keys". De agent handelt alleen op namens de expliciet geauthenticeerde gebruiker en respecteert strikt alle bestaande Google Workspace-deelrechten en document-ACL’s.
Daarnaast introduceert het robuuste beheerdercontroles.
Workspace-beheerders kunnen specifieke MCP-tools op de allowlist zetten, het API-gebruik binnen de organisatie monitoren en DLP-regels (Data Loss Prevention) afdwingen om te voorkomen dat agents per ongeluk gevoelige Drive-documenten of e-mails lekken naar niet-geautoriseerde externe domeinen.
Voordat je code schrijft, betekent "configuratie" hier het instellen van Google Cloud-rechten om toegang te krijgen tot de externe server.
Eerst moet je zowel de standaard Workspace-API’s als de specifieke MCP-services in je Google Cloud-project inschakelen.
Omdat Workspace-data gebruikersspecifiek is, vereist het externe MCP-eindpunt een Authorization: Bearer <TOKEN>-header die de menselijke gebruiker vertegenwoordigt.
Ga naar API’s & Services > Credentials en maak een OAuth 2.0 Client-ID (type Desktop Application).
Download het JSON-referentiebestand. Dit wordt gebruikt om via een browserloginflow het benodigde OAuth 2.0-access token te verkrijgen.
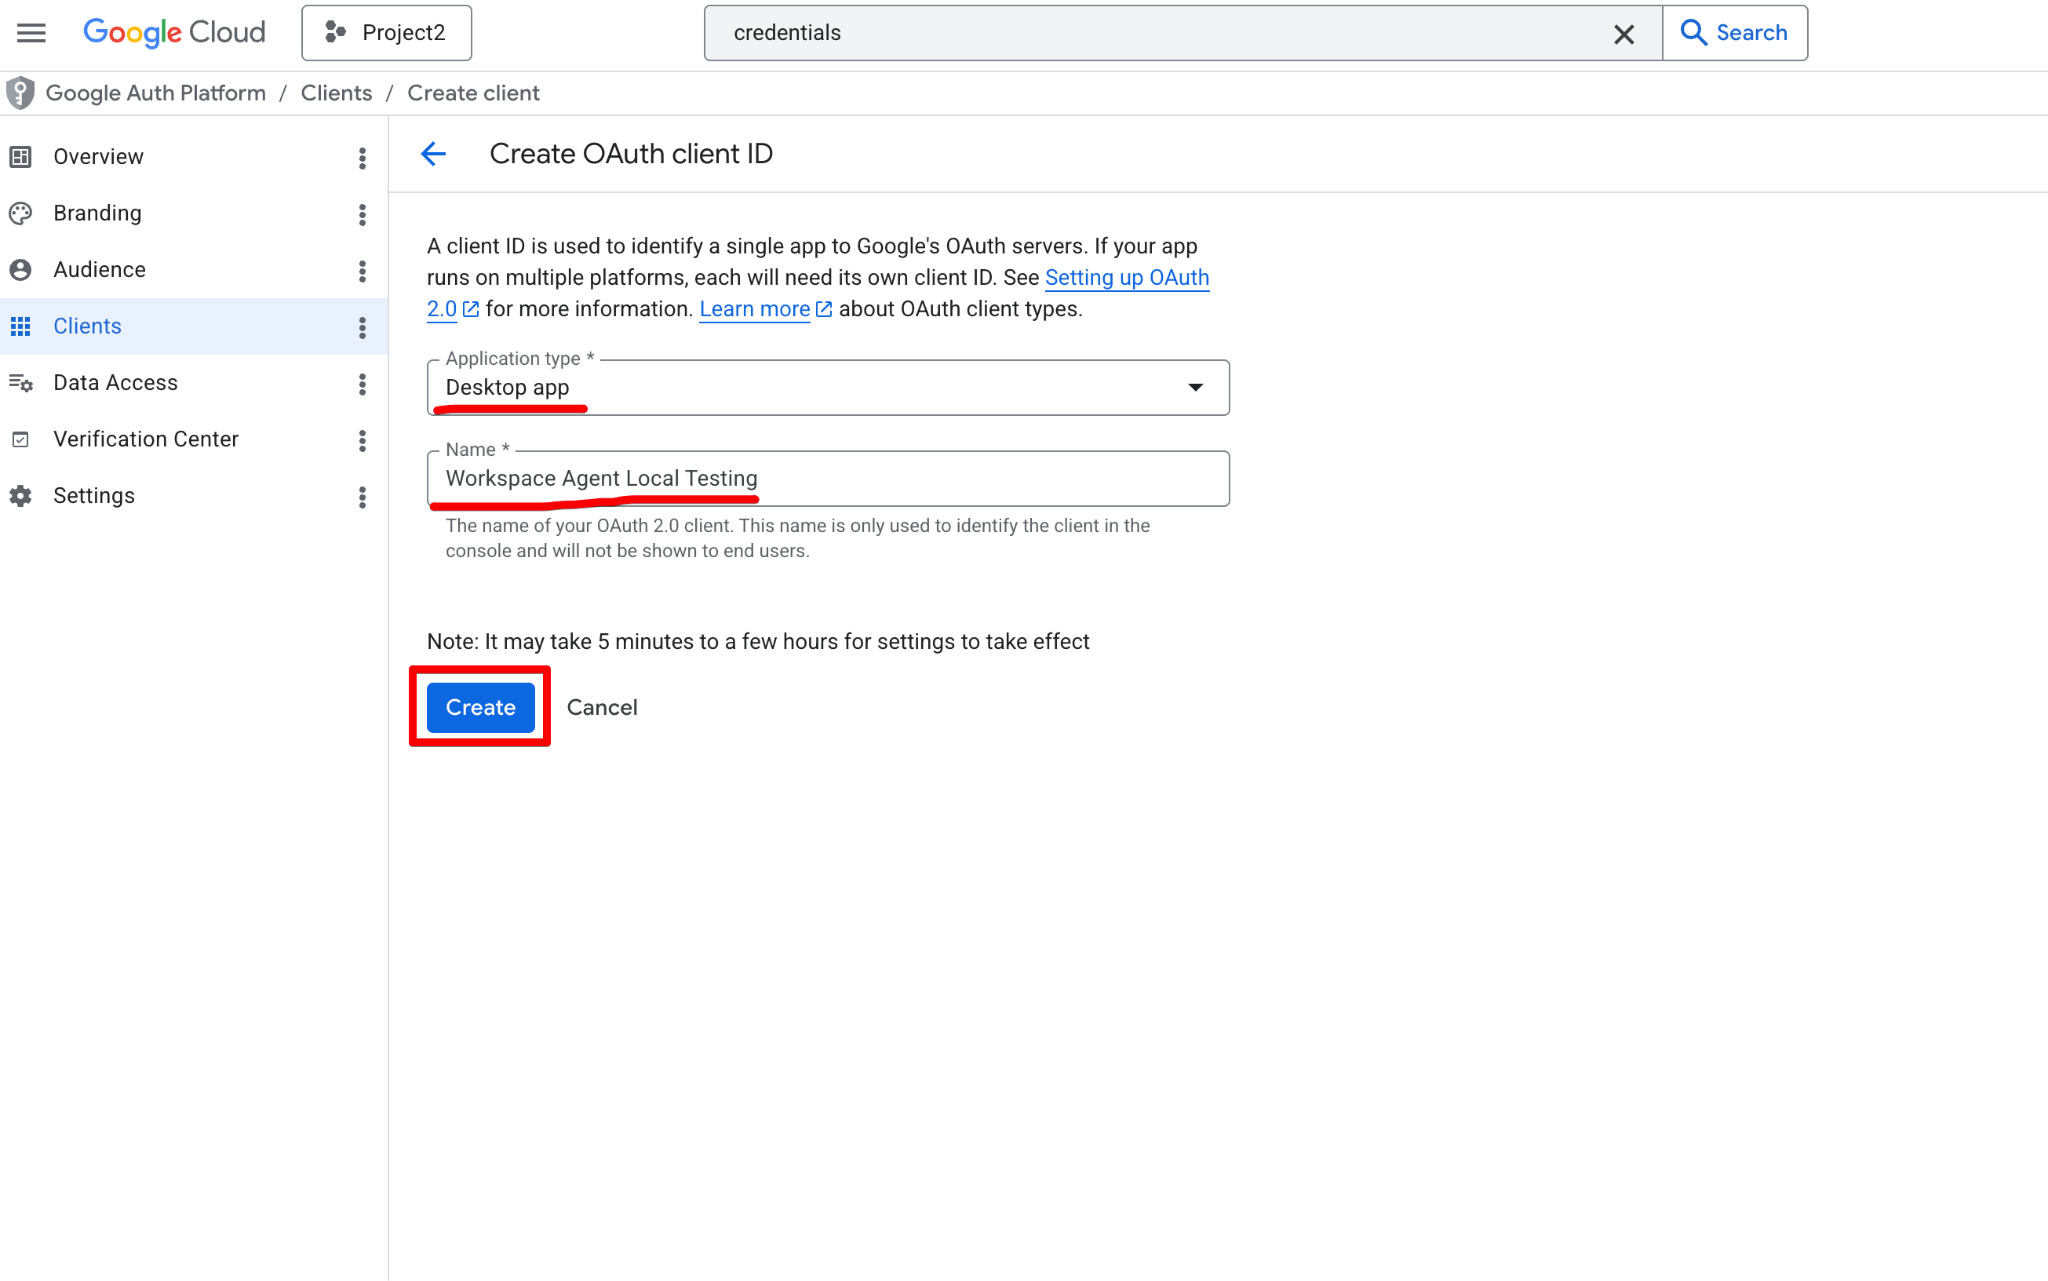
Klik op Create en kopieer de Client ID en Client Secret. Die heb je in de volgende stap nodig.
Voordat je complexe Python-agentcode schrijft, is het sterk aan te raden een "Hello World"-test uit te voeren om je referenties te verifiëren en te controleren of de externe MCP-eindpunten bereikbaar zijn.
Testen in een vereenvoudigde omgeving helpt authenticatieproblemen los te koppelen van je applicatielogica.
We kunnen de verbinding testen met zowel de Gemini CLI als de Google Antigravity-UI, maar we focussen nu op de Gemini CLI.
De snelste manier om de connectiviteit te testen is met de Gemini CLI.
Omdat Workspace strikte authenticatie vereist, configureer je het eindpunt en je OAuth-referenties in je ~/.gemini/settings.json-bestand:
{
  "mcpServers": {
    "calendar": {
      "httpUrl": "https://calendarmcp.googleapis.com/mcp/v1",
      "oauth": {
        "enabled": true,
        "clientId": "<YOUR_CLIENT_ID>",
        "clientSecret": "<YOUR_CLIENT_SECRET>",
        "scopes": [
          "https://www.googleapis.com/auth/calendar.calendarlist.readonly",
          "https://www.googleapis.com/auth/calendar.events.freebusy",
          "https://www.googleapis.com/auth/calendar.events.readonly"
        ]
      }
    },
    "drive": {
      "httpUrl": "https://drivemcp.googleapis.com/mcp/v1",
      "oauth": {
        "enabled": true,
        "clientId": "<YOUR_CLIENT_ID>",
        "clientSecret": "<YOUR_CLIENT_SECRET>",
        "scopes": [
          "https://www.googleapis.com/auth/drive.readonly",
          "https://www.googleapis.com/auth/drive.file"
        ]
      }
    },
    "gmail": {
      "httpUrl": "https://gmailmcp.googleapis.com/mcp/v1",
      "oauth": {
        "enabled": true,
        "clientId": "<YOUR_CLIENT_ID>",
        "clientSecret": "<YOUR_CLIENT_SECRET>",
        "scopes": [
          "https://www.googleapis.com/auth/gmail.readonly",
          "https://www.googleapis.com/auth/gmail.compose"
        ]
      }
    }
  }
}
Zodra je instellingenbestand is bijgewerkt, kun je de Gemini CLI starten en het commando /mcp list uitvoeren.
Je ziet je nieuw geconfigureerde Workspace-servers als "Ready" vermeld, maar met "(OAuth not authenticated)".
Dit bevestigt dat de CLI je configuratie succesvol heeft gelezen en bekend is met de externe tools.
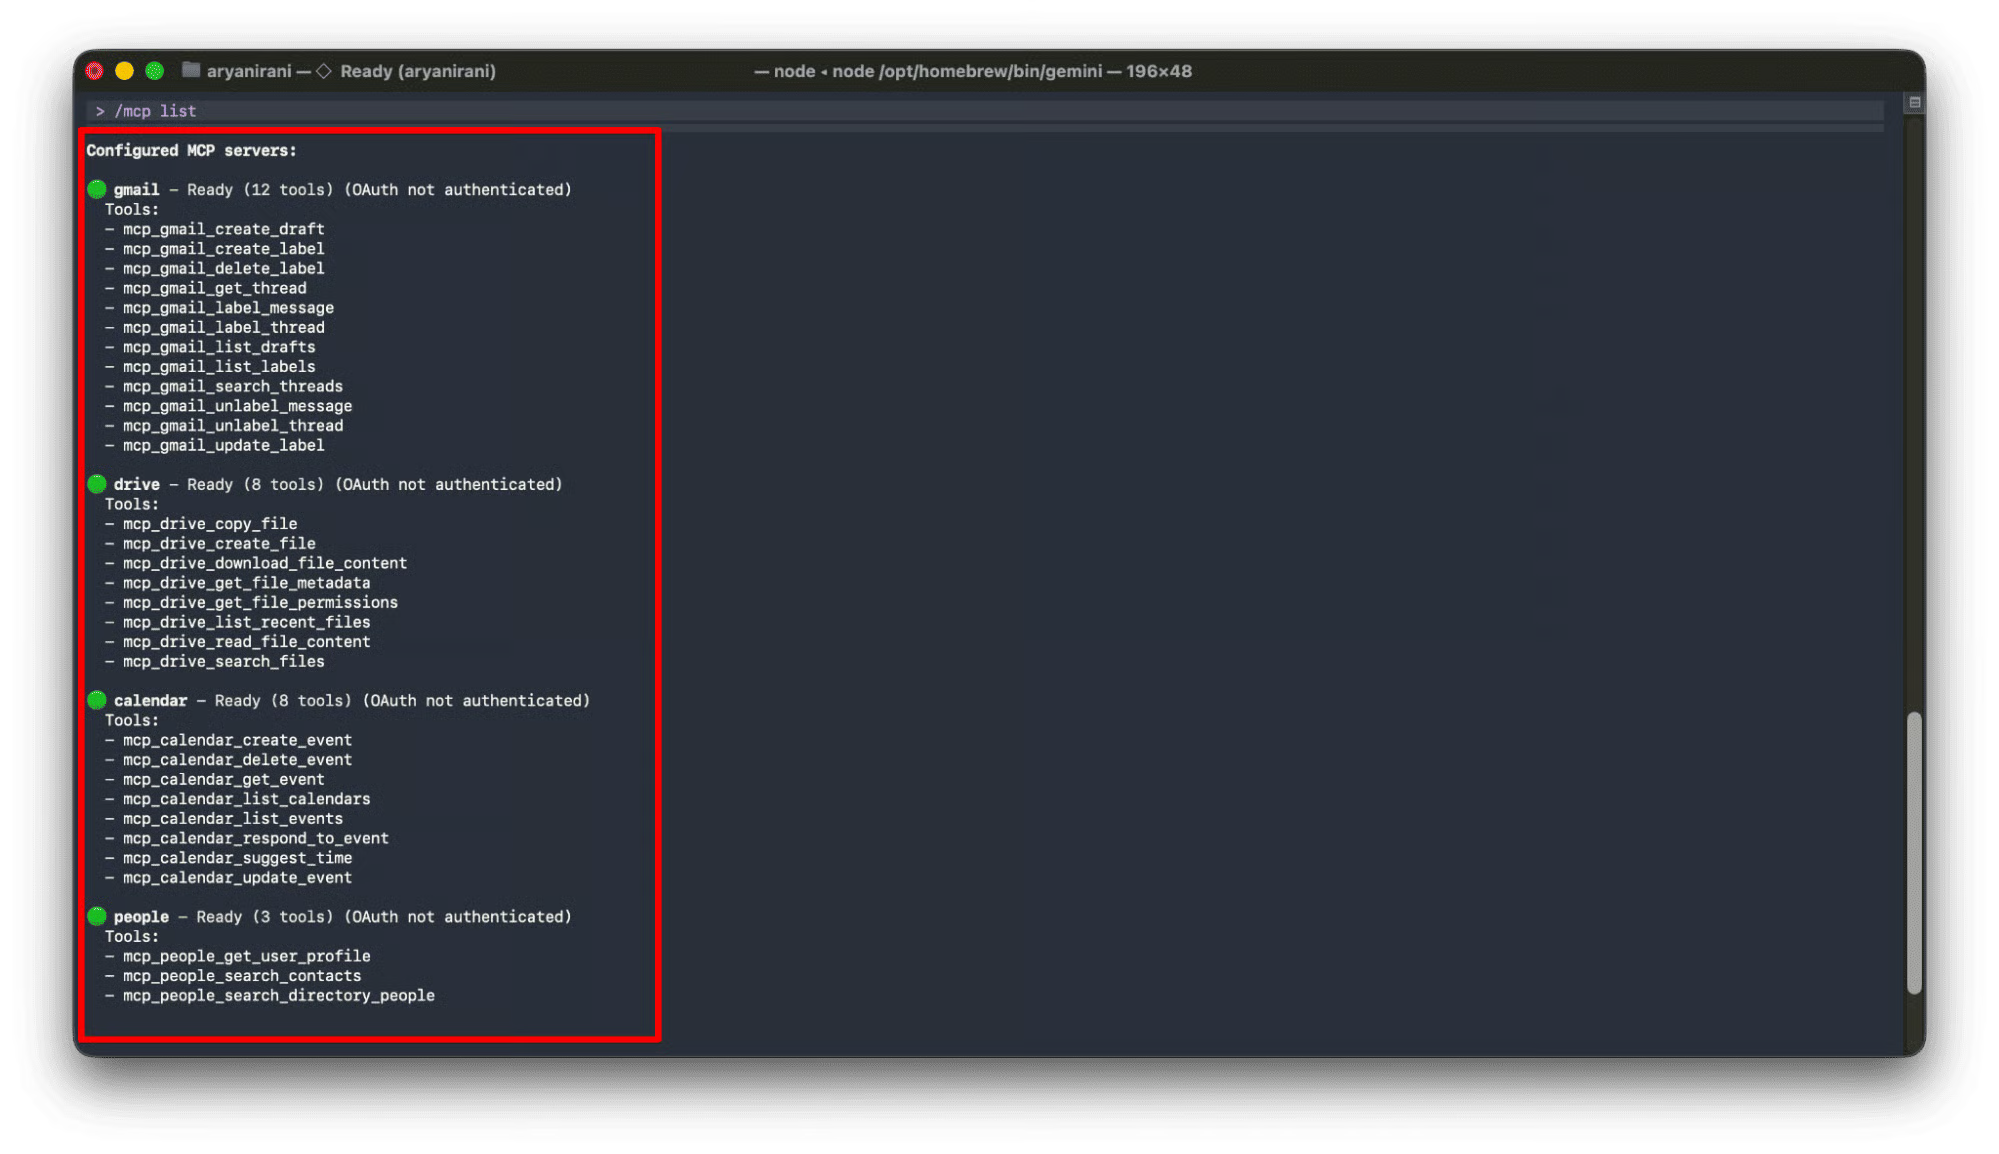
Nu de servers zijn herkend, moet je je authenticeren voordat je ze kunt gebruiken. Begin met het authenticatiecommando voor je Gmail-eindpunt:
/mcp auth gmailDit start een browsergebaseerde OAuth 2.0-flow.
De CLI probeert automatisch je standaardwebbrowser te openen, waarin je wordt gevraagd in te loggen met je Google Workspace-account en de gevraagde rechten te verlenen.
Als je browser niet automatisch opent, geeft de CLI een beveiligde URL die je handmatig kunt kopiëren en plakken. Zodra je het aanmeldproces voltooit, bevestigt de CLI de succesvolle authenticatie en laadt de tools voor die server opnieuw.
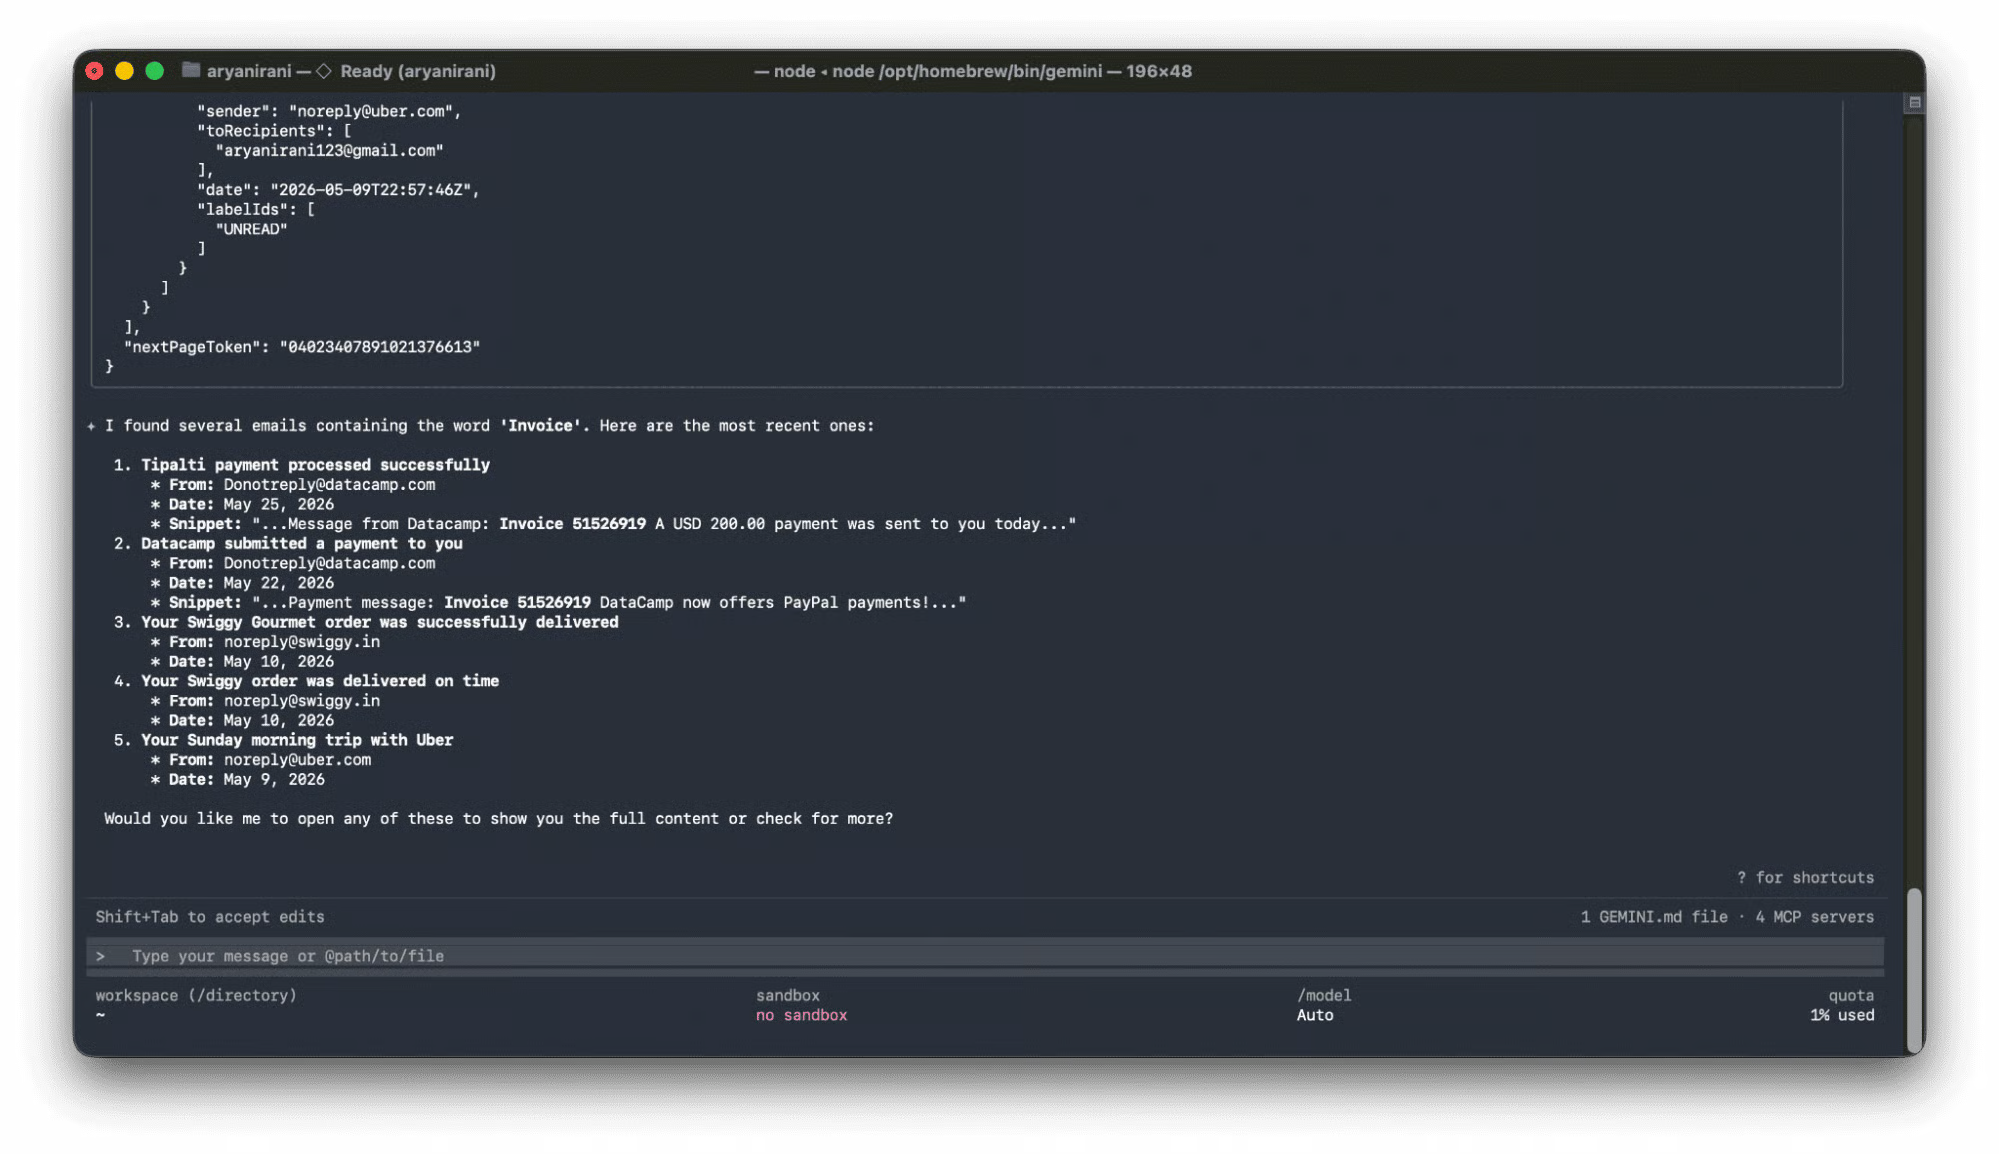
Met de authenticatie voltooid, kun je de verbinding testen met een natuurlijke taalprompt:
my email for any messages containing the word 'Invoice'.De CLI voert de tool achter de schermen uit, haalt de gegevens uit je inbox op en de agent zet het om in een behulpzame reactie:
Laten we een Workspace-agent bouwen die verbinding maakt met alle vijf services (Calendar, Chat, Drive, Gmail, People) en de authenticatie veilig afhandelt.
Voordat de agent kan draaien, heeft hij een OAuth-token nodig om door te geven aan de MCP-eindpunten.
De Gemini CLI regelt dit automatisch met /mcp auth, maar voor een Python-applicatie moeten we zelf een token genereren en opslaan als Application Default Credentials (ADC).
Maak een bestand met de naam auth.py in je projectroot. Zorg dat je gedownloade client_secret.json in dezelfde map staat.
Dit script gebruikt de officiële google-auth-oauthlib om een authenticatie-URL te genereren, de code in te wisselen voor een refresh-token en dit weg te schrijven naar het standaardpad ~/.config/gcloud/application_default_credentials.json, waar de ADK het kan vinden.
import json
import os
from urllib.parse import urlparse, parse_qs
import google.auth
from google_auth_oauthlib.flow import InstalledAppFlow
CLIENT_SECRET_FILE = 'client_secret.json'
SCOPES = [
   "https://www.googleapis.com/auth/cloud-platform",
   "https://www.googleapis.com/auth/calendar",
   "https://www.googleapis.com/auth/chat.spaces.readonly",
   "https://www.googleapis.com/auth/chat.messages",
   "https://www.googleapis.com/auth/drive.readonly",
   "https://www.googleapis.com/auth/gmail.readonly",
   "https://www.googleapis.com/auth/gmail.compose",
   "https://www.googleapis.com/auth/directory.readonly",
   "https://www.googleapis.com/auth/contacts.readonly"
]
# Initialize the flow
flow = InstalledAppFlow.from_client_secrets_file(
   CLIENT_SECRET_FILE,
   scopes=SCOPES,
   redirect_uri='http://localhost:8085/'
)
# Generate Auth URL
auth_url, expected_state = flow.authorization_url(prompt='consent', access_type='offline')
print("Copy this link and paste it into your browser:\\n", auth_url)
redirected_url = input("\\nPaste the full localhost URL here: ").strip()
# Exchange code for tokens
parsed_url = urlparse(redirected_url)
code = parse_qs(parsed_url.query).get('code', [None])[0]
flow.fetch_token(code=code)
# Save ADC
adc_data = {
   "client_id": flow.credentials.client_id,
   "client_secret": flow.credentials.client_secret,
   "refresh_token": flow.credentials.refresh_token,
   "type": "authorized_user"
}
adc_path = os.path.expanduser("~/.config/gcloud/application_default_credentials.json")
os.makedirs(os.path.dirname(adc_path), exist_ok=True)
with open(adc_path, "w") as f:
   json.dump(adc_data, f, indent=2)
print(f"Success! ADC saved to: {adc_path}")
Voer het script uit in je terminal: python3 auth.py
Wanneer je dit uitvoert, moet je een handmatige authenticatieflow doorlopen:
Het script wisselt de code in voor een OAuth-token, slaat dit op in ~/.config/gcloud/application_default_credentials.json en genereert een .env-bestand in je workspace_agent-map met je Google Cloud Project-instellingen.
Je lokale omgeving is nu volledig geauthenticeerd!
Maak nu een bestand met de naam agent.py.
Omdat Workspace-data zeer gevoelig is, vereisen de MCP-servers dat het zojuist gegenereerde access token wordt geïnjecteerd in de HTTP-headers bij elk verzoek.
We moeten de ADK-omgeving ook veilig configureren.
Laten we de code doornemen:
Eerst laden we de Application Default Credentials (ADC) van de gebruiker die in de vorige stap zijn gegenereerd.
Een cruciaal onderdeel van enterprise-agents is het efficiënt cachen van tokens. Als we het token bij elke tooluitvoering vernieuwen, kunnen we API-limieten raken of oneindige vernieuwingslussen triggeren tijdens retries.
De TokenRelay-klasse cachet het token in het geheugen en ververst het alleen als het binnen 5 minuten verloopt.
import os
import datetime
import google.auth
from google.auth.transport.requests import Request
from google.adk.agents.llm_agent import LlmAgent
from google.adk.tools.mcp_tool.mcp_toolset import McpToolset
from google.adk.tools.mcp_tool.mcp_session_manager import StreamableHTTPConnectionParams
# Enable graceful error handling so timeouts return as tool outputs
os.environ["ADK_ENABLE_MCP_GRACEFUL_ERROR_HANDLING"] = "1"
# Inject User ADC path globally
_adc_path = os.path.expanduser("~/.config/gcloud/application_default_credentials.json")
if not os.path.exists(_adc_path):
   raise FileNotFoundError("Please run 'python3 auth.py' first to generate credentials.")
os.environ["GOOGLE_APPLICATION_CREDENTIALS"] = _adc_path
creds, _ = google.auth.default()
class TokenRelay:
   """Manages in-memory caching of Google OAuth access tokens."""
   def __init__(self, credentials):
       self._creds = credentials
       self._cached_token = None
       self._expiry = None
   def get_token(self) -> str:
       now = datetime.datetime.now()
       if (self._cached_token is None or self._expiry is None
           or now >= (self._expiry - datetime.timedelta(minutes=5))):
           self._creds.refresh(Request())
           self._cached_token = self._creds.token
           self._expiry = now + datetime.timedelta(minutes=50)
       return self._cached_token or ""
token_relay = TokenRelay(creds)
token_relay.get_token()
def auth_header_provider(tool_context=None) -> dict[str, str]:
   return {"Authorization": f"Bearer {token_relay.get_token()}"}
Met onze tokencache klaar, configureren we onze 5 MCP-verbindingen. We gebruiken StreamableHTTPConnectionParams om verbinding te maken met Server-Sent Events (SSE)-endpoints.
Wat de McpToolset zo krachtig maakt, is dat deze het externe endpoint dynamisch uitvraagt. Hij haalt automatisch de beschikbare tools en JSON-schema's op. Je hoeft er geen enkele hard te coderen!
# Initialize the 5 GWS MCP servers with dynamic runtime provider
calendar_mcp = McpToolset(
   connection_params=StreamableHTTPConnectionParams(url="https://calendarmcp.googleapis.com/mcp/v1"),
   header_provider=auth_header_provider
)
chat_mcp = McpToolset(
   connection_params=StreamableHTTPConnectionParams(url="https://chatmcp.googleapis.com/mcp/v1"),
   header_provider=auth_header_provider
)
drive_mcp = McpToolset(
   connection_params=StreamableHTTPConnectionParams(url="https://drivemcp.googleapis.com/mcp/v1"),
   header_provider=auth_header_provider
)
gmail_mcp = McpToolset(
   connection_params=StreamableHTTPConnectionParams(url="https://gmailmcp.googleapis.com/mcp/v1"),
   header_provider=auth_header_provider
)
people_mcp = McpToolset(
   connection_params=StreamableHTTPConnectionParams(url="https://people.googleapis.com/mcp/v1"),
   header_provider=auth_header_provider
)Tot slot maken we onze LlmAgent aan. We gebruiken het gemini-2.5-flash model, injecteren dynamisch de huidige datum in de systeemprompt zodat de LLM relatieve tijd begrijpt ("deze week", "vandaag"), en geven de 5 toolsets mee.
current_date = datetime.datetime.now().strftime("%Y-%m-%d")
root_agent = LlmAgent(
   model="gemini-2.5-flash",
   name='gws_adk_agent',
   instruction=f"""You are a helpful assistant grounded in the user's Google Workspace data.
   Today's current date is {current_date}. Always calculate relative dates (like 'this week' or 'upcoming meetings') using this reference.
   Use the provided MCP tools to answer questions about their Calendar, Chat, Drive, Gmail, and Contacts.
   If a tool returns an error indicating a timeout, inform the user that the service took too long to respond.""",
   tools=[calendar_mcp, chat_mcp, drive_mcp, gmail_mcp, people_mcp]
)In plaats van een aangepaste Python-loop te schrijven, kunnen we deze agent meteen testen en draaien met de ingebouwde ADK Web-interface. Start vanuit je terminal de webserver:
adk web Dit start een lokale developmentserver. Navigeer in je browser naar http://localhost:8080.
Je ziet je agent geladen en klaarstaan.
Vanuit deze UI kun je native met de agent chatten en zien hoe hij naadloos schakelt tussen Gmail, Calendar en Drive om je verzoeken uit te voeren!
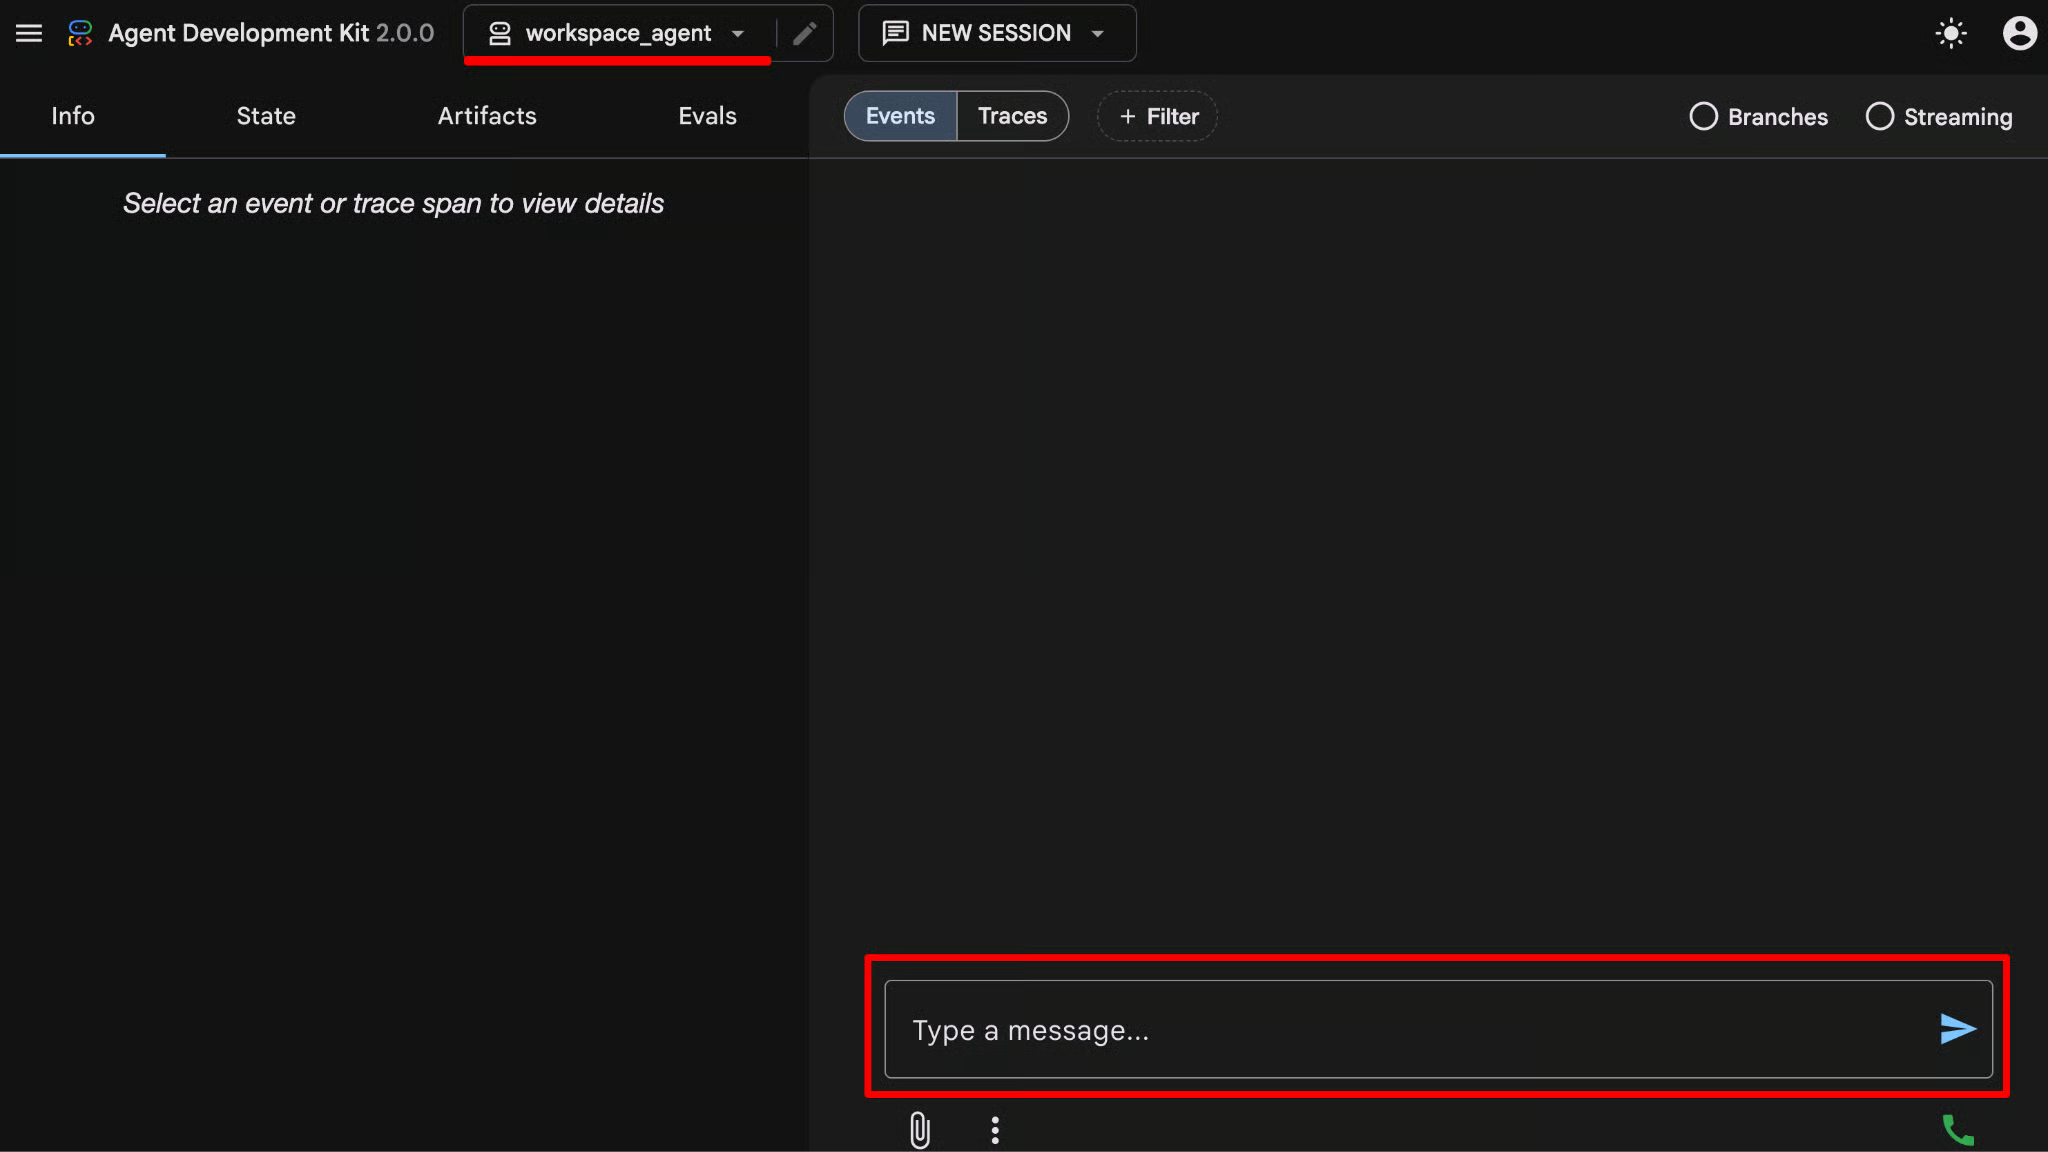
Nu de agent draait, kun je hem complexe, cross-functionele vragen stellen waarvoor je normaal drie verschillende tabs zou openen.
Bijvoorbeeld:
Prompt 1: Check mijn agenda voor morgen en vat de onderwerpen van mijn meetings samen. Zijn er relevante documenten in mijn Drive daarvoor?
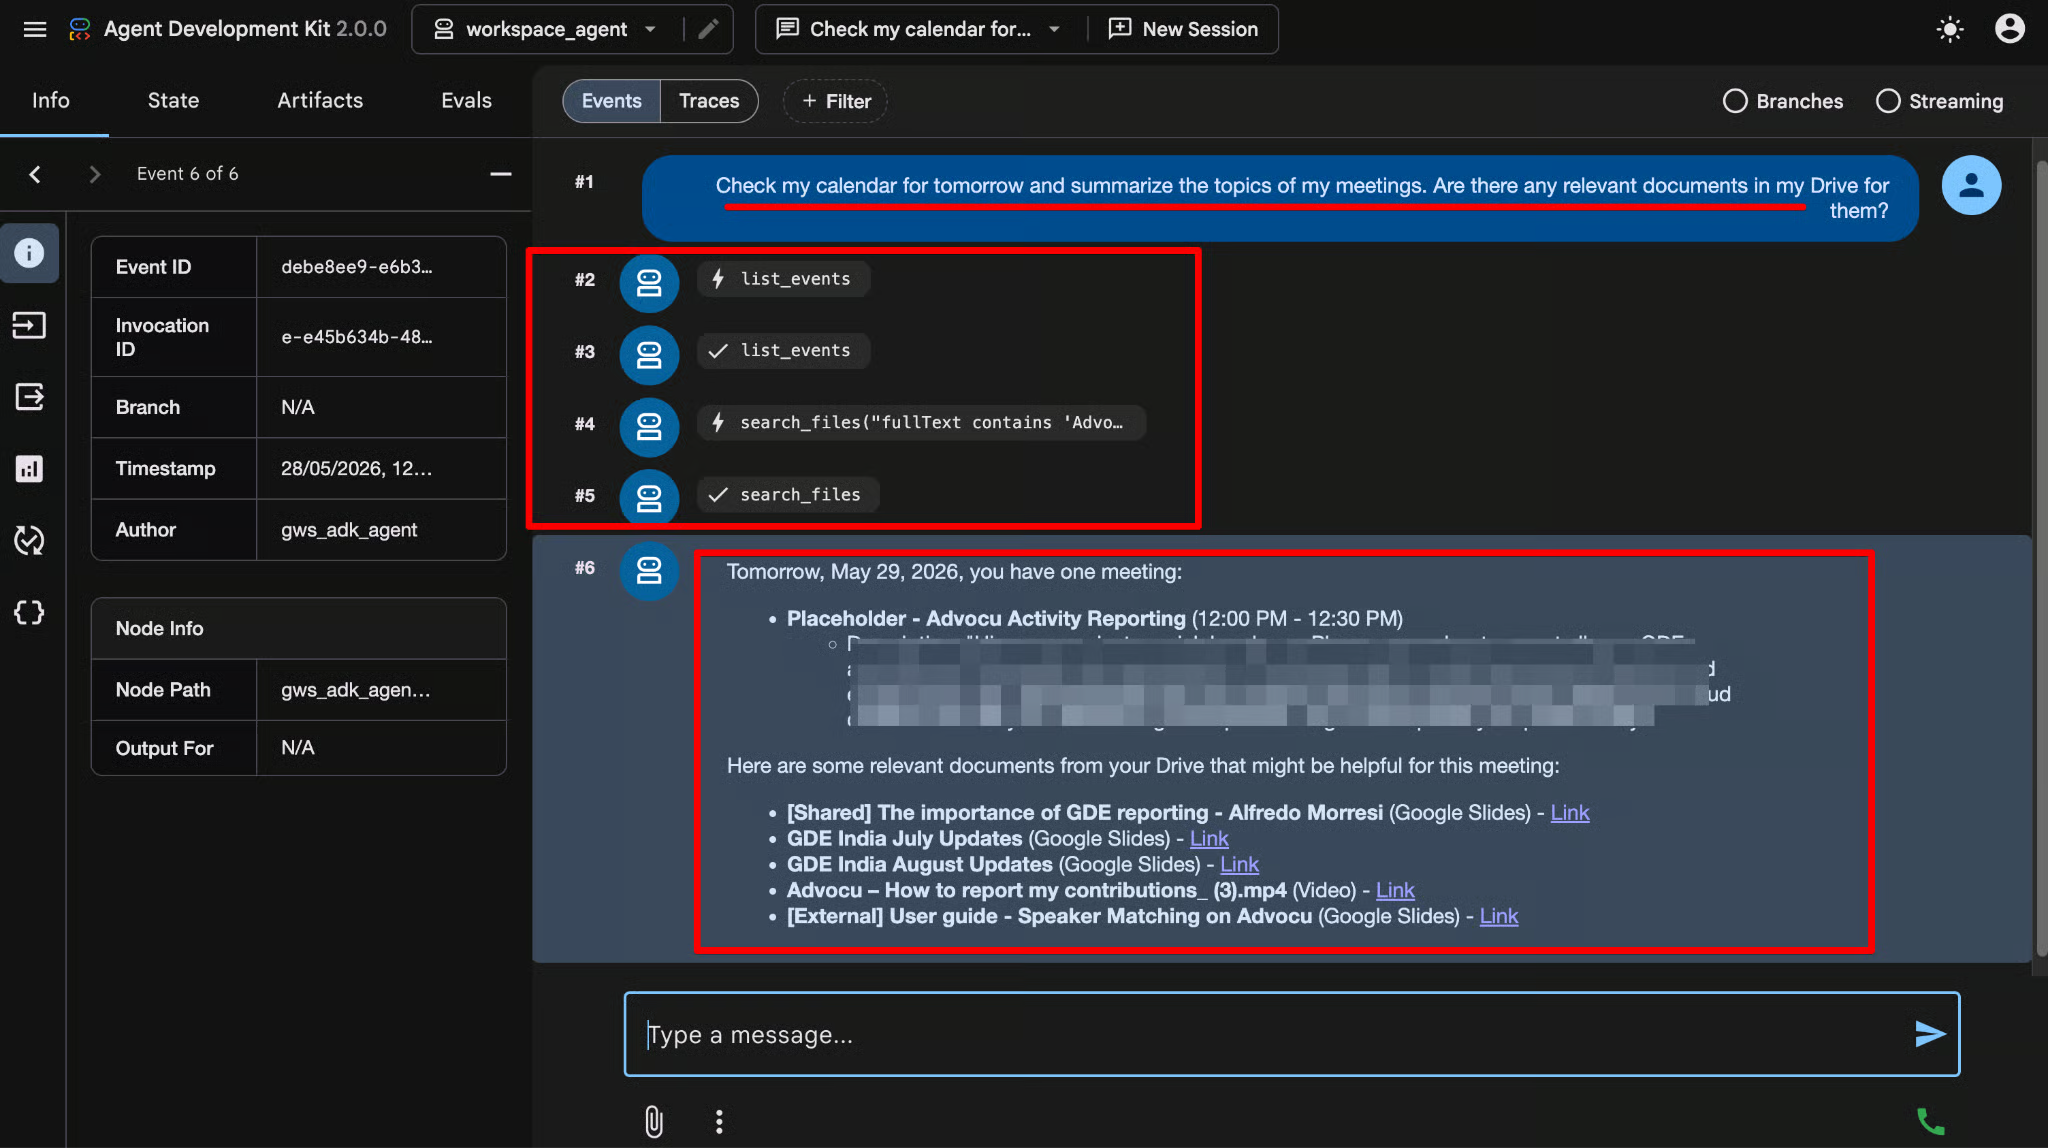
Wat er achter de schermen gebeurt:
In plaats van aangepaste API-wrappers en integratielogica te schrijven, stelde je gewoon een vraag en bedacht de LLM de meerstapsorkestratie.
Prompt 2: Zoek alle e-mails die in de afgelopen 7 dagen door [Vul e-mail in] zijn verzonden.
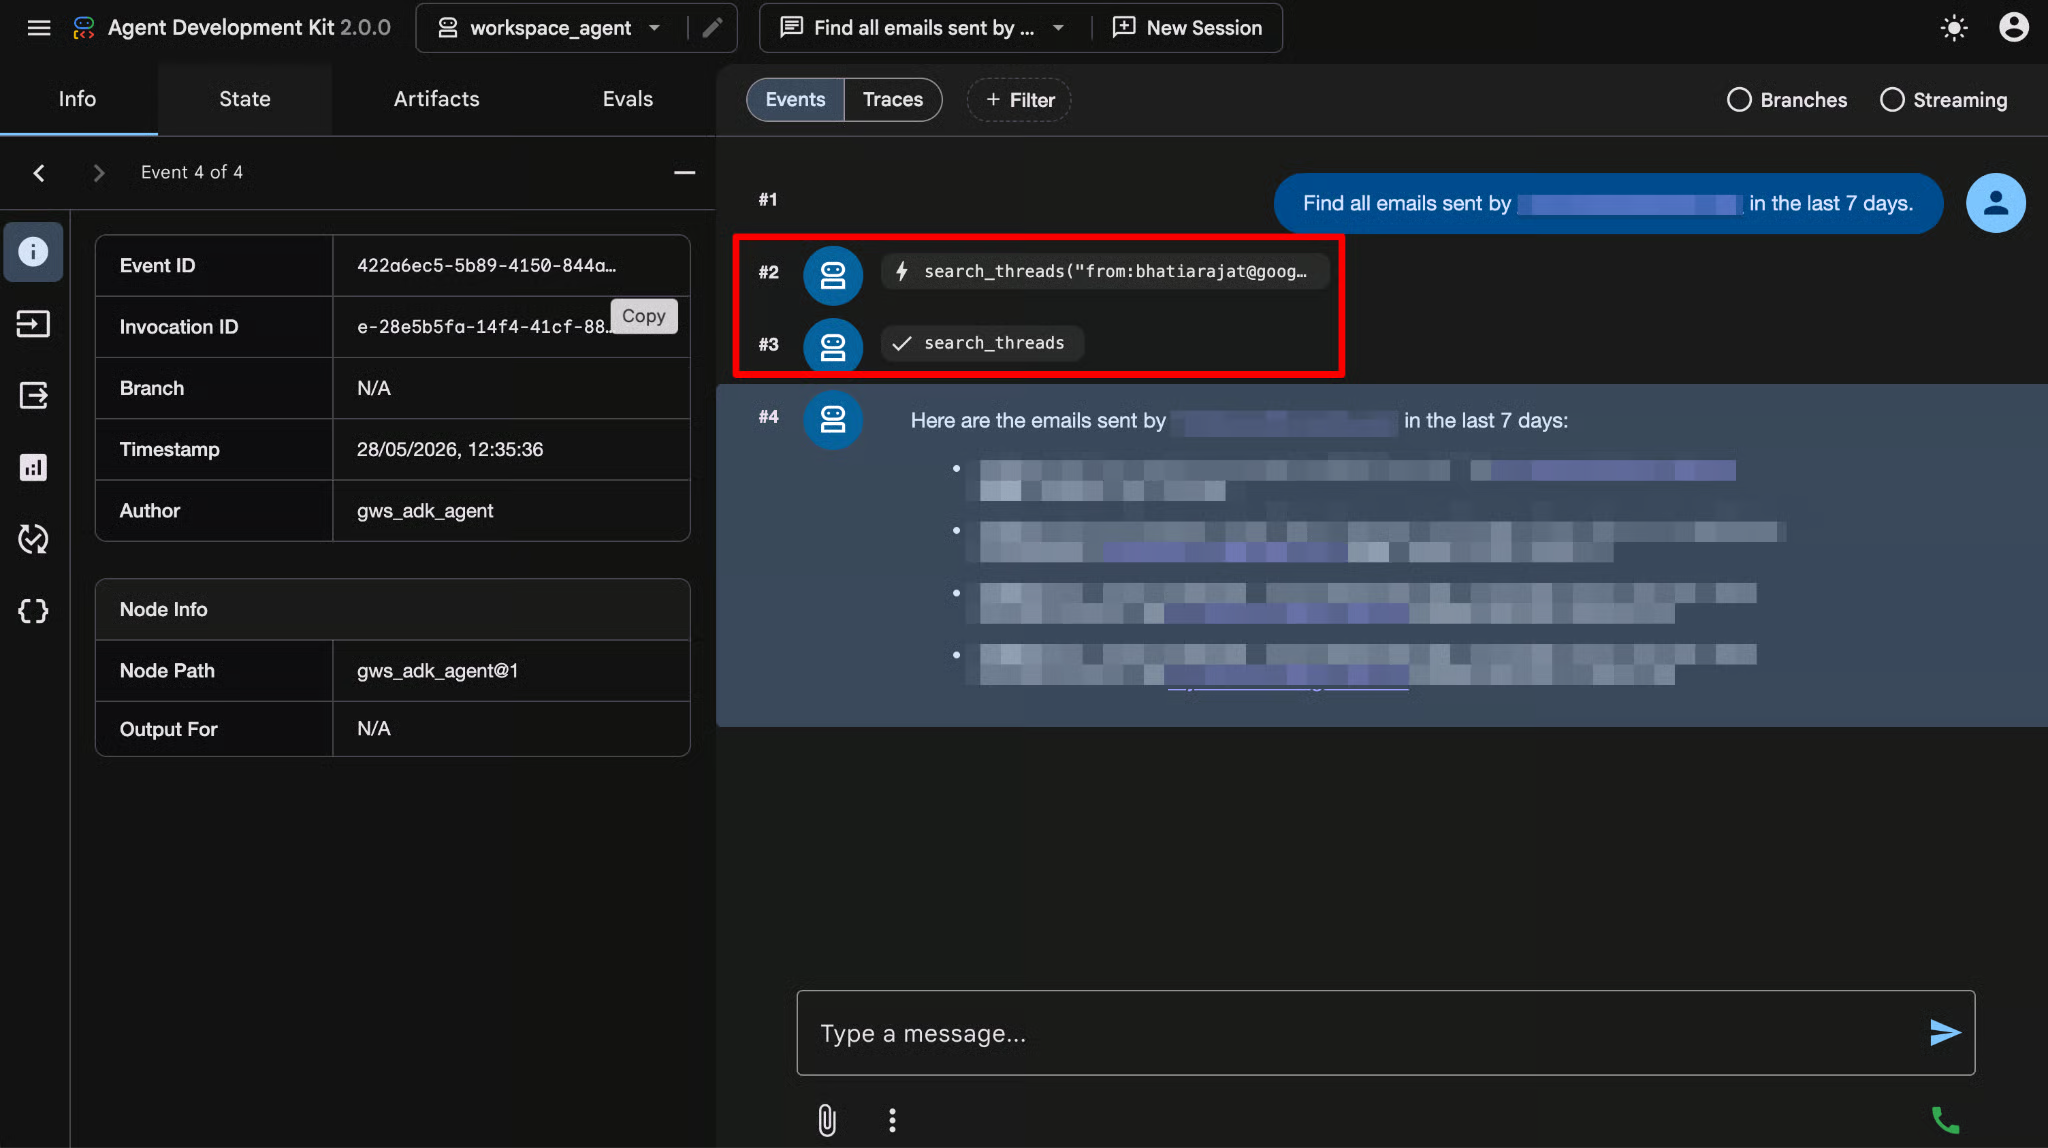
Wat er achter de schermen gebeurt:
De mogelijkheden zijn eindeloos wanneer al je enterprise-data is verbonden met een redeneermachine.
Probeer deze andere prompts eens in je lokale omgeving:
Door Google's Agent Development Kit te combineren met de gestandaardiseerde Workspace MCP-servers, heb je in minder dan honderd regels code een assistent op enterpriseniveau gebouwd.
Maar dit is nog maar het begin.
Dit is wat deze architectuur mogelijk maakt voor ontwikkelaars en bedrijven:
De Google Workspace MCP Server elimineert de "glue code" die nodig is om AI met productiviteitsapps voor bedrijven te verbinden. Door een veilige, volledig beheerde externe endpoint te bieden, stelt het ontwikkelaars in staat om diep geïntegreerde agentische workflows te bouwen die standaard de gebruikersrechten en beveiligingsnormen van enterprises respecteren.
Best practice-herinnering: pas altijd het principe van minimale privileges toe.
Wijs bij het toekennen van OAuth-scopes aan je AI-agents nooit schrijftoegang toe (bijv. https://www.googleapis.com/auth/drive.file) als de agent alleen gegevens hoeft te lezen.
Zet je leerreis voort met onze begeleide DataCamp-cursussen:
Topcursussen op DataCamp
Cursus
Cursus
Oefen en volg je voortgang.
Ga Verder Met Googleblog
Adel Nehme
15 min