Programa
Containerização e virtualização com o Docker e o Kubernetes
13 h
Você precisa de armazenamento de objetos para desenvolvimento, mas não quer configurar e pagar pelo AWS S3?
O MinIO te dá um armazenamento compatível com S3 que funciona em qualquer lugar — no seu laptop, em uma VM ou em um cluster Kubernetes. É um software de código aberto, o que significa que não depende de nenhum fornecedor específico e você não vai ter nenhuma surpresa desagradável na conta no final do mês. E junto com o Docker, é ainda mais fácil usar o MinIO, porque dá pra montar um servidor de armazenamento rapidinho, sem precisar instalar nada direto na sua máquina.
Os contêineres Docker mantêm o MinIO isolado do seu sistema e, ao mesmo tempo, oferecem controle total sobre a configuração e a persistência dos dados. Você pode testar as APIs do S3 localmente, simular configurações de armazenamento de produção ou executar um armazenamento de objetos leve para projetos pequenos.
Neste artigo, vou mostrar como rodar o MinIO com o Docker, verificar se está funcionando direitinho e configurar as opções mais comuns.
Se você é completamente novo no Docker, dedique uma tarde de sábado para dominar os fundamentos - Introdução ao Docker do DataCamp. Introdução ao Docker tem tudo o que você precisa.
Você precisa de três coisas para rodar o MinIO com o Docker.
Docker instalado e rodando na sua máquina. Você pode conferir isso executando docker --version no seu terminal. Se você receber um número de versão, está tudo certo.
Conhecimento básico de comandos do Docker. Você deve saber como iniciar e parar contêineres, visualizar logs e trabalhar com imagens do Docker. Se você já usou o docker run ou trabalhou com o Docker Compose antes, você vai se dar bem.
Um diretório local para armazenamento persistente. O MinIO precisa de um lugar pra guardar seus dados fora do contêiner. Crie um diretório vazio na sua máquina host - algo como ~/minio/data funciona bem.
É isso aí. A lista é curta e simples, mas certifique-se de marcar todas as opções antes de prosseguir.
Uma configuração MinIO de nó único executa uma instância do MinIO em um contêiner Docker e armazena todos os seus dados em um único local.
Essa configuração funciona para desenvolvimento, testes e cargas de trabalho de produção em pequena escala, onde você não precisa de alta disponibilidade ou armazenamento distribuído. Você tem compatibilidade total com a API S3 sem a complexidade de executar vários nós.
O comando ` docker run ` inicia o MinIO em um novo contêiner com tudo configurado em uma única linha.
Aqui está o comando básico:
docker run -p 9000:9000 -p 9001:9001 \
  --name minio \
  -v ~/minio/data:/data \
  -e "MINIO_ROOT_USER=admin" \
  -e "MINIO_ROOT_PASSWORD=password123" \
  quay.io/minio/minio server /data --console-address ":9001"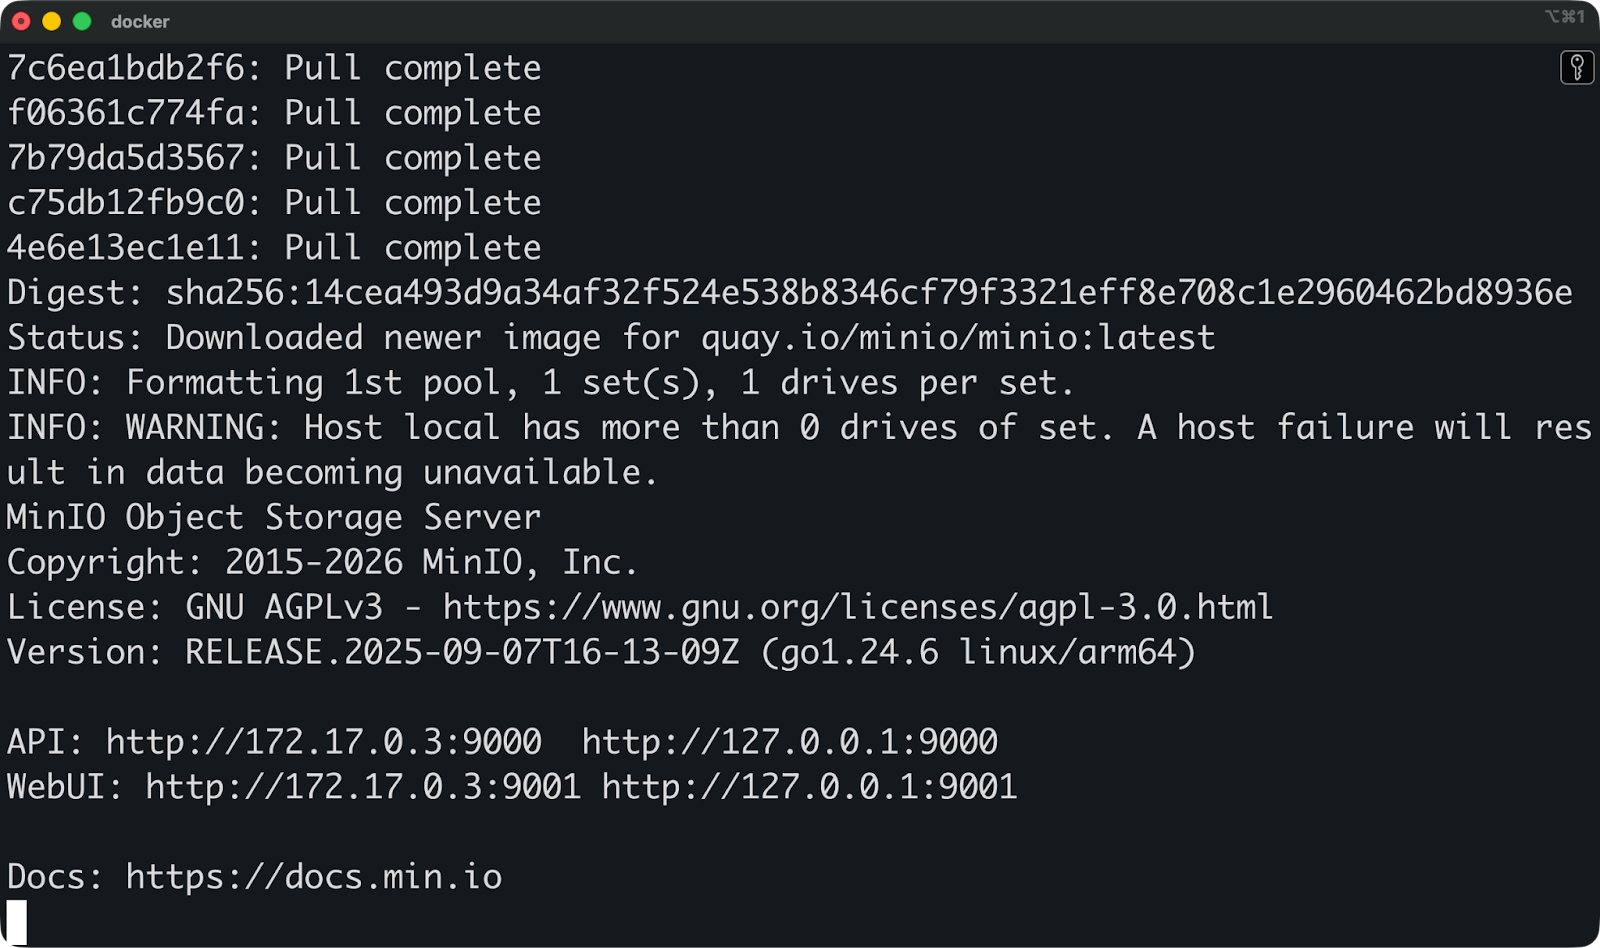
Executando o MinIO com o docker run
Vamos ver o que cada parte faz.
A porta 9000 é o ponto final da API onde seus aplicativos se conectam para fazer upload e download de arquivos. É aqui que os clientes compatíveis com S3 mandam suas solicitações.
A porta 9001 hospeda o console da web onde você gerencia buckets, define permissões e monitora o armazenamento. Você vai usar isso pra conferir se o MinIO tá funcionando direitinho.
A flag ` -v ~/minio/data:/data ` mapeia seu diretório local para o local de armazenamento do contêiner. Tudo o que o MinIO armazena vai para um ~/minio/data no seu computador. Quando você para ou remove o contêiner, seus dados ficam seguros nesse diretório.
Variáveis de ambiente definam suas credenciais de acesso. MINIO_ROOT_USER é seu nome de usuário de administrador e MINIO_ROOT_PASSWORD é a senha. Essas são as credenciais que você vai usar para entrar no console da web e configurar o acesso à API.
O argumento ` server /data ` diz ao MinIO para rodar no modo servidor e usar ` /data ` como diretório de armazenamento. A bandeira ` --console-address ":9001" ` diz qual porta o console web fica de olho.
Tem uma maneira alternativa de rodar o MinIO que é ótima se você não curte comandos longos e com várias linhas no terminal.
Observação: A MinIO não atualiza mais suas imagens do Docker Hub e Quay (desde outubro de 2025). O código neste artigo ainda funciona para desenvolvimento local, mas para uso em produção, considere alternativas mantidas, como a imagem MinIO da Chainguard (cgr.dev/chainguard/minio:latest).
O Docker Compose permite que você defina sua configuração do MinIO em um arquivo YAML, em vez de digitar comandos longos.
Isso faz com que sua configuração seja repetível e controlada por versão. Você pode compartilhar o arquivo com sua equipe, enviá-lo para o git e reiniciar o MinIO com as mesmas configurações todas as vezes.
Crie um arquivo docker-compose.yml:
services:
  minio:
    image: quay.io/minio/minio
    container_name: minio
    ports:
      - "9000:9000"
      - "9001:9001"
    environment:
      MINIO_ROOT_USER: admin
      MINIO_ROOT_PASSWORD: password123
    volumes:
      - ./minio/data:/data
    command: server /data --console-address ":9001"
A estrutura é igual à do comando docker run, mas organiza tudo em seções nomeadas. Portas, variáveis de ambiente e volumes têm seus próprios blocos.
O mapeamento de volume funciona da mesma forma - ./minio/data:/data cria um diretório na sua pasta atual e o monta no contêiner. O ./ significa relativo ao local onde esse arquivo docker-compose.yml está.
Agora você pode iniciar o MinIO com:
docker-compose up -d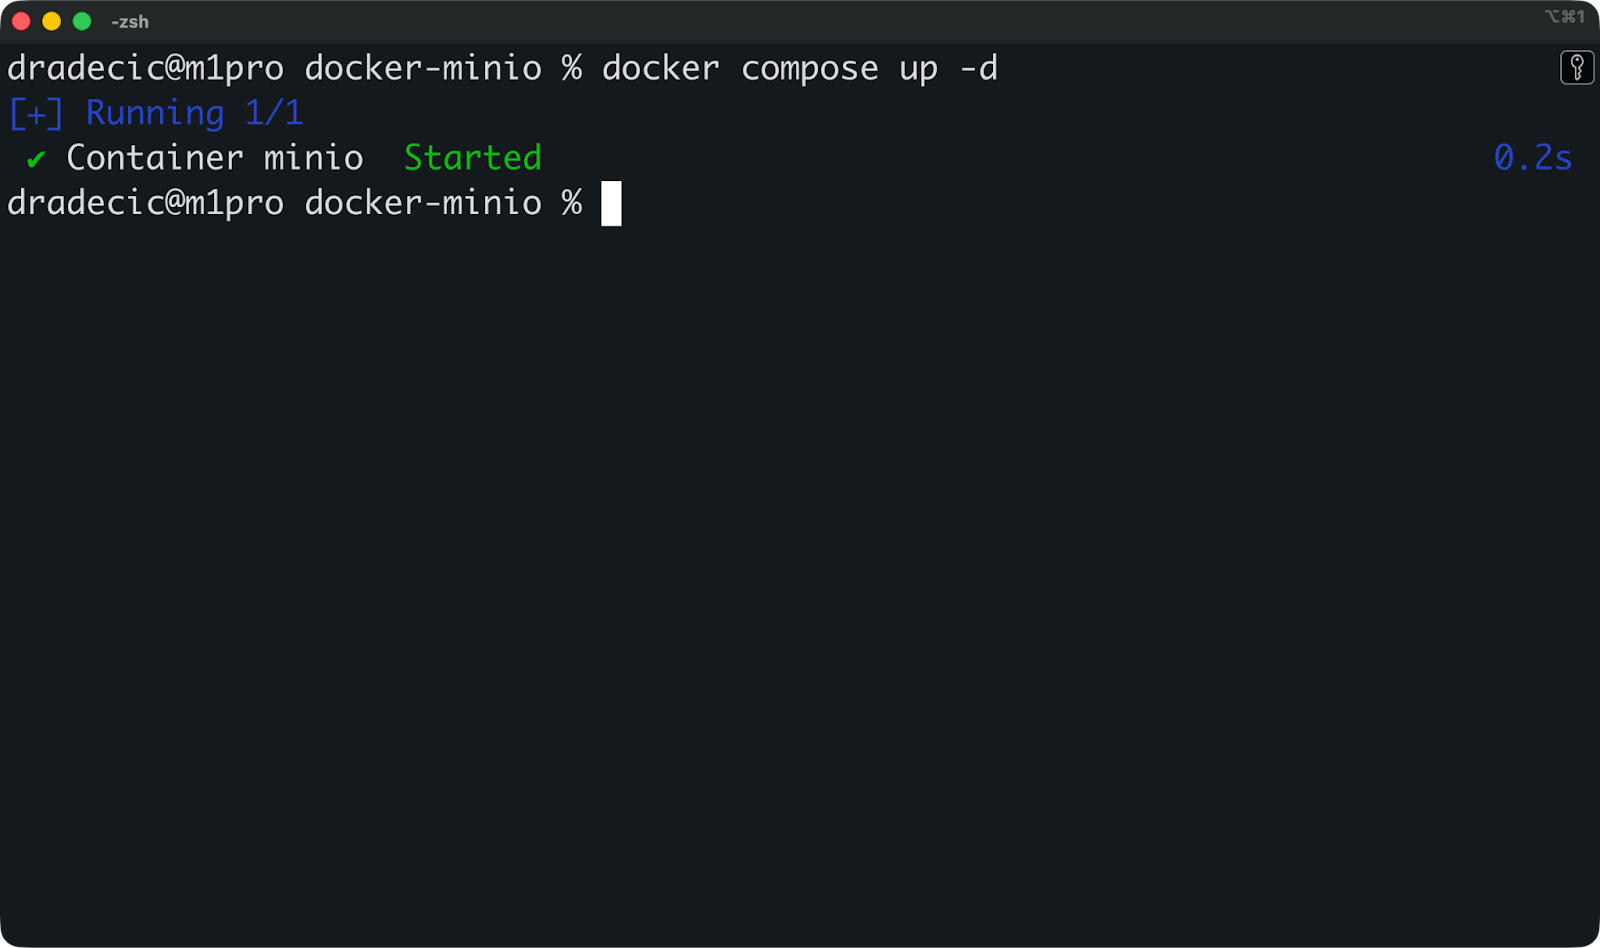
Executando o MinIO com o Docker Compose
A bandeira ` -d ` executa o contêiner em segundo plano. Seu terminal não vai ficar travado pelos registros do MinIO, e o contêiner continua funcionando depois que você fecha o terminal.
Pare com isso:
docker-compose downO Compose é melhor para o desenvolvimento porque você pode adicionar verificações de integridade, políticas de reinicialização e vários serviços no mesmo arquivo. Se você precisar adicionar um banco de dados ou outros serviços junto com o MinIO mais tarde, basta adicionar mais entradas em services:.
Agora que o MinIO está funcionando, você vai querer confirmar se ele iniciou corretamente antes de usá-lo para armazenamento.
Tem duas maneiras de conferir sua configuração: o console web pra ver tudo de olho e o cliente MinIO pra checar pela linha de comando.
Abra o seu navegador e vá para http://localhost:9001.
Você vai ver uma tela de login pedindo suas credenciais:
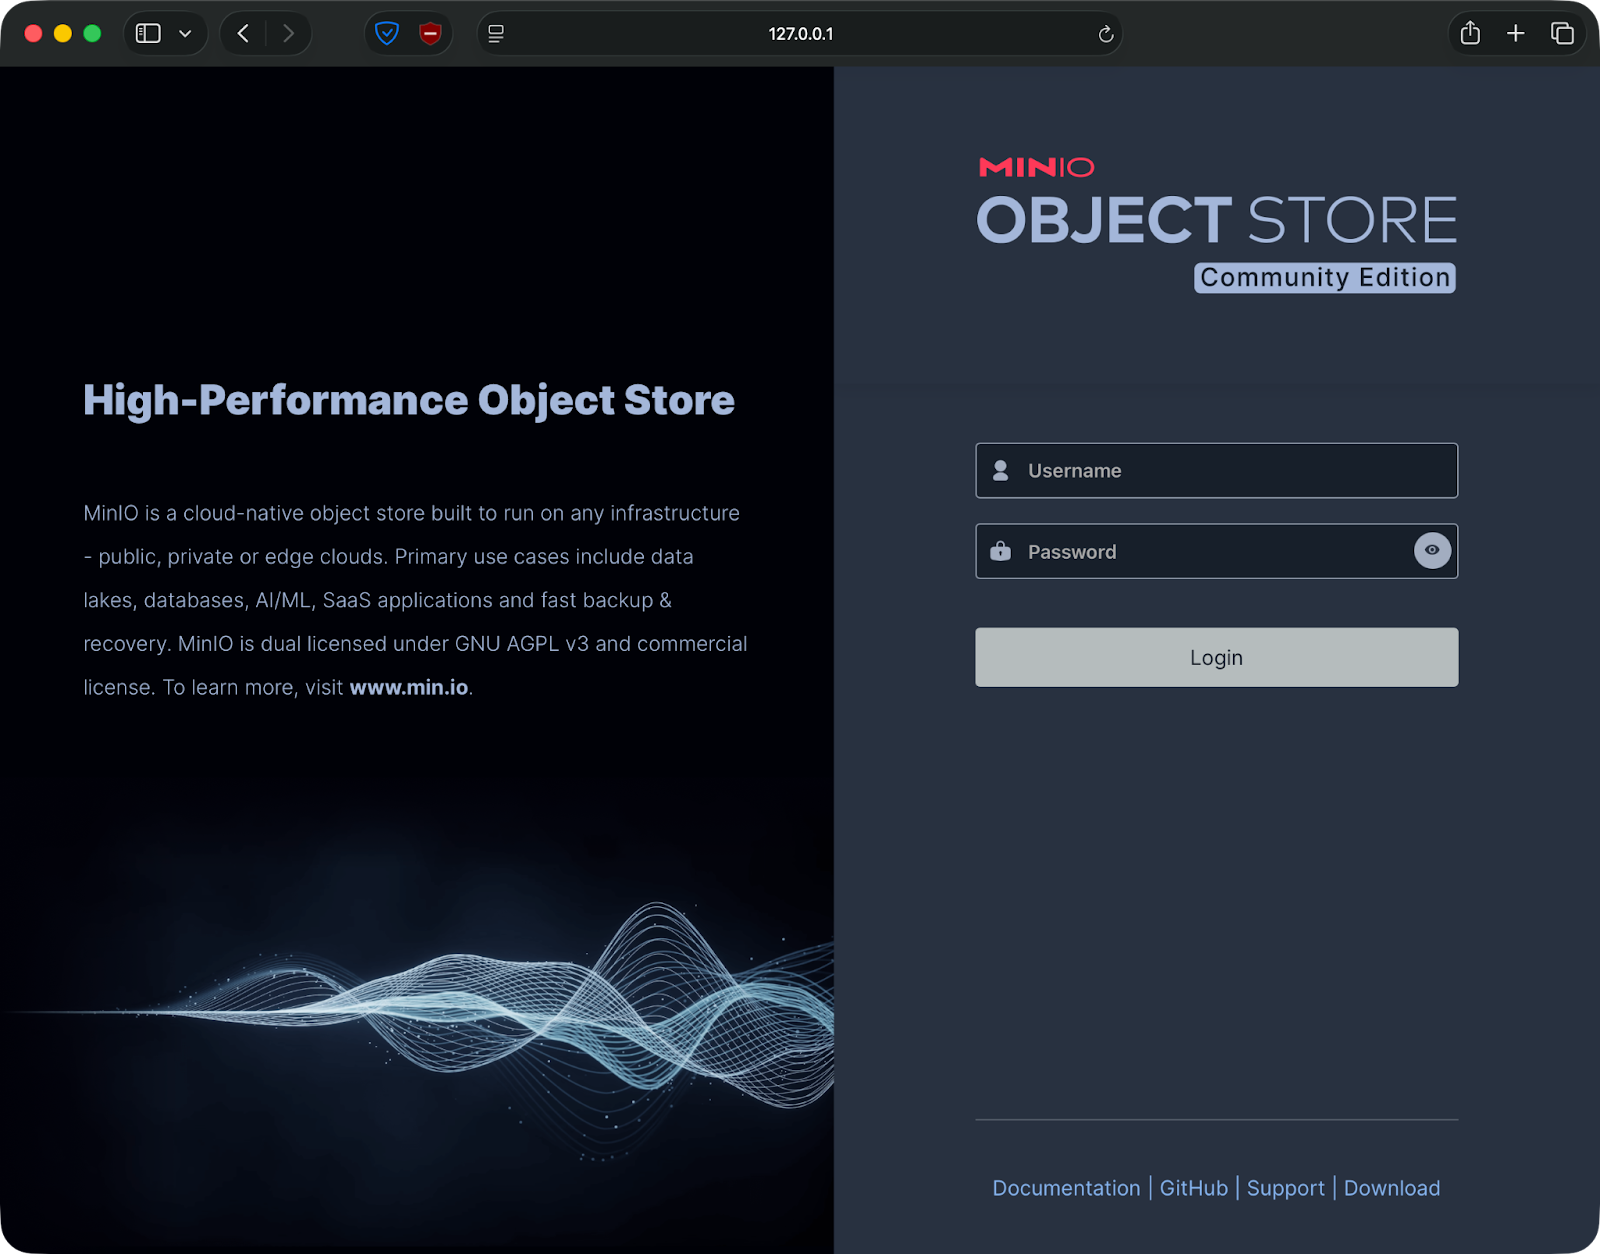
Interface do usuário da web do MinIO
Você pode fazer login com as credenciais que você forneceu como variáveis de ambiente - admin/password123 no meu caso.
Depois de fazer login, você vai chegar ao painel do MinIO. A página principal mostra o uso do armazenamento, o número de buckets e a integridade do sistema. A barra lateral esquerda tem opções para criar buckets, gerenciar usuários e visualizar métricas.
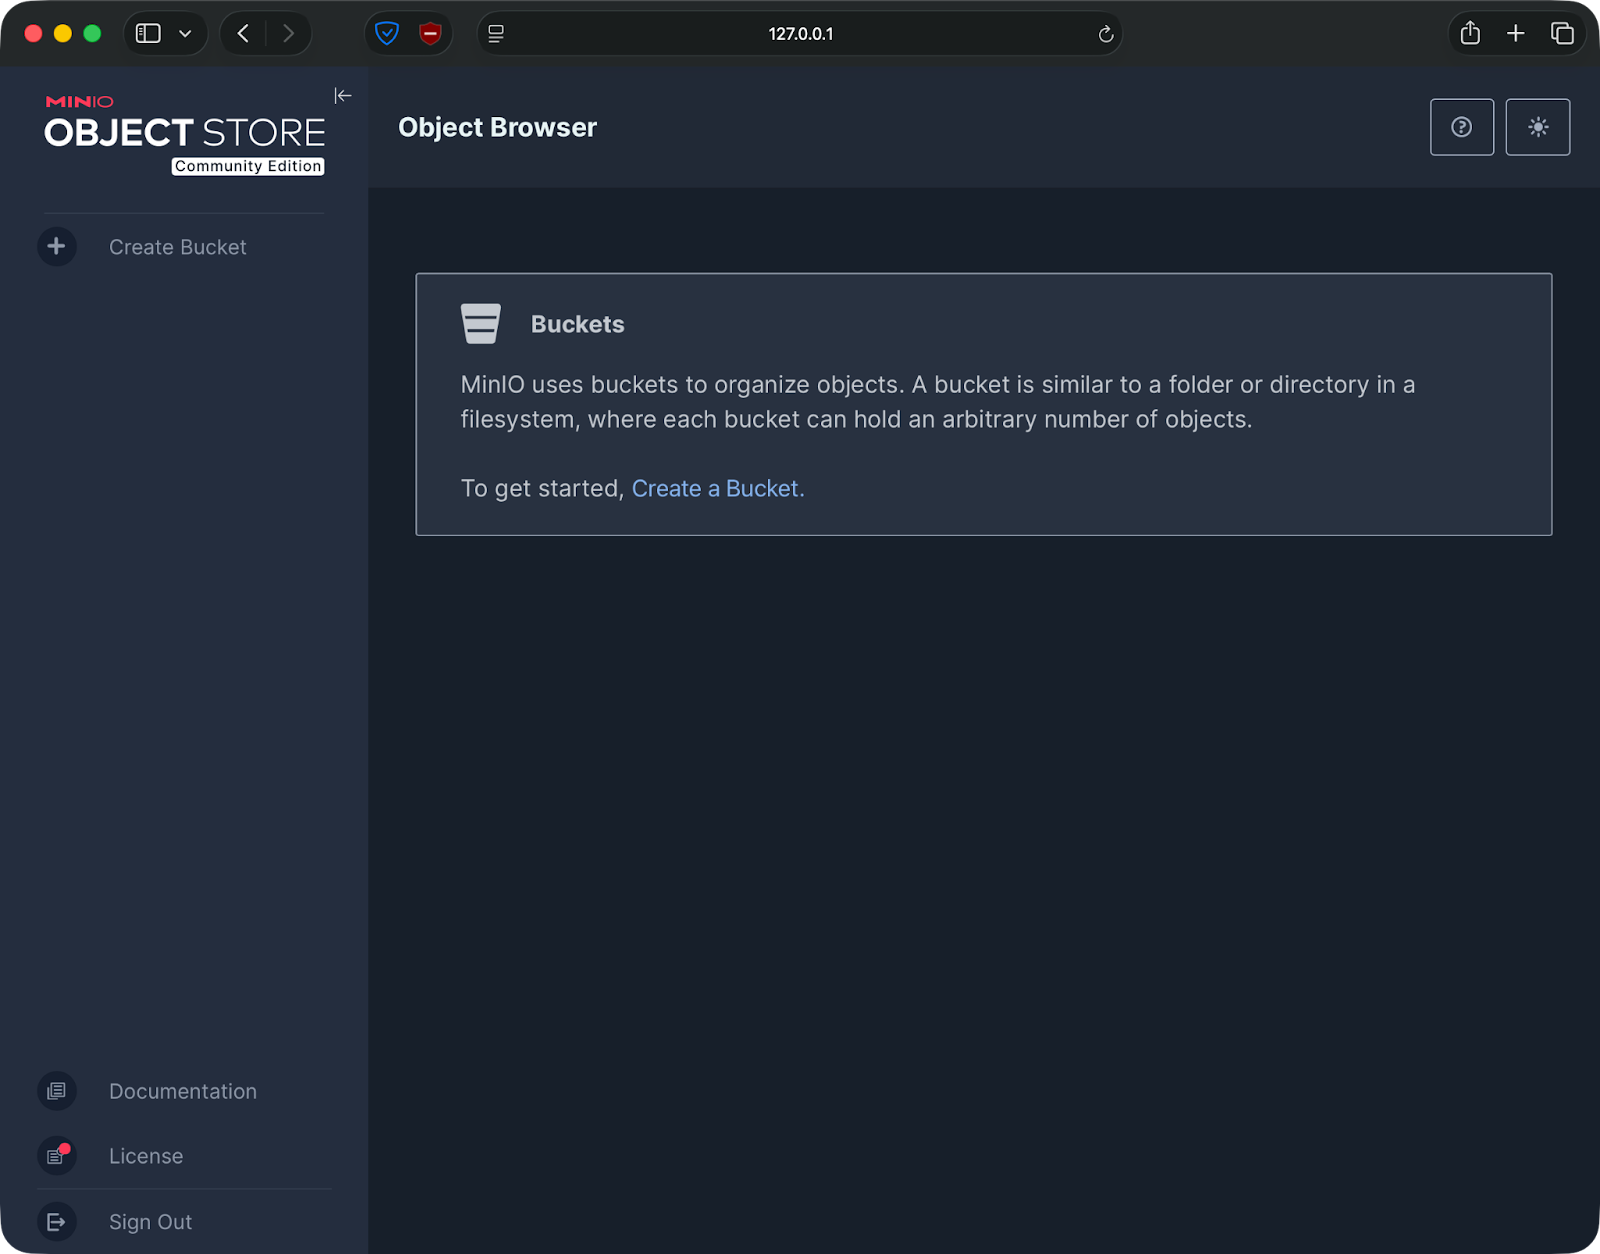
Criando um bucket pela interface do usuário da web do MinIO
Crie um balde de teste para ver se tudo tá funcionando. Clique em “Buckets” na barra lateral e, em seguida, em “Criar Bucket”. Dê um nome como “ test-bucket ” e clique em “criar”. Se o bucket aparecer na sua lista, o MinIO está funcionando direitinho e guardando os dados.

Criando um bucket pela interface do usuário da web do MinIO
O cliente MinIO é uma ferramenta de linha de comando que permite interagir com o MinIO como você faria com a AWS CLI.
Execute um destes comandos para instalá-lo:
# macOS
brew install minio/stable/mc

# Linux
wget https://dl.min.io/client/mc/release/linux-amd64/mc
chmod +x mc
sudo mv mc /usr/local/bin/
E agora execute este comando para conectar o cliente à sua instância local do MinIO:
mc alias set local http://localhost:9000 admin password123Isso cria um alias chamado local que aponta para o seu servidor MinIO. Agora você pode executar comandos nele.
Liste seus baldes:
mc ls local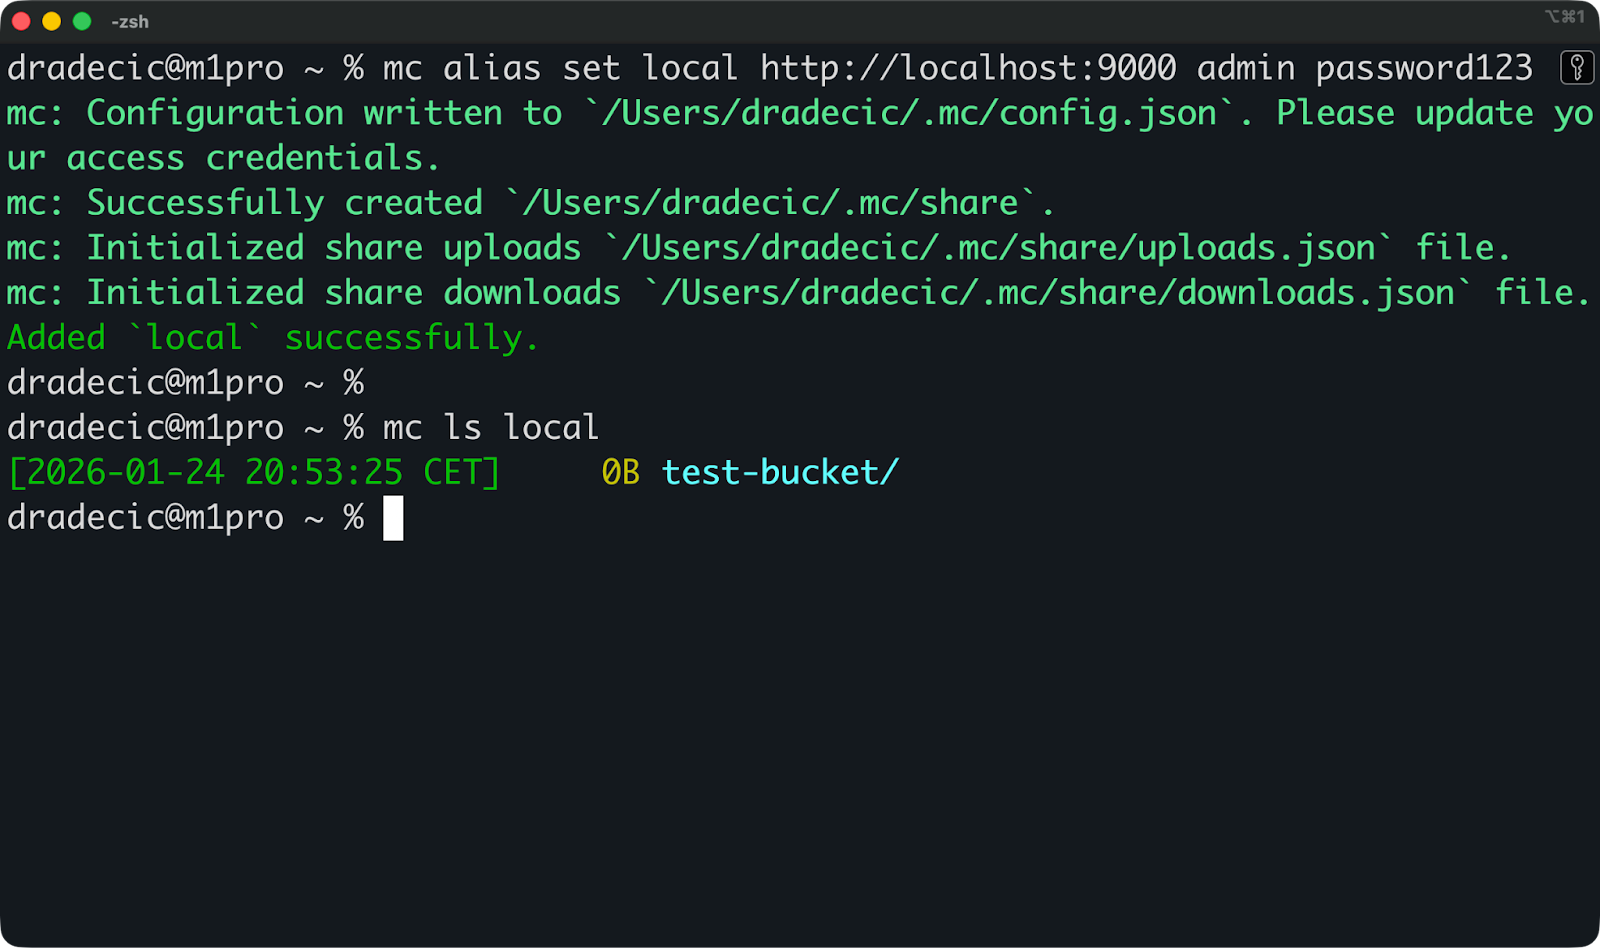
Listando baldes
Se você criou o bucket de teste antes, vai vê-lo na saída. Se o comando não mostrar nada ou mostrar seus buckets, o MinIO está funcionando.
Agora você pode enviar um arquivo de teste para o bucket:
echo "test" > test.txt
mc cp test.txt local/test-bucket/
E depois dá uma olhada pra ver se tá lá:
mc ls local/test-bucketSe você vir “ test.txt ” na saída, é porque configurou tudo direitinho.
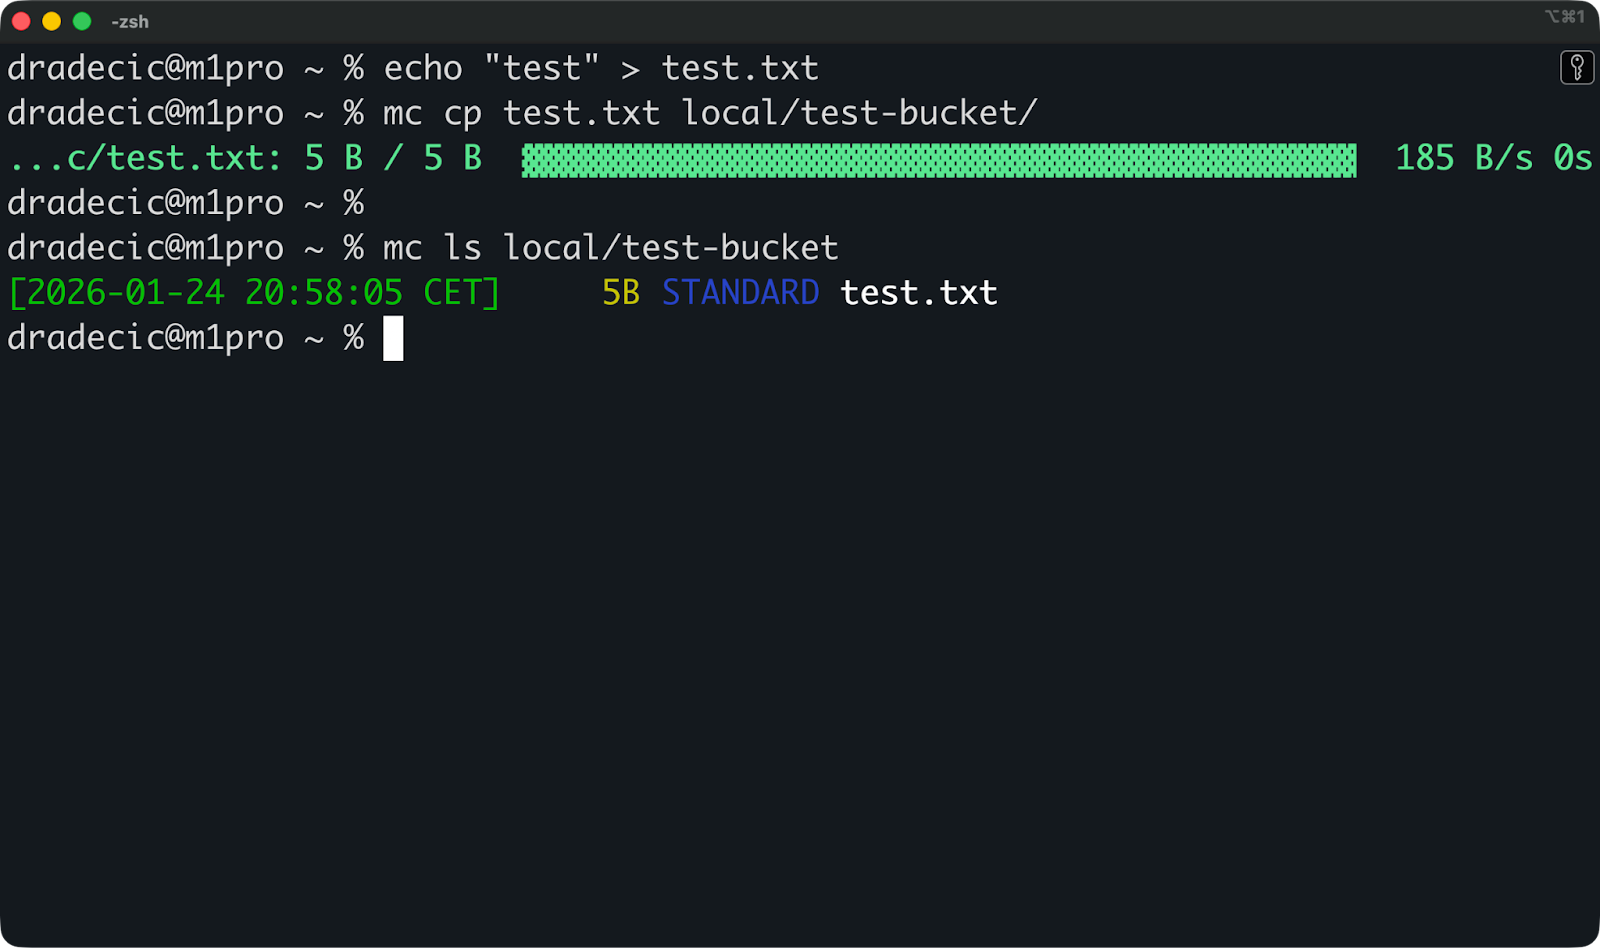
Listando arquivos em um bucket
Aqui estão algumas soluções caso algo não esteja funcionando:
Dá uma olhada se o contêiner tá funcionando com o comando ` docker ps`. Se você não vir um contêiner chamado minio, ele não foi iniciado ou travou.
Dá uma olhada nos registros com o comando ` docker logs minio`. Procure por erros relacionados a portas já em uso ou problemas de permissão no diretório de dados.
Se você não conseguir acessar o console da web, veja se as portas não estão bloqueadas verificando docker port minio. Você deve ver tanto o 9000 quanto o 9001 mapeados corretamente.
Se você estiver enfrentando erros de permissão no diretório de dados, execute chmod -R 755 ~/minio/data para corrigir os problemas de acesso.
Os contêineres são efêmeros por padrão — quando você remove um contêiner, tudo dentro dele desaparece.
O MinIO guarda objetos, metadados e arquivos de configuração. Se você não configurar o armazenamento persistente corretamente, perderá todos os seus dados no momento em que reiniciar ou remover o contêiner.
Os volumes do Docker e as montagens vinculadas mantêm seus dados seguros fora do contêiner.
Quando você usa -v ~/minio/data:/data ou mapeia um volume no Docker Compose, o MinIO grava tudo na sua máquina host. O contêiner lê e grava arquivos em /data, mas esses arquivos na verdade ficam em ~/minio/data no seu host.
Quando você para o contêiner, remove-o ou até mesmo exclui a imagem, seus dados permanecem em ~/minio/data. Comece um novo contêiner MinIO apontando para o mesmo diretório e todos os seus buckets, objetos e configurações voltarão exatamente como você os deixou.
Se você não mapear um volume, o MinIO usa o sistema de arquivos interno do contêiner. Tudo funciona bem até você parar o contêiner. Quando você reinicia, o MinIO começa do zero, sem buckets, sem objetos e sem configuração.
O exemplo de composição que mostrei antes cria uma pasta minio/data bem onde seu arquivo de composição está:
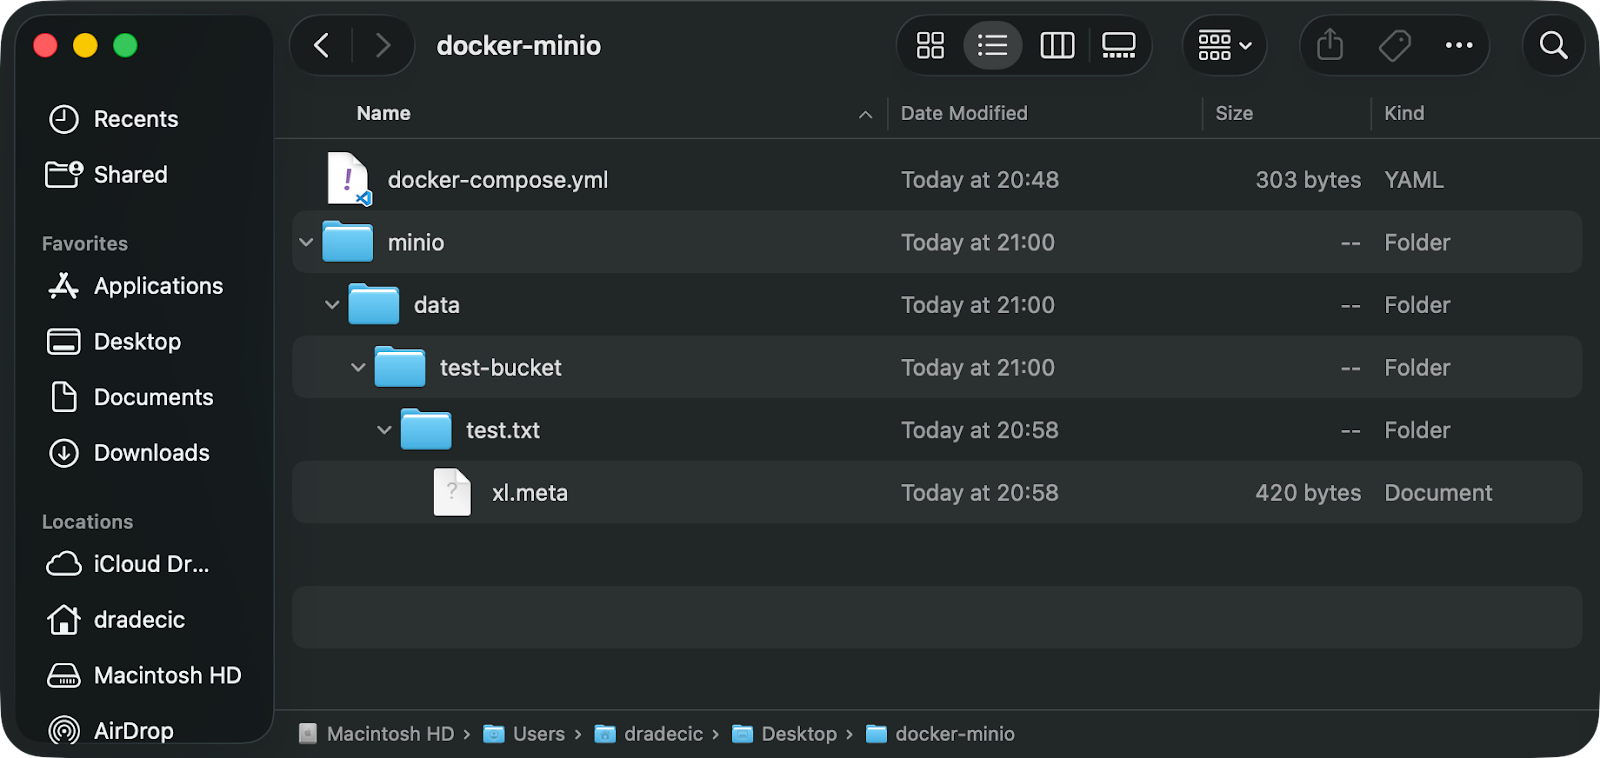
Pasta de dados MinIO
Executar sem um volume é o erro mais comum.
Você inicia o MinIO, faz upload de arquivos, cria buckets e tudo parece estar funcionando bem. Depois, você reinicia o contêiner para uma atualização ou alteração de configuração. Todos os seus dados sumiram porque estavam guardados dentro do contêiner, não no seu host.
Sempre veja se o seu comando Docker ou arquivo Compose tem um mapeamento de volume antes de colocar dados reais no MinIO.
Problemas de permissão acontecem quando o Docker não consegue gravar no seu diretório montado.
O processo MinIO dentro do contêiner rola como um usuário específico. Se esse usuário não tiver permissões de gravação no diretório host, o MinIO trava na inicialização ou falha silenciosamente ao tentar armazenar objetos.
Você pode resolver isso garantindo que seu diretório de dados esteja configurável para gravação:
chmod -R 755 ~/minio/dataOu execute o contêiner com um usuário que corresponda ao seu usuário host:
docker run --user $(id -u):$(id -g) ...Resumindo, configure seus volumes corretamente uma vez e você não precisará se preocupar com a perda de dados.
O MinIO lê sua configuração a partir de variáveis de ambiente quando é iniciado.
Isso quer dizer que você pode mudar como o MinIO funciona sem precisar mexer nos arquivos de configuração ou reconstruir os contêineres. Você define essas variáveis no comando ` docker run ` ou no arquivo Docker Compose.
O MinIO precisa de duas variáveis de ambiente para autenticação: MINIO_ROOT_USER e MINIO_ROOT_PASSWORD.
Isso cria a conta de administrador root, que tem controle total sobre sua instância do MinIO. O usuário root pode criar buckets, gerenciar outros usuários, definir políticas e acessar todos os objetos armazenados.
Defina-os assim em docker run:
-e "MINIO_ROOT_USER=admin" \
-e "MINIO_ROOT_PASSWORD=your-secure-password"
Ou no Docker Compose:
environment:
  MINIO_ROOT_USER: admin
  MINIO_ROOT_PASSWORD: your-secure-password
Não use credenciais padrão na produção. Os exemplos neste artigo usam admin e password123 por simplicidade, mas essas são péssimas escolhas para implementações reais.
Escolha uma senha forte com pelo menos 8 caracteres. Melhor ainda, use credenciais geradas aleatoriamente e guarde-as em um gerenciador de senhas ou sistema de gerenciamento de segredos.
Não coloque credenciais diretamente nos arquivos do Docker Compose antes de mandar pro controle de versão. Use arquivos de ambiente em vez disso:
environment:
  MINIO_ROOT_USER: ${MINIO_ROOT_USER}
  MINIO_ROOT_PASSWORD: ${MINIO_ROOT_PASSWORD}
Depois, crie um arquivo .env com suas credenciais reais e adicione-o a .gitignore.
O MinIO precisa de duas portas para funcionar direitinho.
Mapeie essas portas no seu comando Docker:
-p 9000:9000 -p 9001:9001Os conflitos de porta acontecem quando outro serviço já está usando 9000 ou 9001 no seu host.
Você vai ver um erro tipo “bind: endereço já em uso” ao iniciar o contêiner. Resolva isso mapeando para diferentes portas do host:
-p 9090:9000 -p 9091:9001Agora, a API do MinIO está em http://localhost:9090 e o console está em http://localhost:9091. O contêiner ainda usa 9000 e 9001 internamente, mas externamente você acessa-os através de portas diferentes.
Esses comandos vão te ajudar a ver o que está usando uma porta antes de iniciar o MinIO:
# Linux/macOS
lsof -i :9000
lsof -i :9001

# Windows
netstat -ano | findstr :9000
netstat -ano | findstr :9001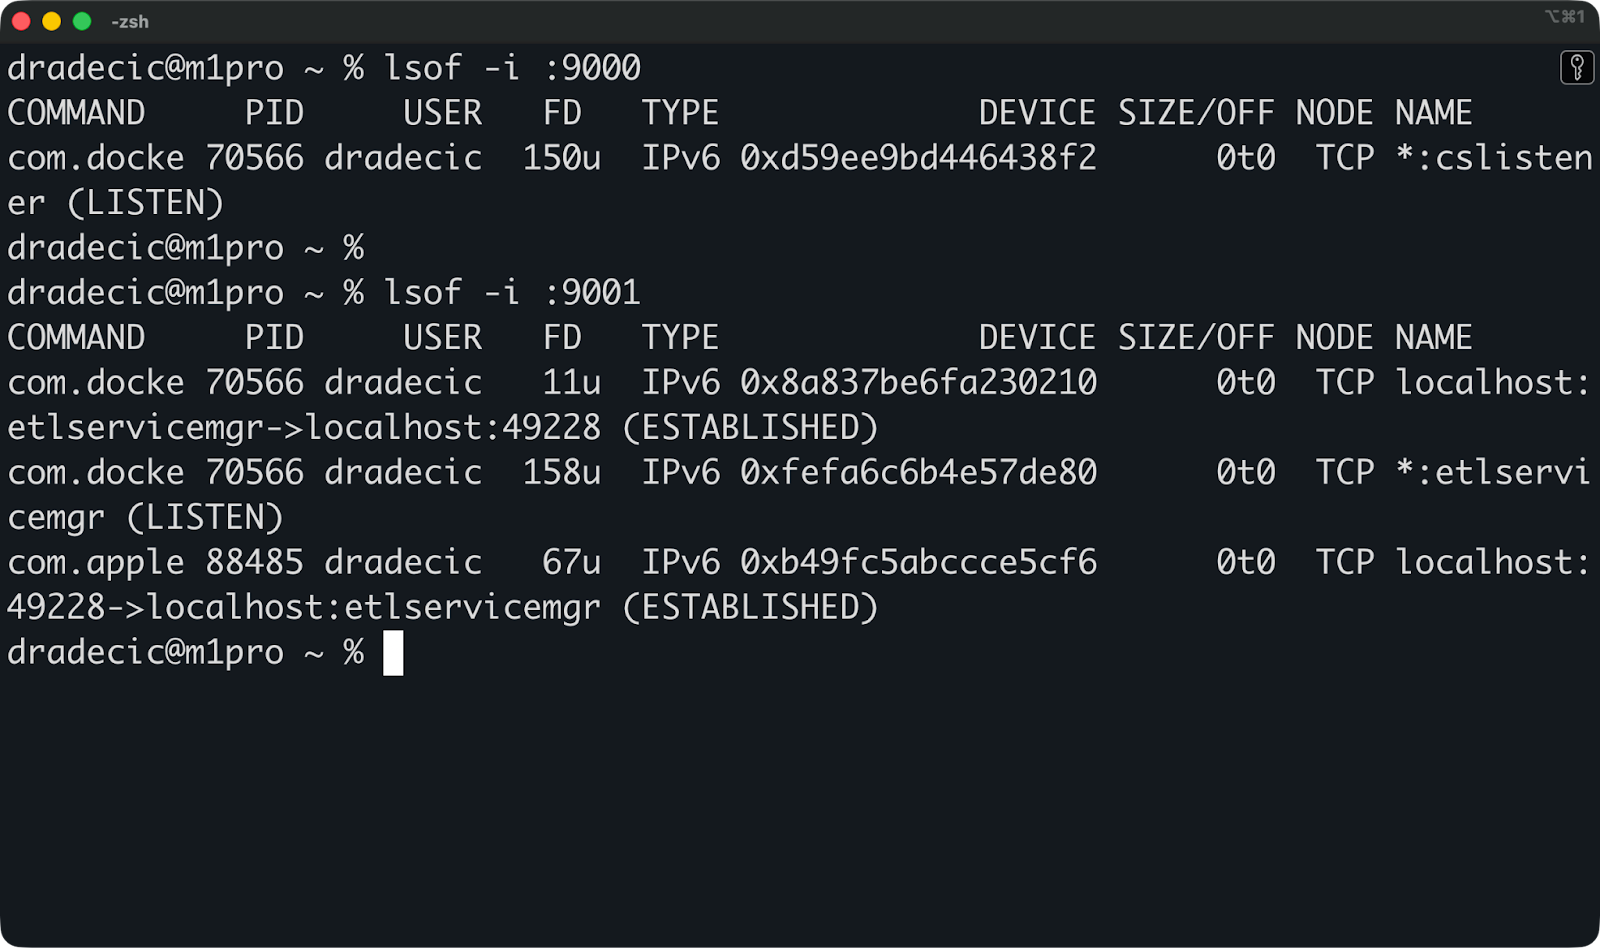
Verificando o que está usando uma porta
Se você estiver rodando várias instâncias do MinIO na mesma máquina, dê a cada uma delas mapeamentos de porta exclusivos para que não entrem em conflito entre si.
O modo distribuído executa o MinIO em vários servidores com várias unidades para alta disponibilidade e redundância de dados.
Você não precisa disso para desenvolvimento ou testes. O modo de nó único dá conta da maioria dos casos de uso sem problema. Pule esta seção, a menos que você esteja planejando uma implantação de produção que precise permanecer online mesmo quando os servidores falharem.
Use o modo distribuído quando precisar de tolerância a falhas.
Se um servidor parar de funcionar numa configuração distribuída, o MinIO continua funcionando e seus dados continuam acessíveis. O sistema usa codificação de apagamento para dividir objetos entre várias unidades e servidores, para que você possa perder unidades ou nós inteiros sem perder dados.
Você também precisa do modo distribuído para armazenamento em grande escala. Se você tá guardando terabytes ou petabytes de dados, espalhar isso por várias máquinas dá um desempenho melhor e mais capacidade do que um único servidor pode oferecer.
O desenvolvimento local não precisa de nada disso. O modo distribuído adiciona complexidade — você precisa de várias máquinas ou VMs, rede coordenada e configuração cuidadosa da unidade. Pra testar as APIs do S3 ou rodar o armazenamento de objetos no seu laptop, o modo de nó único faz tudo o que você precisa.
Os ambientes de produção usam o modo distribuído quando o tempo de inatividade não é aceitável e a perda de dados seria um desastre. Pense em sistemas de backup, data lakes ou aplicativos em que os usuários dependem da disponibilidade constante de armazenamento.
O MinIO distribuído precisa de pelo menos quatro unidades em vários nós.
Cada nó executa um contêiner MinIO, e todos os nós devem ver a mesma configuração de unidade. Não dá pra misturar nós com uma única unidade com nós com várias unidades nem mudar o número de unidades depois da configuração.
Uma configuração distribuída básica é assim:
Você pode cuidar da coordenação em um único arquivo Compose, mas aviso: vai ser bem grande. Você precisa definir todos os nós, configurar seus caminhos de unidade e iniciá-los juntos.
Aqui está um exemplo completo para quatro nós com duas unidades cada:
version: "3.9"

services:
  minio1:
    image: quay.io/minio/minio:latest
    hostname: minio1
    container_name: minio1
    command: server http://minio{1...4}/data{1...2} --console-address ":9001"
    ports:
      - "9001:9000"
      - "9091:9001"
    environment:
      MINIO_ROOT_USER: admin
      MINIO_ROOT_PASSWORD: password123
    volumes:
      - ./data/minio1/data1:/data1
      - ./data/minio1/data2:/data2
    networks:
      - minio

  minio2:
    image: quay.io/minio/minio:latest
    hostname: minio2
    container_name: minio2
    command: server http://minio{1...4}/data{1...2} --console-address ":9001"
    ports:
      - "9002:9000"
      - "9092:9001"
    environment:
      MINIO_ROOT_USER: admin
      MINIO_ROOT_PASSWORD: password123
    volumes:
      - ./data/minio2/data1:/data1
      - ./data/minio2/data2:/data2
    networks:
      - minio

  minio3:
    image: quay.io/minio/minio:latest
    hostname: minio3
    container_name: minio3
    command: server http://minio{1...4}/data{1...2} --console-address ":9001"
    ports:
      - "9003:9000"
      - "9093:9001"
    environment:
      MINIO_ROOT_USER: admin
      MINIO_ROOT_PASSWORD: password123
    volumes:
      - ./data/minio3/data1:/data1
      - ./data/minio3/data2:/data2
    networks:
      - minio

  minio4:
    image: quay.io/minio/minio:latest
    hostname: minio4
    container_name: minio4
    command: server http://minio{1...4}/data{1...2} --console-address ":9001"
    ports:
      - "9004:9000"
      - "9094:9001"
    environment:
      MINIO_ROOT_USER: admin
      MINIO_ROOT_PASSWORD: password123
    volumes:
      - ./data/minio4/data1:/data1
      - ./data/minio4/data2:/data2
    networks:
      - minio

networks:
  minio:
    driver: bridge
A sintaxe ` {1...4} ` diz ao MinIO para se conectar a quatro nós (minio1 a minio4) com duas unidades cada (data1 e data2). Cada nó recebe mapeamentos de porta exclusivos para que você possa acessá-los individualmente — o nó 1 usa 9001/9091, o nó 2 usa 9002/9092 e assim por diante.
A rede minio-distributed permite que os contêineres se comuniquem entre si por nome de host. Todos os nós precisam usar as mesmas credenciais e ver o mesmo layout da unidade.
Para iniciar o cluster, primeiro crie diretórios de dados e, em seguida, execute o arquivo compose.
mkdir -p data/minio{1..4}/data{1..2}
docker compose up -d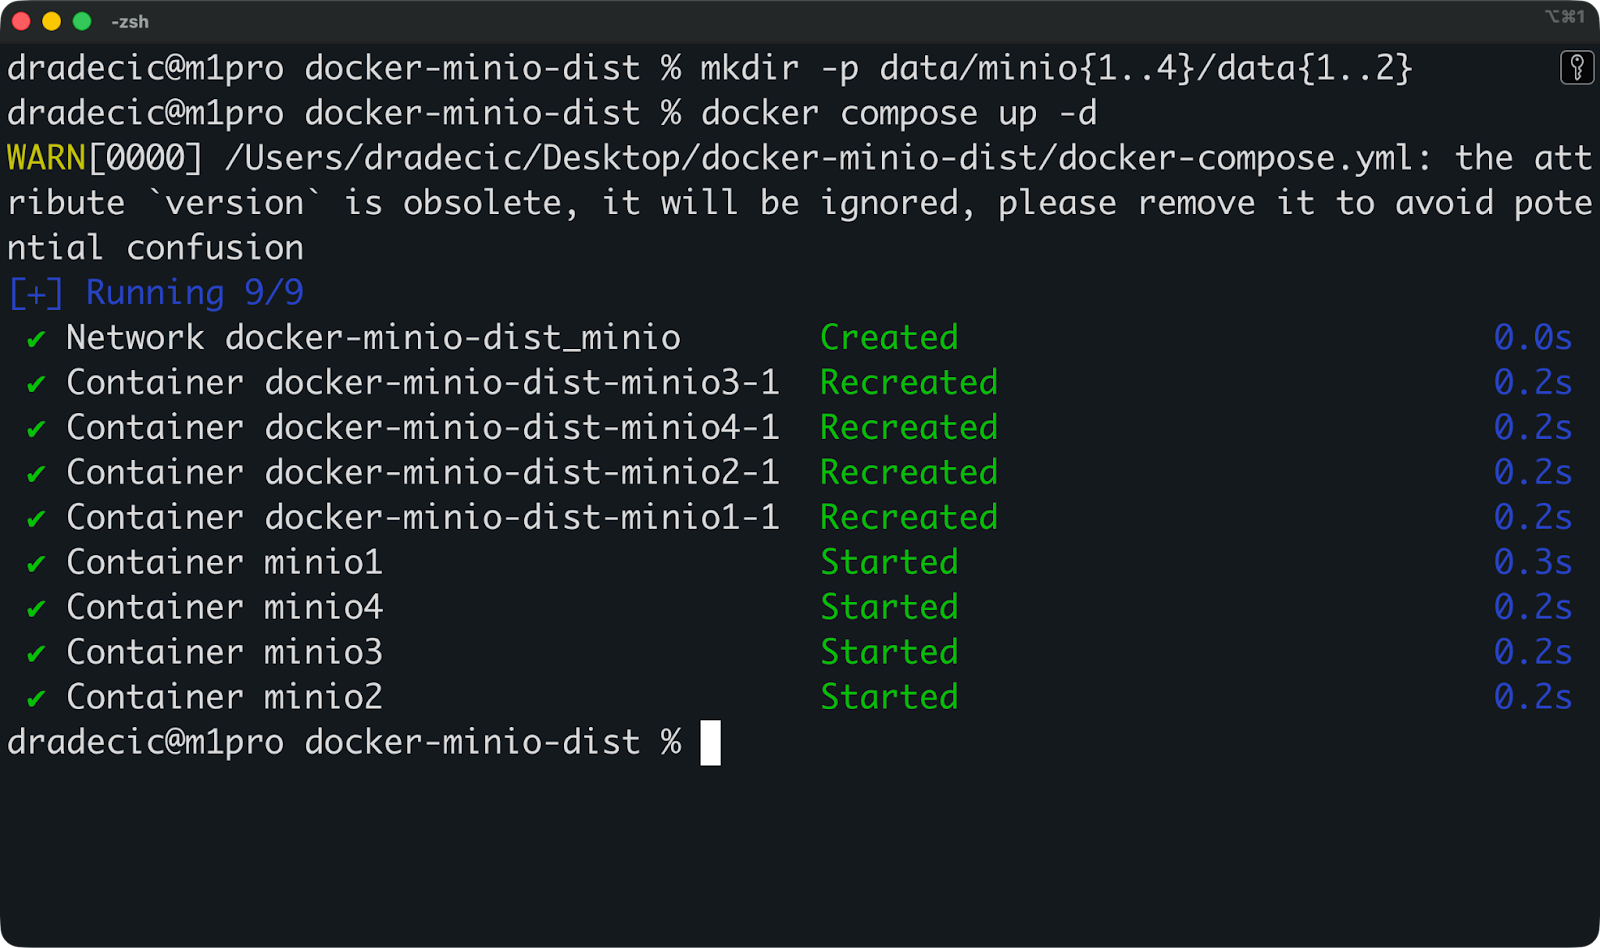
Executando o MinIO no modo distribuído
É isso aí! Agora você pode visitar qualquer um dos seguintes URLs para acessar a interface do usuário da web:
Mas, de novo, não crie isso a menos que você realmente precise — o modo distribuído é para cargas de trabalho de produção onde o tempo de atividade e a redundância justificam a complexidade extra.
Além disso, você provavelmente vai querer coisas como TLS, terminal de console único, volumes/discos externos para um ambiente de produção completo.
A maioria dos problemas do MinIO Docker vem de volumes, portas ou credenciais mal configurados.
Aqui estão os problemas que você realmente vai encontrar e como resolvê-los rapidinho.
Você executa docker ps e vê o contêiner funcionando, mas http://localhost:9001 não mostra nada ou dá um erro de tempo limite.
Para resolver isso, primeiro veja se a porta do console está mapeada direitinho:
docker port minioDá uma olhada em 9001/tcp -> 0.0.0.0:9001. Se você não vir a porta 9001 listada, é porque esqueceu de mapeá-la no comandodocker run do seu ou no arquivo Compose.
Dá uma olhada também nos logs do MinIO:
docker logs minioProcure a linha que diz “Console: http://...” — isso mostra qual endereço o MinIO está realmente escutando. Se você vir uma porta diferente da esperada, sua bandeira ` --console-address ` pode estar errada.
O MinIO trava na inicialização ou você vê erros de "permissão negada" nos registros quando ele tenta gravar em /data.
O processo MinIO rola como um usuário específico dentro do contêiner, e esse usuário precisa de acesso de gravação ao seu diretório montado. Resolva isso com:
chmod -R 755 ~/minio/dataOu, se você estiver no Linux, execute o contêiner com sua ID de usuário:
docker run --user $(id -u):$(id -g) ...Você recebe a mensagem “bind: endereço já em uso” ao iniciar o contêiner.
Isso quer dizer que outro serviço já está usando a porta 9000 ou 9001. Descubra o que está usando isso:
# Linux/macOS
lsof -i :9000
lsof -i :9001

# Windows
netstat -ano | findstr :9000
E então mapeie o MinIO para diferentes portas do host:
docker run -p 9090:9000 -p 9091:9001 ...Agora, dá uma olhada na API em localhost:9090 e no console em localhost:9091.
Você configurou MINIO_ROOT_USER e MINIO_ROOT_PASSWORD, mas não consegue fazer login ou o contêiner não inicia.
Para resolver, veja se você realmente passou as variáveis de ambiente:
docker inspect minio | grep -A 5 EnvProcure por “ MINIO_ROOT_USER ” e “ MINIO_ROOT_PASSWORD ” na saída. Se estiverem faltando, você esqueceu as bandeiras -e ou a seção environment: no seu arquivo Compose.
O MinIO também exige que as senhas tenham pelo menos 8 caracteres. Se a sua senha for mais curta, o contêiner pode rejeitá-la ou usar uma senha padrão.
Se você mudou as credenciais em uma configuração já existente, pare e remova o contêiner completamente, depois comece do zero:
docker stop minio
docker rm minio
docker run ...  # with new credentials
Arquivos de credenciais antigos podem continuar no seu diretório de dados e causar problemas.
Siga essas práticas para evitar erros comuns e manter sua configuração do MinIO fácil de cuidar.
Use o Docker Compose para garantir a repetibilidade. Um arquivo Compose documenta sua configuração exata - portas, volumes, variáveis de ambiente e comandos. Você pode controlar as versões, compartilhar com sua equipe e recriar configurações idênticas em diferentes máquinas. Executar comandos longos docker run a partir do histórico do seu shell leva a desvios de configuração e erros.
Sempre configure o armazenamento persistente. Mapeie um volume ou faça uma montagem vinculada antes de guardar qualquer dado real. Os contêineres são temporários — se você pular essa etapa, vai perder tudo quando o contêiner reiniciar. Dá uma olhada na sua configuração em docker inspect minio e vê se o mapeamento de volume tá certo.
Não deixe suas credenciais no histórico de comandos. Não coloque senhas diretamente nos comandos ` docker run ` nem as envie para o git nos seus arquivos Compose. Use arquivos de ambiente (.env) com o Docker Compose ou passe as credenciais por meio de variáveis de ambiente durante a execução. Adicione .env ao seu .gitignore imediatamente.
Use o modo de nó único só para desenvolvimento. O modo distribuído é complicado e demora para configurar. Você não precisa de alta disponibilidade ou codificação de apagamento no seu laptop. Guarde as implantações distribuídas para produção onde o tempo de inatividade realmente importa.
Fique de olho nos registros durante a inicialização. Execute docker logs -f minio ao iniciar o MinIO pela primeira vez. Os registros mostram o endpoint da API, a URL do console e quaisquer erros de configuração. Se algo estiver errado, você vai perceber na hora, em vez de ficar se perguntando por que nada funciona.
Siga essas práticas e sua configuração do MinIO vai ficar bem firme desde o primeiro dia.
Executar o MinIO com o Docker significa que você pode ter um armazenamento de objetos compatível com S3 funcionando na sua máquina em menos de um minuto.
Para desenvolvimento, testes e projetos de pequena escala, o MinIO de nó único no Docker oferece tudo o que você precisa. Você tem compatibilidade total com a API S3, um console web para gerenciamento e controle total sobre seus dados, sem depender de serviços em nuvem ou pagar por armazenamento que você não usa.
Comece com o básico: um comando simples docker run ou um arquivo Docker Compose com volumes persistentes e credenciais seguras (prefira o último). Teste sua configuração, veja se tá tudo certo e só adicione mais coisas quando for mesmo necessário.
O modo distribuído, a alta disponibilidade e as configurações de nível de produção existem por um motivo — mas esse motivo não é o desenvolvimento local. Mude para essas configurações quando estiver fazendo a implantação em produção, quando o tempo de inatividade custar dinheiro ou quando estiver armazenando dados que não podem ser perdidos. Até lá, mantenha as coisas simples e concentre-se em desenvolver seu aplicativo, em vez de gerenciar a infraestrutura.
Quando você estiver pronto para mergulhar em tópicos mais complexos do Docker, confira nossa Containerização e virtualização com Docker e Kubernetes .
Aprenda Docker com o DataCamp
Programa
Curso
Curso
blog
Matt Crabtree
8 min
Tutorial
Bex Tuychiev
Tutorial
Zoumana Keita
Tutorial
Tim Lu
Tutorial
Zoumana Keita
Tutorial
Javier Canales Luna