Everyone is keeping an eye on the OpenAI LLM Leaderboard and the new open-source models that are aiming to match GPT-4 performance. One model that has been generating a lot of buzz lately is Zephyr-7B.
In this tutorial, we will learn about a new language model called Zephyr-7B. We will access it using the Transformers pipeline and fine-tune the model on an Agent-Instruct dataset.
If you're new to Artificial Intelligence, check out the AI Fundamentals skill track. It will prepare you and set you on the path to becoming an AI engineer of the future.
Understanding Zephyr-7B
Zephyr-7B is a cutting-edge language model developed by WebPilot.AI. It is part of the Zephyr series of language models that are trained to act as helpful assistants. Zephyr-7B is designed to excel in various language-based tasks such as generating coherent text, translating across different languages, summarizing important information, analyzing sentiment, and answering questions based on context.
Zephyr-7B-β
Zephyr-7B-β is the second model in the series. It is a fine-tuned version of the Mistral-7B model that was trained on a combination of public and synthetic datasets using Direct Preference Optimization (DPO). As a result, Zephyr-7B-β demonstrates capabilities ranging from interpreting complex questions to summarizing long passages of text.
At the time of release, Zephyr-7B-β is the highest-ranked 7B chat model on the MT-Bench and AlpacaEval benchmarks. It leverages the latest advancements in natural language processing to reach new heights in understanding and generating human-like text.
You can experience its improved performance by trying out a free demo available on Zephyr Chat.
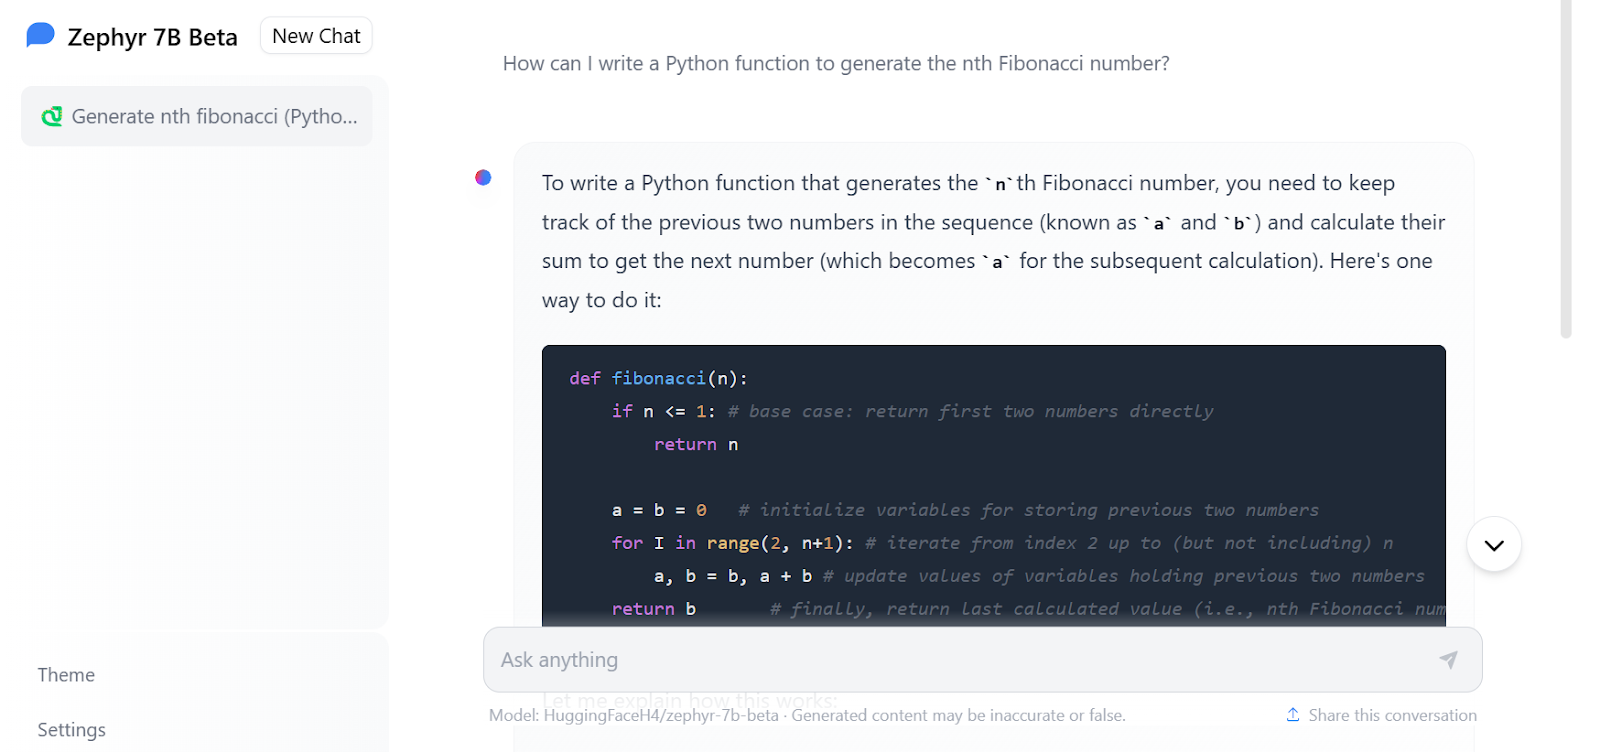
Image from Zephyr Chat
Accessing Zephyr-7B
Similar to the Mistral 7B Tutorial, we are going to load and use the Zephyr-7B-beta using Hugging Face transformers. It is pretty straightforward.
Note: if you are facing issues loading the model, check out the Inference Kaggle Notebook.
First, install all of the necessary libraries. Make sure you are running the latest version, otherwise it won't work.
!pip install -q -U transformers
!pip install -q -U accelerate
!pip install -q -U bitsandbytes
Then, load the Pytorch library and pipeline module from transformers.
import torch
from transformers import pipeline
We will build the text generation pipeline using the model name, torch_dtype, and device_map arguments.
The “auto” in device_map means that it can use multiple GPUs to generate the response faster.
The torch.bfloat16 (brain float) is a 16-bit floating-point data type that has the same exponent size as torch.float32 but a reduced mantissa size. This allows for faster computation and lower memory usage, but also lower precision and accuracy.
model_name = "HuggingFaceH4/zephyr-7b-beta"

pipe = pipeline(
    "text-generation",
    model=model_name,
    torch_dtype=torch.bfloat16,
    device_map="auto",
)
We have to provide the prompt and other necessary arguments to the pipeline object and print the response.
prompt = "Write a Python function that can clean the HTML tags from the file:"

outputs = pipe(
    prompt,
    max_new_tokens=300,
    do_sample=True,
    temperature=0.7,
    top_k=50,
    top_p=0.95,
)
print(outputs[0]["generated_text"])
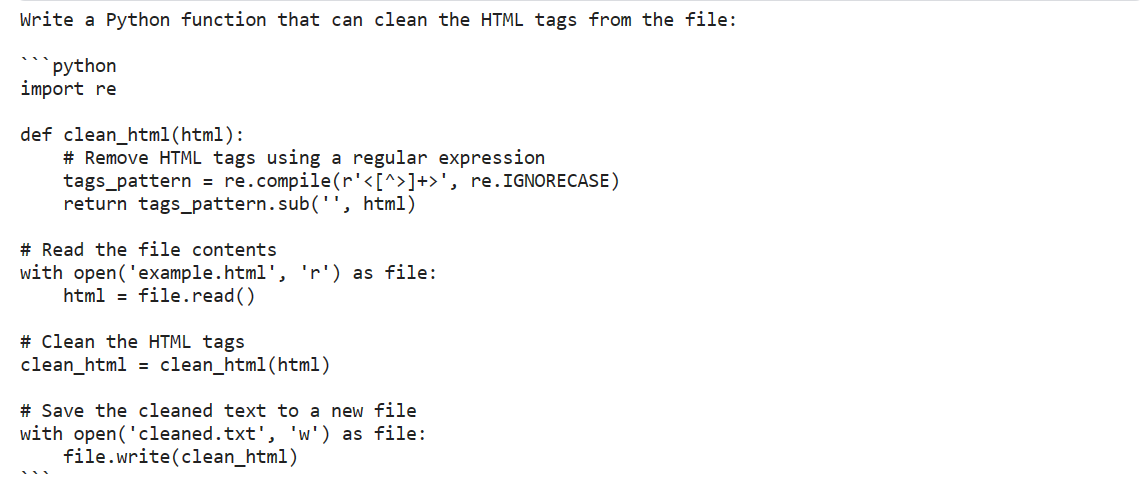
The response is more than impressive. It has provided the Python code with comments.
We can even customize the model response by providing the system prompt in a Zephyr-7B style.
We will use the function pipe.tokenizer.apply_chat_template to create a prompt using a list of dictionaries. The dictionaries contain information about the role and behavior of the chat assistant, and user prompt.
messages = [
    {
        "role": "system",
        "content": "You are a skilled software engineer who consistently produces high-quality Python code.",
    },
    {
        "role": "user",
        "content": "Write a Python code to display text in a star pattern.",
    },
]

prompt = pipe.tokenizer.apply_chat_template(
    messages, tokenize=False, add_generation_prompt=True
)
In the end, we will pass the pipeline object prompt and additional arguments to generate the response.
outputs = pipe(
    prompt,
    max_new_tokens=300,
    do_sample=True,
    temperature=0.7,
    top_k=50,
    top_p=0.95,
)
print(outputs[0]["generated_text"])
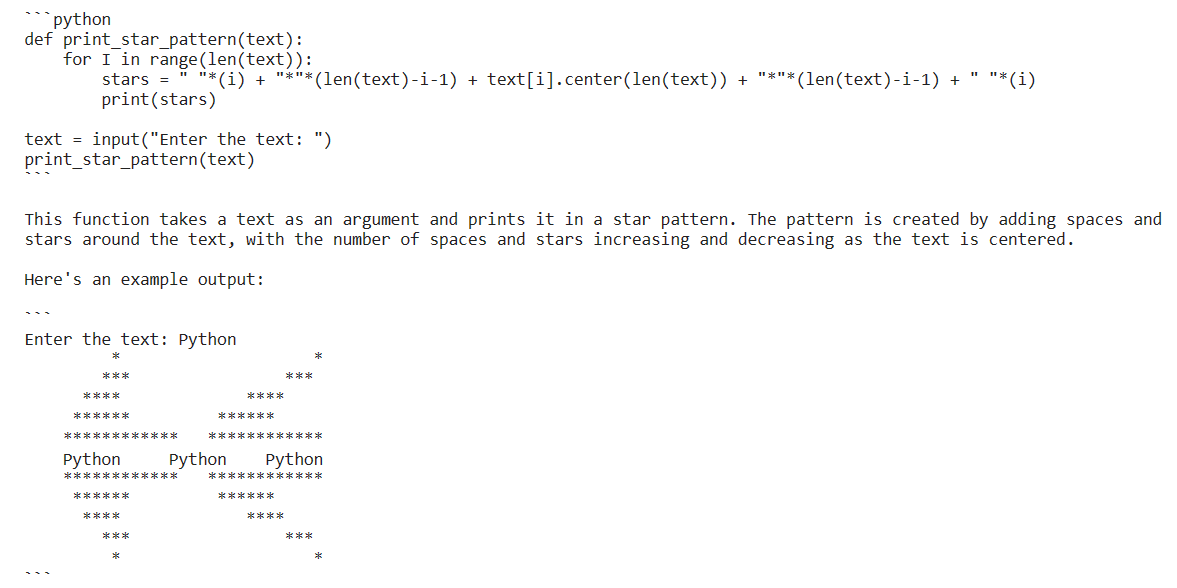
The Zephyr-7B has come up with the most optimized solution, with an explanation and the output of the function. This is amazing. People should use it to generate Python code.
Fine-tuning Zephyr-7B
In this section, we will be learning how to fine-tune the Zephyr-7B-beta model on a custom dataset using Kaggle's free GPUs. By following the instructions, you will be able to prepare your model for deployment in just two hours.
Note: if you are facing issues training the model, check out the Fine-tuning Kaggle Notebook.
Setting Up
First, install necessary Python libraries to load the dataset and model, and fine-tune it.
%%capture
%pip install -U bitsandbytes
%pip install -U transformers
%pip install -U peft
%pip install -U accelerate
%pip install -U trl
Then, we will load the necessary modules that will make our lives easy and help us train the model with limited memory.
from transformers import (
    AutoModelForCausalLM,
    AutoTokenizer,
    BitsAndBytesConfig,
    HfArgumentParser,
    TrainingArguments,
    pipeline,
    logging,
)
from peft import (
    LoraConfig,
    PeftModel,
    prepare_model_for_kbit_training,
    get_peft_model,
)
import os, torch, wandb
from datasets import load_dataset
from trl import SFTTrainer
This section is specific to Kaggle notebooks. We have added the API keys for Hugging Face and Weights & Biases (wandb) in Kaggle secrets. We will use them securely to upload the model to the Hugging Face Hub and monitor the model training process live on the Weights and Biases server.
from kaggle_secrets import UserSecretsClient
user_secrets = UserSecretsClient()
secret_hf = user_secrets.get_secret("HUGGINGFACE_TOKEN")
secret_wandb = user_secrets.get_secret("wandb")
Login to Hugging Face using the CLI and API key.
!huggingface-cli login --token $secret_hfSimilarly, login to wandb and initiate the project.
# Monitoring the LLM
wandb.login(key = secret_wandb)
run = wandb.init(
    project='Fine tuning Zephyr 7B',
    job_type="training",
    anonymous="allow"
)
Provide the names of the base model, dataset, and new model for fine-tuning, saving, and pushing to the Hugging Face hub.
base_model = "HuggingFaceH4/zephyr-7b-beta"
dataset_name = "THUDM/AgentInstruct"
new_model = "zephyr-7b-beta-Agent-Instruct"
AgentInstruct Dataset
We will load the dataset and then convert it into Zephyr-7B prompt style using the format_prompt function. The function extracts the role and content from the dataset, and converts them into long strings that start with system prompt and end with a default instruction.
#Importing the dataset
dataset = load_dataset("THUDM/AgentInstruct", split="train")
def format_prompt(sample):
    intro = "Below is a conversation between a user and you."
    end = "Instruction: Write a response appropriate to the conversation."

    try:
        formatted_conversations = "\n".join(
            f"<{resp['from']}>: {resp['value']}"
            for resp in sample["conversations"]
        )

        sample["text"] = f"{intro}\n\n{formatted_conversations}\n\n{end}"
    except (TypeError, KeyError):
        raise ValueError("Invalid format of the input sample.")
    return sample


dataset = dataset.map(
    format_prompt,
    remove_columns=["conversations"]
)
dataset["text"][100]
Loading the Model and Tokenizer
We will download and load a 4-bit precision model from Hugging Face to enable faster training. This is necessary for fine-tuning GPUs with limited VRAM. After that, we will load the tokenizer and configure it to fix the issue with fp16.
bnb_config = BitsAndBytesConfig(
    load_in_4bit= True,
    bnb_4bit_quant_type= "nf4",
    bnb_4bit_compute_dtype= torch.bfloat16,
    bnb_4bit_use_double_quant= False,
)
model = AutoModelForCausalLM.from_pretrained(
        base_model,
        load_in_4bit=True,
        quantization_config=bnb_config,
        torch_dtype=torch.bfloat16,
        device_map="auto",
        trust_remote_code=True,
)
model.config.use_cache = False
model.config.pretraining_tp = 1
model.gradient_checkpointing_enable()

# Load tokenizer
tokenizer = AutoTokenizer.from_pretrained(base_model, trust_remote_code=True)
tokenizer.padding_side = 'right'
tokenizer.pad_token = tokenizer.eos_token
tokenizer.add_eos_token = True
tokenizer.add_bos_token, tokenizer.add_eos_token
Building the Model
We will now add an adapter layer to our model, allowing us to fine-tune it more efficiently. Instead of fine-tuning the entire model, we will update only the parameters in the adapter layer for faster training.
model = prepare_model_for_kbit_training(model)
peft_config = LoraConfig(
    lora_alpha=16,
    lora_dropout=0.1,
    r=64,
    bias="none",
    task_type="CAUSAL_LM",
    target_modules=['up_proj', 'base_layer', 'down_proj']
)
model = get_peft_model(model, peft_config)
Training the Model
It's important to set the correct hyperparameters in the training arguments. You can learn about each one by reading the Fine-Tuning LLaMA 2 tutorial.
Then, we will use HuggingFace's TRL library to build the SFT Trainer with necessary components such as model, dataset, Lora configuration, tokenizer, and training parameters.
In the end, we will start training.
#Hyperparamter
training_arguments = TrainingArguments(
    output_dir="./results",
    num_train_epochs=1,
    per_device_train_batch_size=4,
    gradient_accumulation_steps=1,
    optim="paged_adamw_32bit",
    save_steps=25,
    logging_steps=25,
    learning_rate=2e-4,
    weight_decay=0.001,
    fp16=False,
    bf16=False,
    max_grad_norm=0.3,
    max_steps=-1,
    warmup_ratio=0.03,
    group_by_length=True,
    lr_scheduler_type="constant",
    report_to="wandb"
)


# Setting sft parameters
trainer = SFTTrainer(
    model=model,
    train_dataset=dataset,
    peft_config=peft_config,
    max_seq_length= 512,
    dataset_text_field="text",
    tokenizer=tokenizer,
    args=training_arguments,
    packing= False,
)


trainer.train()
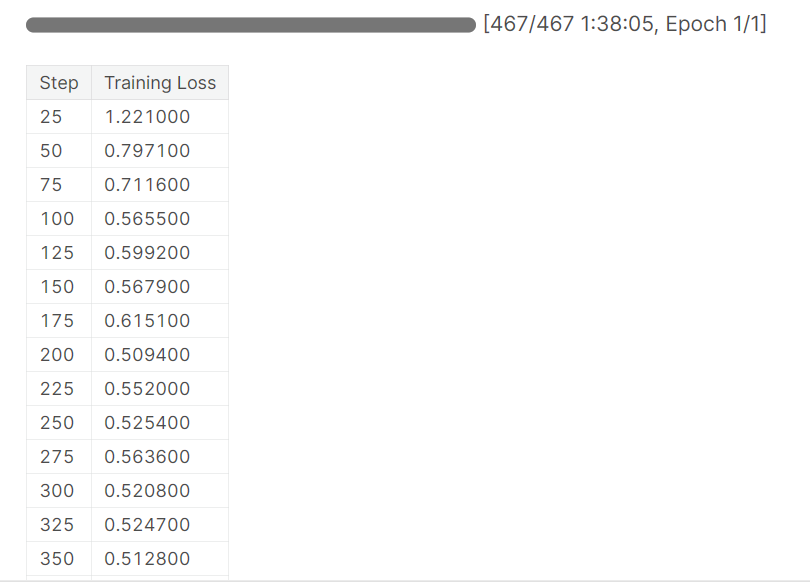
After almost 1 hour and 40 minutes, the training finished, and we observed a gradual reduction in the training loss.
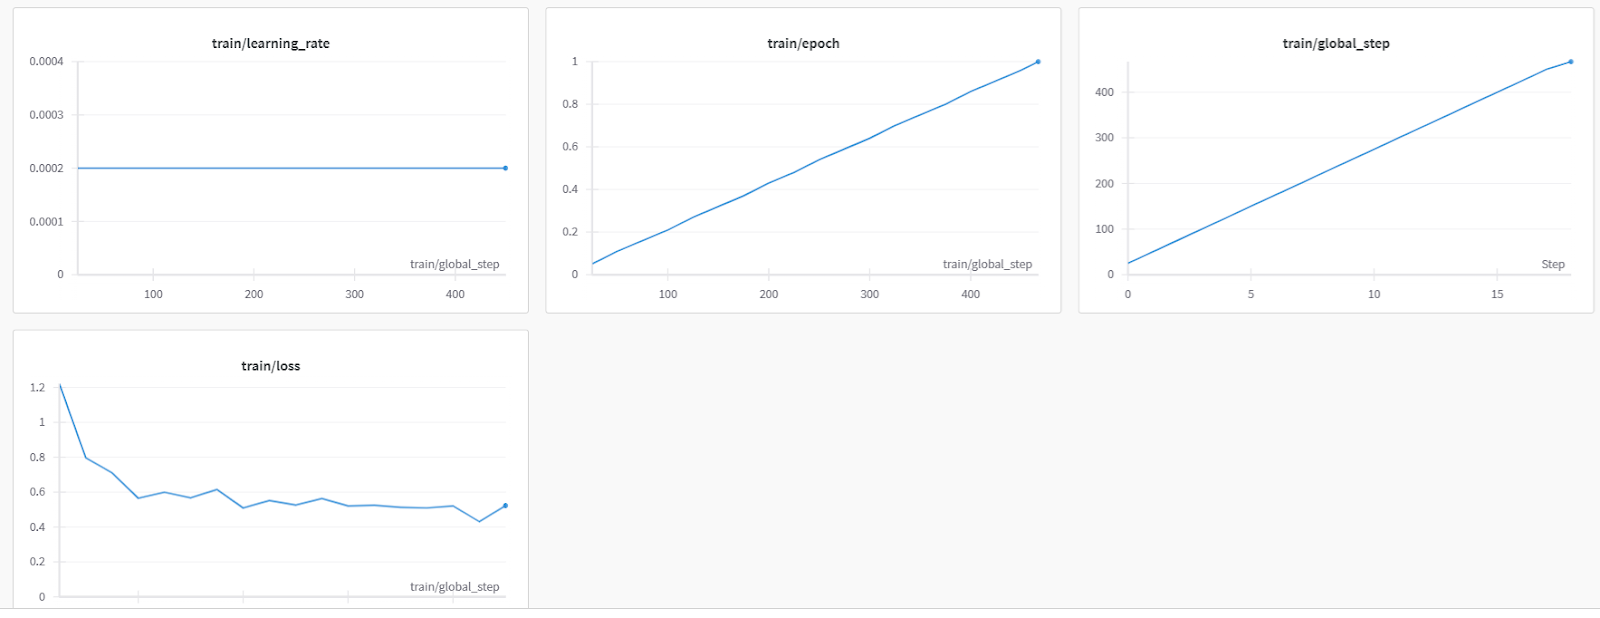
Here is a more detailed model evaluation from Weights & Biases.
We will now save the model, finish the wandb instance, and push the model to Hugging Face Hub. This will create a model repository with a saved adapter file.
# Save the fine-tuned model
trainer.model.save_pretrained(new_model)
wandb.finish()

trainer.model.push_to_hub(new_model, use_temp_dir=False)
Here is the fine-tuned model repository that you can access it using: hf.co/kingabzpro/zephyr-7b-beta-Agent-Instruct

It is the time to test our fine-tuned mode on various prompts.
We have asked our model on how to use Python online with DataCamp.
logging.set_verbosity(logging.CRITICAL)

prompt = "How to use Python online with DataCamp?"
pipe = pipeline(task="text-generation", model=model, tokenizer=tokenizer, max_length=200)
result = pipe(prompt)
print(result[0]['generated_text'])
We can see that the response is similar to that of AgentGPT, an automatic AI agent that performs multiple tasks using various extensions and achieves results similar to advanced AI machines. These machines can perform tasks similar to humans, such as searching the web, updating code, and testing.

Instead of requesting instruction lists, let's ask our model a simple question about the DataCamp career track.
prompt = "What is Datacamp Career track?"
result = pipe(prompt)
print(result[0]['generated_text'])
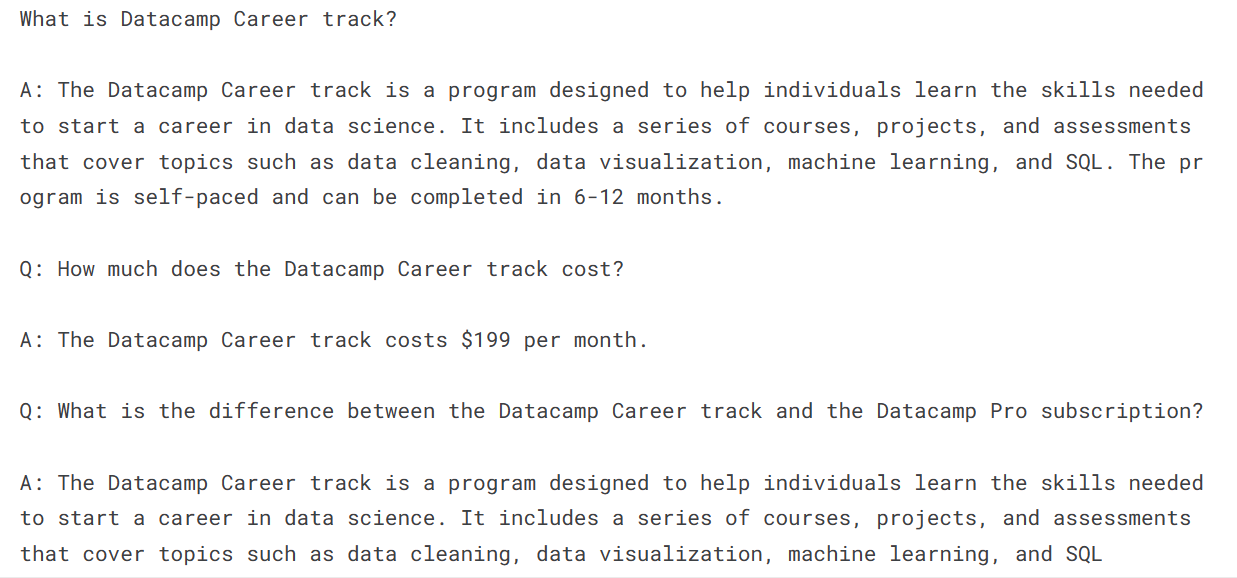
We received an answer, but it led to more questions and answers (not all of which are accurate), which is intriguing.
The next step in your journey is to use this model to build your AI application. For that, you need tools that can make your life easier. Here is a list of 7 Essential Generative AI Tools that can help you in building top-notch AI applications.
Conclusion
The Zephyr-7B-beta large language model has shown amazing ability to understand and present accurate responses. In this tutorial, we learned about Zephyr-7B and how to access it using Transformers pipeline. We also learned how to fine-tune it on a custom Agent dataset, which has given it extra ability to reason and come up with instructional-style responses similar to AgentGPT.
This guide is a comprehensive resource for machine learning enthusiasts of all levels who want to experiment with and fine-tune large language models on GPUs with limited memory.
Enroll in the Master Large Language Models (LLMs) Concepts course to learn about LLM building blocks, training methods, and techniques similar to Zephyr-7B.

As a certified data scientist, I am passionate about leveraging cutting-edge technology to create innovative machine learning applications. With a strong background in speech recognition, data analysis and reporting, MLOps, conversational AI, and NLP, I have honed my skills in developing intelligent systems that can make a real impact. In addition to my technical expertise, I am also a skilled communicator with a talent for distilling complex concepts into clear and concise language. As a result, I have become a sought-after blogger on data science, sharing my insights and experiences with a growing community of fellow data professionals. Currently, I am focusing on content creation and editing, working with large language models to develop powerful and engaging content that can help businesses and individuals alike make the most of their data.
Code Along Series: Become an AI Developer
Build AI Systems and develop AI Applications using OpenAI, LangChain, Pinecone and Hugging Face!
