
Kurs
Multimodale Modelle mit Hugging Face
4 Std.
1.8K
Qwen-Image-2512 ist ein starkes Open-Source-Modell, das Text in Bilder umwandelt, das besonders gut bei realistischen Bildern und textlastigen Kompositionen ist. In diesem Tutorial bauen wir damit ein Poster Studio, ein Gradio App, in der du Produktdetails wie Name, Angebot, Preis, CTA und Vorteile eingeben, ein Seitenverhältnis für die Plattform auswählen und mit nur einem Klick ein Werbebild erstellen kannst.
Weil Qwen-Image-2512 ein großes Modell ist, schauen wir uns auch an, wie man es am besten reibungslos laufen lässt. Du lernst, wie du es mit den richtigen Präzisionseinstellungen stabil auf eine A100 laden, häufige Fehler vermeiden und dich an jeden Arbeitsablauf anpassen kannst, indem du mit kleineren Auflösungen arbeitest, Schritte reduzierst oder ein quantisiertes Modell für leistungsstärkere Hardware ausprobierst.
Qwen-Image-2512 ist ein Update des Qwen-Text-zu-Bild-Grundmodells und bietet eine deutliche Qualitätssteigerung gegenüber der früheren Version Qwen-Image. Im Hintergrund ist Qwen-Image ein 20B MMDiT-Diffusionsmodell, das für starke Prompt-Adhäsion und Text-in-Bild-Rendering ausgelegt ist.
Es basiert auch auf einer groß angelegten Bewertung im Präferenzstil mit über 10.000 Blindrunden auf AI Arena, wo das Modell als das stärkste Open-Source-Modell herauskam und gleichzeitig mit geschlossenen Systemen mithalten konnte.
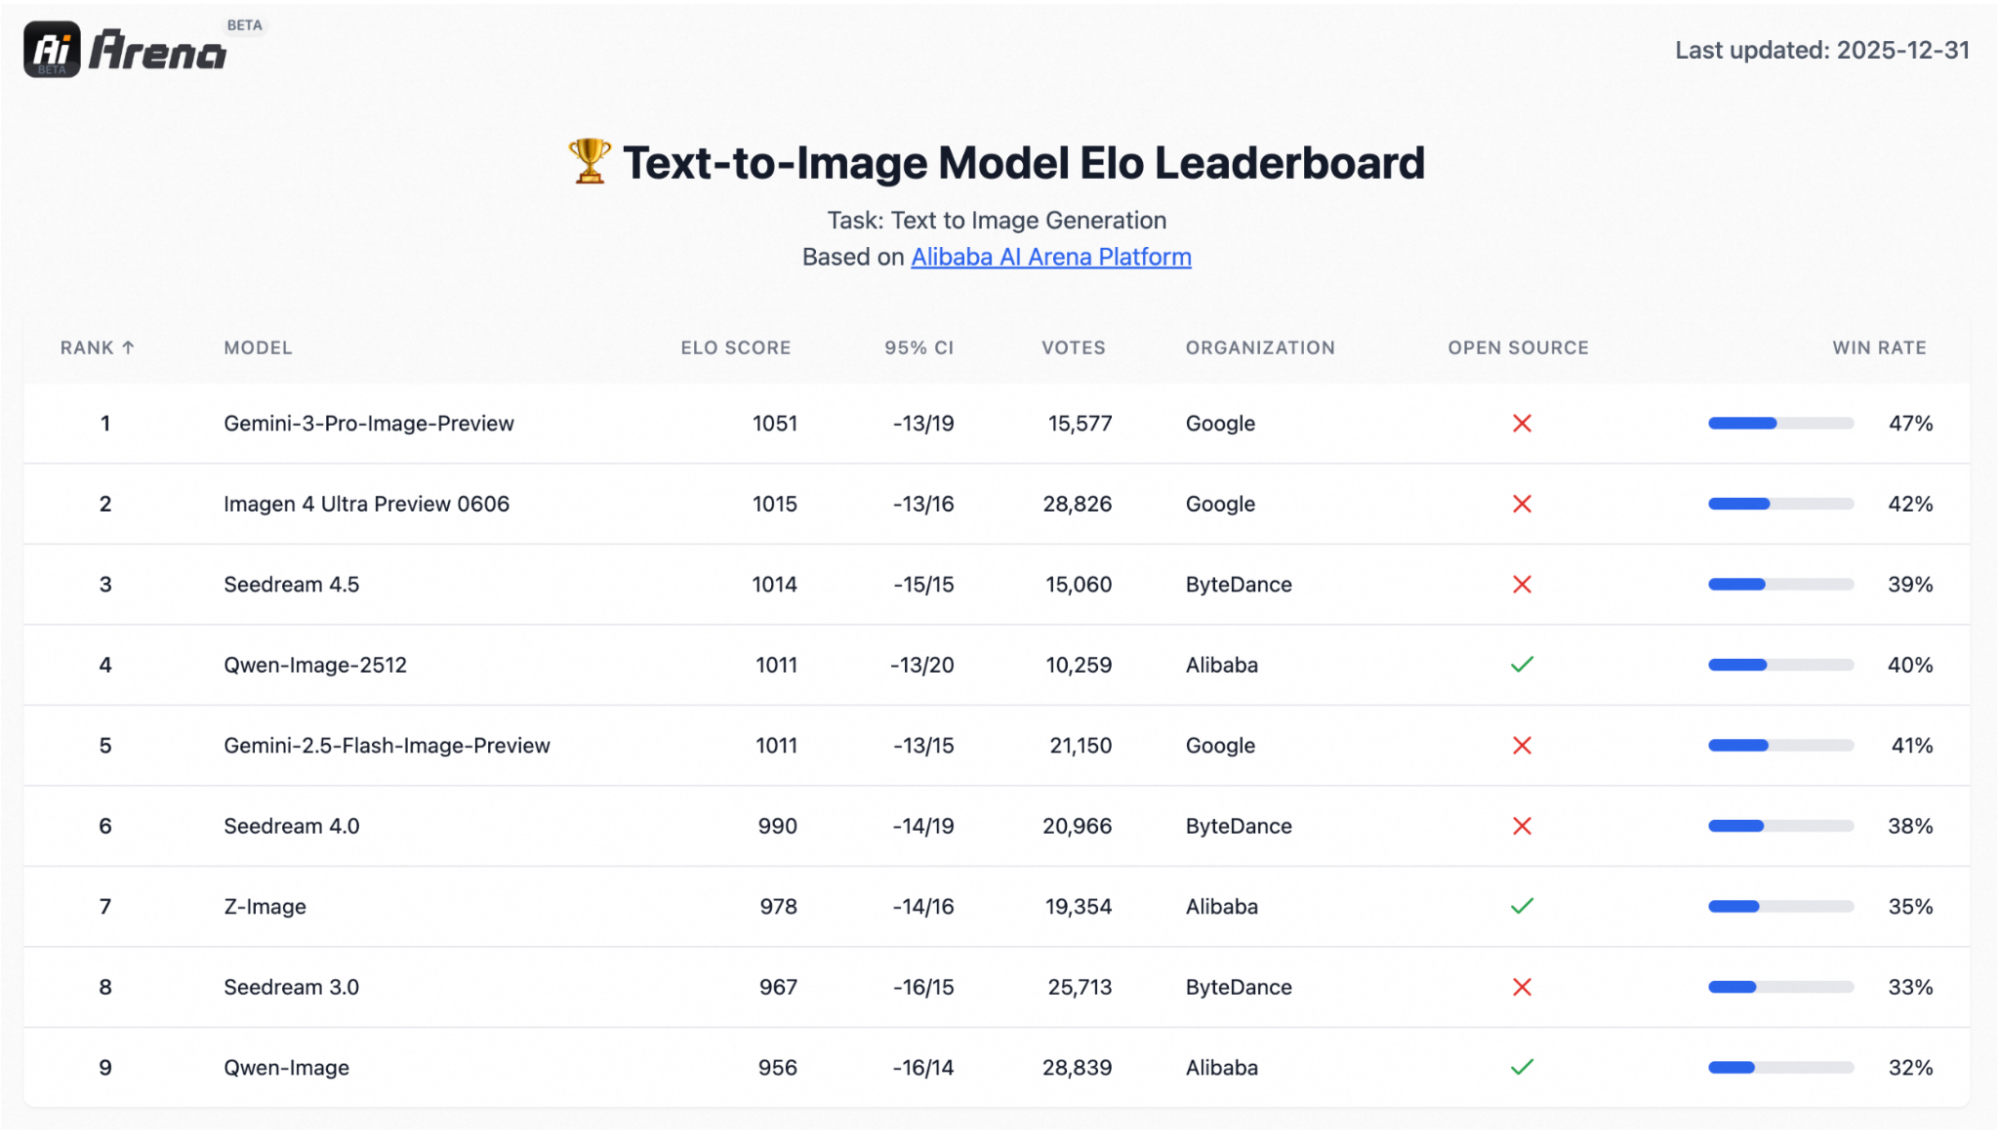
Die drei Upgrades, die in echten Arbeitsabläufen meistens am wichtigsten sind, sind:
In diesem Abschnitt erstellen wir eine einfache Gradio-App, die:
steps, true_cfg_scale, seed und ein optionales negative prompt.QwenImagePipeline.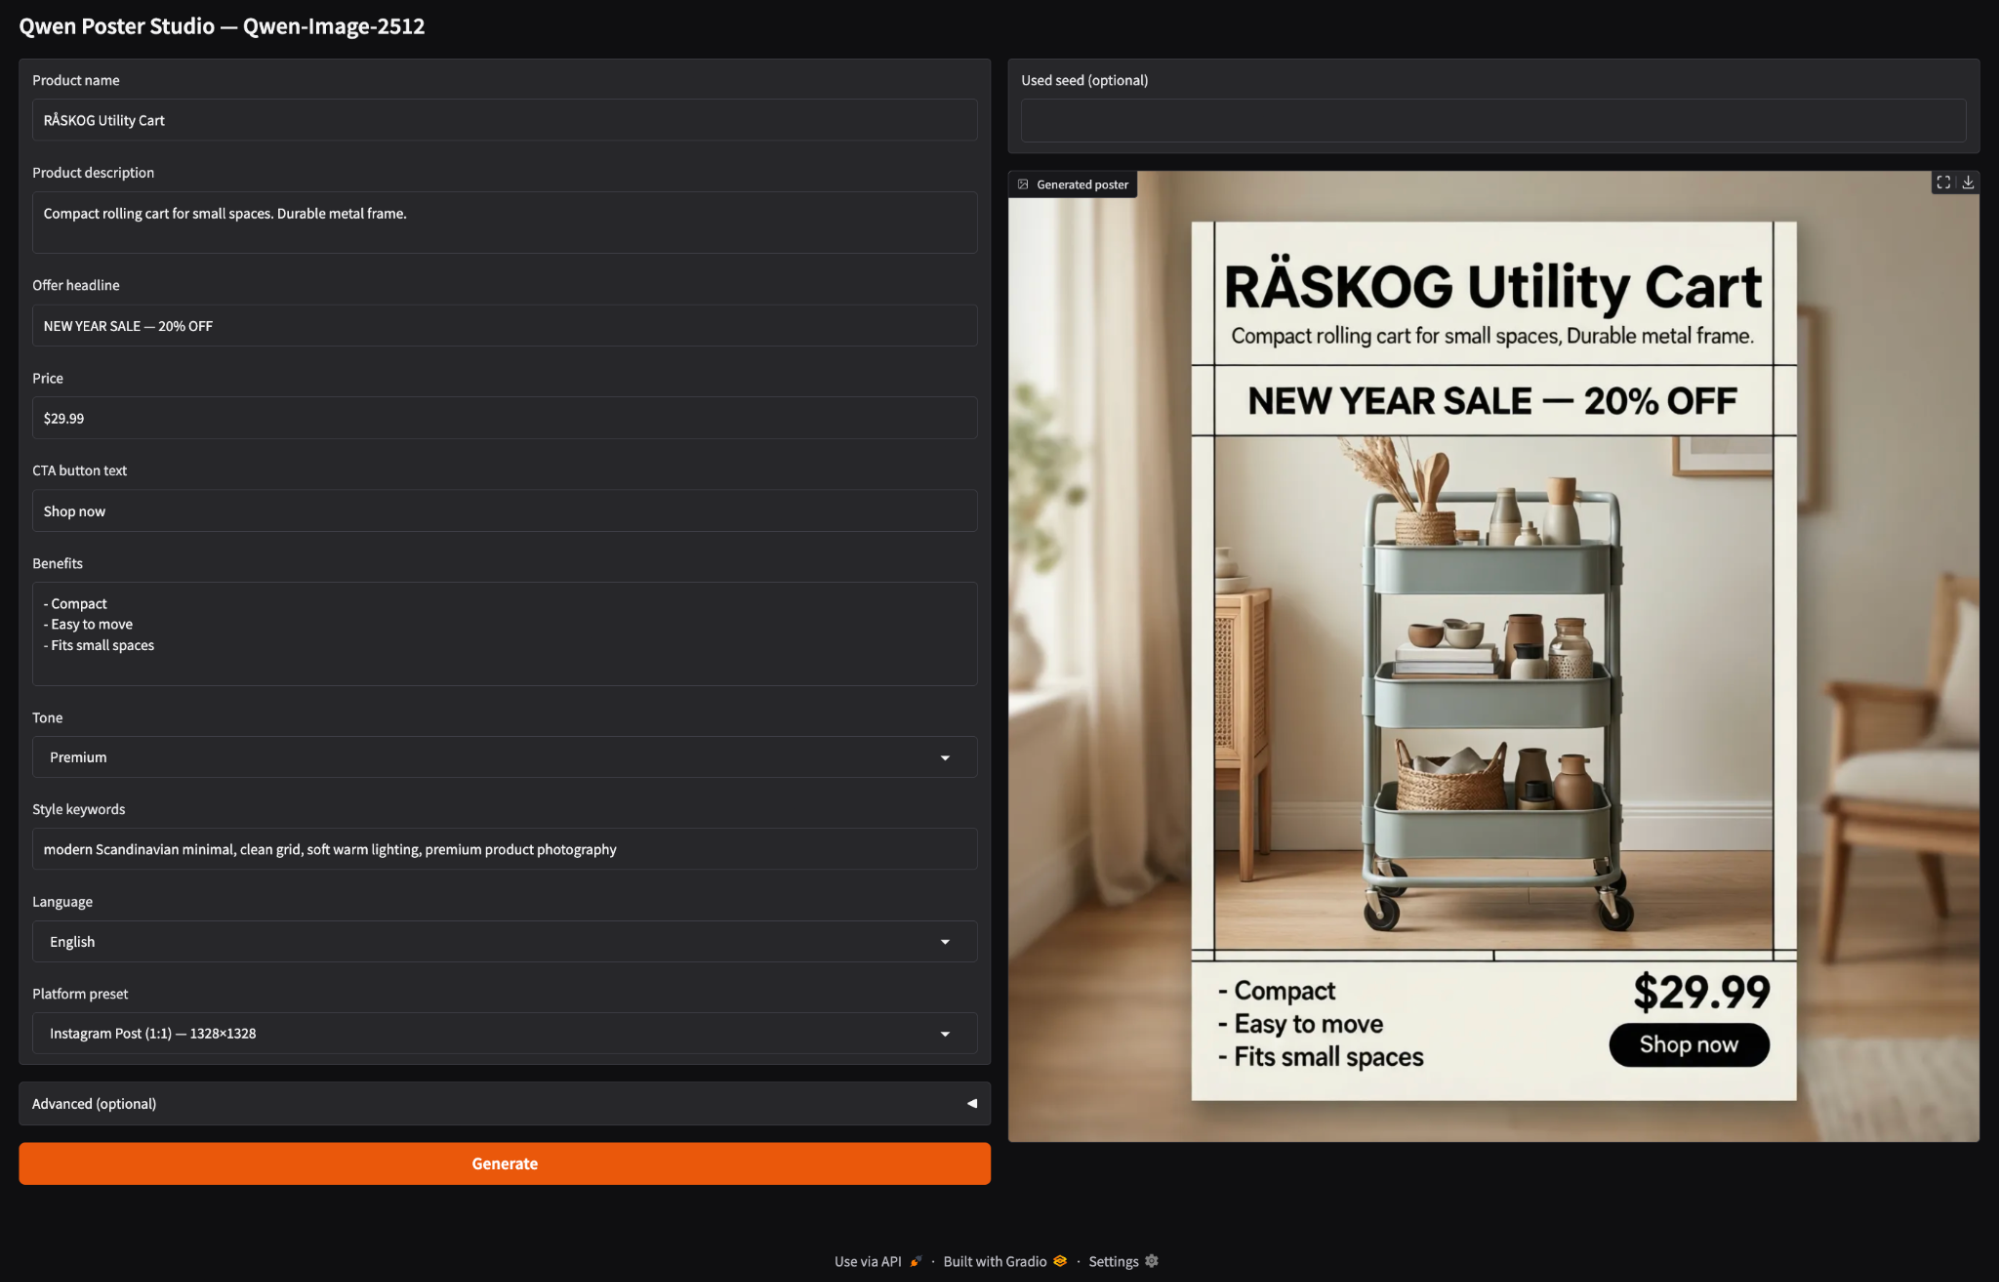
Lass es uns Schritt für Schritt aufbauen.
Installier zuerst die neueste Version von Diffusers von GitHub (Qwens Modellkarte empfiehlt das für die Pipeline-Unterstützung) zusammen mit den Kernabhängigkeiten:
!pip -q install --upgrade pip
!pip -q install git+https://github.com/huggingface/diffusers
!pip -q install transformers accelerate safetensors gradio pillow psutil
Als Nächstes machst du eine kurze Überprüfung, um sicherzugehen, dass CUDA verfügbar ist, und um die GPU zu erkennen:
import torch, diffusers
print("diffusers:", diffusers.__version__)
print("CUDA available:", torch.cuda.is_available())
!nvidia-smi
Wenn du „ CUDA available: True “ eingibst und deine GPU unter „ nvidia-smi “ siehst, kannst du das Modell laden.
Hey, nur zur Info: „ QwenImagePipeline ” ist kein einzelner Block im UNet-Stil. Bei Diffusoren geht's um einen kompletten Stack, der aus einem Qwen2.5-VL-7B-Instruct-Text -Encoder, dem MMDiT-Diffusions-Transformator und einem Variational Auto-Encoder(VAE) für die Decodierung besteht. Der 7B-Text-Encoder ist ein wichtiger Grund dafür, dass RAM/VRAM beim Laden und Generieren von Modellen, vor allem bei kleineren GPUs, stark beansprucht werden kann.
Ich hab dieses Tutorial auf Google Colab mit einem A100 gemacht, der eine Bildauflösung von 1328×1328 bei ~50 Schritten locker schafft. Bei GPUs der T4/16GB-Klasse musst du normalerweise runter skalieren (auf eine Bildauflösung von ungefähr 768×768 und weniger Schritte) oder quantisierte Varianten über alternative Laufzeiten (wie GGUF/ComfyUI) nutzen.
Bevor wir das Modell laden, lohnt es sich, ein kleines Laufzeit-Harness einzurichten, das Colab vorhersehbar hält. Qwen-Image-2512 ist schwer, und die Bildgenerierung kann ganz schön viel System-RAM und GPU-Speicher fressen.
import os, gc, random, psutil, torch
from diffusers import QwenImagePipeline
import gradio as gr
os.environ["HF_HOME"] = "/content/hf"
os.makedirs("/content/hf", exist_ok=True)
def mem(tag=""):
    ram = psutil.virtual_memory().used / 1e9
    v_alloc = torch.cuda.memory_allocated()/1e9 if torch.cuda.is_available() else 0
    v_res   = torch.cuda.memory_reserved()/1e9 if torch.cuda.is_available() else 0
    print(f"[{tag}] RAM={ram:.1f}GB | VRAM alloc={v_alloc:.1f}GB reserved={v_res:.1f}GB")
def cleanup(tag="cleanup"):
    gc.collect()
    if torch.cuda.is_available():
        torch.cuda.empty_cache()
    mem(tag)
assert torch.cuda.is_available(), "GPU runtime required"
print("GPU:", torch.cuda.get_device_name(0))
torch.backends.cuda.matmul.allow_tf32 = True
torch.set_float32_matmul_precision("high")
cleanup("startup")
Sobald die Abhängigkeiten installiert sind, richten wir Importe, Caching, Speicherüberwachung und ein paar GPU-Leistungsflags ein. So sieht das im Code aus:
QwenImagePipeline: Das ist die Haupt-Pipeline-Klasse, die wir später zum Laden und Ausführen von Qwen-Image-2512 für die Bilderzeugung verwenden werden.gradio: Diese Bibliothek macht die einfache Web-Benutzeroberfläche möglich, sodass wir Poster direkt in Colab erstellen können.HF_HOME=/content/hf: Wir nutzen das, um den Hugging Face-Cache in einem bekannten Ordner zu speichern, damit die Modell-Downloads und Gewichte bei allen Durchläufen gleich bleiben.mem() Funktion: Die Funktion mem() behält den Überblick über den belegten und reservierten System-RAM und GPU-VRAM. cleanup() Funktion: Das ist ein kleines Reset-Tool, um Python-Referenzen zu löschen und zwischengespeicherten GPU-Speicher freizugeben. Das ist echt praktisch, wenn man die Auflösung/Schritte wiederholt.Diese Konfiguration erzeugt noch keine Bilder, macht aber die nächsten Schritte (Laden und Inferenz) viel stabiler und einfacher zu debuggen.
Jetzt, wo die Laufzeit eingerichtet ist, ist es Zeit, das Modell in eine Diffusers-Pipeline zu laden. Auf einem A100 ist es am besten, die meisten Gewichte in BF16 zu verarbeiten, um die Leistung zu optimieren, aber die VAE-Decodierung in FP32 zu belassen, um NaNs zu vermeiden, die als komplett schwarze Bilder angezeigt werden können.
DTYPE = torch.bfloat16
pipe = QwenImagePipeline.from_pretrained(
    "Qwen/Qwen-Image-2512",
    torch_dtype=DTYPE,
    low_cpu_mem_usage=True,
    use_safetensors=True,
).to("cuda")
if hasattr(pipe, "vae") and pipe.vae is not None:
    pipe.vae.to(dtype=torch.float32)
cleanup("after pipe load")
Hier ist, was wir mit dem obigen Code erreichen wollen:
torch_dtype=DTYPE: Dadurch werden die meisten Gewichte in BF16 geladen, um den VRAM zu reduzieren und die Inferenz zu beschleunigen.low_cpu_mem_usage=True: Es reduziert die CPU-seitige Duplizierung während der Last (wichtig für große Checkpoints).use_safetensors=True: Dadurch wird sichergestellt, dass der Loader das sicherere/schnellere Safetensors-Format verwendet, wenn es verfügbar ist.pipe.vae.to(torch.float32) “ die Ausgänge des latenten Raums in Pixel um. Wenn dieser Dekodierungsschritt auf NaNs/Infs mit geringerer Genauigkeit stößt, kann das endgültige Bild komplett schwarz werden. Also zwingen wir die VAE zu FP32 und machen dann einen Aufruf von „ cleanup() “, um den RAM/VRAM-Speicherbedarf nach dem Laden zu checken.Als Nächstes legen wir Voreinstellungen für das Seitenverhältnis der Plattform fest und verbinden die Pipeline mit einer minimalistischen Gradio-Benutzeroberfläche, um interaktive Poster zu erstellen.
Jetzt bauen wir den Motor der Demo, also eine kleine Schicht, die UI-Eingaben in eine gut strukturierte Eingabeaufforderung umwandelt, eine Ausgabeauflösung basierend auf Plattformvoreinstellungen auswählt und die Qwen Image-Pipeline aufruft, um ein Bild zu generieren.
ASPECT_PRESETS = {
    "Instagram Post (1:1) — 1328×1328": (1328, 1328),
    "Instagram Story (9:16) — 928×1664": (928, 1664),
    "YouTube / Banner (16:9) — 1664×928": (1664, 928),
    "Poster (3:4) — 1104×1472": (1104, 1472),
    "Slides (4:3) — 1472×1104": (1472, 1104),
    "Fast Draft (1:1) — 768×768": (768, 768),
}
DEFAULT_NEG = " "
def build_prompt(product_name, product_desc, offer, price, cta, benefits, tone, style_keywords, language):
    return f"""
Create a high-converting e-commerce promotional poster in {language}. Clean grid layout, strong hierarchy.
- Product name: "{product_name}"
- Product description: "{product_desc}"
- Offer headline (exact): "{offer}"
- Price (exact): "{price}"
- CTA button text (exact): "{cta}"
- Benefits (use these exact phrases, no typos):
{benefits}
- Tone: {tone}
- Style keywords: {style_keywords}
- Text must be legible and correctly spelled.
- Do not add extra words, fake prices, or random letters.
- Align typography to a neat grid with consistent margins.
""".strip()
@torch.inference_mode()
def generate_image(product_name, product_desc, offer, price, cta, benefits, tone, style_keywords,
                   language, preset, negative_prompt, steps, true_cfg_scale, seed, show_seed):
    w, h = ASPECT_PRESETS[preset]
    prompt = build_prompt(product_name, product_desc, offer, price, cta, benefits, tone, style_keywords, language)
    if seed is None or int(seed) < 0:
        seed = random.randint(0, 2**31 - 1)
    seed = int(seed)
    gen = torch.Generator(device="cuda").manual_seed(seed)
    img = pipe(
        prompt=prompt,
        negative_prompt=negative_prompt,
        width=int(w),
        height=int(h),
        num_inference_steps=int(steps),
        true_cfg_scale=float(true_cfg_scale),
        generator=gen,
    ).images[0].convert("RGB")
    return (seed if show_seed else None), img
Die voreingestellte Karte und die beiden oben genannten Funktionen sind das Herzstück unseres Poster Studios.
ASPECT_PRESETS “ erklärt verschiedene Plattform-Canvas-Größen (z. B. 1:1 für Instagram-Posts, 9:16 für Stories, 16:9 für Banner). Die Nutzer können einfach eine Voreinstellung auswählen, und wir machen daraus die richtige „ width × height “ für die Generierung.build_prompt() ” verwandelt einfache Produktangaben wie Name, Angebot, Preis, CTA und Vorteile in ein Bildbriefing. Es berücksichtigt das Layout und die Textregeln, sodass das Modell jedes Mal einheitliche Einschränkungen bekommt und nicht zu zufälligen Kopien führt.generate_image() “ ist die Ausführungsschicht. Es liest die gewählte Voreinstellung, um „ width/height “ zu bekommen, und ruft die Qwen-Image-Pipeline mit den ausgewählten „ steps “, „ true_cfg_scale “ und „ negative_prompt “ auf. Schlussendlich gibt es das erstellte Poster (und optional den Seed) zurück. Die Option „ steps “ bestimmt, wie lange der Diffusionsprozess läuft (mehr Schritte bedeuten langsamere, aber normalerweise sauberere Ergebnisse), während „ true_cfg_scale “ festlegt, wie stark das Modell der Eingabe folgt (ein höherer Wert bedeutet eine bessere Übereinstimmung, aber ein zu hoher Wert kann zu Artefakten führen).Als Nächstes packen wir die Funktion „ generate_image() “ in eine Gradio-Schnittstelle, damit Leute Poster erstellen können, ohne sich mit der rohen Prompt-Technik rumschlagen zu müssen.
Zum Schluss packen wir die Poster-Generierungs-Engine in eine Gradio-Schnittstelle. Mit der App kannst du Produktdetails eingeben, ein Seitenverhältnis für die Plattform auswählen und auf „Generieren“ klicken.
with gr.Blocks(title="Qwen Poster Studio (Simple)") as demo:
    gr.Markdown("## Qwen Poster Studio — Qwen-Image-2512")
    with gr.Row():
        with gr.Column(scale=1):
            product_name = gr.Textbox(value="RÅSKOG Utility Cart", label="Product name")
            product_desc = gr.Textbox(value="Compact rolling cart for small spaces. Durable metal frame.", lines=2, label="Product description")
            offer = gr.Textbox(value="NEW YEAR SALE — 20% OFF", label="Offer headline")
            price = gr.Textbox(value="$29.99", label="Price")
            cta = gr.Textbox(value="Shop now", label="CTA button text")
            benefits = gr.Textbox(value="- Compact\n- Easy to move\n- Fits small spaces", lines=4, label="Benefits")
            tone = gr.Dropdown(["Premium", "Minimal", "Bold", "Playful", "Tech"], value="Premium", label="Tone")
            style_keywords = gr.Textbox(value="modern Scandinavian minimal, clean grid, soft warm lighting, premium product photography", label="Style keywords")
            language = gr.Dropdown(["English", "中文"], value="English", label="Language")
            preset = gr.Dropdown(list(ASPECT_PRESETS.keys()), value="Instagram Post (1:1) — 1328×1328", label="Platform preset")
            with gr.Accordion("Advanced (optional)", open=False):
                negative_prompt = gr.Textbox(value=DEFAULT_NEG, label="Negative prompt", lines=2)
                steps = gr.Slider(10, 80, value=50, step=1, label="Steps")
                true_cfg_scale = gr.Slider(1.0, 10.0, value=4.0, step=0.1, label="true_cfg_scale")
                seed = gr.Number(value=-1, precision=0, label="Seed (-1 = random)")
                show_seed = gr.Checkbox(value=False, label="Show seed in output")
            btn = gr.Button("Generate", variant="primary")
        with gr.Column(scale=1):
            used_seed_out = gr.Number(label="Used seed (optional)", precision=0)
            image_out = gr.Image(label="Generated poster")
    btn.click(
        fn=generate_image,
        inputs=[product_name, product_desc, offer, price, cta, benefits, tone, style_keywords,
                language, preset, negative_prompt, steps, true_cfg_scale, seed, show_seed],
        outputs=[used_seed_out, image_out]
    )
demo.launch(share=True, debug=True)
So erstellen wir die Gradio-App:
width × height, mithilfe von ASPECT_PRESETS, verknüpft ist.steps “ (Anzahl der Iterationen) und „ true_cfg_scale “ (Prompt-Stärke), die festlegen, wie oft das Modell die Rauschunterdrückung wiederholt und wie genau es dem Prompt folgt. Der Startwert regelt die Reproduzierbarkeit, und mit „ show_seed “ kannst du den endgültigen Startwert anzeigen lassen.btn.click() “ alles miteinander. Gradio nimmt alle Eingabe-Widgets der Reihe nach, schickt sie an „ generate_image() “ und leitet die zurückgegebenen Werte an die Ausgabe-Widgets weiter. Schließlich startet „ demo.launch(share=True, debug=True) “ den Gradio-Server, gibt uns einen öffentlichen Link für Demos, den wir teilen können, und zeigt Debug-Protokolle im Notebook an, um Probleme zu diagnostizieren.Hier ist ein Video, das unsere fertige App „Qwen Image 2512” in Aktion zeigt:
Die besten DataCamp-Kurse
Kurs
Kurs
Kurs
Blog
Hesam Sheikh Hassani
15 Min.
Blog
Nathaniel Taylor-Leach
8 Min.
Blog
Blog
Nathaniel Taylor-Leach