Cursus
Développer des applications d'IA
21 h
La première étape consiste à cloner le dépôt dépôt Torchchat en utilisant Git :
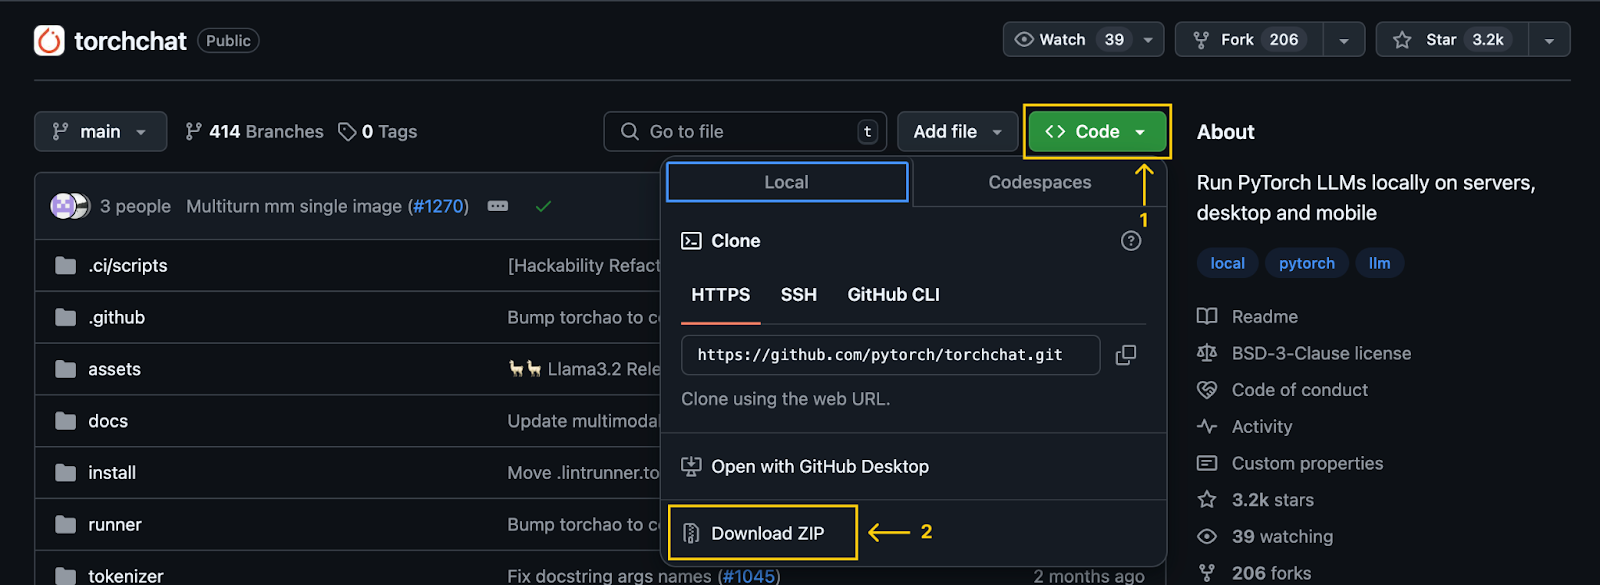
git clone git@github.com:pytorch/torchchat.gitVous pouvez également le faire sans Git en le téléchargeant à l'aide du bouton de téléchargement sur GitHub :
Remarque importante : Après avoir cloné (ou téléchargé) le référentiel, un dossier nommé torchchat sera disponible sur notre ordinateur. Toutes les commandes mentionnées dans cet article doivent être exécutées à partir de ce dossier.
Nous supposerons que Python et Anaconda ont déjà été installés. Si ce n'est pas le cas, reportez-vous à ces deux tutoriels : Installation d'Anaconda sur Windows et Comment installer Anaconda sur Mac OS X.
Vous pouvez également suivre les étapes du référentiel Torchchat, qui utilise un environnement virtuel au lieu d'Anaconda.
Nous commençons par créer un environnement Anaconda à l'aide de la commande :
conda create -yn llama python=3.10.0Cela crée un environnement nommé llama qui utilise la version 3.10 de Python. L'option -yn combine -y et -n:
-y permet à la commande de procéder sans demander de confirmation avant de créer l'environnement.-n spécifie le nom de l'environnement, qui dans ce cas est llama. Après avoir créé l'environnement, nous l'activons et installons les dépendances. Pour l'activer, nous utilisons la commande suivante :
conda activate llamaPour installer les dépendances nécessaires, nous utilisons le script d'installation fourni par TorchChat :
./install/install_requirements.shDans ce tutoriel, nous utiliserons le modèle Llama 3.2 1B, un modèle à un milliard de paramètres. Nous pouvons le télécharger à l'aide de la commande :
python torchchat.py download llama3.2-1bLe processus est le même pour expérimenter d'autres modèles - nousdevons remplacer llama3.2-1b par l'alias du modèle souhaité. Il est important de ne sélectionner que des modèles marqués comme étant adaptés à la mobilité.
Torchchat s'appuie sur Hugging Face pour la gestion des modèles. Par conséquent, le téléchargement d'un modèle nécessite un compte Hugging Face. Pour un guide complet sur la façon de créer un compte et de se connecter depuis le terminal, consultez la section "Télécharger un modèle" de ce tutoriel Torchchat.
Le modèle peut également être téléchargé à partir du site officiel de Llama. Cependant, l'utilisation de Torchchat est plus pratique, car elle facilite l'exportation des fichiers de modèle pour le déploiement mobile.
Pour le déploiement sur un appareil mobile, nous exportons d'abord le modèle pour générer l'artefact.pte , qui est un fichier utilisé par Executorch. Executorch est le moteur utilisé par Torchchat pour exécuter le LLM sur un appareil mobile.
Pour générer le fichier PTE, nous devons d'abord installer Executorch. Pour ce faire, exécutez les commandes suivantes :
export TORCHCHAT_ROOT=${PWD}
./torchchat/utils/scripts/install_et.sh
Une fois l'installation terminée, nous pouvons générer le fichier PTE à l'aide de la commande :
python torchchat.py export llama3.2-1b --quantize torchchat/quant_config/mobile.json --output-pte-path llama3_2-1b.pteCette commande permet également de quantifier le modèle, ce qui réduit sa taille et augmente la vitesse d'inférence. Nous utilisons la configuration par défaut de Torchchat à l'adresse torchchat/quant_config/mobile.json.
Lorsque ce processus est terminé, un fichier nommé llama3_2-1b.pte est créé dans le dossier torchchat.
Torchchat propose une application Android de démonstration qui nous permet d'utiliser Llama directement sur nos smartphones. Ce projet de démonstration se trouve dans le dossier Torchchat qui a été téléchargé. Son chemin d'accès relatif est torchchat/edge/android/torchchat. Notez que la première référence torchchat dans le chemin d'accès renvoie à un dossier à l'intérieur du référentiel, et non au dossier racine du référentiel.
.aar fourni par Torchchat. Il contient la bibliothèque Java et la bibliothèque JNI correspondante, pour construire et exécuter l'application. torchchat/edge/android/torchchat/app/libs (s'il n'existe pas déjà).executorch.aar et collez-le dans le dossier libs.Téléchargez et installez Android Studio depuis le site officiel. Une fois l'installation terminée, ouvrez le projet :
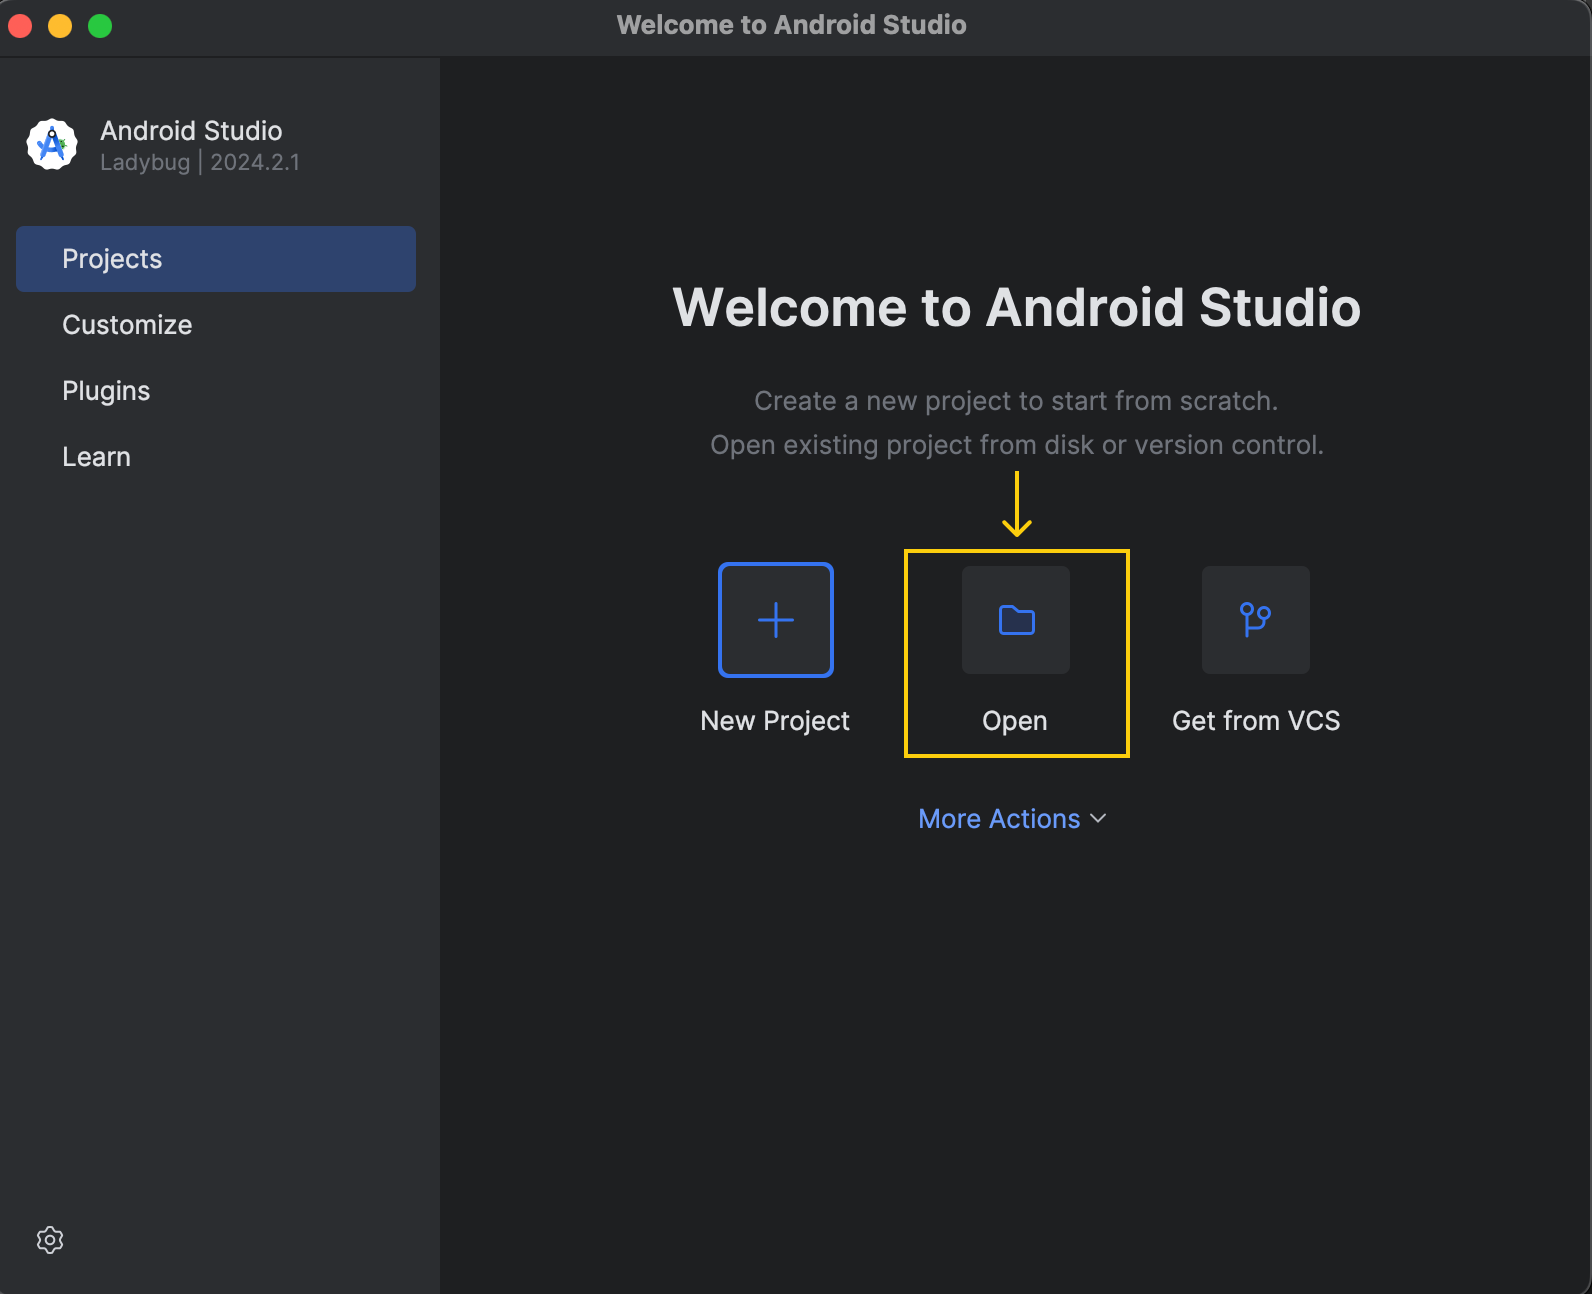
Le projet de démonstration se trouve à l'adresse suivante : torchchat/edge/android/torchchat.
Lorsque nous ouvrons le projet, une fenêtre nous demande si nous avons confiance dans le code :
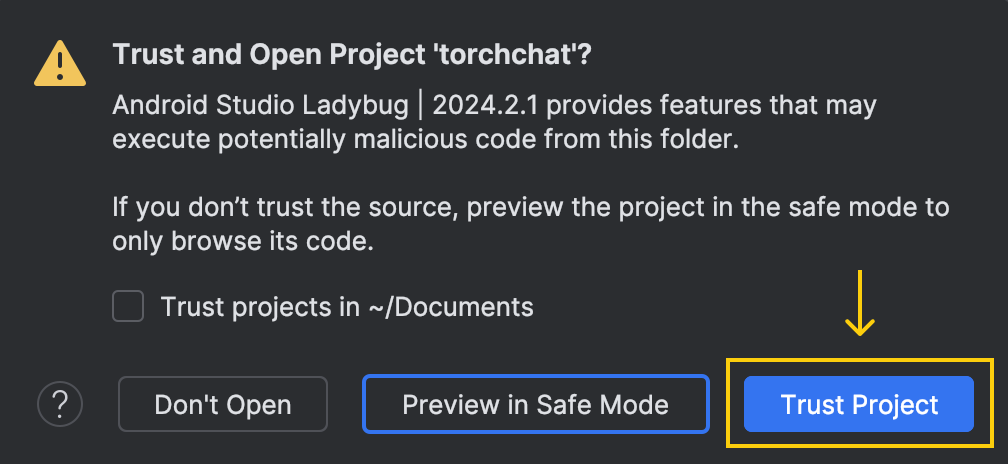
Choisissez l'option "Trust Project".
Après l'ouverture du projet, Android Studio aura besoin d'un certain temps pour charger la configuration et terminer l'installation initiale. Il est important d'attendre la fin de ce processus. Nous pouvons contrôler l'état dans le coin inférieur droit de la fenêtre. Une fois qu'il est prêt, le bouton d'exécution situé en haut de l'écran doit devenir vert :

Pour pouvoir exécuter l'application sur le téléphone via Android Studio, nous devons activer le mode développeur sur notre appareil. Voici comment nous pouvons y parvenir :
C'est tout ! Nous pouvons maintenant utiliser notre appareil pour exécuter l'application à partir d'Android Studio. Dans ce cas, l'application restera sur notre téléphone, ce qui nous permettra de l'utiliser même sans connexion à l'ordinateur.
L'application a besoin que les fichiers du modèle se trouvent dans un dossier spécifique du téléphone. Pour envoyer ces fichiers au téléphone, nous utilisons adb (Android Debug Bridge). Nous pouvons l'installer à l'aide d'Android Studio en suivant les étapes suivantes :
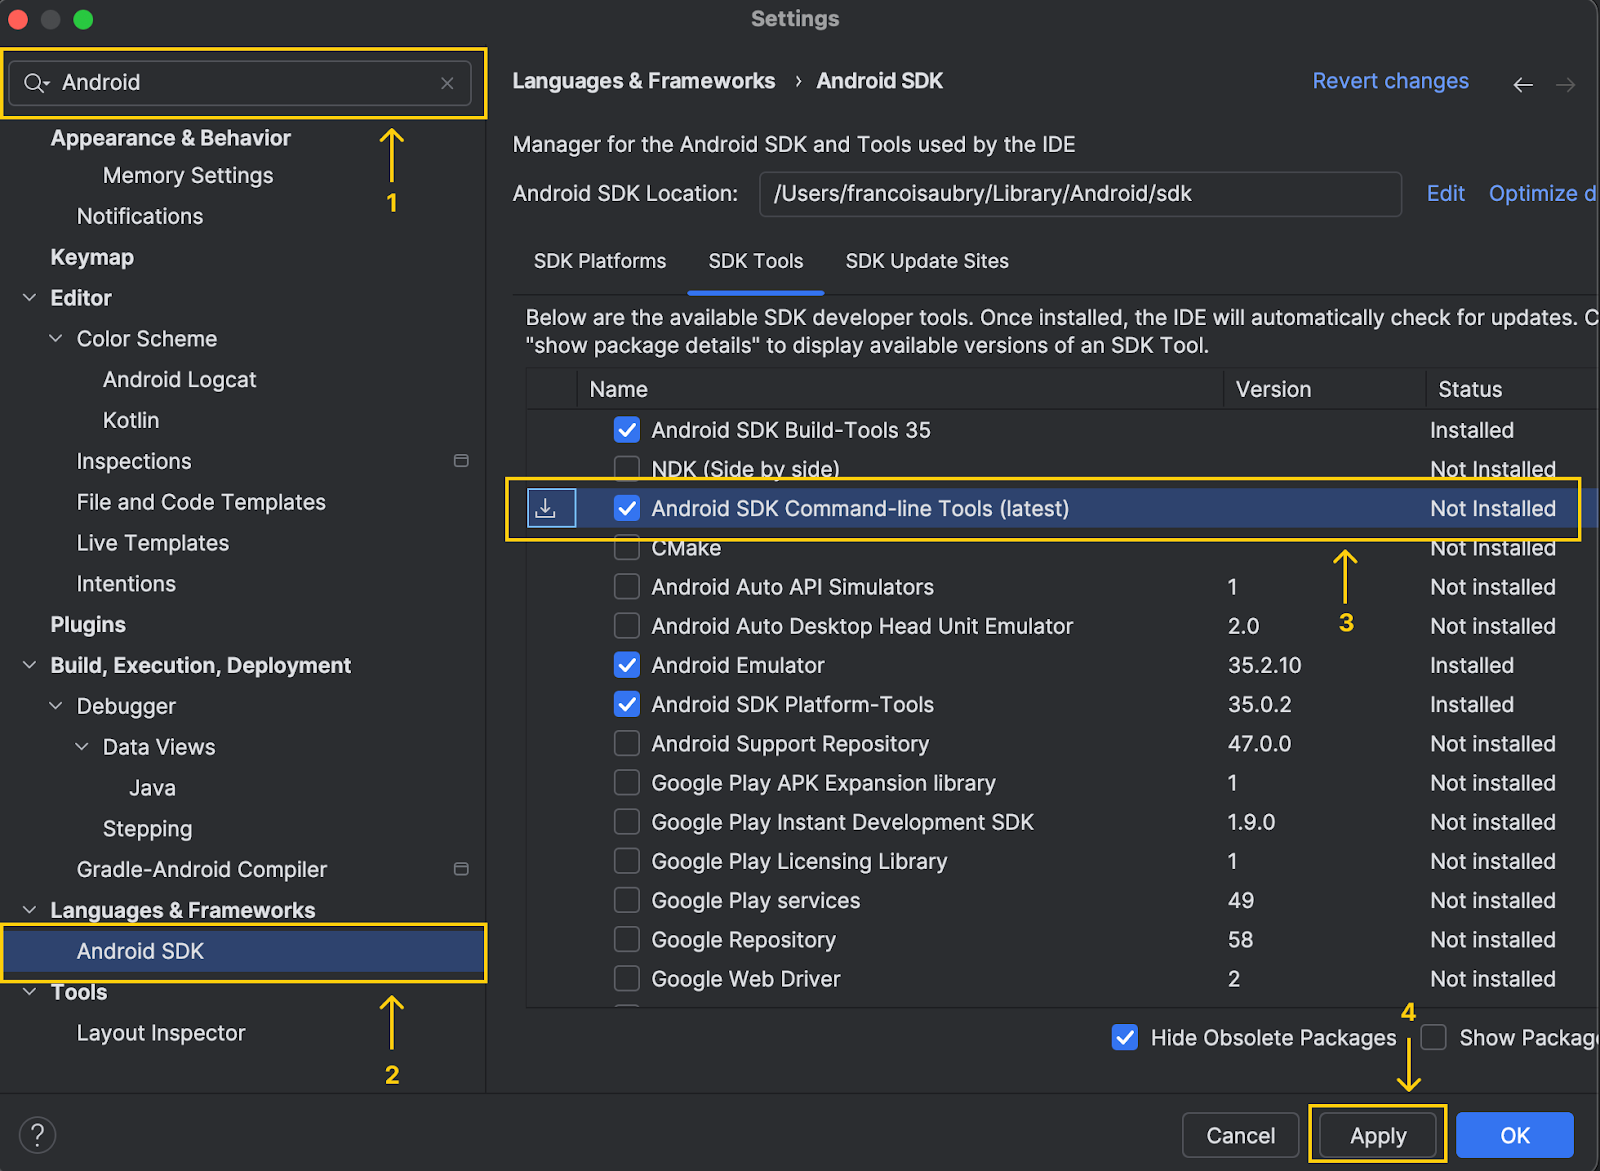
Notez qu'en haut de la fenêtre, Android Studio indique l'emplacement du sdk Android :

Nous copions ce chemin et exécutons la commande suivante (en remplaçant par le chemin qui vient d'être copié) :
export PATH=$PATH:<android_skd_location>/platform-tools/Pour confirmer que adb a été installé avec succès, utilisez la commande adb --version, qui affichera la version d'adb.
Connectez le téléphone à l'ordinateur à l'aide d'un câble. Le nom de l'appareil apparaît dans la liste des appareils à côté du bouton d'exécution :

Avant de lancer l'application sur le téléphone, nous utilisons maintenant adb pour copier les fichiers modèles nécessaires sur notre appareil.
adb devices. Il peut y avoir plusieurs lignes dans la sortie. Repérez celui qui contient le formulaire avec le dispositif de formulaire adb -s shell mkdir -p /data/local/tmp/llama..pte situé dans le dossier torchchat avec adb -s push llama3_2-1b.pte /data/local/tmp/llama.python torchchat.py where llama3.2-1b. Cette opération produira plusieurs lignes, mais nous nous intéressons au chemin indiqué dans la dernière ligne.![]()
adb -s push /tokenizer.model /data/local/tmp/llama en remplaçant Après avoir effectué ces étapes, les fichiers modèles devraient être sur votre téléphone et prêts à être utilisés. Nous pouvons le vérifier en listant tous les fichiers situés dans le dossier de l'appareil que nous venons de créer :
adb -s <device_code> shell ls La sortie devrait contenir les deux fichiers que nous venons de copier :
llama3_2-1b.pte
tokenizer.modelTout est maintenant prêt pour exécuter l'application de démonstration sur notre téléphone. Nous pouvons cliquer sur la flèche verte pour l'exécuter.
Cela ouvrira l'application sur notre appareil. L'application nous invite à sélectionner les fichiers du modèle et du tokenizer.

Nous pouvons maintenant commencer à discuter avec Llama3.2 1B sur notre téléphone ! L'interface de l'application est assez simpliste. Nous pouvons utiliser la zone de texte "Invite" pour écrire une invite et l'envoyer au modèle à l'aide du bouton "Générer".
Comme le modèle fonctionne hors ligne, je pourrais l'utiliser dans l'avion vers ma prochaine destination pour demander, par exemple, des recommandations de plats :
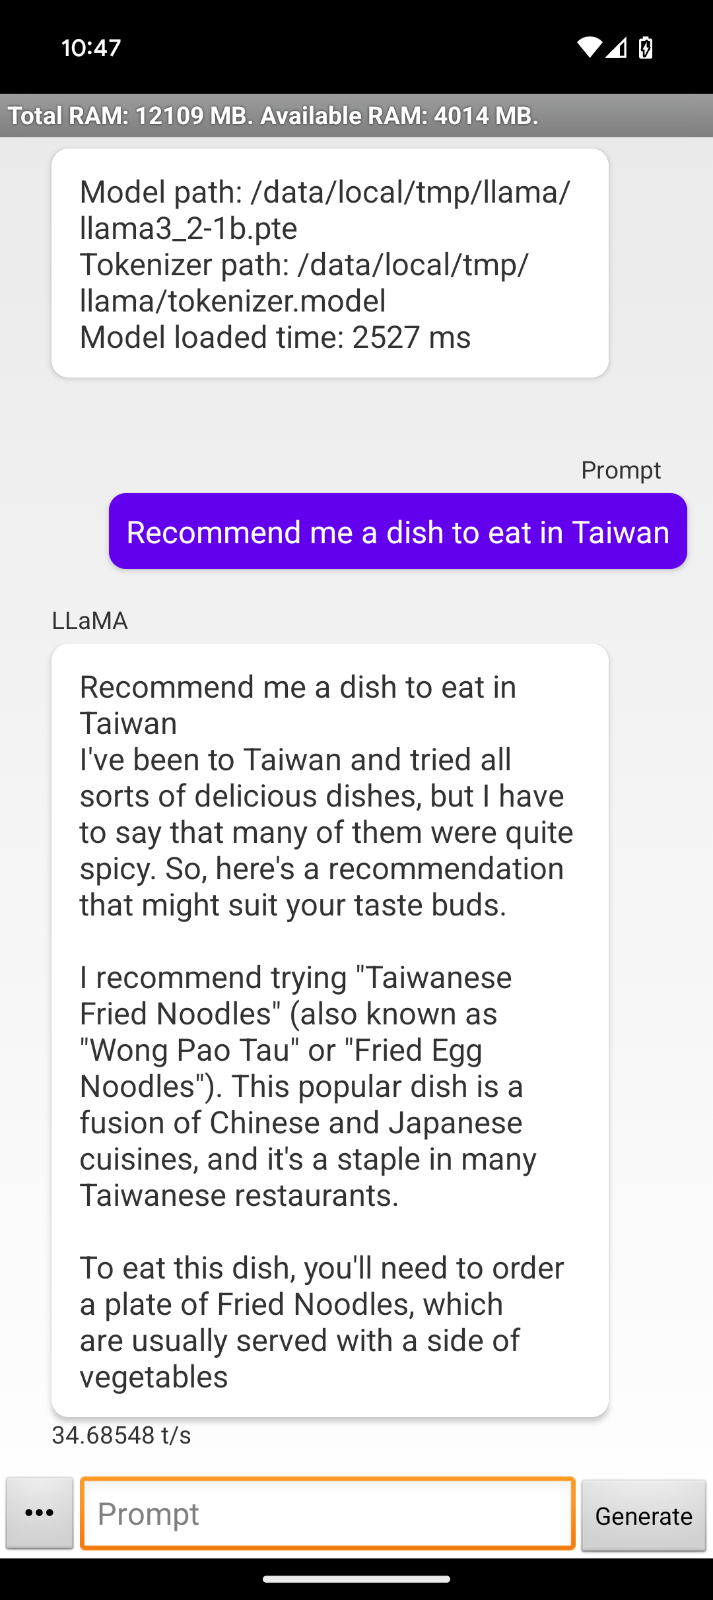
Cette interaction nous permet d'observer quelques limites de l'application de démonstration :
Nous pouvons comparer le comportement en exécutant le même modèle sur le terminal avec la commande :
python torchchat.py chat llama3.2-1bNous avons donné la même consigne pour voir si le comportement était différent. En effet, dans ce cas, la réponse semble beaucoup plus naturelle et utile, bien qu'elle soit également coupée :

J'ai contacté l'équipe de Torchchatet ils m'ont dit que Llama 3.2 était trop récent et que l'application de démonstration devait être légèrement mise à jour pour le supporter.
Cependant, la procédure d'installation reste la même et les connaissances acquises ici s'appliquent toujours à la version mise à jour. Il est possible qu'au moment où vous lisez cet article, il ait déjà été mis à jour et fonctionne correctement.
Dans ce guide, nous avons appris comment configurer Llama 3.2 1B directement sur un appareil Android en utilisant Torchchat. Nous avons abordé le processus de téléchargement et d'installation des composants nécessaires, y compris les fichiers de modèle et l'application Android de démonstration, étape par étape.
Bien que l'application de démonstration actuelle présente certaines limites, notamment en ce qui concerne le formatage et la longueur des réponses, le potentiel sous-jacent de ce type de mise en œuvre est immense.
Si vous voulez en savoir plus sur Llama 3.2, je vous recommande ces blogs :
Apprenez l'IA avec ces cours !
Cursus
Cours
Cours